
FTP question

Thread Starter
Joined: Jun 2005
Posts: 512
Likes: 0
From: SoCal/Arizona
FTP question
ive searched and searched, and i cant find anything on restoring my FTPs,i sanded them down with 800 grit,now theyre dull and i cant get em tp be nice and clear,ive tried toothpaste,brasso,car wax and randon cleaners and polishers, and theyre still dul, how can i restore them? thanks for the advice opinons
Play Well
Joined: Feb 2005
Posts: 4,218
Likes: 0
From: We're all fine here now, thank you. How are you?
way better IMO, this is in the DIY section of 240sxforums but not everyone can veiw it so Ill post it up here
I thought I'd give it a try at making a DIY Tutorial for wet sanding. I'm not good at all. So please comments and criticism is loved!
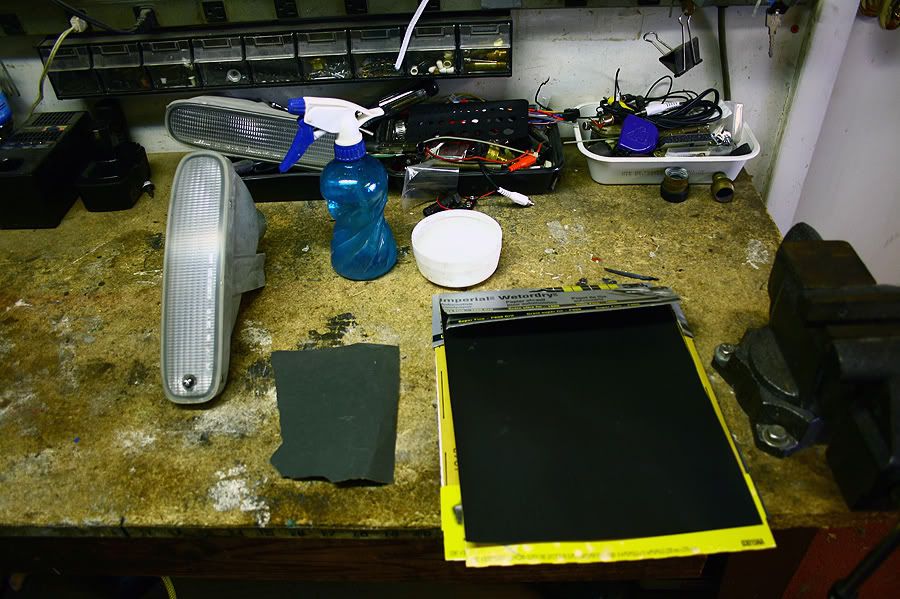
Items Required.
1 400 grit sandpaper
1 800 grit sandpaper
1 1000 grit sandpaper
(You can go all the way up to 2500grit. But 1000 gives me the oem i want)
1 Cup
1 Spray bottle or hose/sink
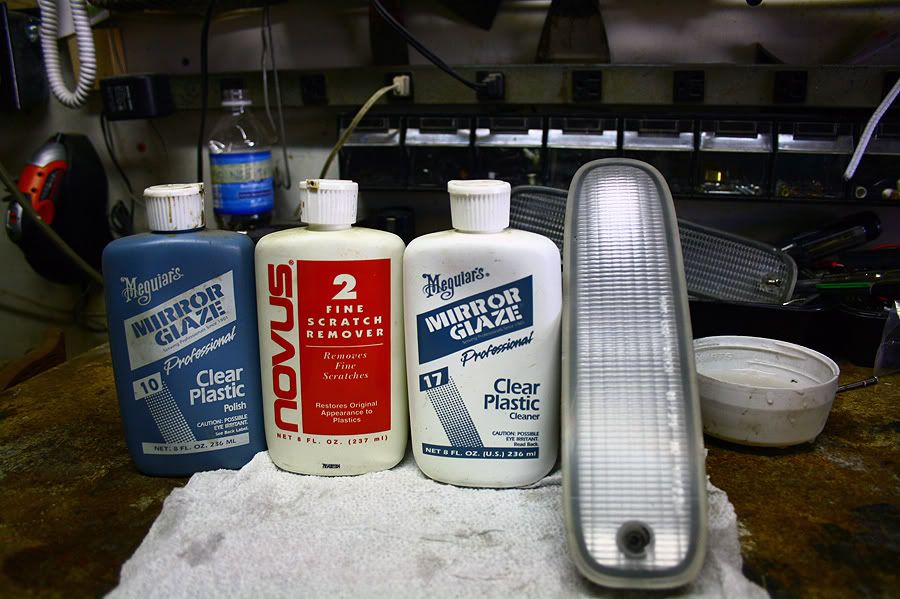
3 bottles:
Clear plastic cleaner
Plastic scratch remover
Plastic Polisher.
And some Patience.
Now, GO GO GO!
Pictured below is the items you will need to start your wet sanding
First, You will want to fill your cup up with water, Doesn't really matter just fill it up. Take a square piece of your 400 grit sand paper, Soak it in the water for a few seconds.
Now Spray your headlight with your water bottle or hose what ever you are using. You always want to keep your headlight and your sandpaper wet AT ALL TIMES!
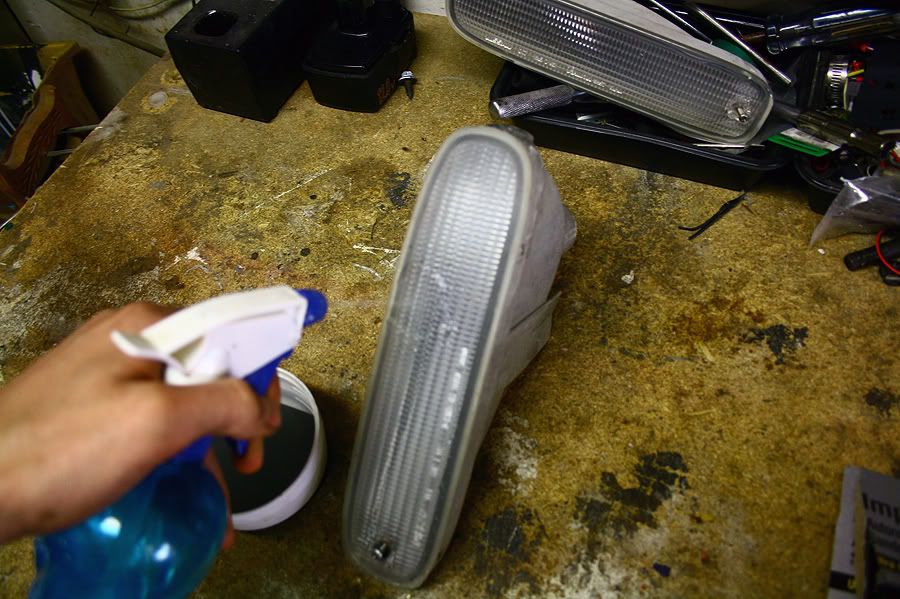
Now, Using your sandpaper, only apply the weight of your hand. More than this and you can risk scratching it more than you want. Go over the whole headlight. Keep the cup full of water so that you can periodically dunk your sand paper in the water to keep it wet, And keep your headlight wet. This is what it looks like with the 400 grit sand paper, I did two coats to make sure I got everything sanded.
Now take your 800 grit sand paper, put it in the cup of water and let it soak for a few seconds, Remember to keep your headlight wet! Take the 800 grit and go over the whole headlight making sure you've sanded EVERY PART. Periodically dunk your 800 grit in the water to get the stuff that you're sanding off of the sand paper. Your water will turn a cloudy white, That's good. That means that you are getting all of the dirt and grime that is fogging up your headlight off. Go over more than once with the 800 and remember to keep both headlight and sandpaper wet.
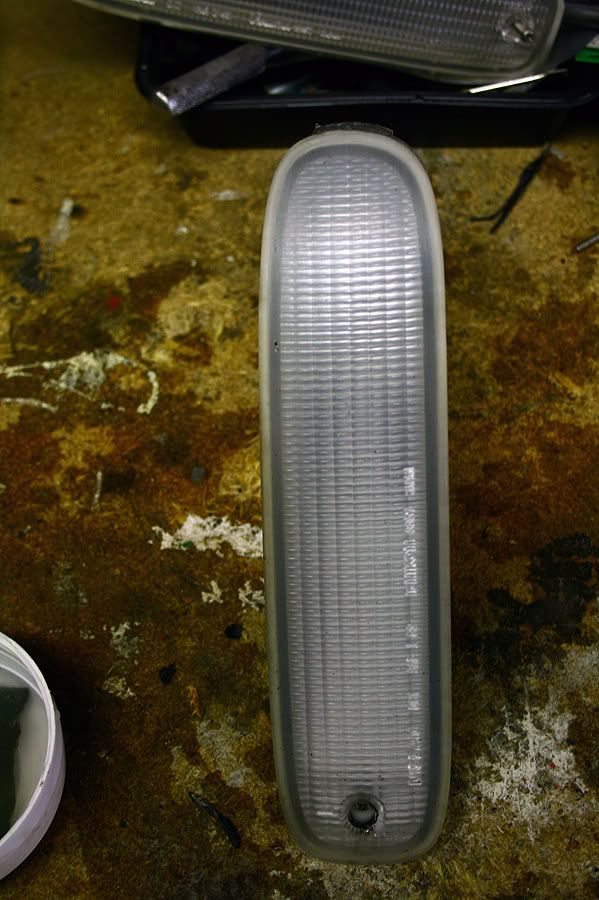
Now take your 1000 grit sandpaper, And put it in the cup and let soak for a few seconds. Remember! Keep your headlight wet. Go over the whole area with your 1000grit sand paper and make sure you remember to keep it wet at all times.
Now comes the fun part
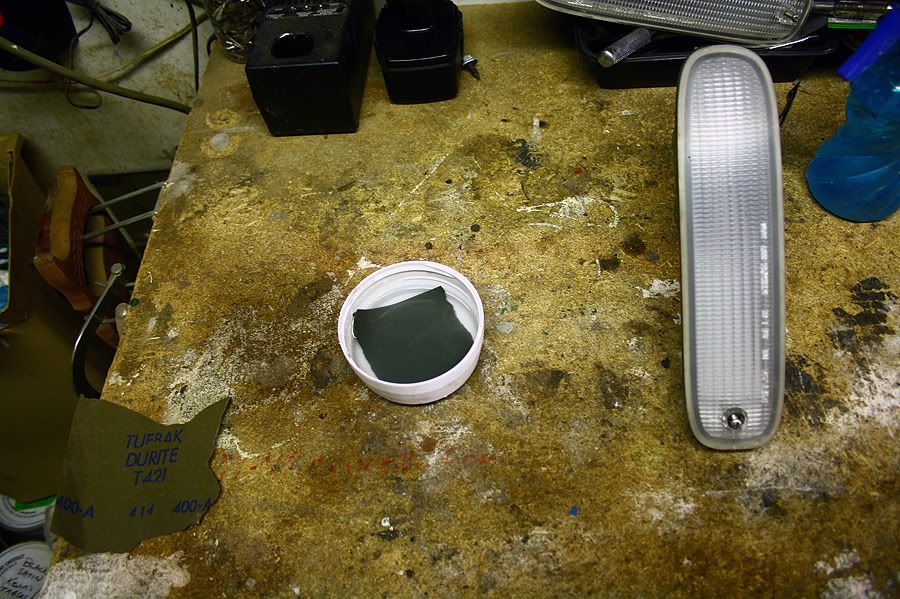
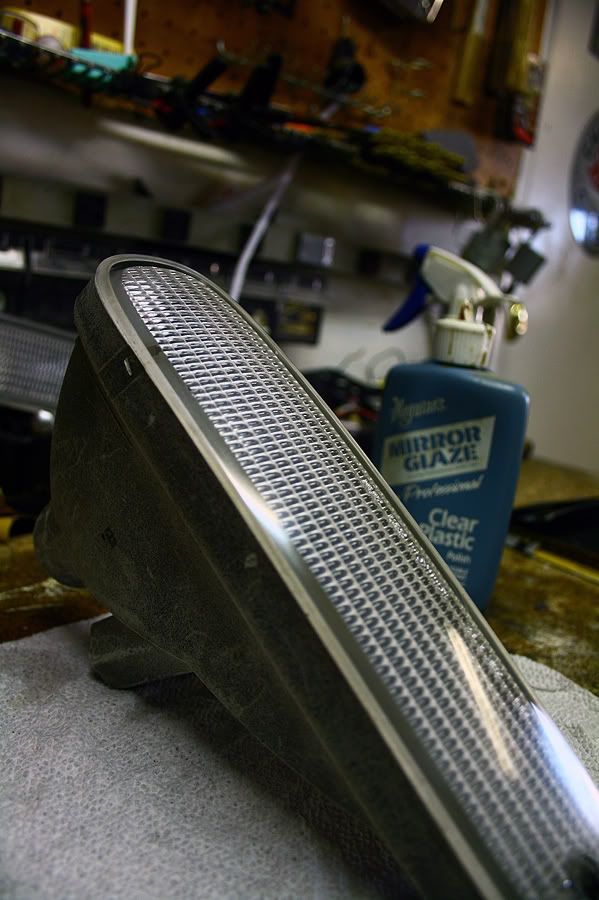
Go to your local Hardware store // Autozone // Auto parts store and look for Clear plastic cleaners, Scratch removers, and polishers. I used the ones pictured below, Because I had these laying around from when I used to make model cars.
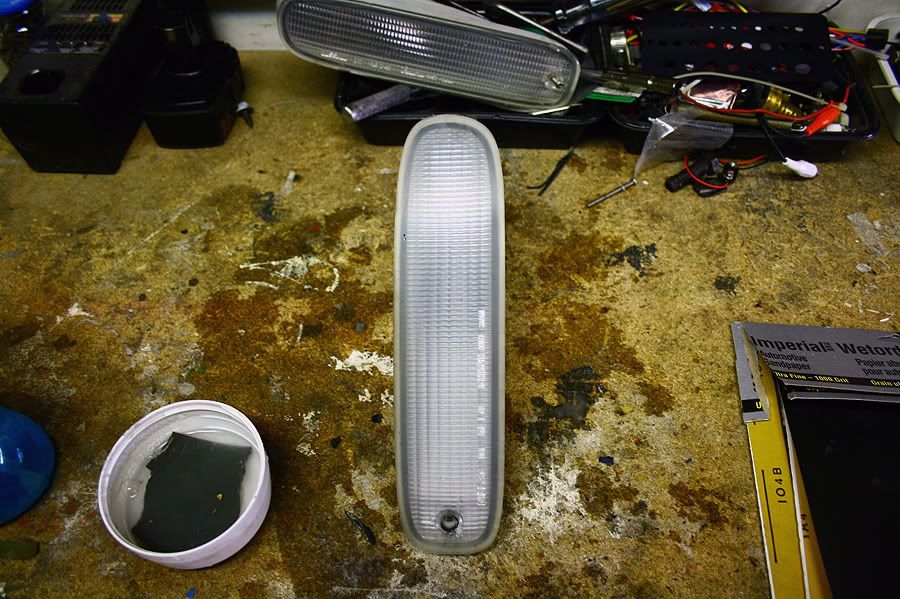
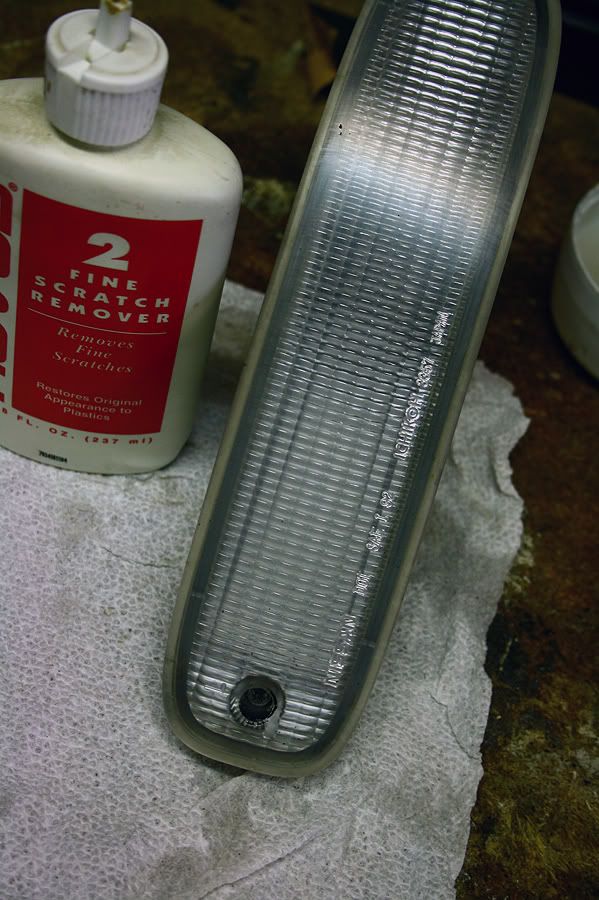
Take your scratch remover and with a soft terry cloth rag, Spray a liberal amount of scratch remover on the entire headlight, Using the terry cloth, Spread the remover around the whole area untill it starts to disappear. Take a clean part of the cloth, And buff out the whole headlight.
To get an even cleaner look, Repeat the process more than 2 times. I did 4 times
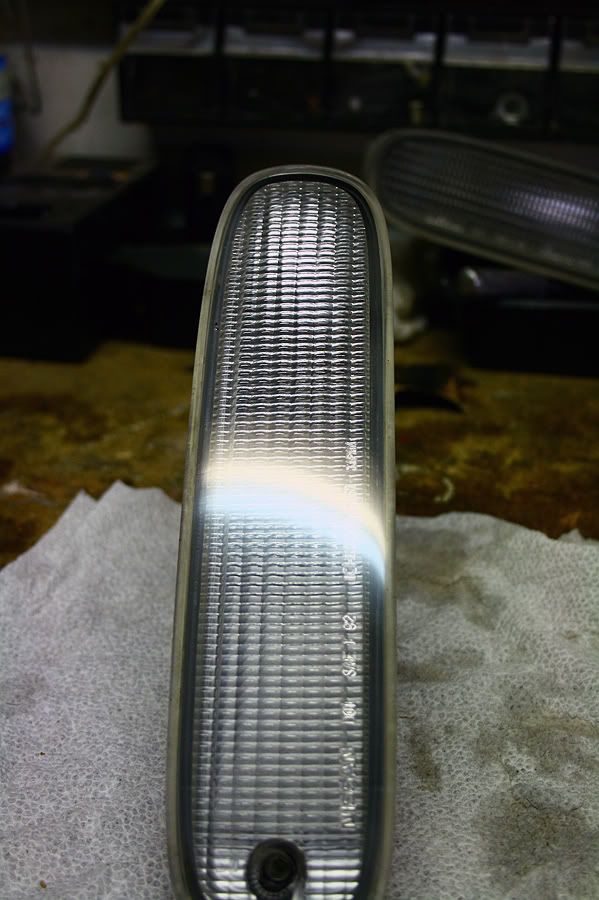
Now take your Clear plastic Cleaner and spray a liberal amount of Cleaner on the entire headlight, Using the terry cloth, Spread the cleaner around untill it starts to disappear. take a clean part of the cloth and buff out the whole entire headlight.
Repeat process. ( I did 4)
Now take your Clear plastic polish and spray a liberal amount all over the entire headlight, Using the cloth spread the polish around with a sufficent amount of pressure around the entire headlight untill it starts to disappear, Take a clean part of the cloth, and buff it out. Repeat the process untill you get the look you are going for. (I once again, Did it 4 times.)
I thought I'd give it a try at making a DIY Tutorial for wet sanding. I'm not good at all. So please comments and criticism is loved!
Items Required.
1 400 grit sandpaper
1 800 grit sandpaper
1 1000 grit sandpaper
(You can go all the way up to 2500grit. But 1000 gives me the oem i want)
1 Cup
1 Spray bottle or hose/sink
3 bottles:
Clear plastic cleaner
Plastic scratch remover
Plastic Polisher.
And some Patience.
Now, GO GO GO!
Pictured below is the items you will need to start your wet sanding
First, You will want to fill your cup up with water, Doesn't really matter just fill it up. Take a square piece of your 400 grit sand paper, Soak it in the water for a few seconds.
Now Spray your headlight with your water bottle or hose what ever you are using. You always want to keep your headlight and your sandpaper wet AT ALL TIMES!
Now, Using your sandpaper, only apply the weight of your hand. More than this and you can risk scratching it more than you want. Go over the whole headlight. Keep the cup full of water so that you can periodically dunk your sand paper in the water to keep it wet, And keep your headlight wet. This is what it looks like with the 400 grit sand paper, I did two coats to make sure I got everything sanded.
Now take your 800 grit sand paper, put it in the cup of water and let it soak for a few seconds, Remember to keep your headlight wet! Take the 800 grit and go over the whole headlight making sure you've sanded EVERY PART. Periodically dunk your 800 grit in the water to get the stuff that you're sanding off of the sand paper. Your water will turn a cloudy white, That's good. That means that you are getting all of the dirt and grime that is fogging up your headlight off. Go over more than once with the 800 and remember to keep both headlight and sandpaper wet.
Now take your 1000 grit sandpaper, And put it in the cup and let soak for a few seconds. Remember! Keep your headlight wet. Go over the whole area with your 1000grit sand paper and make sure you remember to keep it wet at all times.
Now comes the fun part
Go to your local Hardware store // Autozone // Auto parts store and look for Clear plastic cleaners, Scratch removers, and polishers. I used the ones pictured below, Because I had these laying around from when I used to make model cars.
Take your scratch remover and with a soft terry cloth rag, Spray a liberal amount of scratch remover on the entire headlight, Using the terry cloth, Spread the remover around the whole area untill it starts to disappear. Take a clean part of the cloth, And buff out the whole headlight.
To get an even cleaner look, Repeat the process more than 2 times. I did 4 times
Now take your Clear plastic Cleaner and spray a liberal amount of Cleaner on the entire headlight, Using the terry cloth, Spread the cleaner around untill it starts to disappear. take a clean part of the cloth and buff out the whole entire headlight.
Repeat process. ( I did 4)
Now take your Clear plastic polish and spray a liberal amount all over the entire headlight, Using the cloth spread the polish around with a sufficent amount of pressure around the entire headlight untill it starts to disappear, Take a clean part of the cloth, and buff it out. Repeat the process untill you get the look you are going for. (I once again, Did it 4 times.)

what i noticed is if you use a high speed or variable speed buffer the results are awesome. i used the drill add on with a buffer attachment. i sand with 1000/1500 and use compound or plastic polisher, the key is to get some speed when buffing.

Thread
Thread Starter
Forum
Replies
Last Post
Adaptronic S5 Turbo PNP Unit questions
_Tones_
Adaptronic Engine Mgmt - AUS
10
May 25, 2021 05:37 AM
Nosferatu
2nd Generation Specific (1986-1992)
7
Sep 5, 2015 02:13 PM