FC3S 3D Model

whats a Turbo V?
Joined: Nov 2006
Posts: 1,215
Likes: 0
From: Goose Creek, SC
[QUOTE=vipers]yeah, that pic your using is incorrect on the lower front fascia.. there is no solid indentation anywhere on the front bumper.. both s4 and s5's are a smooth fluid curve all the way to the bottom... i dont understand why that picture is off like that...
QUOTE]
acutally thats how my car is with the indent in at the center opening on the front bumper. it goes in about and inch back from the rest of the bumper.
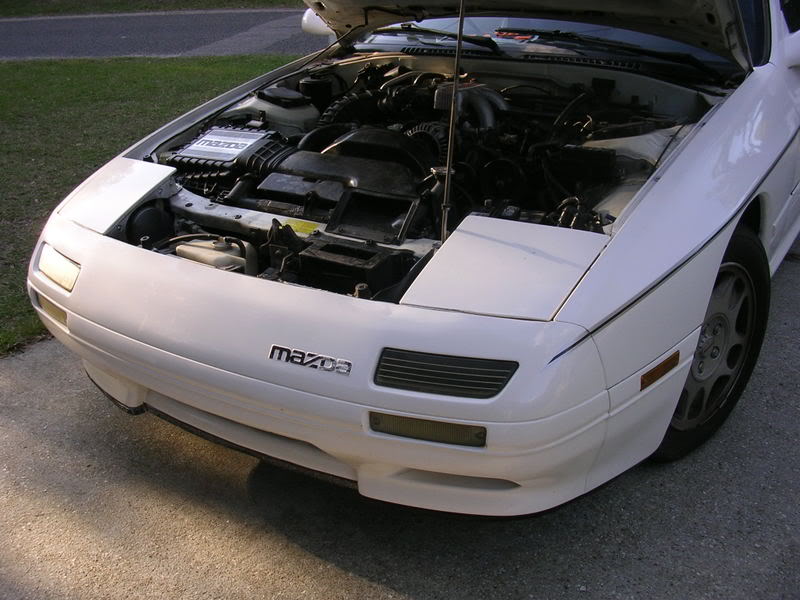
my car is a 1990 model
QUOTE]
acutally thats how my car is with the indent in at the center opening on the front bumper. it goes in about and inch back from the rest of the bumper.
my car is a 1990 model
Originally Posted by 1MZFE
There is clearly an indent there...?
Thread Starter
Joined: Dec 2006
Posts: 1,307
Likes: 0
From: Beaverton, OR
Originally Posted by cmanns
I'll get something, what do you recomend? I need ease of use though. Might need to drop you a couple hundred pm's of questions lmao j/k if I can design windows skins, websites and servers I'm sure I can do some 3d work
Originally Posted by vipers
also, the rear i noticed has a upward curve to it, kinda like a small molded spoiler right where the hatch ends...and that its carried to the taillights... the rear of a fc is really flat coming off of the rear hatch, then has a very small curve leading down to the taillights..
other than those small issues... your doing a great job!
other than those small issues... your doing a great job!
Originally Posted by Asterisk
THAT is an s4 FC, do the s5 like his car (s4 is the older version with the square back lights, crap bumpers, black molding,) like the FD's you got the "99 spec" and the older one, do the s5 version.
Thanks to all for your suggestions, I'm trying my best to make this car to the best of my ability to the spec of the real thing, but apparently my blueprints are inaccurate and it's making things semi-difficult on me...so don't blame me if it turns out crappy. :p lol jk...actually you can blame me.
Full Member
Joined: Jun 2005
Posts: 236
Likes: 0
From: Gainesville, Georgia
What version of C4D are you using? I was looking at some of the prices and it is very inexpensive compared to UG NX, I would like to have something to use at home. I�m going to check on a converter, C4D to UG NX and visa-versa.
I would like to do file on the 13B.
I would like to do file on the 13B.
These might help you out... They're pretty old but very good.
http://www.yfish.net/snkgallary/cg/rx-700.html
http://www.yfish.net/snkgallary/movie/RE01.html
http://www.yfish.net/snkgallary/movie/RX-7-01.html
http://www.yfish.net/snkgallary/cg/rx-700.html
http://www.yfish.net/snkgallary/movie/RE01.html
http://www.yfish.net/snkgallary/movie/RX-7-01.html
Thread Starter
Joined: Dec 2006
Posts: 1,307
Likes: 0
From: Beaverton, OR
Originally Posted by 57bronco
What version of C4D are you using? I was looking at some of the prices and it is very inexpensive compared to UG NX, I would like to have something to use at home. I�m going to check on a converter, C4D to UG NX and visa-versa.
I would like to do file on the 13B.
I would like to do file on the 13B.
I'm running C4D 9.1, I don't use 10 because it's not backwards compatable.
In terms of pricing, the XL Bundle have is worth $2,500, however I did *NOT* :: wink wink :: download a pirated version, if you DO however, download 9.0 then get the 9.1 update from their website.
And if you do a 13B I would love to use it, and give credit to you of course.
Thread Starter
Joined: Dec 2006
Posts: 1,307
Likes: 0
From: Beaverton, OR
That's a HUGE discout, I know how discounts work, when I went to a community college I got the whole CS2 suite for $400, where if you bought each for retail it's over $1,000...
Like I said thou, I suggest NOT buying 10, not backwards compatable, and they changed the layout, so basically all the tutorials out there done on the internet by people using 8 and 9, will NOT work for you, and are obsolete now. I suggest like the above post, getting 9.0 then downloading the 9.1 update from their website, only way to do it in my opinion...
Like I said thou, I suggest NOT buying 10, not backwards compatable, and they changed the layout, so basically all the tutorials out there done on the internet by people using 8 and 9, will NOT work for you, and are obsolete now. I suggest like the above post, getting 9.0 then downloading the 9.1 update from their website, only way to do it in my opinion...
Thread Starter
Joined: Dec 2006
Posts: 1,307
Likes: 0
From: Beaverton, OR
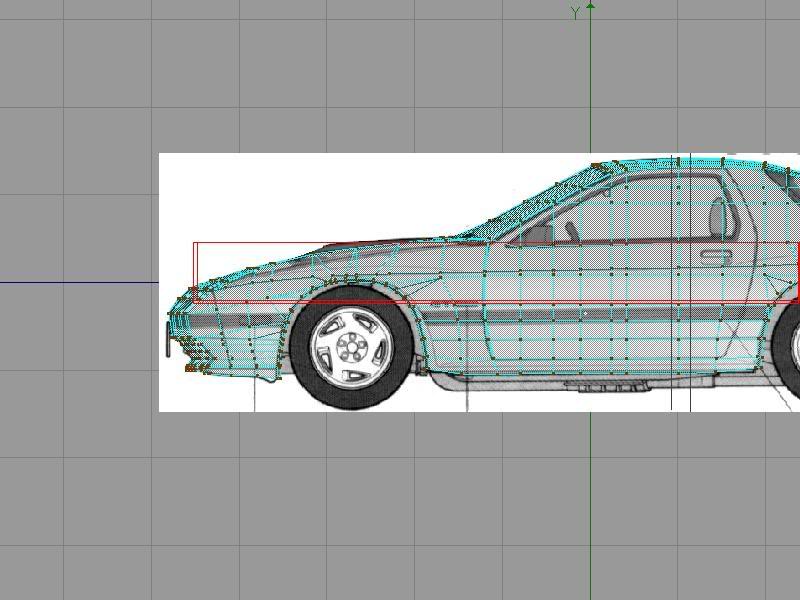
Alright, new updates...
Added a LOT more definition to the window loop up top, did some more point managment and made sure that points lined up, changed the back view a little bit, and added some more definition back there as well...other than that just minor details probably no one else would notice.
Added a LOT more definition to the window loop up top, did some more point managment and made sure that points lined up, changed the back view a little bit, and added some more definition back there as well...other than that just minor details probably no one else would notice.
Thread Starter
Joined: Dec 2006
Posts: 1,307
Likes: 0
From: Beaverton, OR
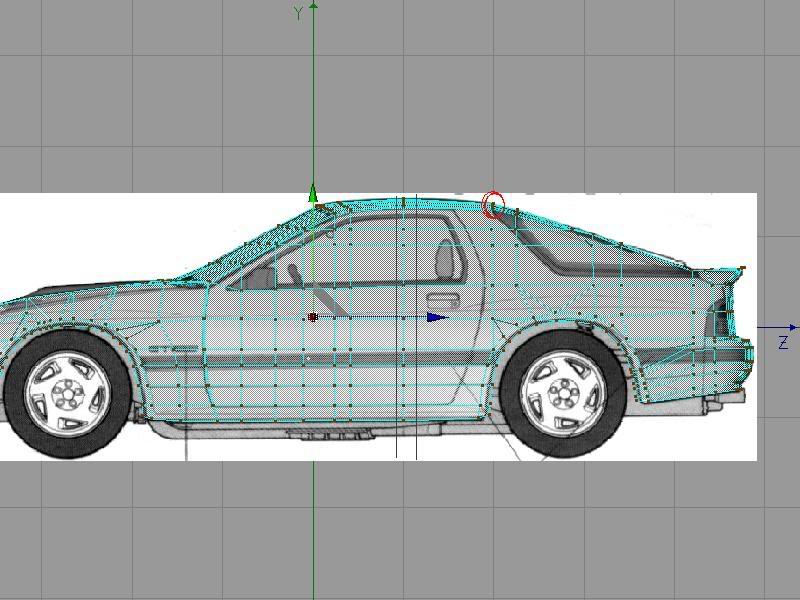
Did more work on the window, and now I'm starting on parts of the door frame, window and door changes are circled in rectangles and circles, the parts I need to work on are in the irregular rectangle shape off to the left, I still have more work to do on those wheel wells.
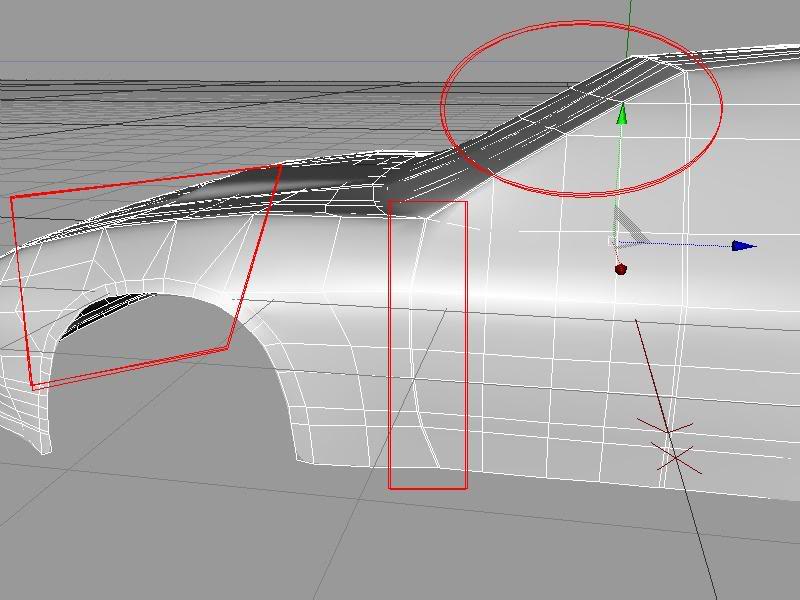
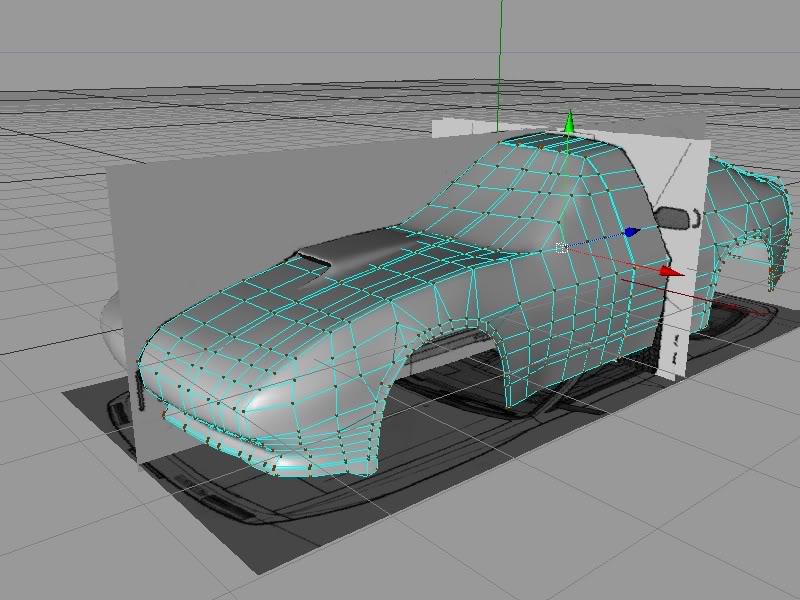
My mesh looks a little messy too, luckily NURB's solves a lot of that program, but I have a lot of cleaning up too do.
My mesh looks a little messy too, luckily NURB's solves a lot of that program, but I have a lot of cleaning up too do.

Senior Member
Joined: Jan 2003
Posts: 301
Likes: 0
From: the nati, ohio
ive tried this before, those front fenders alltogether are hell to get right. even if you get it structured right the normals dont want to come out how they should, especially where they meet the front bumper.
Thread Starter
Joined: Dec 2006
Posts: 1,307
Likes: 0
From: Beaverton, OR
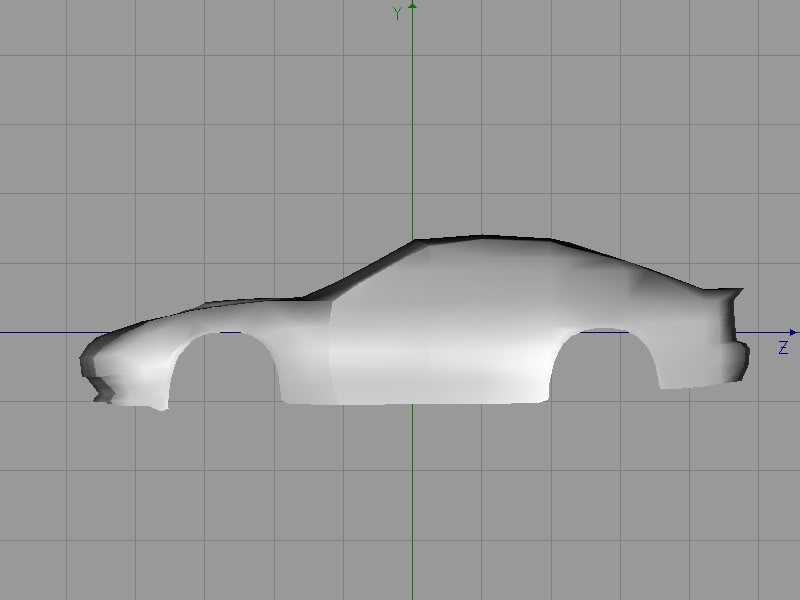
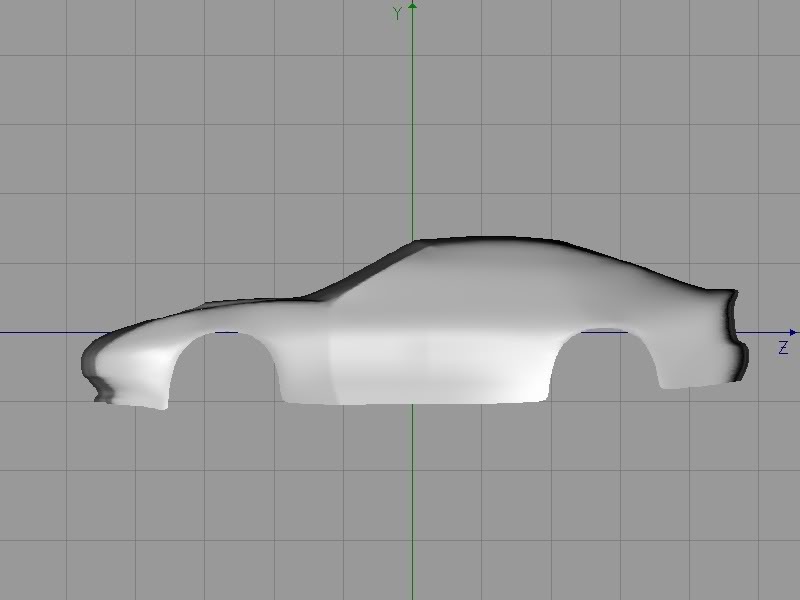
Originally Posted by stylEmon
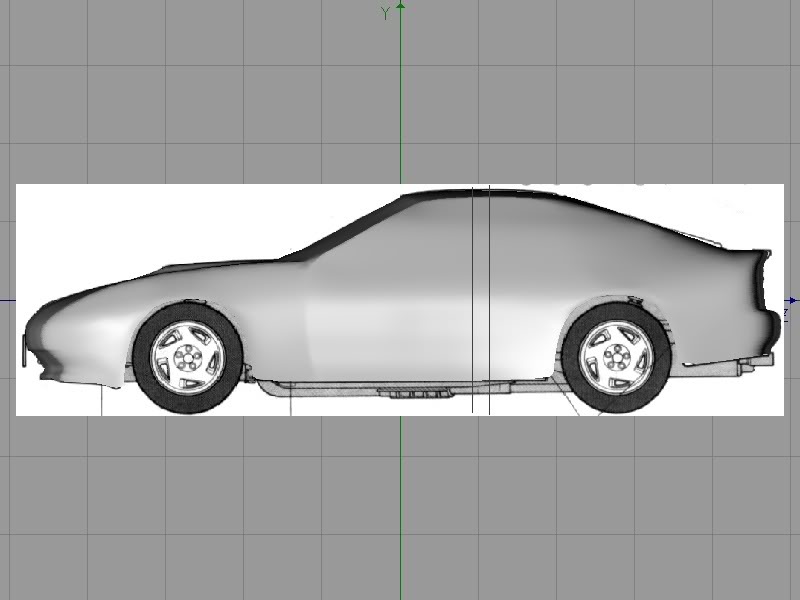
But anyway...difference between non and NURB'ed are below, you can see how rough the non-NURB car is compared to the smoothed out NURB'ed model.

not bad looking at all. bring the windshield point up so its level with the top of the fender. the fender doesnt slope down like that and the rear bumper needs to be raised just a scosch
Thread Starter
Joined: Dec 2006
Posts: 1,307
Likes: 0
From: Beaverton, OR
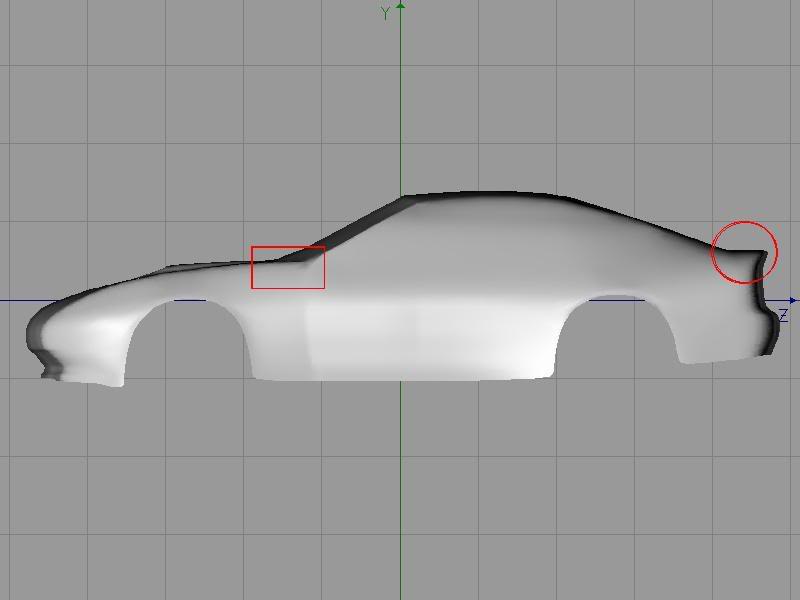
Originally Posted by stevensimon
not bad looking at all. bring the windshield point up so its level with the top of the fender. the fender doesnt slope down like that and the rear bumper needs to be raised just a scosch
Okay, I raised the points up so it no longer slumps, I hope this is what you were talking about...and then also I raised the back up a very tiny bit, changes are outlined in red.
Thread Starter
Joined: Dec 2006
Posts: 1,307
Likes: 0
From: Beaverton, OR
Had a small brain fart there and realized he said bumper, not trunk, so here I am with more updates...bumper is fixed, and so is more of the door frame...
Moved points are in rectangle, new points are in circles.
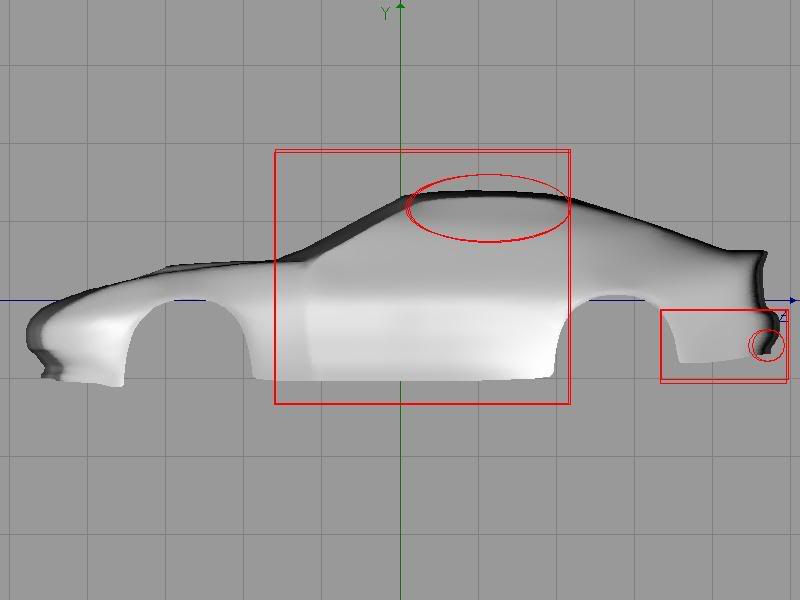
Moved points are in rectangle, new points are in circles.
the bottom of the bumper was fine. im talking about the shelf right below the tails needs to be raised slightly. and it looks like you might need to bring the top of the hatch forward it looks like it might be sitting too far back but i might just be wierd.
There's definitely not THAT much of a rear deck on the FC. Eliminate the 'overhang' looking thing and it might be spot on. And it looks like the fenders need more shoulder.
Edit: The way it looks now modernizes things a bit, IMHO.
Edit: The way it looks now modernizes things a bit, IMHO.
Thread Starter
Joined: Dec 2006
Posts: 1,307
Likes: 0
From: Beaverton, OR
Well the bottom of it needed to be raised up when I looked EXTREMELY close at the bumper, it was off by a merely .5...lol...I just thought you had a sharp eye.
I also fixed what you showed me, once again it was off a very tiny bit, and now it lines up perfectly with my blueprints, if you still think it looks wrong I'll go to my references pictures people sent me.
Also did work on the rear hatch, and it does line up exactly with my blueprints, as shown below...
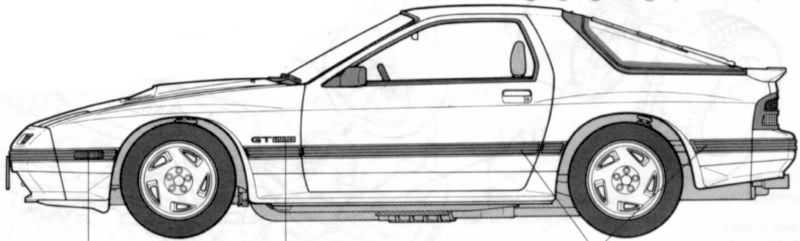
Ohhh, that includes the spoiler...no wonder it looked off. Sans spoiler, there's virtually no rear deck...two inches or so. In the blueprint, you can see the fender shoulders.
Thread Starter
Joined: Dec 2006
Posts: 1,307
Likes: 0
From: Beaverton, OR
Originally Posted by Acesanugal
There's definitely not THAT much of a rear deck on the FC. Eliminate the 'overhang' looking thing and it might be spot on. And it looks like the fenders need more shoulder.
Edit: The way it looks now modernizes things a bit, IMHO.
Edit: The way it looks now modernizes things a bit, IMHO.
Originally Posted by LeeTheSlacker
ive tried this before, those front fenders alltogether are hell to get right. even if you get it structured right the normals dont want to come out how they should, especially where they meet the front bumper.
Originally Posted by 1MZFE
Fender is good by both my blueprints and reference pictures that I have, and please actually show me what you mean, by taking my picture, and using a real life example, it's really hard to tell what everyone is telling me when you overword things, it's hard to locate what I need to fix. EXAMPLES PEOPLE! lol
My comment about the rear deck was before I saw that there was a spoiler on the car. Without the spoiler, there's almost no rear deck.
Thread Starter
Joined: Dec 2006
Posts: 1,307
Likes: 0
From: Beaverton, OR
Okay, I cut the points out, now I just have to turn them into edges, I beleive what I'm going to do is just bevel the edges themselves, then do an inner extrude and then bring the points out, which should make it work...