engine stopped cranking

 11-06-14, 08:39 PM
#77
Full Member
Thread Starter
 11-10-14, 10:46 AM
#81
Full Member
Thread Starter
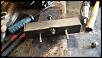
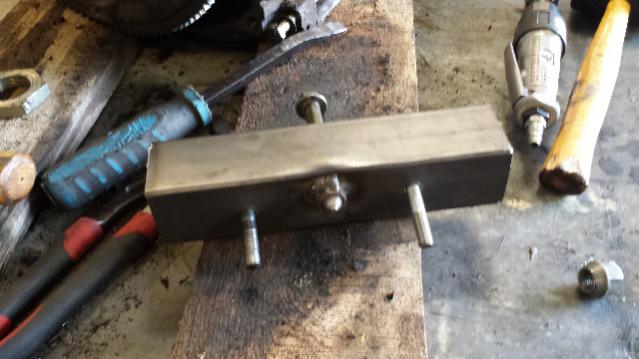
Okay, so I tried the prybar hammer method to no avail. I then fabricated a puller of sorts, a very crude SST like tool. It put down a LOT of force, but the flywheel is still on. I drilled some holes in some tubular steel, so I could thread bolts into the flywheel. Then I welded a large nut in the center hole so I could press a large bolt against that center thread in the middle of the flywheel. There were two steel plates I placed over the thread, so that the bolt wouldn't enter the thread tube, and it just bent them in to a tit like shape. XD I know this is hard to picture, so I attached a photo of the tool. This thing is STUCK.
 11-10-14, 11:22 AM
#83
Moderator
iTrader: (3)
Join Date: Mar 2001
Location: https://www2.mazda.com/en/100th/
Posts: 30,835
Received 2,604 Likes
on
1,847 Posts
if the engine isn't out yet, maybe its easier to pull the engine, and then tackle the flywheel off the car?
the "factory" puller + some hammer taps should do the trick.
the "factory" puller + some hammer taps should do the trick.
11-11-14, 05:32 AM
#85
Senior Member

Join Date: May 2010
Location: vancouver, bc
Posts: 535
Likes: 0
Received 0 Likes
on
0 Posts
A puller will never work. It needs to be jarred. Just keep tapping. Try all different areas while applying even pressure. It won't take much. Just a light tap. You just need to find the sweet spot

 11-12-14, 08:20 AM
#91
Senior Member
Join Date: May 2010
Location: vancouver, bc
Posts: 535
Likes: 0
Received 0 Likes
on
0 Posts
in an extreme case, you could use heat as well.
heating ONLY the area of the flywheel surrounding the taper to a glow. then, allow it to cool, on its own, to the touch. the flywheel would then slide off by hand, guaranteed. my only worry being the taper on the flywheel would now be very slightly more expanded then it was. whether that would cause an issue, i don't know
heating ONLY the area of the flywheel surrounding the taper to a glow. then, allow it to cool, on its own, to the touch. the flywheel would then slide off by hand, guaranteed. my only worry being the taper on the flywheel would now be very slightly more expanded then it was. whether that would cause an issue, i don't know
11-12-14, 06:58 PM
#92
Red Pill Dealer
iTrader: (10)

No need to heat to glow. I personally wouldn't do that. If you could apply pressure with a puller and then tap with a hammer, or heat and tap, I think you'll get it. I don't recommend any prying against the keg for pressure because it all gets put on the front thrust bearing..
11-12-14, 09:57 PM
#94
Senior Member
Join Date: May 2010
Location: vancouver, bc
Posts: 535
Likes: 0
Received 0 Likes
on
0 Posts
heat wouldn't be my first resort either. believe me. the only thing propane will do is melt loc tite. you're not heating the e shaft. that's the whole idea. and you certainly don't wanna heat and pry or tap. that could distort the flywheel. you'd wanna heat just the flywheel, around the taper. don't touch anything. let it cool to the touch. then slip it off. personally, i wouldn't worry using this method. but really, i also don't think it's necessary to go that far with it. it'll come off. just need to hit the sweet spot
11-12-14, 10:11 PM
#95
Retired Moderator, RIP
iTrader: (142)
Join Date: Sep 2005
Location: Smiths Falls.(near Ottawa!.Mapquest IT!)
Posts: 25,581
Likes: 0
Received 131 Likes
on
114 Posts
Ok..let's see if we can explain a Crude flywheel removal tool.
I use a 24 inch piece of 3/8 flat bar.( I also use it as a flywheel stopper to get the e-shaft nut off and have a 19mm socket on it for the fronmt pulley to get that Beotch off too!)
I drilled 2 holes to insert 1.25 x50 threaded bolts in through the bar to line up with the threaded holes(one on each side of the Eccentric shaft nut) in the middle of the stock flywheel.
Place the Nut ON the shaft by a couple turns.
Put the bar OVER the nut to use it as a stationary point.(so Bolt>Nut<Bolt)
Thread the bolts into the flywheel.
Turn one bolt a couple turns,then alternate to the other..POP...
Done.
11-12-14, 11:19 PM
#96
Senior Member
Join Date: May 2010
Location: vancouver, bc
Posts: 535
Likes: 0
Received 0 Likes
on
0 Posts
Ok..let's see if we can explain a Crude flywheel removal tool.
I use a 24 inch piece of 3/8 flat bar.( I also use it as a flywheel stopper to get the e-shaft nut off and have a 19mm socket on it for the fronmt pulley to get that Beotch off too!)
I drilled 2 holes to insert 1.25 x50 threaded bolts in through the bar to line up with the threaded holes(one on each side of the Eccentric shaft nut) in the middle of the stock flywheel.
Place the Nut ON the shaft by a couple turns.
Put the bar OVER the nut to use it as a stationary point.(so Bolt>Nut<Bolt)
Thread the bolts into the flywheel.
Turn one bolt a couple turns,then alternate to the other..POP...
Done.
I use a 24 inch piece of 3/8 flat bar.( I also use it as a flywheel stopper to get the e-shaft nut off and have a 19mm socket on it for the fronmt pulley to get that Beotch off too!)
I drilled 2 holes to insert 1.25 x50 threaded bolts in through the bar to line up with the threaded holes(one on each side of the Eccentric shaft nut) in the middle of the stock flywheel.
Place the Nut ON the shaft by a couple turns.
Put the bar OVER the nut to use it as a stationary point.(so Bolt>Nut<Bolt)
Thread the bolts into the flywheel.
Turn one bolt a couple turns,then alternate to the other..POP...
Done.
11-14-14, 10:58 AM
#99
Full Member
Thread Starter
To be completely honest with you guys. At this point, although I am still attempting to dismantle the motor, I have also been looking into another vehicle.  I absolutely LOVE my FC. It is my first car, and I have SO many memories in it, but as a senior in high school, soon to start college, an RX7 with questionable reliability is not exactly the ideal vehicle to have. The money I would spend on the parts to fix it could go toward a down payment in another vehicle. There might good news however, there may or may not be a part out of an FC s5 convertible with a great body and interior on the forum soon. Hopefully my RX7 will help other owners, as well help me put the down payment on my new vehicle.
But I still want to tear it apart and find out what happened...
I absolutely LOVE my FC. It is my first car, and I have SO many memories in it, but as a senior in high school, soon to start college, an RX7 with questionable reliability is not exactly the ideal vehicle to have. The money I would spend on the parts to fix it could go toward a down payment in another vehicle. There might good news however, there may or may not be a part out of an FC s5 convertible with a great body and interior on the forum soon. Hopefully my RX7 will help other owners, as well help me put the down payment on my new vehicle. But I still want to tear it apart and find out what happened...
11-15-14, 05:41 AM
#100
Senior Member
Join Date: May 2010
Location: vancouver, bc
Posts: 535
Likes: 0
Received 0 Likes
on
0 Posts
tbh, in all likelihood, your engine is likely not going to be worth rebuilding. at least not for someone in your position. when i said 200$ for a used engine, that's a bit of a stretch. i mean, i have of course seen them go for that low, but never when you need them of course. 4 or 500$ would fetch you a very decent pre owned motor though. find some shops that work on rotaries in your area. some reputable ones. they'll probably have something that isn't too questionable.
but i mean, it's a rotary. it's always gonna be questionable!
but i mean, it's a rotary. it's always gonna be questionable!