
Double ?, Rats Nest Removal and Twin Scroll Addition?

Thread Starter
Freshly Built Streetport
Joined: May 2010
Posts: 206
Likes: 0
From: Minneapolis, Minnesota
Double ?, Rats Nest Removal and Twin Scroll Addition?
So I bought my '88 TII 3 years ago in perfect body shape, ok running shape. I realized quick that the previous owner did a few things to the engine, but it turned out to be kind of a hack job. The only obvious changes were that he removed the air pump and part of the emissions system. So I ran it that way for the past few years and it ran ok, not great, but alright to me as it's my first 7. But it developed some leaks and I had a bad crack in my exhaust manifold, so this summer I decided it was time to learn about the engine and tear in down to the block and fix the leaks and replace the exhaust manifold.
So here is where my questions come in. I have the rats nest out right now and obviously want to clean it up. Since I bought the car, the clump of vac lines in between the firewall and LIM were just open. Great job previous owner, but now that everythings apart I followed them to the vac rack. Yes, I used the search function and a number of people said I can get rid of all 5 of the vac valves. Though some said don't remove the twin-scroll valve. Question one, can I just get rid of all the vac valves and associated lines? The connectors are blue, orange, green, greyish, and light yellow. Which one is for the twin scroll if I do need to keep it?
Second question. To my surprise when I got the turbo and manifold out of the engine bay, I found out that the previous owner had removed the entire twin scroll system. (So that explains why I have no power below 3k and then the boost rushes in) Anyway, the manifold I found on Craigslist just so happens to have the twin scroll flap and actuator with it. So the question is, should I add the twin scroll system back onto my car? Or just remove it from the new manifold and run it the way I have been because I'm used to it that way? If I do keep it, do I need any parts the previous owner may have thrown away? What vac source would I connect the actuator to? Thanks in advance for any advice.
Blue: Relief solenoid
Gray: Switching solenoid
Orange: Fuel pressure regulator solenoid
Yellow: EGR solenoid
Green: Twin-scroll solenoid
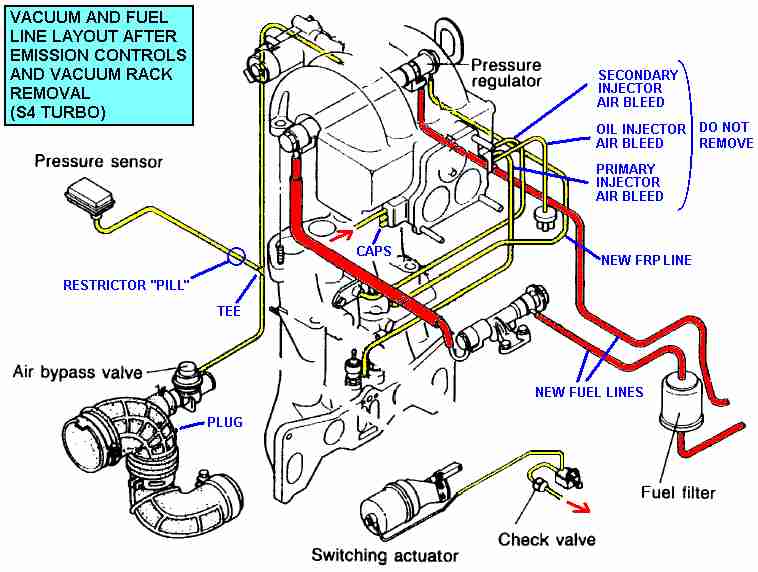
The twin scroll system is beneficial under 2700 RPM (where the door will be closed), so I'd hook it back up if you like additional torque. I think most of us do. It's a very simple system too. It's just a vacuum line with a check valve connected to the solenoid, and then a line from the solenoid runs to the twin-scroll actuator. The actuator moves a door inside the exhaust manifold that covers one of the turbine runners, which leads to higher exhaust gas velocity and faster spool-up. At 2700 RPM, the ECU switches the solenoid to vent vacuum rather than directing it to the actuator (opens the flapper door).
Here's a diagram I just found in a quick search. They show the setup connected to the nipple on the top/front of the UIM.
Another option you might consider is an S5 turbo and manifold. It has a better design (divided manifold) that improves low-end torque over the S4 system, and also allows for a little bit of extra top-end flow.
Gray: Switching solenoid
Orange: Fuel pressure regulator solenoid
Yellow: EGR solenoid
Green: Twin-scroll solenoid
The twin scroll system is beneficial under 2700 RPM (where the door will be closed), so I'd hook it back up if you like additional torque. I think most of us do. It's a very simple system too. It's just a vacuum line with a check valve connected to the solenoid, and then a line from the solenoid runs to the twin-scroll actuator. The actuator moves a door inside the exhaust manifold that covers one of the turbine runners, which leads to higher exhaust gas velocity and faster spool-up. At 2700 RPM, the ECU switches the solenoid to vent vacuum rather than directing it to the actuator (opens the flapper door).
Here's a diagram I just found in a quick search. They show the setup connected to the nipple on the top/front of the UIM.
Another option you might consider is an S5 turbo and manifold. It has a better design (divided manifold) that improves low-end torque over the S4 system, and also allows for a little bit of extra top-end flow.
Thread Starter
Freshly Built Streetport
Joined: May 2010
Posts: 206
Likes: 0
From: Minneapolis, Minnesota
Thanks RotaryRocket88, I was kinda leaning toward putting the twin scroll system back in, but didn't know where to start. So to run the twin scroll, I'd obviously need to keep the green plug, but what about the other 4? Like I said above, I think they've all been disconnected since I got the car, so I'm not sure if they're needed at all. It idled like crap though, though for many reasons associated with the work the previous owner did. I've already fixed a number of his mistakes. And is this diagram suggesting that I just run new lines rather than cutting apart the rats nest?
And turbo wise, I'm planning on getting a BNR stage 3 once I get around to rebuilding the internals. Right now I just want to get it to run and idle correctly since it has yet to do so in the 3 years I've owned it. So the S4 turbo should be fine for now I'd think.
And turbo wise, I'm planning on getting a BNR stage 3 once I get around to rebuilding the internals. Right now I just want to get it to run and idle correctly since it has yet to do so in the 3 years I've owned it. So the S4 turbo should be fine for now I'd think.
Last edited by TIIFC3S; Jul 15, 2010 at 04:09 PM.

Trending Topics
Thread Starter
Freshly Built Streetport
Joined: May 2010
Posts: 206
Likes: 0
From: Minneapolis, Minnesota
I'll get some pics up later, but it was a really bad leak. It was almost louder than my HKS exhaust, so I was sick of listening to that leak. The manifold I have now had some cracks, but the guy I bought it from was a welder so he took care of most of them. None went all the way through, so I'm pretty confident this one will work out. There's one crack on the inside that I'm worried about. I'll get a pick of that later.

Rotary Enthusiast
Joined: Sep 2009
Posts: 884
Likes: 0
From: Omaha, Ne
Blue: Relief solenoid
Gray: Switching solenoid
Orange: Fuel pressure regulator solenoid
Yellow: EGR solenoid
Green: Twin-scroll solenoid
The twin scroll system is beneficial under 2700 RPM (where the door will be closed), so I'd hook it back up if you like additional torque. I think most of us do. It's a very simple system too. It's just a vacuum line with a check valve connected to the solenoid, and then a line from the solenoid runs to the twin-scroll actuator. The actuator moves a door inside the exhaust manifold that covers one of the turbine runners, which leads to higher exhaust gas velocity and faster spool-up. At 2700 RPM, the ECU switches the solenoid to vent vacuum rather than directing it to the actuator (opens the flapper door).
Here's a diagram I just found in a quick search. They show the setup connected to the nipple on the top/front of the UIM.
Another option you might consider is an S5 turbo and manifold. It has a better design (divided manifold) that improves low-end torque over the S4 system, and also allows for a little bit of extra top-end flow.
Thread Starter
Freshly Built Streetport
Joined: May 2010
Posts: 206
Likes: 0
From: Minneapolis, Minnesota
The valve on the bottom is the green one, which controls the switching actuator for the twin scroll system. You'll find all the solenoids attached to the rats nest more or less under the oil fill neck. There are 2 vac lines hooked up to the green solenoid, you'll see 1 vac line that runs to the switching actuator, keep it hooked up to the same spots, but run a new vac hose to eliminate the metal hard lines. The other vac line runs to the rats nest I believe. Remove that line and run a new one to the nipple on the front of the UIM, like the arrow points at in the diagram. You can remove the other solenoids as they are not needed after you remove the rats nest. All of the wiring and plugs for those solenoids are wrapped tightly together in the engine harness. So to gain more slack for the plugs, I carefully cut the harness wrap, separated the green plug from the rest, and then taped the harness back up to look stock. At this point, you'll have 1 vac solenoid, which you can attach to the oil filler neck, as there is 1 clip opening there for one of the other solenoids you won't use any more. I followed the diagram above and when I was done, MY car ran much better. The first pic is how the rats nest came out of my car, the second is everything I removed, and the third shows how I ran my fuel lines and how much cleaner everything is. You can also see where the twin scroll solenoid is attached to the oil fill neck.
Rotary Enthusiast
Joined: Sep 2009
Posts: 884
Likes: 0
From: Omaha, Ne
The valve on the bottom is the green one, which controls the switching actuator for the twin scroll system. You'll find all the solenoids attached to the rats nest more or less under the oil fill neck. There are 2 vac lines hooked up to the green solenoid, you'll see 1 vac line that runs to the switching actuator, keep it hooked up to the same spots, but run a new vac hose to eliminate the metal hard lines. The other vac line runs to the rats nest I believe. Remove that line and run a new one to the nipple on the front of the UIM, like the arrow points at in the diagram. You can remove the other solenoids as they are not needed after you remove the rats nest. All of the wiring and plugs for those solenoids are wrapped tightly together in the engine harness. So to gain more slack for the plugs, I carefully cut the harness wrap, separated the green plug from the rest, and then taped the harness back up to look stock. At this point, you'll have 1 vac solenoid, which you can attach to the oil filler neck, as there is 1 clip opening there for one of the other solenoids you won't use any more. I followed the diagram above and when I was done, MY car ran much better. The first pic is how the rats nest came out of my car, the second is everything I removed, and the third shows how I ran my fuel lines and how much cleaner everything is. You can also see where the twin scroll solenoid is attached to the oil fill neck.
Thread Starter
Freshly Built Streetport
Joined: May 2010
Posts: 206
Likes: 0
From: Minneapolis, Minnesota
As long as you run new fuel lines like in the diagram, you don't need anything in the second pic. I have it hanging on the wall in my garage right now.  Compared to other things, it's not too bad in the car, but it would have been much easier out of the car. One other thing to look at while you're doing all this is your OMP lines, if you're keeping the OMP that is. When I took everything apart my lines where very brittle and 1 snapped. I talked to Atkins rotary about it and they said if the one broke, the rest are sure to follow. So I bought a new set and it's reassuring to know they're new. Here's a pic.
Compared to other things, it's not too bad in the car, but it would have been much easier out of the car. One other thing to look at while you're doing all this is your OMP lines, if you're keeping the OMP that is. When I took everything apart my lines where very brittle and 1 snapped. I talked to Atkins rotary about it and they said if the one broke, the rest are sure to follow. So I bought a new set and it's reassuring to know they're new. Here's a pic.
Thread Starter
Freshly Built Streetport
Joined: May 2010
Posts: 206
Likes: 0
From: Minneapolis, Minnesota
http://atkinsrotary.com/store/catalo...t-p-16468.html
If your's are good then you may not need to. I had 146k on my engine so they were dark brown and brittle. The new ones are very flexible. I just thought I'd mention it as it was something I didn't know about until I took everything apart.
If your's are good then you may not need to. I had 146k on my engine so they were dark brown and brittle. The new ones are very flexible. I just thought I'd mention it as it was something I didn't know about until I took everything apart.
Senior Member
Joined: Nov 2012
Posts: 455
Likes: 0
From: LA
Blue: Relief solenoid
Gray: Switching solenoid
Orange: Fuel pressure regulator solenoid
Yellow: EGR solenoid
Green: Twin-scroll solenoid
The twin scroll system is beneficial under 2700 RPM (where the door will be closed), so I'd hook it back up if you like additional torque. I think most of us do. It's a very simple system too. It's just a vacuum line with a check valve connected to the solenoid, and then a line from the solenoid runs to the twin-scroll actuator. The actuator moves a door inside the exhaust manifold that covers one of the turbine runners, which leads to higher exhaust gas velocity and faster spool-up. At 2700 RPM, the ECU switches the solenoid to vent vacuum rather than directing it to the actuator (opens the flapper door).
Here's a diagram I just found in a quick search. They show the setup connected to the nipple on the top/front of the UIM.
Another option you might consider is an S5 turbo and manifold. It has a better design (divided manifold) that improves low-end torque over the S4 system, and also allows for a little bit of extra top-end flow.
Gray: Switching solenoid
Orange: Fuel pressure regulator solenoid
Yellow: EGR solenoid
Green: Twin-scroll solenoid
The twin scroll system is beneficial under 2700 RPM (where the door will be closed), so I'd hook it back up if you like additional torque. I think most of us do. It's a very simple system too. It's just a vacuum line with a check valve connected to the solenoid, and then a line from the solenoid runs to the twin-scroll actuator. The actuator moves a door inside the exhaust manifold that covers one of the turbine runners, which leads to higher exhaust gas velocity and faster spool-up. At 2700 RPM, the ECU switches the solenoid to vent vacuum rather than directing it to the actuator (opens the flapper door).
Here's a diagram I just found in a quick search. They show the setup connected to the nipple on the top/front of the UIM.
Another option you might consider is an S5 turbo and manifold. It has a better design (divided manifold) that improves low-end torque over the S4 system, and also allows for a little bit of extra top-end flow.
 .
.

Thread Starter
Freshly Built Streetport
Joined: May 2010
Posts: 206
Likes: 0
From: Minneapolis, Minnesota
Yup, I did the same thing when I just rebuilt my engine and removed the OMP. Make sure to keep the injector bleeds. If I remember correctly, there are three nipples on the back of the UIM: 2 small, 1 big. I capped the big one and used the other two for the injector bleeds
The twin scroll vacuum hardline rots, and the bolts for the actuator snap off. It is really prone to failure, and that could be the reason it was initially removed. It was busted on my car when I purchased it, and it was also busted on my girls car when she bought hers. I completely removed mine because I didn't want to bother having machine shop fix something that I don't think the powerfc cant control.
PS I do have new stainless steel omp lines that I am willing to sell. I am not using them because I am going to premix. Lines are for s4 t2.
PS I do have new stainless steel omp lines that I am willing to sell. I am not using them because I am going to premix. Lines are for s4 t2.
Last edited by tuscanidream; Oct 15, 2013 at 11:21 AM.
Thread Starter
Freshly Built Streetport
Joined: May 2010
Posts: 206
Likes: 0
From: Minneapolis, Minnesota
I haven't been on in a few days, sorry for the wait. The FPR hooks into a nipple on the inside of the LIM. It's more or less in between the two secondary injectors. In my post above (#12), you can see it just below the sub zero block off plate and right above the oil injector vac lines.
Last edited by TIIFC3S; Oct 21, 2013 at 04:06 PM.
Thread Starter
Freshly Built Streetport
Joined: May 2010
Posts: 206
Likes: 0
From: Minneapolis, Minnesota
The S4's don't have that nipple, at least USDM's don't. I had the same question verified through PM when I was doing the work. I just PM'd you the message so you have the same explanation I got. I have S5 intake manifolds on my car now and there is are additional nipples that connect the secondaries and then another that comes out on the back side of the LIM for that air bleed.
https://www.rx7club.com/2nd-generati...n-pics-517411/
link to said thread. posting here for future searchers
link to said thread. posting here for future searchers

Thread
Thread Starter
Forum
Replies
Last Post
Jeff20B
1st Generation Specific (1979-1985)
73
Sep 16, 2018 07:16 PM