20Beast in a GSL-SE

 09-08-11, 02:13 PM
#27
I need a new user title

Join Date: Oct 2005
Location: Yaizu, Japan
Posts: 2,646
Likes: 0
Received 0 Likes
on
0 Posts
Wow, it's really coming along nicely. Do you have plans for the radiator/oil cooler/intercooler setup yet? Also, planning on doing a baffle plate for that oil pan?
09-09-11, 10:59 AM
#28
Moderator
iTrader: (3)
Join Date: Mar 2001
Location: https://www2.mazda.com/en/100th/
Posts: 30,832
Received 2,603 Likes
on
1,847 Posts
wow nice build! you know you've been around the forum for a long time when you remember that cars first build thread!
09-13-11, 01:07 AM
#30
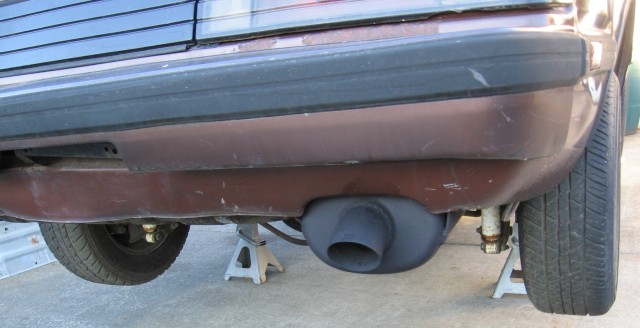
3" muffler.
Oil pan all welded up.
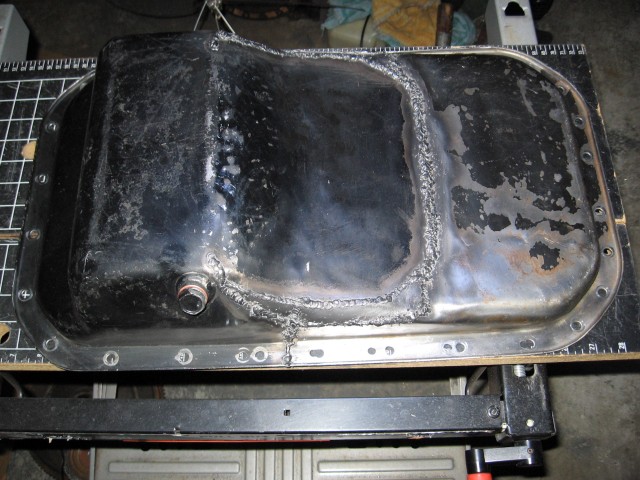
Or so I thought.
Test fitting in engine bay to check for clearance.

Looks good.
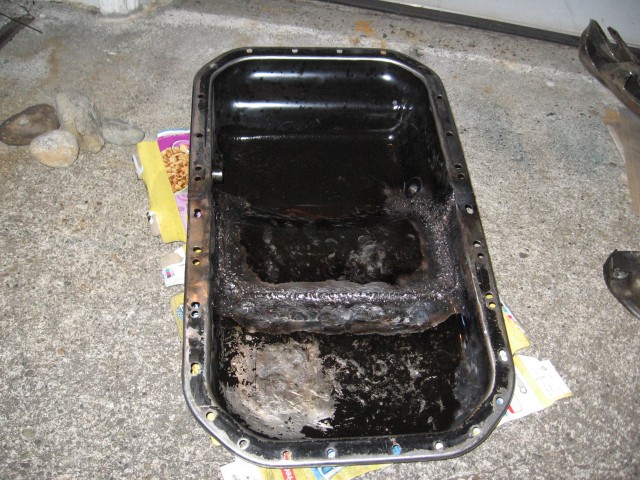
Word of advice. An oil pan mod this ambitious should not be welded with a flux core welder. After the fit checked out, I did a leak test with engine degreaser (it's like oil but washes away with water!) It had like twenty leaks here and there. I rewelded the outside several times and while it did stop several, it shrank the steel, warping the pan so I had to hammer-stretch it back out and unwarp the flange each time. I didn't want to weld the inside because there would be a bunch of little slag ***** that could potentially damage the oil pump. Well, I went ahead and welded the inside after there were still leaks on the ouside that I just couldn't fix any other way. Hopefully the final hammer stretch has shaken loose any ***** that would have come loose under normal heat cycling. Plus I chissled off several already but still lots more to go.
As you can see in this pic, I sprayed some degreaser, then checked it a half hour later. I didn't see any more leaks on the outside! Or at least none that I could confirm. I'll let it sit over night and check tomorrow.
Oil pan all welded up.
Or so I thought.
Test fitting in engine bay to check for clearance.
Looks good.
Word of advice. An oil pan mod this ambitious should not be welded with a flux core welder. After the fit checked out, I did a leak test with engine degreaser (it's like oil but washes away with water!) It had like twenty leaks here and there. I rewelded the outside several times and while it did stop several, it shrank the steel, warping the pan so I had to hammer-stretch it back out and unwarp the flange each time. I didn't want to weld the inside because there would be a bunch of little slag ***** that could potentially damage the oil pump. Well, I went ahead and welded the inside after there were still leaks on the ouside that I just couldn't fix any other way. Hopefully the final hammer stretch has shaken loose any ***** that would have come loose under normal heat cycling. Plus I chissled off several already but still lots more to go.
As you can see in this pic, I sprayed some degreaser, then checked it a half hour later. I didn't see any more leaks on the outside! Or at least none that I could confirm. I'll let it sit over night and check tomorrow.
09-13-11, 06:28 AM
#31
Welded sumps can be a PITA to stop pin hole leaks, looks like your getting on top of it.
Have you thought about increasing the capacity of the sump? Maybe a deeper frontal section...The sump has good clearance but I'd be concerned with oil pick up starvation under acc/decell/cornering. Some trap doors might help.
Have you thought about increasing the capacity of the sump? Maybe a deeper frontal section...The sump has good clearance but I'd be concerned with oil pick up starvation under acc/decell/cornering. Some trap doors might help.
09-13-11, 10:45 AM
#32
I'm actually as deep as I can go in front and the middle (above the crossmember only had a finger's clearance). But I can hammer the rear 12A section down for more capacity. 
The R5 pans have a bit over 5 quart capacity. By adding the rear 12A section it's up to 6 or more, now.
I like the idea of trap doors. Not sure how to design it. Any pictures you can link to?
The R5 pans have a bit over 5 quart capacity. By adding the rear 12A section it's up to 6 or more, now.
I like the idea of trap doors. Not sure how to design it. Any pictures you can link to?
09-14-11, 05:43 AM
#33
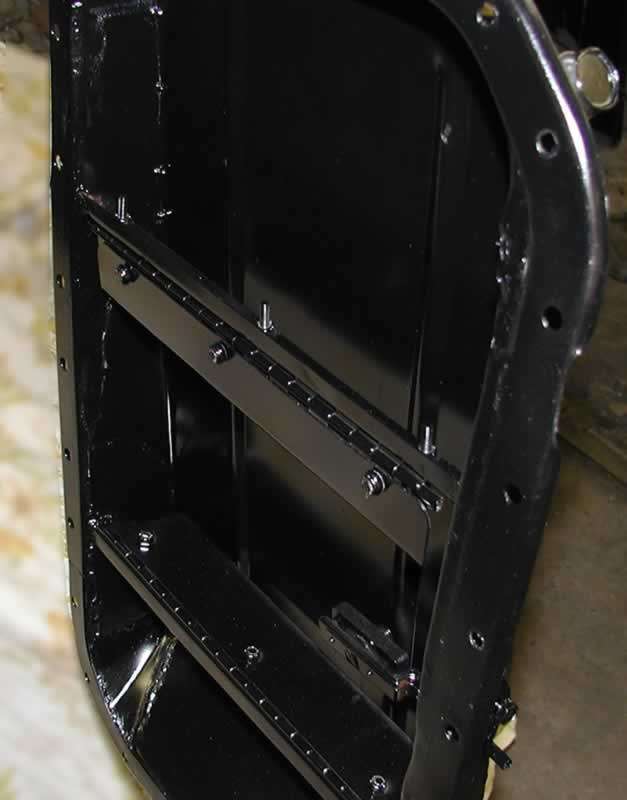
If you cannot drop the sump down maybe expand the sides..
Anyway, you shouold be able to run a trap door set up like below. Will help slow the movement of the oil in you sump under acc/decell. Hope this gives you some ideas mate. Keep the updates coming too, great stuff.
Anyway, you shouold be able to run a trap door set up like below. Will help slow the movement of the oil in you sump under acc/decell. Hope this gives you some ideas mate. Keep the updates coming too, great stuff.
Last edited by stokrx; 09-14-11 at 05:48 AM.
09-16-11, 11:55 PM
#36
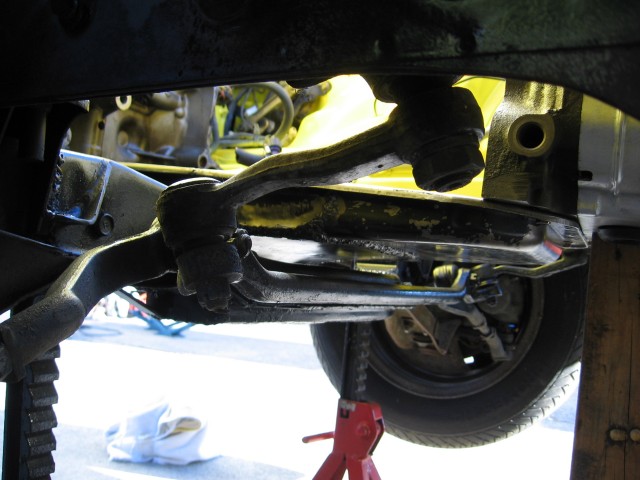
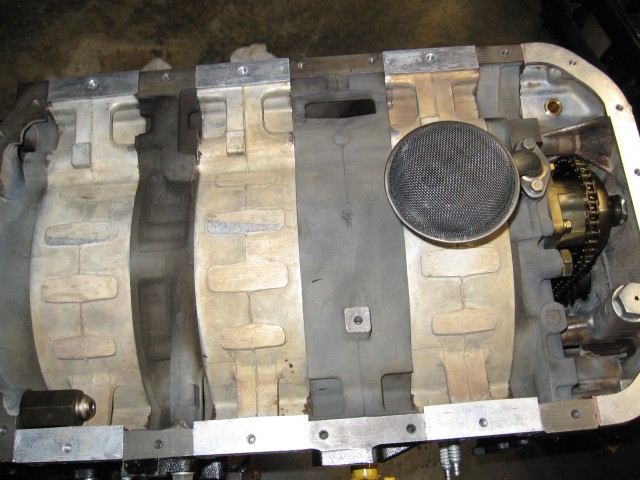
Thanks! I'm waiting for an order from Mazdatrix to get here in a few days before I can drop this monster in, so figured I'd take a pic of the underbelly for posterity.
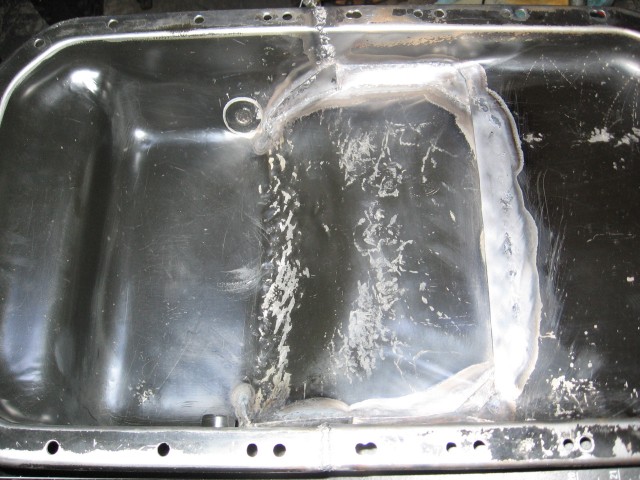
Here you can see the old school pickup tube. Nice large screen. In the upper right corner is the oil return fitting. Lower left is a lightly smashed ROPR.
And here's the finished pain in the ***. I slathered some RTV on the outside before painting. It says it's the ultra black with maximum oil resistance. Maybe it just might hold?
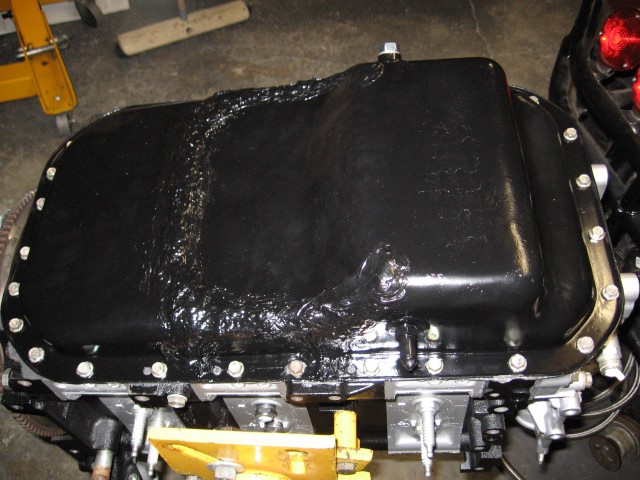
I've got another R5 pan to play with if I need to. This time I'll have someone tig it for me (or learn to do it myself lol).
Here you can see the old school pickup tube. Nice large screen. In the upper right corner is the oil return fitting. Lower left is a lightly smashed ROPR.
And here's the finished pain in the ***. I slathered some RTV on the outside before painting. It says it's the ultra black with maximum oil resistance. Maybe it just might hold?
I've got another R5 pan to play with if I need to. This time I'll have someone tig it for me (or learn to do it myself lol).
09-19-11, 11:17 PM
#42
While waiting I gooped some quicksteel in the ACV ports. I already jambed some steel rod in the air feed holes in the rotor housings (the ones under at a 45 degree, not the outside facing ones). Adding quicksteel is extra insurance against a hot intake manifold.
I already jambed some steel rod in the air feed holes in the rotor housings (the ones under at a 45 degree, not the outside facing ones). Adding quicksteel is extra insurance against a hot intake manifold.
09-22-11, 02:04 AM
#44
Progress is slow. But it is progress. Better than congress, if you get what I mean.
Test fitting some OMP lines from various engines. The stock 20B ones were brittle like uncooked spaghetti.
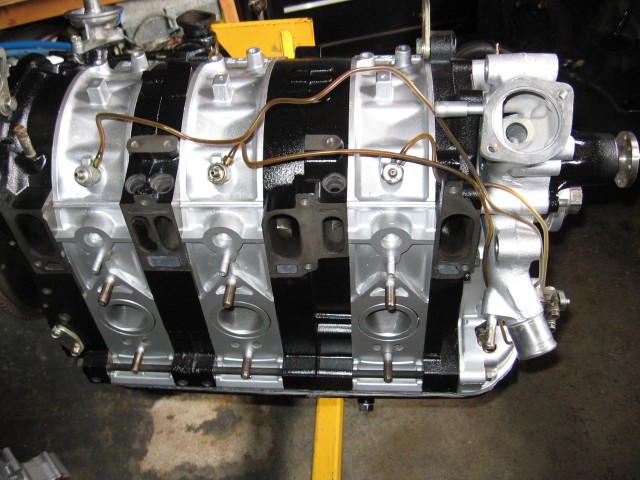
Check out the blind bolt. Looks like everything fits. Time to take it off and clean it. Then install a new o-ring and jack it open to 9 o-clock.
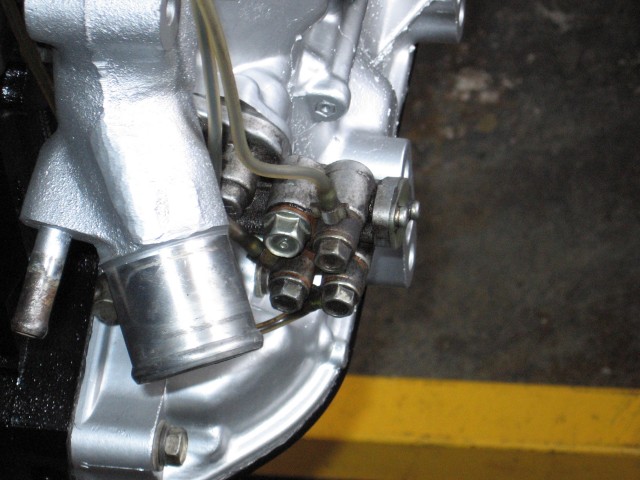
Test fitting some OMP lines from various engines. The stock 20B ones were brittle like uncooked spaghetti.
Check out the blind bolt. Looks like everything fits. Time to take it off and clean it. Then install a new o-ring and jack it open to 9 o-clock.
09-23-11, 12:46 AM
#45
Mini update: primary fuel rail is in, all six oil injector copper washers have been heat anealed and reused, OMP jacked open to 10 o'clock, decided to go with an Atkins serpentine pulley set because the main drive pulley is a lot lighter than stock and I needed to mark one anyway. This corrected a pulley alignment mismatch I was head-scratching about (either WP or main drive was too far forward, didn't bother to remember lol). I tested several stockers and they were all off a similar amount but the Atkins were spot-on. Yeah buddy!
What else? Oh, I threw about 4 liters of oil in (yes, I had some fresh oil I drained out of another engine and used a couple of 2 liter soda bottles for storage because they're clear and withstand oil well enough). This is to test my funky fresh oil pan mod. I'm not Canadian, not that there's anything wrong with that.
Lastly, I'm sure PercentSevenC will want to know about this, I "stabbed" in the CAS. I think I'll set the timing map back to 0 for low RPM so I can set timing and tighten the nut down etc. I don't like the thought of having to compensate for 10 degrees in Aaron Cake's map for its first start. KnowhatImean?
09-27-11, 01:00 PM
#47
300 daily reliable and 400 for weekend fun.
I found a nice 3 foot braided stainless AN hose in my pile so I drilled and tapped a new oil pan drain bolt and installed one of the fittings in it. The other fitting can thread right into the turbo.
Both fittings are steel so there shouldn't be any need to have to buy anything down the road. Most stuff I've seen online is aluminum. That didn't seem right. Glad I had these steel parts.
I think I'll test run the engine NA first, just to get it up and running on the header I already have. Then spend time on the manifold. I mean I have a turbo, I might as well use it instead of sell it, right?
09-28-11, 01:13 AM
#48
Well, it's finally in. Now I get to make sure the UIM will fit without having to cut out some hood supports. I already had to trim the alt bracket. Looks like I'll have to use a short v-belt and switch back to the stock steel pullies. Oh well, the serpentine was fun while it lasted. Besides, the serpentine set will go to the other engine that's getting the aluminum flywheel and an RB Holley.
Looks like I'll have to use a short v-belt and switch back to the stock steel pullies. Oh well, the serpentine was fun while it lasted. Besides, the serpentine set will go to the other engine that's getting the aluminum flywheel and an RB Holley.
09-28-11, 03:22 AM
#49
Thanks! I'm waiting for an order from Mazdatrix to get here in a few days before I can drop this monster in, so figured I'd take a pic of the underbelly for posterity.
Here you can see the old school pickup tube. Nice large screen. In the upper right corner is the oil return fitting. Lower left is a lightly smashed ROPR.
Here you can see the old school pickup tube. Nice large screen. In the upper right corner is the oil return fitting. Lower left is a lightly smashed ROPR.
Nice
09-29-11, 01:00 AM
#50
Exactly! A hammer can be useful if you don't have a press. Ironically just today I was digging through the "pile" looking for something and found one of those adjustable regs. I'll probably use it in the next engine build.
Got a small update. I'm about 1/4" away from closing the hood. Shouldn't've biased it up in front a fraction of a degree like I did. Oh well. I'll just cut and reweld the front mount bar 1/4" lower so the motor mounts stay correctly installed. I already tried omitting the steel spacer, or the aluminum spacer. No go (the through-bolt goes all weird). So gotta cut and weld the bar itself. Wouldn't be the first time. The GLC's bar needed this treatment, but I had to go up a good 10mm so the pan wouldn't hit the crossmember. This time I've got the pan clearance, but need hood clearance. LoL I already had to trim the hood supports to get this far. "That's hotrodding" I keep telling myself.
Got a small update. I'm about 1/4" away from closing the hood. Shouldn't've biased it up in front a fraction of a degree like I did. Oh well. I'll just cut and reweld the front mount bar 1/4" lower so the motor mounts stay correctly installed. I already tried omitting the steel spacer, or the aluminum spacer. No go (the through-bolt goes all weird). So gotta cut and weld the bar itself. Wouldn't be the first time. The GLC's bar needed this treatment, but I had to go up a good 10mm so the pan wouldn't hit the crossmember. This time I've got the pan clearance, but need hood clearance. LoL I already had to trim the hood supports to get this far. "That's hotrodding" I keep telling myself.