Write-Up on Mech seconds + Accelerator Pump Mod

 07-25-12, 05:34 AM
#27

It all depends on how you drive it. If you want less fuel consumption you drive it off the secondaries. If you want more mid-range power, you hit the secondaries early. The mech secondaries mod is about giving you the control and choice to drive it either way.
07-25-12, 02:45 PM
#29
Don't Cross The Streams..
iTrader: (3)
Join Date: Apr 2009
Location: Houston, TX
Posts: 842
Likes: 0
Received 0 Likes
on
0 Posts
i havent done anything else... i just removed all my emissions stuff, except my A/C. thats all.. my carb has been rebuilt recently by someone local though who is well respected and knows his stuff.. so i know thats not an issue... just noticed it stumbling. alot especially at takeoff.it has that "flat" spot where it almost stalls when taking off when i get on the gas to let the clutch out.
 08-22-15, 06:50 PM
#32
anyone know where I can find a thread for the accelerator pump mod? This one no longer has the original attachment. All the threads I have read just refer to the mod but don't tell how to actually do it.
All I know is you have to put in a thicker gasket, then modify the arm in some fashion, and possibly stretch the spring, but I'm hoping for some more details
All I know is you have to put in a thicker gasket, then modify the arm in some fashion, and possibly stretch the spring, but I'm hoping for some more details
08-22-15, 09:30 PM
#33
Double or triple up the gaskets on each side of the diaphragm. I think Sterling used to recommend stretching the spring out a little bit, but I'm not certain if that is required or not. You also need to fabricate a small lengthening arm to bolt onto the stock arm. Bend the bottom of it so that it is perpendicular to the rod going through and doesn't bind up. It also helps to oval out the bottom hole a little. Move it back and forth to watch the way it moves and you'll see why you need to oval the hole a little.
Jeff20B may be able to give better guidance on this whole procedure that I can. It's been too long since I did mine. I attached some pictures of the finished product though so you can see.
Jeff20B may be able to give better guidance on this whole procedure that I can. It's been too long since I did mine. I attached some pictures of the finished product though so you can see.
08-22-15, 11:33 PM
#34
Glazed, thanks for posting pics of your original Sterling style accel pump but I need to point out it required some adjustment that involved sticking your steel extension piece in the vice and giving it a good solid tweak so to create two 23 degree bends, not just one. You need to two bends in order to get the adjustment right where the accel pump diaphram's tip has to be pushed in just a little. You'll see the difference from the pic you posted compared to the adjustment it has now, that there is some preload on it. This is required for it to squirt as soon as the pedal is push. And then the travel of the pedal needs to have enough travel in the accel pump so when the carb is fully floored, the accel pumop reaches the end of its travel as well. Does that makes sense?
Hint: you might want to post a pic of how it is adjusted now so we can see how the two differ. Oh and leave a note suggestion that they follow the later pic.
As for the details, I've posted them before, but I will again.
1. The diaphram has to be the long travel style from an OEM 79-80 kit and not an 81-85 which was the short travel style. However because OEM parts have dried up and all we can pretty much get these days are hygrade kits from rockauto, they, at least, have the 79-80 long travel style so this allows the Sterling accel pump mod to be performed correctly.
2. The extension piece has to be at least 16 gauge mild steel like the kind you can buy at the hardware store. The width should match the width of the accel pump's arm, so like 11mm or so (be sure to check). I use a sawsall but a hack saw or band saw could work. Or use the stuff Glazed used. It was thick and somewhat hard to bend. For my 16 gauge ones, I grab it with a vice grip on each side and give it a good bend until it looks right. This will require trial and error to get right but something like 22 degrees maybe.
Back up, I should have mentioned the two holes you have to drill before you bend. The holes have to allow an 8-32 or metric equivalent screw through. I use 8-32 1/2" long screws that take an 11/32 nut; a couple of flat washers and a lock washer round out the package. These seem to stay put.
Then I paint them with epoxy paint because it is rust and scratch resistant. The extension piece, not the screws.
As for the accel pump diaphram housing, I take an old diaphram or a gasket I previously made, as a template on a sheet of gray gasket paper from the auto parts store. This paper appears to be oil and gas resistant so even you premixing types can probably use this stuff. The big hole is about 24mm but I think a US quarter can be used, or some washer of the right size. I took a dull 1" hole saw, ground down the teeth and sharpened it from the inside only so the outside could stay 24mm. This works but the paper disc it cuts out is hard to remove from the hole saw.
As for the four holes in the gaskets and the screws that go in them, I used to use a leather punch, the kind with multiple tips you can rotate. However this sort of crushes the paper rather than cut it because it was designed for leather. It would usually tear the paper if the hole was next to an edge. So I recently got a 4mm hole punch designed for punching plastic cards like credit cards. a 4.5mm could have been ideal but it was either 4mm or 5mm. I figured 5mm would locate the punched screw holes too close to the big 24mm. I have yet to try this 4mm hole punch. I'll do a gasket cutting production run soon.
I make them in batches of 6 at a time usually because each carb requires three on each side of the diaphram.
The screws I use are the same thread pitch as the originals. Only the length is different. And I don't use any lock washers unlike the originals which had lock washers. Not sure if they are necessary. M4 x .7mm thread pitch x 16mm thread length.
For the banjo bolt I tend to drill everything with a 118 drill bit or .0465". We're talking all the holes in the banjo bolt and the nozzle but I suspect anything smaller could work. Sterling used to recommend a .050" drill bit but having seen how huge my pump shot is, on a 13B with a turbo, I can't recommend something that large on a 12A. I guess you could start small and drill it progressively larger until you don't notice any additional performance or tip-in. Because after that point, you're just wasting gas.
I wrap the brass doodad with the 30 stamped on it, with teflon tape because they always tend to leak once disturbed. Sterling did this too. It's that thing above the tiny brass weight and checkball, above the accel pump housing.
There is more which I'll get to in a bit.
Hint: you might want to post a pic of how it is adjusted now so we can see how the two differ. Oh and leave a note suggestion that they follow the later pic.
As for the details, I've posted them before, but I will again.
1. The diaphram has to be the long travel style from an OEM 79-80 kit and not an 81-85 which was the short travel style. However because OEM parts have dried up and all we can pretty much get these days are hygrade kits from rockauto, they, at least, have the 79-80 long travel style so this allows the Sterling accel pump mod to be performed correctly.
2. The extension piece has to be at least 16 gauge mild steel like the kind you can buy at the hardware store. The width should match the width of the accel pump's arm, so like 11mm or so (be sure to check). I use a sawsall but a hack saw or band saw could work. Or use the stuff Glazed used. It was thick and somewhat hard to bend.
For my 16 gauge ones, I grab it with a vice grip on each side and give it a good bend until it looks right. This will require trial and error to get right but something like 22 degrees maybe.Back up, I should have mentioned the two holes you have to drill before you bend. The holes have to allow an 8-32 or metric equivalent screw through. I use 8-32 1/2" long screws that take an 11/32 nut; a couple of flat washers and a lock washer round out the package. These seem to stay put.
Then I paint them with epoxy paint because it is rust and scratch resistant. The extension piece, not the screws.
As for the accel pump diaphram housing, I take an old diaphram or a gasket I previously made, as a template on a sheet of gray gasket paper from the auto parts store. This paper appears to be oil and gas resistant so even you premixing types can probably use this stuff. The big hole is about 24mm but I think a US quarter can be used, or some washer of the right size. I took a dull 1" hole saw, ground down the teeth and sharpened it from the inside only so the outside could stay 24mm. This works but the paper disc it cuts out is hard to remove from the hole saw.
As for the four holes in the gaskets and the screws that go in them, I used to use a leather punch, the kind with multiple tips you can rotate. However this sort of crushes the paper rather than cut it because it was designed for leather. It would usually tear the paper if the hole was next to an edge. So I recently got a 4mm hole punch designed for punching plastic cards like credit cards. a 4.5mm could have been ideal but it was either 4mm or 5mm. I figured 5mm would locate the punched screw holes too close to the big 24mm. I have yet to try this 4mm hole punch. I'll do a gasket cutting production run soon.
I make them in batches of 6 at a time usually because each carb requires three on each side of the diaphram.
The screws I use are the same thread pitch as the originals. Only the length is different. And I don't use any lock washers unlike the originals which had lock washers. Not sure if they are necessary. M4 x .7mm thread pitch x 16mm thread length.
For the banjo bolt I tend to drill everything with a 118 drill bit or .0465". We're talking all the holes in the banjo bolt and the nozzle but I suspect anything smaller could work. Sterling used to recommend a .050" drill bit but having seen how huge my pump shot is, on a 13B with a turbo, I can't recommend something that large on a 12A. I guess you could start small and drill it progressively larger until you don't notice any additional performance or tip-in. Because after that point, you're just wasting gas.
I wrap the brass doodad with the 30 stamped on it, with teflon tape because they always tend to leak once disturbed. Sterling did this too. It's that thing above the tiny brass weight and checkball, above the accel pump housing.
There is more which I'll get to in a bit.
Last edited by Jeff20B; 08-23-15 at 07:31 AM.
08-23-15, 11:04 AM
#36
I ran out of time yesterday so I posted what I had.
The hole spacing is 1 1/4". I've tried slightly longer and slightly shorter spacings. The result was either too much travel and not enough pump shot, or plenty of pump shot but not quite enough travel. This required me to oval the upper hole for fine adjustment as well as the lower hole for the rod, which is supposed to be ovaled. So mark the steel 1 1/4" apart and leave enough margin past it. Then cut it out and then drill it. Then oval the holes (file, creative drilling etc works). Then bend and check for fitment, tweaking as necessary. Then paint.
Note I began ovaling both holes in my latest production run. The results are much easier to get full travel with full volume. I made like nine of these things and they're all pretty much spoken for.
08-23-15, 11:47 AM
#38
Here is an early one that had several holes so I could test various hole spacings and how they affected travel.
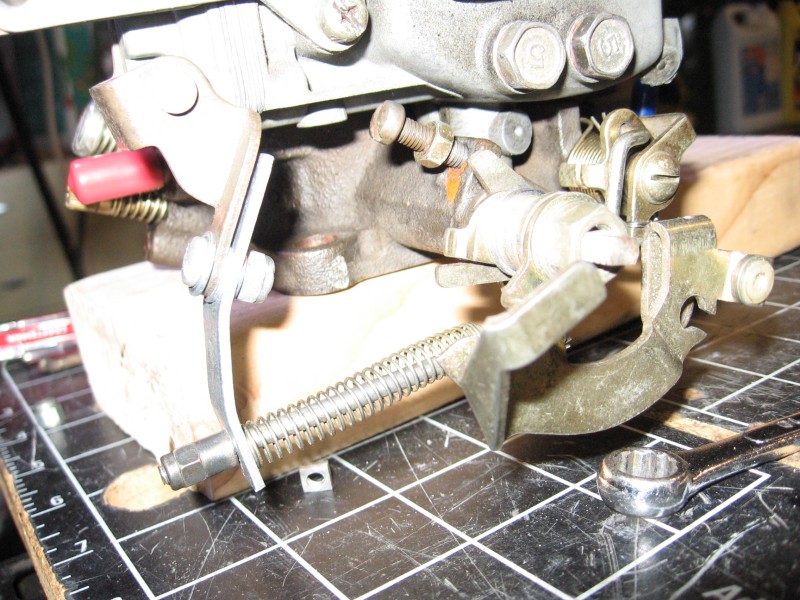
The accel pump housing seen from above. This shows a set of rare OEM long screws along with the stack of three gaskets on either side of the diaphragm, and where the lever that pushes on the diaphragm's pin is ideally adjusted with a little preload.

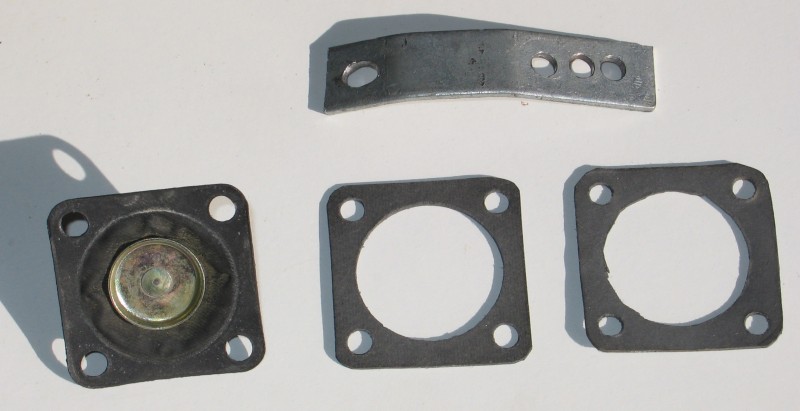
Here is that same early extension and a couple of gaskets, one cut by hand and the other cut with my 24mm hole punch.
Hole punch tool.
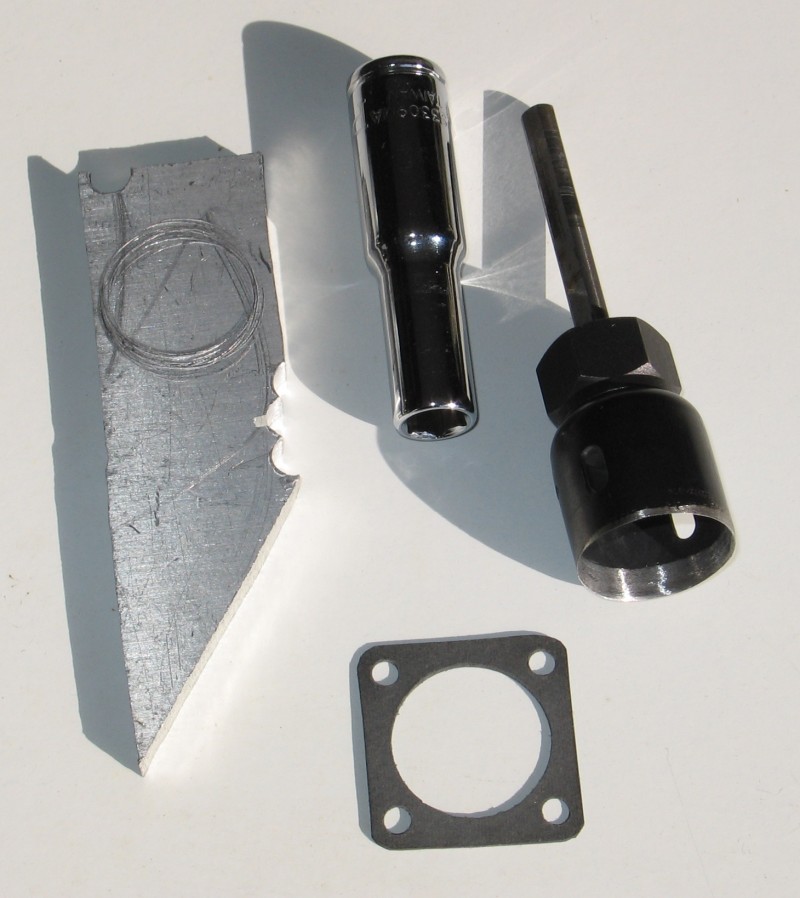
Here is a short 1 1/8" spacing extension. It turned out to be too short so I ovaled the top hole which corrected the problem.
Another angle. Still too short. So when you do yours, it should look like this, but just a touch longer.

The accel pump housing seen from above. This shows a set of rare OEM long screws along with the stack of three gaskets on either side of the diaphragm, and where the lever that pushes on the diaphragm's pin is ideally adjusted with a little preload.
Here is that same early extension and a couple of gaskets, one cut by hand and the other cut with my 24mm hole punch.
Hole punch tool.
Here is a short 1 1/8" spacing extension. It turned out to be too short so I ovaled the top hole which corrected the problem.
Another angle. Still too short. So when you do yours, it should look like this, but just a touch longer.
The following users liked this post:
Dave74rx4 (05-09-23)

Thread
Thread Starter
Forum
Replies
Last Post
sherff
Adaptronic Engine Mgmt - AUS
9
02-24-19 12:09 PM