
steering wheel instal ?

Thread Starter
Full Member
Joined: Jul 2005
Posts: 92
Likes: 0
From: Asheville, NC
steering wheel instal ?
forgive me for not tacking this one to the end of one of the existing threads on this topic, but it seemed just different enough that it would be better to start a new one than bring back a dead one.
I will be taking my steering wheel off so that I can rebuild my combo switch (the high beam setting doesn't work) and was doing some research what I'm going to have to do. in the Haynes repair manual they say to use a new lock nut when reinstalling the steering wheel. this sounds like fairly solid advice to me so I plan to follow it unless someone cares to correct me there? my question is, what size is the lock nut, I need to have the new one before I take the steering wheel off since it would be kind of hard for me to go get to the store without a steering wheel.
also, if you have done a combo switch rebuild I would appreciate any advice on it. thanks.
I would just re-use the nut unless it gets damaged when you remove it. When you get the nut off, don't use a puller to get the steering wheel off. Just give it a couple of good whacks with the palm of your hand and wiggle the wheel from side to side. Be sure to mark your wheel & column before you take the wheel off completely. As far as the switch, I would get some electronic contact cleaner and clean up the contact points really good.
Airflow is my life
Joined: Aug 2002
Posts: 6,736
Likes: 2
From: Orlando, Fl
Originally Posted by Mazdo
I would just re-use the nut unless it gets damaged when you remove it. When you get the nut off, don't use a puller to get the steering wheel off. Just give it a couple of good whacks with the palm of your hand and wiggle the wheel from side to side. Be sure to mark your wheel & column before you take the wheel off completely. As far as the switch, I would get some electronic contact cleaner and clean up the contact points really good.
 +1
+1
There is a way to get the switch assy off of there without taking the wheel off. There are a couple screws that clamp the whole turn sig/wipers/switch assy around the steering column. If you loosen those, you can rotate it to where you can get at it with a screwdriver. the switch assy screws come out from the back (if that makes sense) and the whole thing will come off. If you pop the two halves of the switch apart make sure you don't lose anything, as i recall there are a couple of small springs and such in there.
Certified Old Fart
Joined: Oct 2004
Posts: 490
Likes: 0
From: Inkerman, On, South of Ottawa, the 2nd coldest Capital in the World
Repairing the combo switch has been covered many times. I did a full write up on the process. At the time I had no real intention of doing a write up, so unfortunately there are no pics, but the instructions are very detailed and the process quite simple once you get to it.
Here's the link to my write up: https://www.rx7club.com/1st-generation-specific-1979-1985-18/write-up-combo-switch-full-disassembly-cleaning-499367/
Here's the link to my write up: https://www.rx7club.com/1st-generation-specific-1979-1985-18/write-up-combo-switch-full-disassembly-cleaning-499367/
Thread Starter
Full Member
Joined: Jul 2005
Posts: 92
Likes: 0
From: Asheville, NC
thanks for the tips.
Whanrow,
I got the info from your write up, I just wanted to double check against the info that the repair manual gave. I'm going to be doing this tomorrow so maybe I'll take some pictures and put them together with your write up after I'm done.
Whanrow,
I got the info from your write up, I just wanted to double check against the info that the repair manual gave. I'm going to be doing this tomorrow so maybe I'll take some pictures and put them together with your write up after I'm done.
Thread Starter
Full Member
Joined: Jul 2005
Posts: 92
Likes: 0
From: Asheville, NC
stumped
I hate to came back for help this early, but I'm stuck

this is what I have it taken down to, the clamp in the back has also been loosened, and it just won't budge. I get slight side to side motion but its just not coming towards me at all. any clues?
this is what I have it taken down to, the clamp in the back has also been loosened, and it just won't budge. I get slight side to side motion but its just not coming towards me at all. any clues?
Trending Topics
the switch assy is on the left sid as you're looking towards it. I've never taken the whole thing off so i don't know whats preventing it. Try taking the clamping bolts all the way out in case they fit into a groove on the column? From the point you are at i would rotate the whole thing counter-clockwise so you can get clearance for the screws in the back. Hope this helps
J
J
Thread Starter
Full Member
Joined: Jul 2005
Posts: 92
Likes: 0
From: Asheville, NC
I've been fallowing Whanrow's write up on doing this so far. the screw for the clamp is all the way off and I can't get it to rotate at all. I can see a little something up along the top of the steering column that doesn't move with the rest of the assy, just can't figure out how its holding it all on.
I suspect its just caught on crud, try a little lube, and work it back and forwards firmly but gently, mine came off easy.
When you dismantle the switch beware of one piece that will try to fall out, and clean all the copper contacts thoroughly with electronic contact cleaner, and a rag or small brush, spray alone wasn't enough for mine.
Its not very difficult and makes the switch like new when finished. Good Luck.
When you dismantle the switch beware of one piece that will try to fall out, and clean all the copper contacts thoroughly with electronic contact cleaner, and a rag or small brush, spray alone wasn't enough for mine.
Its not very difficult and makes the switch like new when finished. Good Luck.

Look for an alignment tab. I think my switch didn't have one or was broken. I just loosen the bolt and the combo switch comes off. I have heard that there is suppose to be a plastic alignment tab (I think at the top/back of the combo switch) so that the combo switch stays centered.
Thread Starter
Full Member
Joined: Jul 2005
Posts: 92
Likes: 0
From: Asheville, NC
got it off and did the cleanup. seems to be working (mostly) at the moment, although the lights are stuck in the up position. I'll edit up some of the pictures and post them tonight after work. thanks for the help with everyone.
Certified Old Fart
Joined: Oct 2004
Posts: 490
Likes: 0
From: Inkerman, On, South of Ottawa, the 2nd coldest Capital in the World
Sorry, I didn't check this thread last night to give you a hand. Undoubtably the switch was stuck on the the little invisible pin at the back mentioned in my write up. Same thing gslseaddict mentions. In my case, I just loosened the clamp all the way and pulled and shook until the little clip let go of the switch. You can't see the darn thing, and you can't get at it either. Anyway, glad you finally had success.
p.s. most comon reason for lights not popping up are the fusible links being blown.
p.s. most comon reason for lights not popping up are the fusible links being blown.
Thread Starter
Full Member
Joined: Jul 2005
Posts: 92
Likes: 0
From: Asheville, NC
I finaly got the thing off, and rebuilt, and back on. and its mostly working.
it was that little bump on the switch that fits into the hole in the steering column. I finaly got fed up and put some muscle into trying to get it off and it did the trick.
broke the switch apart and let it sit with electronic cleaner on the contacts and switching mechanism overnight. tried to run some tests on it to figure out what contact went to what, only to find that the electrical diagrams in the manual I have don't really help all that much.
I put everything back on the next morning because I had to get to work early, didn't really have time to test everything. looked like the lights were working though, aside from the headlights not wanting to go back down. I figgured that was all that was wrong, untill after work when I got pulled over for my tail lights being out. the cop was nice though (despite the sound of my exaust pouring out the gap in it) and just asked me to drive with my hazards one so no one would rearend me. it was just a fuse though.
however the lights are still stuck in the up position. any clues on how I might have done this?
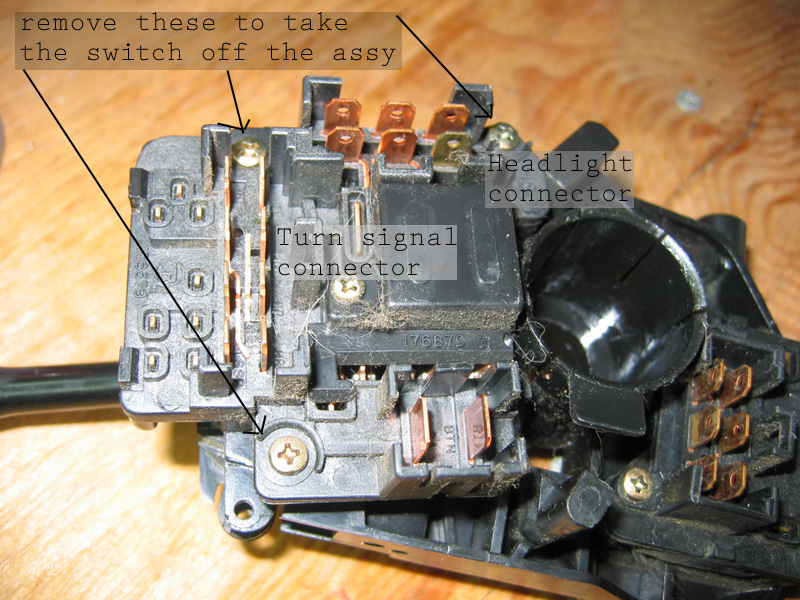
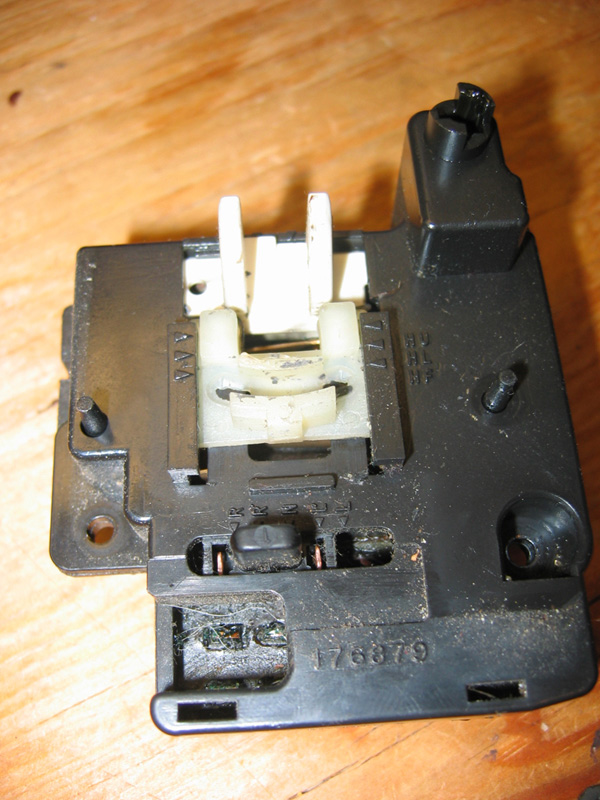
and here are the pictures I got from the strip down/rebuild.
it was that little bump on the switch that fits into the hole in the steering column. I finaly got fed up and put some muscle into trying to get it off and it did the trick.
broke the switch apart and let it sit with electronic cleaner on the contacts and switching mechanism overnight. tried to run some tests on it to figure out what contact went to what, only to find that the electrical diagrams in the manual I have don't really help all that much.
I put everything back on the next morning because I had to get to work early, didn't really have time to test everything. looked like the lights were working though, aside from the headlights not wanting to go back down. I figgured that was all that was wrong, untill after work when I got pulled over for my tail lights being out. the cop was nice though (despite the sound of my exaust pouring out the gap in it) and just asked me to drive with my hazards one so no one would rearend me. it was just a fuse though.
however the lights are still stuck in the up position. any clues on how I might have done this?
and here are the pictures I got from the strip down/rebuild.
