
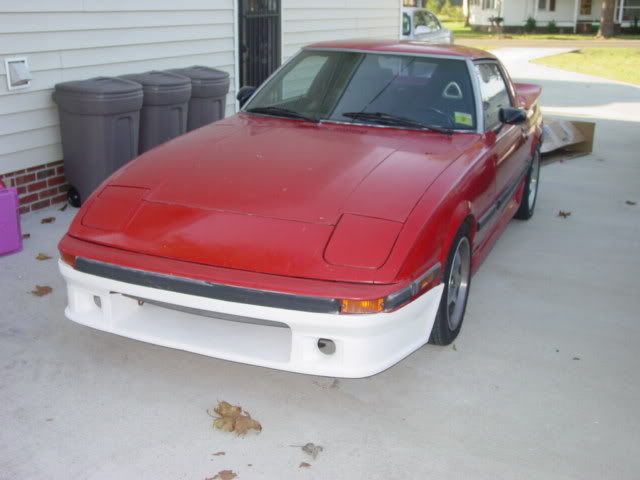
Received a front air dam from ISCRacing.net ...

Thread Starter
Senior Member
Joined: Mar 2004
Posts: 589
Likes: 3
From: Coastal
Received a front air dam from ISCRacing.net ...
Just got back in from Atlanta, today, and this thing was in my garage...

Looks like it's going to require a professional installation, too.
Looks like it's going to require a professional installation, too.
Professional Installation?  . Just mount it on the lip in the front wheelwell. I used two pop rivets on each side, have had no problems. It has been on there for over 2 years....Carl
. Just mount it on the lip in the front wheelwell. I used two pop rivets on each side, have had no problems. It has been on there for over 2 years....Carl

Thread Starter
Senior Member
Joined: Mar 2004
Posts: 589
Likes: 3
From: Coastal
Carl, did your front tow-hook rings present any problem? Did you remove your original lower front valance prior to mounting? I was thinking on having a body shop do it for me when I get new paint.
No.. Just slap it on there. I have an 82, I dont know what year yours is but It should be pretty much the same front end. It is easy to do yourself. Just two pop rivets per side and you should be good. Mine has taken a lot of abuse over the years..but it has held up very well. At the time I worked at a bodyshop, so I painted it and mounted it myself. Good Luck!
Banned. I got OWNED!!!
Joined: Mar 2003
Posts: 1,546
Likes: 2
From: Austin, Texas
As long as the towhooks aren't bent you'll have no problems. If they are, get out your sledge hammer and persuade them back into place.
Another mounting point you may want to look into is the fiberglass tray onto the sheet steel tray behind the radiator. I had problems with them cracking on the track until I drilled holes to allow the dam to be attached at the back there. Apparently at 100+ it would flap in the wind and crack it where the dam attaches to the marker lights. :oops:
Another mounting point you may want to look into is the fiberglass tray onto the sheet steel tray behind the radiator. I had problems with them cracking on the track until I drilled holes to allow the dam to be attached at the back there. Apparently at 100+ it would flap in the wind and crack it where the dam attaches to the marker lights. :oops:
Thread Starter
Senior Member
Joined: Mar 2004
Posts: 589
Likes: 3
From: Coastal
Thanks for the mounting tips, guys. So, neither of you removed the original front lower valance, then?
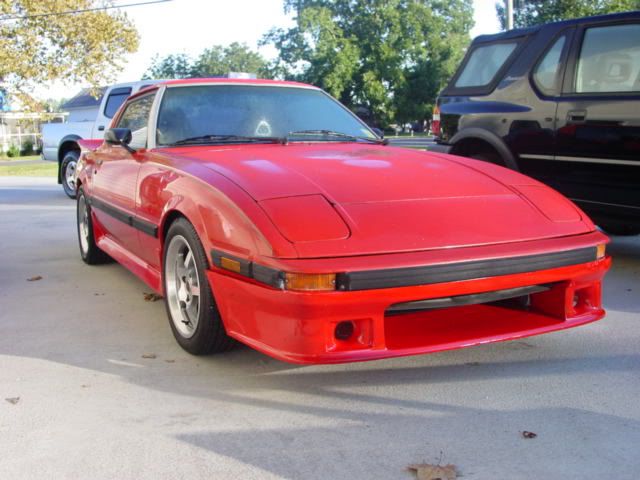
You can see that I did have it slapped up there for the photo. It appears that some sanding will be required at the top edge that curves around on the side of the bumper. I assume this is standard procedure? Christaylor, are you referring to the sheet steel tray as being that bottom shield under the engine? Mines been removed and in the garage, atm. Also, my tow hooks were close but the opening straddles them quite well. You can see that in the photo, too. I do appreciate the tips!
Here's a photo at the other angle...
Last edited by ChasRX; Oct 15, 2005 at 10:52 PM.
Trending Topics
Banned. I got OWNED!!!
Joined: Mar 2003
Posts: 1,546
Likes: 2
From: Austin, Texas
Yep... that'd be the one. Not sure if the one I've got experience with is pre- or post-hurricane. I heard they had somebody else making them or something during one hurricane season and the dam's changed design slightly.
Senior Member
Joined: Oct 2002
Posts: 501
Likes: 0
From: Eugene, Oregon
ChasRX;
I can't believe it. This post is perfect timing!
I'm ordering this same AirDam from them this week and wanted to see what it looked like out of the box.
As we all know, what is advertised is not always what it turns out to be. i.e. Painted and installed for the Sales Pitch.
I already have the Mariah Mode 3 and Turbo Whale Tail installed now, (not sure if I'm going to keep the Tail?)
I emailed them last week to ask how the Front AirDam installs.
They Replied. (Very Easy)!!! Great answer. 2 words.
Since I have the Round Style Fog Lights this Upgrade is perfect for me.
Question for you ChasRX or anyone else with this setup.
Is there a place in the light holes to use to hold the fog light mounts?
If Not. Sugestions!
Thanks
steve
sgieldon
Too old to act my age
Joined: Feb 2005
Posts: 3,164
Likes: 0
From: Tulsa, Ok.
Yes, I too am glad to someone post about the fit right out of the box. It's easy to make something look good for a sales brochure, but seeing it's fresh outta the mold fit is the only real way to tell. I have a freind with a fiberglass shop, so I know too well how important it is to have a great fit out of the mold.
As previously mentioned, I know who'll get my money, thanks to this post.
They always say, the best advertisement is the "Tell a Freind" method.
As previously mentioned, I know who'll get my money, thanks to this post.
They always say, the best advertisement is the "Tell a Freind" method.
Too old to act my age
Joined: Feb 2005
Posts: 3,164
Likes: 0
From: Tulsa, Ok.
Originally Posted by sgieldon
Well Said Mr. Wulff
steve
sgieldon
steve
sgieldon

I would be interested in a few more pics though. Close ups of the side and front, where it meets the fenders/bumper. Along with one showing where it meets under the front.
Wheel Revolutionist!
Joined: Apr 2005
Posts: 1,018
Likes: 1
From: West Virginia
wow i have been wanting an air dam for awhile. My dad wants me to get one too cause when the car reaches 80 and above the front end starts to feel a bit unstable.. the side skirts look great too how much were they?
Thread Starter
Senior Member
Joined: Mar 2004
Posts: 589
Likes: 3
From: Coastal
I took some photos of another "fit-up" this morning. I didn't have time to actually fasten it until this evening.
Here's some "fit-up" tips:
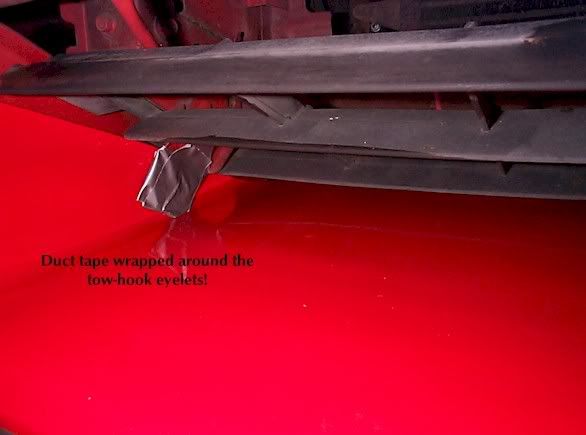
-Cover your tow-hooks with duct tape before you try your "fit-up". Those metal hooks will put a-hurtin' on the gelcoat finish if you don't. (See last photo.)
- Put big thick towels down directly under the airdam while doing your "fit-up"; especially if parked on a hard surface. Chances are that it will slip off the front while you are positioning it. At least the towels will dampen the impact and prevent some chipping.
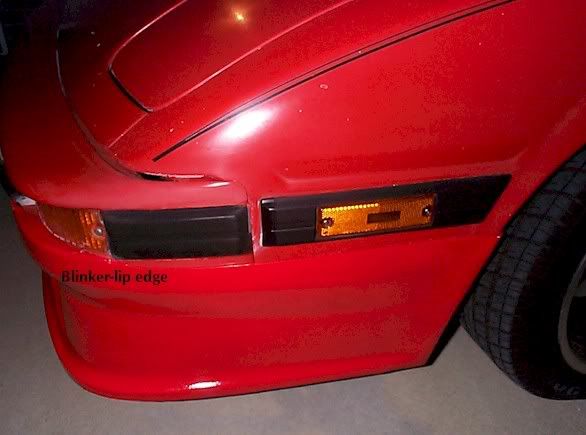
- Don't rush it. Use the two-hooks and the blinker-lip edges as the initial points of concern. Once you clear the tow-hooks, the airdam will rest on the blinker-lip edges.
- Did I say don't rush it? =)
- Slip the front edge UNDER the black painted bumper strip; then attempt to slip the fender-well lip edge into amounting position. It kinda "hooks" under the black strip of the front bumper cover; then it can hook around the front of the fender well. Do one fender well at a time. It will probably be VERY tight and difficult to slip around both fender wells. I removed my front blinker lenses to make sure every millimeter could be gained while slipping the fender-wells into mounting position. I did do it myself, with no help and I used two stainless steel size 8 x 3/4" length screws per side for the initial mount up. I plan on removing it one more time to place a strip of 3M Acrylic PT tape along the front of the inside of the airdam for a permanent mount along with rivets to replace the temporary stainless steel screws.
Not fastened in the first two photos...
I just took these a few minutes ago to show you guys how tight the gap-fit is per my '81:
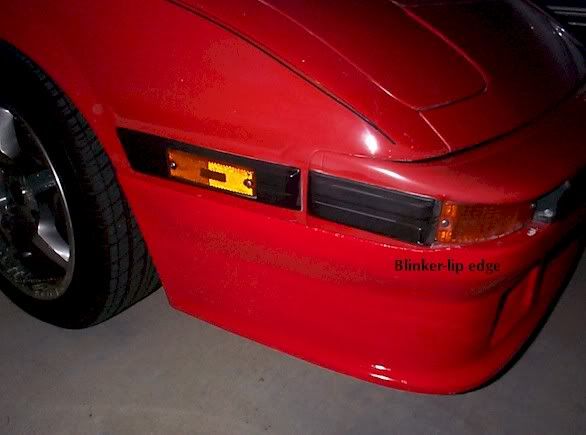
Here's duct tape wrapped on the tow-hook: be sure to do this while test fitting!
Here's some "fit-up" tips:
-Cover your tow-hooks with duct tape before you try your "fit-up". Those metal hooks will put a-hurtin' on the gelcoat finish if you don't. (See last photo.)
- Put big thick towels down directly under the airdam while doing your "fit-up"; especially if parked on a hard surface. Chances are that it will slip off the front while you are positioning it. At least the towels will dampen the impact and prevent some chipping.
- Don't rush it. Use the two-hooks and the blinker-lip edges as the initial points of concern. Once you clear the tow-hooks, the airdam will rest on the blinker-lip edges.
- Did I say don't rush it? =)
- Slip the front edge UNDER the black painted bumper strip; then attempt to slip the fender-well lip edge into amounting position. It kinda "hooks" under the black strip of the front bumper cover; then it can hook around the front of the fender well. Do one fender well at a time. It will probably be VERY tight and difficult to slip around both fender wells. I removed my front blinker lenses to make sure every millimeter could be gained while slipping the fender-wells into mounting position. I did do it myself, with no help and I used two stainless steel size 8 x 3/4" length screws per side for the initial mount up. I plan on removing it one more time to place a strip of 3M Acrylic PT tape along the front of the inside of the airdam for a permanent mount along with rivets to replace the temporary stainless steel screws.
Not fastened in the first two photos...
I just took these a few minutes ago to show you guys how tight the gap-fit is per my '81:
Here's duct tape wrapped on the tow-hook: be sure to do this while test fitting!
Last edited by ChasRX; Oct 17, 2005 at 09:25 PM.
Too old to act my age
Joined: Feb 2005
Posts: 3,164
Likes: 0
From: Tulsa, Ok.
That looks fantastic!!!!!!!! As someone who has dealt with more ill-fitting fiberglass parts than the law should allow, that is one of the best out-of-the-box fits I have seen. A fit like that is rare, most 'glass stuff needs a little work before it looks even half that good. The rest usually needs a lot of work........
Thanks for the latest round of pics. Since my car is also a bright red, it gives me an excellent idea of what it will look like.
Thanks for the latest round of pics. Since my car is also a bright red, it gives me an excellent idea of what it will look like.
Thread Starter
Senior Member
Joined: Mar 2004
Posts: 589
Likes: 3
From: Coastal
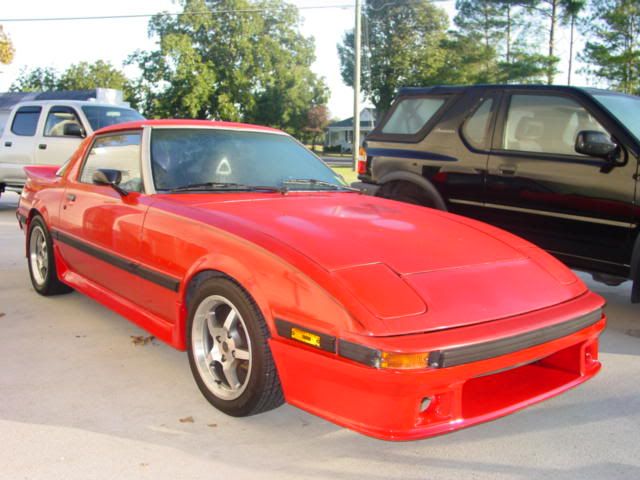
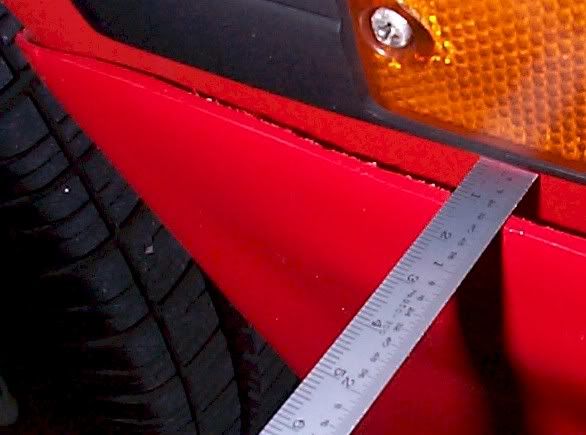
Here's a photo of the side mount gap (approx. 1 cm). Seems acceptable to me and not noticable; however, other FBs may have slightly more or less.
It is snug-TIGHT along the front: no gap at all. I'd dare say that it really doesn't require 3M acrylic PT tape in my case, but I'll apply it regardless once I decide if I'll remove the stock lower front urethane valance and black grill. (I still have all the stock front lower valance and black grill remaining intact in these pictures.)
It is snug-TIGHT along the front: no gap at all. I'd dare say that it really doesn't require 3M acrylic PT tape in my case, but I'll apply it regardless once I decide if I'll remove the stock lower front urethane valance and black grill. (I still have all the stock front lower valance and black grill remaining intact in these pictures.)
Too old to act my age
Joined: Feb 2005
Posts: 3,164
Likes: 0
From: Tulsa, Ok.
A little strip of that tape along each side would solve that minor issue. I was thinking of using it along the front and sides anyways.
I like the idea of being able to leave the stock valance, or removing it.
I like the idea of being able to leave the stock valance, or removing it.
Thread Starter
Senior Member
Joined: Mar 2004
Posts: 589
Likes: 3
From: Coastal
Well, there is absolutely no flex on the side. The 3M tape that I am using is not thick enough to make up for such a gap, nor hold it snug tight. But, that shadow is abit enhanced due to my flash at night. I really don't have an issue with that amount of gap on the side.
I still need to sand / wet-sand it and repaint at least one more coat to hold it over until I get a "real" paint job.
I still need to sand / wet-sand it and repaint at least one more coat to hold it over until I get a "real" paint job.
Too old to act my age
Joined: Feb 2005
Posts: 3,164
Likes: 0
From: Tulsa, Ok.
ISC Racing ought to have pics like those on their website, with one still in the gelcoat, to show the fit.
As for that little gap, it'll likely disappear next summer. Amazing what a snug fit, and hot weather will do, when it comes to FG parts..............
Added to my "to do" list.......
Both lower corner of my valance are torn, and the corner of the bumper, under the turn signal, has minor damage. Both will be completely solved with one of these.
Banned. I got OWNED!!!
Joined: Jun 2005
Posts: 10
Likes: 0
From: WA state
i really like that one piece design if anyone wants to trade a one piece for a FACTORY urethane 3 piece imsa im game, lol.. im prolly on crack but hey.. some ppl like the rarity of the factory 3 piece..
-mazdasix(roku)
-mazdasix(roku)
Senior Member
Joined: Oct 2002
Posts: 501
Likes: 0
From: Eugene, Oregon
Great WriteUp and Pic's ChasRX;
My AirDam should arrive by Friday according to ISC.
When you get a chance can you take a look at the Fog Light area and let us know how there mounting them i.e. Support Are if any.
Thanks again for your work on this project.
I wish my Mariah Kit was that tight. I had to do alot of sanding the fiberglass to get it all to look like it was installed professionaly.
steve
sgieldon