
Picture Request; Thermal Reactor Port Inserts

Thread Starter
Joined: Jun 2008
Posts: 8,376
Likes: 30
From: Chino Hills, CA
Picture Request; Thermal Reactor Port Inserts
For any of you who may still have SA Thermal Reactors removed and stashed on a shelf:
I could really use to see some close-up pictures of the inserts that go into the two inlet main ports - - the part of the unit which connects to the exhaust ports on the rotor housings.
I'm trying to determine if mine are 'normal.'
Mainly, I'm interested to see if the inserts extend up through the holes in the exhaust manifold gasket, or if they are flat to the rest of the mating surface.
Thanks for any pix that can be offered.


Thread Starter
Joined: Jun 2008
Posts: 8,376
Likes: 30
From: Chino Hills, CA
Yep; specifically, I need pics of the inserts both installed in the TR and removed (unless welded). I need to see how they protrude (or fail to) from the otherwise-flat face that bolts to the engine, & their shape and orientation.
I'll take good pix of mine tonight, showing what I'm looking for.
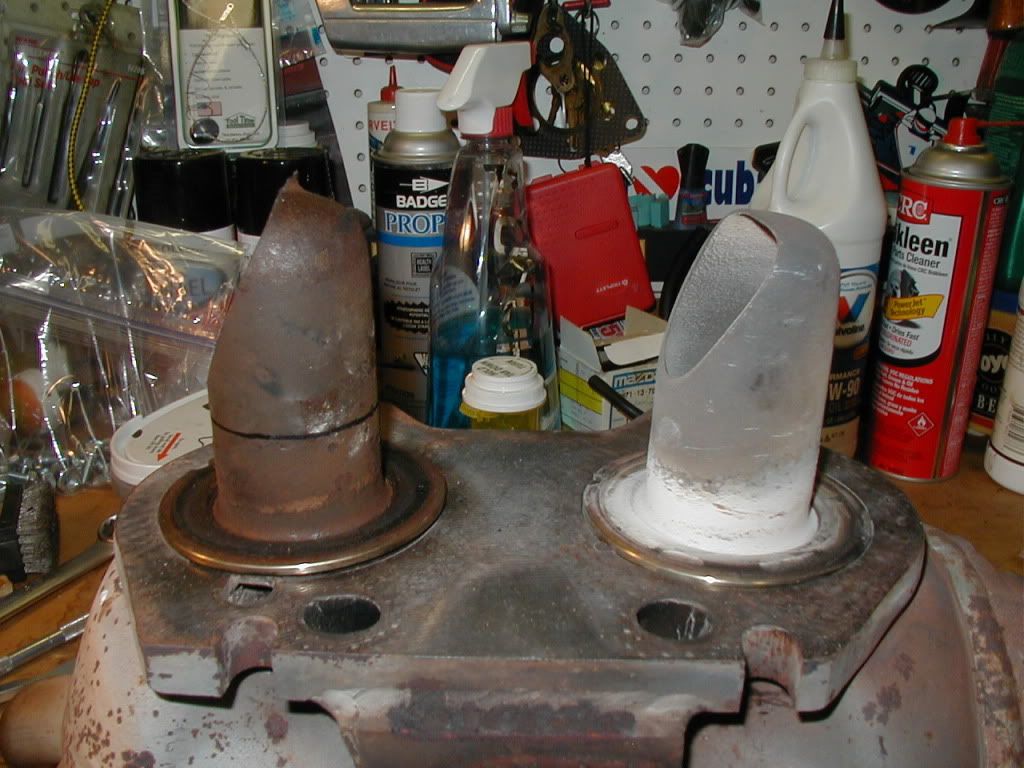
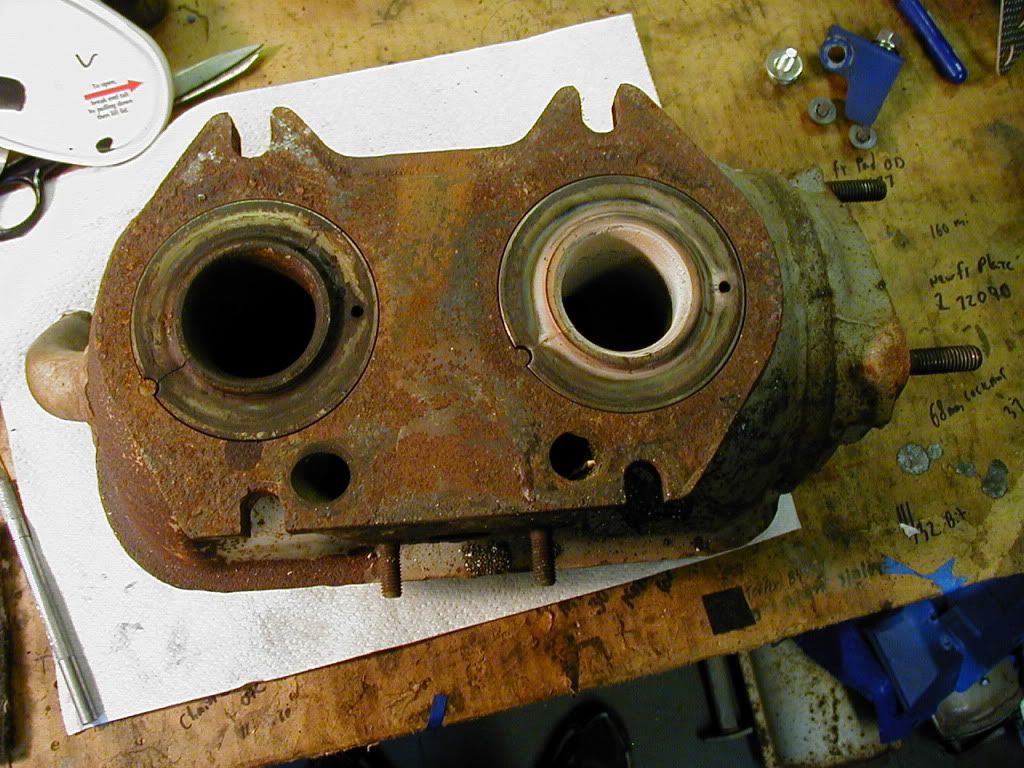
Had one laying on the floor, let me know if you need more.
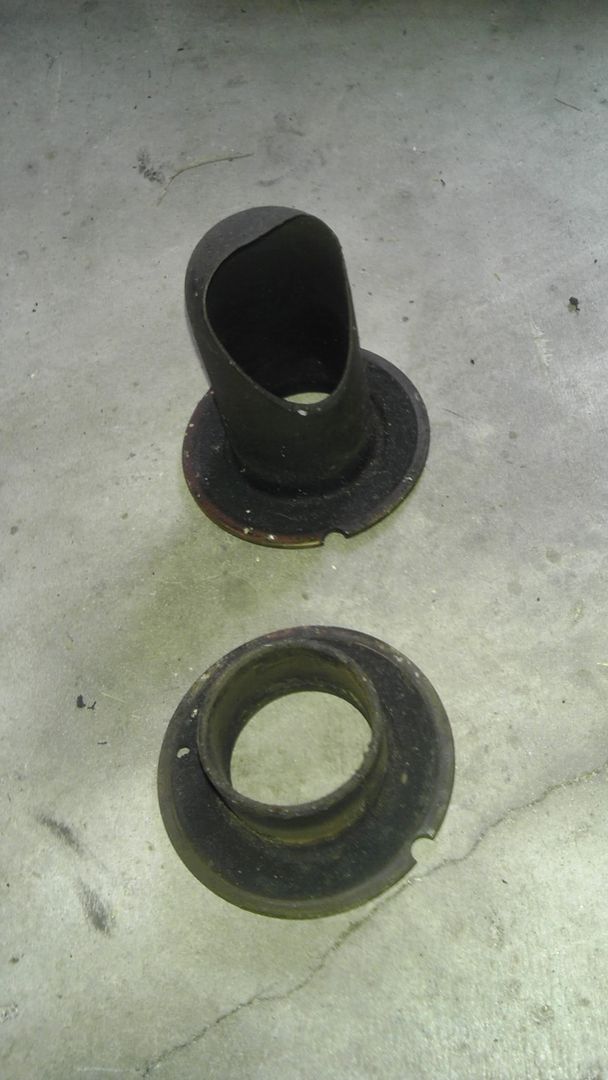
Last one is the reactor w/o inserts. Both of my inserts also have hairline cracks down them. This reactor didn't come off my running engine, it came off of a engine I pulled off clist for $25 I'll be posting those pics in a sec.
Last one is the reactor w/o inserts. Both of my inserts also have hairline cracks down them. This reactor didn't come off my running engine, it came off of a engine I pulled off clist for $25 I'll be posting those pics in a sec.
Thread Starter
Joined: Jun 2008
Posts: 8,376
Likes: 30
From: Chino Hills, CA
Those are helpful, thanks.
So on yours, both the front and the rear inserts protrude thru the holes in the gasket to touch the rotor housings, it looks like. And both your front and rear inserts are removable.
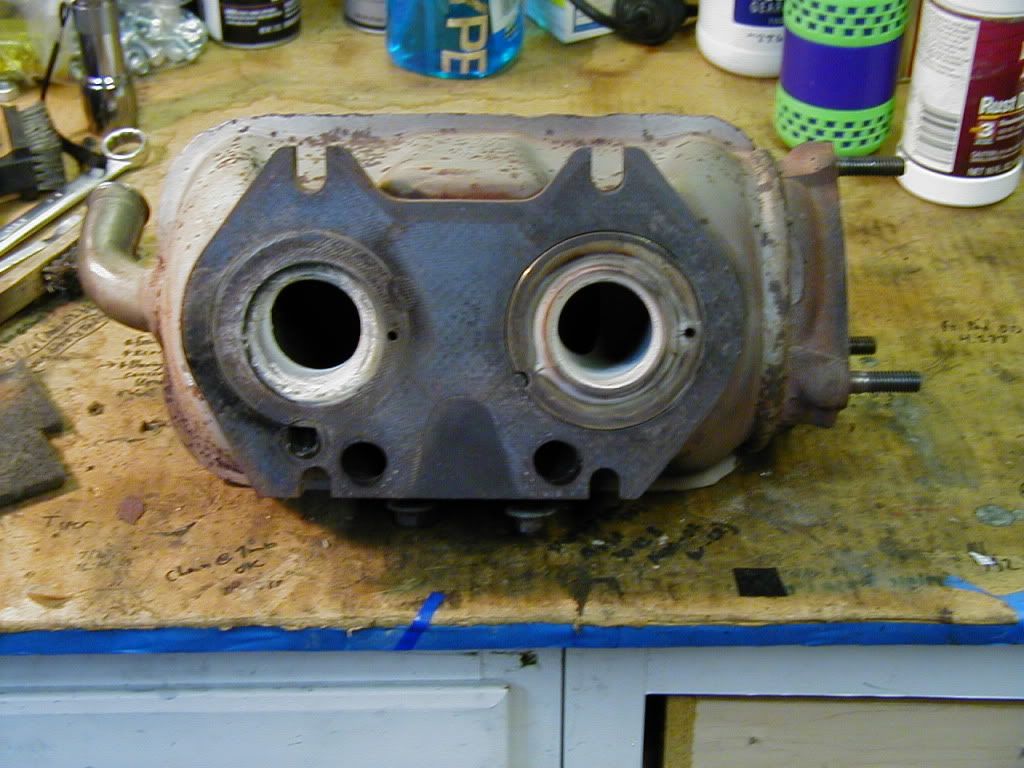
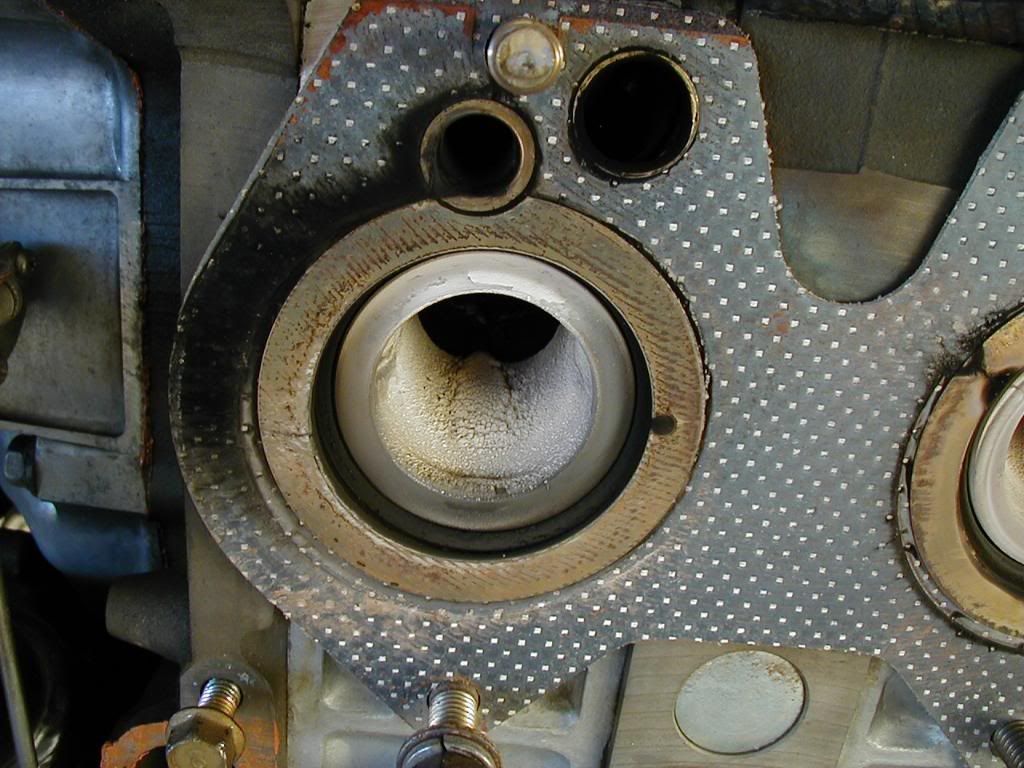
Here's mine:
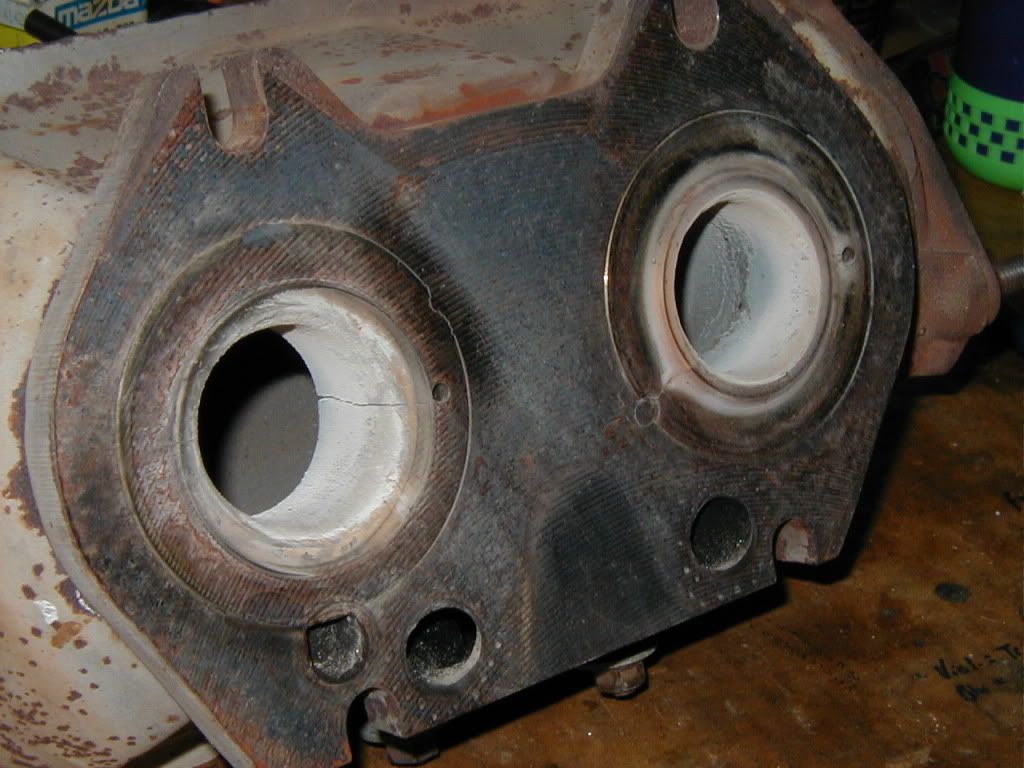
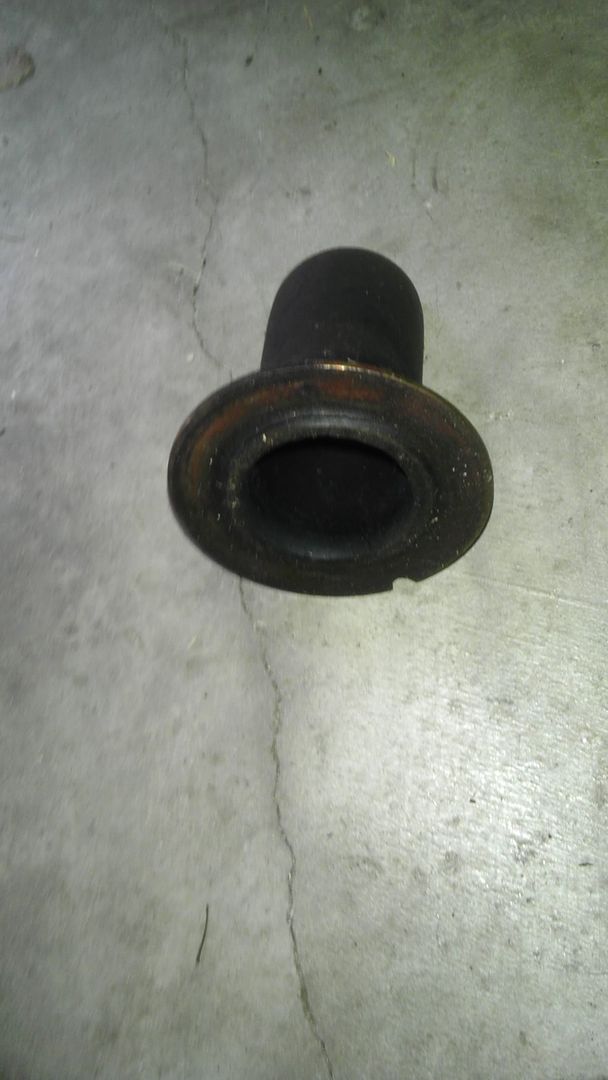
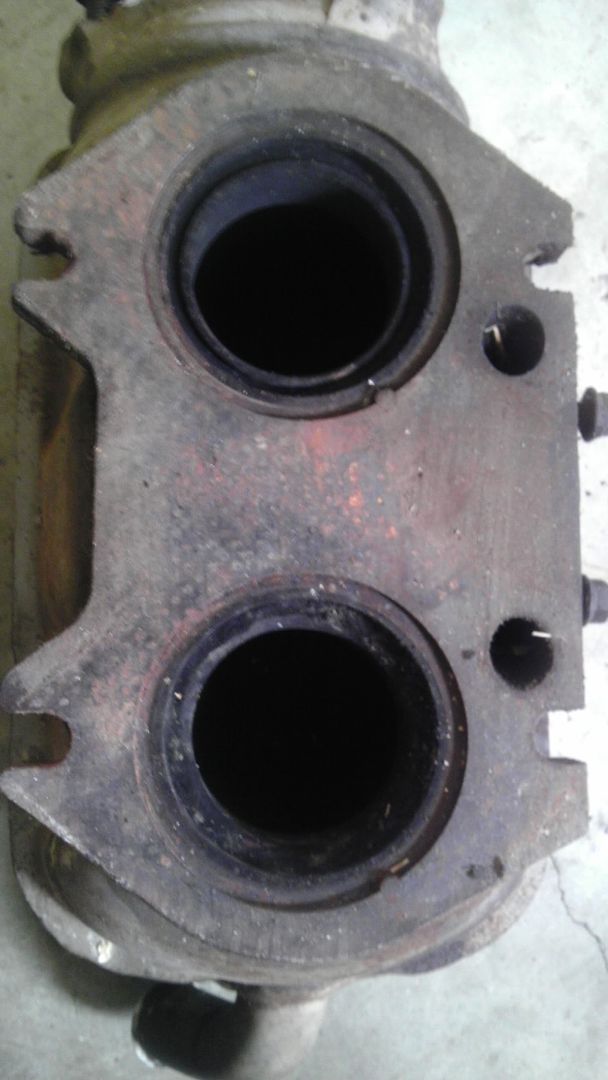
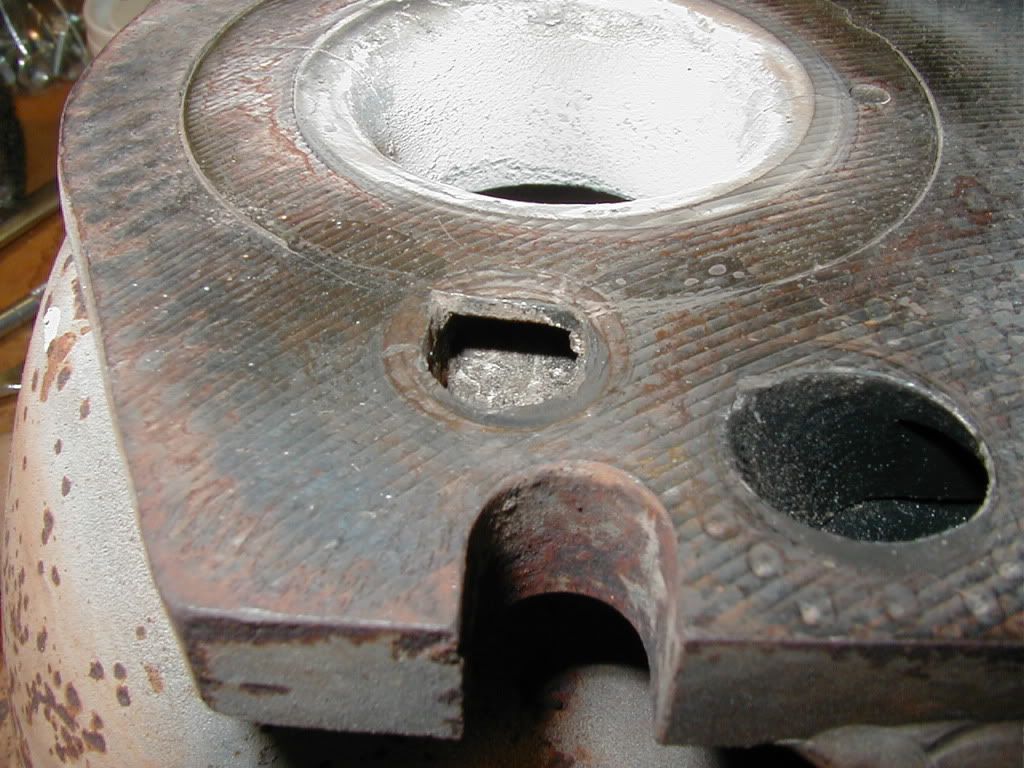
Only the rear insert protrudes... the front one is flush to the mounting face, & appears to have been welded in place at 3 points around the perimeter. (Mine also has the EGR hole adjacent to the front insert's rim at the bottom, but it does not effect the insert.)
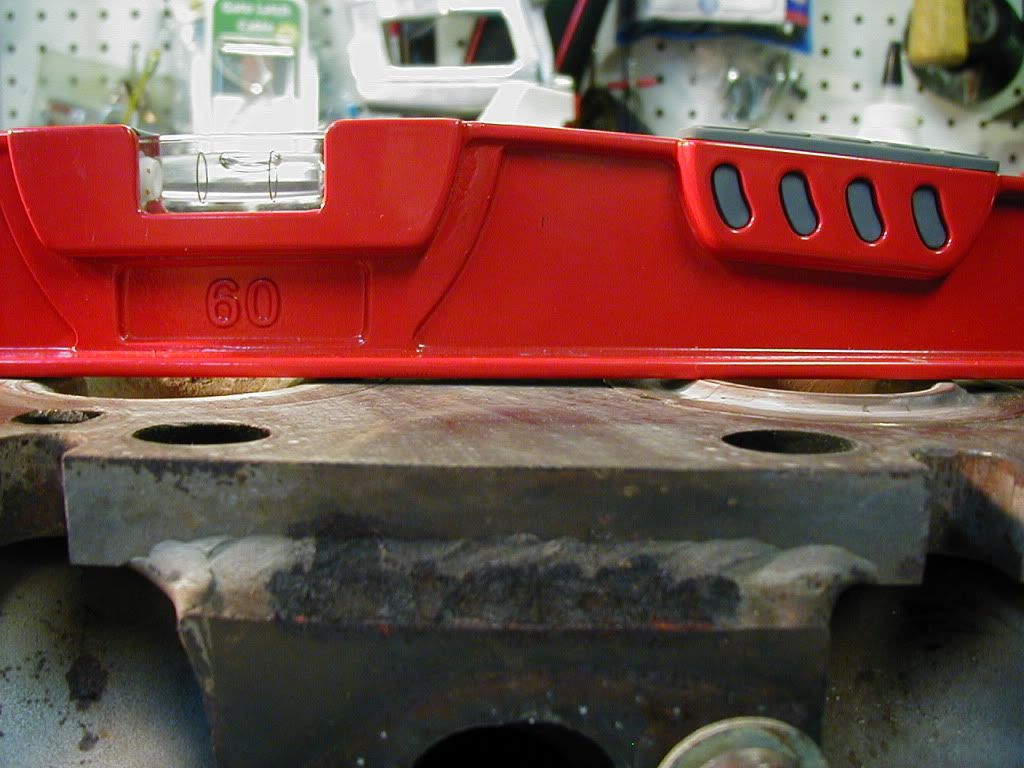
Closeup of the protrusion:

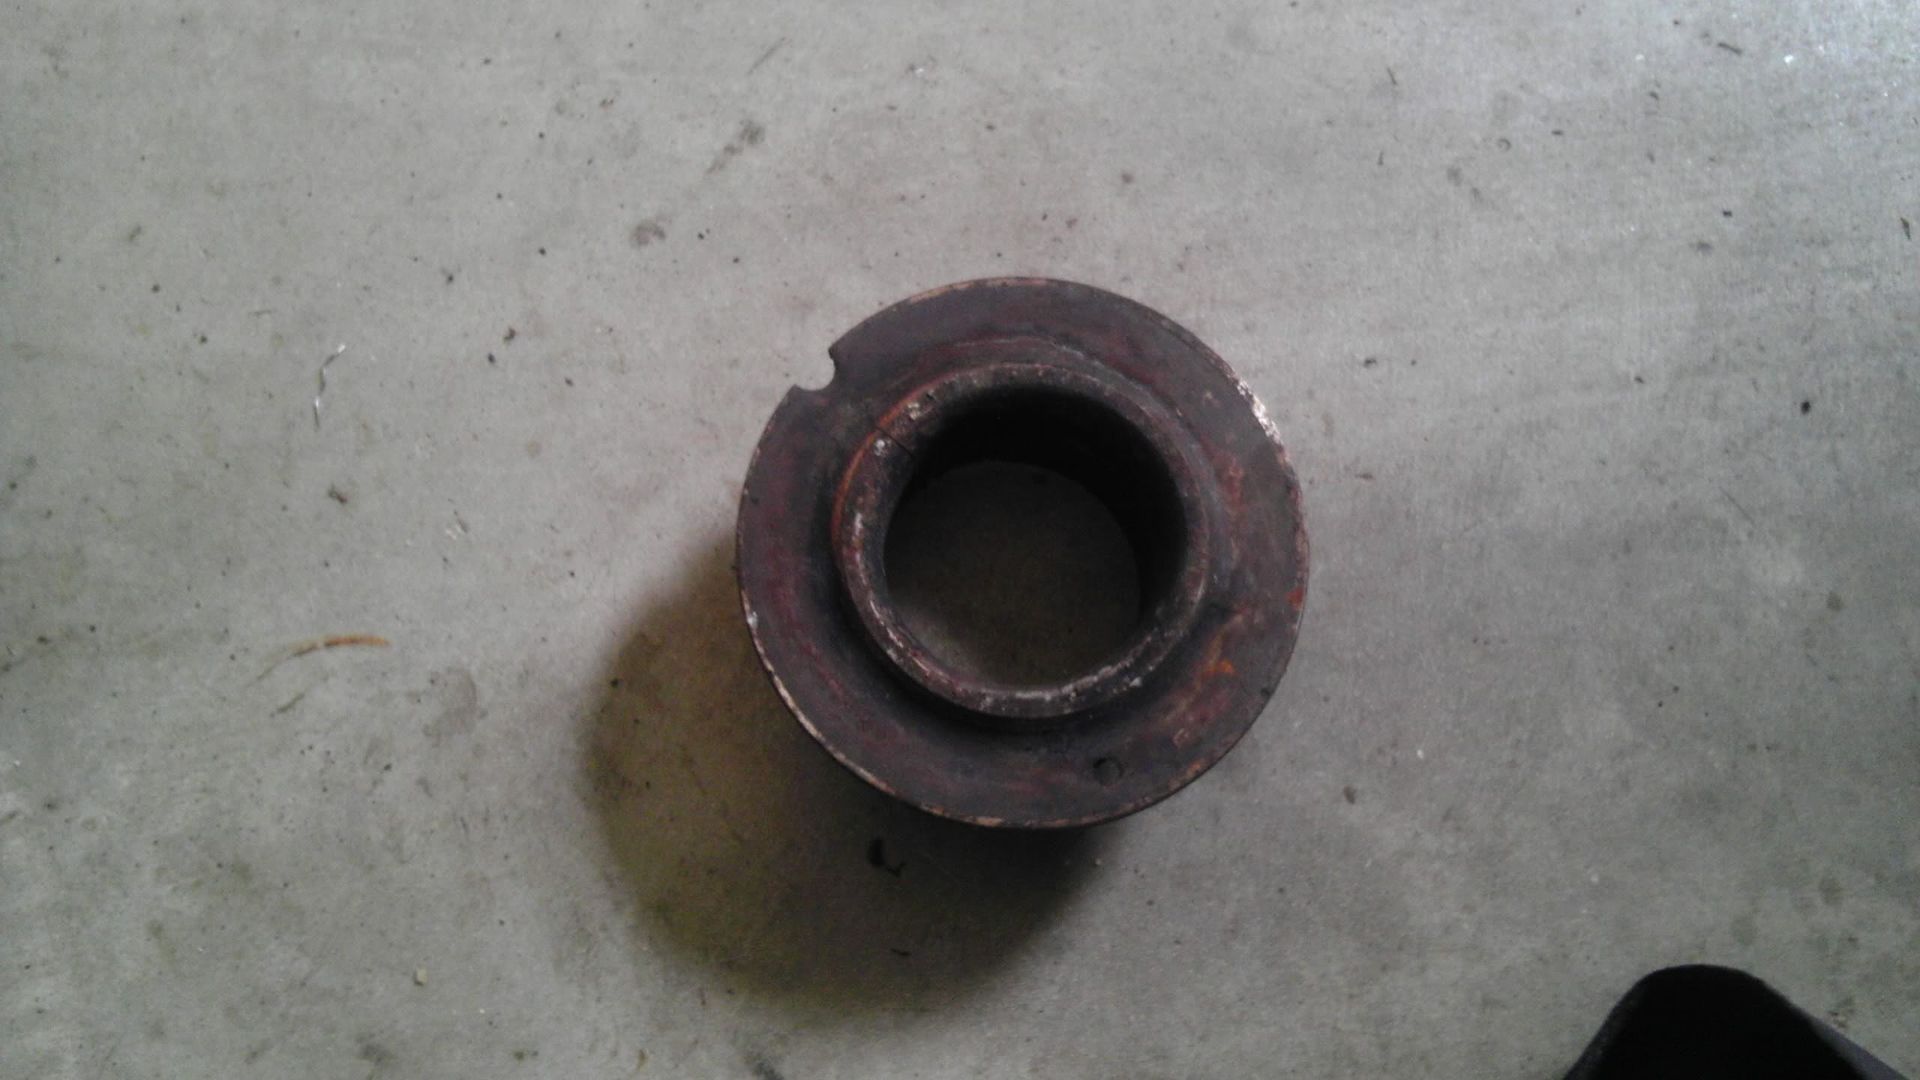
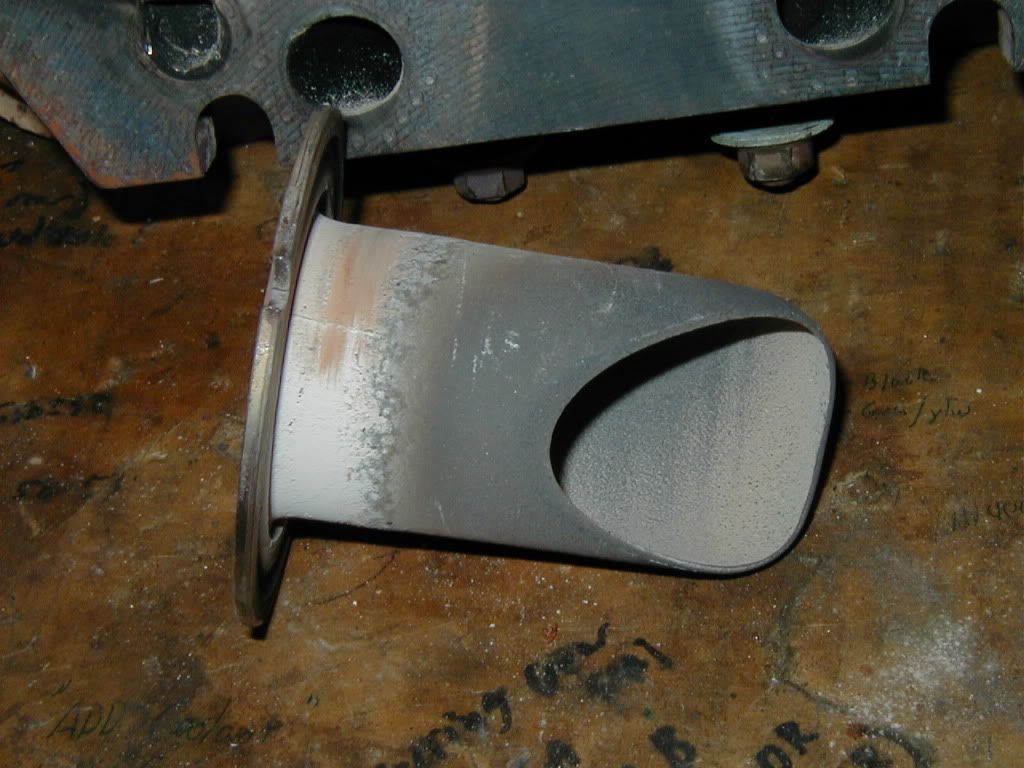
Shape of the rear insert:
I think this mismatch may have a lot to do with why I had an exhaust leak at the gasket; in effect, the TR was at different heights between the front and rear ports.
This is confusing, as I know this TR goes back with the car thru at least 2001 for sure. But I never had an exhaust leak before, and I passed smog with it a couple times since then.
Anyone else got pics? Maybe of a rear insert that doesn't protrude? Especially one they don't want any more?
So on yours, both the front and the rear inserts protrude thru the holes in the gasket to touch the rotor housings, it looks like. And both your front and rear inserts are removable.
Here's mine:
Only the rear insert protrudes... the front one is flush to the mounting face, & appears to have been welded in place at 3 points around the perimeter. (Mine also has the EGR hole adjacent to the front insert's rim at the bottom, but it does not effect the insert.)
Closeup of the protrusion:
Shape of the rear insert:
I think this mismatch may have a lot to do with why I had an exhaust leak at the gasket; in effect, the TR was at different heights between the front and rear ports.
This is confusing, as I know this TR goes back with the car thru at least 2001 for sure. But I never had an exhaust leak before, and I passed smog with it a couple times since then.
Anyone else got pics? Maybe of a rear insert that doesn't protrude? Especially one they don't want any more?
Thread Starter
Joined: Jun 2008
Posts: 8,376
Likes: 30
From: Chino Hills, CA
Anyone else? Buhler?
I have a remedy in mind, but it's a bit extreme. Don't want to go there unless I have to, but I just don't see the mismatch I currently have working 100% properly.
Wish I had at least ONE MORE set of pix from which to make a judgement.
I have a remedy in mind, but it's a bit extreme. Don't want to go there unless I have to, but I just don't see the mismatch I currently have working 100% properly.
Wish I had at least ONE MORE set of pix from which to make a judgement.
Joined: Mar 2001
Posts: 31,857
Likes: 3,243
From: https://www2.mazda.com/en/100th/
i'll have pics friday. i believe on that TR, which is a 13B one from an Rx4/5/repu the inserts are slip fit, and symmetrical. the guy did make an extra cut in the sleeves so you can install them pointing toward the rear, instead of the front
Trending Topics
Sin City Rotary
Joined: Sep 2009
Posts: 1,707
Likes: 2
From: Las Vegas
my thermo reactor is in the cabinet next to my SA ... there is also an engine on the ground
in front of one of choopacabra's car (also in my garage) that I am pretty sure still has it's
thermal reactor attached we could drop that one as well
Thread Starter
Joined: Jun 2008
Posts: 8,376
Likes: 30
From: Chino Hills, CA
Holler holler...
What I'm thinking of doing is cutting free the welded front insert in my original TR, cutting my spare rear insert down to proper internal shape, then using it in the front opening.
Either that, or I may try this with my spare (non-EGR) TR, by modding it to provide the EGR opening below the lip of the front , which seems to have a pretty simple geometry to it. That spare TR is in somewhat rougher condition overall, though.
But I just want to see a couple more examples before I go to that length, if possible.
Irreversible mods on semi-rare parts always bother me.
DD, does/did your gasket show signs of leaking around your front insert? What seems strange to me is that your front insert is tacked in. All the others I've saw (and in the pictures) have the 5mm or so pin locater in both openings. The very presence of the locator (to keep the insert from rotating) suggests that they should not be welded in. Otherwise, why would you need the locater?
Could the welded insert (and whole TR) be something specific to Calif smog cars? If so, could it also use a specific gasket, maybe designed to compensate for any differences and seal things up?
Could the welded insert (and whole TR) be something specific to Calif smog cars? If so, could it also use a specific gasket, maybe designed to compensate for any differences and seal things up?
Thread Starter
Joined: Jun 2008
Posts: 8,376
Likes: 30
From: Chino Hills, CA
The old gasket does show signs of leakage, yes; that's what got me to looking into this in the first place. The problem may or may not have been caused by this mismatch in port design - - I went through a lot of shenanigans cobbling together a functioning emissions system last time around (2008), and it may have been a case of misalignment of parts.
The front insert on my original TR has no locator pin that I can see; and the welding was clearly done before the gasket surface was milled, so it was from-the-factory that way. The welds only show up as a discoloration in the surface, and a discontinuity of the seam between the insert and the TR body.
Welded front inserts may have been an only-EGR (and therefore Cali-only) construction; in the 80 model year, the Cali TR had a different part number from all others, starting with VIN 568501 (my car is #597799).
If I had another Cali-spec TR (or photos of same) with the EGR passage to compare to, I could tell. Thus far, I've been unable to locate any.
Main thing I'm trying to solve is:
Did the original rear insert for my TR protrude like the replacement ones I have, or was it also flush, and I just didn't notice the difference when I replaced its fractured remains a dozen or so years ago? & is the mismatch important enough to matter (i.e., causes exhaust leaks).
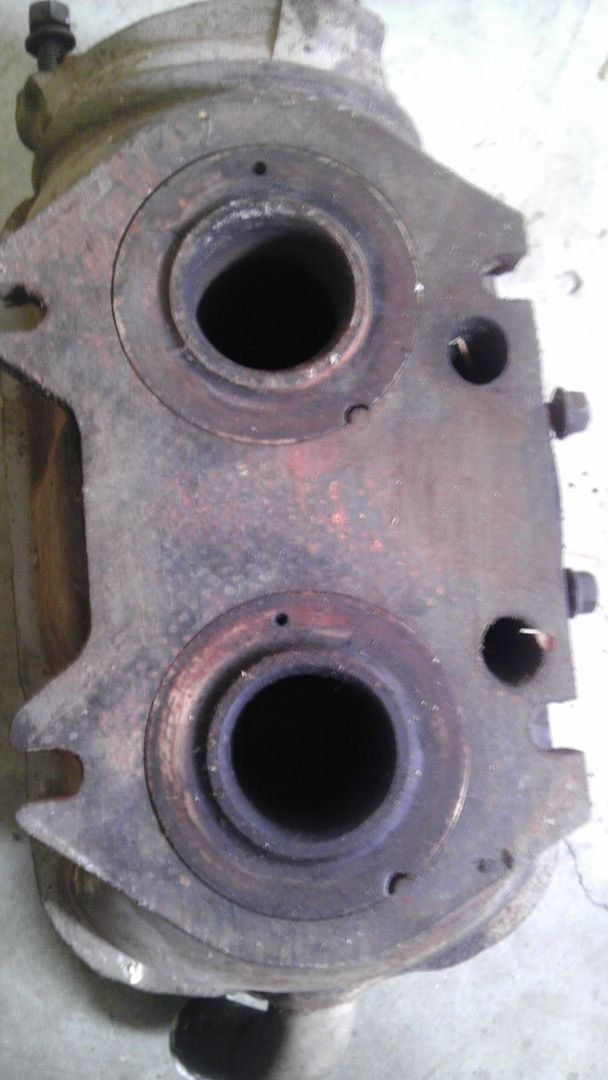
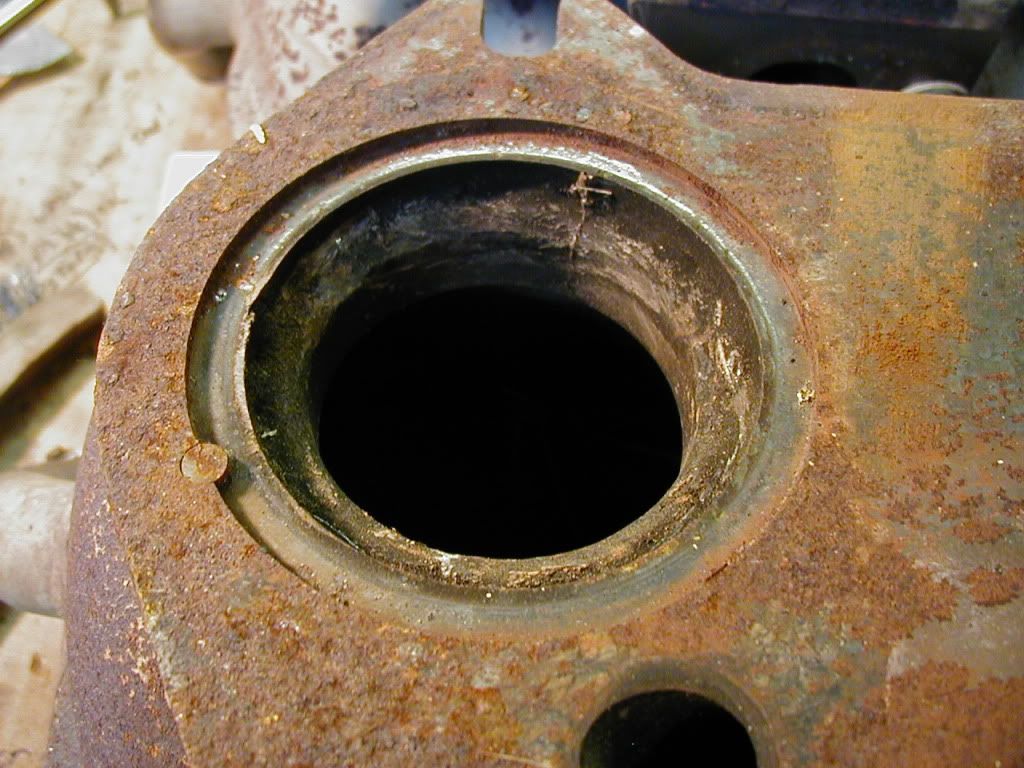
Pix showing lack of locator pin on front insert:
The front insert on my original TR has no locator pin that I can see; and the welding was clearly done before the gasket surface was milled, so it was from-the-factory that way. The welds only show up as a discoloration in the surface, and a discontinuity of the seam between the insert and the TR body.
Welded front inserts may have been an only-EGR (and therefore Cali-only) construction; in the 80 model year, the Cali TR had a different part number from all others, starting with VIN 568501 (my car is #597799).
If I had another Cali-spec TR (or photos of same) with the EGR passage to compare to, I could tell. Thus far, I've been unable to locate any.
Main thing I'm trying to solve is:
Did the original rear insert for my TR protrude like the replacement ones I have, or was it also flush, and I just didn't notice the difference when I replaced its fractured remains a dozen or so years ago? & is the mismatch important enough to matter (i.e., causes exhaust leaks).
Pix showing lack of locator pin on front insert:
So your gasket shows leakage around the rear? I was thinking the protruding lip of the insert goes inside the gasket and without a lip, the front was leaking. Your thinking you replaced the rear in 08 and now the lip may be holding the the whole thing out (misaligned) at the rear.
Not to be a tease, but I have what your looking for. My 1980 is a Calif smog queen. S/N 577104. She's even Tornado Silver! Problem is, the TR is still attached.....I'd guess, the rear remained unchanged, locating pin, lip and all. I'm also guessing the inserts were not available seperately, so no P/N difference to reference?
If you fit it up to the housings w/a gasket can you detect any gaps? What if you measure the amount of lip protrusion and compare it to the gasket thickness to check for possibile interferences? Break out the snag grinder?

Thread Starter
Joined: Jun 2008
Posts: 8,376
Likes: 30
From: Chino Hills, CA
So your gasket shows leakage around the rear? I was thinking the protruding lip of the insert goes inside the gasket and without a lip, the front was leaking. Your thinking you replaced the rear in 08 and now the lip may be holding the the whole thing out (misaligned) at the rear.
That's more or less my thinking, but more like the lip in the rear insert caused the whole TR to be misaligned, so the gasket never compressed properly. It's not like the massive TR flange is gonna flex at the torques used on the four mounting nuts, you know?
Not to be a tease, but I have what your looking for. My 1980 is a Calif smog queen. S/N 577104. She's even Tornado Silver! Problem is, the TR is still attached.....I'd guess, the rear remained unchanged, locating pin, lip and all. I'm also guessing the inserts were not available seperately, so no P/N difference to reference?
Too bad you don't have any pix of that TR unmounted, but it's nice to know that there's at least one more still in the universe.
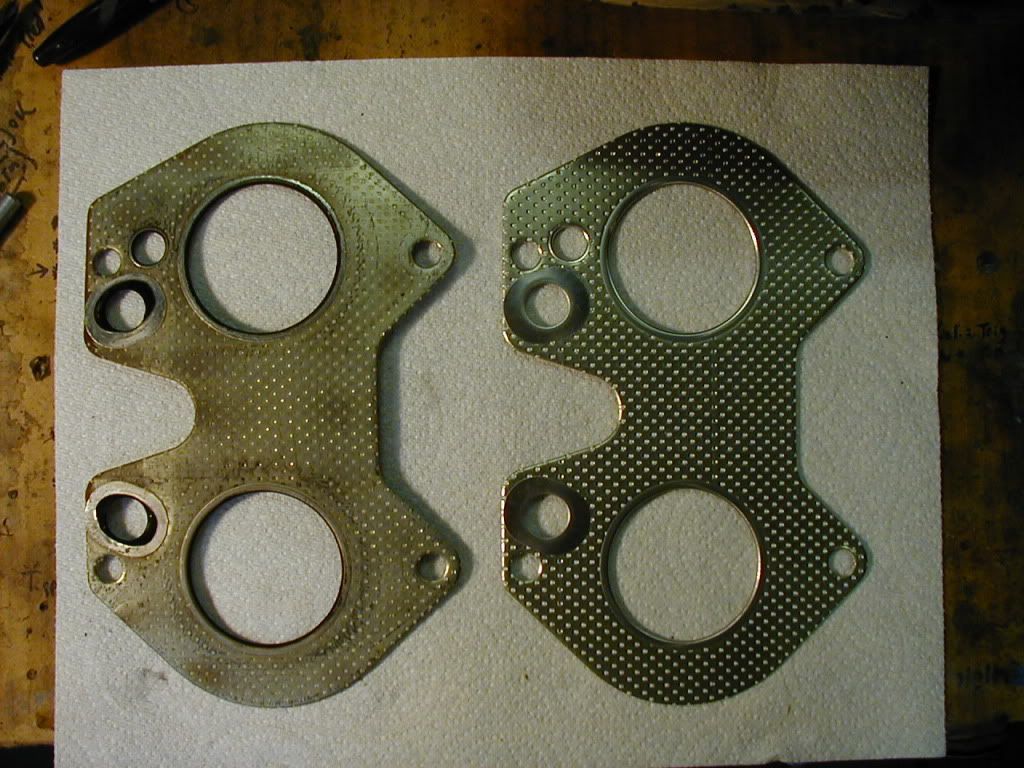
I'll post up a picture of both sides of the old gasket tonight... Appears to have been leaking at both ports, if I recall correctly.
These I took while disassembling:

Thread Starter
Joined: Jun 2008
Posts: 8,376
Likes: 30
From: Chino Hills, CA
Wouldn't hurt, though it checks out flat against a straightedge now.
You know, the flooding problem I had may have contributed to this, by causing early breakdown of the gasket.
You know, the flooding problem I had may have contributed to this, by causing early breakdown of the gasket.
Sin City Rotary
Joined: Sep 2009
Posts: 1,707
Likes: 2
From: Las Vegas
love the braaaap
Joined: Jul 2003
Posts: 3,771
Likes: 5
From: Bognor, Ontario
I'll get some pics of my 79's TR tonight, inserts and all. Its in pretty good shape and wasn't leaking when removed.
Looking at your original pictures, it looks as if there are machining marks across the sealing face that are also on your front insert, but not the rear. Looks almost like the front insert was stuck in place and someone trued up the surface with the front insert still in place.
Pics uploaded. Mine doesn't have the EGR port, but it is a 79.
Thread Starter
Joined: Jun 2008
Posts: 8,376
Likes: 30
From: Chino Hills, CA
Thanks for that; it seems to match what Jinkung posted earlier.
Question: is your front insert also short and straight, or does it look have the 'scoop' shape that the rear insert does?
Here's what's starting to build up as an overall picture:
The 79 TR had only one version, part number 8871-13-800B
The 80 TR used in the 49 states and Canada also lists the same number, & therefore was the same as 85rotarypower's known 79 unit pictured above.
The 80 TR for Cali only, and only from VIN 568501 on, changed the part number to 8344-13-800, which incorporated the EGR front port design.
Both examples other than mine with pix in this thread must be of 8871-13-800B. Which had inserts that were not welded, had index pins to prevent rotation, and both of which extended thru the gasket.
I have a 8344-13-800. Which appears to have had a welded & unpinned (don't need a pin if it's welded) front insert that did not extend thru the gasket... and for which the correct design of the rear insert remains an open question, as no one yet has a pic of one known to be unmolested.
Thread Starter
Joined: Jun 2008
Posts: 8,376
Likes: 30
From: Chino Hills, CA
Thanks for that info.
Here's my thinking at this point:
I can clean up my spare TR; it's pretty rusty, but seems mechanically sound enough. It's a non-Cali unit, but thus far I can see only two differences:
1) Removable inserts front and rear.
2) No passage under the lip of the front insert for the EGR.
SO, clean it up, cut the required passage, cut my spare (read as, second-best) rear insert to the proper length of a front insert, and count on the anti-rotation pin and pressure from the housing face to hold it in place to serve the EGR passage.
Relevant pictures
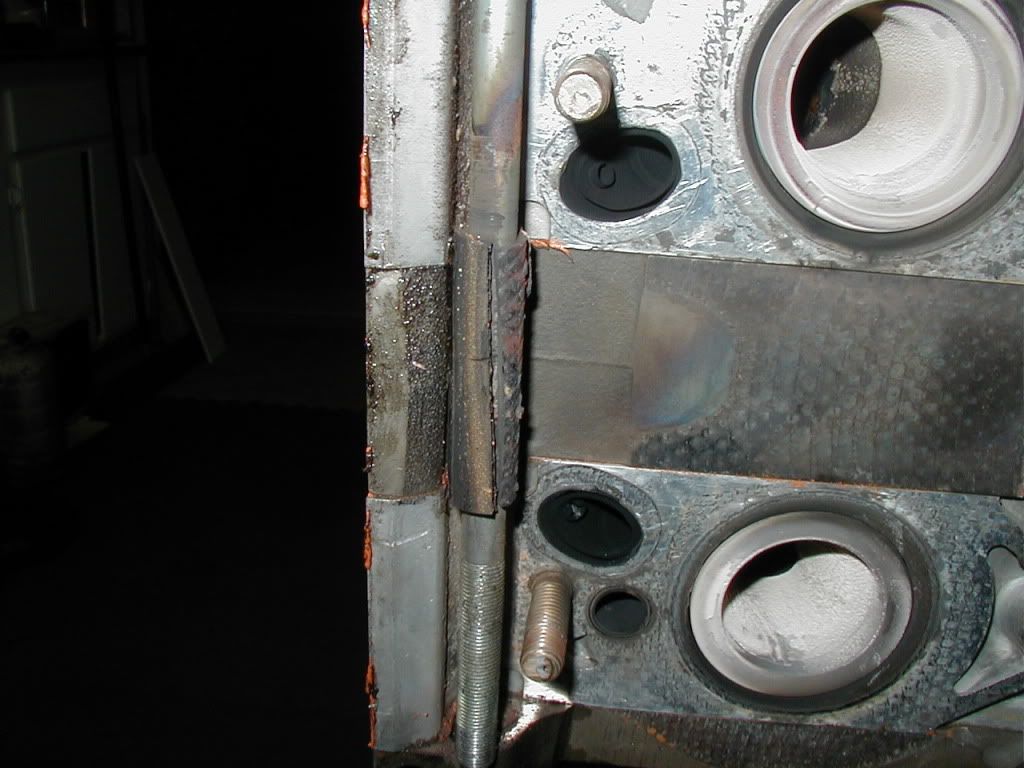
Spare TR on bottom, original Cali unit on top:
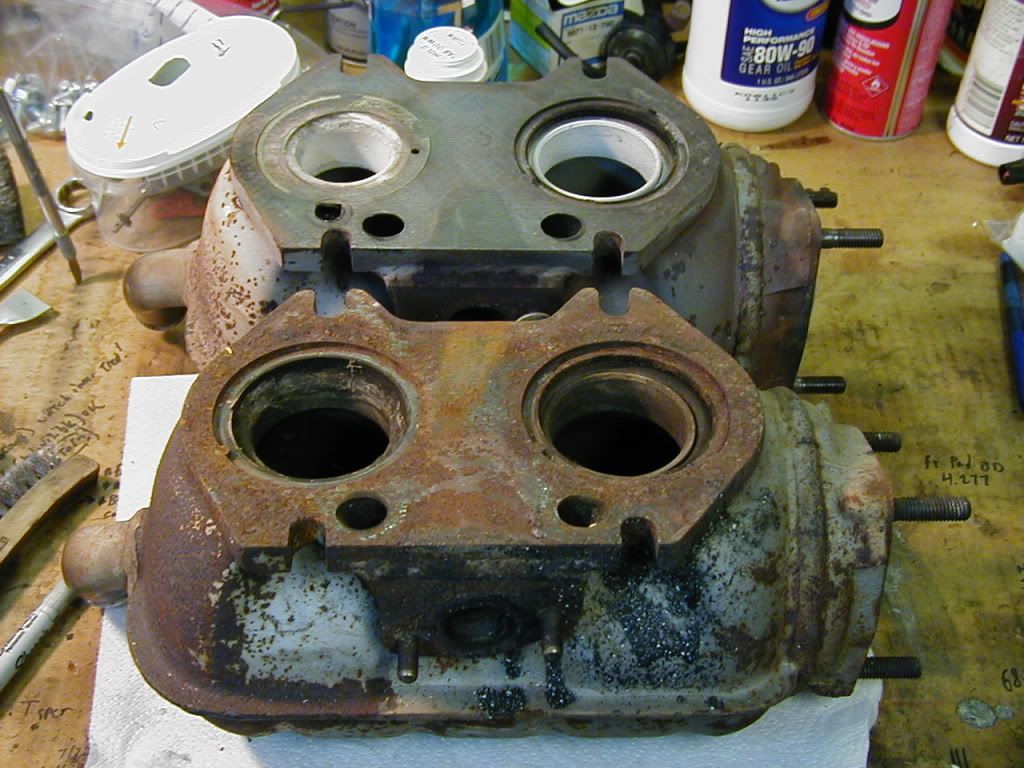
Front port on spare, non-Cali TR:
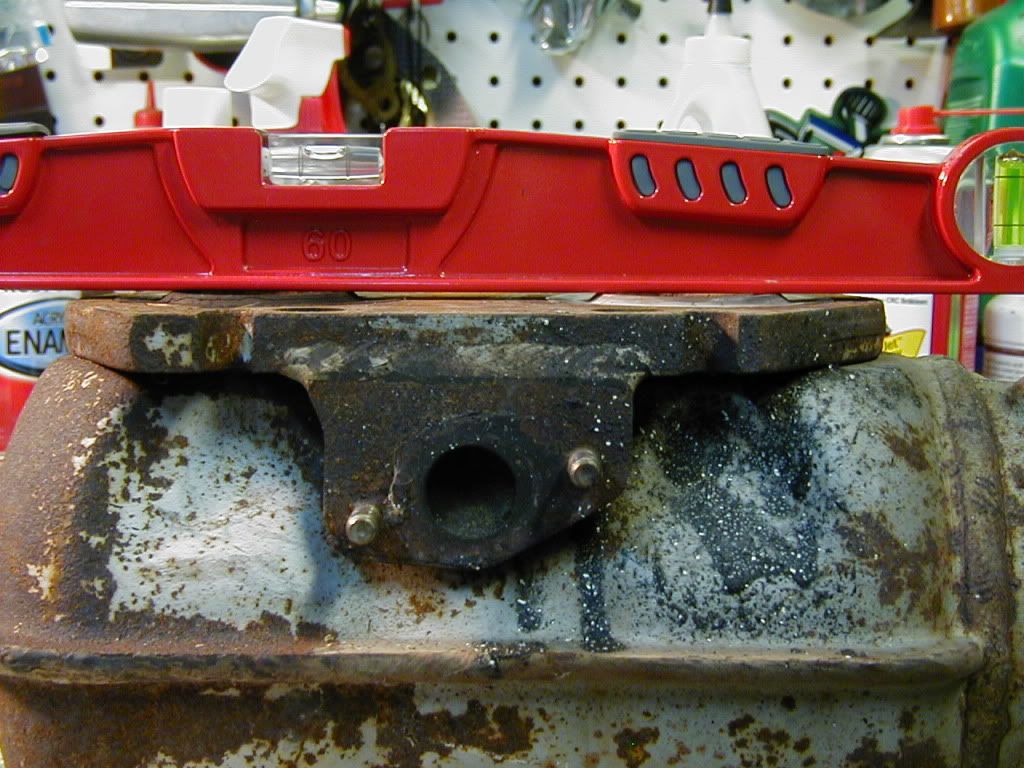
EGR passage on Cali TR; it goes straight into the chamber adjacent to the insert, constant depth of 0.365", straight sides - - essentially a milled slot:
My two inserts, with the intended victim showing where I'll cut it off:
Spot on spare TR where slot needs to be cut (black sharpie marked area):
This will let me use two inserts of the same protrusion:
The protrusion is slightly shorter than the gasket thickness, so there should stll be good - - but even - - pressure on the gasket this way:
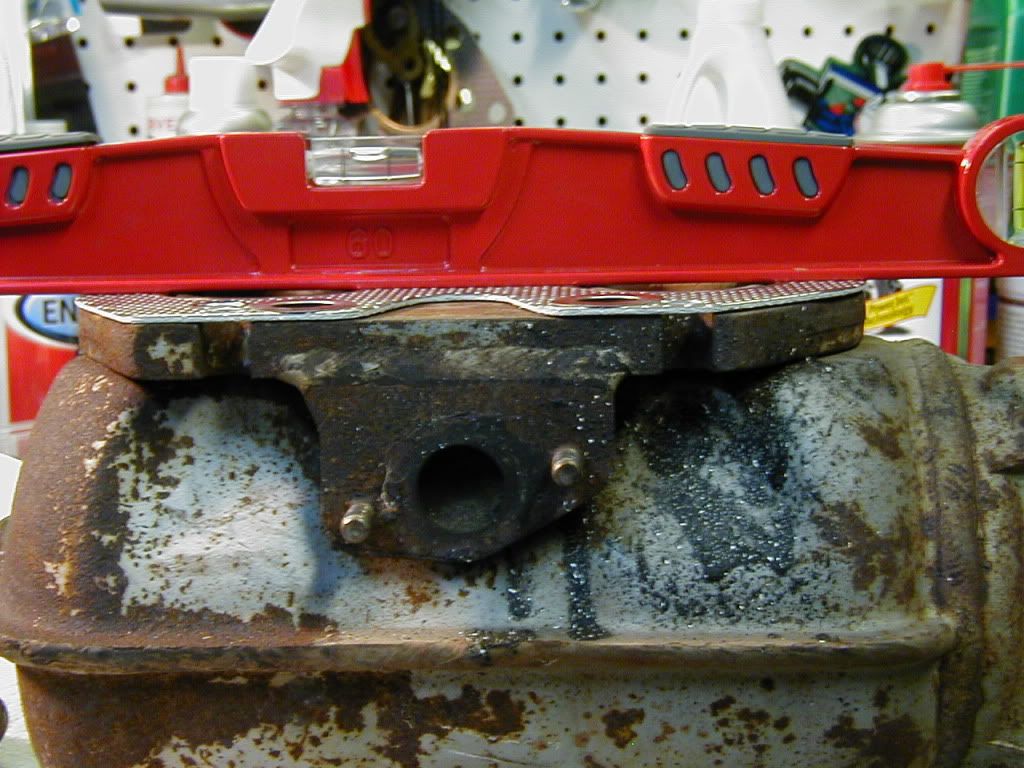
What was going on with my original TR: no protrusion on front means it couldn't meet the block straight on:
The best part of this plan is that at worst I'll end up out a couple of gaskets; my original TR remains unmodified, and if I can ever find a proper (non-protruding) insert for it, its preserved for future use. The spare insert is no great loss as it is in poorer condition than the one I've been using.
Does anyone see anything I'm missing that might foul me up here?
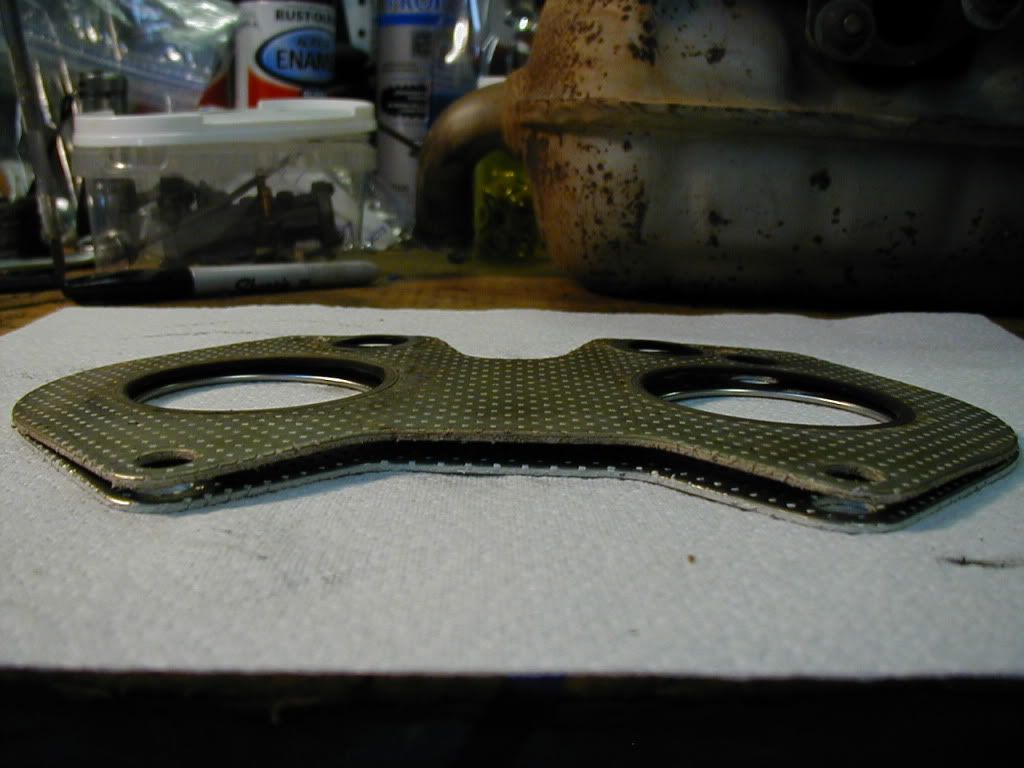
Oh, and for the record; here's the previous gasket compared to a new one, front and back. The gasket is actually warped, & it should never have had room enough to warp if it was properly clamped flat.

Could one of you gents with a removable front insert accurately measure its overall height for me? I'd like to make sure I'm cutting it to the proper length.
Here's my thinking at this point:
I can clean up my spare TR; it's pretty rusty, but seems mechanically sound enough. It's a non-Cali unit, but thus far I can see only two differences:
1) Removable inserts front and rear.
2) No passage under the lip of the front insert for the EGR.
SO, clean it up, cut the required passage, cut my spare (read as, second-best) rear insert to the proper length of a front insert, and count on the anti-rotation pin and pressure from the housing face to hold it in place to serve the EGR passage.
Relevant pictures
Spare TR on bottom, original Cali unit on top:
Front port on spare, non-Cali TR:
EGR passage on Cali TR; it goes straight into the chamber adjacent to the insert, constant depth of 0.365", straight sides - - essentially a milled slot:
My two inserts, with the intended victim showing where I'll cut it off:
Spot on spare TR where slot needs to be cut (black sharpie marked area):
This will let me use two inserts of the same protrusion:
The protrusion is slightly shorter than the gasket thickness, so there should stll be good - - but even - - pressure on the gasket this way:
What was going on with my original TR: no protrusion on front means it couldn't meet the block straight on:
The best part of this plan is that at worst I'll end up out a couple of gaskets; my original TR remains unmodified, and if I can ever find a proper (non-protruding) insert for it, its preserved for future use. The spare insert is no great loss as it is in poorer condition than the one I've been using.
Does anyone see anything I'm missing that might foul me up here?
Oh, and for the record; here's the previous gasket compared to a new one, front and back. The gasket is actually warped, & it should never have had room enough to warp if it was properly clamped flat.
Could one of you gents with a removable front insert accurately measure its overall height for me? I'd like to make sure I'm cutting it to the proper length.
Not to change your direction of travel, but what about just trimming off the protrusion on the #2 insert and installing it in your original TR. Both inserts would then be flat instead of both being lipped. Are you looking for the lips to help locate or seal it?
Thread Starter
Joined: Jun 2008
Posts: 8,376
Likes: 30
From: Chino Hills, CA
The shape of the insert precludes doing that; the protrusion is hollow underneath. Trimming it off would end up cutting straight thru it; it's quite thin in that area, possibly to allow it to flex when torqued to the block face.