Oil pan gasket replacement - se 13b
 01-13-06, 11:22 PM
#1
Certified Old Fart
Thread Starter
Join Date: Oct 2004
Location: Inkerman, On, South of Ottawa, the 2nd coldest Capital in the World
Posts: 490
Likes: 0
Received 0 Likes
on
0 Posts
Oil pan gasket replacement - se 13b
I've had a burning oil smell and a little smoke when sitting at a light or when I stop the car. It seemed to come from around the OMP, so today I took off the undertray and started her up.
The good new is it turns out the OMP is fine, bad news is its the oilpan gasket. The pan gets hot enough to make the oil residue smoke.
From what I can see, there no way to remove the pan without lifiting the engine up a good 4 - 6 ". Can anybody confirm this? Option 2 would be to disconnect the centre link of the steering. I really want to avoid that.

 01-14-06, 12:28 AM
#4
Certified Old Fart
Thread Starter
Join Date: Oct 2004
Location: Inkerman, On, South of Ottawa, the 2nd coldest Capital in the World
Posts: 490
Likes: 0
Received 0 Likes
on
0 Posts
ya just slop some RTV on there and pull down the idler arm from the frame, gives you enough room to pull it in and out.
01-14-06, 12:31 AM
#5
no clever remarks...
Join Date: Dec 2004
Location: WA State
Posts: 778
Likes: 0
Received 0 Likes
on
0 Posts
When I did mine I unbolted the idler arm and it gave me enough room to pull pan out and re-install. I used RTV only and have not had a problem. I also did not mess up my alignment when removing the idler arm. Good luck. Having a lift is great also!
01-14-06, 12:51 AM
#6
you cant pul out the pan wihtout removing the oil pick up tube. here's how I've done it in the past.
1. Be sure to have the car lifted on a jack stand.
2. Grab a floor jack and place a piece of 2x4 wood. Place it under the belll housing like in this picture. Well not quite, it has to be further back. Otherwise, you wont be able to remove the oil pan completely out of the car. I FUCKED UP in my last job and it caused me to loose time.
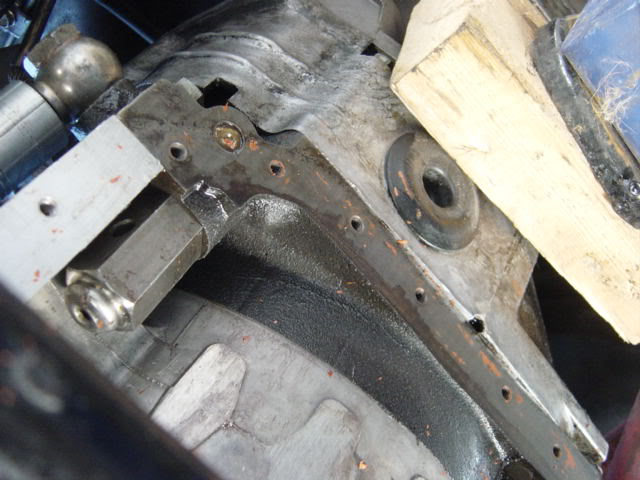
3. Grab your 14mm wrench or socket and unbolt the 4 bolts that holds the engine to the front engine mount. BE SURE THAT THE FLOOR JACK IS IN THE BELL HOUSING FOR SUPPORT.
4. Once all 4 14mm bolts are out, raise the floor jack as high as you can.
5. To prevent breaking the pan bolts, use 1/4 socket @ 10mm. It takes time but it is safe.
6. Get your 10mm wrench and remove the 2 oil pick up bolts and let it drop inside the oil pan.
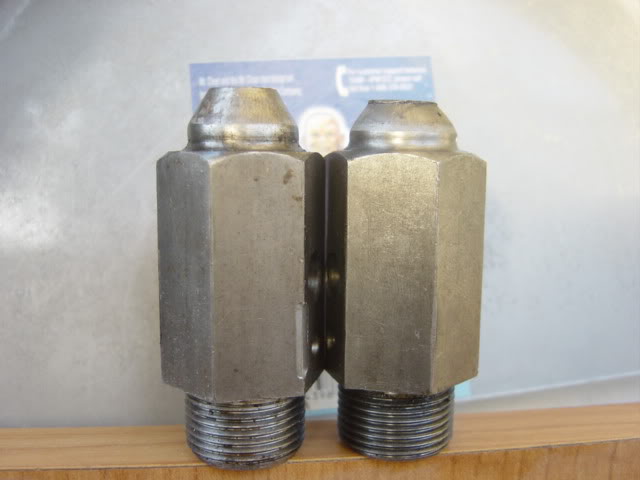
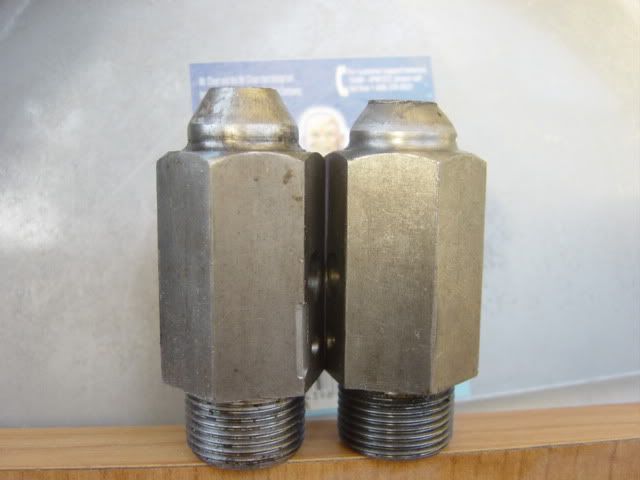
7. WHILE YOU'RE IN THIS STAGE, MODIFY your ROPR. I use 1 1/16 wrench which I grinded down the rounded end to fit the rear housing. The pix below is for illustration purposes only.
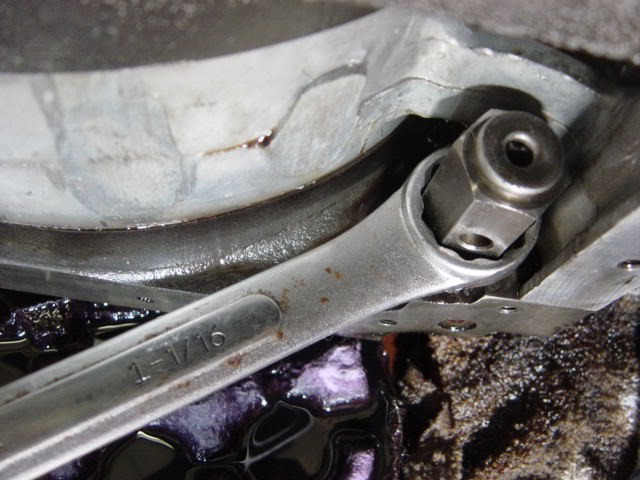
Again as in other topic, left is stock while right is 80 PSI & about 30 at idle. (slightly hammer the tip like the pix below)
8. Clean the oil pan with brake cleaner.
9. I highly recommend the red or copper high temp silicone and be sure to put silicone along with gasket on the oil pick up tube. You dont want it to be sucking air.
Installation is reverse. There are other ways to do it but removing the 4 bolts (front mount) will save you time in ligning up the engine.
1. Be sure to have the car lifted on a jack stand.
2. Grab a floor jack and place a piece of 2x4 wood. Place it under the belll housing like in this picture. Well not quite, it has to be further back. Otherwise, you wont be able to remove the oil pan completely out of the car. I FUCKED UP in my last job and it caused me to loose time.
3. Grab your 14mm wrench or socket and unbolt the 4 bolts that holds the engine to the front engine mount. BE SURE THAT THE FLOOR JACK IS IN THE BELL HOUSING FOR SUPPORT.
4. Once all 4 14mm bolts are out, raise the floor jack as high as you can.
5. To prevent breaking the pan bolts, use 1/4 socket @ 10mm. It takes time but it is safe.
6. Get your 10mm wrench and remove the 2 oil pick up bolts and let it drop inside the oil pan.
7. WHILE YOU'RE IN THIS STAGE, MODIFY your ROPR. I use 1 1/16 wrench which I grinded down the rounded end to fit the rear housing. The pix below is for illustration purposes only.
Again as in other topic, left is stock while right is 80 PSI & about 30 at idle. (slightly hammer the tip like the pix below)
8. Clean the oil pan with brake cleaner.
9. I highly recommend the red or copper high temp silicone and be sure to put silicone along with gasket on the oil pick up tube. You dont want it to be sucking air.
Installation is reverse. There are other ways to do it but removing the 4 bolts (front mount) will save you time in ligning up the engine.
01-21-06, 12:33 PM
#7
Full Member
Join Date: Mar 2003
Location: shreveport, LA
Posts: 63
Likes: 0
Received 0 Likes
on
0 Posts
If you pull the idler arm out of the bushings and let hang free, it will work. You will have to reach between the pan and engine with a 10mm wrench and remove the 2 pickup bolts and reverse the procedure when putting the pan back on. In other words, you have to pull the pickup tube with the pan but that is a lot easier than pulling the motor. The wood idea above is a great idea!!! Anything that raises the engine will just make it easier.
Trending Topics
01-21-06, 02:11 PM
#8
Full Member
Join Date: Oct 2005
Location: New York
Posts: 135
Likes: 0
Received 0 Likes
on
0 Posts
Hi Guys- I also have oil leaking form the pan but I bought a Felpro pan gasket- should I install this dry or with high temp silicone or just silicone with no gasket? thanks!
01-21-06, 05:53 PM
#10
Full Member
Join Date: Mar 2003
Location: shreveport, LA
Posts: 63
Likes: 0
Received 0 Likes
on
0 Posts
I've built MANY engines and you run a higher probability of leakage With the gasket. I use red high temp silicone without the gasket as long as the pan edges look as though they are not bent and will mount flush. The thickness of the gasket often leaves 2 less threads in the bottom of the rotor housings, esp if your year motor has the threadless tips on the bolts. I usually replace those with the ones that are threaded to the end.
01-21-06, 07:00 PM
#11
Originally Posted by nosferatu595
I've built MANY engines and you run a higher probability of leakage With the gasket. I use red high temp silicone without the gasket as long as the pan edges look as though they are not bent and will mount flush. The thickness of the gasket often leaves 2 less threads in the bottom of the rotor housings, esp if your year motor has the threadless tips on the bolts. I usually replace those with the ones that are threaded to the end.
I use sandpaper to make the surface rough. and wait couple of days or after several hours of running time prior to scraping the excess.
06-05-06, 08:07 PM
#12
hello, dont mean to thread jack but for the sake of starting another thread to pollute the searches and since i have a question basically the same topic i thought i might post here:
so i have a 1982 12A completely stock, never taken apart engine. i believe i have an oil pan gasket leak. i just rebuilt the omp (but that still seems to be leaking too.. maybe the gasket wasnt put on right). is it the same instructions for the oil pan for my 12a as stated above? do i even have an oil pickup tube? yea im a newb... but we all learn sometime right? also for the external gasket on the omp, can i rtv that as well? or am i safer to order another gasket? thanks for any help!
so i have a 1982 12A completely stock, never taken apart engine. i believe i have an oil pan gasket leak. i just rebuilt the omp (but that still seems to be leaking too.. maybe the gasket wasnt put on right). is it the same instructions for the oil pan for my 12a as stated above? do i even have an oil pickup tube? yea im a newb... but we all learn sometime right? also for the external gasket on the omp, can i rtv that as well? or am i safer to order another gasket? thanks for any help!
06-06-06, 05:06 PM
#19
Certified Old Fart
Thread Starter
Join Date: Oct 2004
Location: Inkerman, On, South of Ottawa, the 2nd coldest Capital in the World
Posts: 490
Likes: 0
Received 0 Likes
on
0 Posts
Also don't discount using the cardboard from a cereal box as a gasket. I've made more than one gasket over the years out of the stuff.
I should qualify the above, and mention that ceral box probably wouldn't work for something exposed to oil though.
I should qualify the above, and mention that ceral box probably wouldn't work for something exposed to oil though.
06-08-06, 09:42 AM
#21
wheres the water goin?
iTrader: (9)
Join Date: May 2005
Location: Nor Cal
Posts: 1,586
Likes: 0
Received 0 Likes
on
0 Posts
Originally Posted by wackyracer
you cant pul out the pan wihtout removing the oil pick up tube. here's how I've done it in the past.
1. Be sure to have the car lifted on a jack stand.
2. Grab a floor jack and place a piece of 2x4 wood. Place it under the belll housing like in this picture. Well not quite, it has to be further back. Otherwise, you wont be able to remove the oil pan completely out of the car. I FUCKED UP in my last job and it caused me to loose time.

3. Grab your 14mm wrench or socket and unbolt the 4 bolts that holds the engine to the front engine mount. BE SURE THAT THE FLOOR JACK IS IN THE BELL HOUSING FOR SUPPORT.
4. Once all 4 14mm bolts are out, raise the floor jack as high as you can.
5. To prevent breaking the pan bolts, use 1/4 socket @ 10mm. It takes time but it is safe.
6. Get your 10mm wrench and remove the 2 oil pick up bolts and let it drop inside the oil pan.
7. WHILE YOU'RE IN THIS STAGE, MODIFY your ROPR. I use 1 1/16 wrench which I grinded down the rounded end to fit the rear housing. The pix below is for illustration purposes only.

Again as in other topic, left is stock while right is 80 PSI & about 30 at idle. (slightly hammer the tip like the pix below)
8. Clean the oil pan with brake cleaner.
9. I highly recommend the red or copper high temp silicone and be sure to put silicone along with gasket on the oil pick up tube. You dont want it to be sucking air.
Installation is reverse. There are other ways to do it but removing the 4 bolts (front mount) will save you time in ligning up the engine.
1. Be sure to have the car lifted on a jack stand.
2. Grab a floor jack and place a piece of 2x4 wood. Place it under the belll housing like in this picture. Well not quite, it has to be further back. Otherwise, you wont be able to remove the oil pan completely out of the car. I FUCKED UP in my last job and it caused me to loose time.
3. Grab your 14mm wrench or socket and unbolt the 4 bolts that holds the engine to the front engine mount. BE SURE THAT THE FLOOR JACK IS IN THE BELL HOUSING FOR SUPPORT.
4. Once all 4 14mm bolts are out, raise the floor jack as high as you can.
5. To prevent breaking the pan bolts, use 1/4 socket @ 10mm. It takes time but it is safe.
6. Get your 10mm wrench and remove the 2 oil pick up bolts and let it drop inside the oil pan.
7. WHILE YOU'RE IN THIS STAGE, MODIFY your ROPR. I use 1 1/16 wrench which I grinded down the rounded end to fit the rear housing. The pix below is for illustration purposes only.
Again as in other topic, left is stock while right is 80 PSI & about 30 at idle. (slightly hammer the tip like the pix below)
8. Clean the oil pan with brake cleaner.
9. I highly recommend the red or copper high temp silicone and be sure to put silicone along with gasket on the oil pick up tube. You dont want it to be sucking air.
Installation is reverse. There are other ways to do it but removing the 4 bolts (front mount) will save you time in ligning up the engine.
not meaning to highjack but i was trying to find the thread that you started about modding the ROPR, but now its right in front of me!