
Official vented hood update thread

Airflow over the nose of the car is going to want to "curl" into the open vent since its past the point of "impact" at the back edge of the front bumper and front edge of the header panel. It's following the curve of the hood past that header. The purpose of a dam on the 427 Vettes and on the back of 70's Trans-Ams is the same. If they aren't there, the airflow tries to follow the countour of the sheetmetal and "curls", creating drag and turbulence. With the airdam, the airflow is kicked up, still creating some turbulence, but it no longer tries to follow the sheetmetal and so there is reduced drag.
For the vented hood, efficient airflow through the vents is going to be compromised by the over-the-bumper-airflow trying to "curl" into the "sudden" opening along a flat edge at the vents, irregardless of the airflow force coming through those vents. A 427-style airdam will kick the airflow up and the airflow coming from the vents can carry and blend that air slightly away from the car increasing the efficiency of both airstreams...
Please re-consider the "no vent" idea....
Thread Starter
add to cart
Joined: Jun 2002
Posts: 4,181
Likes: 0
From: Saskatoon, SK & Montreal, PQ
Originally posted by mar3
Airflow over the nose of the car is going to want to "curl" into the open vent since its past the point of "impact" at the back edge of the front bumper and front edge of the header panel.
Airflow over the nose of the car is going to want to "curl" into the open vent since its past the point of "impact" at the back edge of the front bumper and front edge of the header panel.
Last edited by Manntis; Jun 7, 2004 at 10:17 AM.
Driving through fog or a light rain doesn't exhibit the behavior of the air/water mass as you describe...lacking an actual wind tunnel, that real-world observation and the shape of the car itself compared to say an 80's Vette or Fiat X-1/9 is where I draw these conclusions...
RX-7 Alumni
Joined: Oct 2002
Posts: 1,140
Likes: 1
From: Spacecenter Houston
The nose and hood of the car act like an airfoil producing a low pressure distribution over the hood area.
Look at this pic and you'll see what I mean. No it's not an RX-7 shown but the principles are the same.
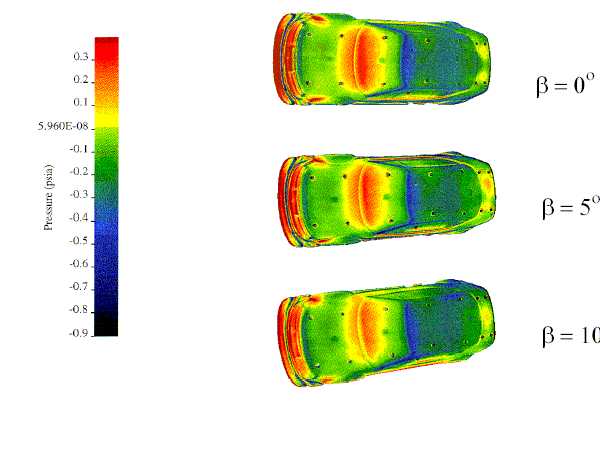
The light green areas are slightly less pressure than ambient. With the under hood pressures being higher, the air would be sucked out of the engine bay via the vent--just like Manntis pointed out.
This is much more complicated than just the free flow around a body, there is a heated, higher pressure stream of air flowing out of the vent.
I also see what Mar3 is trying to say. At the very front edge of the vent, the air from the free stream and vent stream are meeting. The best case would be for the two streams to meet like the tail of an airfoil. Making the freestream go in the same direction as the vent stream could be desirable to pull more air out of the vent. To actually prove or disprove would be very expensive and the difference would be hard to measure. So go with what looks better or is easier to manufacture (cost).
Scott
Look at this pic and you'll see what I mean. No it's not an RX-7 shown but the principles are the same.
The light green areas are slightly less pressure than ambient. With the under hood pressures being higher, the air would be sucked out of the engine bay via the vent--just like Manntis pointed out.
This is much more complicated than just the free flow around a body, there is a heated, higher pressure stream of air flowing out of the vent.
I also see what Mar3 is trying to say. At the very front edge of the vent, the air from the free stream and vent stream are meeting. The best case would be for the two streams to meet like the tail of an airfoil. Making the freestream go in the same direction as the vent stream could be desirable to pull more air out of the vent. To actually prove or disprove would be very expensive and the difference would be hard to measure. So go with what looks better or is easier to manufacture (cost).
Scott
#include <stdhdr.h>


Joined: Aug 2001
Posts: 375
Likes: 3
From: Allen, Tx
A simple aerodynamic study would be all that is really needed. A quick cruise down the highway with some tufts of thread taped to the hood would do. It's worked for NASA for decades now. If nothing else I volunteer myself and FrankenRex to do it.
Originally posted by dfwrx7
A simple aerodynamic study would be all that is really needed. A quick cruise down the highway with some tufts of thread taped to the hood would do. It's worked for NASA for decades now. If nothing else I volunteer myself and FrankenRex to do it.
A simple aerodynamic study would be all that is really needed. A quick cruise down the highway with some tufts of thread taped to the hood would do. It's worked for NASA for decades now. If nothing else I volunteer myself and FrankenRex to do it.
Though remember mine's an SA22C. I don't *think* that the aerodynamics vary significantly from an FB... The profile's about the same, and the hood and header panel exactly the same.
I think I'm actually going to try making a vented hood out of one of my spares. A little creative welding and fiberglas work and...

Being as stubborn as Manntis, I'm going to go one step further. I was interested in this hood dealio because my own hood on Furious is finished. It has extensive hail damage and deep rust on a character line from sitting at Teh's house unprotected too long before I bought her. That and the clear coat on the hood is completely gone...anyhoos, I'm going to get plastic rod and heavy fabric strips from the local Hancock Fabrics or Michael's Hobby Store this weekend. I will then construct pedestals of various heights with the fabric strips attached to the tops of the pedestals which I will glue to the hood's surface in a nice "x" pattern across the areas in question. I'll have a couple of my homeys take some pics of the "test hood" from their car as we go down the interstate at 40, 50, 60, 70 and then 80 mph to see what the strips do and see what the Truth is. And the Truth ain't about an imminent threat here, either...
Last edited by mar3; Jun 9, 2004 at 10:21 PM.
Neat. Have at least one vide camera running. One inside the car might not be a bad idea either.
If Tim (dfwrx7) isn't otherwise occupied this weekend, I'd still like to just do the "tape streamers to the hood" test.
"Furious"?
If Tim (dfwrx7) isn't otherwise occupied this weekend, I'd still like to just do the "tape streamers to the hood" test.
"Furious"?
Tennis, anyone
Joined: Jun 2001
Posts: 1,803
Likes: 4
From: SoCal.
Run whatever tests you guys need to, won't matter.
for some reason he just don't like the idea of the small bump/airdam leading the vents..i'm very sure that with the bump/airdam, underhood heat vents the same without one.. at least measuring the difference is beyond me. no one will tell the difference.. as far as designing goes,,, the vent lines alone, too simple. add 2 more lines, leading, hell try trailing, but something, it's strickly for looks, leading...IMO.
for some reason he just don't like the idea of the small bump/airdam leading the vents..i'm very sure that with the bump/airdam, underhood heat vents the same without one.. at least measuring the difference is beyond me. no one will tell the difference.. as far as designing goes,,, the vent lines alone, too simple. add 2 more lines, leading, hell try trailing, but something, it's strickly for looks, leading...IMO.
Thread Starter
add to cart
Joined: Jun 2002
Posts: 4,181
Likes: 0
From: Saskatoon, SK & Montreal, PQ
getting there... but it's going a lot slower than I'd planned on. This being summer there's a lot of people bringing in their boats and canoes to be patched, which is distracting my glassman.
That's Nice!!!!
Joined: Sep 2003
Posts: 592
Likes: 0
From: Wisconsin
by the time your hood get done ill have mine finished. i just got my spare hood the other day and i was going to start on it today. fiberglass isnt that hard to do. you just have to have the time and money for the materials. it should take abot 3-4 days to complete one. well maybe ill do mine first then post some pics for you guys.
Tennis, anyone
Joined: Jun 2001
Posts: 1,803
Likes: 4
From: SoCal.
about 1 week is what it took me to make a complete fibre glass sub-structure and pour the hood 'skin'.
i'll admit, i don't like how it turned out. i was going for a lite hood,, around 4 1/2 - 5 lbs. not ridgid enough for me.
i may try it again.. it was a learning thing i write it up as..
i'll sell it, cheap !
i'll admit, i don't like how it turned out. i was going for a lite hood,, around 4 1/2 - 5 lbs. not ridgid enough for me.
i may try it again.. it was a learning thing i write it up as..
i'll sell it, cheap !
Tennis, anyone
Joined: Jun 2001
Posts: 1,803
Likes: 4
From: SoCal.
I guess i could seperate the sub-structure from the 'skin'
and use them as a mold or buck. then try it again. but my casting of both pieces turned out perfect. i also think i need to lay down at least 4 layers of cloth too, be-it sea glass cloth or carbon cloth.
and use them as a mold or buck. then try it again. but my casting of both pieces turned out perfect. i also think i need to lay down at least 4 layers of cloth too, be-it sea glass cloth or carbon cloth.
That's Nice!!!!
Joined: Sep 2003
Posts: 592
Likes: 0
From: Wisconsin
i just did 2 layers. a layer of thick stingy layer then a nice layer of the carbon cloth. it was really light. i liked it very much. i used alot of the resin and hardener just to make sure the strenght was there. i finished it up with a coat of flat black sealer primer then flat black chromabase paint with my paint gun. day later i put it on. it didnt look too bad. i sold it though. it was worth the experience.
manntis, what kind of vents are going in this hood? and do you have any pics of them? i want to see. maybe ill try to match them with my glassing skills.
manntis, what kind of vents are going in this hood? and do you have any pics of them? i want to see. maybe ill try to match them with my glassing skills.
Originally posted by MarkPerez
Run whatever tests you guys need to, won't matter.
for some reason he just don't like the idea of the small bump/airdam leading the vents..i'm very sure that with the bump/airdam, underhood heat vents the same without one.. at least measuring the difference is beyond me. no one will tell the difference.. as far as designing goes,,, the vent lines alone, too simple. add 2 more lines, leading, hell try trailing, but something, it's strickly for looks, leading...IMO.
