
Looking for installed pics of resppeed big brake kit


Trending Topics
Thread Starter
Senior Member
Joined: Jun 2003
Posts: 367
Likes: 0
From: Virginia
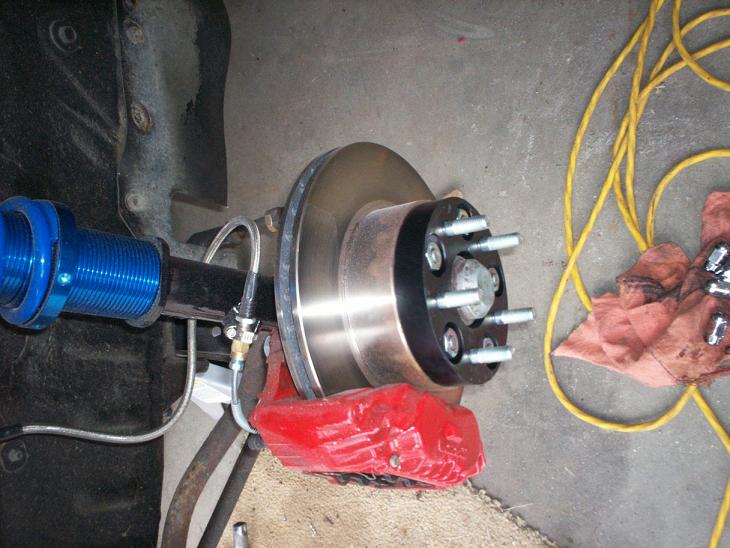
I am trying to find out if I have installed the calipers right. I don't have hubs yet so I'm waiting on them. Mainly I am looking at those zinc spacers that they provided and location o fhtbe nuts and bolts on that backside. I will try to take a pic later on today.


Yes the brackets are on incorrectly.
The round section of the bracket should be on the opposite side of the gold spacers and caliper ears.
-billy
love the braaaap
Joined: Jul 2003
Posts: 3,771
Likes: 5
From: Bognor, Ontario
The spacers I had custom made out of 1" thick mild steel. My dad made them for me actually, he works at a tool and die shop and runs a wire EDM, so everything is very accurate. Some parts were CNC machined though. I just used stock TII wheel studs in the spacers and got some low profile lug nuts to bolt them on. They are a little heavy, but very strong. The spacers are also an adapter. I had a set of nice 5 spoke wheels laying around that I couldn't sell because of the bolt pattern, so I figured if i had to have spacers made anyway, why not adapt them to the bolt pattern of the wheels I have.
Unfortunately I don't have any better pics of the coilovers right now. This is the race kit though and its not a "bolt on" installation. The more expensive kit that respeed sells is a bolt on kit, no welding required. But as far as installation of the race kit, if you know how to weld and use a grinder properly, you can pretty much install the race kit. You do need a 220V welder though to get proper penetration of the weld for the lower perch. The race kit is a lot more adjustable though, the lower perch can be welded on in any position you want, and the actual threaded sleeve is longer, making for more adjustment. At least I think its longer.
The wheels are Sport Edition E1, 16x7 all around with BFG G-Force Sport 205/45R16 tires.
Last edited by 85rotarypower; Feb 14, 2008 at 01:25 PM.

That looks correct for the driver side. I also did a screen shot for you. This shows the driver side mounting as well.
NOTICE* The light blue round spots are the "head" of a top hat threaded bung. They ALWAYS go on the opposite side than the side the bolt threads in from.
-billy
NOTICE* The light blue round spots are the "head" of a top hat threaded bung. They ALWAYS go on the opposite side than the side the bolt threads in from.
-billy
Thread Starter
Senior Member
Joined: Jun 2003
Posts: 367
Likes: 0
From: Virginia
I'll be sure to change everything around once I get the other calipers painted and post a final approval. I think it's time for Respeed to change there directions to reflect there product change.

Are those all custom?
love the braaaap
Joined: Jul 2003
Posts: 3,771
Likes: 5
From: Bognor, Ontario
The flex lines I used are FB stainless steel braided flex lines from Mazdatrix. Nothing special with the way they are routed up to the "flange" on the strut housing. After that I ran the line around the strut housing to a metric brake line union which I clamped to a small flat bar I welded to the strut housing. From that point I used a 6" section of 1/4" hard line from the union to the caliper which happens to have a taper in the bottom of the threaded bore to accept a hard line fitting. Its not a standard fitting though. I believe its a metric bubble fitting, which is kinda hard to come by. It took the guy at the parts store about half an hour to dig one up.
If anyone else has any questions about my setup, feel free to PM me from now on. I've threadjacked the OP thread enough already.
If anyone else has any questions about my setup, feel free to PM me from now on. I've threadjacked the OP thread enough already.
Thread Starter
Senior Member
Joined: Jun 2003
Posts: 367
Likes: 0
From: Virginia
Allright guys I appreciate all of your help. I gotr everything on there correctly now. All I have to do now is wait for the hubs to come in and slap on the sloted rotors but now it looks like yall have convinced me to the coil over setup. I know it didn't take much but when I saw the bolt on kit I was sold even though my wife wasn't. These are the last pics I am posting for this thread so you can hijack the thread now.

