When you click on links to various merchants on this site and make a purchase, this can result in this site earning a commission. Affiliate programs and affiliations include, but are not limited to, the eBay Partner Network.
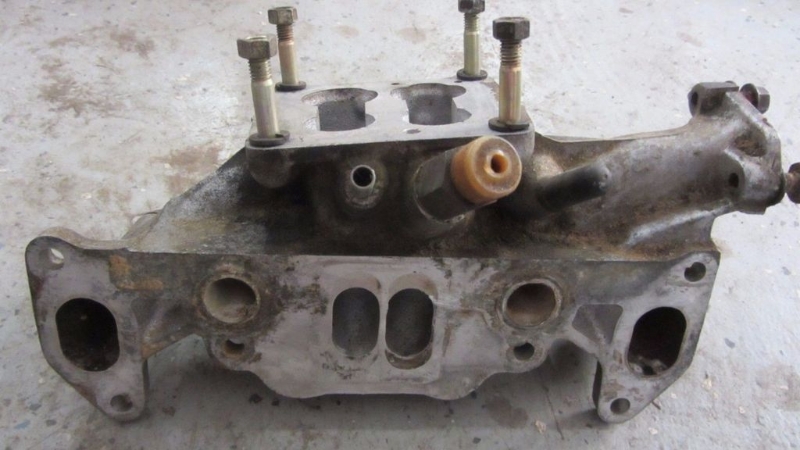
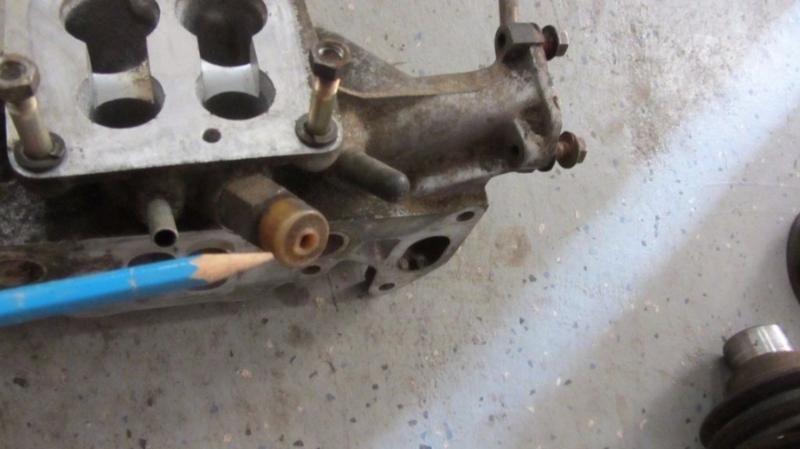
They call that fitting the altitude compensator in the FSM. Yeah, it looks and functions more like a PCV valve if you hook it up to your oil filler tube but lol whatever.
When it's broken like that I swap it out for a length of 5/8 or 1/2 heater hose hose (don't recall the size anymore) and then hook that to an aftermarket PCV valve like the Fram FV333 or FV266. You have to break the plastic cap off to see the nice nipple fitting.
Of if you are like me and are going turbo with your 79 manifold, I now drill and tap for 1/8" NPT threads in that fitting after gutting it, and install a 3/16" brass nipple to connect to a Tee or Y fitting, with one side going to a boost/vacuum gauge and the other side going to your BOV. It works fantastically well for this as it pulls from both primaries and is pretty smooth as it has a little open chamber where both vacuum/boost signals can smooth out a bit before they go to their respective places.
The only gotcha on the 79/80 mani is there is no cover for the ACV port in the intermediate plate, so you need to clean the metal and smoosh in a bunch of quicksteel or similar putty. You have to do this t prevent a not so obvious exhaust leak on the 81-85 engines. And I figure if you are doing all this, you could also install a set of 20mm freeze plugs in your rotor housings, as there is no more exhaust heat flowing through the ACV port in the manifold, so no need to keep the manifold cool with coolant anymore. Does that make sense? A cooler mani makes more power and keeping it cool is a safety concern on a boosted setup. But it does make more power NA as well, and you don't have an annoying coolant loss when you pull the manifold for whatever reason.
The rest of the nipples on that manifold can be blocked as one was for the auto trans modulator and the other was probably for emissions. Your auto trans is already blocked off so leave it alone unless it is loose. They usually stay tight after having not moved in over 30 years.
First and foremost, thank you Jeff20B. I have been reading a lot of your posts about he Nikki, and the amount of information that you have is very much appreciated. I am humbled that you would take time to help me out.
They call that fitting the altitude compensator in the FSM. Yeah, it looks and functions more like a PCV valve if you hook it up to your oil filler tube but lol whatever.
Is the "lol" because peejay goes this route and you go the route of just a breather on the oil filler tube? I may be mixing up posts because honestly when I get interested in a topic I do a lot of research on it in one sitting and get names mixed up.
Or if you are like me and are going turbo with your 79 manifold, I now drill and tap for 1/8" NPT threads in that fitting after gutting it, and install a 3/16" brass nipple to connect to a Tee or Y fitting, with one side going to a boost/vacuum gauge and the other side going to your BOV. It works fantastically well for this as it pulls from both primaries and is pretty smooth as it has a little open chamber where both vacuum/boost signals can smooth out a bit before they go to their respective places.
I would love to go turbo someday, but as of right now my fab skills are not up to snuff.
The only gotcha on the 79/80 mani is there is no cover for the ACV port in the intermediate plate, so you need to clean the metal and smoosh in a bunch of quicksteel or similar putty. You have to do this to prevent a not so obvious exhaust leak on the 81-85 engines. And I figure if you are doing all this, you could also install a set of 20mm freeze plugs in your rotor housings, as there is no more exhaust heat flowing through the ACV port in the manifold, so no need to keep the manifold cool with coolant anymore. Does that make sense? A cooler mani makes more power and keeping it cool is a safety concern on a boosted setup. But it does make more power NA as well, and you don't have an annoying coolant loss when you pull the manifold for whatever reason.
Yup makes perfect sense. I had a RB intake on there before with the Holley 465, and I may have already done this "mod" but I am not 100% sure (it was a decade ago). I will be making sure that I do this if that is not the case.
The rest of the nipples on that manifold can be blocked as one was for the auto trans modulator and the other was probably for emissions. Your auto trans is already blocked off so leave it alone unless it is loose. They usually stay tight after having not moved in over 30 years.
I was perusing the FSM and I think that one of the ports may be for the "ventilation and check valve", but I could be totally wrong.
Now I need to ask you a question. You are dumping the Holley 465 to go to a Nikki which any of us would wholeheartedly agree with. But what mods have been done on the Nikki?
As for the PCV valve, I have not added a breather to anything. I suppose if you are in a potentially dusty environment, as peejay probably is any time he races on dirt, I'd think he's the one who adds a breather.
The Nikki I have is currently from a '82 and in completely unmodified. My plan is to do about 100+ more hours of reading and follow along for hogging her out, mech. secondaries, AP mod. This is based on both you and t_g_farrell's hogging out a Nikki (as well as Sterling).
Before all of that though, I was going to use the stripping a Nikki tutorial that foxed has on his server.
Last edited by Nshimmy; Apr 25, 2017 at 09:14 AM.
Reason: grammar
That Nikki stripping tutorial leaves much to be desired, but ok. Good luck.
I can tell you this about the venturi sizes to go with. To make more power than a Holley 465, wankel=awesome suggests 24.5mm primaries and 28mm secondaries, but with an improved angle on both. That would be 11 and 7 degrees. He said he tried 29mm and 30mm but the secondaries didn't start to flow and come online as quickly as he was hoping with those larger sizes.
I would like to make an addendum in saying his findings were on a stock ignition system with stock ports and I assume the RB long primary. His setup could have used direct fire. If he had direct fire, in my opinion, and if he followed my secondary air bleed recommendations to the letter, he could have easily gotten away with 29mm or even possibly 30mm secondaries, thus making more power from a lower RPM up to a higher RPM. The ignition really does make a difference on our cars.
Edit: added more:
I've never had any issues even at 31mm myself on my 74 ported 13B with all the mods I do. And I recently tested 30.15mm on a streetported 12A with stock ignition and an RB short collected 2" exhaust. Its secondaries flowed fine as soon as they opened. Oh and the primaries were a rather large 25.6mm which ran perfectly fine on my engine but had a flat spot somewhere between 1700 and 2300 rpm on his late closing streetport (it has a very strong reversion pulse which temporarily interrupts the incoming air flow at lowish RPMs until enough velocity is reached to overcome it). Let that be a lesson to anyone wanting a streetport for the street. Skip it. Go 74 ported instead. It lets you go with larger venturis with less risk of a flat spot due to the earlier port closing, but it's still later than stock spec so it's still a win. I'd say 74 spec is the perfect "street" port. It has a lot more low end torque and driveability which is what you need every time you accelerate from a stop, and we all do this every time we drive.
Note: There is no such thing as an actual streetport from RB. They call it a "streetable" port meaning it is for the track but is still streetable. It's not ideal for the street, but streetable much like their aluminum flywheel is not ideal but can still be driven on the street. That is why I use their light steel flywheel for a daily instead. Does that all make sense? And in your case, you can keep using the stock flywheel like the streetported 12A does. Not that it's needed for the street, but it does well enough I'd stick with it.
Not that I know of. It's just that some of the techniques in that tutorial are old and outdated. There are newer more efficient and safer ways to tear down a Nikki but I don't know of any tutorials out there. Just know I spend an hour or two carefully tearing them down, and I've been at this for a while. Go slow and take notes. Do not damage any parts. Use an impact screwdriver on the difficult screws, with a slotted bit. The philips is only for spinning them out after they've been loosened. Only the altitude compensator uses phillips only, and are hard to reach, so I carefully use an extended bit on them.
24.5/28mm venturi is perfect, and it's loads more power than the RB465.
I have this exact size on my 12A, and mine actually runs a bit on the lean side, and still has more seat of the pants pull than my pig rich holley setups I've run over the years.
with proper tuning, keeping the primaries in the 13:1 AFR area, and WOT in the 12:1 area, it's more power and torque across the board.
I changed a few key things on my setup from Jeff20b's, so we do have some differing experiences.
1) I now run a full capacitive discharge ignition (msd) with upgraded coils and ignition boxes.
2) I have switched to fine wire iridium spark plugs for more unshrouded area around the spark plug, gapped to .015"
3) I run a 1974 main body (carburetor), with a much larger air horn, and open overhead fuel vent's
4) my venturi were precision cut on a lathe, and used the aforementioned 11* inlet and 7* outlet, and this by itself greatly affects signal characteristics
5) I run an open air inlet for an air cleaner now. It's a modified version of a k@n air filter
you're just getting into some fun stuff, so happy tuning! My tinkering has been very rewarding, but unfortunately for me I have a very thirsty engine now, that runs very lean despite 120 primary jets and 170 secondary. Meaning I have power left on the table yet to grab!