
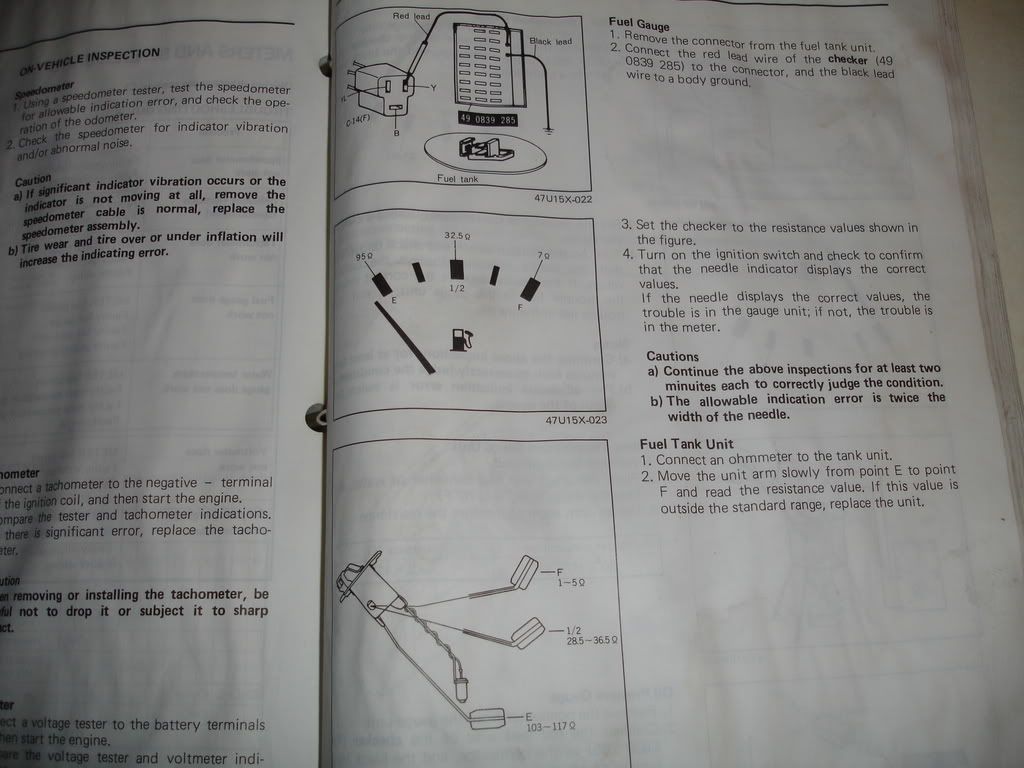
Fuel Guage ? 85 SE


Yep. Usually that is a problem with the sender. I had the same basic issue. It would read okay above 1/2, but would go to E once below 1/2 tank. New sender fixed the problem (also fixed my low fuel warning light which never worked before). A new sender will run you just over $100.


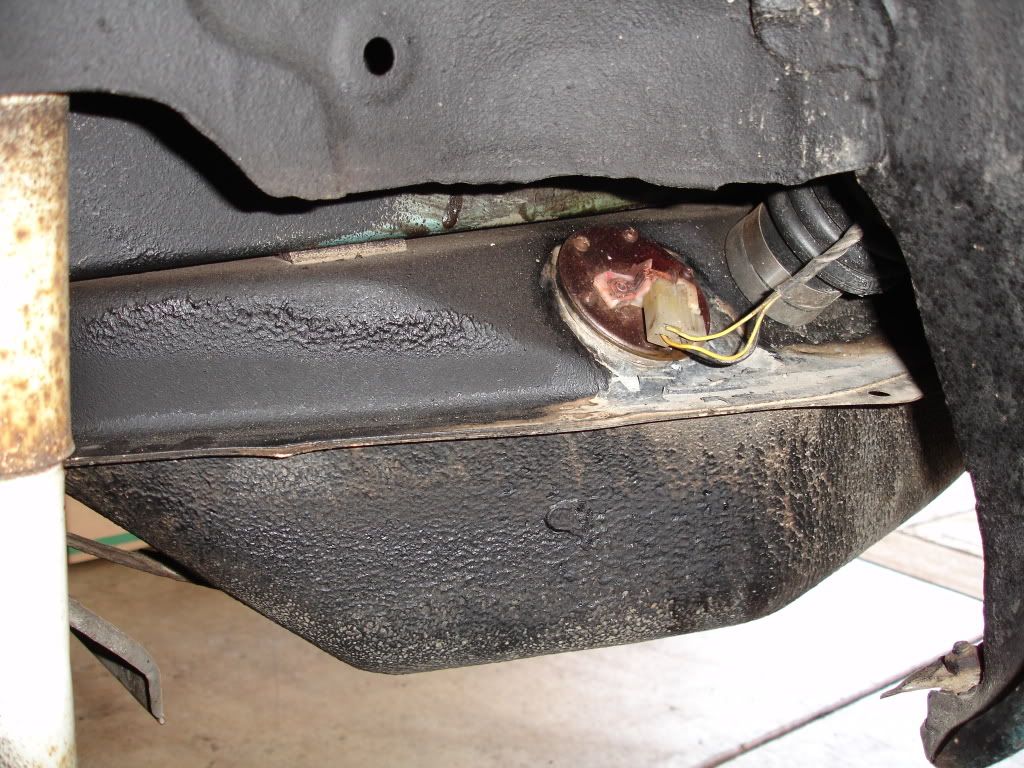
Pull the sender, it's sooo easy. Just remove the inner fender liner behind the drivers wheel and it is right there. You will find one of the terminals is corroded to nothing, and needs replacement. Watch the orientation as you remove it and don't forget. Next, once out, hook it up and just move the float up and down while a buddy watches the guage.
Trending Topics
here's some info and my writeup on dropping the tank should you need to do that. others may do it differently, but this is what i've found works. dropping the tank is no big feat. just make sure you drain all of the gas first. it makes a big difference when removing and reinstalling the tank. pop open te filler door and remove the three 8mm bolts holding the filler neck on. push the filler neck through the opening. it may be a little tough at first but the seal will unstick and it will push through.
next, get under the car and remove the three lines ahead of the fuel tank. eaiser to do this now rather than when the tank is coming down. then you'll want to remove the small plastic splash guard in the left wheel well. this will give you access to the sending unit. unplug it. chances are the connector will fight you a bit coming off and will be stiff. be patient with it.
you will then want to remove the two 14mm bolts holding the tank up, move the straps down, and work the tank down. get the tank on the ground and remove the pickup lines and the fuel level sender. you may find the screws for the fuel level sender very rusty and difficult to remove..of course you are in NC so i doubt that thats the case... you can now look in the tank and make a determination of where you want to go from there. when the tank is clean you will want to replace the gasket for the fuel level sender and the gasket for the pickup lines. you may also want to replace the pickup screen that attatches to the pickup lines. this can be clogged or ripped or otherwise in poor condition. the part numbers for replacement parts from mazda are as follows:
pickup/return line gasket: FA54-42-182
fuel level sender gasket: 8871-60-962A
pickp screen: GA97-42-113
fuel tank pad: 8871-42-761
fuel level sender(if yours is bad. new sender comes with gasket): FA54-60-960
i have recently purchased most of these parts for my project and the prices are pretty reasonable from the dealer.
pics to follow with explanations.
here are the instructions with pics for the tank removal:
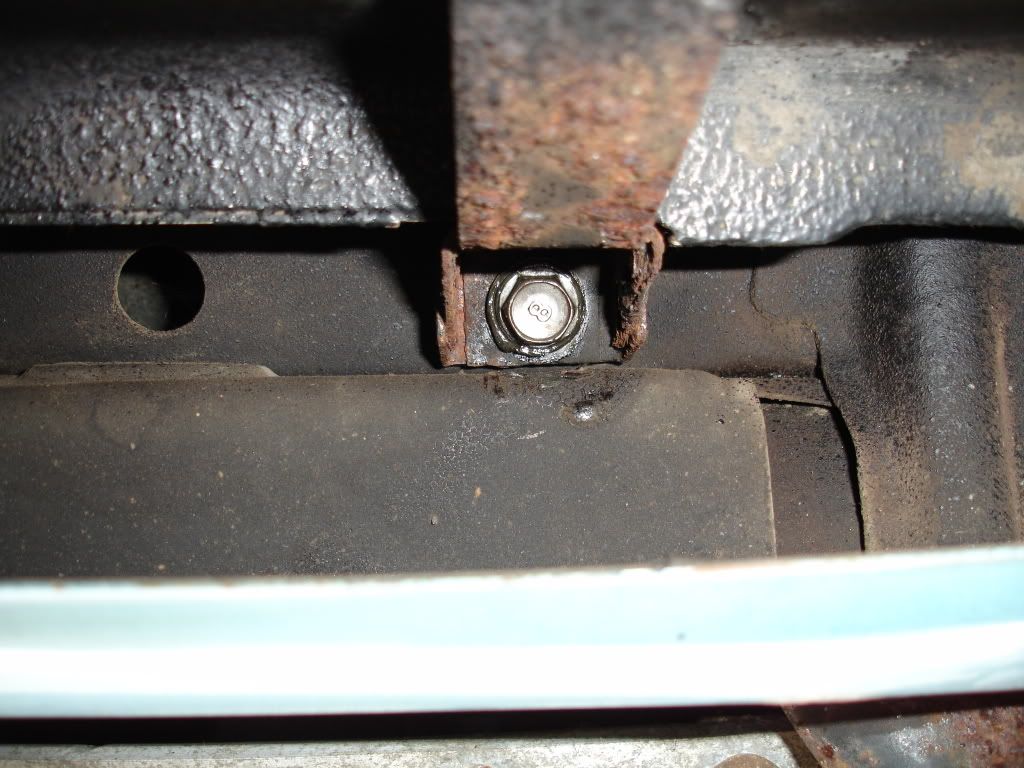
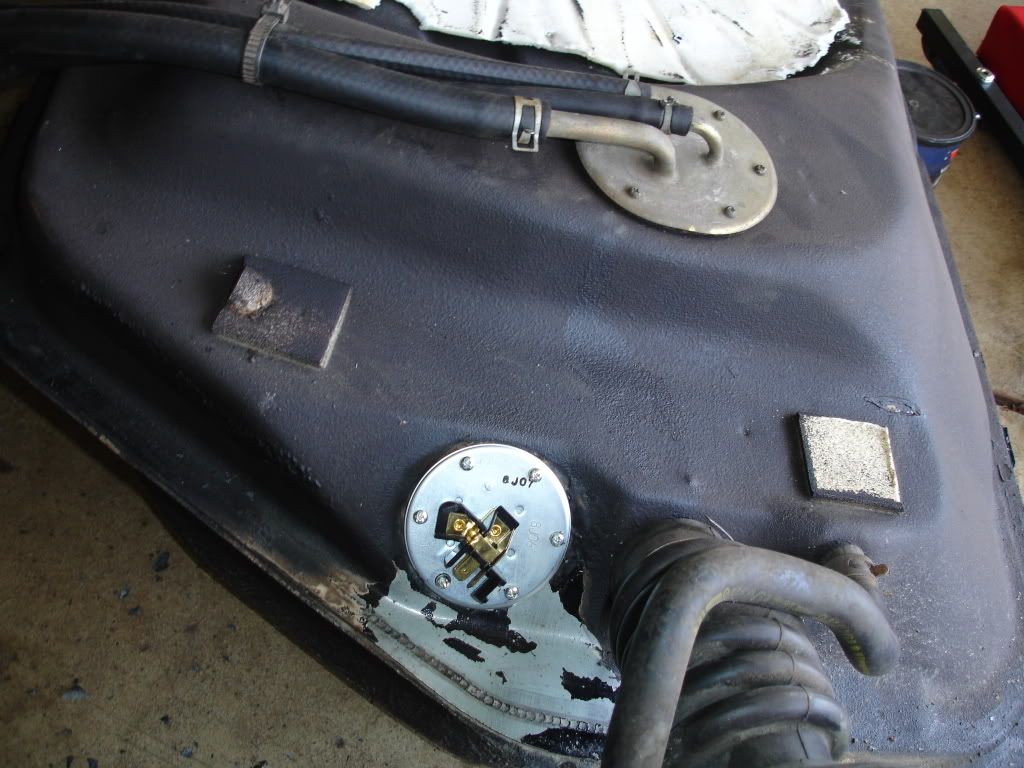
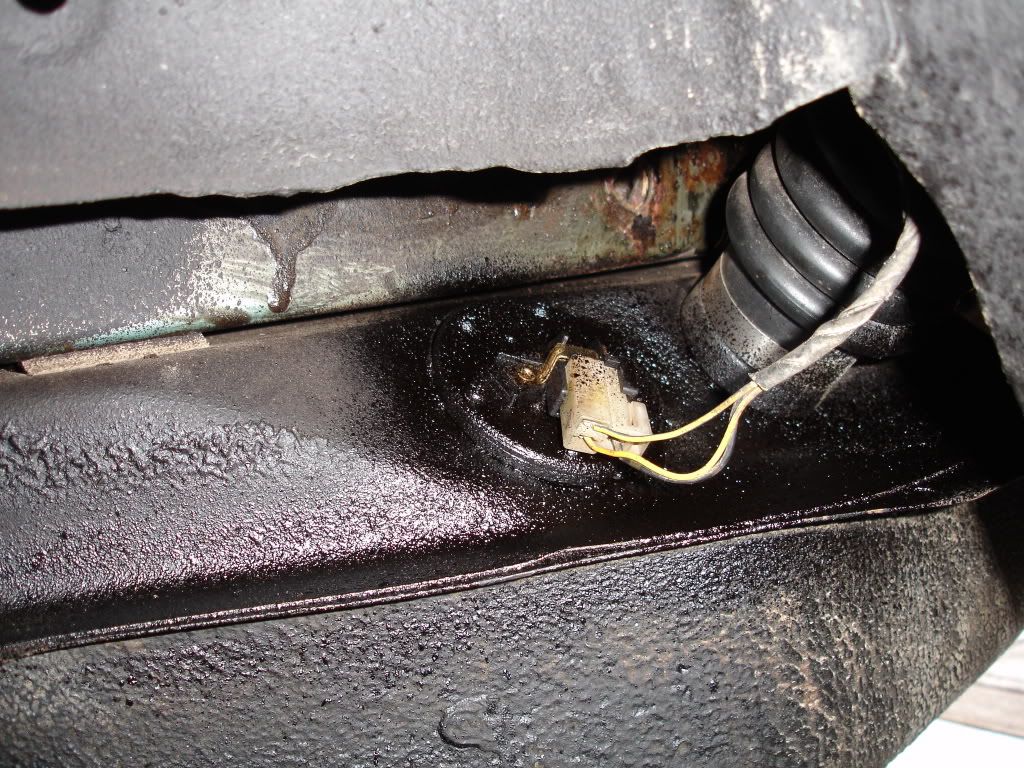
first, jack the car up, put it on stands, remove the left rear wheel, remove the plastic splash shield in the left wheel well. it is held on by two 10mm bolts and a 10mm nut. this will expose the fuel level sender which needs to be unplugged at this step:
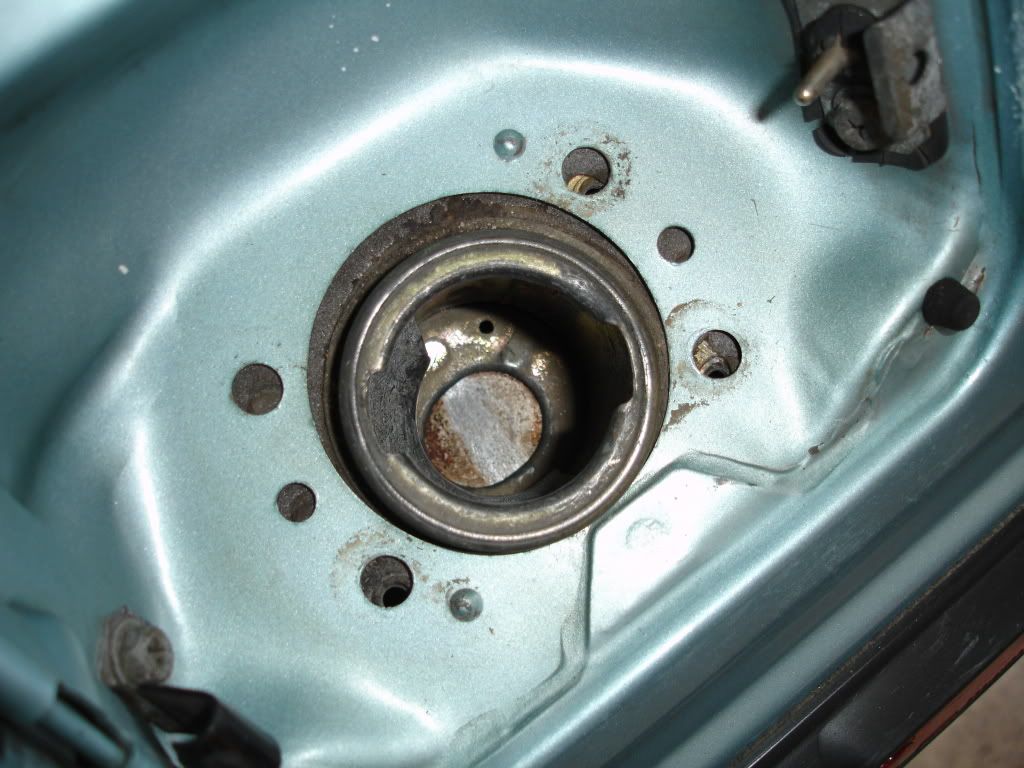
next, open the filler door, remove the gas cap and the three 8mm bolts, lift off the plate and push the neck down until it breaks away from the body:
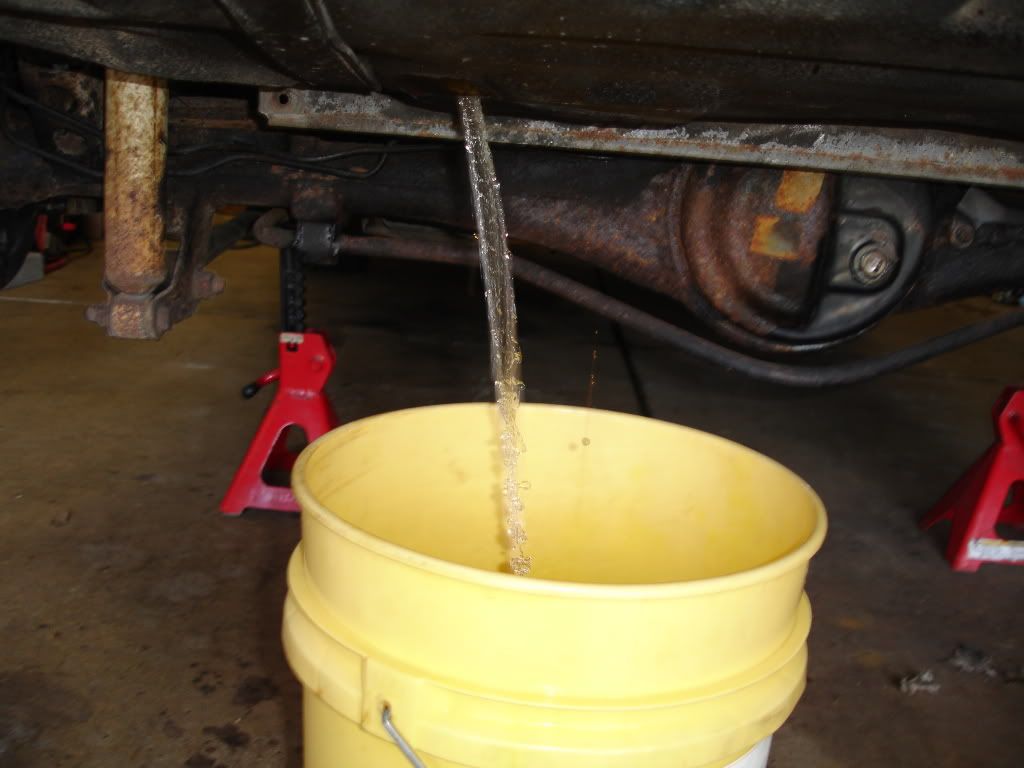
now is a good time to drain the gas. place a suitable bucket under the drain plug and remove the drain plug. a clean 5 gallon bucket works great and you can empty the bucket into a 5 gallon gas can or cans:
after the tank is drained, reinstall the drain plug and remove the clamps from the feed, return, and vent lines and slide the hoses off:

once thats done, remove the 14mm bolt from from each tank strap, they'll be in the front of the straps towards the rear bumper and you'll want to swing the straps down:
when the tank starts coming down, wiggle the filler neck out of its opening. once you do this, the tank will finish coming down(all the while you are supporting the tank with your leg or suitable support i hope)

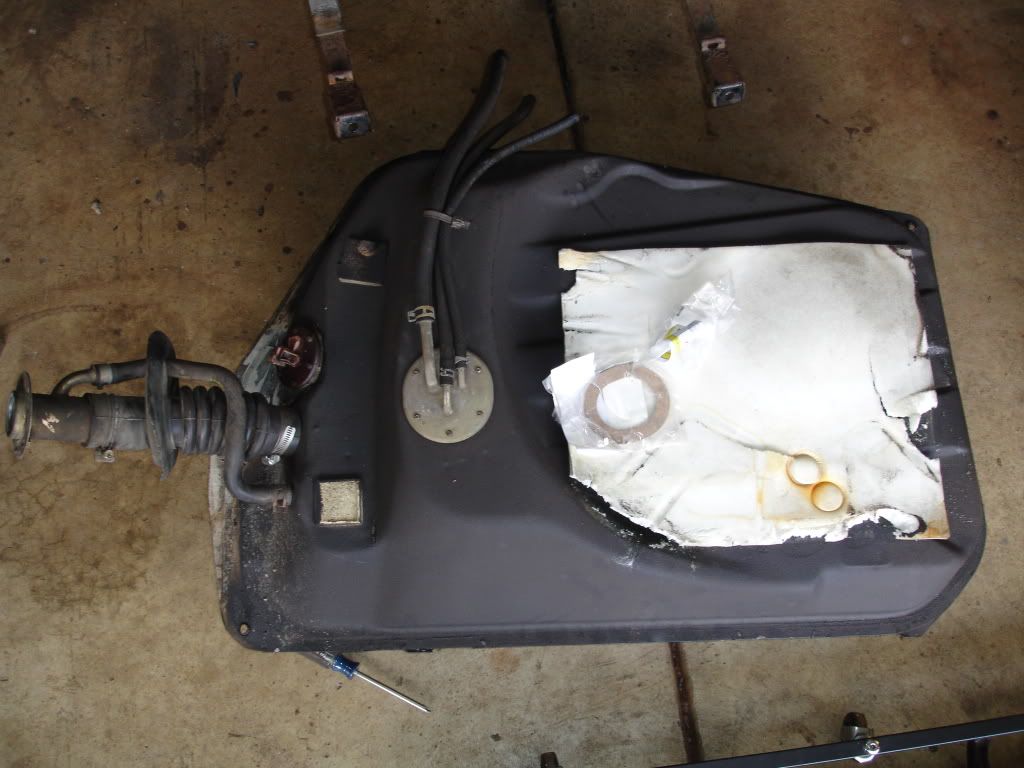
and the tank will be down and ready for service:
once you are satisfied with the tank, install is the reverse of removal. wiggling the filler neck into its opening while installing the tank at an angle is the toughest part. once everything is set in place, you'll bolt the straps up, install the lines, install the filler hose and cap, connect the sender connector, install the splash shield, install the tire, lower the car down, fill the tank with gas, start, and check for leaks.
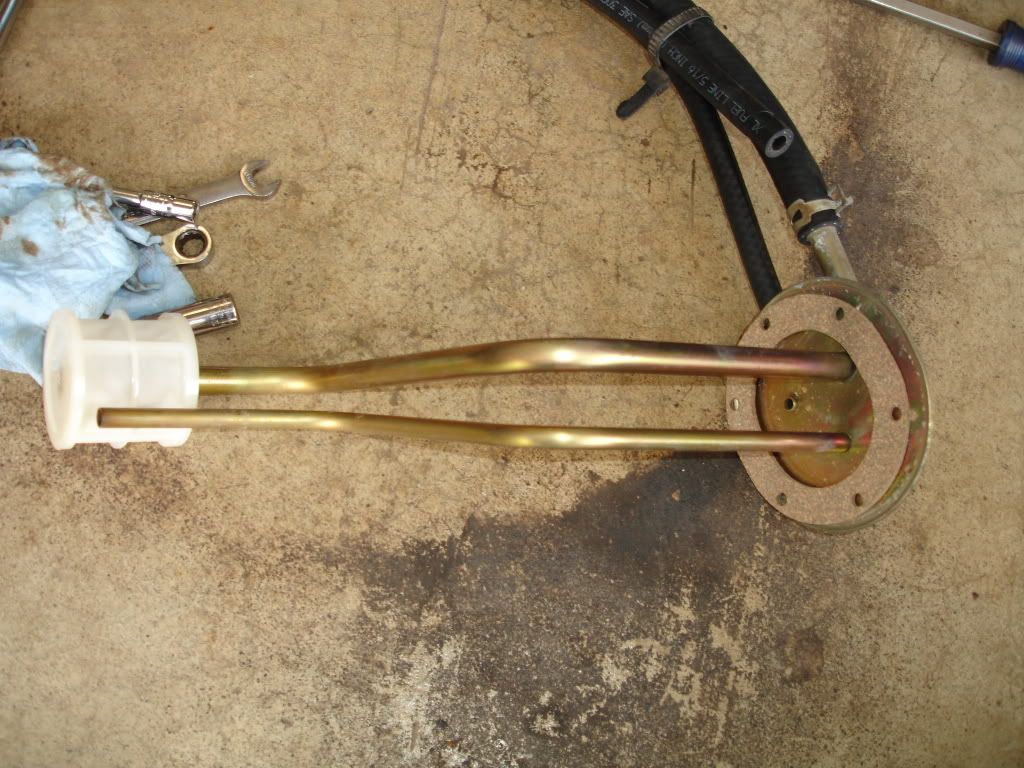
here is the new pickup gasket and fuel level sender with screws installed
reinstall the tank and add a coat of undercoating to preserve the sender and protect it and the screws from rust. you may also want to clean and undercoat the entire top of the tank while it out to preserve it:
[IMG]http://i469.photobucket.com/albums/rr53/mazdaverx713b/DSC08045.jpg[/img
first, jack the car up, put it on stands, remove the left rear wheel, remove the plastic splash shield in the left wheel well. it is held on by two 10mm bolts and a 10mm nut. this will expose the fuel level sender which needs to be unplugged at this step:
next, open the filler door, remove the gas cap and the three 8mm bolts, lift off the plate and push the neck down until it breaks away from the body:
now is a good time to drain the gas. place a suitable bucket under the drain plug and remove the drain plug. a clean 5 gallon bucket works great and you can empty the bucket into a 5 gallon gas can or cans:
after the tank is drained, reinstall the drain plug and remove the clamps from the feed, return, and vent lines and slide the hoses off:
once thats done, remove the 14mm bolt from from each tank strap, they'll be in the front of the straps towards the rear bumper and you'll want to swing the straps down:
when the tank starts coming down, wiggle the filler neck out of its opening. once you do this, the tank will finish coming down(all the while you are supporting the tank with your leg or suitable support i hope)
and the tank will be down and ready for service:
once you are satisfied with the tank, install is the reverse of removal. wiggling the filler neck into its opening while installing the tank at an angle is the toughest part. once everything is set in place, you'll bolt the straps up, install the lines, install the filler hose and cap, connect the sender connector, install the splash shield, install the tire, lower the car down, fill the tank with gas, start, and check for leaks.
here is the new pickup gasket and fuel level sender with screws installed
reinstall the tank and add a coat of undercoating to preserve the sender and protect it and the screws from rust. you may also want to clean and undercoat the entire top of the tank while it out to preserve it:
[IMG]http://i469.photobucket.com/albums/rr53/mazdaverx713b/DSC08045.jpg[/img
Great write up. I would like to add, if I go to the trouble of dropping the tank, it gets inspected inside and out. Nearly every 1st gen tank I've dropped needs refurbished, inside and out. Remove the sender and pickup, take the tank to a radiator shop that boils/cleans tanks. You can have them reline it or do it yourself. It's not hard to reline at home.
Check the under coating on the outside. If there are bubbles in the undercoating, scrape them off and check for pockets of rust. If you have groupings of rust pockets, strip the undercoating. I usually strip the entire tank and sandblast it. You can soften the undercoating by laying heavy paper towels on the tank and soaking them with mineral spirits or paint thiner. The use a putty knife to scrape the coating off followed by steel wool and thinner.
Once cleaned and prepped, coat the tank with an epoxy sealer, POR-15, etc.. Your final coat can be undercoating in a spray can but I prefer Dupli-Color truck bed liner. Don't forget to do the staps while you're at it.
Speed only when its LEGAL
Joined: Aug 2009
Posts: 117
Likes: 0
From: ridgefield wa
i had the same prob you sender is shot well half shot the thin wire on the ceramic resistor
in the main body of the sender are broken about in the middle so it works from 1/2 tank to full
my advice would if your strapped for cash look in the for sale section for a part out car of your
year and get a used sender iirc u can use any sending unit from any first gen idk bout the sa tho i
have an 85 gsl-se sending unit in my 83 gsl and it works perfect after a slight calibration
(very slight bend in the float arm so that it reads lower than it actuallt is so i dont run outta gas haha)
but dont quote me on that its 6 am on no sleep for tha past 3 days so sry for the huge run on
sentance im so friggin tired and spelling errors
peace
Last edited by theFBthatcould; Jan 4, 2010 at 08:30 AM.
I went a different route when I built the widebody and added Autometer gauges. I bought a universal sender and matching gauge. No one make a fuel level sender that's even close to matching the ohm range of the fuel level sender/gauge. It has worked until recently. The widebody sat for quite a while during the last upgrade and for some reason my gauge only goes to the 1/2 mark, even with a full tank.
The last poster is dead on on the cause of they way your gauge if performing. It has a broken wire in the windings. If you want a trouble free gauge for years to come, shell out the 100+ for a new one. If one could source the same wire as that the stock gauge has, it wouldn't be that hard to replace the winding. I've taken one apart out of curiosity and the construction is very simple.
The last poster is dead on on the cause of they way your gauge if performing. It has a broken wire in the windings. If you want a trouble free gauge for years to come, shell out the 100+ for a new one. If one could source the same wire as that the stock gauge has, it wouldn't be that hard to replace the winding. I've taken one apart out of curiosity and the construction is very simple.
I'm having a similar problem with my 83. Fuel always reads between 3/4 and 1/2 tank, even when it's bone dry. Tried re-grounding the tank (as was suggested by a friend), didn't work. Tested the wires in the gauge cluster, they seem to be okay.
Removing the fuel sender unit doesn't sound too terribly hard, but I'm not mechanically inclined, is it fairly simple for someone just starting out? Also, do you have to drain the gas in order to take out the sender? Sorry if it's already been stated, I might have missed it (7am and I haven't slept yet lol).
Removing the fuel sender unit doesn't sound too terribly hard, but I'm not mechanically inclined, is it fairly simple for someone just starting out? Also, do you have to drain the gas in order to take out the sender? Sorry if it's already been stated, I might have missed it (7am and I haven't slept yet lol).
You don't have to drain the tank, but it shouldn't be more than 1/2 full. The screws holding the sender and pickup tube are usually rusted and strip or snap off easily. An impact hammer is a must imho. Other than the screws, the task is relatively simple. I replace the stock screws with allen head ones. Once you ruin a screw, you might as well drain and drop the tank.


Full Member

Joined: May 2008
Posts: 69
Likes: 10
From: rochester ny
Swapping senders, swapping tank
The sender unit for the GSL-SE has 3 wires going to the harness instead of two (one is for the "tank empty" light) and the connection for the senders that are 2 wires can't be used because the pos wire position in that type is for the "tank empty" light in the 3 wire, so you really need a sender that has more than just the floppy float lever.
I've been sitting on a used tank for 20+ years, and I'm finally going to have to use it. The inside of the tank appears to have a solid rusty-ish bottom, not flaky, and definitely not shiny metal. Any issues there?
Also the sender unit ohms varies from 56 to 173, so I'm assuming it's toast. (But it was using a H-F Centech multimeter.... yeah....)
Last edited by rmauser; May 17, 2025 at 05:01 PM. Reason: adding more info
The sender unit for the GSL-SE has 3 wires going to the harness instead of two (one is for the "tank empty" light) and the connection for the senders that are 2 wires can't be used because the pos wire position in that type is for the "tank empty" light in the 3 wire, so you really need a sender that has more than just the floppy float lever.
I've been sitting on a used tank for 20+ years, and I'm finally going to have to use it. The inside of the tank appears to have a solid rusty-ish bottom, not flaky, and definitely not shiny metal. Any issues there?
Also the sender unit ohms varies from 56 to 173, so I'm assuming it's toast. (But it was using a H-F Centech multimeter.... yeah....)
I've been sitting on a used tank for 20+ years, and I'm finally going to have to use it. The inside of the tank appears to have a solid rusty-ish bottom, not flaky, and definitely not shiny metal. Any issues there?
Also the sender unit ohms varies from 56 to 173, so I'm assuming it's toast. (But it was using a H-F Centech multimeter.... yeah....)
Full Member
Joined: May 2008
Posts: 69
Likes: 10
From: rochester ny
I'll give that a try. What about the tank itself? I'm finding some rust on the inside top surface, as well as the "peanut-brittle-like coating on the bottom".
I've found a description of the process -
1) wash it out with clean water first
2) pour in enough evapo-rust to completely cover one side of the tank (1 gallon? 2? 3?) let soak 2-3 hours, then rotate to soak another side.
3) Drain the tank, collect the Evapo-rust - it can be re-used (yay! - I'm on a budget). Check the tank for signs of any rust remaining (I don't know how I'll be able to see much inside the tank), and repeat step two if necessary.
4) Once satisfied that it’s rust free; rinse the tank out with a product that will evaporate (methylated spirits (denatured alcohol), acetone or petrol)
An Evapo-rust video says rinse it out with water, drain then rinse out with rubbing alcohol (to mix with remaining water) and then rinse out with gasoline.
----------------------------------
And then I stumbled onto this:
"HAS ANYONE USED 1 PART MOLASSES 9 PARTS WATER to remove rust? You put your part in the mix for 2-4-weeks and it removes the rust (and paint??) You just rinse off with water after. Any thoughts good or bad? I found this on youtube."
https://forums.aaca.org/topic/160333...sing-molasses/
Last edited by rmauser; May 18, 2025 at 02:37 PM. Reason: adding more info

Thread
Thread Starter
Forum
Replies
Last Post
Jmotsch
3rd Gen General Discussion
5
Oct 12, 2019 03:17 PM
purple82
1st Generation Specific (1979-1985)
10
Apr 16, 2005 01:23 PM