
A few quick DLIDFIS questions!


A few quick DLIDFIS questions!
So I had been thinking about upgrading my ignition somehow for quite a while now, and Ive had a bit of spare time on my hands so I decided to throw a little upgrade together for the 7! After looking around my basement, it seemed I had everything needed to put together a DLIDFIS system, so I decided to just do it! what the heck eh?
Anyways, I followed Jeff20b's picture and came up with this: (quick sneak peak)
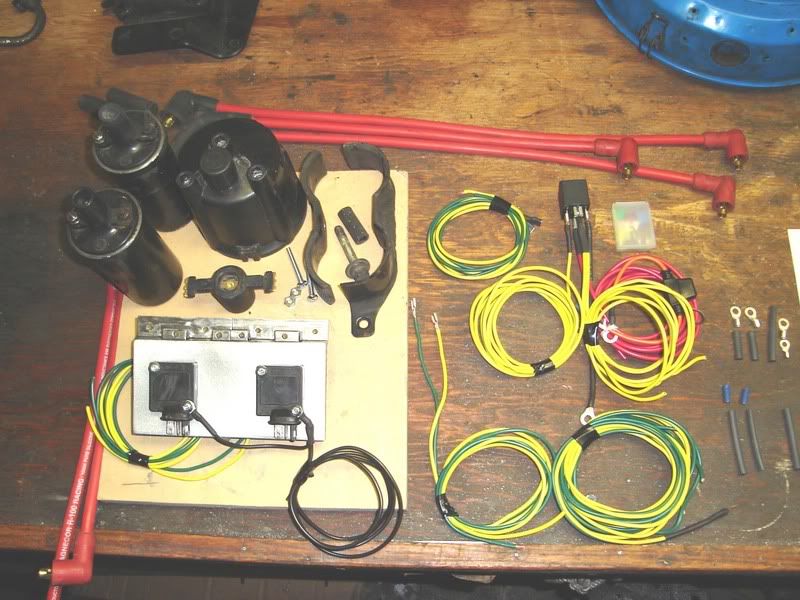
Anyways, as you can see Ive prety much got all the wiring ready before I go out into the cold winter to install this badboy, but I just wanted to ask a few things first.
I decided that rather than risk putting another coil on the same circuit, that a relay and seperate power direct from the battery is what I am going to use to
power the system.
Q #1- Only thing Im wondering about this is if it is okay to just run the coil side of my relay off the positive terminal on the original leading coil?
Q #2- I also assume that since the igniter is no longer connected to the old leading coil, that leaving the coil in place and wired up wont be a problem as long as its not getting a signal from the igniter, is this right???
And finally,
Q #3- I have run 14 g wire from the battery to the relay. What size fuse do I want to use coming off the battery?
Anyways, I followed Jeff20b's picture and came up with this: (quick sneak peak)
Anyways, as you can see Ive prety much got all the wiring ready before I go out into the cold winter to install this badboy, but I just wanted to ask a few things first.
I decided that rather than risk putting another coil on the same circuit, that a relay and seperate power direct from the battery is what I am going to use to
power the system.
Q #1- Only thing Im wondering about this is if it is okay to just run the coil side of my relay off the positive terminal on the original leading coil?
Q #2- I also assume that since the igniter is no longer connected to the old leading coil, that leaving the coil in place and wired up wont be a problem as long as its not getting a signal from the igniter, is this right???
And finally,
Q #3- I have run 14 g wire from the battery to the relay. What size fuse do I want to use coming off the battery?
haha, and I just had to throw this one other picture in:
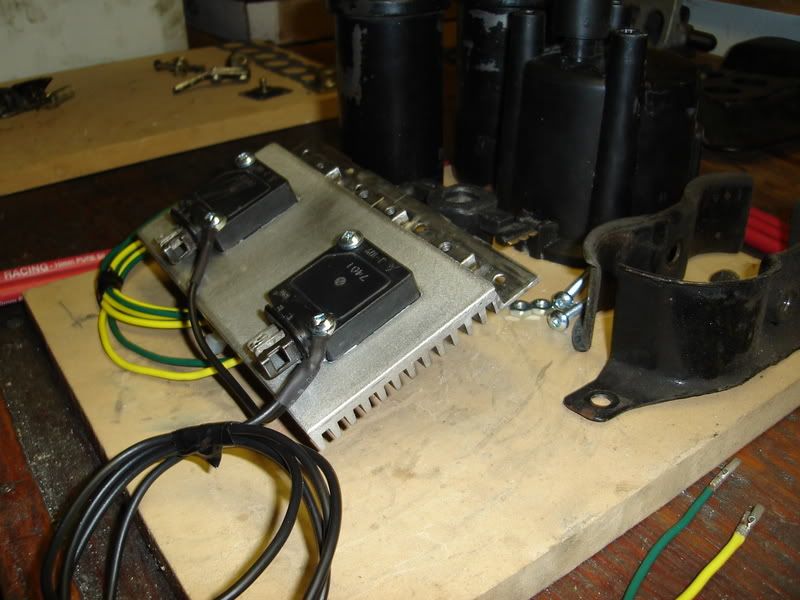
I spent a long time crankin this heat sink out.. You can barely tell, but its actually 3 pieces, and took the most time of everything.
Now I just wait for a nice day to install this sweet little setup!
I spent a long time crankin this heat sink out.. You can barely tell, but its actually 3 pieces, and took the most time of everything.
Now I just wait for a nice day to install this sweet little setup!
Q #1- Only thing Im wondering about this is if it is okay to just run the coil side of my relay off the positive terminal on the original leading coil?
To trigger the relay, yes.
Q #2- I also assume that since the igniter is no longer connected to the old leading coil, that leaving the coil in place and wired up wont be a problem as long as its not getting a signal from the igniter, is this right???
Leave it in place but be sure to transfer the negative wire from the original leading coil to one of the DLIDFS coil.
And finally,
Q #3- I have run 14 g wire from the battery to the relay. What size fuse do I want to use coming off the battery?
you can use 30 amps. But I highly recommend upgrading to FC fusebox. I just hate looking at the battery's terminal with a so many wires.
Keep it simple. that plate is way too big.
Thanks for the advice wacky, gottsta find me a 2nd gen fusebox now!
And I may have gone a little overkill on the heatsink, but I was having fun and it turned out good. I just wanted to be different and do a little extra, it keeps me out of trouble lol.
I cut the old trailing nipples off with a dremel, pulled the contacts out and epoxied it up with some special plastic epoxy.
I also cut the rotor in half.
... and thats what happens when I get bored, lol.
And I may have gone a little overkill on the heatsink, but I was having fun and it turned out good. I just wanted to be different and do a little extra, it keeps me out of trouble lol.
Originally Posted by 3rd and final 7
looks good!
sorry i dont have answers to your questions just praise about how good it looks!
1 question though how did you do that with your dizzy cap with only 3 nipples?
sorry i dont have answers to your questions just praise about how good it looks!
1 question though how did you do that with your dizzy cap with only 3 nipples?
I also cut the rotor in half.
... and thats what happens when I get bored, lol.
It's not a good idea to mess with your cap and rotor because if one of the (leading) ignitors fails, you won't simply be able to go back to stock and get to your destination. You'll have to completely disable your trailing ignition and all that. I don't recommend modding the cap and rotor because the name of the game for me was backward compatibility and redundancy. Everyone else tends to do things their own way, which is fine, I suppose. You guys know who you are. 
I have yet to install DLIDFIS in a 1st gen. I've done plenty of REPUs and other points rotaries, where just getting the electronic ignition in there required some effort, so maybe that explains a few things. Anyway, the info is out there. It's pretty easy to adjust it to fit the 1st gen's engine bay and wiring. Good luck and may your efforts prove reliable.
I have yet to install DLIDFIS in a 1st gen. I've done plenty of REPUs and other points rotaries, where just getting the electronic ignition in there required some effort, so maybe that explains a few things. Anyway, the info is out there. It's pretty easy to adjust it to fit the 1st gen's engine bay and wiring. Good luck and may your efforts prove reliable.
Last edited by Jeff20B; Jan 9, 2007 at 01:13 PM.
Thanks Jeff,
I am fully aware that my setup wont be easily reversable (unless I carry a stock cap + rotor and a spare spark plug wire) but it doesnt bother me. The car that this is going in is my weekend warrior, and wont see as much usage as the -SE until I work all the bugs out of the project and know for sure that its not gonna leave me stranded.
I appreciate your warning, but I know what Im getting myself into
Thanks for lookin out for me!
Trending Topics
That's good.
Here's something that you could try, and it drives the piston heads crazy. Note it works best with a stock cap and rotor.
Since it's your weekend warrior, you're bound to run into some piston dork who's full of himself and his car. You both pull into a parking lot to swap stories and peaks under the hoods. You wager that your engine will still run even with the cap removed. He doesn't believe you. You discretely unplug the trailing ignitor connector and remove the cap, exposing the rotor for all to see. You reach in and fire it up. The piston guy watches in quiet astonishment as the rotor sits there and spins while your engine runs smooth as before.
You can escalate his ignorance further at that point or come clean and explain the ins and outs. Just realise that a stock rotor is more impressive looking with its trailing section intact. It looks cooler than a cut down one in my not so humble opinion.
Well, I must thank everyone for their help and direction with this project.
If it wasnt for you guys I wouldnt have thought this up. Extra thanks to the guys who put in the R&D time.
I got around to finishing up the install this afternoon, and I must say Im very pleased with the results. Seems like it idles much smoother, and the new ignition actually required I re-tune the idle on the carb. I didnt feel that the car was more free to rev as some of you noted, but when I rev the engine it seems much smoother as well.
All in all I think it is a worthy mod if youve got the parts kickin around.... Here are some pics of the install:
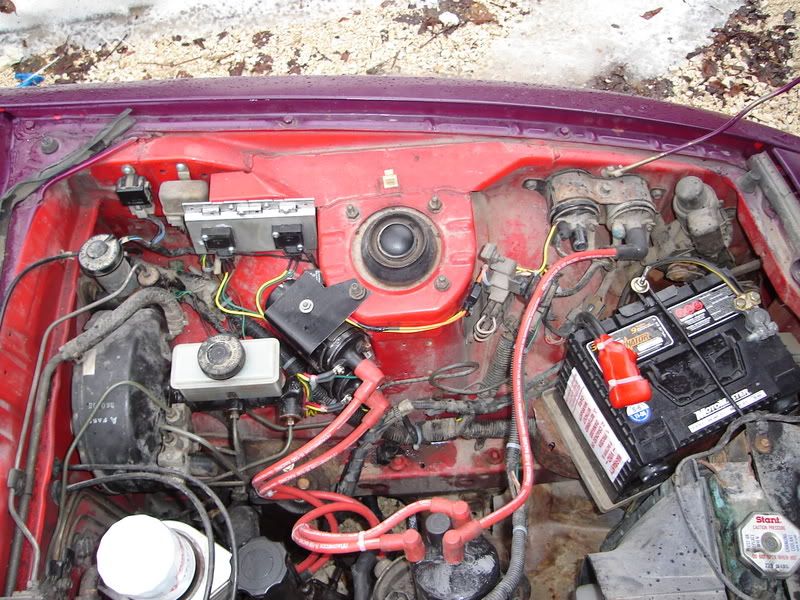
I thought this was the best place to mount everything..I had to relocate a few things but it turned out real nice?
Thanks again! and good luck to those who try this in the future
If it wasnt for you guys I wouldnt have thought this up. Extra thanks to the guys who put in the R&D time.
I got around to finishing up the install this afternoon, and I must say Im very pleased with the results. Seems like it idles much smoother, and the new ignition actually required I re-tune the idle on the carb. I didnt feel that the car was more free to rev as some of you noted, but when I rev the engine it seems much smoother as well.
All in all I think it is a worthy mod if youve got the parts kickin around.... Here are some pics of the install:
I thought this was the best place to mount everything..I had to relocate a few things but it turned out real nice?
Thanks again! and good luck to those who try this in the future

Nicely done and nicely documented.
I have done something like this using a MSD and a 2nd gen coil.
Has anyone had problems with overheating the coils?
How could you tell if the coil was over heating?
Thanks
I have done something like this using a MSD and a 2nd gen coil.
Has anyone had problems with overheating the coils?
How could you tell if the coil was over heating?
Thanks
Originally Posted by Kill No Cone
I have done something like this using a MSD and a 2nd gen coil.
Has anyone had problems with overheating the coils?
How could you tell if the coil was over heating?
Thanks
Has anyone had problems with overheating the coils?
How could you tell if the coil was over heating?
Thanks
I have both MSD with blaster coils and MSD with FC coil. I have no over heating problem at all.
Well, I had a problem once on an old stock leading coil (customer's car). After a few hours of driving, leading will spark on and off. Wires ok. Igniters replaced. Problem continues. Test the coil but using a towel to cool the coil. It worked!!!. Coil got hot, no spark again. Replaced both coils and no problem since.

Well, It seems to be working well...but I havent gotten around to re-timing the engine yet.
I put a timing light on it quick just to make sure both coils were firing, there was no problem except I realized that you get twice the flashes...something I failed to think of before. I aimed it at the pulley just to look, and the timing mark seemed quite impossible to see.
I painted it a little brighter with some nail polish, but Im just wondering if there are any other tricks.
I feel retarded because I just cant seem to see the mark on the pulley, and the extra flash cant be helping. Is seeing the mark on the pulley really as hard as it appears????
It blows my mind that in almost 5 years of driving these cars that I havent timed any of the 4 rotary engines Ive owned. crazy!
Ill go at it again tonight once Im off work, but any pulley marking tips, or just ways to make timing the engine easier would be appreciated!
[QUOTE=Gen1onr]Well, It seems to be working well...but I havent gotten around to re-timing the engine yet.
I put a timing light on it quick just to make sure both coils were firing, there was no problem except I realized that you get twice the flashes...something I failed to think of before. I aimed it at the pulley just to look, and the timing mark seemed quite impossible to see.
So how is it working for you? Were you able to check/ adjust your timing yet? I will be doing this mod tomorrow.
Yah, I managed to time the engine just fine, it was a bit hard to see the mark but I guess I just wasnt looking good enough before..... but while timing the engine I noticed I was having some problems.
I had all the symptoms of a bad igniter, only one coil firing so I put a spare igniter in.
Same problem again. Checked to see if it was coil specific by swapping the coils - trigger, but still only one coil firing. Changed the igniters on my heatsink. Same result. That to me indicated the wiring was proper.
I took a look at the wiring, and by playing with the coils/igniters I have this odd feeling that pickup in the dizzy is only being read by one igniter (I wired them up in a daisy chain fashion) It seems that the first igniter in the chain is the only one picking up the signal. I really cant see 2 good igniters off a running engine would go bad or not work.
My only solution is to split the dizzy pickup wire and run equal length wires to the igniters. Then at least the signal wont favor the first igniter.
If that doesnt work I am gonna give up on it. I did so much inspecting tonight, that theres no possible chance its anything else. I literally tested every wire and checked every connection, even added grounds before going back to the stock style ignition.
Ive also been taught quite well in terms of wiring, my father being a electrician / perfectionest he wouldnt let me skimp on anything. I was conditioned to always use proper connectors, and couldnt ever be caught wrapping a wire around a terminal post or half *** my jobs like that. Most of the wiring in my DLIDFIS setup was crimped, soldered, and waterproof heat shrink tubing applied.
Hopefully I will resolve the problem...Ill let everyone know the outcome.
Sorry to hear that you're having some issues with the ignition system. I was able to make my heatsink plate with the ignitors and have it all wired up and ready to go for the install tomorrow. I'm sure you've wired everything correctly especially with your background in electronics. The wiring seems pretty straight forward thanks to the diagram and pictures we have from Jeff20B. Well hope you figure things out and I'll post how my project turns out. Also wondering how hot your plate was getting when your engine warmed up? Thanks for the info.
Originally Posted by RXnos1200
Also wondering how hot your plate was getting when your engine warmed up?
Barely warm to touch, even difficult to know if the engine has been running. I found they got a little warm after a 5K + rpm run, but almost un-noticable!
OK thanks for the info. I've felt the ignitors on the distributor after a short drive and they seem pretty warm. I took off the ignitors to see how hot it is on the dis where the ignitors sit. It feels pretty hot to me, so I'm sure the heatsinks can only help cool it down some.