When you click on links to various merchants on this site and make a purchase, this can result in this site earning a commission. Affiliate programs and affiliations include, but are not limited to, the eBay Partner Network.
Took it upon myself to try and model the window triangles. 1st attempt attached. It's definitely not 100% accurate, especially in the corners, but I'll fix that + the rest in v2.
I'll try it on my fdm printer too; I think with a little bit of sanding an fdm print of this can look as good as the resin sla print.
Nice! They look great already.
Yesterday I finally ran the first batch of center console clips, although of course the tensioner had to break during the last hour when I wasn't monitoring it....
This had happened to my other printer already, which was then upgraded to a metal tensioner - now this one is upgraded as well. Always sucks to have a full day (or longer) print job fail at the very end.
The enclosure is also now finally complete, and so far I've managed to get the "high temp" printer's enclosure up to 52C. Essentially the "high temp" box has the filtration setup, as well as the printer with a handful of upgrades. The other is more or less stock and set up for not as picky materials. I have some new materials on route, one of which I will be trying to use for those press fit screw caps in the hatch area. Right now time is still my limiting factor, but progress is being made.
Oh, and I've also made a few tweaks allowing me to now have HIPS printing reliably. I still do not plan to use it for many interior parts, although it is back in the running for some more structural components. This also means that ABS, ASA, etc. should all print without issues as well.
Murphy's law strikes again. Following your progress closely and thanks for your effort. It would be nice to have some of these parts available. Nothing more frustrating when trying to do a nice restoration and you can't find parts.
Two weeks gone by and parts are finally available!
I wasn't happy with the quality and durability I was seeing for a while and so I decided to rework everything. Mainly this meant changing the print orientation of the parts, but that added lots of other fun issues. Anyway, now available are console bolt cover clips, window crank screw cover clips, and hatch-area screw covers. Thanks to the re-working of the clips you're now more likely to break the whole thing in half than snap a tab off, and even then the tabs will bend long before they break. Unfortunately this change means the surface finish is now quite glossy and there is often a small glitch on one spot of the perimeter due to a seam issue (I've done my best to fix it and it's as good as it's getting), but I think the greatly increased durability makes it worth it.
As of now all parts have a smooth finish (layers are not invisible however), and not textured like most of the factory parts are. Eventually I may be able to add texture, but Fusion 360 doesn't really do that so... we'll see. It would also mean that anyone who wants to sand and paint them would sand the texture off, making it a somewhat moot point. That said, the clips do sand well, so if that's of interest to anyone I'd say give it a shot. Material is PETG for those looking for painting tips. I would advise against sanding and painting the hatch screw covers, however. They are made of TPU which doesn't play too nicely with post-processing. The hatch screw covers are also a little more flexible than factory. As of now they have a shore hardness of 95A, although I'd like to try something like 98A. Of course those slightly harder materials also cost more, so we'll see how that plays out as time goes on.
So anywho, to find the parts search "1979-1985 Mazda RX-7 Window Crank Bolt Covers" on eBay and they should pop-up. Username is the same wonderfully creative name that I have here. No links of course by forum rules. To find the others just click on my username and you'll see the whatever else is available.
And a little peak at one of the larger pieces currently in the works...
First off, thanks for the purchases! I'd love to hear some feedback from anyone who has picked some parts up, good or bad (hopefully good of course).
Next up, while there isn't anything too ground breaking, I have been toying around with some new ideas. First is a possible upgrade to the various trim clips. I'm working on a way that they can be printed with fewer artifacts, be even stronger, and also be able to match any interior color. This is still very much in the prototyping phase, but if everything goes to plan I expect some parts to be coming out with this in a month or two.
I've finally begun working with ASA (a UV resistant cousin of ABS). So far results are good, although I have made the unfortunate discovery that "black" is really more like "dark grey", at least from this particular manufacturer. The main benefit to this material over PETG is greater heat resistance, so in theory heat should not be a concern at all with parts made from this material. As of now the only part I've printed in ASA is the glove box latch/light switch bracket - not too exciting unfortunately. I don't figure it to be of much demand, but it was fairly simple to make and will likely be up for sale within a few weeks just for the heck of it.
ASA also has the added benefit of having the ability to be acetone vapor smoothed, which is essentially just chemical polishing. It help hide layer lines, increase shine, and overall make parts look less "3D printed". Attached below is a photo of the glove box latch bracket(s). The leftmost is unfinished ASA (I stopped the print early, hence the decapitation), the center is vapor smoothed, and the rightmost is the factory part.
I do have one question to end this post with. Would anyone be willing to measure all the features of an S2 center console plate radio cutout and share them with me? The measurements in question are anything would normally reside within the hole the PO has conveniently cut in my console plate (see below). Measurements ideally in millimeters to at least the tenths place (so calipers needed), and hopefully radiuses can be measured as well if you have the means. Thank you to anyone able and willing to give this a shot. Feel free to post here or PM me, whichever you prefer.
I'd say that about wraps this up. Unfortunately there's not too much exciting stuff going on at the moment - hopefully in a few weeks I'll have some cooler stuff to share.
If the S2 radio is the same format or unit as the S1 I could possibly remove mine and ship it to you or try measuring first... more I think about shipping it the more worried I get.. its NOS (with the old receipt) so perfect condition.
The acetone vapor polished part looks amazing by the way. Once I figure out what all I need I'll place an order with you.
You can make a cover plate to cover the hole for the equalizer in the S2 consoles that has 2 or 3 holes made to install aftermarket gauges....
I know that there is guy on eBay that makes them but there are mainly for Hondas and other cars and he said he can be make them for rx7....but I prefer and the guys here also, to give the money to you here in the forum instead to someone else...
I don't know how expensive it will be but he sells them at $20.00... It's up to you ..just an idea💡...
If the S2 radio is the same format or unit as the S1 I could possibly remove mine and ship it to you or try measuring first... more I think about shipping it the more worried I get.. its NOS (with the old receipt) so perfect condition.
The acetone vapor polished part looks amazing by the way. Once I figure out what all I need I'll place an order with you.
Unfortunately I believe they do not have the same cut-out for the radio, though I'm not certain (they are definitely different parts overall). I have an S1 plate as well, but it too has been cut by the PO. Thankfully I will need a few similar dimensions from the S1 plate so perhaps you could help with that. I'd also be a little iffy with shipping a mint condition NOS part; I would definitely try measuring first.
Originally Posted by raven12aFB
I got an idea....
You can make a cover plate to cover the hole for the equalizer in the S2 consoles that has 2 or 3 holes made to install aftermarket gauges....
I know that there is guy on eBay that makes them but there are mainly for Hondas and other cars and he said he can be make them for rx7....but I prefer and the guys here also, to give the money to you here in the forum instead to someone else...
I don't know how expensive it will be but he sells them at $20.00... It's up to you ..just an idea💡...
Haha, great minds think alike . Allowing for aftermarket gauges to be installed was actually one of my main motivations for making these. I currently have an AFR gauge jankily mounted on mine - and somehow did so without cutting the original plate at all - but I'd like to install more gauges and do so in a cleaner way. Rather than inserts, I had been planning to offer both factory console plates as well as ones with gauge cut-outs. I'm still working out the best way to do the cut-outs, but I think I can probably make them so that they come with removable blanks allowing you to install only one or two gauges without having large un-used holes. It's just a thought for now; I don't expect any of those to be available for at least a month yet. I'm not sure if the factory equalizer hole is large enough to fit standard gauges without being trimmed, but if it is I could also make the inserts as you suggested. Great idea, thank you.
Haha, great minds think alike . Allowing for aftermarket gauges to be installed was actually one of my main motivations for making these. I currently have an AFR gauge jankily mounted on mine - and somehow did so without cutting the original plate at all - but I'd like to install more gauges and do so in a cleaner way. Rather than inserts, I had been planning to offer both factory console plates as well as ones with gauge cut-outs. I'm still working out the best way to do the cut-outs, but I think I can probably make them so that they come with removable blanks allowing you to install only one or two gauges without having large un-used holes. It's just a thought for now; I don't expect any of those to be available for at least a month yet. I'm not sure if the factory equalizer hole is large enough to fit standard gauges without being trimmed, but if it is I could also make the inserts as you suggested. Great idea, thank you.
If I'm not mistaken to fit 3 52mm gauges it will need to be trimmed about a 1/4 to 1/2 an inch...if you want 3 gauges...if not 2 gauges will fit perfectly spaced in the equalizer opening. Like me , I don't mind trimming the area a little, I want to fit 3 gauges and the edges will be covered by the plate...
It will be just a personal preference at the point of choosing if you want 2 or 3 gauges...
But when you can get it done I'm game....let me know...
One like this is be interested. One that covers the equalizer hole up to the lighter to install 3/52mm gauges. I don't smoke so I don't need the cigarette lighter. I'm installing a dual usb charging port down where the rear defrost button goes...
What about a gauge situation under the glove box? While yes it's not exactly in your view there are nuts under there that you can use for mounting. Terrible rendering below.
What about a gauge situation under the glove box? While yes it's not exactly in your view there are nuts under there that you can use for mounting. Terrible rendering below.
There is too far away and you have to turn your head away to try to read the gauges....in my opinion there is too risky....
I figured that'd come up. I do have a gauge mounted there already and I agree you do need to look away but it's not the worse thing ever. For me street car not race car so, way more relaxed.
I figured that'd come up. I do have a gauge mounted there already and I agree you do need to look away but it's not the worse thing ever. For me street car not race car so, way more relaxed.
Mine is a street car also....but only takes one second of you looking away for the **** to hit the fan...🤷♂️
I was thinking along the lines of a gauge pod that fits nicely inside the glove box. Would really just be for troubleshooting and initial tuning. Having a passenger to read off numbers during power pulls would be better than trying to auto learn using a laptop or keypad by yourself (efi but the experience is same). Then you just close it when not needed and the interior stays clean.
I was thinking along the lines of a gauge pod that fits nicely inside the glove box. Would really just be for troubleshooting and initial tuning. Having a passenger to read off numbers during power pulls would be better than trying to auto learn using a laptop or keypad by yourself (efi but the experience is same). Then you just close it when not needed and the interior stays clean.
I feel like that would be a pretty easy thing for me to whip up. Personally I wouldn't use it, but I can see your logic and I've seen similar setups before. Pretty sure I can make something that will attach to the metal beam in that area, although I'll need to take another look at it first.
Recently I've begun working on some 3D printed replacement interior parts for my SA and I'm curious if this is something anyone else might be interested in having available. With the popularity of kutukutu1's replacement headlight bushings, I thought perhaps folks may be interested in hard to find replacement interior (or other) parts as well.
Currently in the works are a new center console fa�ade, door handle screw cover trim (not sure what to call it; it's chrome and covers the top door handle screw), and new door handle cups. In the short term parts would be left unfinished, although they can be easily sanded and painted, or vapor smoothed. Material would be some form or cousin of ABS - at the moment I'm playing around with HIPS (high impact polystyrene).
So anyway, just testing the waters for now to see if there's any interest. Unfortunately I'm a little tied up these next couple weeks, but I'll update with what progress is made. And of course I need to make it clear that this is (for now) a side project. If there's sufficient interest it will become less of a side project and more of a side gig . Also if anyone has ideas for other parts that they'd like to see made available I'll gladly consider them.
could you make the facade that goes around the door locks like the piece of plastic that closes off the vinyl around it and even simple little stuff like the small black screw covers found throughout the interior thatd be great id love to support you and buy some stuff being that this stuff is hard to find.
It's been a little while since I've touched this thread, and kutukutu1's recent post reminded me that I should update over here.
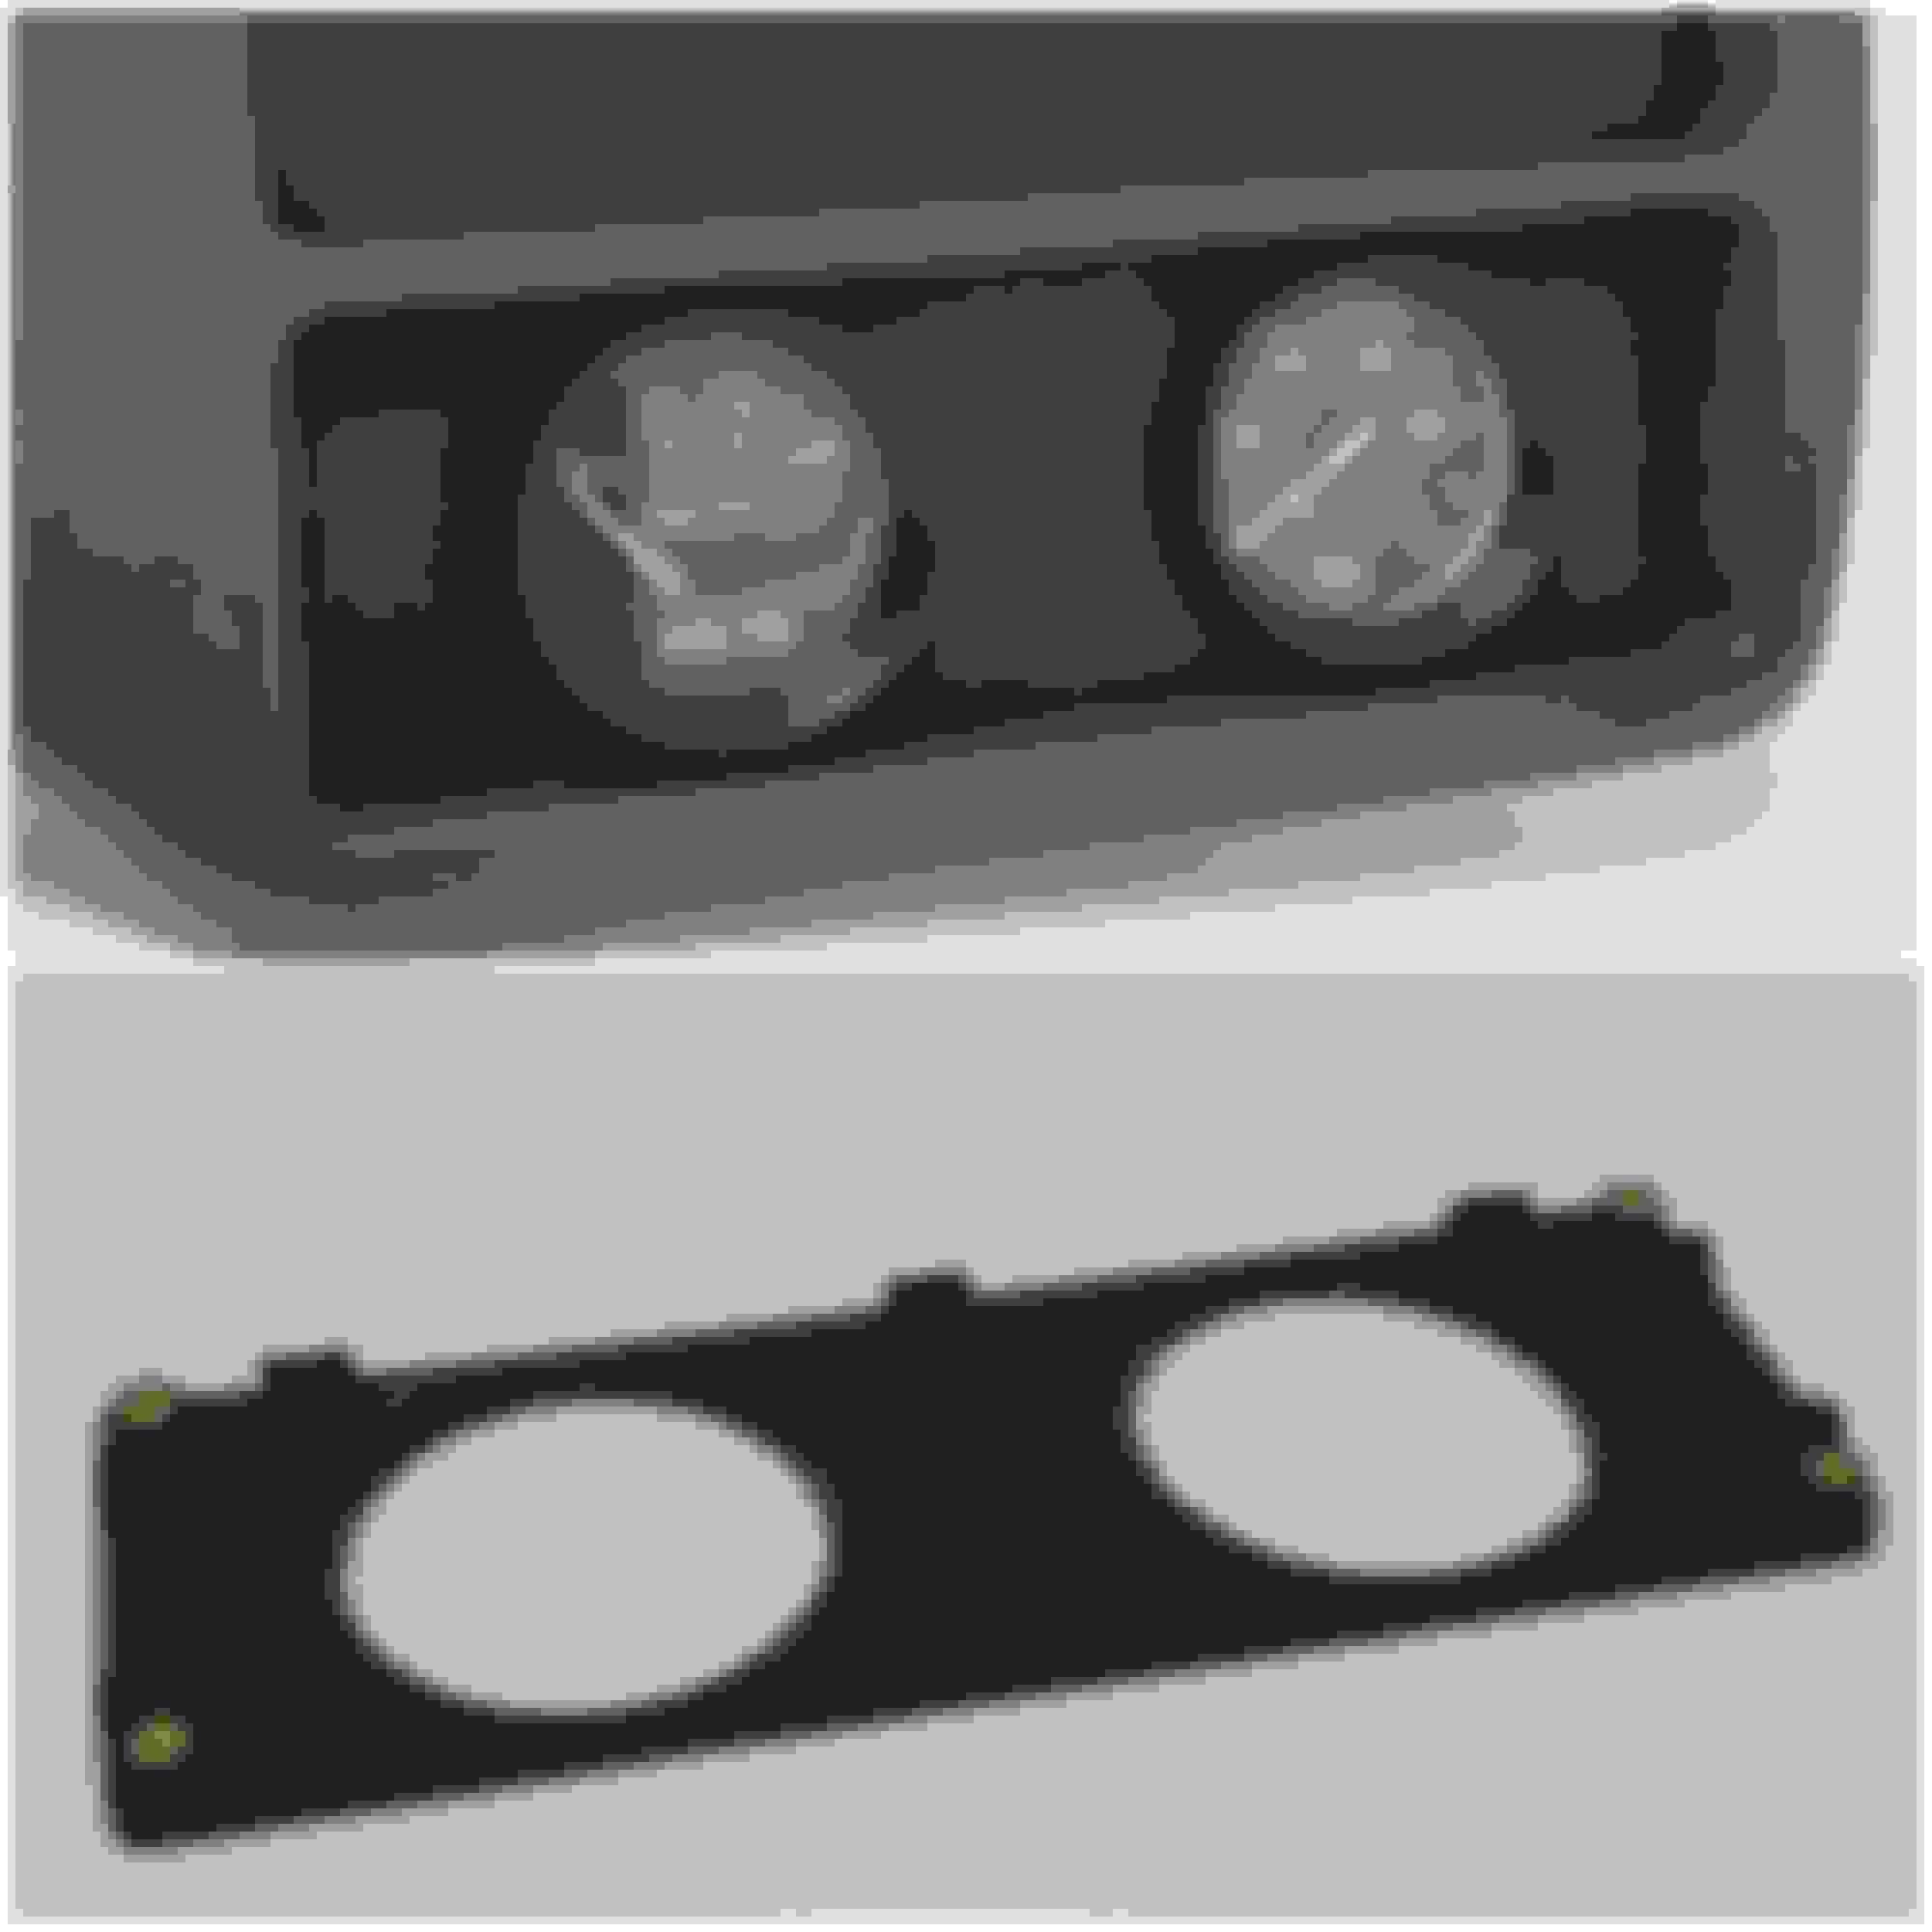
While I haven't fully completed any new items, I do have one that is nearing the end of development that I wanted to share an update on. The part in question is the SA center console plate which has been modified to accept three gauges and a single DIN radio. Presently I only have the prototype installed in my vehicle, but it's been working great for the month or so that it's been installed. The final will be made from a different material and I hope will be ready within a couple months, although I have no set timeline on it for now as I've been preoccupied elsewhere. Here's a photo of the installed prototype. Note that the surface finish will be different on the final version.
I've also been working on another 3D printed component for the EFI swap, but I'll post that in my build thread as it's more of a personal project situation.
Some folks may have noticed that I have not had the center console bolt hole covers for sale in a little while. I pulled them from eBay upon discovering that they (out of all the other PETG parts) were the only ones that seemed to not adequately tolerate heat based on my own vehicle over the summer. It would appear that there is too much tension on them which leads to the clip tabs loosening over time and eventually beginning to spin/rattle. I have not yet heard anything regarding this from purchasers, but please, if you bought some of these and have encountered this issue pm me and we can figure something out. At this time there is no suitable replacement that I have figured out as most other materials do not have strong enough layer adhesion to bend this much when being installed. At some point I'll try a redesign that will be more friendly to better heat tolerant materials but with worse layer adhesion, however there is presently no timeline. All other parts currently for sale have no issues that I am aware of, although please let me know if you have discovered one.
If you would I'd like to see the SA center console plate with stock radio cut-outs and the gauges below, maybe have the holes as knockouts? At any rate, All these parts look awesome I can't wait to see them available!
If you would I'd like to see the SA center console plate with stock radio cut-outs and the gauges below, maybe have the holes as knockouts? At any rate, All these parts look awesome I can't wait to see them available!
 04-21-21, 02:53 AM


 . Allowing for aftermarket gauges to be installed was actually one of my main motivations for making these. I currently have an AFR gauge jankily mounted on mine - and somehow did so without cutting the original plate at all - but I'd like to install more gauges and do so in a cleaner way. Rather than inserts, I had been planning to offer both factory console plates as well as ones with gauge cut-outs. I'm still working out the best way to do the cut-outs, but I think I can probably make them so that they come with removable blanks allowing you to install only one or two gauges without having large un-used holes. It's just a thought for now; I don't expect any of those to be available for at least a month yet. I'm not sure if the factory equalizer hole is large enough to fit standard gauges without being trimmed, but if it is I could also make the inserts as you suggested. Great idea, thank you.