Monsterbox's 20b FD3S Conversion
 07-19-14, 03:00 AM
#1
Monsterbox's 20b FD3S Conversion
Hello everyone,
I've owned the 1994 FD3S since the summer of 2006. This forum has been an awesome source of information and inspiration and I would like to share this 20b journey.
The car started as a stock touring model black/tan. It ran a 300hp reman on stock turbos from '06-'11 and in '12 was swapped with a streetported T04R 500hp single turbo engine.
I've recently sold the engine to fund the 20b project.
Here are a few shots of the car as it sat before pulling the last engine.


Progress Pics of the first swap:

Recently I have teamed up with a now close friend of mine who is also hopelessly obsessed with cars. Here are a few of the recent projects.
twin charged s2000

Swapped an R33 front frame, bumper, fenders and motor + 67mm single into an S14
650hp, water/meth


Swapped a 13b-rew into an FB running sequential and stock ECU (The FD Reman Motor)

We have now arrived at this:

D-series 20b D170. Found an ad in craigslist of a local guy who was stationed in Okanawa. His friend owned a Cosmo that had been sitting behind a house for many years. He pulled this engine and brought it with him back to the U.S. to sell.

I've owned the 1994 FD3S since the summer of 2006. This forum has been an awesome source of information and inspiration and I would like to share this 20b journey.
The car started as a stock touring model black/tan. It ran a 300hp reman on stock turbos from '06-'11 and in '12 was swapped with a streetported T04R 500hp single turbo engine.
I've recently sold the engine to fund the 20b project.
Here are a few shots of the car as it sat before pulling the last engine.
Progress Pics of the first swap:
Recently I have teamed up with a now close friend of mine who is also hopelessly obsessed with cars. Here are a few of the recent projects.
twin charged s2000
Swapped an R33 front frame, bumper, fenders and motor + 67mm single into an S14
650hp, water/meth
Swapped a 13b-rew into an FB running sequential and stock ECU (The FD Reman Motor)
We have now arrived at this:
D-series 20b D170. Found an ad in craigslist of a local guy who was stationed in Okanawa. His friend owned a Cosmo that had been sitting behind a house for many years. He pulled this engine and brought it with him back to the U.S. to sell.


 07-19-14, 03:35 AM
#3
Some details about the swap:
Current Parts List:
-20b D170 - street port and RA super seals, recently rebuilt by Banzai Racing in Indiana
-Borg Warner S480 Billet with compact 2.5inch compressor outlet and 1.15AR T4 Exhaust Housing
-HKS 60mm GTII Wastegate
-LS1 D581 Truck Coils
-Microtech LTS12
-850cc low-imp top feed/1680cc secondary, Banzai Racing Rails
-Fragola Performance Push-Lite 8000 Series Fittings/Hoses
-RX7 Specialties Subframe (although it looks like a Hinson)
-RX7 Specialities Spindle Relocation/Correction Pieces
-Converted Manual Rack
-Exedy Twin Plate Sprung Clutch/Flyweel
-Koyo N-Flow and Factory Fans/Shroud
-Blitz FMIC, Greddy BOV
-Twin Walbo 400LPH Pumps, 12v Direct from 80amp Relay with cockpit switch
-180amp alternator
-Dual R1 Oil Coolers (may end up being to small, will upgrade later if necessary)
-Aeromotive FPR
-FD Waterpump and Pulleys, No AC/PS/AP
-Powder coated water pump housing, pulleys etc
-20b Throttle Body
-Solid Delrin Motor Mounts
-NGK R7420 -11 Plugs 6x
-1000cc Water Injection Coolingmist Stage 2
The Goal is to produce around 650rwhp ~18psi daily and maybe take it up to 22-23psi on pump with water/meth for a high boost tranny explosion map.
The car currently has a stock rear and trans. I'm opting to leave this alone until I finish the swap as I have not decided/budgeted a plan yet on the drivetrain. I have 2 spare transmissions and nothing better to do the blow them up. Finish what matters first. Completing the car and getting it mobile with as little drama and time as possible.
I would like to sincerely thank Banzai Racing for building this engine. Chris and Elaine are top notch in customer service. They have taken the time to go above and beyond to recommend parts and tips from their years of experience.
A number of other members on this forum have been of great help in PM's. A lot of the info on this swap is hard to come by, and trying to order parts before you've actually built this swap can be a little confusing with nothing in front of you to work off. The help on this forum has simply been great.
Progress:
Engine was purchased in May. Rebuilt over this past month and arrived yesterday. Subframe/Steering Rack has been installed. Almost all of the obvious fittings, parts, hardware and accessories have arrived.
Last night I picked up the engine from the shipping company. Just unwrapped it today. Test fitted with the powder coated manifolds, couldn't resist the urge to see the color combo. Desert Red Wrinkle, extremely similar to the Ferrari wrinkle.
Tomorrow, I have to figure out how to remove these damn exhaust manifold studs. When I bought the engine, only 3 of the 6 studs were left in the rotor housing exhaust ports. This engine was a complete rust bucket. I forgot to ask Banzai to remove these studs from the housings.
For the life of me, I cannot get them out in any conventional way The threads are trashed. I forced two nuts onto the trashed threads and locked them together and attempted to break loose the stud with a large wrench. Even with tons of liquid wrench, the first attempted stud will not budge! I'm afraid of snapping. I tried tapping with a hammer, heating with a torch and cooling. Tomorrow I'm thinking of trying a hammer-on stud remover socket for more surface area. If this does not work I'm unsure what to do next. If it was a 13b I'd be more ambitious to try harder.
I could cut the studs off and drill them out into the housings making sure that I do not travel too deep. Then, retap the threads inside the housing. However, maybe its best to drop this motor off at a head servicing shop.
If I can get these lame studs out, the next step will be installing oil pick-up, oil-pan, clutch/flywheel, fuel system, etc all on the block and drop into the car. Then proceed to manifold, turbo, wiring...
Thanks for stopping by!
Current Parts List:
-20b D170 - street port and RA super seals, recently rebuilt by Banzai Racing in Indiana
-Borg Warner S480 Billet with compact 2.5inch compressor outlet and 1.15AR T4 Exhaust Housing
-HKS 60mm GTII Wastegate
-LS1 D581 Truck Coils
-Microtech LTS12
-850cc low-imp top feed/1680cc secondary, Banzai Racing Rails
-Fragola Performance Push-Lite 8000 Series Fittings/Hoses
-RX7 Specialties Subframe (although it looks like a Hinson)
-RX7 Specialities Spindle Relocation/Correction Pieces
-Converted Manual Rack
-Exedy Twin Plate Sprung Clutch/Flyweel
-Koyo N-Flow and Factory Fans/Shroud
-Blitz FMIC, Greddy BOV
-Twin Walbo 400LPH Pumps, 12v Direct from 80amp Relay with cockpit switch
-180amp alternator
-Dual R1 Oil Coolers (may end up being to small, will upgrade later if necessary)
-Aeromotive FPR
-FD Waterpump and Pulleys, No AC/PS/AP
-Powder coated water pump housing, pulleys etc
-20b Throttle Body
-Solid Delrin Motor Mounts
-NGK R7420 -11 Plugs 6x
-1000cc Water Injection Coolingmist Stage 2
The Goal is to produce around 650rwhp ~18psi daily and maybe take it up to 22-23psi on pump with water/meth for a high boost tranny explosion map.
The car currently has a stock rear and trans. I'm opting to leave this alone until I finish the swap as I have not decided/budgeted a plan yet on the drivetrain. I have 2 spare transmissions and nothing better to do the blow them up. Finish what matters first. Completing the car and getting it mobile with as little drama and time as possible.
I would like to sincerely thank Banzai Racing for building this engine. Chris and Elaine are top notch in customer service. They have taken the time to go above and beyond to recommend parts and tips from their years of experience.
A number of other members on this forum have been of great help in PM's. A lot of the info on this swap is hard to come by, and trying to order parts before you've actually built this swap can be a little confusing with nothing in front of you to work off. The help on this forum has simply been great.
Progress:
Engine was purchased in May. Rebuilt over this past month and arrived yesterday. Subframe/Steering Rack has been installed. Almost all of the obvious fittings, parts, hardware and accessories have arrived.
Last night I picked up the engine from the shipping company. Just unwrapped it today. Test fitted with the powder coated manifolds, couldn't resist the urge to see the color combo. Desert Red Wrinkle, extremely similar to the Ferrari wrinkle.
Tomorrow, I have to figure out how to remove these damn exhaust manifold studs. When I bought the engine, only 3 of the 6 studs were left in the rotor housing exhaust ports. This engine was a complete rust bucket. I forgot to ask Banzai to remove these studs from the housings.
For the life of me, I cannot get them out in any conventional way
The threads are trashed. I forced two nuts onto the trashed threads and locked them together and attempted to break loose the stud with a large wrench. Even with tons of liquid wrench, the first attempted stud will not budge! I'm afraid of snapping. I tried tapping with a hammer, heating with a torch and cooling. Tomorrow I'm thinking of trying a hammer-on stud remover socket for more surface area. If this does not work I'm unsure what to do next. If it was a 13b I'd be more ambitious to try harder.I could cut the studs off and drill them out into the housings making sure that I do not travel too deep. Then, retap the threads inside the housing. However, maybe its best to drop this motor off at a head servicing shop.
If I can get these lame studs out, the next step will be installing oil pick-up, oil-pan, clutch/flywheel, fuel system, etc all on the block and drop into the car. Then proceed to manifold, turbo, wiring...
Thanks for stopping by!
07-19-14, 04:03 PM
#6
Full Member

Join Date: Jun 2007
Location: chch
Posts: 195
Likes: 0
Received 0 Likes
on
0 Posts
Try heating the studs up and then while still nice and hot spray some crc 5.56, penetrate or WD40 in and around the internal thread.
and on a side note its a very nice looking 7.
and on a side note its a very nice looking 7.
07-19-14, 04:21 PM
#7
Any other ideas? Friend is bringing over a stud pulling socket that grabs the entire stud (or what's left of it) for more area. But I'm betting we need to chop it down and drill/tap. Is this something I should not attempt on my own to the rotor housing?
Trending Topics
07-19-14, 08:19 PM
#9
Full Member
Join Date: Jun 2007
Location: chch
Posts: 195
Likes: 0
Received 0 Likes
on
0 Posts
I've always found that they tend to come out easier while still hot rather than letting them cool down.
drilling them out is definitely something that you should be capable of doing. main thing is get the first hole you drill centred and know your depth.
drilling them out is definitely something that you should be capable of doing. main thing is get the first hole you drill centred and know your depth.
07-20-14, 02:13 AM
#13
Full Member
Join Date: Jun 2007
Location: chch
Posts: 195
Likes: 0
Received 0 Likes
on
0 Posts
You shouldn't need tungsten carbide drill bits, normal machine steel drill bits and the correct speed and pressure will do the job.
As Silverfd has mentioned cutting fluid can help.
if all else fails drill bits can be sharpened
As Silverfd has mentioned cutting fluid can help.
if all else fails drill bits can be sharpened
07-20-14, 07:06 PM
#15

I don't like using carbide bits ob broken bolts. If the bit gets broken off, you can't drill the bit out.
There are some machine shops that will weld on to a broken bolt/stud to get them out. Since this engine is already assembled, I'd take it to a machine shop to get the studs out.
There are some machine shops that will weld on to a broken bolt/stud to get them out. Since this engine is already assembled, I'd take it to a machine shop to get the studs out.
07-21-14, 12:44 AM
#16
I don't like using carbide bits ob broken bolts. If the bit gets broken off, you can't drill the bit out.
There are some machine shops that will weld on to a broken bolt/stud to get them out. Since this engine is already assembled, I'd take it to a machine shop to get the studs out.
There are some machine shops that will weld on to a broken bolt/stud to get them out. Since this engine is already assembled, I'd take it to a machine shop to get the studs out.
07-22-14, 12:13 PM
#17
To 20B or not to 20B
Join Date: Jan 2013
Location: Copenhagen
Posts: 113
Likes: 0
Received 0 Likes
on
0 Posts
We use reverse drills, I think you guys call them lefthand drills? they seem to somehow always get the bolt out eventually. Or at least the core but then its easier to rethread afterwards.
07-24-14, 11:55 AM
#19
Rotary Enthusiast

i remember seeing this engine on craigslist. i figured it was trash as it looked like a pile of shat with rust all over it. the last engine i got from a JDM importer that looked similiar had water sitting in the engine and rusted the plates. so it was a hell no for me.
so what all did you reuse in the rebuild?
so what all did you reuse in the rebuild?
07-24-14, 11:08 PM
#20
In person, the outside looked aweful, however it turned over with loud even chugs.
Reused all the main internal parts, replaced all the typical seals and gaskets. Everything was in spec.
The outside of the motor was in very poor condition. Everything was completely rusted. However, I'm using an FD water pump, pulleys, and alternator. Sand blasted the motor mount brackets/powder coated. Everything has been flawless except for that one stud.
07-27-14, 02:42 AM
#21
Update:
-Intake Manfolds test fitted and fuel rails/injectors installed
-Oil Pan Installed
-Greddy Elbow chopped and welded with 20b TB Flange
-water pump housing / water pump installed
-FD main crank pulley marked/slotted to match 20b timing marks
-Clutch installed and aligned
-Motor dropped in and bolted up to subframe
At this point, the motor is in the car. Everything regarding subframe geometry, oil pan, etc lines up great.
Next 2 weeks will be exhaust manifold, downpipe, intercooler piping, and wiring.
07-28-14, 09:54 AM
#22
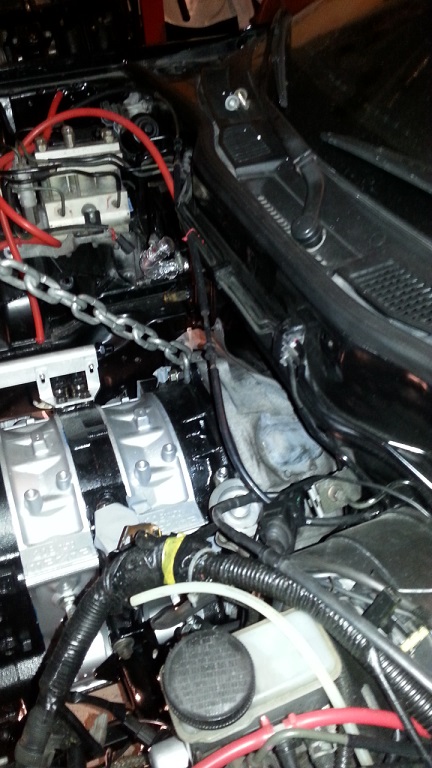
A few pics of the install from Saturday night.
Test fitted a 3 rotor manifold designed for an FC, likely going to chop it, lengthen the runners and move it backwards and down to clear the hood and/or build a new one.
Will post some more pics of the motor mounts and subframe. Phone problems.
I just realized I could actually run solid connections on the intake side with these solid motor mounts. Hmmm to take the plunge and weld wiggins clamps to the I/C, turbo, throttle body elbow....

 07-28-14, 12:14 PM
#24
For your Entertainment while waiting on more 20b progress;
Heres some shots of my partners s2000. Thats actually a 78mm turbo hanging off the side. We just finished up the oil return system for the chargers and wastegate setup and took it for the first spin, fully completed. Should be a world record HP contender for the stock block
Heres some shots of my partners s2000. Thats actually a 78mm turbo hanging off the side. We just finished up the oil return system for the chargers and wastegate setup and took it for the first spin, fully completed. Should be a world record HP contender for the stock block
