TII Tranny Fitment in SA.
 07-03-06, 04:05 PM
#1
Rotary Enthusiast
Thread Starter

TII Tranny Fitment in SA.
I have a 1979 RX-7 (SA) that is now running a boosted 6-port engine, and am collecting parts for the swap over to TII transmission. I still need a starter, and custom driveshaft, but the rest is at hand now. I've read through the "TII in an FB" threads, any haven't seen any pics of the actual transmission modifications. Here's what I've found so far.
With the SA and TII (JSpec) transmissions sitting side-by-side, I took some measurements:
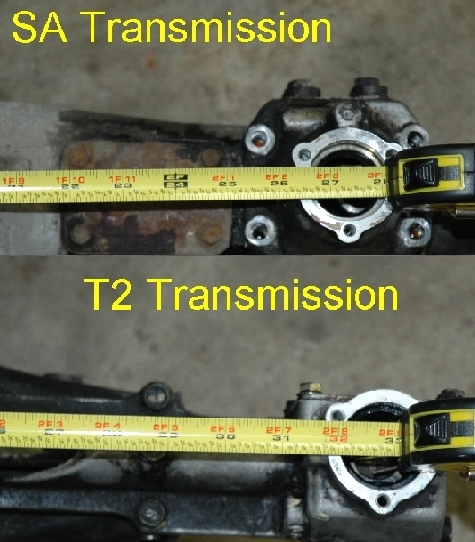
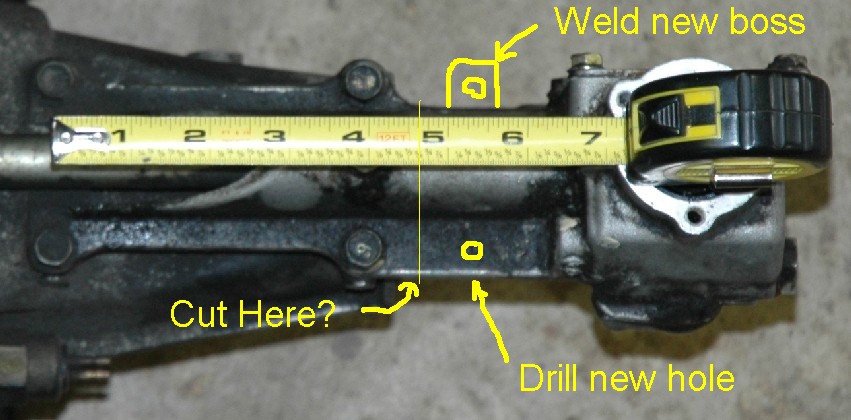
From the bellhousing back, the stock SA shifter pivot is about 27-3/8" back. The TII shift pivot is about 32-3/4" back, for a difference of 5-3/8". There appears to be enough free length on the shifter rod and tube to shorten by this amount, but the housing would required some serious modifications to move forward by that amount. Below is a pic showing the mods needed to the shifter housing. The housing would be cut as shown by the vertical line, and the housing relocated to the left 5-3/8" to use the original two mounting holes shown on the left. The remaining two mounting holes could support a sheet metal bracket fabricated to hole the end of the shifter housing.
There doesn't appear to be any possibility of swapping tailshaft housings, as the bolt pattern is different between the TII and SA. For reference, the TII tailshaft housing bolt pattern differs from the S5 na tranny I have as well.
Also, the alignment pin for the TII shifter is mounted on the front side of the housing, while on the SA it is on the rear. Cutting another groove in the opposite side of the spherical ball would take care of that issue.
Any thoughts from those that have been through this before?
With the SA and TII (JSpec) transmissions sitting side-by-side, I took some measurements:
From the bellhousing back, the stock SA shifter pivot is about 27-3/8" back. The TII shift pivot is about 32-3/4" back, for a difference of 5-3/8". There appears to be enough free length on the shifter rod and tube to shorten by this amount, but the housing would required some serious modifications to move forward by that amount. Below is a pic showing the mods needed to the shifter housing. The housing would be cut as shown by the vertical line, and the housing relocated to the left 5-3/8" to use the original two mounting holes shown on the left. The remaining two mounting holes could support a sheet metal bracket fabricated to hole the end of the shifter housing.
There doesn't appear to be any possibility of swapping tailshaft housings, as the bolt pattern is different between the TII and SA. For reference, the TII tailshaft housing bolt pattern differs from the S5 na tranny I have as well.
Also, the alignment pin for the TII shifter is mounted on the front side of the housing, while on the SA it is on the rear. Cutting another groove in the opposite side of the spherical ball would take care of that issue.
Any thoughts from those that have been through this before?
 07-03-06, 05:10 PM
#2
Banned. I got OWNED!!!
Join Date: Mar 2002
Location: Las Vegas, NV
Posts: 4,236
Likes: 0
Received 0 Likes
on
0 Posts
What i did was just install the TII eng and trans. Cut further back to mount the TII shifter and then welded some metal in.. I like the shifter to the rear more than the stock location..
Pm me and wil send you some pics..
Pm me and wil send you some pics..
07-03-06, 05:54 PM
#3
If its not too much trouble I would like to see some pictures of that as well gonzz, thanks!
(if you want to send them by email my email address is: Dan_s_young@msn.com)
(if you want to send them by email my email address is: Dan_s_young@msn.com)
07-03-06, 06:20 PM
#4
Banned. I got OWNED!!!
Join Date: Mar 2002
Location: Las Vegas, NV
Posts: 4,236
Likes: 0
Received 0 Likes
on
0 Posts
Originally Posted by Dan_s_young
If its not too much trouble I would like to see some pictures of that as well gonzz, thanks!
(if you want to send them by email my email address is: Dan_s_young@msn.com)
(if you want to send them by email my email address is: Dan_s_young@msn.com)
07-04-06, 12:38 PM
#6
Rotary Enthusiast
Thread Starter
Thanks Jeff. If the 4" was enough, simply shuffling the assembly forward like you did would be great. I doubt that'll look right with the stock console, so I'll need to do some more elaborate fabrication.
For others reading this thread, here's another excellent site showing pics of shifter linkage modifications. The are reworking FB to SA configuration, but the inner workings are likely similar.
http://www.geocities.com/izzmus/trans/trans.html
For others reading this thread, here's another excellent site showing pics of shifter linkage modifications. The are reworking FB to SA configuration, but the inner workings are likely similar.
http://www.geocities.com/izzmus/trans/trans.html
07-04-06, 03:41 PM
#7
Senior Member

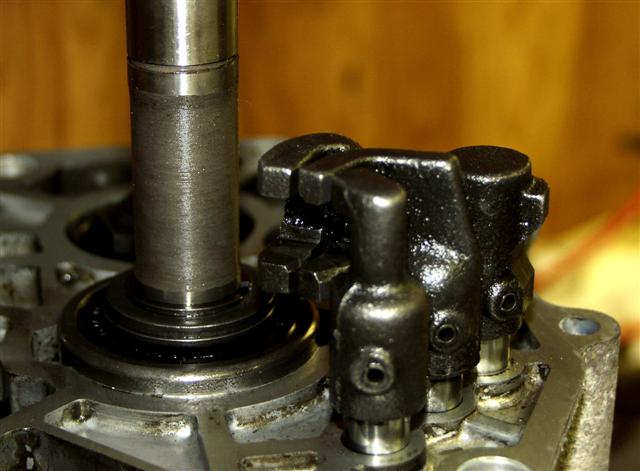
what i did was to replace the tailpiece of the s5 tii box with the 12A one. I then removed the shaft and cut the end off...about 1.5cm. I then also drilled a new alignment hole. I tapped this hole as well. the screw goes into there and into the metal block which is a cup for the ball joint of the gear lever.
this whole process takes a while. for some people I've seen on here it works first time. My first time did not work properly because when i then assembled the box (outside the car of course) I couldn't engage 2nd/4th/reverse properly...so i had obviously cut it wrong as it was hitting against the rear of the housing. moral of the story...you have to assemble and test outside the car first. I cannot emphasise this point enough. In the end i wasted 1 rod and had to do it all over again. but on my second attempt it worked perfect....gear selection all fine.
one more trick to fitting though. you have to fabricate a gearbox mount as the original 12a mount will be too big and knock the box against the body. This mount is then between the gearbox and the original cross member. I used two pieces of metal with a hard rubber sandwiched in between.
after that, the stick should line up perfectly. then get your custom driveshaft fitted, and top up with oil. remember, there is one hole to fill the oil, and another hole to check the level, not like with the 12a when it was just the same hole.
also, watch out for the conections. the box has about 3 different switches...like a neutral switch, etc. u just need to hook up the reverse only
here is a pick of my custom tranny mount
Trending Topics
07-04-06, 08:55 PM
#8
Rotary Enthusiast
Thread Starter
Originally Posted by craigw1
what i did was to replace the tailpiece of the s5 tii box with the 12A one. I then removed the shaft and cut the end off...about 1.5cm. I then also drilled a new alignment hole. I tapped this hole as well. the screw goes into there and into the metal block which is a cup for the ball joint of the gear lever.
07-05-06, 03:39 PM
#9
Senior Member
sorry for the confusion.
in the pic you can see the extention housing of the 12a box fitted to the tii box. The original tii one is slightly longer
you then have to remove the selector as well, and cut a piece off from the end and redrill a new hole. Make damn sure you get the location angle exactly in line with the original hole ie. first drill another hole then cut the end piece off.
in the second pic you can see the 12a tailpiece on the tii box with the shortened selector tube (piece has already been cut off and redrilled)
in the third pic you can see the original tii tailpiece back on the tii box with the shortened selector piece. here you can see how much has been cut off.
you also have to cut a piece of the selector shaft tube off and reseal.
hope this is clearer
good luck. Like I said, mine never worked first time and i again had to cut off a piece from another selector. Also, its quite tricky to put the selector back and juggle the tailpiece in...it took me a while....everytime i then tried to measure up the shaft, it would come out of its position...then i would have to loosen the whole thing up again. this whole thing took me the best part of a saturday to complete. But I tell you, I am now an expert on this conversion.
07-06-06, 06:50 AM
#10
Rotary Enthusiast
Thread Starter
OK, thanks for the details. It looks like you are swapping over what the FSM calls the "Change Control Case". That works for swapping in to FB series cars, but the earlier SA tranny has the change control case built in to the extension housing, so it can't be swapped separately. I suppose I could find an FB change control case, and then modify the tunnel of the car to suit the FB shifter location.
On another issue, how did you sort out your driveshaft? I took the TII yoke and SA driveshaft to the local driveshaft shop, but they had nothing for me. From discussions with that guy, the only option is to swap out the companion flange on the rear axle to a larger unit (likely custom machined part), which would then allow the same size universals front and rear.
Thanks again for the info and pics.
07-06-06, 12:47 PM
#11
Originally Posted by renns
and then modify the tunnel of the car to suit the FB shifter location.
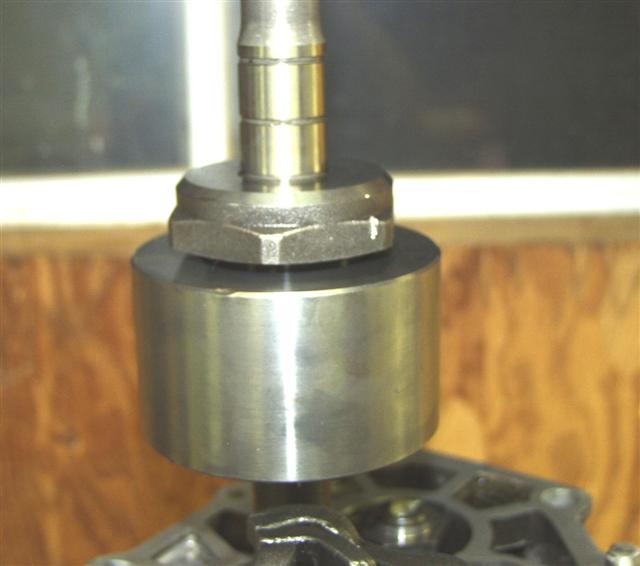
Pulling the alignment dowels out of the tail housing. Just ignore the other stuff in the picture. Not pictured is the removal of one of the threaded attatchment points at the rear.
The rod after drilling and tapping (unnecessary on T2 rod)
A closeup before cutting.
The completed mod. The shaved rear attatchment point is behind the shifter housing.
This tranny is an '81-'83 with the big gears (as pointed out on peejay's website). If it had been the other type with the smaller gears, I wouldn't have bothered modding it.
I also did a short shifter (not pictured) and used the RX-4 shift lever due to the shift boot and the driving position of the car. The SA is similar but shorter and you could probably get away with the FB/T2 shorter lever. Or you could purchase a short shifter kit and install the SA lever above the big slotted ball. I cut the small ball off the bottom of the RX-4 shifter and welded on the FB ball. Works great in the RX-4 and the throws are 1/2" shorter than stock.
 07-06-06, 03:03 PM
#12
Rotary Enthusiast
Thread Starter
Thanks for the extra pics Jeff. I am clear on the mods you did, and I'm sure it worked great for you. I have my doubts in my SA, though, as the dimensions clearly show another 1-3/8" movement is required beyond what your mods provide in order to match the original shifter location perfectly. If 'close enough' was good enough, then all those FB guys would use the TII tranny as-is, rather than swapping the FB change control case and cutting the shifter rod down that 3 cm (less than 1-1/4").
07-06-06, 03:21 PM
#13
Originally Posted by renns
On another issue, how did you sort out your driveshaft? I took the TII yoke and SA driveshaft to the local driveshaft shop, but they had nothing for me. From discussions with that guy, the only option is to swap out the companion flange on the rear axle to a larger unit (likely custom machined part), which would then allow the same size universals front and rear.
07-06-06, 04:23 PM
#14
Originally Posted by renns
as the dimensions clearly show another 1-3/8" .
The 1st gen selector housing in this new posiition lines up perfectly in the RX-4 hole. The RX-4 rubber cover fits great.
Last edited by Jeff20B; 07-06-06 at 04:25 PM.
07-06-06, 04:42 PM
#15
Senior Member
Re the drivesgaft, this is what I did :
after fitting motor/gearbox I towed the car to local driveshaft place. Took my old 12A driveshaft with. They then custom made a new shaft with a yoke to fit the tii and the flange from my 12A shaft. was obviously balanced as well. I dropped the car off the morning and towed back the evening. better to take the car there and get the guys to fit themself rather than giving them measurements. also, I asked them to make the new shaft the same diameter as the original tii shaft (per heynes manual specification). the tii shaft is slightly wider in diameter than the 12A shaft.
after fitting motor/gearbox I towed the car to local driveshaft place. Took my old 12A driveshaft with. They then custom made a new shaft with a yoke to fit the tii and the flange from my 12A shaft. was obviously balanced as well. I dropped the car off the morning and towed back the evening. better to take the car there and get the guys to fit themself rather than giving them measurements. also, I asked them to make the new shaft the same diameter as the original tii shaft (per heynes manual specification). the tii shaft is slightly wider in diameter than the 12A shaft.
07-06-06, 10:10 PM
#16
Rotary Enthusiast
Thread Starter
Originally Posted by Jeff20B
I see. I wonder if it would be possible to swap in a 1st gen shift selector housing and rod instead. Have any 1st gen owners done this?
The 1st gen selector housing in this new posiition lines up perfectly in the RX-4 hole. The RX-4 rubber cover fits great.
The 1st gen selector housing in this new posiition lines up perfectly in the RX-4 hole. The RX-4 rubber cover fits great.
Originally Posted by Blake
What I did on my peripheral port 13B race car was to modify a 2nd gen (86-91) NA companion flange (slightly larger flange) to fit a 1st gen pumpkin. It took a little machining to make a spacer ring and then find an off-the-shelf seal, but it was not that big of a deal.
If your driveline shop says they can't do it, go find another driveline shop.
07-07-06, 12:55 AM
#17
Originally Posted by renns
Blake, just to clarify here, the 2nd gen companion flange ID is a direct fit on the splines of the FB drive pinion? Only OD was modified to fit inside the housing properly?
07-07-06, 01:57 AM
#18
Originally Posted by renns
Ah, now you are cooking with gas! That's probably the cleanest solution to avoid welding a new ear on. I just recently sent my only spare 81-85 tranny off to a GSL-SE owner in need. I'll have to see if I can get the remains of his old tranny back to scavenge that "change control case" for trimming and mounting to the TII tranny. Thanks for that idea!
07-11-06, 10:38 AM
#19
Senior Member

Join Date: Nov 2003
Location: Calgary, AB
Posts: 457
Likes: 0
Received 0 Likes
on
0 Posts
Craigw1, did you do anything to correct the speedo when you did the swap? On the NA FC->FB conversions the tailhousing gets switched which takes care of the problem. But the worm gear from your FB output shaft wouldn't fit into the TII tranny, right?
Jeff20B... Too bad you don't live closer. I'd gladly trade a worn transmission from a '84 GS for help installing and setting up an aftermarket ECU.
Jeff20B... Too bad you don't live closer. I'd gladly trade a worn transmission from a '84 GS for help installing and setting up an aftermarket ECU.
07-11-06, 01:56 PM
#22
Senior Member
Join Date: Nov 2003
Location: Calgary, AB
Posts: 457
Likes: 0
Received 0 Likes
on
0 Posts
I have no idea craigw1...
In the end, the worm gear and speedo gear are essentially just a multiplier to account for your tire size and rear-end ratio (the only thing between the output shaft and your ground speed)... Since the proper worm gear won't fit onto the TII shaft (and also you probably don't want to drop the tranny and split the tailhousing just to change it) maybe there's an after-market gear you could get that would work with the current worm gear but adjust the speed properly... Like I said though, I have no idea.
In the end, the worm gear and speedo gear are essentially just a multiplier to account for your tire size and rear-end ratio (the only thing between the output shaft and your ground speed)... Since the proper worm gear won't fit onto the TII shaft (and also you probably don't want to drop the tranny and split the tailhousing just to change it) maybe there's an after-market gear you could get that would work with the current worm gear but adjust the speed properly... Like I said though, I have no idea.
07-11-06, 08:11 PM
#23
Rotary Enthusiast
Thread Starter
I'll look at the speedo gear issue when I get my TII tranny apart. If the gear OD is the same, the it's possible the gear could be bored to match the larger TII shaft.
As for fitting a TII tranny into an SA while maintaining stock shifter location, there's still a couple more issues to address:
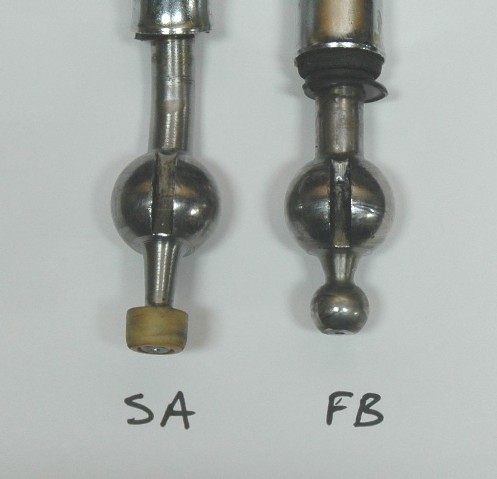
1.) Alignment pin groove in the FB and later shifters is at the front, while the groove in the SA shifter is at the back.
2.) The bottom of the SA shifter is significantly longer than the FB and later units. See attached pic. This means that even if the shifter were modified to address item 1.), the SA shifter still wouldn't work in later boxes.
If desperate, a custom SA shifter could be fabricated by using the bottom portion of an FB or later shifter, with the addition of the offset upper portion. This would address both of the above issues.
For my install, I think the best option will be to modify the transmission tunnel, moving the shifter hole back to FB position. I have a mint FB console that matches the car, so that would finish up the interior nicely. It's another step away from being an authentic 'SA', but it's already such a hybrid that those issues are irrelevant.
Also, while researching this issue, I disassembled a spare S5 n/a tranny I had on the shelf. It appears identical to the S4 units except it has a dynamic damper mounted to the output shaft. For those interested in converting an S5 n/a back to SA configuration, this damper would need to be removed to fit the SA extension housing.
As for fitting a TII tranny into an SA while maintaining stock shifter location, there's still a couple more issues to address:
1.) Alignment pin groove in the FB and later shifters is at the front, while the groove in the SA shifter is at the back.
2.) The bottom of the SA shifter is significantly longer than the FB and later units. See attached pic. This means that even if the shifter were modified to address item 1.), the SA shifter still wouldn't work in later boxes.
If desperate, a custom SA shifter could be fabricated by using the bottom portion of an FB or later shifter, with the addition of the offset upper portion. This would address both of the above issues.
For my install, I think the best option will be to modify the transmission tunnel, moving the shifter hole back to FB position. I have a mint FB console that matches the car, so that would finish up the interior nicely. It's another step away from being an authentic 'SA', but it's already such a hybrid that those issues are irrelevant.
Also, while researching this issue, I disassembled a spare S5 n/a tranny I had on the shelf. It appears identical to the S4 units except it has a dynamic damper mounted to the output shaft. For those interested in converting an S5 n/a back to SA configuration, this damper would need to be removed to fit the SA extension housing.
07-12-06, 05:51 PM
#24
Senior Member
Join Date: Nov 2003
Location: Calgary, AB
Posts: 457
Likes: 0
Received 0 Likes
on
0 Posts
Are the shift forks exactly the same between the S4 and S5 NA? I thought I read that there was a slightly different shift action in the S5's (the S5's not having as much distance between 1st and 3rd).
What exactly is a dynamic damper? And would it interfere with the typical s2/s3 FB tail housing?
What exactly is a dynamic damper? And would it interfere with the typical s2/s3 FB tail housing?
07-12-06, 08:24 PM
#25
Rotary Enthusiast
Thread Starter
Originally Posted by Felgar
Are the shift forks exactly the same between the S4 and S5 NA? I thought I read that there was a slightly different shift action in the S5's (the S5's not having as much distance between 1st and 3rd).
What exactly is a dynamic damper? And would it interfere with the typical s2/s3 FB tail housing?