Think your GXL rims are ruined? Think again.
 04-27-03, 06:19 PM
#1
Refined Valley Dude
Thread Starter
Join Date: Oct 2001
Location: Kitchener, Ontario (Hamilton's armpit)
Posts: 2,283
Likes: 0
Received 2 Likes
on
2 Posts
Since the day I got my first 7 (86 GXL) the rims were pock marked and a dull grey. I didn't like that, but also didn't know what to do about it short of getting them professionally done, which I wasn't about to do at the time.
Then I eventually bump into this site:
http://www.rx7turboturbo.com/robrobinette/polish.htm
Why couldn't I apply this to my rims? They're aluminum, too...
The rims have always been a backburner project while I've chased the bigger problems. But now that I've eliminated all of the bigger problems (other than some bodywork - you'll see ) I thought I'd take a shot at the rims this weekend.
Check it out. I used a small hand sander (you can see it in the first pic - it's blue) and 60, 180, 320 and 600 grit sandpaper. When I finished with the 600 the surface was smoooooth (I was expecting to have to use even finer grit before that would happen.) Afterwards, I used Mother's Aluminum Wheel Polish to 'seal' them.
I have to hit them again. I didn't go at it full-bore and there are patches visible where the pock marks were quite deep. And I only did the driver's side. It took about 2 hours to do each rim.
edit: I don't recommend doing this by hand - it will take FOREVER. I know - I took at stab at doing it by hand last fall...
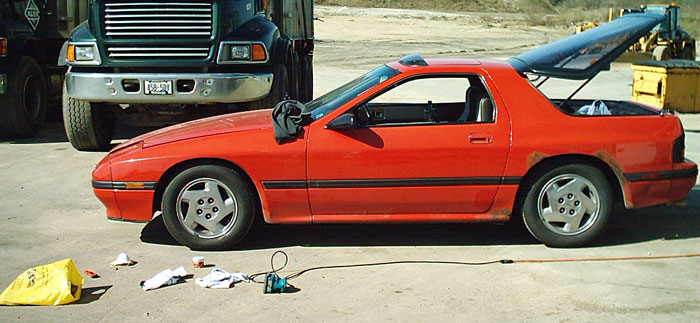
Here is our establishing shot, taken after I finished.
Then I eventually bump into this site:
http://www.rx7turboturbo.com/robrobinette/polish.htm
Why couldn't I apply this to my rims? They're aluminum, too...
The rims have always been a backburner project while I've chased the bigger problems. But now that I've eliminated all of the bigger problems (other than some bodywork - you'll see
) I thought I'd take a shot at the rims this weekend.Check it out. I used a small hand sander (you can see it in the first pic - it's blue) and 60, 180, 320 and 600 grit sandpaper. When I finished with the 600 the surface was smoooooth (I was expecting to have to use even finer grit before that would happen.) Afterwards, I used Mother's Aluminum Wheel Polish to 'seal' them.
I have to hit them again. I didn't go at it full-bore and there are patches visible where the pock marks were quite deep. And I only did the driver's side. It took about 2 hours to do each rim.
edit: I don't recommend doing this by hand - it will take FOREVER. I know - I took at stab at doing it by hand last fall...
Here is our establishing shot, taken after I finished.
Last edited by Amur_; 04-27-03 at 06:30 PM.


 04-27-03, 06:34 PM
#7
Refined Valley Dude
Thread Starter
Join Date: Oct 2001
Location: Kitchener, Ontario (Hamilton's armpit)
Posts: 2,283
Likes: 0
Received 2 Likes
on
2 Posts
If you can borrow the sander (like I did) then all you have to buy is the sandpaper and the polish.
Just mentioning that after looking at your sig.
Just mentioning that after looking at your sig.
Trending Topics
04-27-03, 08:05 PM
#13
Full Member

Join Date: Mar 2003
Location: Oregon
Posts: 106
Likes: 0
Received 0 Likes
on
0 Posts
Just get some tal-strip and remove the clear cloat, then polish and re-apply the clearcoat.
That's what I intend on doing with my rims, not by choice, but because they are so falky that they won't hold a seal to the tires!
That's what I intend on doing with my rims, not by choice, but because they are so falky that they won't hold a seal to the tires!
04-27-03, 08:22 PM
#14
Refined Valley Dude
Thread Starter
Join Date: Oct 2001
Location: Kitchener, Ontario (Hamilton's armpit)
Posts: 2,283
Likes: 0
Received 2 Likes
on
2 Posts
Originally posted by BDoty311
PS- Please get both of your wheels facing the same direction.
PS- Please get both of your wheels facing the same direction.
Oh ****.

The last time I had the rears off, to do some surgery on the differential, I must have slapped the wheels back on without checking.
 04-27-03, 10:39 PM
#18
Full Member
Join Date: Mar 2003
Location: Oregon
Posts: 106
Likes: 0
Received 0 Likes
on
0 Posts
Originally posted by skydivr73
what is tal-strip? How much and where can I find it?
what is tal-strip? How much and where can I find it?
That guy did a nice write up, and no... that's not 3rd gen as in FD
Tal-strip is one hell of a strong paint/gloss/enamel/whatever remover. I think they use it with airplanes as well.
04-28-03, 05:44 PM
#23
Refined Valley Dude
Thread Starter
Join Date: Oct 2001
Location: Kitchener, Ontario (Hamilton's armpit)
Posts: 2,283
Likes: 0
Received 2 Likes
on
2 Posts
Originally posted by Cwaters
Looks nice, very nice. When you get the detail stuff knocked-out, you should post new photos (little higher res. if you can). I'm interested
Looks nice, very nice. When you get the detail stuff knocked-out, you should post new photos (little higher res. if you can). I'm interested
That I can do and will do.
Btw, I swapped the rear wheels so now the rims are all spinning in the right direction. And now I have one 'clean' rim on each side of the car.
I hope to sand at least one more tomorrow night...
04-28-03, 08:10 PM
#24
Refined Valley Dude
Thread Starter
Join Date: Oct 2001
Location: Kitchener, Ontario (Hamilton's armpit)
Posts: 2,283
Likes: 0
Received 2 Likes
on
2 Posts
It is mentioned at the link I posted, and I should have mentioned it in my initial post...
Do not sand your rims unless you are wearing a dust mask.
Aluminum dust is BAD for you. You do not want to breathe it!
Do not sand your rims unless you are wearing a dust mask.
Aluminum dust is BAD for you. You do not want to breathe it!
04-29-03, 12:14 PM
#25
Senior Member

Join Date: Aug 2002
Location: Morgan County, Indiana
Posts: 653
Likes: 0
Received 0 Likes
on
0 Posts
hmm so how long did this take my grandpa is a rim cleaning expert and i have a drimmle style sander and i have the S5 gxl rims i want that crome look but they are mags so ill need to know if you would go about it differently..?