When you click on links to various merchants on this site and make a purchase, this can result in this site earning a commission. Affiliate programs and affiliations include, but are not limited to, the eBay Partner Network.
A few weeks ago I felt the desire to introduce myself as a courtesy of using the forum as a place to do research and asked a couple questions. And maybe sometimes kill time reading build threads when maybe I shouldn't be. A member suggested I start build thread, maybe because of some of the story that comes with the car.
So here goes: Always loved FDs. Absolute dream car. Every time I am graced with a chance to see one in the wild I have to stop for a minute and take it in. It's one of those things that pictures just don't do it justice. But I know I can never afford one so I've been searching around for something else that I thought would be fun and probably a forever car to be honest. My brother just happened to get his hands on an 88 Red NA for peanuts from a family friend. After helping on a few things on it I started looking a little more serious for one. Started the research and reading forum posts etc.
Randomly this (advertised) NA chassis turbo swapped car came up for sale for what I thought might be a fair price. I went to go look at it and ask some questions because there was details in the ad that made me go "huh?".
It's kind of an interesting car, in addition to the Turbo swap, it has Samco rad and intercooler hoses, AEM air/fuel gauge, some kind of boost gauge (brand I'm not familiar with), Greddy turbo timer and boost controller (not sure if working), Apexi intake, Racing Beat cat back (cat is in it but came with a hollowed out resonator) and Racing Beat front sway bar. My guess is that they were laying some ground work to make some power? From what I can tell, cooling should be addressed and aftermarket engine management would be needed.
It also has lowering springs and struts (unsure what brand or condition tbh. Springs are red, strut body is white), Momo steering wheel. Might be more, need to get it up and pull the wheels off etc.
It's been mostly sitting for many years, the PO did start it and drive it a little over the years but it is still starting to seize up; the windows, the locks the sun roof, head lights, brakes, everything. If it's supposed to move, it is starting to not want to move.
The good news is that it doesn't seem to be leaking anything major, yet. It's not rusty and is a well optioned car: Power windows, locks, mirrors, AC, cruise etc. It has door speakers which I've learned is kinda rare?
Plans for the car are currently to get everything working as it should, replace fluids, radiator, brake pads are shot, rotors might be shot, inspect suspension a little closer and generally get it to a point where I can drive it safely.
After getting the car home, first order of business is to get the drivers window working (remember everything that moves, doesn't really want to move any more). I read some where on the forum that the locks have an issue where they sometimes won't unlock and you can tell if it's happened by looking for signs of forced entry. I don't see any signs of forced entry, but I didn't want to deal with that so I figured I'd get the window working and then look at the semi seized brakes - I'm excited to drive it around the block and a get more of a feel for it!
Well that turned into a week long event of dismantling the power window completely to find a bunch of rust inside the motor assembly. Side note: there is a really good reason EVERY guide to cleaning/regreasing these things starts with the window half wayish down. If you can't get it half way down, it's going to suck and it sucked.
After learning these things are EXPENSIVE to replace I cleaned up the rust best I could, painted the metal piece down with some rust converter/encapsulator and greased it up. Cleaned all the beads and the inspected the gear that pushes and pulls those beads. It looks pretty good, but I understand that's a pretty common failure point. Sorry no pics of the reassembly. But it's well documented on a few other posts and at Aaroncake.net and that's pretty much what I did after getting the motor to move freely. I just put it back together with the window half way down. MUCH easier to bolt the glass to the regulator. Almost, like that's how it's supposed to be done...Anyway.
The next step after this is to jack it up and pull the wheels off to start inspecting the brakes, bushings, suspension etc a little closer. BUT now the passenger window is stuck half way down...So I think that's next so I can move it out of the garage if I want and not have to worry about rain etc.
In the mean time car is on hold while I fix my deck...
Raining yesterday. So no work on my deck. Decided misewell pull the passenger door apart!
Here's what I found:
So it looks pretty dirty and dry. I don't think the beads were ever skipping on the drive wheel it's just stuck. Compared to the driver side, I think this is dirtier and less lubricated. I got the snap ring off but the plastic drive wheel did not want to budge. Got tired, soaked everything in the cheapest penetrating fluid on the shelf and called it a night. Maybe more success the next time I try to keep dismantling this.
When I took the door panel off, someone has definitely been in there before. All the plastic is MIA and the glass has writing on it like a window from a scrap yard. Maybe the door isan't original to the car?
Couldn't get the gear off the electric motor shaft so I cleaned the beads up and greased them. Tested the motor while out of the car by back pinning the connector and connecting directly to the battery and it works great.
Put the regulator and assembly and glass back in (much easier with the window half way down) and it doesn't work. Both the passenger and driver side switch do not operate the window. So I'm thinking it's the On\Off switch in the driver side? Need more time to investigate.
The switches on the rx7 for the power windows carry all the current when you go to roll the window motor down. You can disassemble the switches, and the on/off switch, and clean them with some light scrubbing. You'll likely see corrosion on the pins inside the switch.
An alternative to rerouting the high current demands through a dedicated relay is found in this thread
Also inspect the wiring going into and out of the doors on both sides, perhaps there is some damaged wires? A continuity test might help sort that out....
I recall reading this somewhere on the forum, that was why my next focus would have been the driver's side switch. But when I did the driver's side window I took that switch apart and lightly sanded all the contacts and put it back together with a covering of dielectric, hoping it will be the last time I'm in there (wishful).
I had sort of bounced the idea of the wiring into and out of the door..Since I have pass door interior still off, maybe that warrants a look first. Thanks for the link!
Finally had some time to look at the passenger door switch again. It's a little different than the driver door and different than I saw in other posts about cleaning the switch contacts. Figured out how to get it apart without breaking and voila those contacts look black A-F to me. Great! That must be why the window stopped working. Nope. Back to the drawing board... I guess I'll need to start scrutinizing the wiring with the multimeter now.
I have noticed the aftermarket head unit turns on, but doesn't really do anything. It won't change source, radio stations, I don't hear anything out of the speakers and it randomly turns it's self off. For now, low priority. Got to get the windows going up and down, get the wheels off and get the old fuel out.
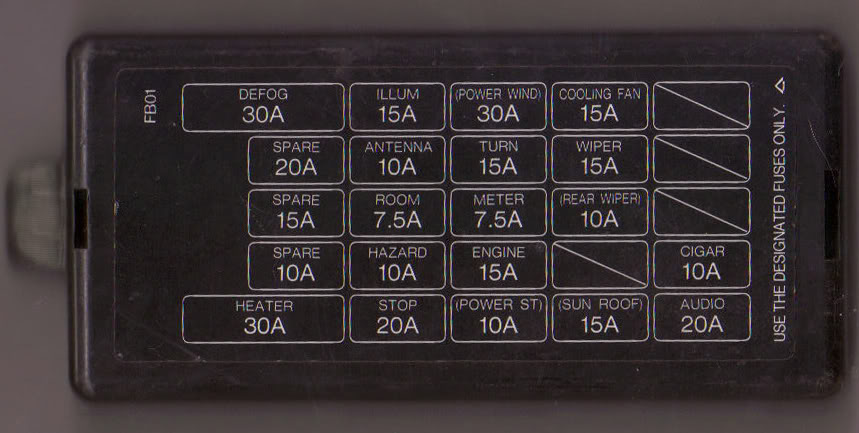
Last night I started looking at the wiring under the driver side dash to see if there is a smoking gun for the passenger window. There is interesting things happening. I didn't take any pictures but I should have. First thing to note is the cover for the fuse panel is MIA. Next thing I noticed is that there is wires sort of wedged into 1 side of the blade fuse on some of the fuses. Pulled all those wires, looked at the fuses and they all look ok.
Today I found a pic of the fuse panel on the forum and there was definitely some red wire pressed into the 10A Power Steering fuse. There was another wire in another fuse, but I can't remember which location now.
I think a simple thing now is take this fuse panel pic and make sure all the right fuses are in the right spots.
The passenger window has been solved! With some help I was able to narrow the issue down to the passenger window switch. The passenger window works from the driver switch now. There is power to the passenger switch but I think the contacts inside the passenger switch are too far worn. So I think I'll keep an eye open for a used one, I see FCs being parted out locally from time to time.
After resolving that I finally got the car up so I could get a really good look underneath. Good news and bad news:
Good news:
My brother ordered a Rotary Compression tester awhile back and it just arrived last week so we decided to do my car first. Both hot and cold.
Cold Front: 94, 94, 96 Hot Front: 84, 87, 84
Cold Rear: 91, 95, 96 Hot Rear: 90, 84, 87
Spark plugs looked a little sooty, but I think the fuel is getting kind of old too.
For 34 years old, it's in really really great shape. The exhaust appears to be a Racing Beat cat back dual exhaust. Haven't looked close enough at the turbo header or down pipe so it could be a full Racing Beat turbo exhaust.
Finally got a close up of the shocks and springs, definitely Tokico White shocks with Racing Beat springs. Definitely a thick Racing Beat front sway bar and itty bitty OEM rear sway bar.
Bad news:
I did find a rust hole in the floor on the driver side, just inside the pinch weld area, inside from where the bottom of the fender attaches [Pics].
The other things of note are:
A slow oil leak, possibly from the oil cooler or lines. Maybe it's the steering rack. Hard to say at this time. No other noticeable leaks though. Could be nothing left to leak.
Various bushings looking really dried out/disintegrating.
I have zero trust in the rad and it must replaced.
Next order of business is to get the rear brakes unstuck. Which starts with me getting a 6 splined tuner lug key because of course it didn't come with the car.
Finding rust is always a gut punch, but honestly if there isn't much more to be found that's not too bad, especially for a car up north. Since it's in a flat section, it could be patched without too much issue. That would also give you the chance to chip some of that undercoating around the area and reseal it. Overall, sounds like the engine condition is a big win! Keep at it.
Brakes. Last Friday night I spent the evening in the garage pulling the rear wheels off to start figuring out why the rear brakes are stuck on.
Good news: It's not the hand brake cable. Bad news: It's the pistons.
Once I got the calipers off it was very obvious why the pistons got stuck: boot are ripped. However I did get the driver side reliably freed up but will need at least the boot replaced, if not completely rebuilt.
Before:
After:
Passenger side was considerably worse. I got it to move a bit but got tired called it a night. Need to spend some more time freeing that up, but it was too hot the rest of the weekend to be in the garage!
Other good news, with the brakes off and the rear wheels moving freely, when I spin one axle, the other spins in the same direction! I should check the diff for a tag but I think this is a LSD car.
Looking over the calipers they're finned and the fronts are twin piston. I think this is a very complete T2 clone.
The good news is, these are really easy to rebuild. You'll likely need new piston seals, the umbrella seal that's torn and maybe new pistons if they're damaged. It's not a tough job.
The good news is, these are really easy to rebuild. You'll likely need new piston seals, the umbrella seal that's torn and maybe new pistons if they're damaged. It's not a tough job.
Yeah I agree on all accounts. As time goes on I'll end up begining to disassemble the calipers and evaluating the pistons, bores etc. I did a little poking around looking for new T2 calipers out of curiosity and got a little sticker shock!
I recently rebuilt and powdercoated all my brakes.
One of the pistons had scoring and gouging on it, but the bore was smooth. I bought a replacement piston from rockauto, along with all new seal kits from ebay. Everything went pretty smoothly.
For the rear brakes you'll need some long reach circlip pliers. I had to buy those to disassemble the parking brake mechanism.
All very solid info here from @Gtikyle. If you don't already know the rear caliper pistons spin out. I was a bit intimidated when I did mine on such knackered calipers. I had a full extra set, it made it easier. Out of the 16 front pistons that I had only 8 were for sure usable without any question. Take your time and soak the parts if needed.
I recently rebuilt and powdercoated all my brakes.
One of the pistons had scoring and gouging on it, but the bore was smooth. I bought a replacement piston from rockauto, along with all new seal kits from ebay. Everything went pretty smoothly.
For the rear brakes you'll need some long reach circlip pliers. I had to buy those to disassemble the parking brake mechanism.
Powder coating looks great! When I do the brakes, the plan is to do largely the same, disassemble, evaluate, paint/powder coat, rebuild, reinstall and bleed brakes enough to change all the fluid. Hopefully.
Originally Posted by Jeff76
All very solid info here from @Gtikyle. If you don't already know the rear caliper pistons spin out. I was a bit intimidated when I did mine on such knackered calipers. I had a full extra set, it made it easier. Out of the 16 front pistons that I had only 8 were for sure usable without any question. Take your time and soak the parts if needed.
Oh yes, I found out the pistons spin in/out very quickly. Took a hot minute to get them freed up enough to spin but they retracted, put the slide pin bolt back in with the pads and pressed the brake pedal a few times and the rear wheels no longer are locked!
However I made a near fatal error when I jacked up the car. I have a set of quick jacks and I did not raise the passenger side up until it locked in it's safety catch. Causing the only thing to hold the passenger side up was the hydraulic ram. I then disconnected the hoses for a few weeks while I worked on the brakes, inspected the under side etc. When I was all done and ready to lower the car back down, I could not get the passenger quick jack hose connected. Turns out a few 1000lbs of psi makes it quite hard to reconnect a 1/2" quick connect hydraulic hose. Who knew?
Anyway, after a couple hours of tenuous fiddling with my floor jacks, axle stands and more wood cribbing than I care to share, I got the car safely back on the ground. Hoping to get it out, and around the block this weekend. My first time! Not counting driving it on/off the trailer...
Last weekend was really exciting and motivating. Got the car back on the ground as previously noted:
Got the car out and drove around the block a couple times and it was great! Got out of 2nd and into 3rd once on a longer stretch but overall, it feels great. Definitely a very aggressive clutch is installed, and shifter is very tight. Car seemed to track straight and didn't make any weird noises, considering I know there is some problems with bushings.
I did notice that the signal lights did not auto cancel. Probably when the aftermarket steering wheel went in - added to my growing list.
Gave it a good wash, adjusted the parking brake cable and topped off the brake fluid and now the brake light is off. Good to know the low brake fluid sensor works!
The previous owner gave me a jug of oil and a filter. I think I'll check the part number on the filter and do an oil change now that I know compression is good.
I *think* my next step will be to address the hole in the floor. That seems like the biggest, hardest hurdle for me right now.
Congrats on your extended maiden voyage. No breakdowns up front is a good sign. Now to just sort out all those little things you find along the way.
I love your license plate frame btw. I should find one of those.
For filters, I would recommend getting the Rx8 oil filter, N3R1-14-302. This is a larger filter canister that has the correct bypass pressures and its OEM quality.
Oil is pick-your-poison, but I'm a firm believer in regular 20w-50 ( I use Castrol GTX, the white jug), and just change it often.