
oilpan tech

Thread Starter


Joined: Oct 2001
Posts: 6,279
Likes: 724
From: Florence, Alabama
oilpan tech, IMPORTANT 2016 UPDATE, BOTTOM POST ONE
this is one scary photo...
if you look carefully you will see that the "Full" level on the dipstick
is approx an inch above the pan rail!
in order to lower the CG of the FD Mazda chose to run a shallow pan necessitating the oil level to be above the pan rail. yikes!
combine this w the higher oil temps of the rotary and is it any wonder that there are lots and lots of "my oil pan is leaking" threads?
over 40% of the motors i disassemble have leaking oilpans. and all of them leak because of build errors. the FD pan, if properly installed doesn't have to leak.
i present no magic bullet here and there are numerous ways to get it done properly but my system works so i thought i would present it. others are very welcome to add here as the primary purpose of the thread is to help eliminate leaking pans.
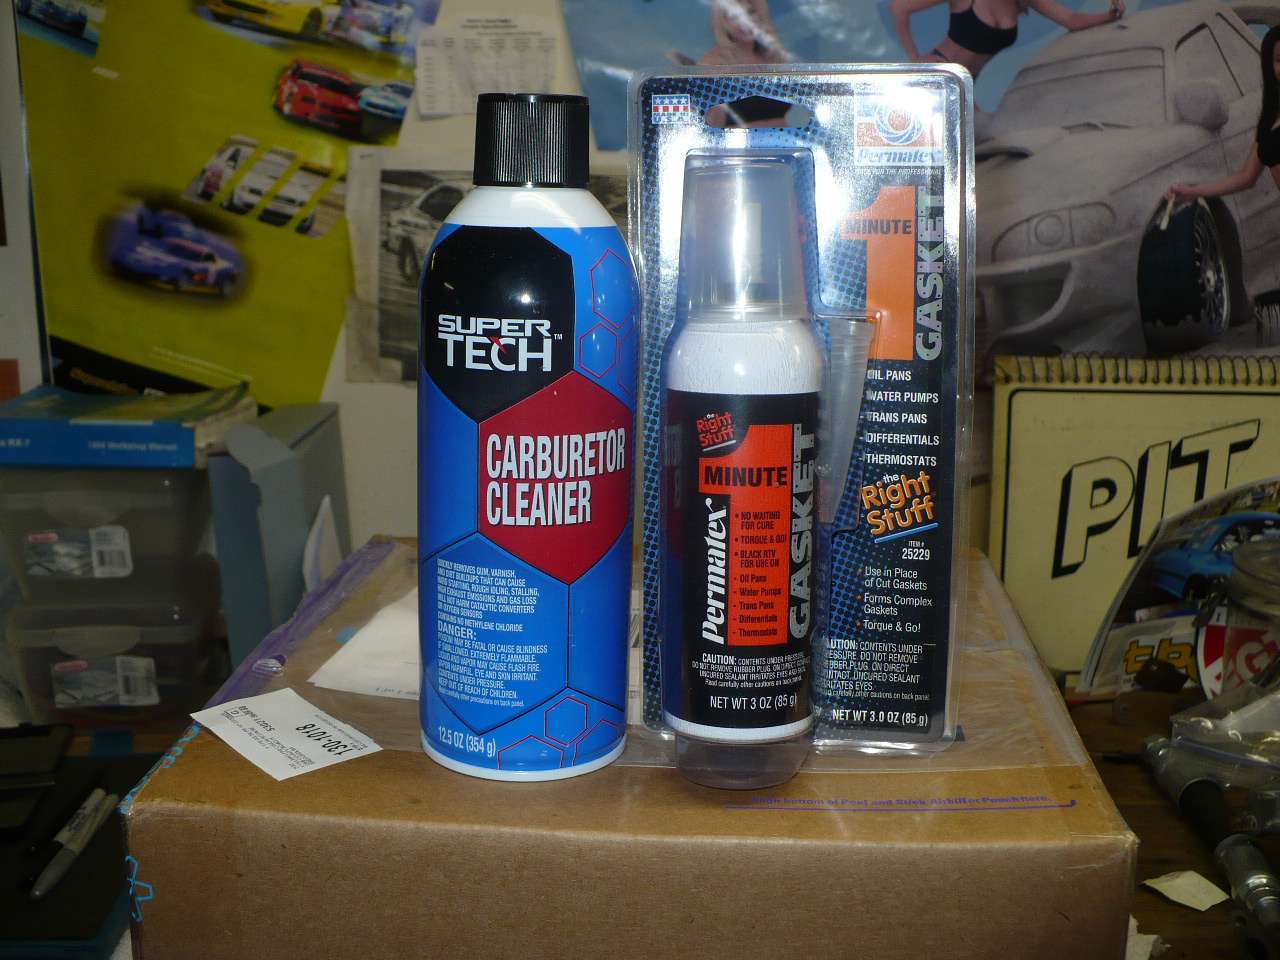
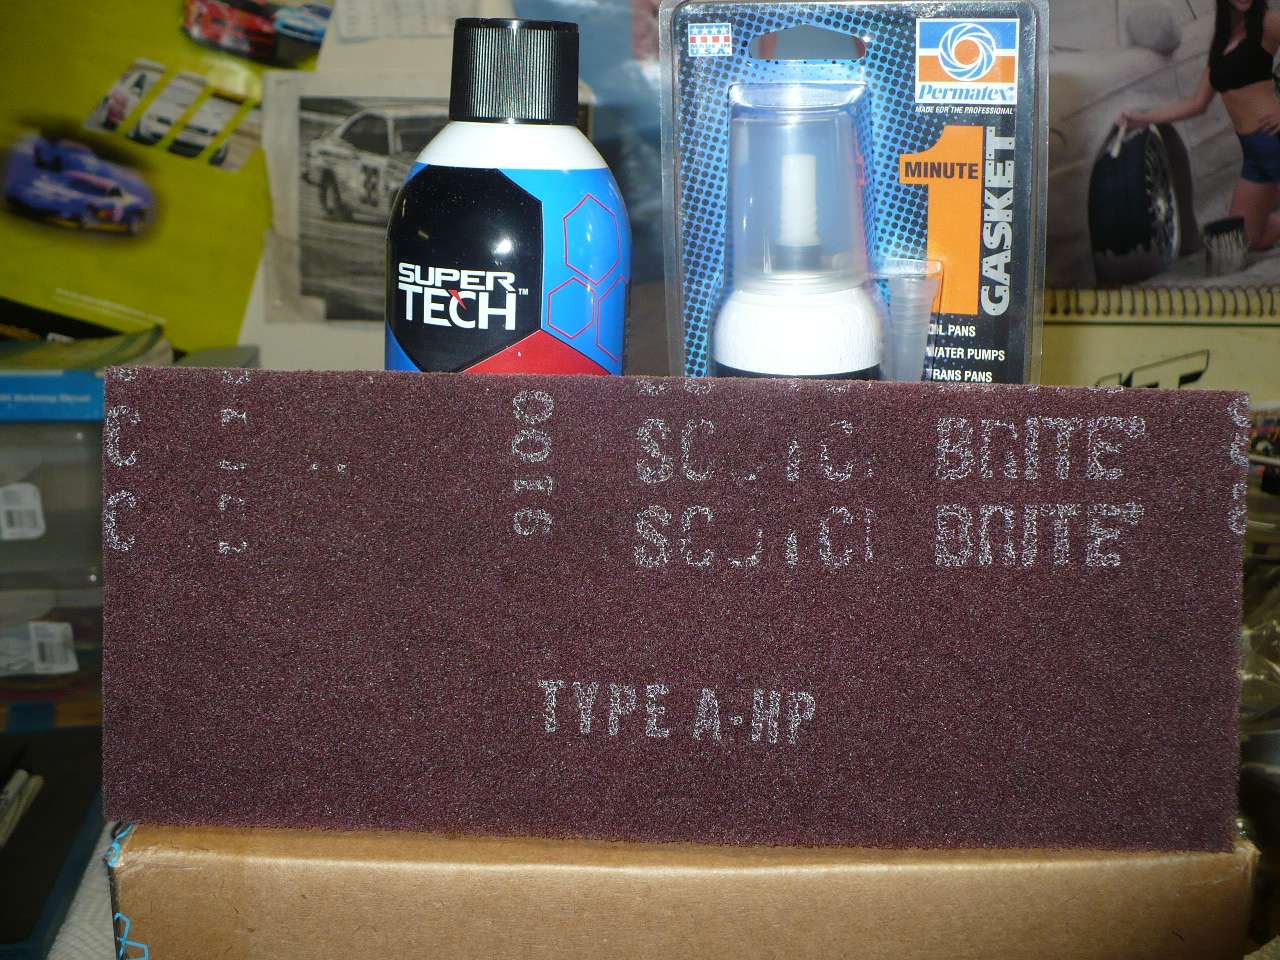
first off a bit about preparation and supplies. i find a simple tool that holds a boxcutter blade laterally greatly speeds scraping the engine pan flange. once i have it mostly clean i grab a can of Walmart's wonderful Carb Cleaner and a piece of 3M Scotch Brite pictured below. this cleans all the residual silicone from the flange.
i then place the pan in a box of 2 X 4s 10 5/8 square interior dimension and attack it first w the scraper. at that point the remaining silicone is in the pan flutes. i use a wire wheel on a drill and it completely cleans the 19 flutes.
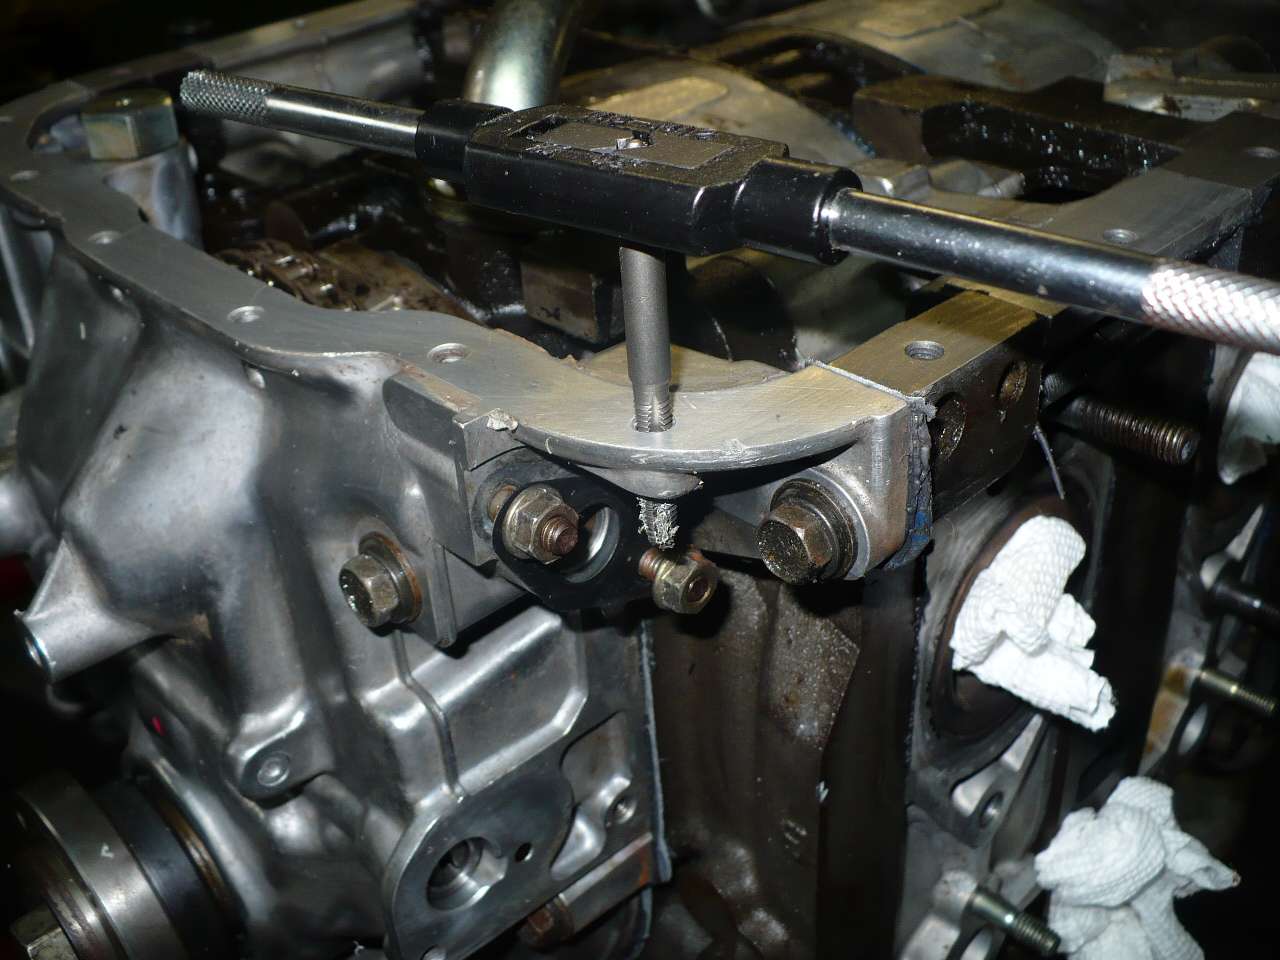
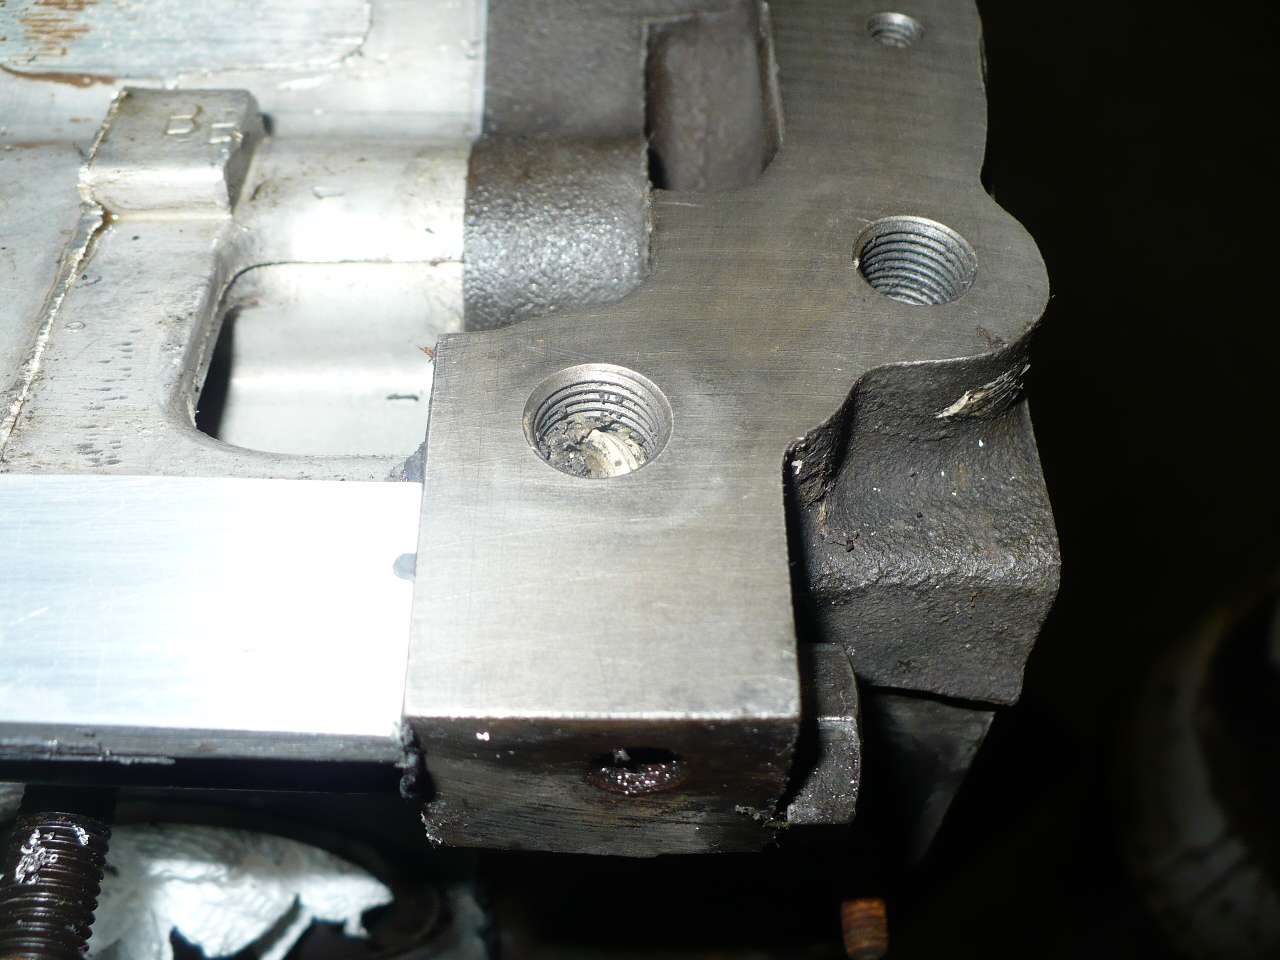
next up are the 18 bolt holes in the block and front cover. i find that 90% of my motors have an incredible amount of silicone accumulation in the holes so i tap each bolt hole. while it might sound like a lot of work after you see what comes out you will have no problem gaining the resolve to do them all. see pic
while you are at it, don't forget the motor mount bolt holes. most have a half inch of silicone at the bottom. grab a pick and remove it. there is, of course no reason to use silicone on the motor mount bolts as they are not in communication with oil.
so now both surfaces are clean, the bolt holes are tapped and it is time to not even think about using a gasket. gaskets are appropriate for certain things but not the oilpan. the newer silicones do the job and why try to seal two faces when you can just seal one?
///2016 UPDATE....... RE specific silicone recommendation, see bottom of Post One.../////////////
coat both surfaces sparingly and you are ready to reach for the bolts...
know this however on the subject of any silicone...
it takes the better part of a WEEK to fully cure. and when i say the better part i am talking probably 7 days at room temp and longer if it is a bit chilly in your garage in October.
sure, the outer part of the silicone on the exterior of the engine cures in a couple of days.
not on the inside where it counts.
so you do your pan job, you are tuckered out... you come back to the car in a couple of days, fill it w oil and go for a drive-- warming up the oil which, incidentally is ABOVE the silicone.
and the silicone isn't completely cured.
back to that handful of grimy silicone encased bunch of pan bolts...
run them thru the parts washer and clean the threads on your bench grinder's wire wheel. you want them looking shiny.
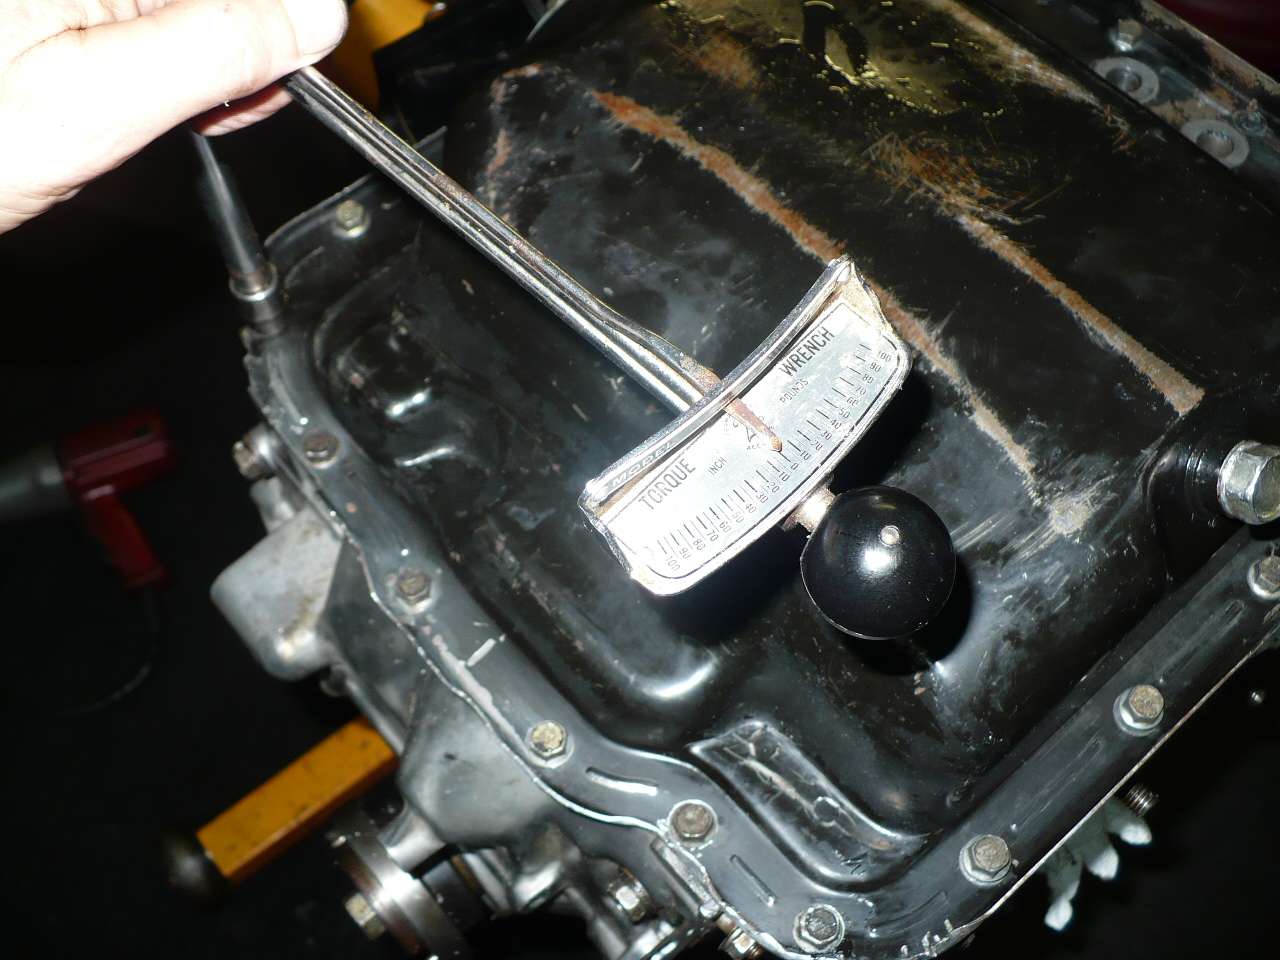
these are tiny bolts w a big job. the reason you tapped the bolt holes and cleaned the bolt threads was so you could get an accurate torque reading. and the number is 100 inch pounds.. there are loads of bolts on the FD that have 10 mm heads and an inch pound torque wrench is the proper tool for the job and not expensive.
after you have all the bolts secure grab your two motor mounts and mount them to the motor at 55 ft pounds. they will help set the silicone in the rear area..
finally, i wrap the outer pan lip to the motor w a band around the entire motor.
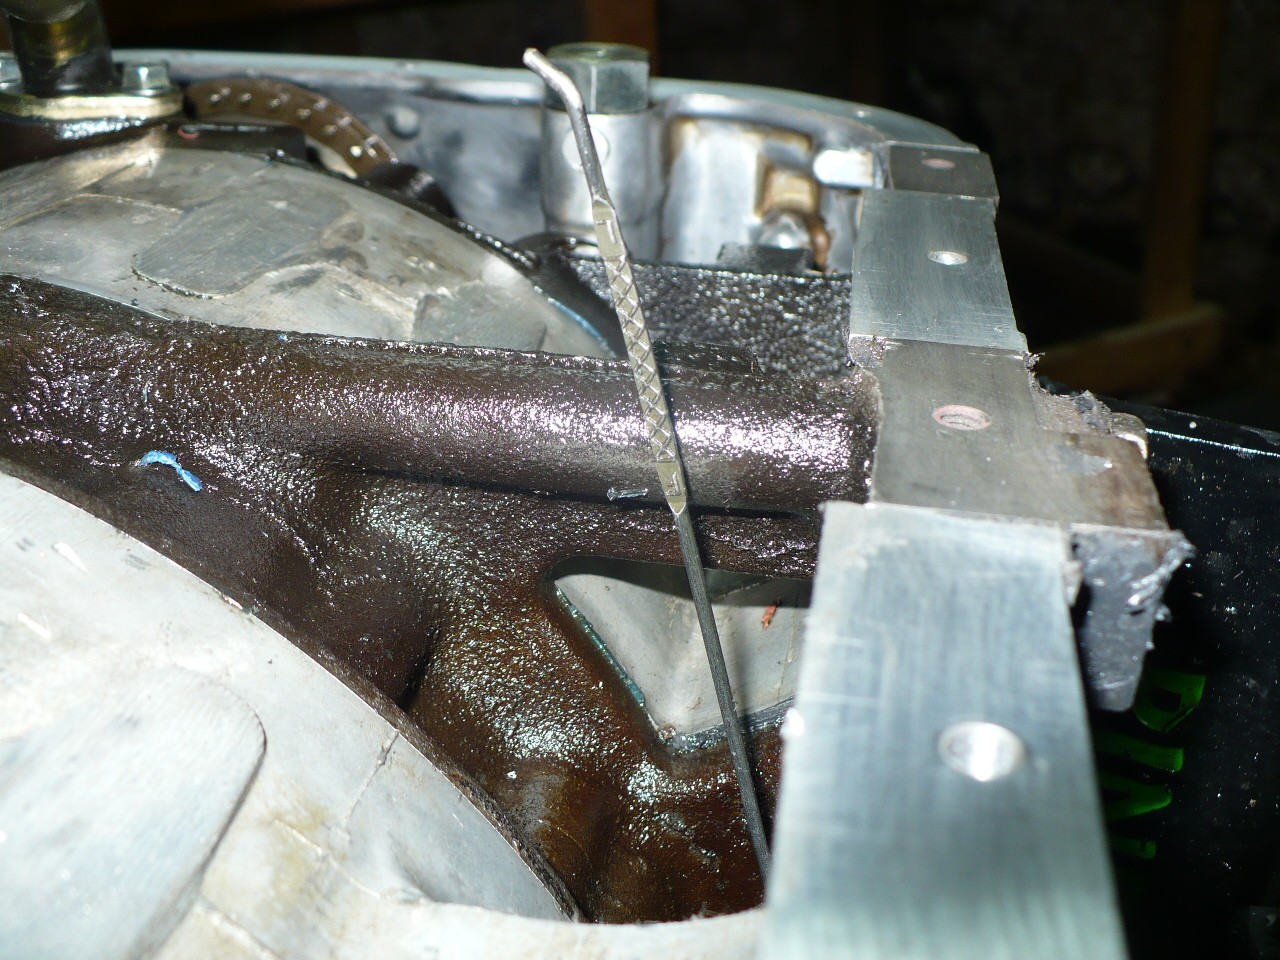
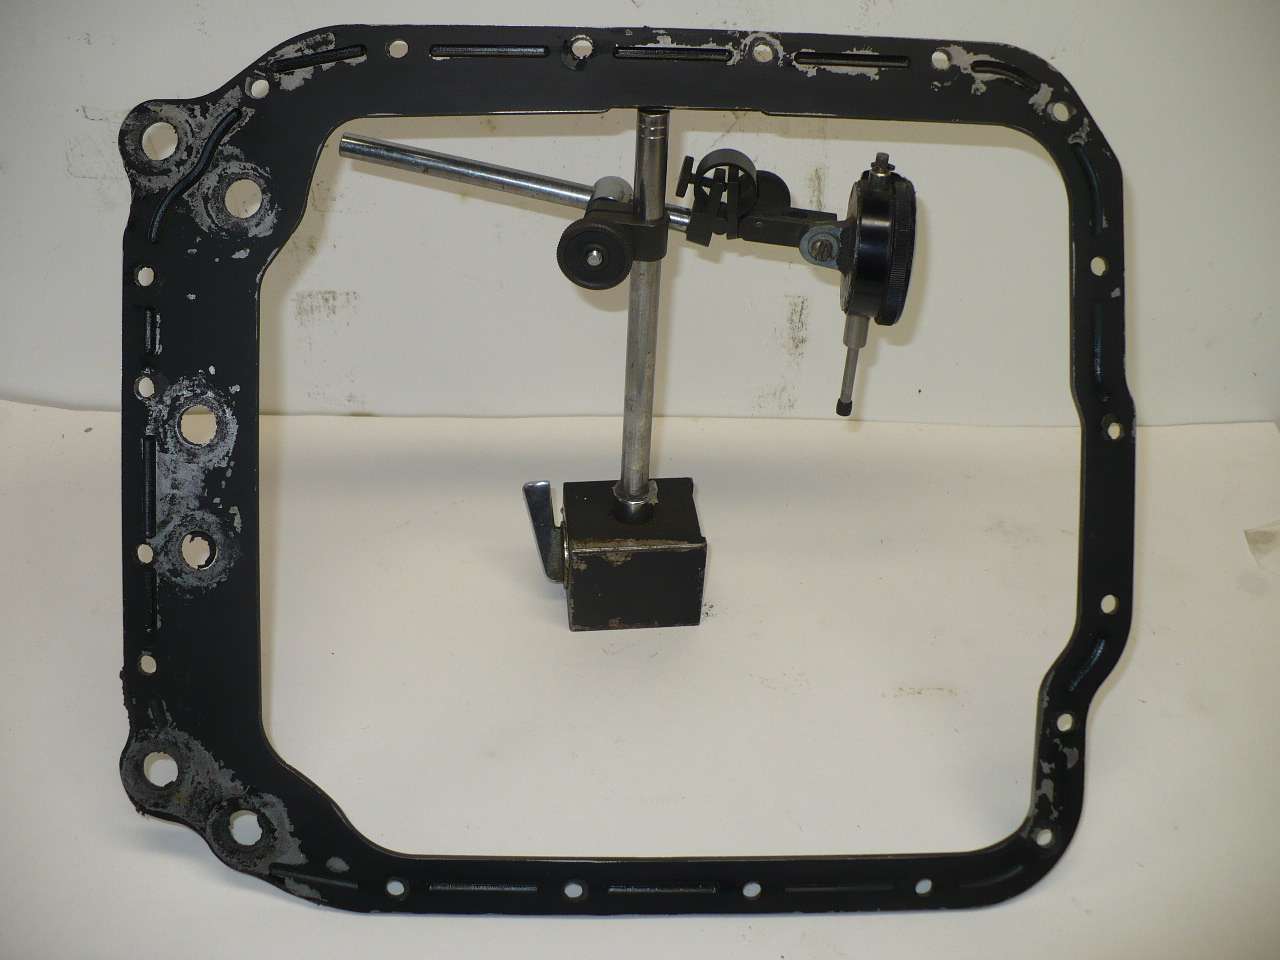
an additional item that i have ran for the better part of ten years and that i install on almost all the motors i build is David Garfinkle type engine block and oilpan brace. it is exquisitely engineered. just look carefully at the following two pics.
FD oilpans have 19 raised flutes for additional rigidity. David's design perfectly fits over the the flutes so when you crank down on the 18 pan bolts you are pressing only flat surfaces together. my current favorite is Chip's Motorsports. IRP also offers an acceptable brace..
so that's about all i have for you on oilpans... they are a major issue but if installed correctly should not leak. i invite and welcome any additional comments on the subject. no doubt much of what is here you may already know but this may be of help to some.
Jan 2, 2016 UPDATE.
the correct silicone sealer MATTERS. all Permatex silicone sealers including The RIGHT STUFF (going forward to be known as The Wrong Stuff) have updated packaging and ALL carry a larger warning statement.... Not to be used with gasoline..
gas gets in our oil. period.
i did a study of 7 silicone sealers. i allowed each to cure for a week and tested them w my durometer. a durometer is used in racing to test hardness of tires. it is a probe on a spring w a dial.
most silicones registered about 60. higher is harder.
i then placed them in gasoline and another batch in E85 for a week. most reacted similarly. those placed in E85 lost approx 5 points. those placed in gasoline lost 25 points and the material seemed changed. sort of spongy.
all but HondaBond.
HB maybe lost 5 points. ThreeBond make most silicone sealers( including ToyotaBond, YamahaBond, MazdaBond) that compete w Permatex. i have spent more than an hour on the phone w them (as well as Permatex) and have tested a couple of their products that are very close to HB. they set up similar to HB but i find them a bit runny to apply. they are also about half the cost.
so it is HondaBond for me. i don't think there is any question that some pans leak because they are sealed w a Permatex product and it has become porous.
howard
if you look carefully you will see that the "Full" level on the dipstick
is approx an inch above the pan rail!
in order to lower the CG of the FD Mazda chose to run a shallow pan necessitating the oil level to be above the pan rail. yikes!
combine this w the higher oil temps of the rotary and is it any wonder that there are lots and lots of "my oil pan is leaking" threads?
over 40% of the motors i disassemble have leaking oilpans. and all of them leak because of build errors. the FD pan, if properly installed doesn't have to leak.
i present no magic bullet here and there are numerous ways to get it done properly but my system works so i thought i would present it. others are very welcome to add here as the primary purpose of the thread is to help eliminate leaking pans.
first off a bit about preparation and supplies. i find a simple tool that holds a boxcutter blade laterally greatly speeds scraping the engine pan flange. once i have it mostly clean i grab a can of Walmart's wonderful Carb Cleaner and a piece of 3M Scotch Brite pictured below. this cleans all the residual silicone from the flange.
i then place the pan in a box of 2 X 4s 10 5/8 square interior dimension and attack it first w the scraper. at that point the remaining silicone is in the pan flutes. i use a wire wheel on a drill and it completely cleans the 19 flutes.
next up are the 18 bolt holes in the block and front cover. i find that 90% of my motors have an incredible amount of silicone accumulation in the holes so i tap each bolt hole. while it might sound like a lot of work after you see what comes out you will have no problem gaining the resolve to do them all. see pic
while you are at it, don't forget the motor mount bolt holes. most have a half inch of silicone at the bottom. grab a pick and remove it. there is, of course no reason to use silicone on the motor mount bolts as they are not in communication with oil.
so now both surfaces are clean, the bolt holes are tapped and it is time to not even think about using a gasket. gaskets are appropriate for certain things but not the oilpan. the newer silicones do the job and why try to seal two faces when you can just seal one?
///2016 UPDATE....... RE specific silicone recommendation, see bottom of Post One.../////////////
coat both surfaces sparingly and you are ready to reach for the bolts...
know this however on the subject of any silicone...
it takes the better part of a WEEK to fully cure. and when i say the better part i am talking probably 7 days at room temp and longer if it is a bit chilly in your garage in October.
sure, the outer part of the silicone on the exterior of the engine cures in a couple of days.
not on the inside where it counts.
so you do your pan job, you are tuckered out... you come back to the car in a couple of days, fill it w oil and go for a drive-- warming up the oil which, incidentally is ABOVE the silicone.
and the silicone isn't completely cured.
back to that handful of grimy silicone encased bunch of pan bolts...
run them thru the parts washer and clean the threads on your bench grinder's wire wheel. you want them looking shiny.
these are tiny bolts w a big job. the reason you tapped the bolt holes and cleaned the bolt threads was so you could get an accurate torque reading. and the number is 100 inch pounds.. there are loads of bolts on the FD that have 10 mm heads and an inch pound torque wrench is the proper tool for the job and not expensive.
after you have all the bolts secure grab your two motor mounts and mount them to the motor at 55 ft pounds. they will help set the silicone in the rear area..
finally, i wrap the outer pan lip to the motor w a band around the entire motor.
an additional item that i have ran for the better part of ten years and that i install on almost all the motors i build is David Garfinkle type engine block and oilpan brace. it is exquisitely engineered. just look carefully at the following two pics.
FD oilpans have 19 raised flutes for additional rigidity. David's design perfectly fits over the the flutes so when you crank down on the 18 pan bolts you are pressing only flat surfaces together. my current favorite is Chip's Motorsports. IRP also offers an acceptable brace..
so that's about all i have for you on oilpans... they are a major issue but if installed correctly should not leak. i invite and welcome any additional comments on the subject. no doubt much of what is here you may already know but this may be of help to some.
Jan 2, 2016 UPDATE.
the correct silicone sealer MATTERS. all Permatex silicone sealers including The RIGHT STUFF (going forward to be known as The Wrong Stuff) have updated packaging and ALL carry a larger warning statement.... Not to be used with gasoline..
gas gets in our oil. period.
i did a study of 7 silicone sealers. i allowed each to cure for a week and tested them w my durometer. a durometer is used in racing to test hardness of tires. it is a probe on a spring w a dial.
most silicones registered about 60. higher is harder.
i then placed them in gasoline and another batch in E85 for a week. most reacted similarly. those placed in E85 lost approx 5 points. those placed in gasoline lost 25 points and the material seemed changed. sort of spongy.
all but HondaBond.
HB maybe lost 5 points. ThreeBond make most silicone sealers( including ToyotaBond, YamahaBond, MazdaBond) that compete w Permatex. i have spent more than an hour on the phone w them (as well as Permatex) and have tested a couple of their products that are very close to HB. they set up similar to HB but i find them a bit runny to apply. they are also about half the cost.
so it is HondaBond for me. i don't think there is any question that some pans leak because they are sealed w a Permatex product and it has become porous.
howard
Last edited by Howard Coleman; Jun 9, 2025 at 08:32 PM.
10-8-10-8
Joined: Jan 2012
Posts: 848
Likes: 12
From: Australia
Nice pictures Howard 
I have often wondered about the factory's decision to run a full sump of oil at a level ABOVE the sump gasket joint. I know they were trying to get the CG low, but this causes all kinds of pan gasket leakage problems, when the gasket HAS to seal, or the oil will persist to gravity leak out of between the pan gasket
Your method is very similar to how I do the sumps on mine, except that I dont normally tap the holes for clean out, unless they look visually full of crud. I use a little plastic scraper thing I found for $2.00, which clips open and accepts a replaceable ordinary razor blade in the end, as the scraping blade. I use the scotchbrite too, but I soak it in paint thinners or prepwash, to help it attack. After replacing the sump on my auto FD due to a previous leak, it has not leaked for 2+ years and running

Why does the pan look like it has drugged on the ground a few times.
How low is that 7?
I have been thread cleaning all engine fasteners on all engines that I have rebuilt.
That includes; bolts, studs, nuts, and threaded holes.
Also have three torque wrenches; small 3/8" in inch pounds, medium 3/8" in foot pounds, and large 1/2" in foot pounds.
This insures an easier installation and the proper tools for tightening them.
Most important is using the recommended mid range torque value.
Every time I hear someone say; "I broke a bolt or stud when tightening it." I laugh.
Proper anti-seize for exhaust/turbo fasteners is required.

if you look carefully you will see that the "Full" level on the dipstick
is approx an inch above the pan rail!
is approx an inch above the pan rail!
Is this somehow related to the fact that the only way to keep oil out of the catchcan is to run 1/2 quart low?
I ask because that is my experience, and the experience of others on the forum.
If the oil is topped off, the catch can soon gets 1/2 quart of oil in it.
And when the catch can gets too full, it start blowing some out the vent.
Not meaning to pull your thread off topic, but it was just too coincidental to ignore.
it takes the better part of a WEEK to fully cure. and when i say the better part i am talking probably 7 days at room temp and longer is it is a bit chilly in your garage in October.
sure, the outer part of the silicone on the exterior of the engine cures in a couple of days.
not on the inside where it counts.
so you do your pan job, you are tuckered out... you come back to the car in a couple of days, fill it w oil and go for a drive-- warming up the oil which, incidentally is ABOVE the silicone.
and the silicone isn't completely cured.
howard
You know it's funny that you mentioned the 7 day drying period. I just recently finished fabbing and welding up my own thick base plate large capacity aluminum sumpted 20b oil pan for my Fd. I had to do something as my engine is so low that the factory oil pan was only 2" from the ground. Didn't take long to get all dented up. Anways I just now bolted it up to the engine late last week and noticed the 7 day waiting period on the silicone. I think for future rebuild reference that I may stick a tube inside the oil fill neck to run some air to help speed things up.

Trending Topics
Thread Starter
Joined: Oct 2001
Posts: 6,279
Likes: 724
From: Florence, Alabama
"that the only way to keep oil out of the catchcan is to run 1/2 quart low?"
one item i neglected to mention in the initial post was that i find my engine requires 4.3 quarts after an oil change. i would be overfilling if i added the "normal" 5 quarts. even w the 4.3 quarts i am at the Full mark and therefore an inch or so above the pan block intersection.
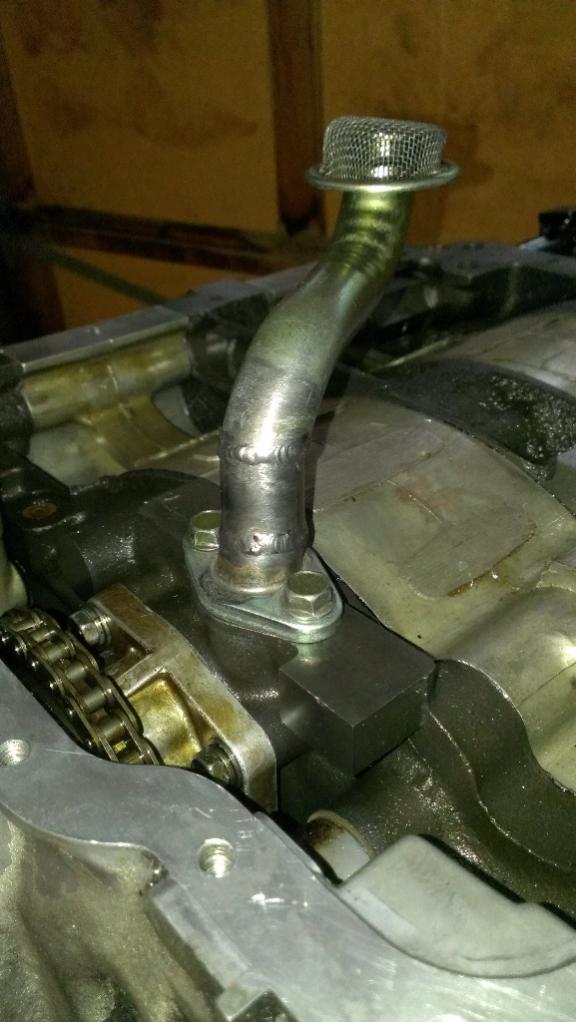
BTW, to aid windage (crankcase ventilation) i strongly suggest, and have run for 5 years, using the rear oil pan drain as an additional vent. this applies to anyone running a single turbo. generally the front vent is used as an oil drain for the turbo but the rear oil drain port should be used as a vent. i brazed a 90 fitting on the baseplate, ran the line upward alongside the block (w protection against exhaust heat) to a 90 degree, across the the motor to my catch tank that services both that line and the line from the oil filler neck.
that way you double ventilation and have ventilation on both right and left turns.
Ceylon is correct, torque the bolts to spec immediately. it is a good question and IMO there are no "dumb" questions. we are all here to learn and share and none of us has all the answers.
"I use the scotchbrite too, but I soak it in paint thinners" thanks for that. i neglected to mention i do hit the scotch brite w carb cleaner. do not use the green SB, use the rust colored as shown in the pic.
hc
one item i neglected to mention in the initial post was that i find my engine requires 4.3 quarts after an oil change. i would be overfilling if i added the "normal" 5 quarts. even w the 4.3 quarts i am at the Full mark and therefore an inch or so above the pan block intersection.
BTW, to aid windage (crankcase ventilation) i strongly suggest, and have run for 5 years, using the rear oil pan drain as an additional vent. this applies to anyone running a single turbo. generally the front vent is used as an oil drain for the turbo but the rear oil drain port should be used as a vent. i brazed a 90 fitting on the baseplate, ran the line upward alongside the block (w protection against exhaust heat) to a 90 degree, across the the motor to my catch tank that services both that line and the line from the oil filler neck.
that way you double ventilation and have ventilation on both right and left turns.
Ceylon is correct, torque the bolts to spec immediately. it is a good question and IMO there are no "dumb" questions. we are all here to learn and share and none of us has all the answers.
"I use the scotchbrite too, but I soak it in paint thinners" thanks for that. i neglected to mention i do hit the scotch brite w carb cleaner. do not use the green SB, use the rust colored as shown in the pic.
hc
Last edited by Howard Coleman; Jun 28, 2013 at 07:04 PM.
Running a catch can and just venting from the oil fill neck alone is not good enough to properly vent the crank case. Just as howard said, running a catch can with two inputs (one from the rear turbo drain port on the rear plate and the other from the oil fill neck) is the way to go.
BTW, to aid windage (crankcase ventilation) i strongly suggest, and have run for 5 years, using the rear oil pan drain as an additional vent. this applies to anyone running a single turbo. generally the front vent is used as an oil drain for the turbo but the back vent should be used as a vent. i brazed a 90 fitting on the baseplate, run the line upward alongside the block (w protection against exhaust heat) to a 90 degree, across the the motor to my catch tank that services both that line and the line from the oil filler neck.
Running 1/2 quart low is not a problem really, not with the extra capacity of a Pineapple oil pan and dual oil coolers.
Filling my car to be 1/2 quart low takes just shy of 5 quarts of oil.
(that is without draining the oil coolers)
Mostly I would just like to understand why that 1/2 quart of oil always gets blown out.
for those that run a lower extra capacity oil pan like Xcessive, would it make sense to add an adapter to the oil pickup tube to lower it and also make a longer dipstick so that your "full" mark if just below the flange?

i found 'the right stuff' probably 5 years ago. at 14$ a can, its a lot more expensive but its very much worth it. nothing else comes close. my cars never leak a drop of anything in stark contrast to friends that use standard black/grey/red/whatever silicone whos cars leak like a siv.
^This!
Running a catch can and just venting from the oil fill neck alone is not good enough to properly vent the crank case. Just as howard said, running a catch can with two inputs (one from the rear turbo drain port on the rear plate and the other from the oil fill neck) is the way to go.
Running a catch can and just venting from the oil fill neck alone is not good enough to properly vent the crank case. Just as howard said, running a catch can with two inputs (one from the rear turbo drain port on the rear plate and the other from the oil fill neck) is the way to go.
I'd like to see a solution for TT owners on this.
I also am going to add a notch to my dipstick at flange height so that I know exactly how far above or below the flange my oil is.

Joined: Mar 2001
Posts: 31,796
Likes: 3,210
From: https://www2.mazda.com/en/100th/
I have been thread cleaning all engine fasteners on all engines that I have rebuilt.
That includes; bolts, studs, nuts, and threaded holes.
Also have three torque wrenches; small 3/8" in inch pounds, medium 3/8" in foot pounds, and large 1/2" in foot pounds.
This insures an easier installation and the proper tools for tightening them.
Most important is using the recommended mid range torque value. .


Joined: Nov 2011
Posts: 3,425
Likes: 489
From: okinawa to tampa
great write up. i will be doing a small "refurbish" of my engine soon and the oil pan is one thing i plan on fixing.
what size tap did you use?
would it make a difference to tap the oil pan bolt holes to accept a larger bolt?
what size tap did you use?
would it make a difference to tap the oil pan bolt holes to accept a larger bolt?

The best way to address this with the engine still in the car is to raise the car on a lift or floor jackss, then brace the engine with another jack or suspend the engine with an engine lift. Then remove the engine frame and motor mounts from the car. This will allow you unfettered access to the oil pan for resealing.

I had a forum member PM me about going into more detail about how I extended my oil pickup when using the Xcessive pan, so I figured I would just share it here...step by step. (Sorry, I don't remember any dimensions and didn't take pictures of this process).
1. Lay a piece of flat bar stock across the oil pan rails and measure the depth of the pan. (Make sure you take into account the thickness of the bar with any measurements).
2. With the pickup bolted to the block, lay the flat bar stock across the engine under the pickup and measure the height of the pickup.
3. Do math. (Pan depth - pickup height - desired pickup clearance = extension length)
4. Mark pickup horizontally where you want to cut it above mounting flange. (A permanent mark like a scratch works best)
5. Mark pickup vertically across horizontal mark so that you can realign it correctly after cutting.
6. Cut pickup tube above mounting flange and measure inside/outside diameter of tubing.
7. Get new tubing (make sure it is the correct size ID and OD) and cut new tubing to length.
8. Debur and clean all tubing that will be welded.
9. Tack weld tubing in between cut sections and ensure proper alignment using vertical mark.
10. Reinstall pickup to block and measure to make sure everything is correct how you want it. (Test fit the pan is also a good idea at this point)
11. Remove the pickup and finish weld the extension. (Be sure to debur the inside of the tube after welding and make sure it is clean of all debris)
12. Install extended pickup and oil pan....done.
Also, here is a link to the first part of my build in MotoIQ where I show this extension along with the custom baffling I fabricated for my Xcessive oil pan.
MotoIQ Project FD RX-7
My oil pan is vented by the rear iron and oil filler neck with -10 line and large oil catch can. 2yrs haven't see a drop of oil. I believe once sealed correctly venting is a must. Get rid of the PVC valve!