How I Fixed my S5 Tail Light Lens
 01-21-07, 05:48 PM
#1
How I Fixed my S5 Tail Light Lens
I recently picked up a pair of S5 tails that had accident damage on the left corner. My plan had been to buy a replacement orange corner lens from Mazda, and simply replace the broken piece. I called Mazda and placed the order, only to find that those pieces have been discontinued - and no warehouse has any in stock... at least in Canada anyway! So, while I am still looking for a dealer or warehouse that has them in stock, I decided to do an interm fix. If anyone knows where I can get a new lens, shoot me a PM! 
Anyway, this is not meant to be a definitive "HOW-TO" thread. I am just sharing with you how I went about fixing the lens on my tail lights. It was never meant to be a seemless fix or permanent replacement, as I still hope to find a new corner lens. My goal was to seal it and make it functional, while keeping the appearence respectable. On with the thread....
So, get your smocks on kids, it's arts and crafts time!
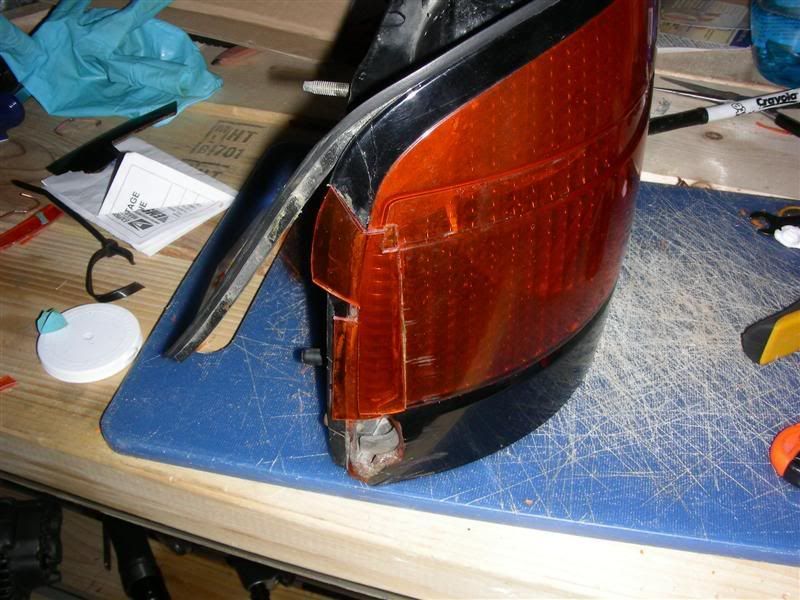
Here is a picture of the damage I started off with - as you can see it is pretty severe. Luckily, the broken part was confined to the outermost corner:

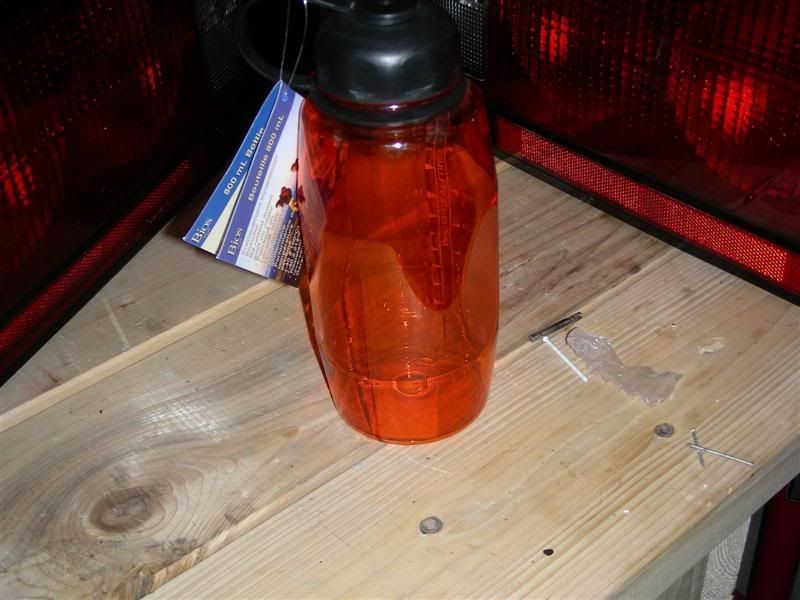
So, off to the local Canadian Tire. For you guys who don't know what that is, it's a mix of Wal Mart and Pep Boys. Anyway, for $2.89, I picked up the following item - similar colour and material to the lens I was looking to repair. That's right, this drinking bottle would serve as a donor.
With a dremel and an exacto knife, I then began to cut away the jagged and broken edges of the corner lens, and made sure that everything was clean. The dremel cut well but did melt the plastic a bit, so the exacto and some sandpaper was needed to finish the edge. Here's a pic part way through. The goal was to make an edge that was relatively straight and eliminate all the cracked plastic.

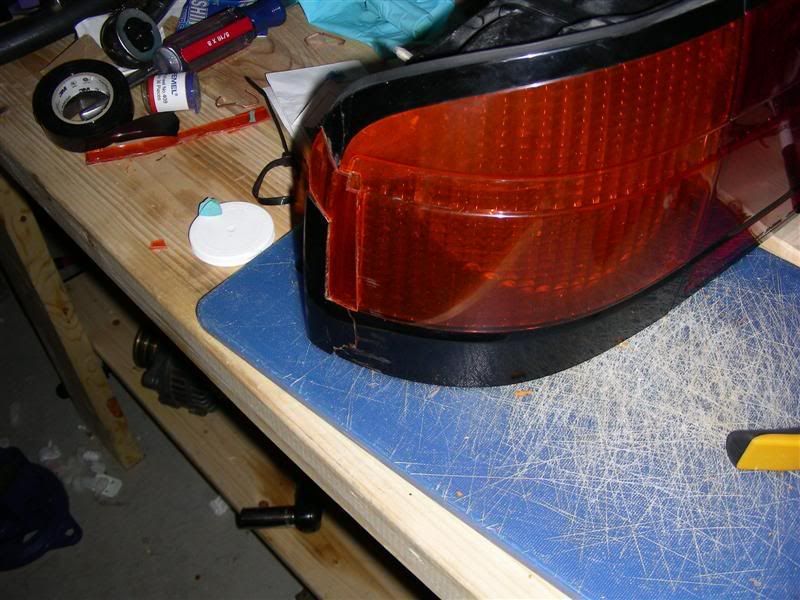
Then the "arts and crafts" started. Using some cardboard and masking tape I made a template of the space I wanted to fill. Again with the dremel and an exacto I cut up the donor water bottle. Luckily the curve of the bottle was pretty close to the curve of the lens at that location. After some test fitting and some adjustments, I eneded up with a piece that fit quite well. Here are a couple shots of it fit in place. As you can see, the colour and curvature are pretty similar to the actual light.
From there it was a matter of securing it in place. I used a clear silicone that is used for repairing windshield cracks and chips. It bonds well to all plastics and is designed to "bleed" or flow into small cracks. It was exactly what I needed to make the fix water tight. I used it everywhere the patch met the existing lens. Once it had dried I submerged that end of the light in water to test it, and sure enough it kept the water out. I'm sure over time in the elements it's waterfastness will seteriorate and I'll need to do some patches, but for now it will keep everything inside dry. Then all I needed to do was paint the exterior black, reattach the weather strip and install it on the car,
After the first coat of paint:

And then the final product after two coats of paint, some light buffing and a clear coat. Here it is installed on the car:

As I said before, it is not perfect and that's fine as hopefully it wont be permanent. But at least from 10 feet away it doesn't look really bad. I suppose the bottom line is that it looks a hell of a lot better than it did when I started, it is water tight and including the price of the silicone, it cost me less than $10 to fix.
Anyway, this is not meant to be a definitive "HOW-TO" thread. I am just sharing with you how I went about fixing the lens on my tail lights. It was never meant to be a seemless fix or permanent replacement, as I still hope to find a new corner lens. My goal was to seal it and make it functional, while keeping the appearence respectable. On with the thread....
So, get your smocks on kids, it's arts and crafts time!
Here is a picture of the damage I started off with - as you can see it is pretty severe. Luckily, the broken part was confined to the outermost corner:
So, off to the local Canadian Tire. For you guys who don't know what that is, it's a mix of Wal Mart and Pep Boys. Anyway, for $2.89, I picked up the following item - similar colour and material to the lens I was looking to repair. That's right, this drinking bottle would serve as a donor.
With a dremel and an exacto knife, I then began to cut away the jagged and broken edges of the corner lens, and made sure that everything was clean. The dremel cut well but did melt the plastic a bit, so the exacto and some sandpaper was needed to finish the edge. Here's a pic part way through. The goal was to make an edge that was relatively straight and eliminate all the cracked plastic.
Then the "arts and crafts" started. Using some cardboard and masking tape I made a template of the space I wanted to fill. Again with the dremel and an exacto I cut up the donor water bottle. Luckily the curve of the bottle was pretty close to the curve of the lens at that location. After some test fitting and some adjustments, I eneded up with a piece that fit quite well. Here are a couple shots of it fit in place. As you can see, the colour and curvature are pretty similar to the actual light.
From there it was a matter of securing it in place. I used a clear silicone that is used for repairing windshield cracks and chips. It bonds well to all plastics and is designed to "bleed" or flow into small cracks. It was exactly what I needed to make the fix water tight. I used it everywhere the patch met the existing lens. Once it had dried I submerged that end of the light in water to test it, and sure enough it kept the water out. I'm sure over time in the elements it's waterfastness will seteriorate and I'll need to do some patches, but for now it will keep everything inside dry. Then all I needed to do was paint the exterior black, reattach the weather strip and install it on the car,
After the first coat of paint:
And then the final product after two coats of paint, some light buffing and a clear coat. Here it is installed on the car:
As I said before, it is not perfect and that's fine as hopefully it wont be permanent. But at least from 10 feet away it doesn't look really bad. I suppose the bottom line is that it looks a hell of a lot better than it did when I started, it is water tight and including the price of the silicone, it cost me less than $10 to fix.
 01-21-07, 06:02 PM
#2
New User
Join Date: Oct 2005
Location: Kansas City
Posts: 507
Likes: 0
Received 0 Likes
on
0 Posts
you sir have way to much time on your hands
that does looks really good though. I'll stop off at the mazda dealership tommorow and see if they can find what you need. I'll let you know on price if they have it.
that does looks really good though. I'll stop off at the mazda dealership tommorow and see if they can find what you need. I'll let you know on price if they have it.


Trending Topics

 01-22-07, 11:01 AM
#12
Thanks for the compliments guys! I think of it less as a "How-To" than a "How I did". I think the people at Canadian Tire thought I was a bit nuts as I was wondering around the aisles looking at everthing that was clear orange plastic! lol
lol - I like to think it's creative use of my time rather than too much time. 
I called a Mazda dealer in Washington state and they said they'd call me back - but no word yet. Thanks for looking into it!
I think of it less as a "How-To" than a "How I did". I think the people at Canadian Tire thought I was a bit nuts as I was wondering around the aisles looking at everthing that was clear orange plastic! lol
Originally Posted by liv
you sir have way to much time on your hands
that does looks really good though. I'll stop off at the mazda dealership tommorow and see if they can find what you need. I'll let you know on price if they have it.
that does looks really good though. I'll stop off at the mazda dealership tommorow and see if they can find what you need. I'll let you know on price if they have it.
I called a Mazda dealer in Washington state and they said they'd call me back - but no word yet. Thanks for looking into it!
01-22-07, 11:02 AM
#13
01-22-07, 11:09 AM
#14
Saiga-12 Power!
iTrader: (4)
Join Date: Oct 2004
Location: N of Chicago
Posts: 4,384
Likes: 0
Received 0 Likes
on
0 Posts
Originally Posted by gospeedgo
I started to laugh as I scrolled down and saw the bottle, but wow... great job !
Nice work. You can hardly tell in the pics. If you sold the car as it is now I doubt any perspective buy would ever notice it unless you pointed it out. LoL
01-22-07, 07:46 PM
#18
Originally Posted by classicauto
Sweet Nik!
When I saw what you'd done I wondered how you got the piece of orange lens! but - water bottle - BRILLIANT!! lol
When I saw what you'd done I wondered how you got the piece of orange lens!
but - water bottle - BRILLIANT!! lol
Originally Posted by Juiceh
+1
Nice work. You can hardly tell in the pics. If you sold the car as it is now I doubt any perspective buy would ever notice it unless you pointed it out. LoL
Nice work. You can hardly tell in the pics. If you sold the car as it is now I doubt any perspective buy would ever notice it unless you pointed it out. LoL
Originally Posted by silverrotor
Nice work Nik. It doesn't surprise me how you restored the lenses. I've seen your work before and your attention to detail.
Originally Posted by micaheli
You are a freak! Awesome work! Mind if I throw this on my wiki?
Awesome work! Mind if I throw this on my wiki?
01-22-07, 08:34 PM
#19
Winter sucks
Join Date: Jan 2004
Location: Newberg, Oregon
Posts: 3,083
Likes: 0
Received 0 Likes
on
0 Posts
02-06-07, 12:22 PM
#23
Junior Member

Join Date: Jan 2007
Location: Vancouver BC Canada
Posts: 5
Likes: 0
Received 0 Likes
on
0 Posts
You know how the lens on the tail lights are kind of hazy with that small square patterns all over it? I wonder if anyone has thought of , or tried to buff them all out so it's all nice and clear :/ Kinda like the tail lights on modern cars when they have LEDs. Its a nice crisp colour. I want that lol
btw, wonderful job on that repair
btw, wonderful job on that repair
02-06-07, 09:16 PM
#24
Originally Posted by Mitsuii
You know how the lens on the tail lights are kind of hazy with that small square patterns all over it? I wonder if anyone has thought of , or tried to buff them all out so it's all nice and clear :/ Kinda like the tail lights on modern cars when they have LEDs. Its a nice crisp colour. I want that lol
btw, wonderful job on that repair
btw, wonderful job on that repair
The square "checker" pattern on the lens is actually an entirely seperate piece. It's clear plastic and sits between the bulb and lens, diffusing the bulb's light.
There is a member on the board who removed this diffuser, I think the title of the thead was "S5 Tail lights Modernized" or something......
Edit: There you go!
https://www.rx7club.com/2nd-generation-specific-1986-1992-17/s5-taillights-%2Amodernized%2A-pics-392954/