Ford Tempo/Escort Alternator Write up. NOT 56k friendly...
 03-19-09, 04:05 PM
#1
Lima!!!
Thread Starter
iTrader: (1)
Join Date: Feb 2007
Location: Pembroke Pines FL
Posts: 208
Likes: 0
Received 0 Likes
on
0 Posts
Ford Tempo/Escort Alternator Write up. NOT 56k friendly...
This is for those guys who showed interest here.
https://www.rx7club.com/2nd-generation-specific-1986-1992-17/ford-tempo-alternator-write-up-826764/
And anyone else who may consider doing this.
Ok, since I was wondering if a Ford Tempo Alternator would fit, I decided to try to retro fit it onto the car. And It fits. This is how I did it. I fit the
Alt onto my S4 N/A convertible Rx-7 so for your S5 things may be a little different.
Here are some pics of the alternators side by side.
The S4 alternator is on the left


These are the things you will need.
-Tools
-Sockets, wrenches, wire cutters/strippers/crimpers, rachets, and make sure you have a socket up to a size 27MM for the alt pulley.
-A 1992-1994 Ford Tempo Alt. OR a 1991-1996 Ford Escort Alt.
- Power Drill
- Power Impact gun (optional, used to remove pulleys)
- Voltmeter/Multimeter (optional for testing Alt output)
- A series of washers )used to properly space the alt)
- Make sure to keep the braket for the alt.
- A Step drill bit
- Needs to be of 1/16 increments from 1/4, 5/16, 3/8, 7/16, 1/2, 9/16, 5/8, 11/16, and 3/4
(I used this to bore out the alt pulley, I had a dual Alt pulley from Mazdatrix that is made out of aluminium. You can drill the aluminium pulley but you
CANNOT drill out the stock steel pulley.)
https://www.rx7club.com/2nd-generation-specific-1986-1992-17/ford-tempo-alternator-write-up-826764/
And anyone else who may consider doing this.
Ok, since I was wondering if a Ford Tempo Alternator would fit, I decided to try to retro fit it onto the car. And It fits. This is how I did it. I fit the
Alt onto my S4 N/A convertible Rx-7 so for your S5 things may be a little different.
Here are some pics of the alternators side by side.
The S4 alternator is on the left
These are the things you will need.
-Tools
-Sockets, wrenches, wire cutters/strippers/crimpers, rachets, and make sure you have a socket up to a size 27MM for the alt pulley.
-A 1992-1994 Ford Tempo Alt. OR a 1991-1996 Ford Escort Alt.
- Power Drill
- Power Impact gun (optional, used to remove pulleys)
- Voltmeter/Multimeter (optional for testing Alt output)
- A series of washers )used to properly space the alt)
- Make sure to keep the braket for the alt.
- A Step drill bit
- Needs to be of 1/16 increments from 1/4, 5/16, 3/8, 7/16, 1/2, 9/16, 5/8, 11/16, and 3/4
(I used this to bore out the alt pulley, I had a dual Alt pulley from Mazdatrix that is made out of aluminium. You can drill the aluminium pulley but you
CANNOT drill out the stock steel pulley.)
 03-19-09, 04:06 PM
#2
Lima!!!
Thread Starter
iTrader: (1)
Join Date: Feb 2007
Location: Pembroke Pines FL
Posts: 208
Likes: 0
Received 0 Likes
on
0 Posts
K here goes...
-1-
Once you are ready to begin, disconnect/remover the battery.
-2-
Remove the alt from the car.
I am assuming you guys already know how to do this, so I am going to skip the description.
-3-
Remove the pulleys from both alternators
-The rx-7 pulley has a 22mm nut and the Tempo pulley has a 27mm nut. It may differ, but these are the ones I had.
-My handy electric impact gun, helped me out on this one

-Be sure to keep the spacer used on the 7 altenator as you may choose to reuse it like I did.
-4-
Bore out the hole of the 7 pulley to make it fit the Tempo pulley
-I had the Mazdatrix dual alt pulley, it is made out of Aluminium, so I was able to bore out the hole. I believe the stock pulley is made of steel
and you will have more trouble boring out the hole.
-Make sure to keep the drill the pulley as centered as possible, an improperly drilled pulley will cause vibrations, and possible damage the alt.
This is where I used the step drill bit


I drilled out both sides to the 5/8 size on the pulley, and then took it a step further on the back side of the pulley to 11/16
So the front half was drilled to 5/8 and the rear half was drilled to 11/16.
You can see here

-5-
I used the spacer from the s4 alt pulley and had to drill that out as well. I grabbed a vice grip to hold the spacer, and drilled out the entire bore to
11/16 size
This is the s4 alt spacer


-1-
Once you are ready to begin, disconnect/remover the battery.
-2-
Remove the alt from the car.
I am assuming you guys already know how to do this, so I am going to skip the description.
-3-
Remove the pulleys from both alternators
-The rx-7 pulley has a 22mm nut and the Tempo pulley has a 27mm nut. It may differ, but these are the ones I had.
-My handy electric impact gun, helped me out on this one
-Be sure to keep the spacer used on the 7 altenator as you may choose to reuse it like I did.
-4-
Bore out the hole of the 7 pulley to make it fit the Tempo pulley
-I had the Mazdatrix dual alt pulley, it is made out of Aluminium, so I was able to bore out the hole. I believe the stock pulley is made of steel
and you will have more trouble boring out the hole.
-Make sure to keep the drill the pulley as centered as possible, an improperly drilled pulley will cause vibrations, and possible damage the alt.
This is where I used the step drill bit
I drilled out both sides to the 5/8 size on the pulley, and then took it a step further on the back side of the pulley to 11/16
So the front half was drilled to 5/8 and the rear half was drilled to 11/16.
You can see here
-5-
I used the spacer from the s4 alt pulley and had to drill that out as well. I grabbed a vice grip to hold the spacer, and drilled out the entire bore to
11/16 size
This is the s4 alt spacer
03-19-09, 04:07 PM
#3
Lima!!!
Thread Starter
iTrader: (1)
Join Date: Feb 2007
Location: Pembroke Pines FL
Posts: 208
Likes: 0
Received 0 Likes
on
0 Posts
-6-
Use the bored bushing/spacer from the s4 alt and place it onthe the Tempo pulley shaft.
Place it in this order; the spacer, the pulley, the nut. You may choose to put a washer before the nut, but I didn't have any and chose not to put one.
Install the peices and tighten the nut.


It should look like this once completed

The spacer will give the pulley about 2mm of clearance on the alt, if not the pulley WILL RUB on the alt housing. So you can use the modified S4 pulley
spacer or find your own, whichever works best for you..
-7-
Remove both plugs from the Tempo alt
-8-
Begin the wiring.
- I used two male spade connector on the end of the wires needed to be installed on the car. This way, you can put the spade connectors into the
origonal plug on the car and do not have to modify the stock harness.

- I am sorry, I was unable to grab very many pics of the wiring because my photographer had left the house and took his camera...I will get more if
requested.
- There are 3 wires on the main plug of the alt, all 3 will be used, 2 will be installed onto the car, the last will go back the the alternator.
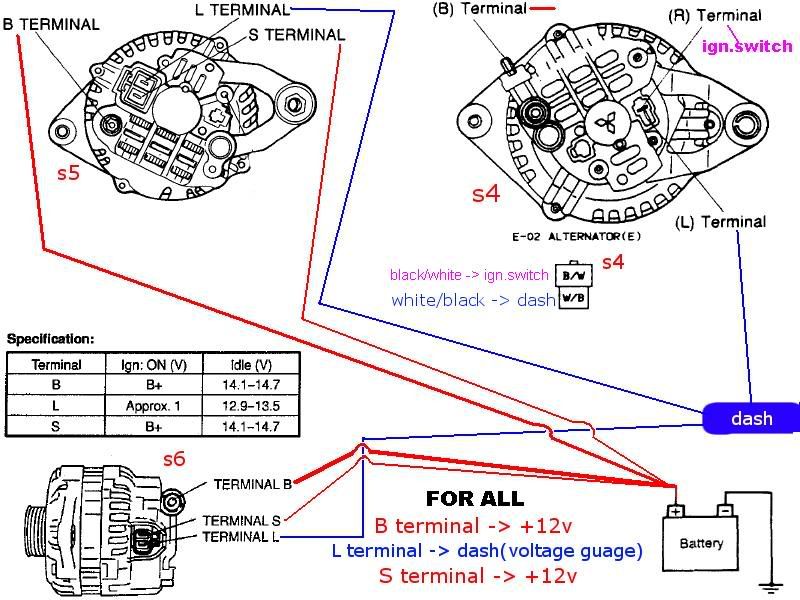
- Wire colors are as follows; The first color is the color of the WHOLE wire, the second color is the STRiPED color of the wire.
- The White/black wire will connect to the white/black wire on the 7 / Dash
- The white/green wire will connect to the black/white wire on the 7 / Ignition
- The white/blue wire will be used by the alternator itself, there is no need to modify/remove this wire, it already has a plug to connect itself the
the alt.
- The Battery terminal on the Tempo alt will go the the solid black wire used on the B terminal of the s4 alt.
These are what the spade wires looked like before I connected them to the 7 plug

- Please remember this is for a S4 N/A Rx-7, Your S5 or S^ will have different wiring, but you can use this to help you.
DO NOT give me credit for this pic, I searched and found this on the forum, I do not know who made it. But I will not take credit for the pis as it is not
mine.
When you are finished, Reconnect the plug back to the alternator, you will not be able to connect the plug when it is on the car.
Use the bored bushing/spacer from the s4 alt and place it onthe the Tempo pulley shaft.
Place it in this order; the spacer, the pulley, the nut. You may choose to put a washer before the nut, but I didn't have any and chose not to put one.
Install the peices and tighten the nut.
It should look like this once completed
The spacer will give the pulley about 2mm of clearance on the alt, if not the pulley WILL RUB on the alt housing. So you can use the modified S4 pulley
spacer or find your own, whichever works best for you..
-7-
Remove both plugs from the Tempo alt
-8-
Begin the wiring.
- I used two male spade connector on the end of the wires needed to be installed on the car. This way, you can put the spade connectors into the
origonal plug on the car and do not have to modify the stock harness.
- I am sorry, I was unable to grab very many pics of the wiring because my photographer had left the house and took his camera...I will get more if
requested.
- There are 3 wires on the main plug of the alt, all 3 will be used, 2 will be installed onto the car, the last will go back the the alternator.
- Wire colors are as follows; The first color is the color of the WHOLE wire, the second color is the STRiPED color of the wire.
- The White/black wire will connect to the white/black wire on the 7 / Dash
- The white/green wire will connect to the black/white wire on the 7 / Ignition
- The white/blue wire will be used by the alternator itself, there is no need to modify/remove this wire, it already has a plug to connect itself the
the alt.
- The Battery terminal on the Tempo alt will go the the solid black wire used on the B terminal of the s4 alt.
These are what the spade wires looked like before I connected them to the 7 plug
- Please remember this is for a S4 N/A Rx-7, Your S5 or S^ will have different wiring, but you can use this to help you.
DO NOT give me credit for this pic, I searched and found this on the forum, I do not know who made it. But I will not take credit for the pis as it is not
mine.
When you are finished, Reconnect the plug back to the alternator, you will not be able to connect the plug when it is on the car.
03-19-09, 04:07 PM
#4
Lima!!!
Thread Starter
iTrader: (1)
Join Date: Feb 2007
Location: Pembroke Pines FL
Posts: 208
Likes: 0
Received 0 Likes
on
0 Posts
-9-
Loosen the alt bracket so that it can move out of the way. You do not need to remove it.
Then place the alternator where it is supposed to go, and place in the bolt on the bottom half of the alt.
I needed to use quite a few washers to properly space/align the alternator.

This may take a few tries to align the alternator.
- When installing the belts, you will have to tilt the alternator downwards, then slip on the belts.

- Place the belts AFTER you have figured out what you will need to do to space/align the alt.
- Once to you place the belts, thread the bolt on the bottom half.
- The bolt I used came with the alt, and was rather long. Fearing that it would interfere with the OMP rod I put some extra washers before the bolt
met the alternator to give the OMP rod some clearance

-10-
Now you are ready to wire the alt to the car.
- Once again my photographer had left whenI did this, and took his camera, so I don't have very many pics of the wiring, I can get more if requested.
- Remember Wht/Blk to Wht/Blk, Wht/Grn to Blk/Wht, Wht/Blu (should aready be plugged back into the alt. and the Batt terminal to the solid black
wire.
- The Wire for the batt. temrminal is a little to small to fit the alt, you can modify the wire terminal or replace it with a larger terminal to fit
the alt.
- If you choose to modify the wire terminal PLEASE BE CAREFUL, I thought I could just drill it out a bit, and it backfired. Well, It did work, but I
did injure my finger, the terminal got caught on the drill bit and got my finger too...

Nothing a "mechanics band-aid" can't fix though... (Some Toilet paper and Electric tape lol)


Anyway.... Back the the DIY...
-11-
Once you have connected the wiring, It is time to finish installing the alternator.
- Grab the alt bracket and align it with the top hole on the alt
- Tighten down the bracket and give tension to the alt.
- Tighten the bottom bolt as well
- check tension on the belt and adjust of needed
-12-
Now it is time to reinstall the battery and turn on the car.
- Before connecting the battery be sure everything is connected properly and that there is nothing left in the engine bay that can get caught with
any moving parts of the engine bay.
- If you have a volt/multimeter check the voltage to ensure proper funtion
---------PLEASE REMEMBER---------
- This was installed on a N/A S4 Rx-7, your installation may differ a bit if it is a different model
- I DO NOT know and NEVER said this will fit the TII model, I DO NOT know if it will interfere with the TMIC
- If you install this on your TII please add any information you gathered about fitment with the TMIC
- You are more than welcome to add any advice/information/criticism you have of your own...


Loosen the alt bracket so that it can move out of the way. You do not need to remove it.
Then place the alternator where it is supposed to go, and place in the bolt on the bottom half of the alt.
I needed to use quite a few washers to properly space/align the alternator.
This may take a few tries to align the alternator.
- When installing the belts, you will have to tilt the alternator downwards, then slip on the belts.
- Place the belts AFTER you have figured out what you will need to do to space/align the alt.
- Once to you place the belts, thread the bolt on the bottom half.
- The bolt I used came with the alt, and was rather long. Fearing that it would interfere with the OMP rod I put some extra washers before the bolt
met the alternator to give the OMP rod some clearance
-10-
Now you are ready to wire the alt to the car.
- Once again my photographer had left whenI did this, and took his camera, so I don't have very many pics of the wiring, I can get more if requested.
- Remember Wht/Blk to Wht/Blk, Wht/Grn to Blk/Wht, Wht/Blu (should aready be plugged back into the alt. and the Batt terminal to the solid black
wire.
- The Wire for the batt. temrminal is a little to small to fit the alt, you can modify the wire terminal or replace it with a larger terminal to fit
the alt.
- If you choose to modify the wire terminal PLEASE BE CAREFUL, I thought I could just drill it out a bit, and it backfired. Well, It did work, but I
did injure my finger, the terminal got caught on the drill bit and got my finger too...
Nothing a "mechanics band-aid" can't fix though... (Some Toilet paper and Electric tape lol)
Anyway.... Back the the DIY...
-11-
Once you have connected the wiring, It is time to finish installing the alternator.
- Grab the alt bracket and align it with the top hole on the alt
- Tighten down the bracket and give tension to the alt.
- Tighten the bottom bolt as well
- check tension on the belt and adjust of needed
-12-
Now it is time to reinstall the battery and turn on the car.
- Before connecting the battery be sure everything is connected properly and that there is nothing left in the engine bay that can get caught with
any moving parts of the engine bay.
- If you have a volt/multimeter check the voltage to ensure proper funtion
---------PLEASE REMEMBER---------
- This was installed on a N/A S4 Rx-7, your installation may differ a bit if it is a different model
- I DO NOT know and NEVER said this will fit the TII model, I DO NOT know if it will interfere with the TMIC
- If you install this on your TII please add any information you gathered about fitment with the TMIC
- You are more than welcome to add any advice/information/criticism you have of your own...
03-20-09, 10:15 AM
#5
so what is the benfit of doing all of this versus just getting another alternator for an rx7? I mean I know Ford Tempos are awesome vehicles for which our rx7's can barely compare in the form of outright performance and gadgetry and pure innovative design, but still some details would help. I do appreciate the pics and step by step info. You put alot of work into this. I wish others made posts as detailed.
Thanks-
Thanks-
03-20-09, 01:23 PM
#7
Lima!!!
Thread Starter
iTrader: (1)
Join Date: Feb 2007
Location: Pembroke Pines FL
Posts: 208
Likes: 0
Received 0 Likes
on
0 Posts
It's no problem, I didn't really add any information as to why I would choose to put a tempo alternator on there.
The alternator is stronger than both the s4 and s5 alternator, is relatively cheap, and is more available at parts stores than the rx-7 alt. Not like they don't have rx7 parts but my local parts store never has any items in stock.
The link does have more information.
The alternator is stronger than both the s4 and s5 alternator, is relatively cheap, and is more available at parts stores than the rx-7 alt. Not like they don't have rx7 parts but my local parts store never has any items in stock.
The link does have more information.
Trending Topics
03-21-09, 01:20 AM
#9
03-21-09, 09:35 AM
#11
Lima!!!
Thread Starter
iTrader: (1)
Join Date: Feb 2007
Location: Pembroke Pines FL
Posts: 208
Likes: 0
Received 0 Likes
on
0 Posts
The stock alternator pumps out 95amps of power, while you can get the upgraded rebuild that pushes out 170Amps. The alternator that pushes out 130Amps is the one off of the Ford Taurus.
03-21-09, 11:58 AM
#12
Jackhilde was able to do the Taurus alt swap. He needed to fab a bracket to attach the alt to the water pump housing, But from talking to him the Taurus alt wouldn't fit under my TMIC. I was going to head to the junkyard and either measure or bring home a Tempo alt, BUT I need to go into work tonight. I'm not sure there is enough time today.
03-21-09, 02:37 PM
#13
Smoke moar
al0389, hmm your alt does seem slightly different then my tempo alt, was yours 3 wires? Mine only had the 2 and the B terminal like S5/S6 alternators, not like S4's with the ign switch.
If not and ford had it already wired with a ign switch or you did it, then we probably got the same one yours was from a junk yard so older.
You can add to your guide for S5 guys to just plug the same stock plug into their new alt, works fine.
Also did you put some loc tite? I'd suggest that, would be very abd to have the pull come ripping off

 05-23-09, 02:41 PM
#17
does this alt stand up to abuse? I've killed two auto zone alt's and I need a alternative.
what I mean by abuse is..it can handle revs up to 7k atleast...everytime I pust it in my car I noticed something always get fried on my alt and I gotta return it again...
what I mean by abuse is..it can handle revs up to 7k atleast...everytime I pust it in my car I noticed something always get fried on my alt and I gotta return it again...
 06-05-09, 11:03 AM
#19
Lima!!!
Thread Starter
iTrader: (1)
Join Date: Feb 2007
Location: Pembroke Pines FL
Posts: 208
Likes: 0
Received 0 Likes
on
0 Posts
The alt in the write up was wired improperly, i had mixed one of the wires, and it was not ragulating voltage properly. I am at work now, and am going to add more information ragarding the proper wiring for it when I get home.
AmviciousRay, I love to rev the 7, and i redline the car a lot, I even take it to the track for some drifting action with SFLDrifters.com. I'm not great at it, but the alt does handle the high RPMs very easily.
AmviciousRay, I love to rev the 7, and i redline the car a lot, I even take it to the track for some drifting action with SFLDrifters.com. I'm not great at it, but the alt does handle the high RPMs very easily.
08-06-09, 07:00 PM
#21
Back at it again!!
iTrader: (3)
Join Date: Jun 2003
Location: Western Colorado
Posts: 1,324
Likes: 0
Received 0 Likes
on
0 Posts
wiring:
On the stock alternator harness, you have 'S', 'L' and 'B'. The 3G alternator has A, S, I, T and B.
'B' on both alternators--> battery (use a thick gauge wire -- I believe 6 gauge or so, maybe bigger)
'L' on stock (rx7) harness and labeled on the alternator --> terminal 'I' on the 3G alt.
'S' on the stock harness (and labeled as well) --> no longer needed
terminal 'A' on the 3G alt. --> Constant 12V+ battery. Using a wire, connect 'A' terminal with 'B' terminal
Now, that covers only the B, I and A terminals so far, but now you are left with S and T -->(this terminal is by itself near the 3 prong connector).
This is simple. Use a wire w/ 2 terminals and connect the S terminal to the T terminal.
RX7______3G (Ford)
B --------> B
L --------> I
S xxxxxxx A (connect with 'B' terminal)
*________S ---> T
*________T ---> S
This is a useful link as well:
http://www.lucasee.dk/filer/engelskinfo.pdf
(bottom of 3rd page)
08-06-09, 07:33 PM
#22
Back at it again!!
iTrader: (3)
Join Date: Jun 2003
Location: Western Colorado
Posts: 1,324
Likes: 0
Received 0 Likes
on
0 Posts
Edit: Connect terminal 'A' directly with the battery as opposed to connecting it with the 'B' terminal.
IMPORTANT NOTE:
Do not use the factory wire that went to terminal 'S' (which is a switched 12V+). Terminal A on the 3G alternator must have a constant 12V+ battery source. IF not, and you instead use the switched 12V+ wire, you will drain your battery because the alternator will see 0V when the car is off and the regulator will continually try and charge the battery.
08-08-09, 01:02 AM
#23
Back at it again!!
iTrader: (3)
Join Date: Jun 2003
Location: Western Colorado
Posts: 1,324
Likes: 0
Received 0 Likes
on
0 Posts
My apologies. The 'S' terminal wire from the harness can go to 'A'. I thought the 'S' harness wire was switched even though it is clearly a constant.