
AAI (Ambient Air Intake)

AAI (Ambient Air Intake)
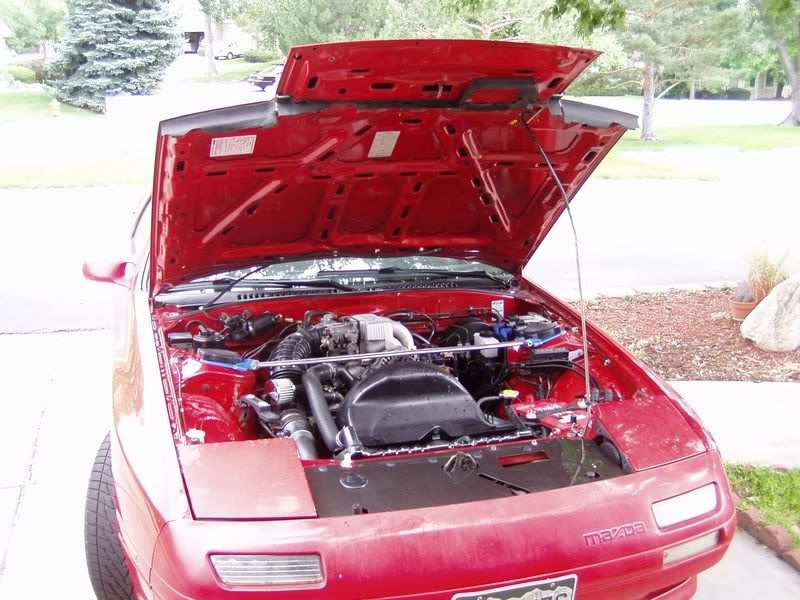
Today's project -part of my Summer of Fun Around the RX Tour- is my attempt at an intake mod.
I've watched with interest the various threads on this and finally got around to it myself. One thing that's bothered me is the tendency to call such a mod a "Cold Air Intake" (CAI for short) when in fact, the best you can hope for is ambient air temp, unheated by the engine bay.
Hence the thread title.
There were a number of criteria I set for myself...
-the mod had to be reversible (in case it doesn't work as planned-DOH!) with minimal evidence of intrusion
-it had to look as factory as possible, which meant scouring the junkyard for appropriate parts
-I did not want to sacrifice performance for looks
-it had to be an all-weather solution, resistant to rain, snow, etc. (time will tell about this)
Yesterday I spent several hours in the broiling sun rambling through my favorite junkyard, looking for a suitable tube arrangement for the intake.
I'd already decided to retain the stock intake from the throttle body to the AFM so all I needed was tubing from the AFM forward. This was tricky since room was at a premium and I needed at least some flexibility in the tube, so all the hard ABS pieces were basically out.
After pondering all the Hondas, Toyotas, Subarus,etc. I was about to give up and hit Home Depot when I literally stumbled across the perfect piece(s).
It was lying on the ground, obviously discarded from someone's frenzied "rip-the-******-out" engine pull but as a result, I have no idea what this came out of.
Ultimately I could hardly have asked for a more perfect unit, I'm sorry I can't pass along the info if anyone cares to try this themselves.
Anyway...
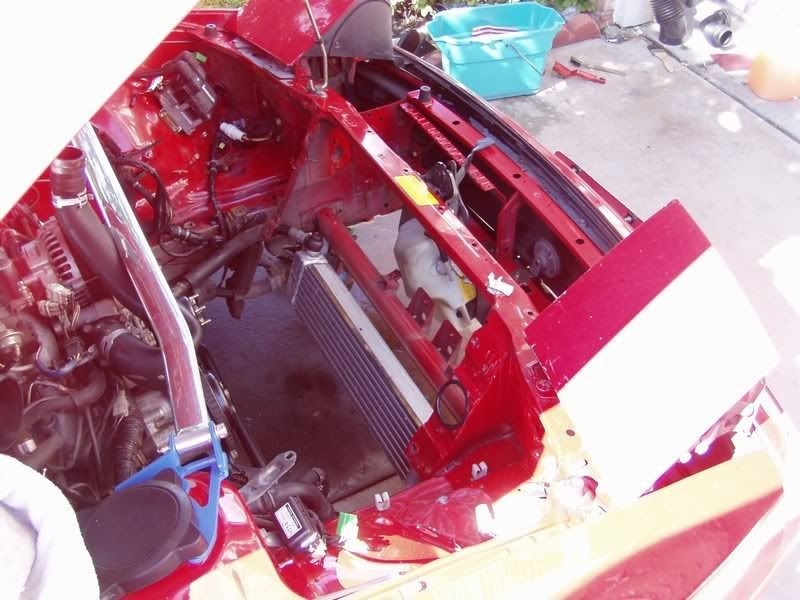
This morning I started by stripping the entire front of the bay...

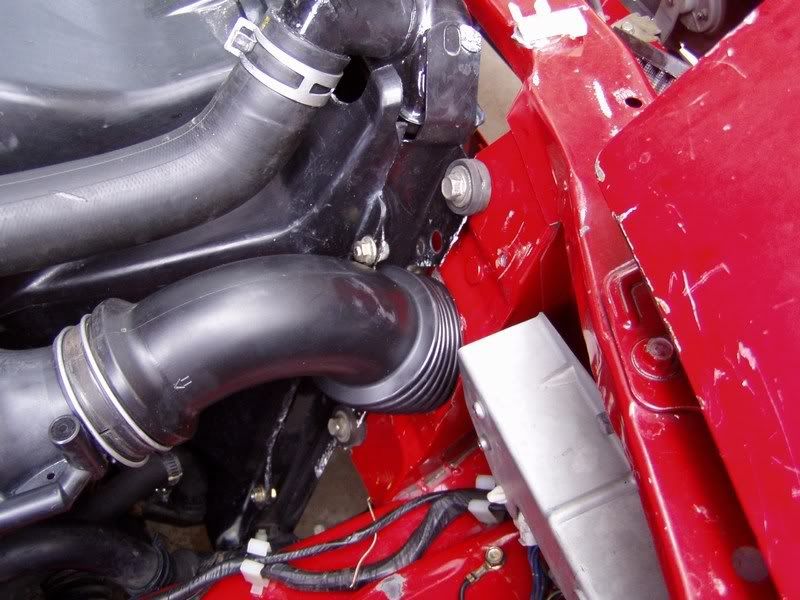
All this so I could cut the hole in the passenger side of the rad support, shown here (already lined with c-channel molding)...
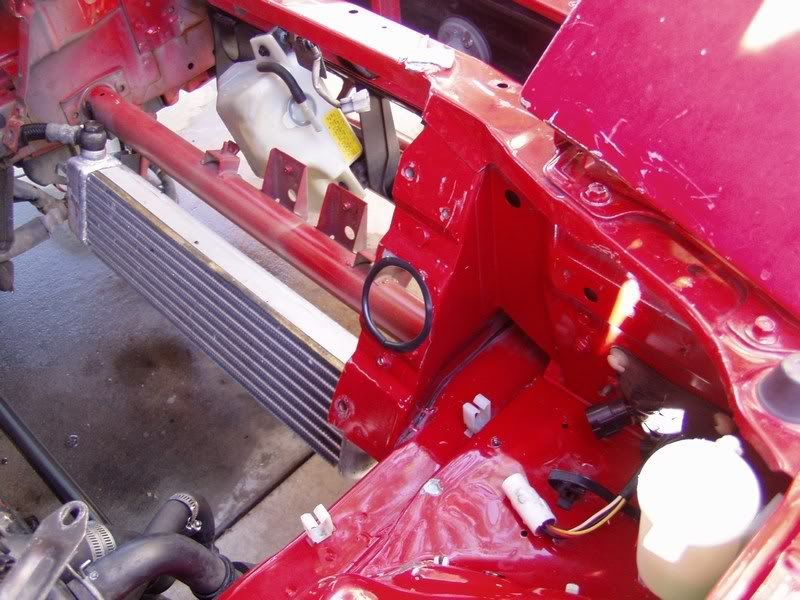
I used a jig saw with a fine toothed metal cutting blade and the whole process took about five minutes. The cut took me right through an unused capture nut and also a little l-bracket that was spot welded to the main support.
The remaining half of the capture nut popped of with pliers as did the rest of the bracket (never was sure what that bracket was for anyway).
The edge was quickly sanded smooth with a drum sander (it was already pretty clean) and the molding applied (I have lots of this cause I use it on fan/rad holes in my computer builds).
The molding not only looks nice but also protects the plastic tube from the sharp metal edge.
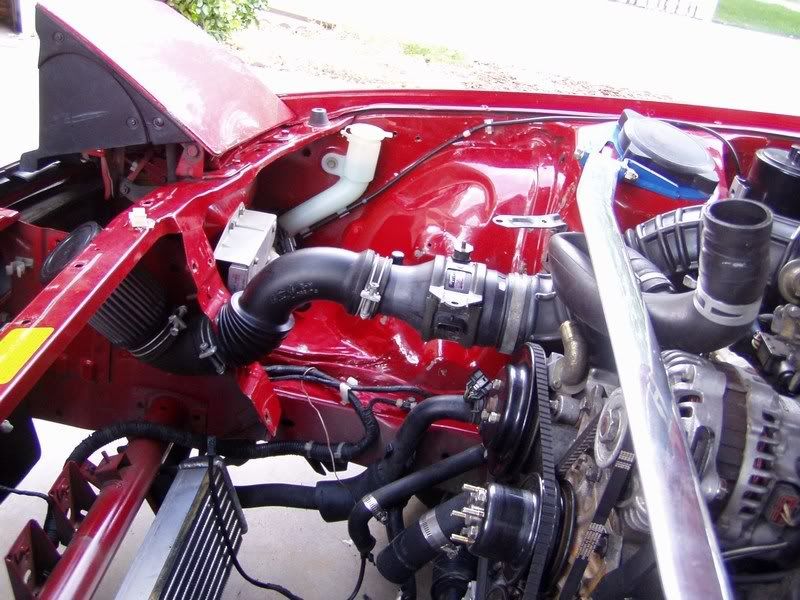
Because the filter was going to occupy the space where the radiator overflow tank lived it was necessary to relocate this part.
Looking to the drivers side I saw all the unused holes (for relays,etc., I assume) and it looked like the tank would fit, so I tried it and hark! almost like it was made to go there...

This required just minimal persuasion to line the brackets up with the threaded holes. Saves me from having to fab up a tank, too.
I also relocated the horn(s) to get them out of the direct airflow- dunno if it'll matter but it was easily done, so why not?
It's amazing how many unused threaded fittings there are in this car and how convenient they can be.
So it was finally time for the first test fit...
YAY!
Looks like it's going to work!
But...but...it's not very straight is it?
Well no, it isn't and here's why...
I had to make sure the radiator would still bolt up and that left a very small area to work with.
This arrangement fits about as closely as I could hope for with fabbing up custom rad brackets...which I had considered early on but discarded because of the domino effect (you know, you move one thing and all of a sudden three other things have to be changed- in this case, custom rad hoses and the shroud wouldn't fit and so on down the line...).
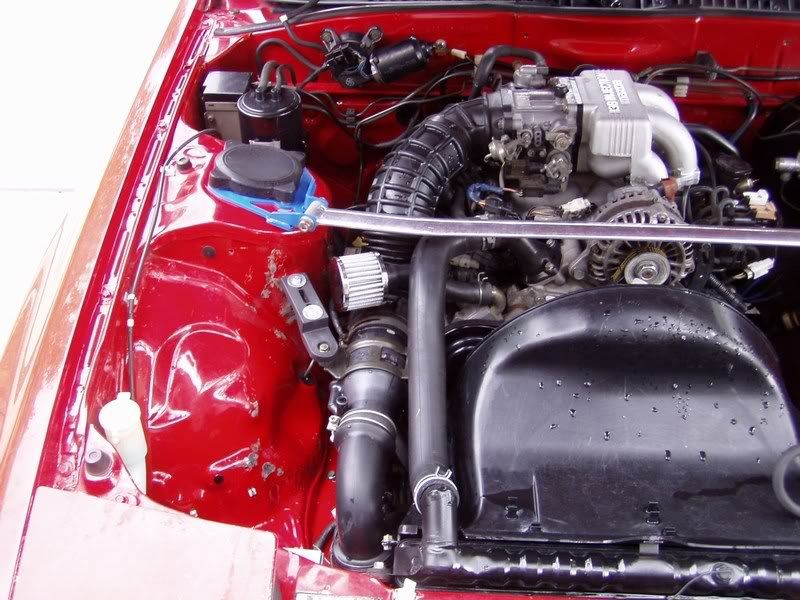
It almost looks like it came this way.
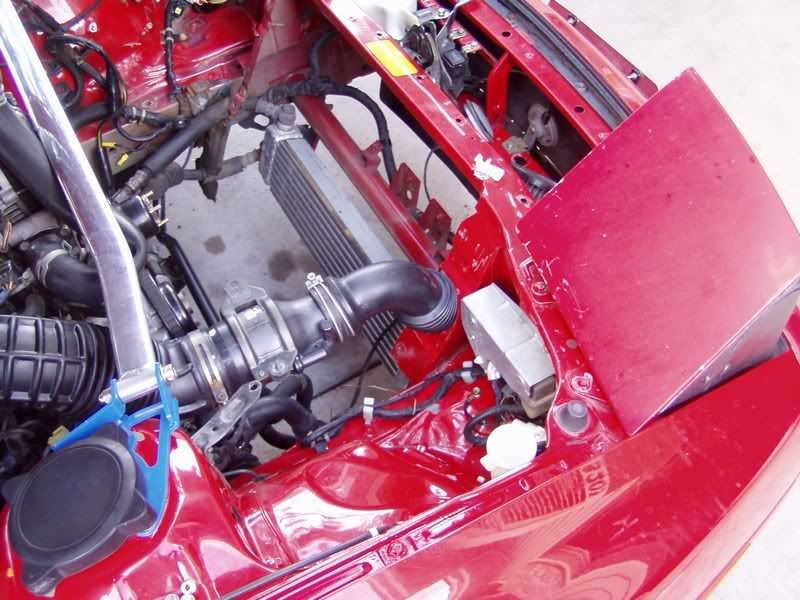
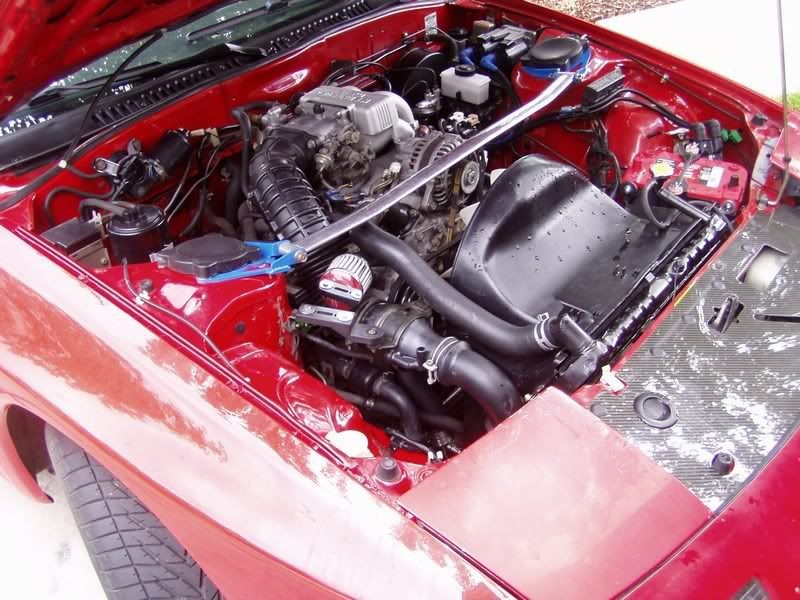
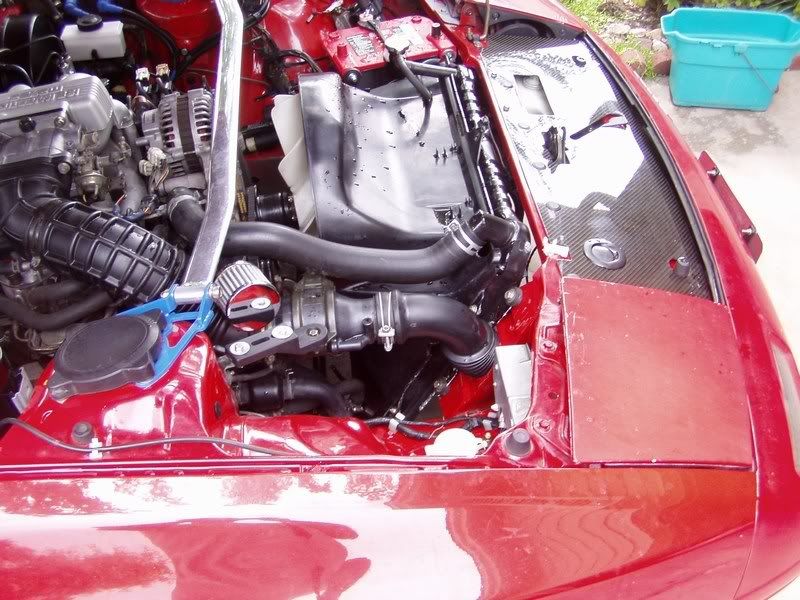
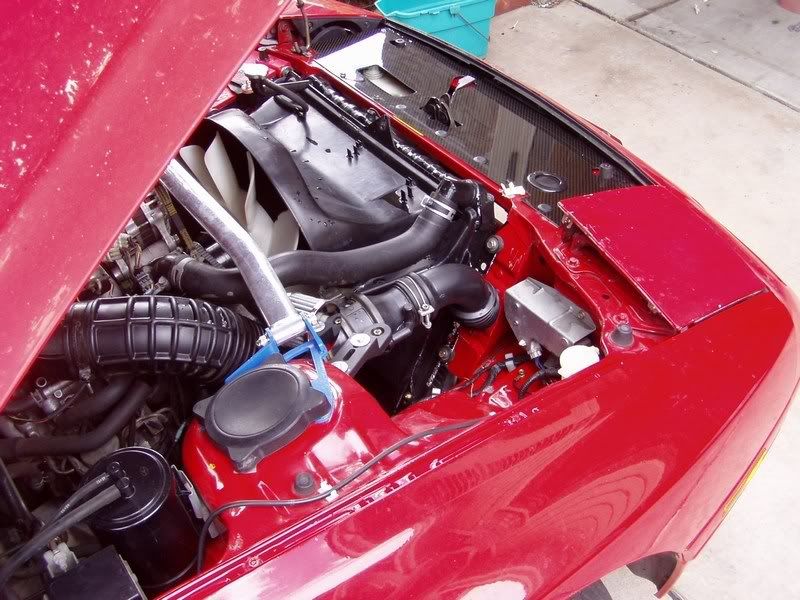
Now to install the CF panel I scored months ago from Vipers and finish off the AFM mounting bracket and the air pump filter and we have this...
And finally, a shot from under the car to show the filter in place...

This filter is a K&N left over from my Z project and may in fact be too small but I didn't know exactly how much room I was going to have to work with before I started so I decided to try it out.
I haven't driven the car yet (there is a Phase II to today's project) but while running it to fill the coolant she didn't seem to have any trouble hitting high revs, so maybe I'll get lucky.
If not, I'll just get a larger filter.
This car is my DD and she's got a semi-tired engine (compression in the 80's and low(ish) oil pressure, but runs well with no starting issues or quirks) so there isn't any dyno info to present, nor is it likely there will be any soon.
If anything obvious presents itself I'll report but otherwise no performance claims are being made.
If nothing else, I think it looks bitchen and it only cost $2 for the junkyard tubes (the filter I already had) and is completely reversible.
Not to mention it was a fun way to spend a Sunday.
As you were.
I've watched with interest the various threads on this and finally got around to it myself. One thing that's bothered me is the tendency to call such a mod a "Cold Air Intake" (CAI for short) when in fact, the best you can hope for is ambient air temp, unheated by the engine bay.
Hence the thread title.
There were a number of criteria I set for myself...
-the mod had to be reversible (in case it doesn't work as planned-DOH!) with minimal evidence of intrusion
-it had to look as factory as possible, which meant scouring the junkyard for appropriate parts
-I did not want to sacrifice performance for looks
-it had to be an all-weather solution, resistant to rain, snow, etc. (time will tell about this)
Yesterday I spent several hours in the broiling sun rambling through my favorite junkyard, looking for a suitable tube arrangement for the intake.
I'd already decided to retain the stock intake from the throttle body to the AFM so all I needed was tubing from the AFM forward. This was tricky since room was at a premium and I needed at least some flexibility in the tube, so all the hard ABS pieces were basically out.
After pondering all the Hondas, Toyotas, Subarus,etc. I was about to give up and hit Home Depot when I literally stumbled across the perfect piece(s).
It was lying on the ground, obviously discarded from someone's frenzied "rip-the-******-out" engine pull but as a result, I have no idea what this came out of.
Ultimately I could hardly have asked for a more perfect unit, I'm sorry I can't pass along the info if anyone cares to try this themselves.
Anyway...
This morning I started by stripping the entire front of the bay...
All this so I could cut the hole in the passenger side of the rad support, shown here (already lined with c-channel molding)...
I used a jig saw with a fine toothed metal cutting blade and the whole process took about five minutes. The cut took me right through an unused capture nut and also a little l-bracket that was spot welded to the main support.
The remaining half of the capture nut popped of with pliers as did the rest of the bracket (never was sure what that bracket was for anyway).
The edge was quickly sanded smooth with a drum sander (it was already pretty clean) and the molding applied (I have lots of this cause I use it on fan/rad holes in my computer builds).
The molding not only looks nice but also protects the plastic tube from the sharp metal edge.
Because the filter was going to occupy the space where the radiator overflow tank lived it was necessary to relocate this part.
Looking to the drivers side I saw all the unused holes (for relays,etc., I assume) and it looked like the tank would fit, so I tried it and hark! almost like it was made to go there...
This required just minimal persuasion to line the brackets up with the threaded holes. Saves me from having to fab up a tank, too.
I also relocated the horn(s) to get them out of the direct airflow- dunno if it'll matter but it was easily done, so why not?
It's amazing how many unused threaded fittings there are in this car and how convenient they can be.
So it was finally time for the first test fit...
YAY!
Looks like it's going to work!
But...but...it's not very straight is it?
Well no, it isn't and here's why...
I had to make sure the radiator would still bolt up and that left a very small area to work with.
This arrangement fits about as closely as I could hope for with fabbing up custom rad brackets...which I had considered early on but discarded because of the domino effect (you know, you move one thing and all of a sudden three other things have to be changed- in this case, custom rad hoses and the shroud wouldn't fit and so on down the line...).
It almost looks like it came this way.
Now to install the CF panel I scored months ago from Vipers and finish off the AFM mounting bracket and the air pump filter and we have this...
And finally, a shot from under the car to show the filter in place...
This filter is a K&N left over from my Z project and may in fact be too small but I didn't know exactly how much room I was going to have to work with before I started so I decided to try it out.
I haven't driven the car yet (there is a Phase II to today's project) but while running it to fill the coolant she didn't seem to have any trouble hitting high revs, so maybe I'll get lucky.
If not, I'll just get a larger filter.
This car is my DD and she's got a semi-tired engine (compression in the 80's and low(ish) oil pressure, but runs well with no starting issues or quirks) so there isn't any dyno info to present, nor is it likely there will be any soon.
If anything obvious presents itself I'll report but otherwise no performance claims are being made.
If nothing else, I think it looks bitchen and it only cost $2 for the junkyard tubes (the filter I already had) and is completely reversible.
Not to mention it was a fun way to spend a Sunday.
As you were.

Smells like 2 stroke.
Joined: Nov 2006
Posts: 527
Likes: 20
From: Misery
Yeah, that looks great! Get it on a dyno... Insulate the intake hose, and see if it makes any difference.... looks kinda close to those radiator hoses to me.
Edit: Tell us what it does in the colorado winter... PM me man.
Edit: Tell us what it does in the colorado winter... PM me man.
Rotorhead
Joined: Feb 2001
Posts: 9,136
Likes: 39
From: Charlottesville, Virginia, USA

I think it looks fine for a non-turbo engine.


Joined: Dec 2003
Posts: 6,598
Likes: 10
From: Temple, Texas (Central)
That looks really awesome, one of the best looking "cold" air intake's I've seen. I have one question, though. How does that fit up with the a/c condenser? I can't think of how it sits from memory.
Trending Topics
This would not be possible were the AC in place as the condenser (which is the same size as the rad) sits right in front of the radiator.
Originally Posted by Evil Aviator
It does look like a factory installation. The bends and the bellows tube will disrupt the airflow some though.
Given my self imposed restrictions there wasn't much I could do about the bends and bellows but I'll be keeping my eyes open during future junkyard forays and who knows, maybe a better piece will show up.
Originally Posted by imloggedin
how big of a hole did you cut?
Tomorrow she goes on the butt dyno and I'll see what happens.
Last edited by clokker; Aug 26, 2007 at 11:33 PM.
Joined: Dec 2003
Posts: 6,598
Likes: 10
From: Temple, Texas (Central)
A PO had apparently tried to remove the stock bracket on the strut tower and the bolts must have been rusted solid because he ended up ripping the capture nuts right out of the sheetmetal.
Then the dumb **** compounded the error by leaving the bracket bolted to the airbox where it spent the rest of it's life scraping the paint- you can see the results in the pics.
Grr.
The bracket I'm using now is actually two pieces.
The under piece started as the airbox bracket that went on the rad support- it's a long skinny piece with a short 90� bend. It's bolted into (what's left of) the stock strut tower bracket hole.
The part you can see is a mounting arm from an efan I had.
It's mounted on the metal underbracket and extends and drops into the area of the AFM.
Between the bracket and the AFM is one of the rubber isolaters that are all over our cars.
Winter sucks
Joined: Jan 2004
Posts: 3,083
Likes: 0
From: Newberg, Oregon

You buying?
The always popular (but never trustworthy) GM Dyno* tells me that the intake works fine, or at least, no worse than the stock airbox with a tired filter.
Like most of you (I suspect), after installing a mod I'm hyperaware of the car's behaviour- actively trying to notice an improvement or reduction in performance.
In this case, results are decidedly neutral.
I would expect any improvement to be subtle and perhaps only situation specific and as yet there has been no "Holy Crap!" revelatory moment.
With the hood open, the airpump intake noise is more noticeable than before but I can't hear it when actually driving.
As I stated in the original post, the intake was only part of the engine bay morph I'm scurrying to implement before the weather turns fugly.
Each step enables the next and times 'a wastin- I have three more stages to finish.
*GM Dyno= Gluteus Maximus/Seat of the Pants/Butt Dyno.
Full Member
Joined: Mar 2001
Posts: 154
Likes: 0
From: Central Florida

Rotary Freak
Joined: Dec 2006
Posts: 1,791
Likes: 0
From: New Hampshire
I don't know about "smoothed out". Air goes from a small restrictive area to a larger less restrictive area. Maybe someone with more knowledge about airflow can chime in here.
I don't know why people think bends are so bad when infact we have a fairly hard bend at the TB where the inside is just HORRIBLY designed. The outter edge is smooth but the inside radius is almost a 90* sharp corner. You could proubly slice a piece of paper of the edge inside the elbow. I ground mine down for the hell of it.
I don't know why people think bends are so bad when infact we have a fairly hard bend at the TB where the inside is just HORRIBLY designed. The outter edge is smooth but the inside radius is almost a 90* sharp corner. You could proubly slice a piece of paper of the edge inside the elbow. I ground mine down for the hell of it.
I really Schruted it
Joined: Sep 2006
Posts: 573
Likes: 0
From: Grand Rapids, MI
Why did you choose to go through the front near the radiator instead of the usual down throught the fender and collect via the brake duct? I would think having the air collect throught the duct gives you fast moving ambient air rather somewhat stagnent/swirling air behind the bumper.
Rotary Freak
Joined: Dec 2006
Posts: 1,791
Likes: 0
From: New Hampshire
Some like to keep the washer fluid resi where it is. Air is far from stagnent behind the front bumper, actually the fender would be more stagnent, either way it will give you the same results. The brake duct won't work as ram as unless you completly redirect it into a 100% sealed box and even at then you may not notice a difference.
I really Schruted it
Joined: Sep 2006
Posts: 573
Likes: 0
From: Grand Rapids, MI
I have a collector in my brake duct running up through the fender and then sealing directly into the end of my air filter. I think I am getting good flow because I am constantly getting bugs, leaves and other crap stuck in my filter. Oh, and my horsepower went from 180 at the wheels to 290.
Brian
Brian
Nice, that reminds me that I eventually need to put a few finishing aesthetic touches on my fenderwell CAI.
You don't have any radiator ducts... is that panel on top of all that supposed to be a stand in for them?
Oh, and the "cold air" thing is all relative. 70 deg is 1/2 of engine bay temps... so it's relatively cold.
You don't have any radiator ducts... is that panel on top of all that supposed to be a stand in for them?
Oh, and the "cold air" thing is all relative. 70 deg is 1/2 of engine bay temps... so it's relatively cold.