HOW TO: Remove/Replace Suspension Bushings
 08-04-03, 09:27 PM
#16
Super Snuggles
Thread Starter
Most of you won't ever replace the following bushings, but if you ever had to, here's how it's done. 
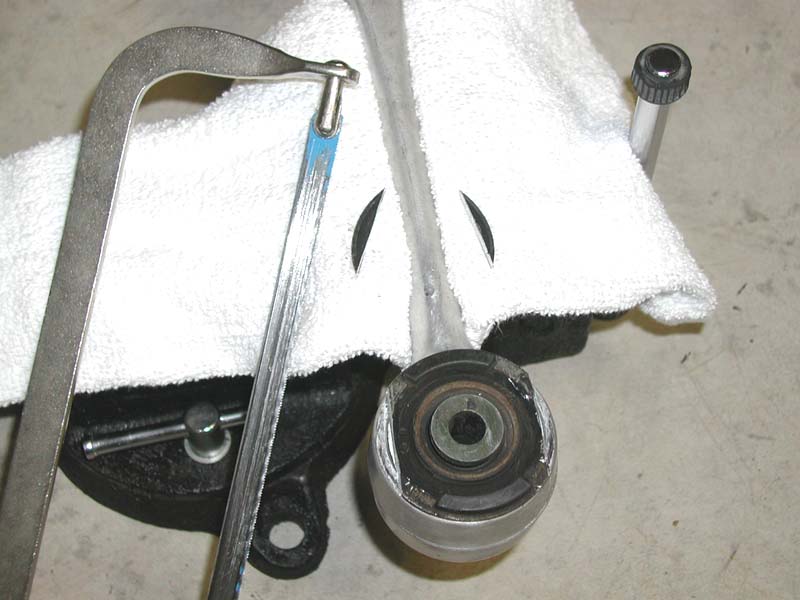
The inner "damping" bushing on the rear lower control arms has a flange that interferes with any attempt to press it out without modification. There's just no place to rest it on, so even the shop manual states that you have to cut away the flange with a hacksaw.
I started with two parallel (to the length of the control arm) cuts, just inside the edge of the aluminum. You can judge how thick it is by looking at the other side. The trick here is to cut very carefully until you're almost down to the aluminum, but not into the aluminum. At that point, you can use a punch or a chisel and a hammer to knock the flange up away from the control arm, tap it back down, and so on until it fatiques and breaks away. This will prevent damage to the aluminum control arm.
In the picture below, you can see the two slivers of flange I cut away sitting on the towel, and you can see that on both sides I've fully exposed the aluminum of the control arm and even cut into the diameter of the bushing sleeve to a small degree. This will give you maximum support for pressing the bushing out when resting the control arm on two pieces of bar stock.
It's not shown, but I went ahead and cut away the rest of the flange, just in case I had to use a larger socket to press into, but as you'll see in the next post, it turned out to be unnecessary.
Last edited by DamonB; 05-02-07 at 10:02 AM.
 08-04-03, 09:35 PM
#17
Super Snuggles
Thread Starter
As shown above, use a vice to hold the lower control arm while you're cutting, and use a razor blade to slice off the two rubber "bumpers" on each side (the other two at top and bottom are still shown in place) remaining to get down to the metal of the flange.
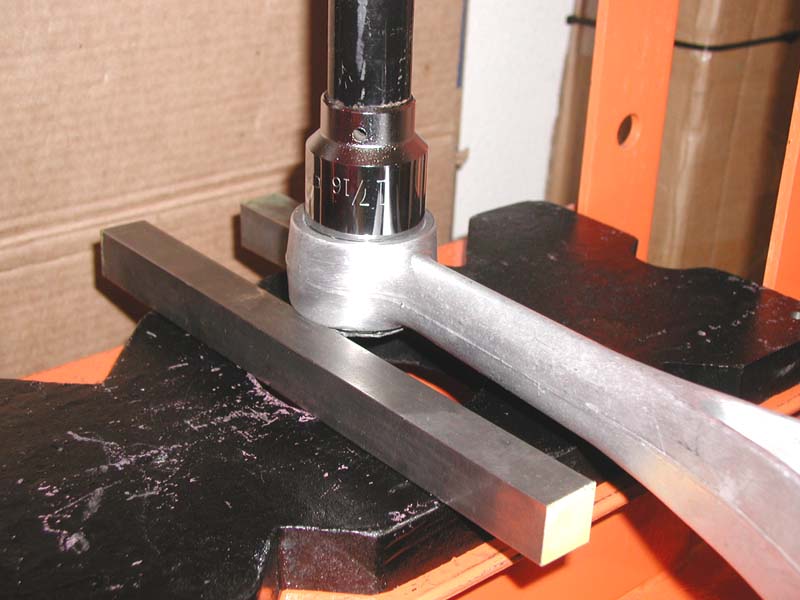
Once that's done, here's how you get rid of the bushing. I left the arbor on the lower setting, put both arbor plates on with the larger "U" cut-outs facing in (to make a circle), and then used two pieces of bar stock to support the control arm with the flange side down. The diameter of the 3/4" drive Craftsman 1 7/16" socket works perfectly to press these out, because there's not much sleeve to press against.
These come loose pretty easily, none of the fanfare of the rear upper control arm bushings here. Again, put something under the arbor to catch the bushing and the socket when they fall through.
Note: The replacement parts are the rear lower control arm "damping" bushing (PN FD01-28-460) and rear lower control arm "stopper" (PN FD01-28-461), which is just the rubber "doughnut" that presses onto the other side of the bushing opposite the flange.
Last edited by DamonB; 05-02-07 at 10:03 AM.
08-04-03, 09:45 PM
#18
Super Snuggles
Thread Starter
And once again, here's the end result. Note that in the picture below, the flanges for the inner damper bushings have been completely cut away.

08-04-03, 09:55 PM
#19
Super Snuggles
Thread Starter
Now you're probably wondering where the 1 11/16" socket comes in... "You can't be telling us to run out and buy one just to catch other bushings with, can you?" You're right, I'm not.
Unfortunately I didn't take any pictures during the process, but the 3/4" drive Craftsman 1 11/16" socket is the perfect size for pressing out the differential mount bushings, and I bought it when I installed a set of my Nylon replacements for a friend, so there you are.
So that concludes my write-up for now. I won't be reinstalling bushings until my suspension components have been polished and probably hard coat anodized, but I'll continue this thread and post the pictures when that time comes.
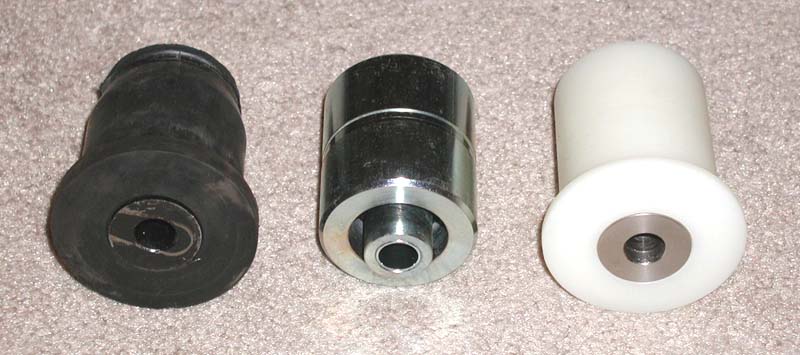
I will probably be doing something with the front control arms too since I have to press my Nylon bushings back out to make way for my custom pillow ball bushings (shown below in the center), and will post that here also.
Unfortunately I didn't take any pictures during the process, but the 3/4" drive Craftsman 1 11/16" socket is the perfect size for pressing out the differential mount bushings, and I bought it when I installed a set of my Nylon replacements for a friend, so there you are.
So that concludes my write-up for now. I won't be reinstalling bushings until my suspension components have been polished and probably hard coat anodized, but I'll continue this thread and post the pictures when that time comes.
I will probably be doing something with the front control arms too since I have to press my Nylon bushings back out to make way for my custom pillow ball bushings (shown below in the center), and will post that here also.
Last edited by DamonB; 05-02-07 at 10:03 AM.
 08-06-03, 08:00 AM
#21
Lives on the Forum
I am going on vacation for a week. This thread will go into our bookmarks and be archived when I get back, just give it some more time to see some "live" action 
08-06-03, 01:48 PM
#24
Rotary Freak
Join Date: May 2002
Location: Houston
Posts: 1,742
Likes: 0
Received 0 Likes
on
0 Posts
You know, that hydraulic press looks like a fancily mounted bottle jack. I wonder if someone could Mcgyver up some way to use a standard bottle jack?
Anyways, two questions.
How long do stock bushings last? At what point would you change them out?
Why is the JimLab set so expensive? I don't know that much about the manufacturing, and was curious. I also don't know the OEM cost of a replacement set.
Anyways, two questions.
How long do stock bushings last? At what point would you change them out?
Why is the JimLab set so expensive? I don't know that much about the manufacturing, and was curious. I also don't know the OEM cost of a replacement set.
08-06-03, 02:51 PM
#25
Former Rx7 *****
Join Date: Nov 2001
Location: Mississauga
Posts: 4,534
Likes: 0
Received 0 Likes
on
0 Posts
Originally posted by PVerdieck
Why is the JimLab set so expensive? I don't know that much about the manufacturing, and was curious. I also don't know the OEM cost of a replacement set.
Why is the JimLab set so expensive? I don't know that much about the manufacturing, and was curious. I also don't know the OEM cost of a replacement set.
08-06-03, 05:37 PM
#26
Lives on the Forum
Originally posted by PVerdieck
Why is the JimLab set so expensive? I don't know that much about the manufacturing, and was curious. I also don't know the OEM cost of a replacement set.
Why is the JimLab set so expensive? I don't know that much about the manufacturing, and was curious. I also don't know the OEM cost of a replacement set.
08-06-03, 07:00 PM
#27
Super Snuggles
Thread Starter
Originally posted by PVerdieck
You know, that hydraulic press looks like a fancily mounted bottle jack.
You know, that hydraulic press looks like a fancily mounted bottle jack.
I wonder if someone could Mcgyver up some way to use a standard bottle jack?
How long do stock bushings last? At what point would you change them out?
Some people may drive 200,000+ miles without ever troubling themselves about their car's bushings, and some people want the best possible handling and replace them immediately with aftermarket versions.
On average, though, they should probably be replaced every 70-80k miles (depending on condition), especially on a performance car like the RX-7, although I've seen some bushings totally worn out at only 60k miles on a car that's seen hard use.
Why is the JimLab set so expensive? I don't know that much about the manufacturing, and was curious. I also don't know the OEM cost of a replacement set.
https://www.rx7club.com/forum/showth...13#post2021913
A set of my replacement bushings for the FD (18 total) sells for $650 before any group buy discount, and that includes shipping in the continental United States. By comparison, the six Mazda pillow bushings shown above cost about $50 each to replace. Add another $60 each for the two rear lower control arm damper bushings and $5 each for the stoppers, and for those eight OEM bushings alone, you'd spend $430+ before shipping. Those particular bushings aren't replaced with my kit because they're pillow bushings, but you get the idea.
08-07-03, 10:34 AM
#28
Rotary Freak
Join Date: May 2002
Location: Houston
Posts: 1,742
Likes: 0
Received 0 Likes
on
0 Posts
Cool, thanks for the info. I just figured that the stock ones wouldn't be so extortionate for that little bit of rubber and steel.
Anyways, I should wait, given that I have only 19K on the car, and have a shitload of stuff I have already spent money on to install. When I start going suspension crazy I'll probably start thinking of it again.
Anyways, I should wait, given that I have only 19K on the car, and have a shitload of stuff I have already spent money on to install. When I start going suspension crazy I'll probably start thinking of it again.
08-10-03, 12:00 PM
#30
Super Snuggles
Thread Starter
Originally posted by rotarypower101
Jim, does it look like there will be another run of the famous jimlab bushings at this time?
Has there been enough interest generated to justify a new run of them yet, perhaps a group buy even.
Jim, does it look like there will be another run of the famous jimlab bushings at this time?
Has there been enough interest generated to justify a new run of them yet, perhaps a group buy even.
https://www.rx7club.com/forum/showth...hreadid=211291