SCCA Super Touring U Build
 05-14-12, 09:32 PM
#51
Updates
No photos at this point but I have been busy.
I was able to check the rear axle housing for straightness and I am happy to report that it is straight! I worked really hard to avoid welding directly to the axle tubes but the panhard brace could warp the housing. It didn't!
I have made rotor spacers and that cleared up the interference problems with the lower control arms.
I spent last Saturday making front brake ducts so I can run 3" hoses to the center of the brake rotors.
I have my first set of wheels - 15x8's. They look cool and barely fit when the car is at ride height in the front. But they FIT!
 05-15-12, 11:36 AM
#53
Moderator
iTrader: (3)
Join Date: Mar 2001
Location: https://www2.mazda.com/en/100th/
Posts: 30,805
Received 2,578 Likes
on
1,831 Posts
No photos at this point but I have been busy.
I was able to check the rear axle housing for straightness and I am happy to report that it is straight! I worked really hard to avoid welding directly to the axle tubes but the panhard brace could warp the housing. It didn't!
I have made rotor spacers and that cleared up the interference problems with the lower control arms.
I spent last Saturday making front brake ducts so I can run 3" hoses to the center of the brake rotors.
I have my first set of wheels - 15x8's. They look cool and barely fit when the car is at ride height in the front. But they FIT!
I was able to check the rear axle housing for straightness and I am happy to report that it is straight! I worked really hard to avoid welding directly to the axle tubes but the panhard brace could warp the housing. It didn't!
I have made rotor spacers and that cleared up the interference problems with the lower control arms.
I spent last Saturday making front brake ducts so I can run 3" hoses to the center of the brake rotors.
I have my first set of wheels - 15x8's. They look cool and barely fit when the car is at ride height in the front. But they FIT!
too bad your axle is straight though, that's a bummer
05-15-12, 08:30 PM
#54
Isn't really a professor
iTrader: (1)

Join Date: Feb 2011
Location: Los Angeles
Posts: 72
Likes: 0
Received 0 Likes
on
0 Posts
So unless I missed it somewhere in the thread, which motor are you going to be running? Are you going to keep the 12a, or move to something with more parts availability?
05-16-12, 12:19 AM
#55
I drove an ITE Mustang that had 1/2" toe out. Of course we didn't know this and spent all day trying to tighten up the car - springs changes, front spring rubbers, etc. Nothing worked and the car was scary at speed. At the end of the day I put a tape measure on the rear end and couldn't believe what I was seeing!
The car owner had welded upper control arm mounts on the axle tubes and warped the crap out of it.
05-16-12, 12:23 AM
#56
The rules just changed and a Bridge Port 13B with 44mm chokes is now legal at 2600lbs. This is temping but that is allot of tire/brake wearing out weight.
05-16-12, 04:40 PM
#57
Isn't really a professor
iTrader: (1)
Join Date: Feb 2011
Location: Los Angeles
Posts: 72
Likes: 0
Received 0 Likes
on
0 Posts
So I know next to nothing about rotaries...which is funny considering I'm racing one...in STU. When I saw the 13B bridge port option come up, I started to wonder about that. Do you know the power difference between a street port and a bridge port on a 13B? In my FC, I'm at ~2,400# with driver after the race, so I started to wondering if I should go a different route with the motor or just continue to get creative with the car's weight loss.
05-16-12, 10:43 PM
#58
So I know next to nothing about rotaries...which is funny considering I'm racing one...in STU. When I saw the 13B bridge port option come up, I started to wonder about that. Do you know the power difference between a street port and a bridge port on a 13B? In my FC, I'm at ~2,400# with driver after the race, so I started to wondering if I should go a different route with the motor or just continue to get creative with the car's weight loss.
Really good, pro built street ports are pushing 240-250HP at the crank with 42mm chokes.
What I like about the street port is that they are easy to build and are pretty durable. Plus, I like the idea of a car that is 2300lbs. That said at a place like Road America I am not sure the weight is as big a deal.
The other option is a single turbo 13B or any Mazda 4cyl-6cyl engine you like up to 3200cc. You could even run a Mazda Speed 3 engine. STU is an engine swap class.
05-17-12, 12:31 PM
#59
Moderator
iTrader: (3)
Join Date: Mar 2001
Location: https://www2.mazda.com/en/100th/
Posts: 30,805
Received 2,578 Likes
on
1,831 Posts
i think i like the 2300lbs/street port setup, it seems like a SIMPLE, good balanced combo.
although if you want HP the mazdaspeed 3 motor is probably the way to go, i'm not sure what they let you do to it, but the drag racers were making 1500hp on the stock block/head... some say the stock bottom end with a proper turbo is capable of 500+hp. granted keeping this together road racing probably puts you in the mid 300's but still...
although if you want HP the mazdaspeed 3 motor is probably the way to go, i'm not sure what they let you do to it, but the drag racers were making 1500hp on the stock block/head... some say the stock bottom end with a proper turbo is capable of 500+hp. granted keeping this together road racing probably puts you in the mid 300's but still...
05-17-12, 09:42 PM
#61
I decided to go STU because I like the engine swap aspect of the class. It is possible to build a good chassis in the ST rule set and the engine swap allowance will keep an old cars competitive. At this point I am going to build an old-school engine because I have the parts and the budget to do it. But in the future maybe a better bet will be a piston engine (Sky Active maybe?) or a 16X - whatever Mazda is going to call the next rotary engine.
Also the ST category is something that the SCCA wants to succeed. I have seen this first hand by how quicky rules requests are addressed and clarifications are made to the rule set. I think the SCCA sees this category as a way to bring in cars that they don't have now and it is a category that competes well with similar classes that NASA offers.
I predict that STU and to an even greater extent, STL, will be very successful classes.
05-17-12, 09:54 PM
#62
Here are some pic's
These are the spacers that I modified. I found them on eBay and they are 5mm thick. The center bore had to be opened up from 64mm to 76mm to fit my hubs. The hubs are FC four lug hubs wil long 1/2 20 studs.

Here are the brake ducts I just finished. I made them out of 3" ID exhaust tubing. I hammered them down on the rotor side to direct air to the hub and center of the rotor. I welded these to the RE Speed caliper brackets. I did cut some half moon shapes in the RE Speed bracket to get the tube closer to the hub.

Wheels. These are VarrStoen V1 15x8 +15mm wheels. Not all that light but the price was right and they will be easy to keep clean. More pic's later when I get some tires on them
 05-19-12, 04:27 PM
#64
Brake/Clutch pedals
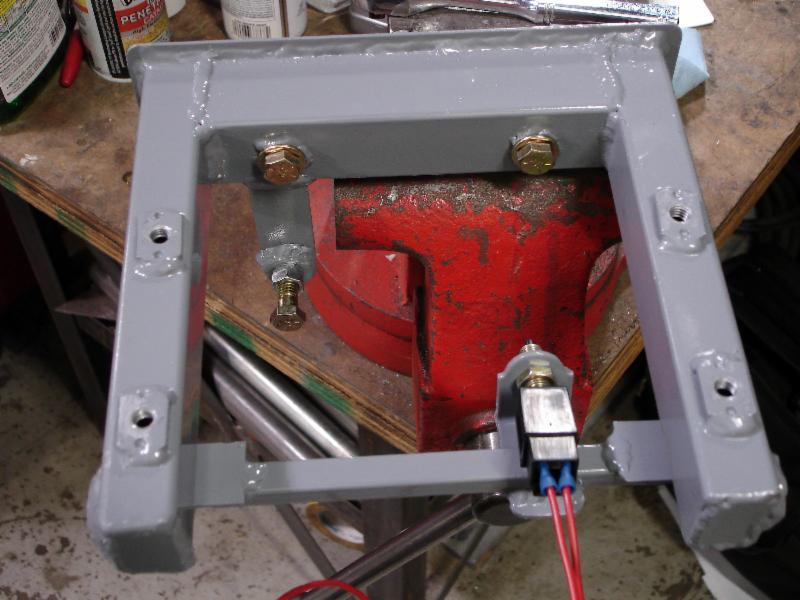
The first fab project I started on the car was to build a pedal mount. I started there because, as I mentioned earlier, cage rules for Super Touring were a liitte grey. Also I knew that I needed to get the pedals hung before I put in too much cage structure.
I don't have any pictures of this part before it was painted. It is designed to bolt into the car using 4 3/8" bolts - one one each side at the front and two through the firewall on the back of the bracket The Wilwood reverse mount pedal assembly bold to the top of the bracket. In the photo you can also see the brake light switch and the clutch pedal stop bolt.
I have the bracket clamped in a vice with the Wilwood pedal assy bolted in place.
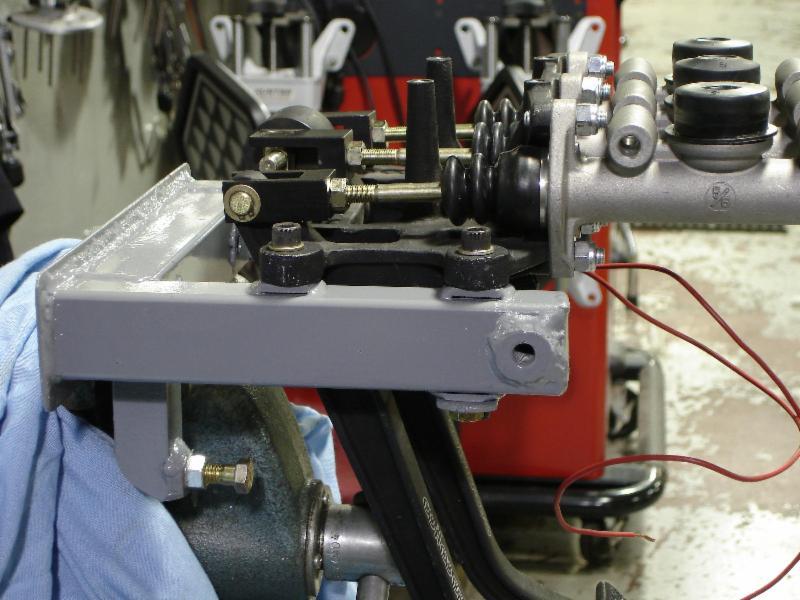
Close up of the brake light switch. This is a Nissan clutch switch that is adjusted to contact the brake pedal arm. When the brake is depressed the switch closes and completes the hot side of the brake light circuit. The other option would have been to use a hydraulic switch in a brake line but these can leak and or fail.
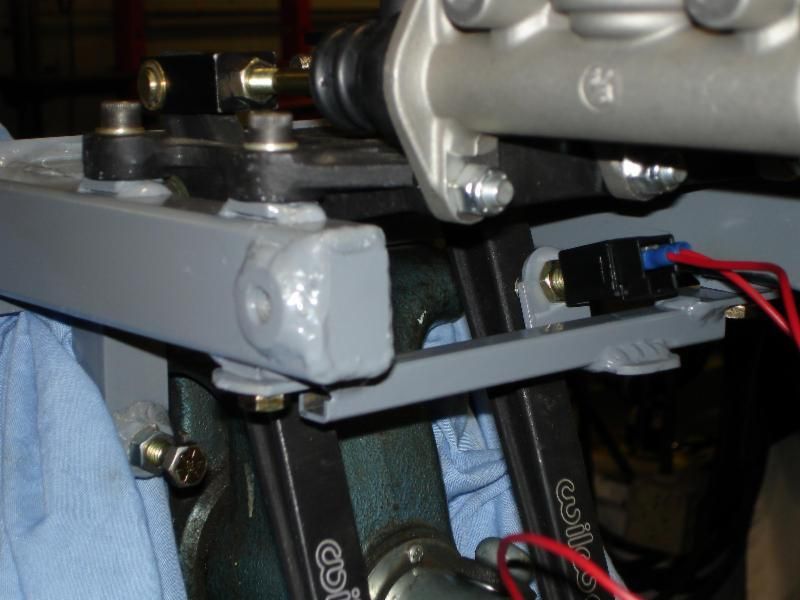
Here is a shot of the pedal assy installed in the car. The left side mount that is on the cage can be seen. The pedals ended up a little higher than stock but I can correct this with longer pedal pads.
The firewall on the drivers side was replaced with 14ga steel. I added a reinforcement to this in the form of a 1/2" square tube that welded on. The bracket bolts go on either side of the reinforcement. I added this because we have found that the firewall on these cars (even with heavier gauge steel in place) flexes when the brakes are applied. This is also a problem with the stock pedal assembly/master cylinder. Mazda figured this out and added a bracket in the cold air box for right hand drive models.
I don't have any pictures of this part before it was painted. It is designed to bolt into the car using 4 3/8" bolts - one one each side at the front and two through the firewall on the back of the bracket The Wilwood reverse mount pedal assembly bold to the top of the bracket. In the photo you can also see the brake light switch and the clutch pedal stop bolt.

I have the bracket clamped in a vice with the Wilwood pedal assy bolted in place.

Close up of the brake light switch. This is a Nissan clutch switch that is adjusted to contact the brake pedal arm. When the brake is depressed the switch closes and completes the hot side of the brake light circuit. The other option would have been to use a hydraulic switch in a brake line but these can leak and or fail.

Here is a shot of the pedal assy installed in the car. The left side mount that is on the cage can be seen. The pedals ended up a little higher than stock but I can correct this with longer pedal pads.

The firewall on the drivers side was replaced with 14ga steel. I added a reinforcement to this in the form of a 1/2" square tube that welded on. The bracket bolts go on either side of the reinforcement. I added this because we have found that the firewall on these cars (even with heavier gauge steel in place) flexes when the brakes are applied. This is also a problem with the stock pedal assembly/master cylinder. Mazda figured this out and added a bracket in the cold air box for right hand drive models.
06-17-12, 12:18 AM
#65
Front Suspension
So, while I'm up watching the 24 hrs of LeMans coverage I thought I would update progress. The front suspension has been the area of focus of late.
This car has spherical bearings at all suspension points. It has for years - this is a legal mod in Improved Touring. The bearings have not worn out in many years of racing so now I am just optimizing how they work with the OE suspension.
The tension rod (strut rods) are located in the car using a .75" spherical bearing. The problem is that the OE tension rod is .700" in diameter and the inside diameter of the spherical bearing is .750". So a .050 sleeve is needed to make the OE tension rod fit the spherical bearing which can be machined but is frankly a bitch. So I decided to modify the tension rods.
Here is my solution. I took an OE tension rod and cut off the metric thread along with an addtional inch of the rod. I combined this with a 6" long piece of 3/4" SAE fine threaded rod and a 2" sleeve that fits over the threaded rod and the OE tension rod. The 3/4" threaded rod will fit the 3/4" spherical bearings snuggly without the need for a shim. Here are all pieces:
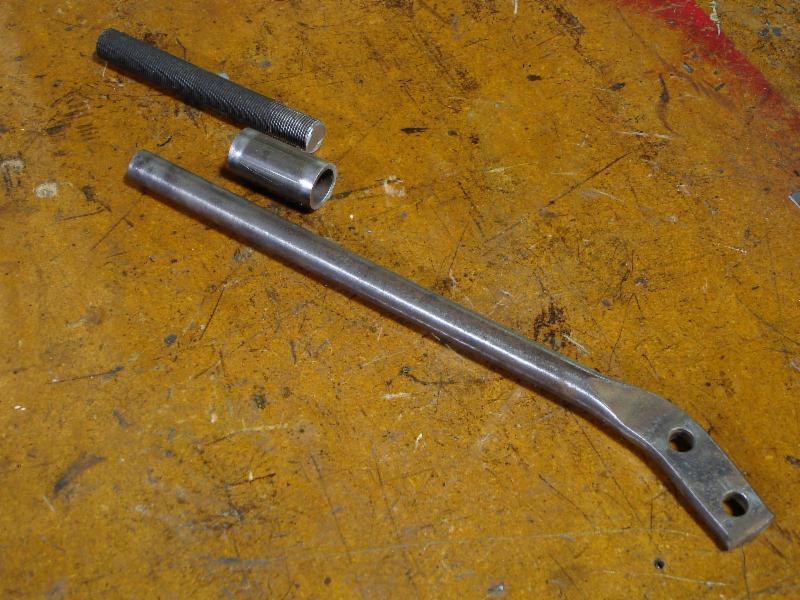
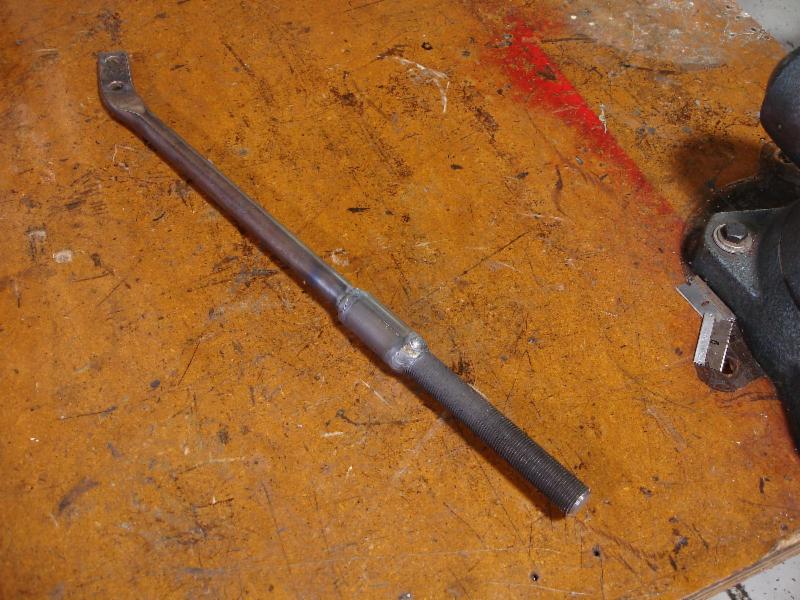
Now all tig welded together:
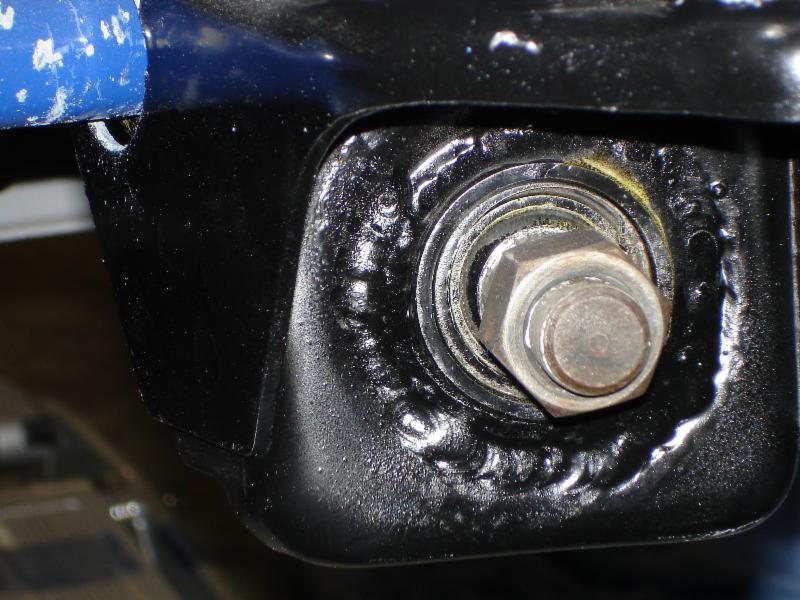
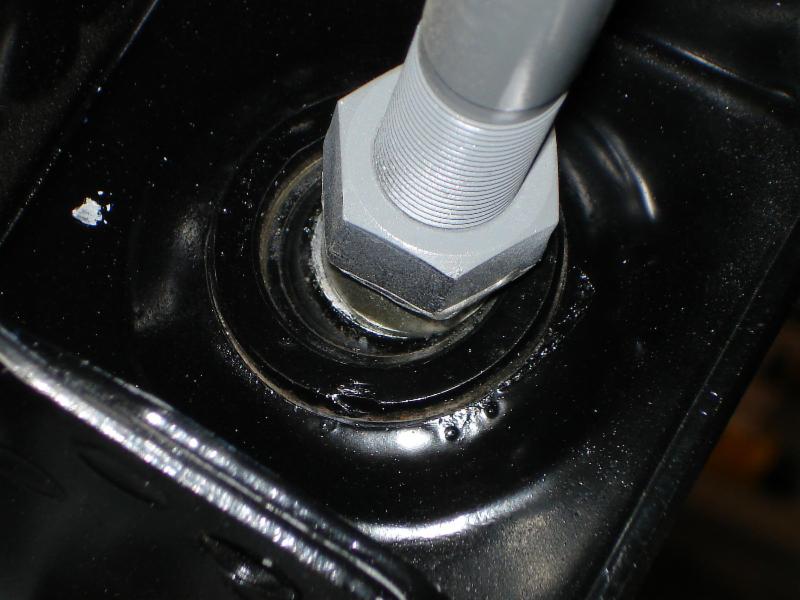
Here are some shots of the Spherical bearing in the tension rod bracket - this is with the OE tension rod installed.
This car has spherical bearings at all suspension points. It has for years - this is a legal mod in Improved Touring. The bearings have not worn out in many years of racing so now I am just optimizing how they work with the OE suspension.
The tension rod (strut rods) are located in the car using a .75" spherical bearing. The problem is that the OE tension rod is .700" in diameter and the inside diameter of the spherical bearing is .750". So a .050 sleeve is needed to make the OE tension rod fit the spherical bearing which can be machined but is frankly a bitch. So I decided to modify the tension rods.
Here is my solution. I took an OE tension rod and cut off the metric thread along with an addtional inch of the rod. I combined this with a 6" long piece of 3/4" SAE fine threaded rod and a 2" sleeve that fits over the threaded rod and the OE tension rod. The 3/4" threaded rod will fit the 3/4" spherical bearings snuggly without the need for a shim. Here are all pieces:

Now all tig welded together:

Here are some shots of the Spherical bearing in the tension rod bracket - this is with the OE tension rod installed.

 07-11-12, 06:39 PM
#69
www.VJMU.org
 07-15-12, 09:01 PM
#70
Updates
Nothing real significant accomplished lately, it has been hot and I have had some club racing responsibilities to tend too.
I have mounted the driver's seat and tested out the fit of the pedals and the steering column and I was really happy with everything. It was nice to sit in the car and find out that all the measurements and planning paid off.
I have since put the car on the ground - first time in over 2.5 years - and it looks pretty good. I will need to replace the 7" coil overs with 6" x 2.5" coil overs to get the car down where it needs to be. Kind of a PITA because it is hard get low rate springs in this size.
Over the weekend I was at Heartland Park for the Majors Invitational. Took a few snap shots of my buddies E Production car. Here is how he raised the strut tops:
07-16-12, 05:28 AM
#71
strut tops.
Nothing real significant accomplished lately, it has been hot and I have had some club racing responsibilities to tend too.
I have mounted the driver's seat and tested out the fit of the pedals and the steering column and I was really happy with everything. It was nice to sit in the car and find out that all the measurements and planning paid off.
I have since put the car on the ground - first time in over 2.5 years - and it looks pretty good. I will need to replace the 7" coil overs with 6" x 2.5" coil overs to get the car down where it needs to be. Kind of a PITA because it is hard get low rate springs in this size.
Over the weekend I was at Heartland Park for the Majors Invitational. Took a few snap shots of my buddies E Production car. Here is how he raised the strut tops:
Your car is looking good. Can't wait to see it sitting on the ground with it's new stance.
09-08-12, 09:50 PM
#72
Updates
The heat wave in KC has kept me out of the shop for much of the months of July and August. But I have accomplished a few things.
I've been planning my wiring harness using Microsoft Visio. I want the harness to be well documented for both my benefit and the benefit of a future owner. Overall there isn't much wiring compared to a street car but more than you might think. For example the racecar has to have functioning wipers (an STU rule), and will have an electric fan, two fuel pumps, a helmet air blower, a defroster, and a water pump for my cool shirt. More on this as it progresses.
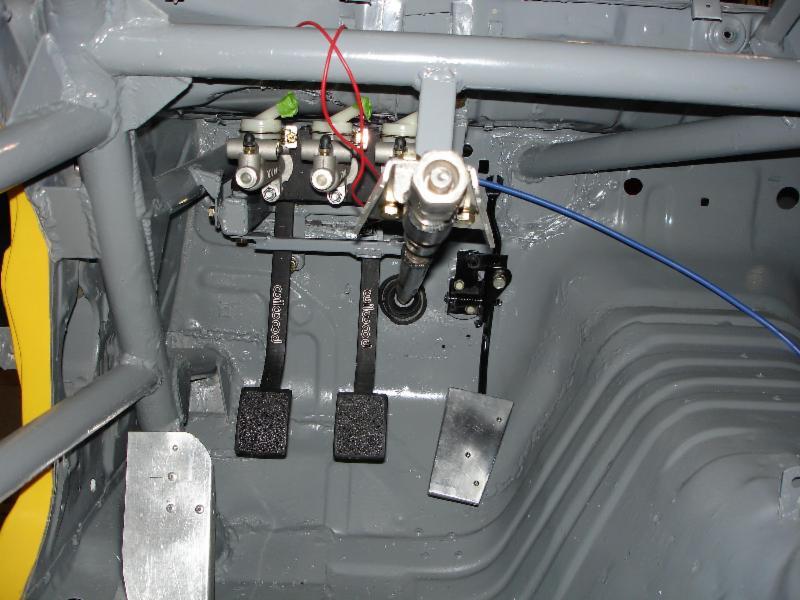
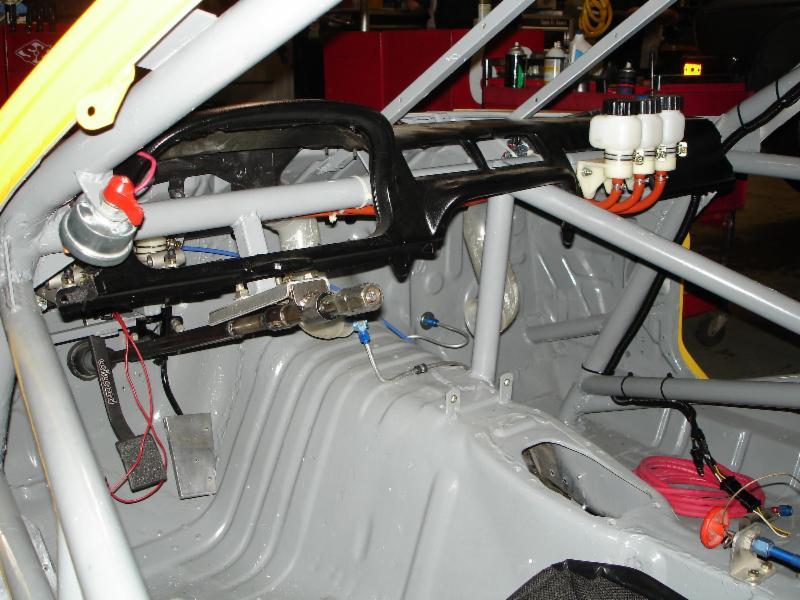
I have installed the master cylinder resevoirs and routed the hoses to the master cylinders. The hose that came with the Tilton master cylinders was too short so I had to order hose from McMaster-Karr that is resistant to brake fluid. Gotta love McMaster-Karr!
The fuel cell is around 8 years old and so if the foam inside of it so I decided to replace it and the fill plate gasket. I also took this opportunity to tighten up the fittings that pass through the fill plate. The foam I purchased from from a local circle track shop. It is good stuff but in hind sight it would have been cheaper to purchase foam from ATL.
To accommodate a street ported engine I am up sizing the fuel line from the cell to -8. This required rerouting the hoses from the pump and installing a new Moroso fuel block. The hoses are covered with military surplus fire sleeve to help with abrasion. The hoses are -6 Aeroquip push-lock.
The pumps are Carter GP4070 pumps. We have found them to be more reliable than Holley pumps. Each pump is connected to a pickup in the cell. One way check valves are installed to prevent the pumps from pushing fuel past each other as the cell empties.
I've been planning my wiring harness using Microsoft Visio. I want the harness to be well documented for both my benefit and the benefit of a future owner. Overall there isn't much wiring compared to a street car but more than you might think. For example the racecar has to have functioning wipers (an STU rule), and will have an electric fan, two fuel pumps, a helmet air blower, a defroster, and a water pump for my cool shirt. More on this as it progresses.
I have installed the master cylinder resevoirs and routed the hoses to the master cylinders. The hose that came with the Tilton master cylinders was too short so I had to order hose from McMaster-Karr that is resistant to brake fluid. Gotta love McMaster-Karr!

The fuel cell is around 8 years old and so if the foam inside of it so I decided to replace it and the fill plate gasket. I also took this opportunity to tighten up the fittings that pass through the fill plate. The foam I purchased from from a local circle track shop. It is good stuff but in hind sight it would have been cheaper to purchase foam from ATL.
To accommodate a street ported engine I am up sizing the fuel line from the cell to -8. This required rerouting the hoses from the pump and installing a new Moroso fuel block. The hoses are covered with military surplus fire sleeve to help with abrasion. The hoses are -6 Aeroquip push-lock.
The pumps are Carter GP4070 pumps. We have found them to be more reliable than Holley pumps. Each pump is connected to a pickup in the cell. One way check valves are installed to prevent the pumps from pushing fuel past each other as the cell empties.
09-08-12, 09:53 PM
#73
More Updates
I installed the driver's seat - Kirkey Roadrace Intermediate - and was pleasantly surprised to find that the brake and clutch pedals are PERFECT!
I was really sweating that because fixing a problem with pedal placement would have been a pain in the ***!
I was really sweating that because fixing a problem with pedal placement would have been a pain in the ***!
09-16-12, 09:53 PM
#74
Working on instrumentation and decided to upgrade my pedestal mount Autogauge tach to a dash mount tach. I started poking around eBay and came accross NOS Stewart Warner Trackforce tachs at a great price so I snapped one up. I have used this model before on several cars and after many years of racing they are still going strong
The tach is a 10K with memory recall. On the left is a low oil pressure warning light that comes on at 20psi. To the right if the tach is a shift light that I will connect to an RPM activated switch.


The tach is a 10K with memory recall. On the left is a low oil pressure warning light that comes on at 20psi. To the right if the tach is a shift light that I will connect to an RPM activated switch.
