
Non-turbo 428rwhp FD build up and history

Non-turbo 428rwhp FD build up and history
So I figured after a bunch of requests I would post the build process of my 20b track car/ street machine. This will be a long thread! Hope its not too boring
History-
Not to sound at all arrogant, but I was the first in the u.s. to really start developing a streetable high power (300+rwhp) n/a 20b sideport engine. Re-amemiya had been building them before me, but I had never seen or read about it. My car was also the first to document using a stock subframe with a 20b in the FD. Carlos Lopez told me it was possible and ways he accomplished it. But once I started fitting the engine, there were a bunch of things I didnt expect. But it created our 20b conversion kit we sell today. Carlos also was the one who gave me the idea for throttle body manifolds, and exhaust specs. He really helped out a lot, and that was the start to a great friendship. His knowlege combined with countless others, and lots of testing/ development has made the results we get now
Here is the first setup from 2004. Tweak-it 55mm throttle bodies with custom modified mazda comp race 13b manifolds welded to custom 20b flange. Custom stainless header/exhaust. Streetported running a microtech. 348rwhp/ 218 rwtq @8300 rpm. Had semi p-ports in the engine but never had the chance to build a intake to use them.
Second revised setup in 2007. Sold the throttle body setup to build a better one. Went drysump and ceramic seals, better cooling system. Electromotive ecu. Had to use the factory intake to get it up and running. Still had the semi p-ports unused. 313rwhp/221 rwtq @9000 rpm.
And here is the latest version of the famous n/a 20b from 2010. Semi p-ports fully functional. 428rwhp/ 245rwtq @10,000rpm
The fresh start for my n/a 20b Rx7-
Like any good idea this one started on paper. Having some time in a wheelchair resting up after my car accident, there I sat with a blank sheet and open to ideas. I was considering any car to build next, as having owned 17 Rx7's maybe it was time for something new. But after longer thought, I kept coming back to the Rx7. Thanks to guys like FDwarrior and Gmonsen and of course Peter (co-owner/best friend) for giving me pep talks as to why stick with the FD again. So after forming ideas into goals, I set out and found a nice black, non-sunroof Rx7 shell. The starting point. I put in a little under two years to get this one done. Granted I ONLY worked on it every sunday. Luckily my friend Matt (fdwarrior) would stop by and lend a hand anytime. Always good to have a second set of eyes and brians around. Both Matt and Peter helped a lot giving new ideas for this car.
Goals-
a) Extreme reliability, even under stressed racing conditions, or day to day driving
b) Extreme lightweight. Under 2500lbs wet.
c) Extremely low center of gravity
d) Mid engine car weight distribution. 48% front and 52% rear
e) Capable of running very large rubber for racing
f) Massive stopping power
g) 400+ rear wheel horsepower naturally aspirated
h) Good downforce to produce very high G loads
So here is the build process-----
Enjoy!
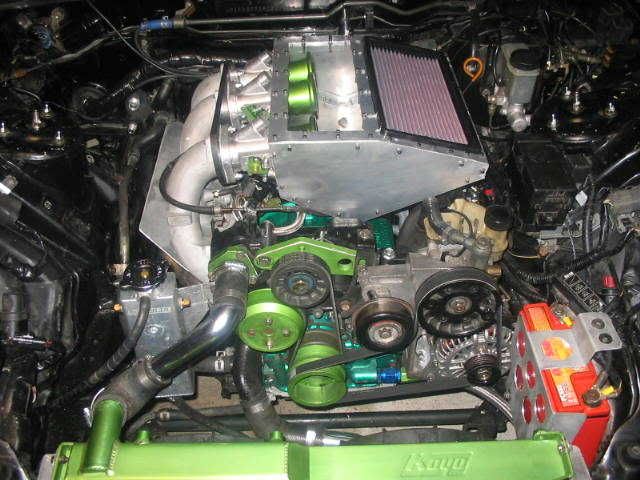
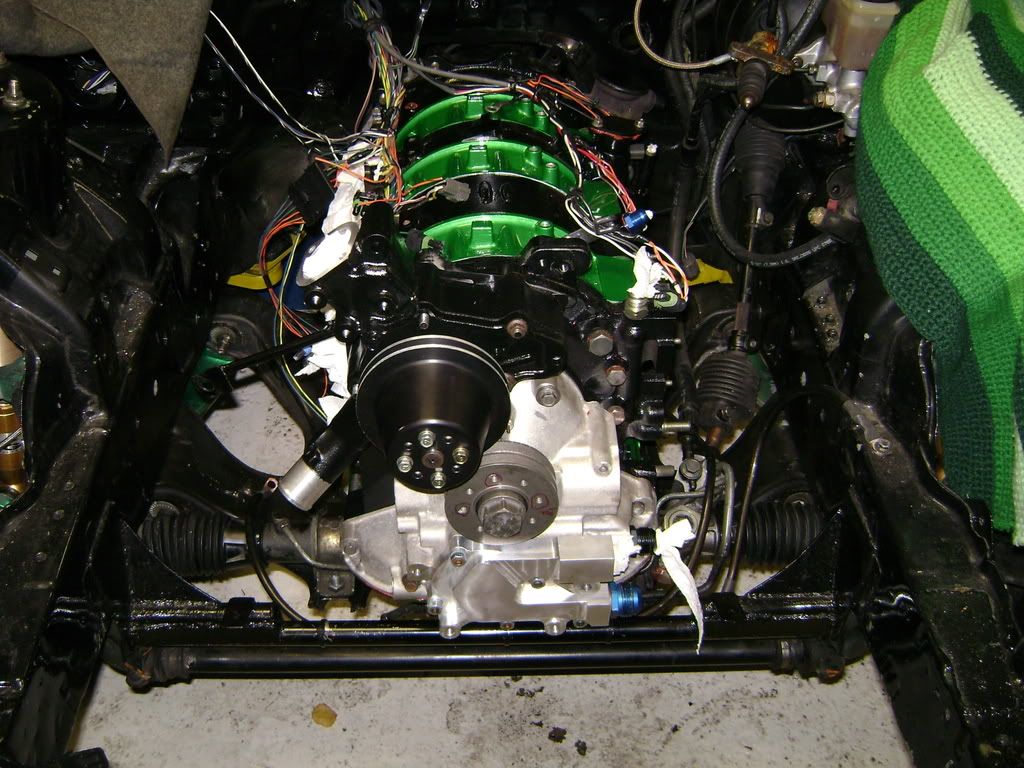
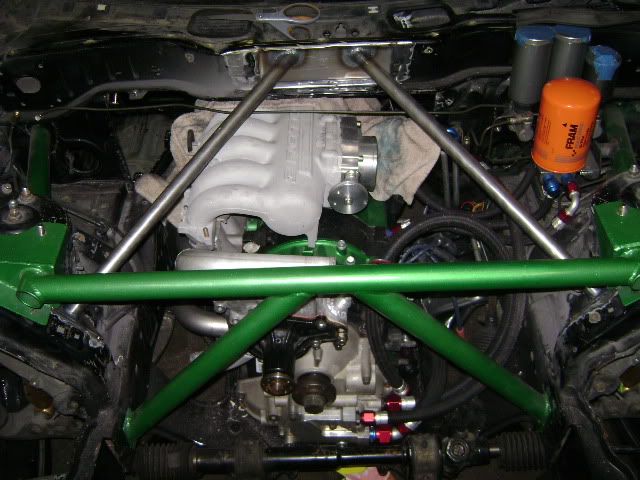
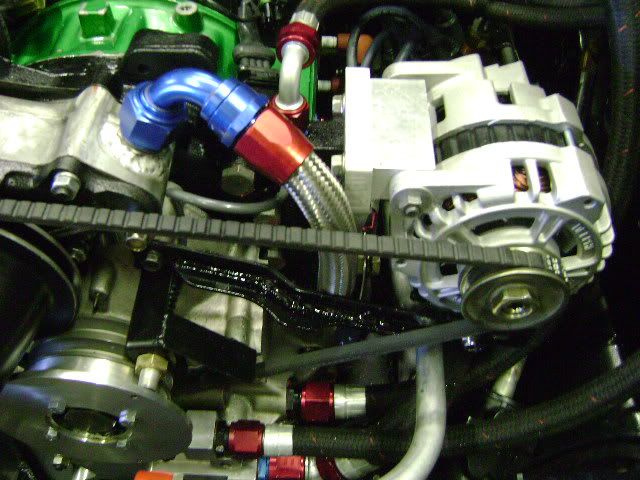
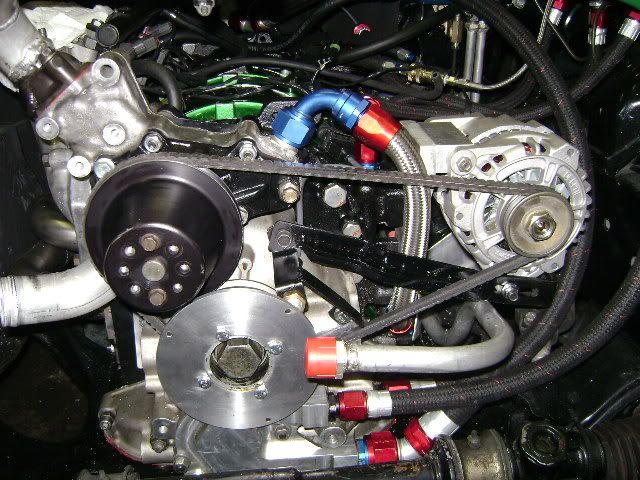
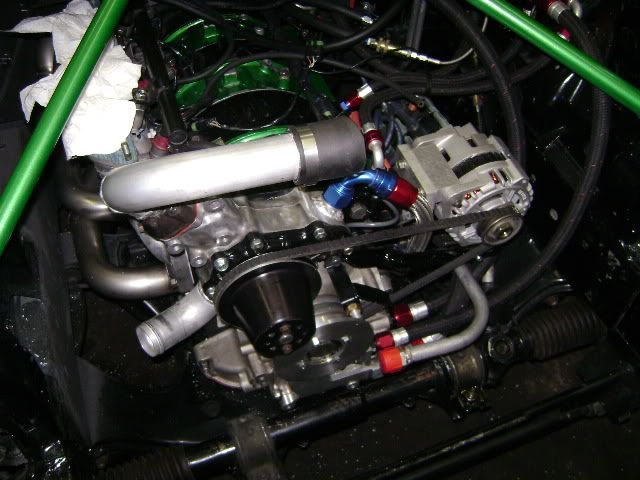
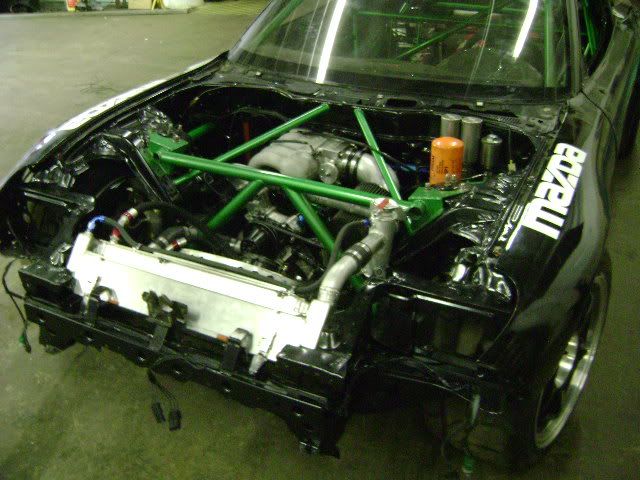
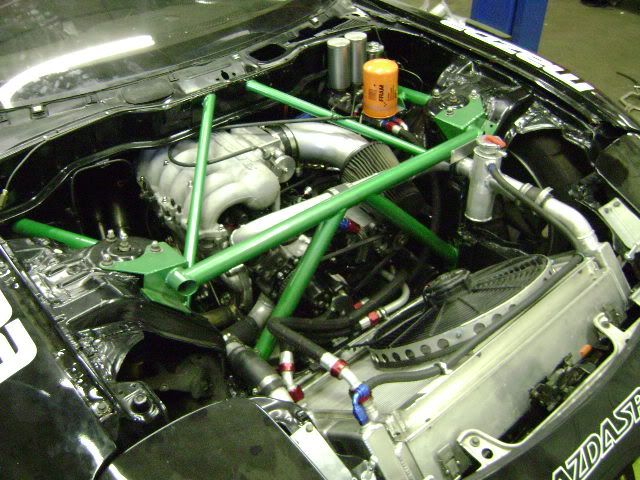
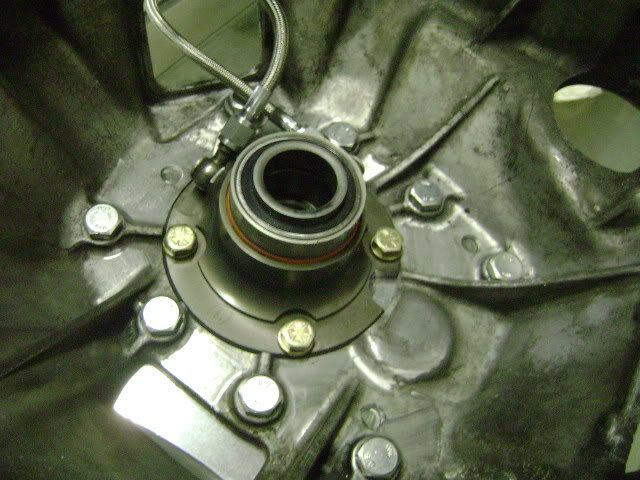
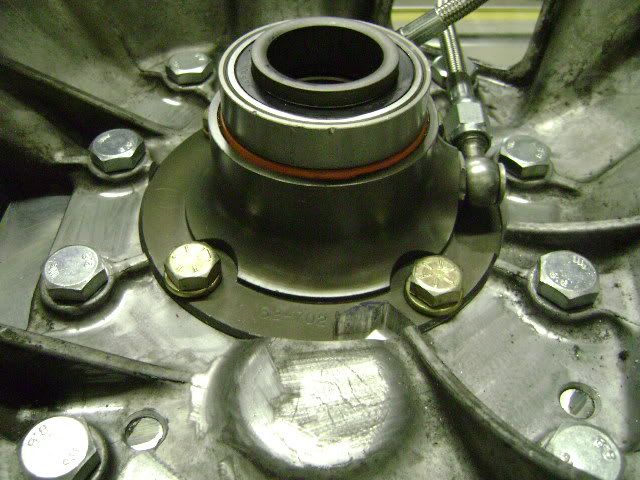
The engine. Carried over from the my last Rx7 unchanged. Specs- C-series 20b, 9.7:1 rotors, balanced, clearanced. NRS ceramic apex seals (allows for rpm over 8900), New FC rotor housings, semi p-ports. Full mazdaspeed drysump front cover (20b oil pump system will NOT hold oil pressure past 8900 rpm). Our Circuit port on the intake and exhaust. Oil modifications to feed front, center, and rear bearings individually.


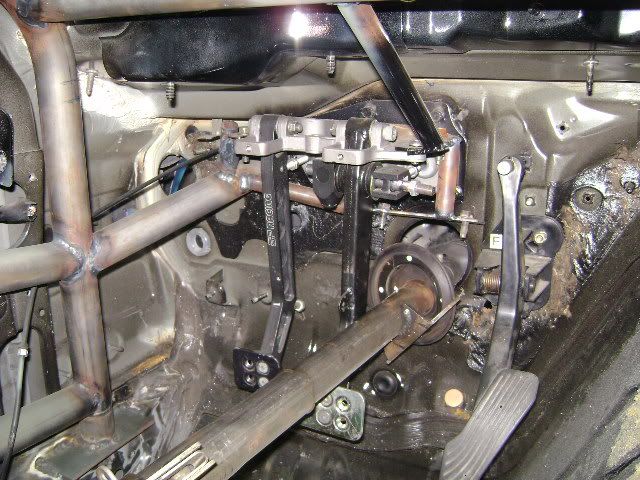
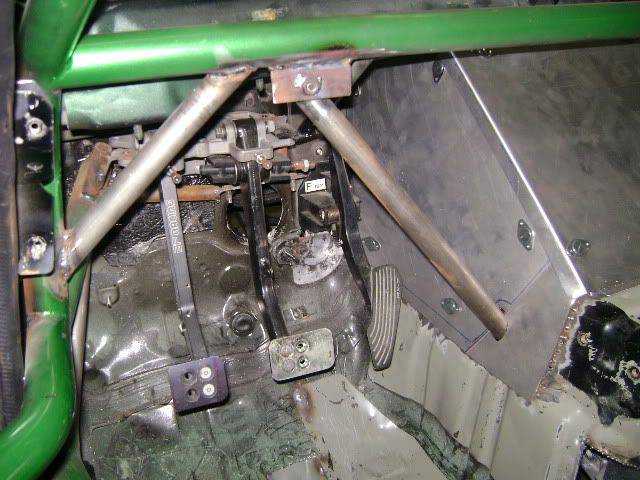
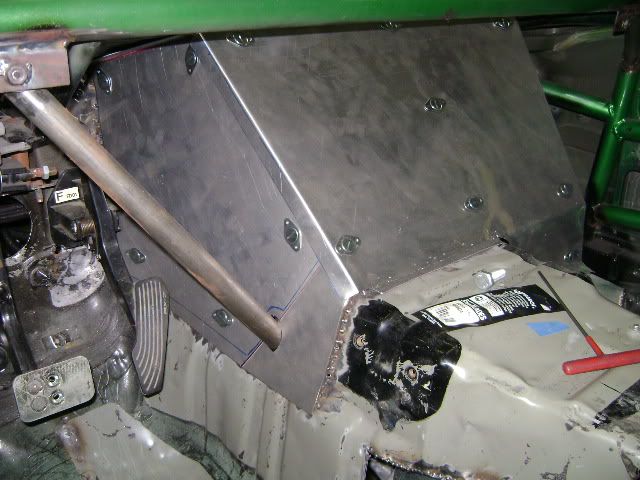
Making firewall reinforcements to fit the AP racing twin brake master setup with clutch assembly. VERY lightweight, and allowed for room to put cage tubing through to the shock towers.
History-
Not to sound at all arrogant, but I was the first in the u.s. to really start developing a streetable high power (300+rwhp) n/a 20b sideport engine. Re-amemiya had been building them before me, but I had never seen or read about it. My car was also the first to document using a stock subframe with a 20b in the FD. Carlos Lopez told me it was possible and ways he accomplished it. But once I started fitting the engine, there were a bunch of things I didnt expect. But it created our 20b conversion kit we sell today. Carlos also was the one who gave me the idea for throttle body manifolds, and exhaust specs. He really helped out a lot, and that was the start to a great friendship. His knowlege combined with countless others, and lots of testing/ development has made the results we get now
Here is the first setup from 2004. Tweak-it 55mm throttle bodies with custom modified mazda comp race 13b manifolds welded to custom 20b flange. Custom stainless header/exhaust. Streetported running a microtech. 348rwhp/ 218 rwtq @8300 rpm. Had semi p-ports in the engine but never had the chance to build a intake to use them.
Second revised setup in 2007. Sold the throttle body setup to build a better one. Went drysump and ceramic seals, better cooling system. Electromotive ecu. Had to use the factory intake to get it up and running. Still had the semi p-ports unused. 313rwhp/221 rwtq @9000 rpm.
And here is the latest version of the famous n/a 20b from 2010. Semi p-ports fully functional. 428rwhp/ 245rwtq @10,000rpm
The fresh start for my n/a 20b Rx7-
Like any good idea this one started on paper. Having some time in a wheelchair resting up after my car accident, there I sat with a blank sheet and open to ideas. I was considering any car to build next, as having owned 17 Rx7's maybe it was time for something new. But after longer thought, I kept coming back to the Rx7. Thanks to guys like FDwarrior and Gmonsen and of course Peter (co-owner/best friend) for giving me pep talks as to why stick with the FD again. So after forming ideas into goals, I set out and found a nice black, non-sunroof Rx7 shell. The starting point. I put in a little under two years to get this one done. Granted I ONLY worked on it every sunday. Luckily my friend Matt (fdwarrior) would stop by and lend a hand anytime. Always good to have a second set of eyes and brians around. Both Matt and Peter helped a lot giving new ideas for this car.
Goals-
a) Extreme reliability, even under stressed racing conditions, or day to day driving
b) Extreme lightweight. Under 2500lbs wet.
c) Extremely low center of gravity
d) Mid engine car weight distribution. 48% front and 52% rear
e) Capable of running very large rubber for racing
f) Massive stopping power
g) 400+ rear wheel horsepower naturally aspirated
h) Good downforce to produce very high G loads
So here is the build process-----
Enjoy!
The engine. Carried over from the my last Rx7 unchanged. Specs- C-series 20b, 9.7:1 rotors, balanced, clearanced. NRS ceramic apex seals (allows for rpm over 8900), New FC rotor housings, semi p-ports. Full mazdaspeed drysump front cover (20b oil pump system will NOT hold oil pressure past 8900 rpm). Our Circuit port on the intake and exhaust. Oil modifications to feed front, center, and rear bearings individually.
Making firewall reinforcements to fit the AP racing twin brake master setup with clutch assembly. VERY lightweight, and allowed for room to put cage tubing through to the shock towers.
Last edited by GtoRx7.; Jan 12, 2011 at 12:49 AM.
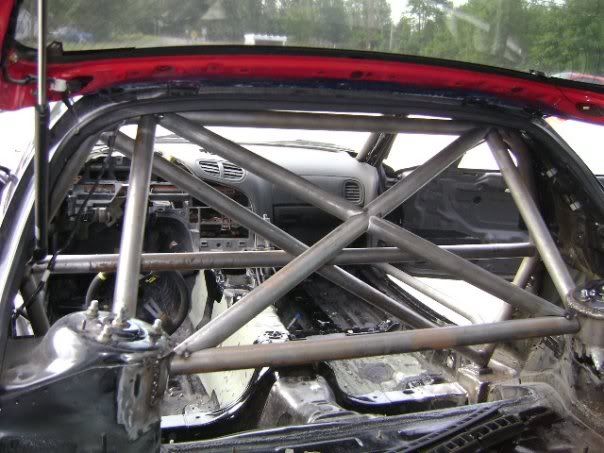
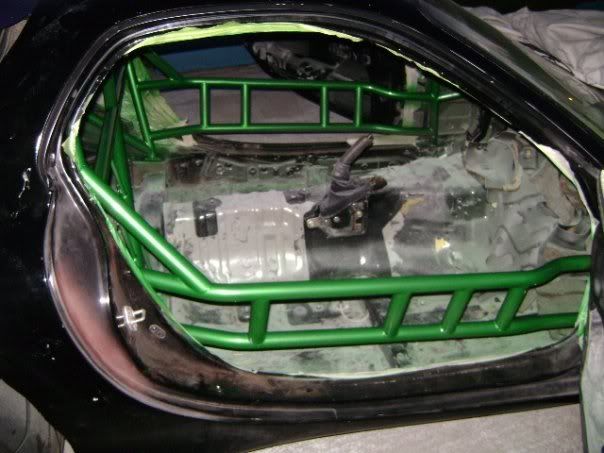
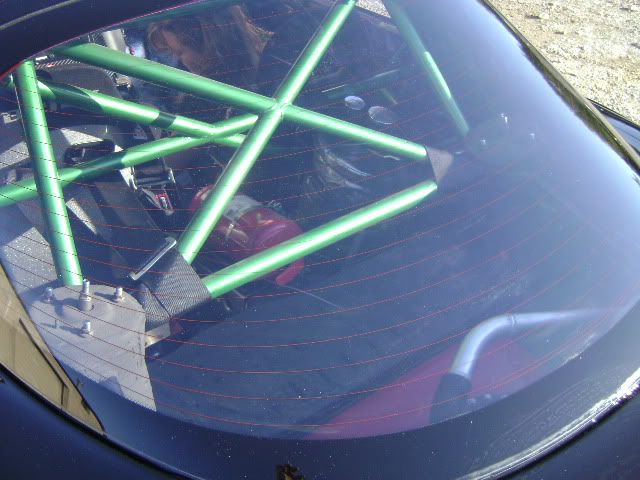
We made the roll cage for extreme stiffness. Every joint was TIG welded for strength.
Fast track cars need wide rubber. So I had the wheels widened to 11" in the front and 12" in the rear. This allowed 275/40/17 front tires and 315/35/17 rear tires.
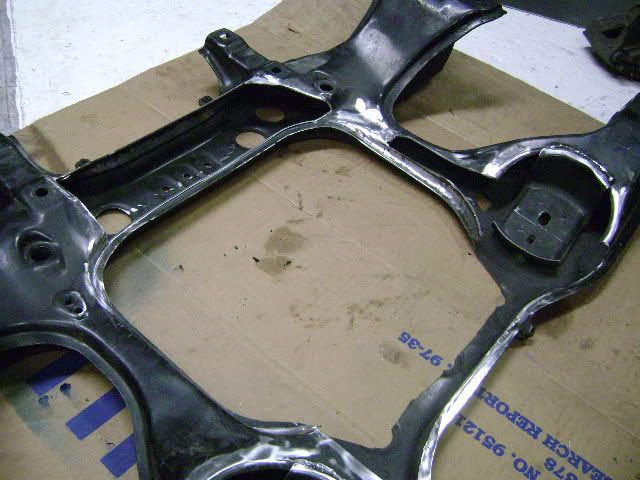
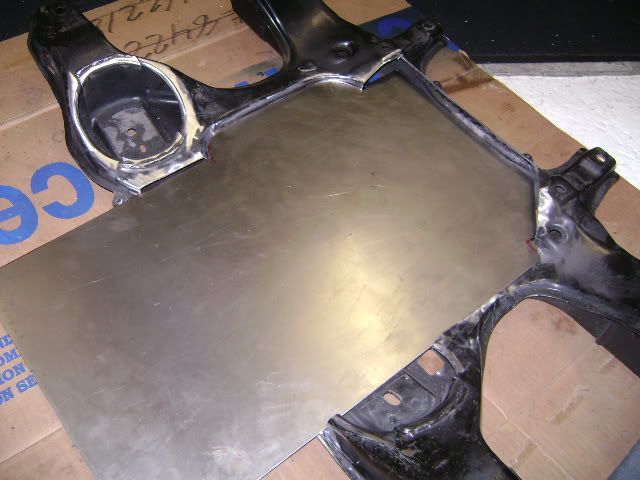
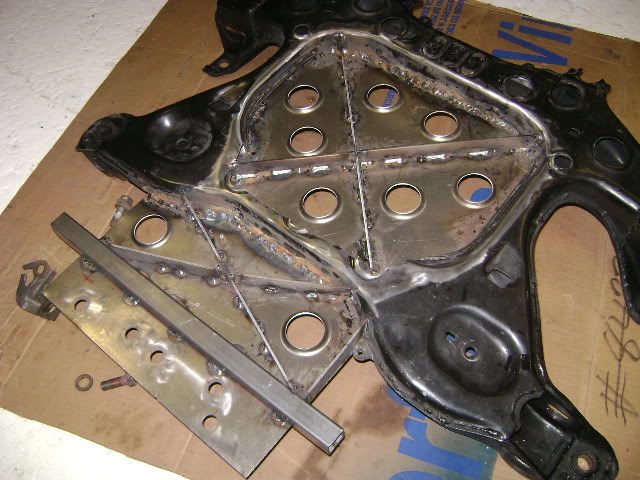
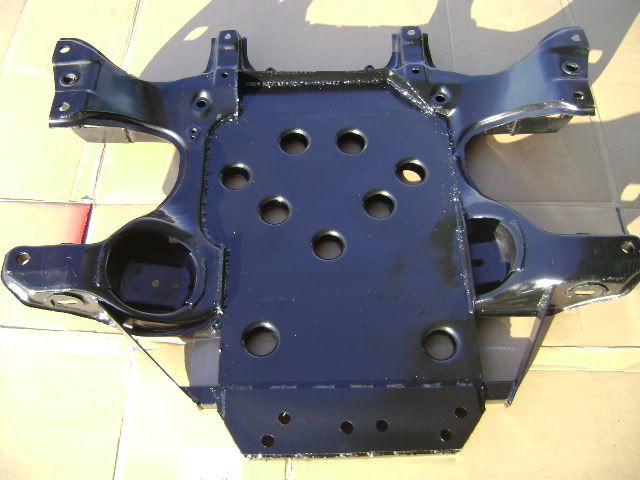
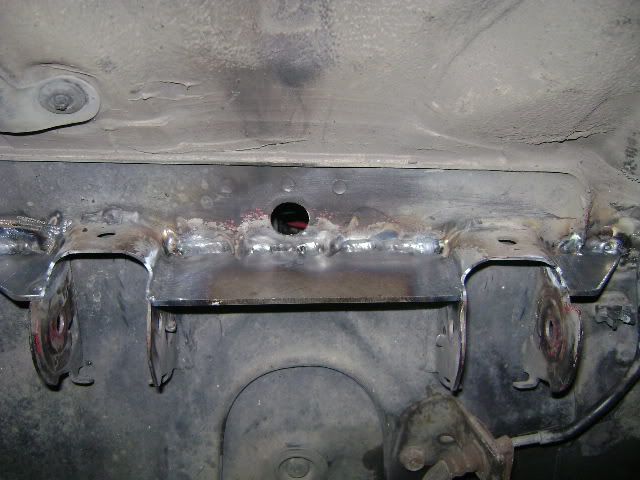
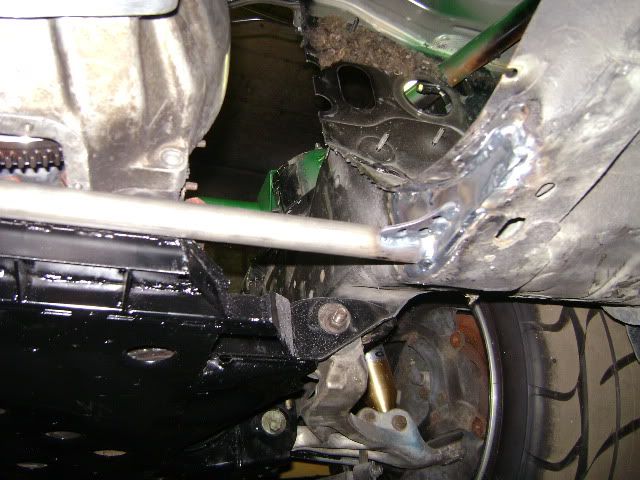
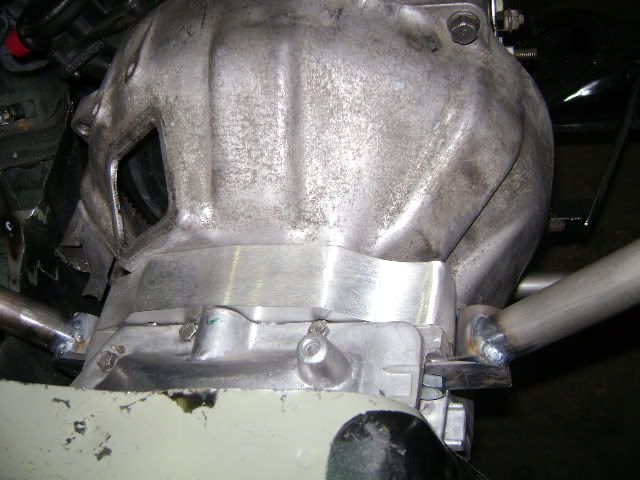
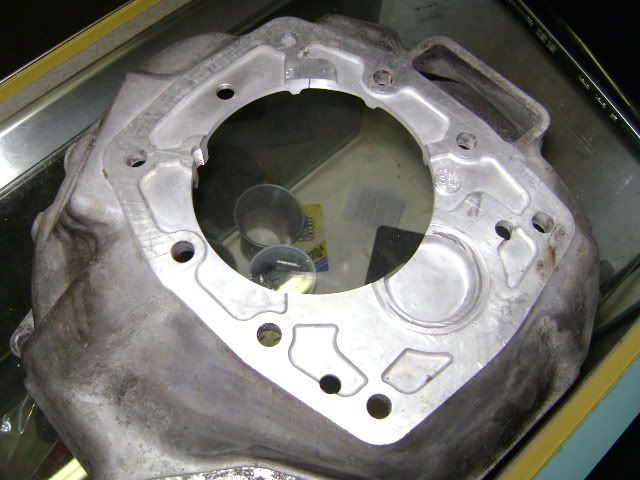
Modified the stock subframe to fit the engine even closer to the ground. With the drysump flat oil plate, I wanted to get the engine less than 1.5" from the bottom of the chassis. The engine now bolts directly to the subframe with no motor mount material. Its also 14" further back into the chassis.
Fast track cars need wide rubber. So I had the wheels widened to 11" in the front and 12" in the rear. This allowed 275/40/17 front tires and 315/35/17 rear tires.
Modified the stock subframe to fit the engine even closer to the ground. With the drysump flat oil plate, I wanted to get the engine less than 1.5" from the bottom of the chassis. The engine now bolts directly to the subframe with no motor mount material. Its also 14" further back into the chassis.
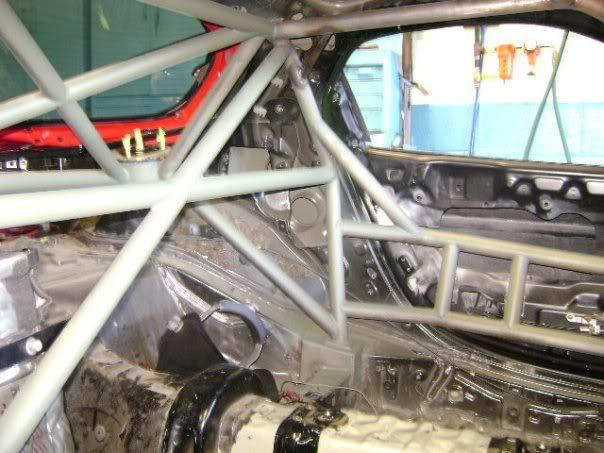
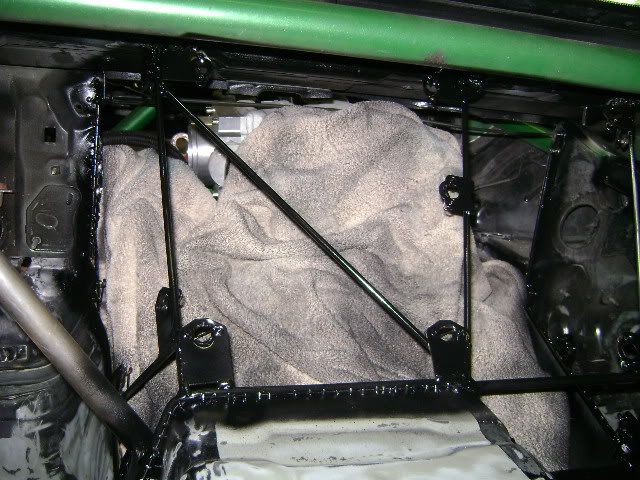
The rear quarters were cut out and TIG welded with tubs to maintain strength. Didnt want to just fill up with foam and call it a day.
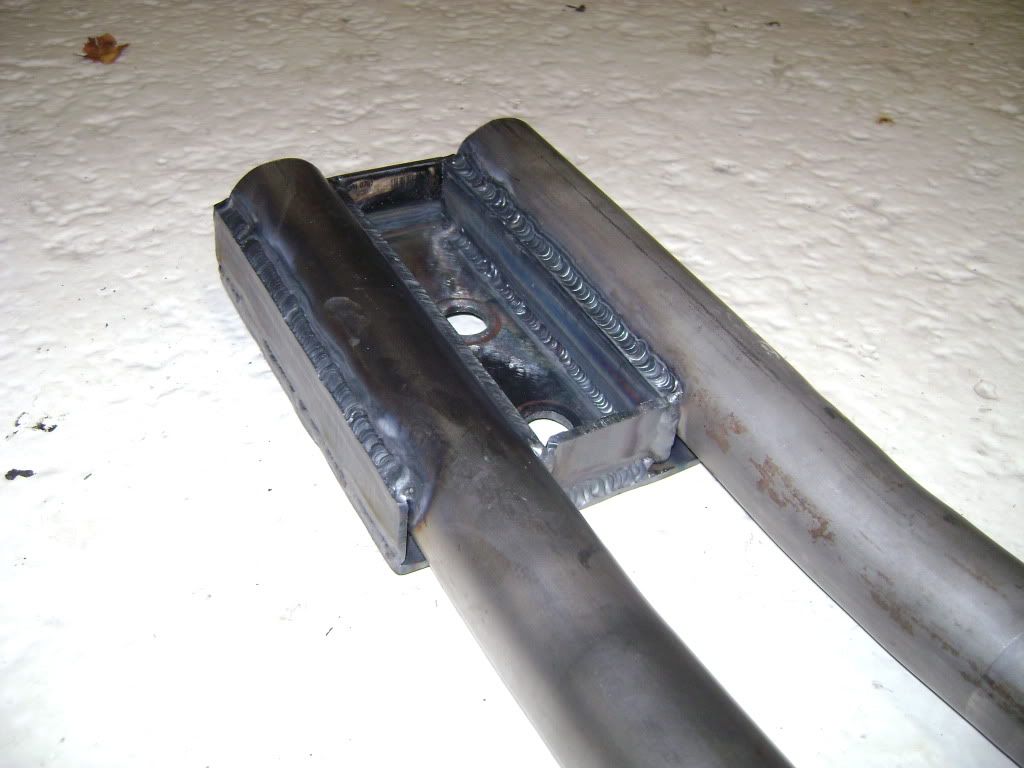
Front A-arm mounts reinforced
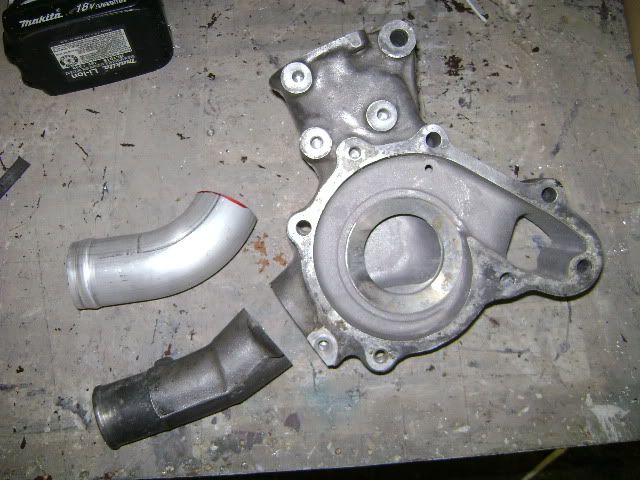
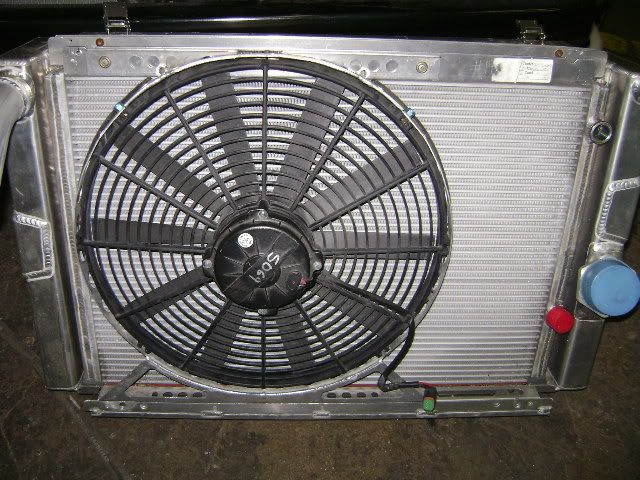
I used a series 4 turbo II waterpump for its increased flowing capabilities. We then further modified it by making the inlet and outet 1.75"
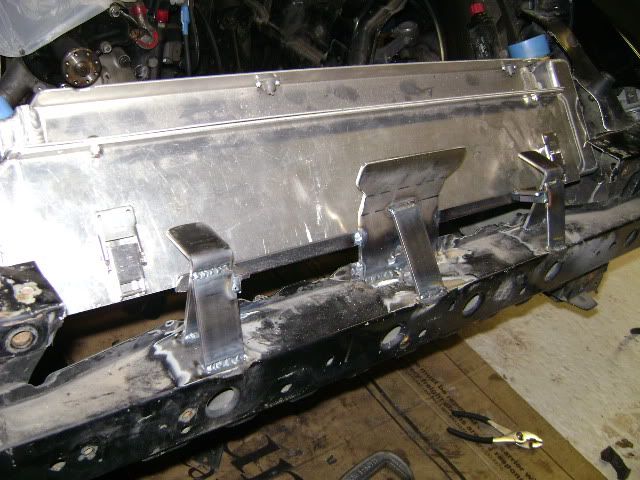
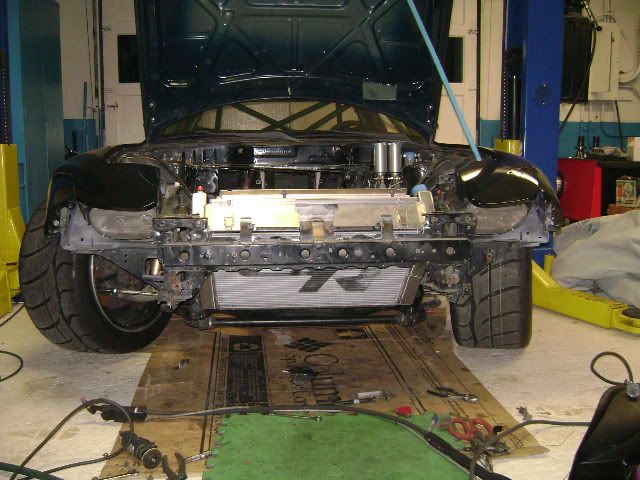
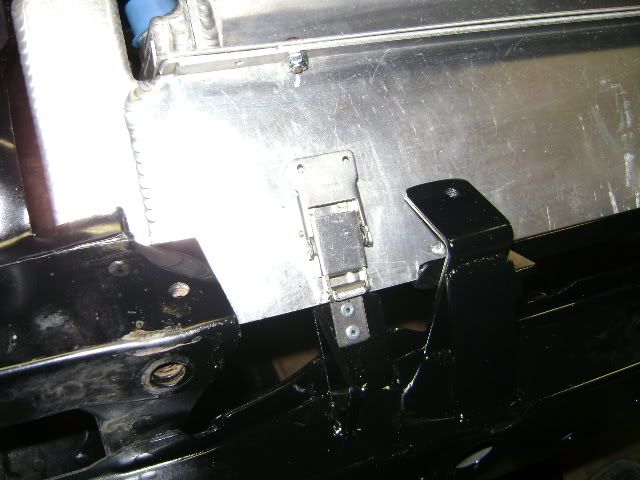
The nascar radiator/oil cooler setup was made with a quick release latches. Replaced hood latch bracket with a 1/8" steel version it fit everything in
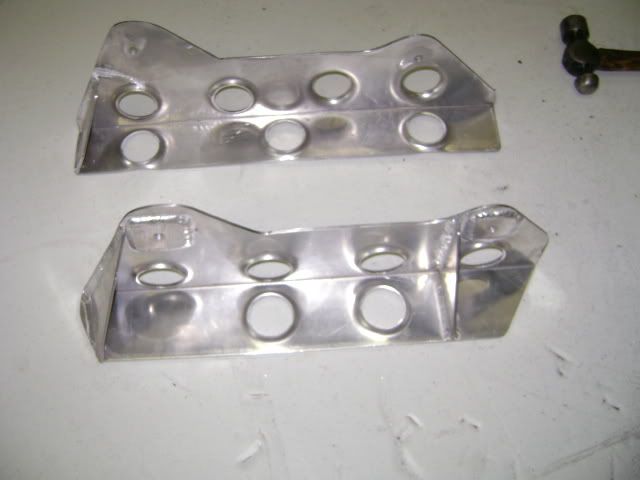
Weight was a primary concern. I wanted a target weight of 2500lbs wet. So every bracket we made was carefully constructed for strength and lightness
Front A-arm mounts reinforced
I used a series 4 turbo II waterpump for its increased flowing capabilities. We then further modified it by making the inlet and outet 1.75"
The nascar radiator/oil cooler setup was made with a quick release latches. Replaced hood latch bracket with a 1/8" steel version it fit everything in
Weight was a primary concern. I wanted a target weight of 2500lbs wet. So every bracket we made was carefully constructed for strength and lightness
Last edited by GtoRx7.; Jan 12, 2011 at 12:59 AM.
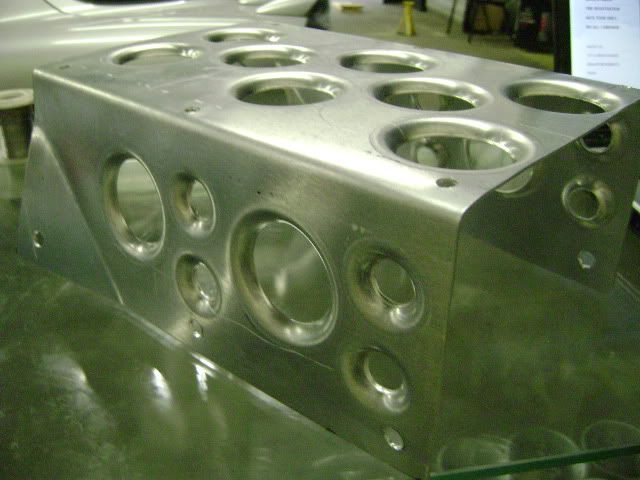
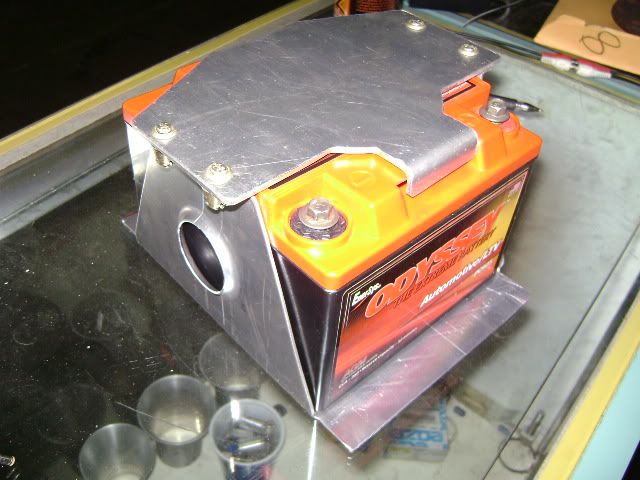
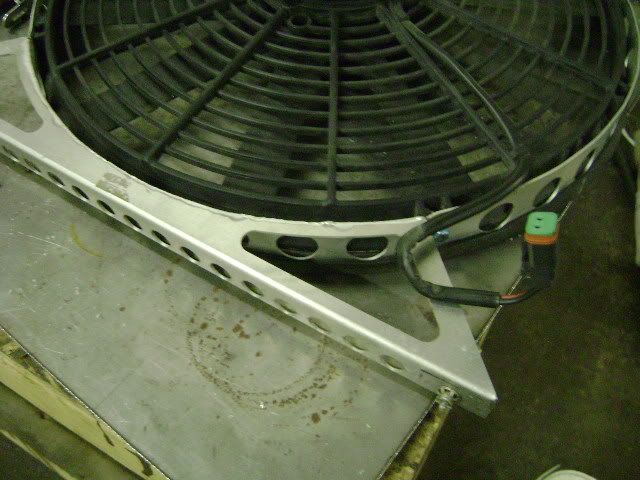
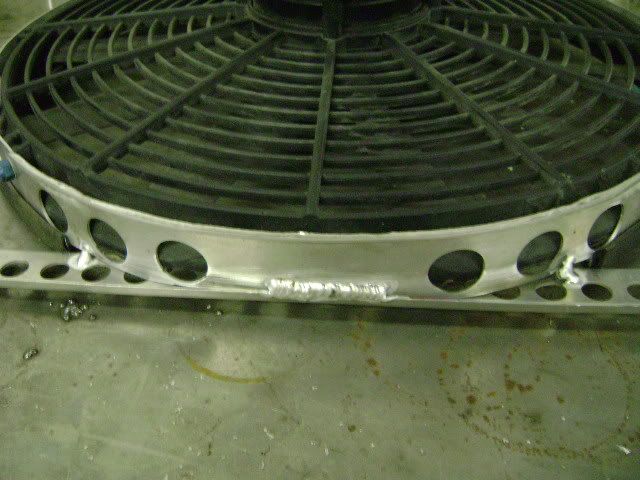
Battery box was made so it could quick release in a second. Using four camloks, its nice and simple
Fan-mount was made with quick release camlocks as well. Very lightweight and strong
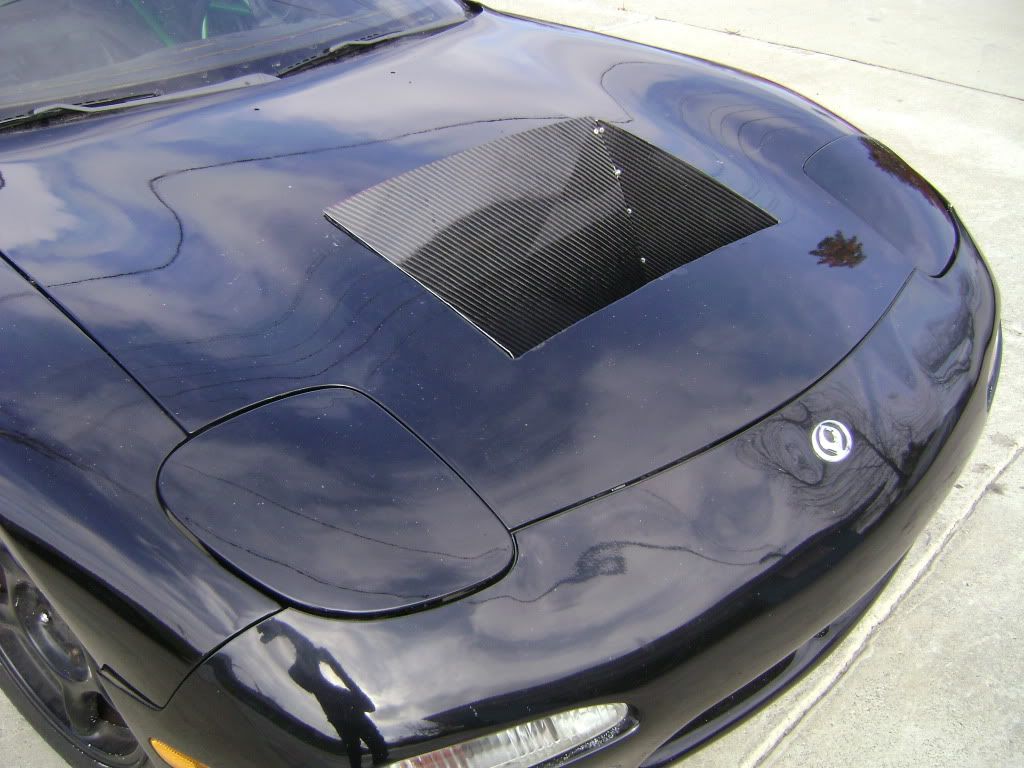
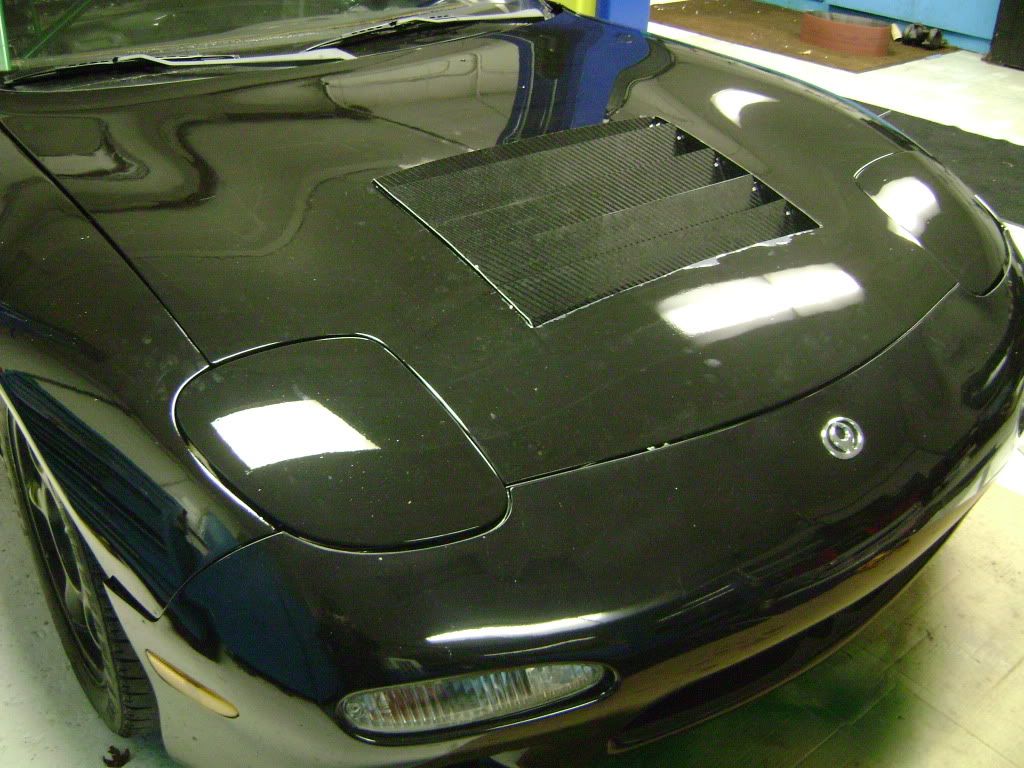
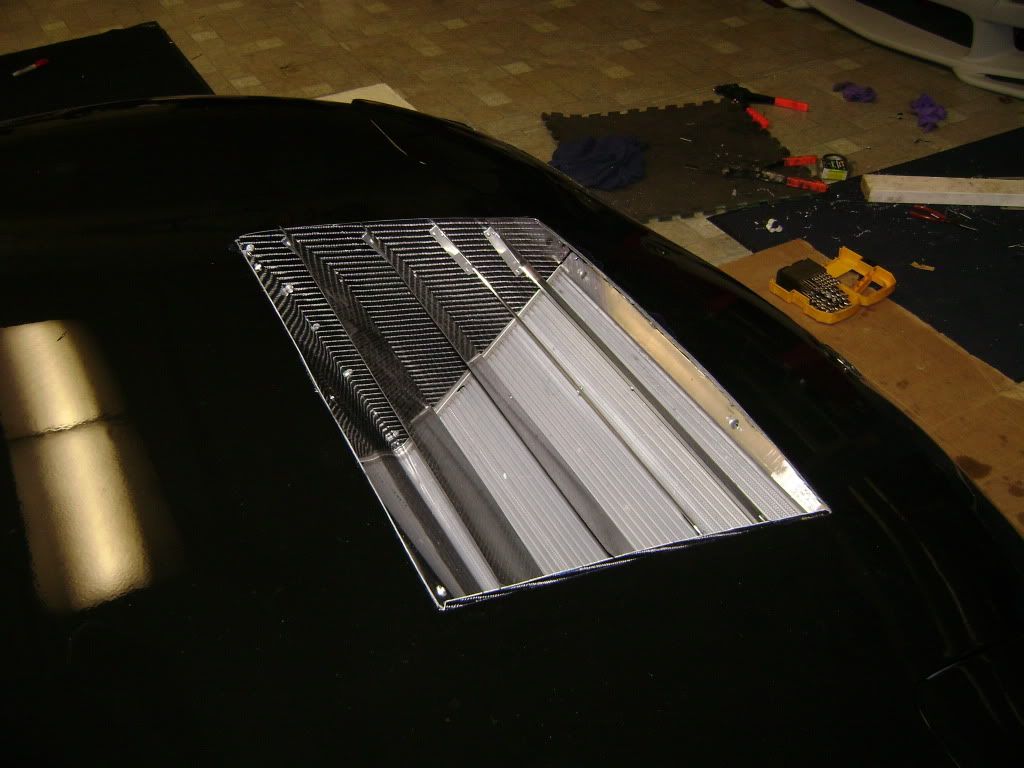
Cut the factory hood to accept a GT style vent. We made the vent assembly entirely out of carbon to save weight. This will pull a vacuum on the radiator air flow up top
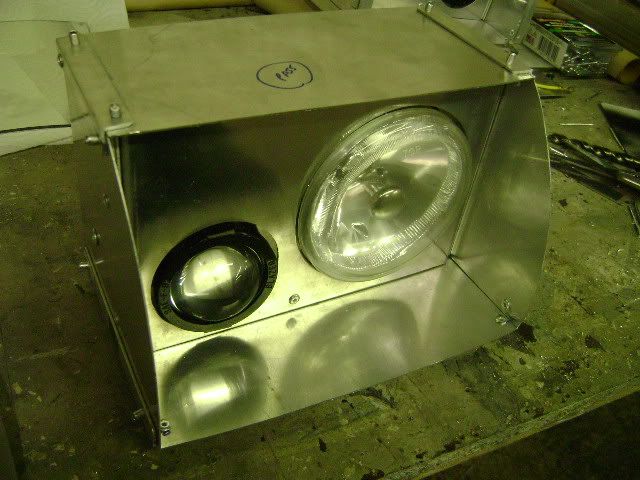
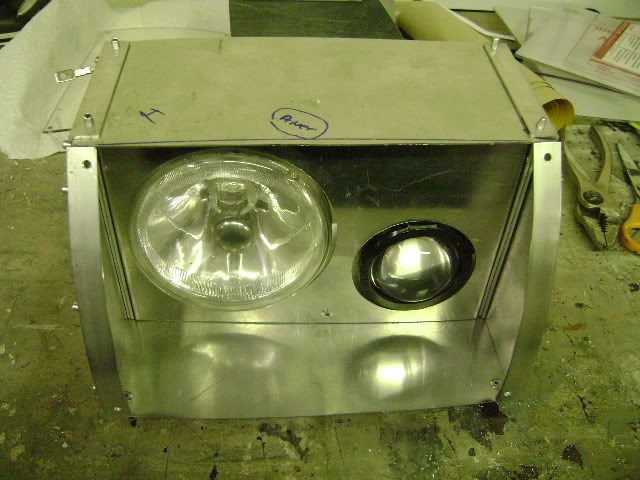
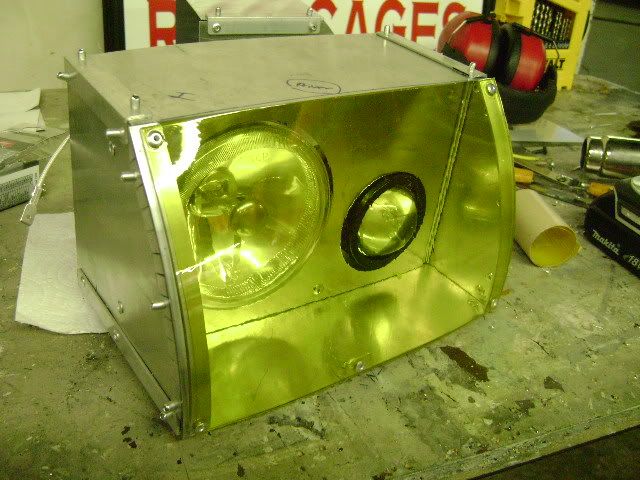
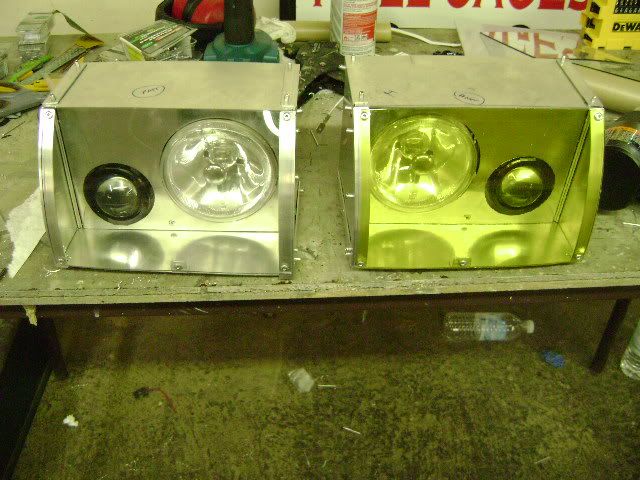
For the headlights, I deleted the standard pop-up assemblies. Then mounted the lids using lightweight aluminum brackets. Next was to custom make these twin "Lemans style" headlights using projectors. This saved over 10lbs.
Fan-mount was made with quick release camlocks as well. Very lightweight and strong
Cut the factory hood to accept a GT style vent. We made the vent assembly entirely out of carbon to save weight. This will pull a vacuum on the radiator air flow up top
For the headlights, I deleted the standard pop-up assemblies. Then mounted the lids using lightweight aluminum brackets. Next was to custom make these twin "Lemans style" headlights using projectors. This saved over 10lbs.
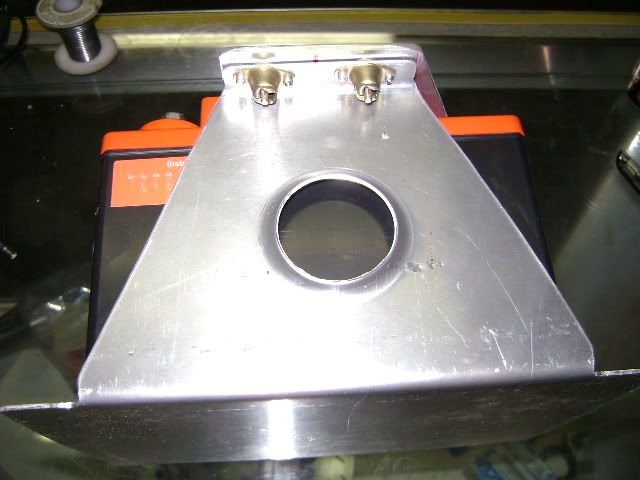
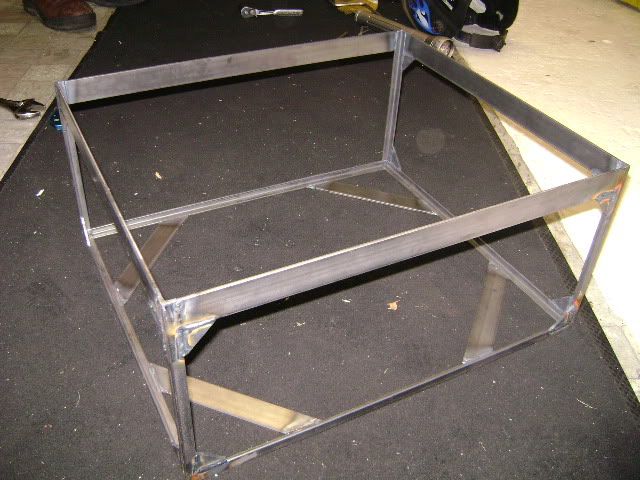
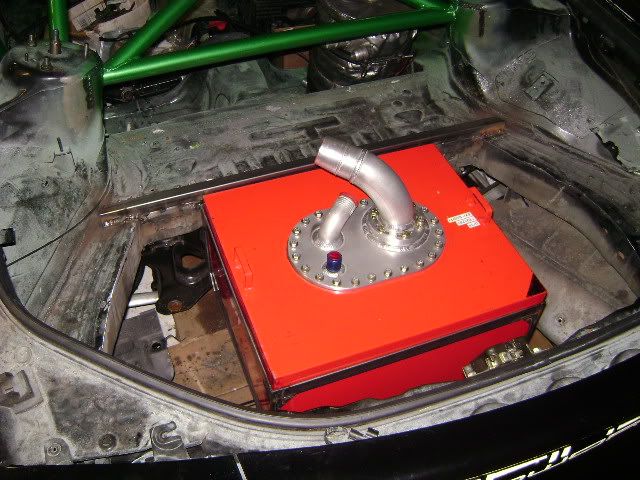
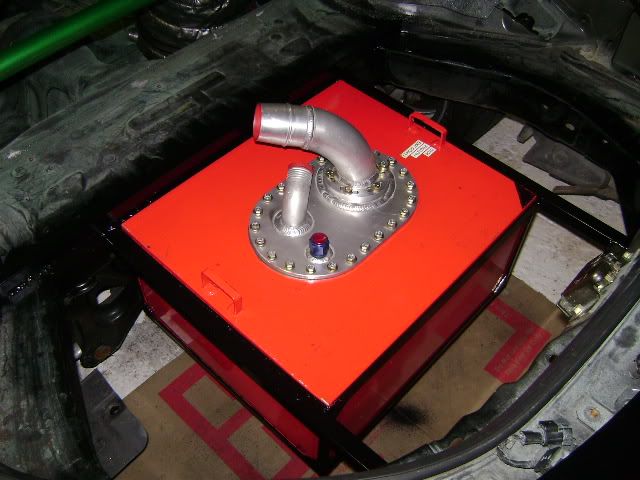
The fuel cell is a Carbon kevlar ATL bladder cell. 13 gallon capacity. I removed the rear sway bar, and will be re-locating it with tie-rod actuation. This allowed the fuel cell to fit 4 inches closer to the centerline of the chassis. I also placed it dead center in the car to make left to right weight distribution more even.
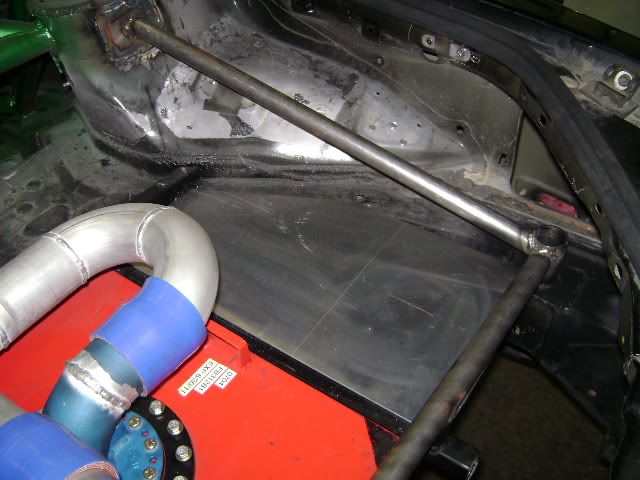
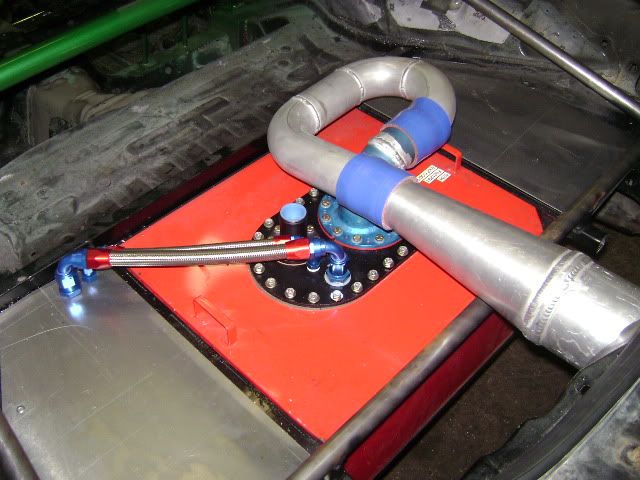
Fuel cell mount
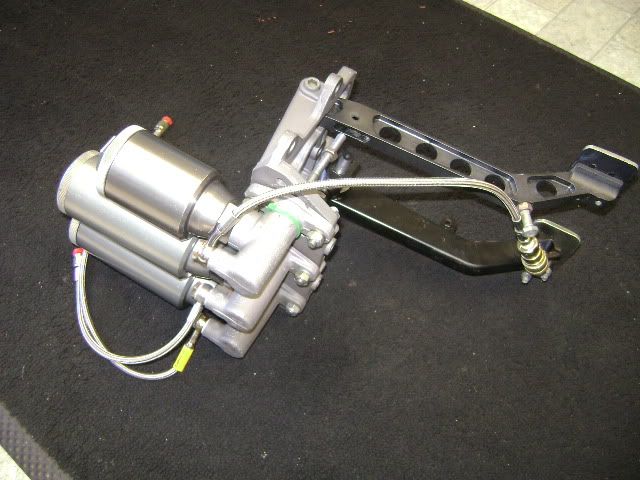
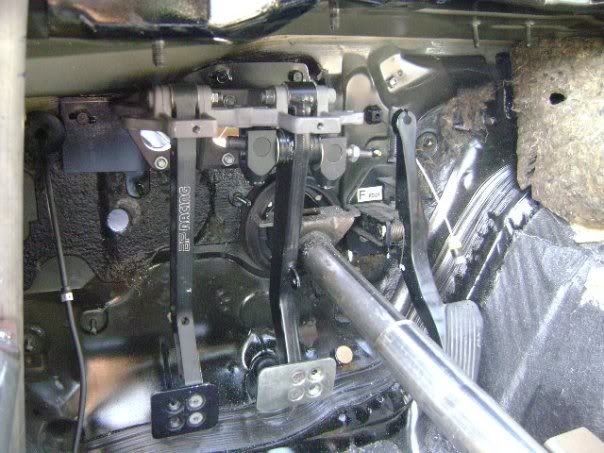
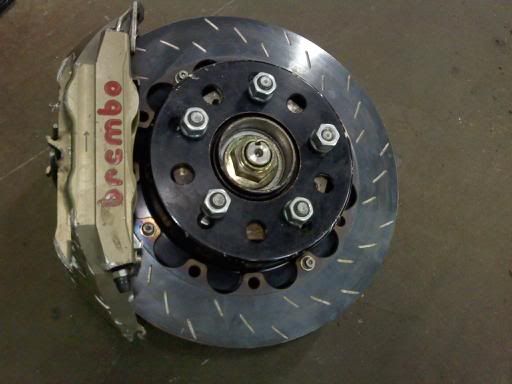
For the brake system, I again sourced our friends in the nascar world. The mounting brackets have to be custom machined to adapt to the fd. And the rotor hats will be cnc cut as well. Lots of work. This is just a mock-up before machining starts. Here are the Front Brembo 4 piston Calipers. Radial mount, monoblock cnc construction, titanium ventilated pistons. Brand new are over $1900 each! PFC two piece floating brake rotors, 13" in diameter and 1.75" thick.
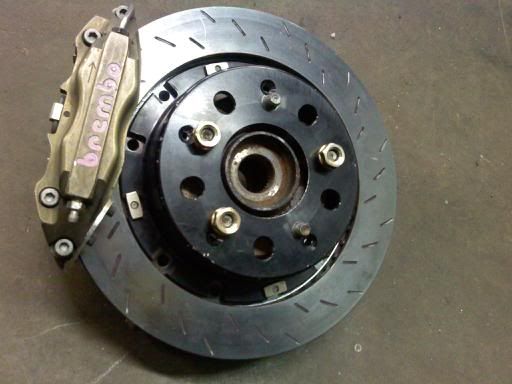
And here is the rear brembo 4 piston calipers. Radial mount, and titanium ventilated pistons. Same PFC two piece rotors, but 1" thick.
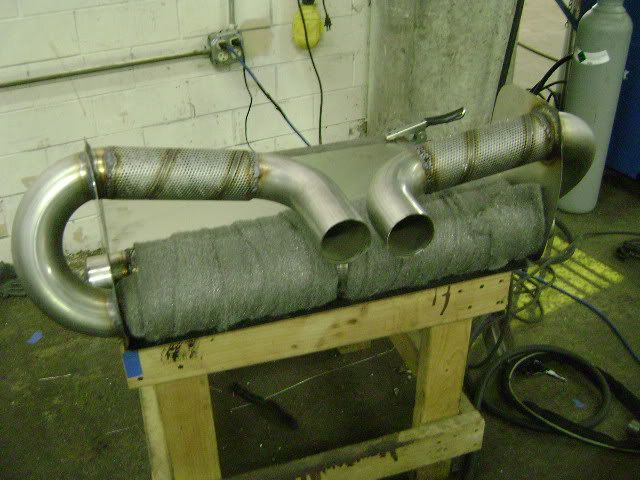
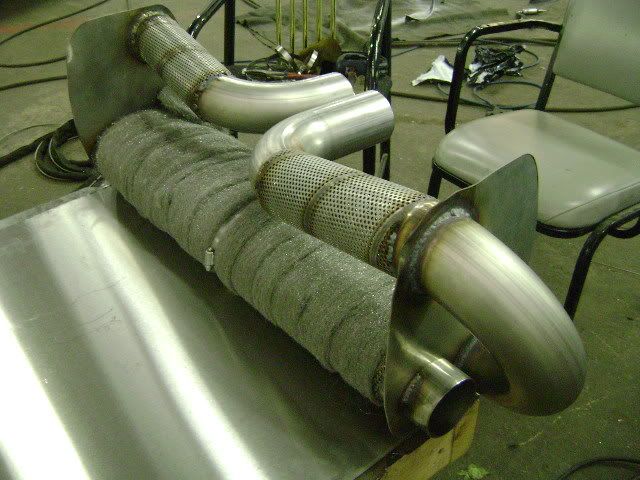
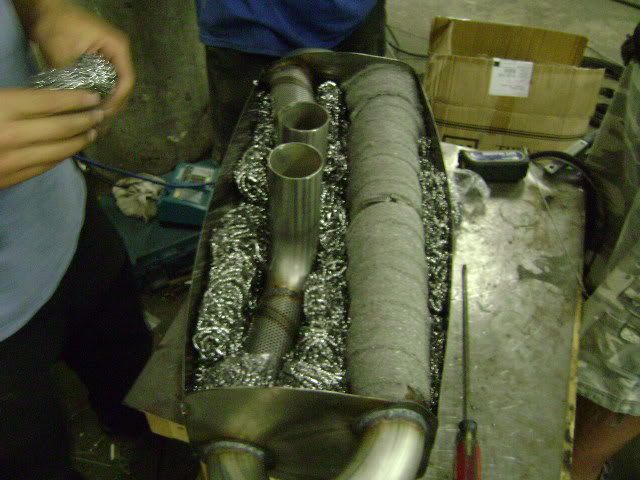
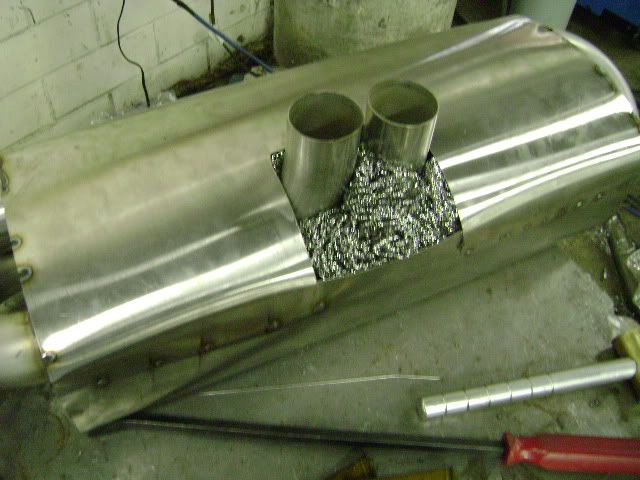
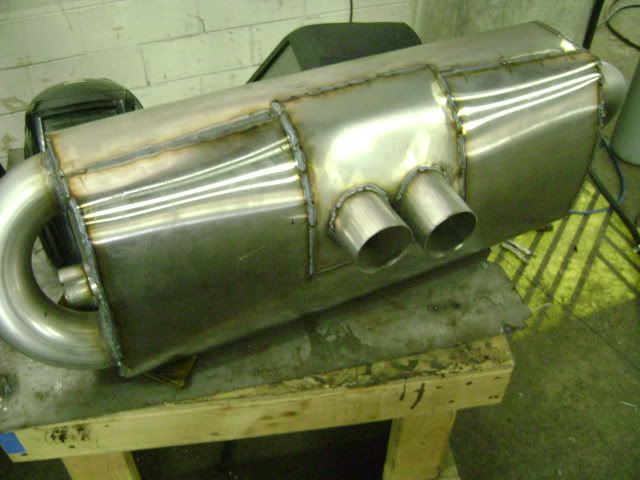
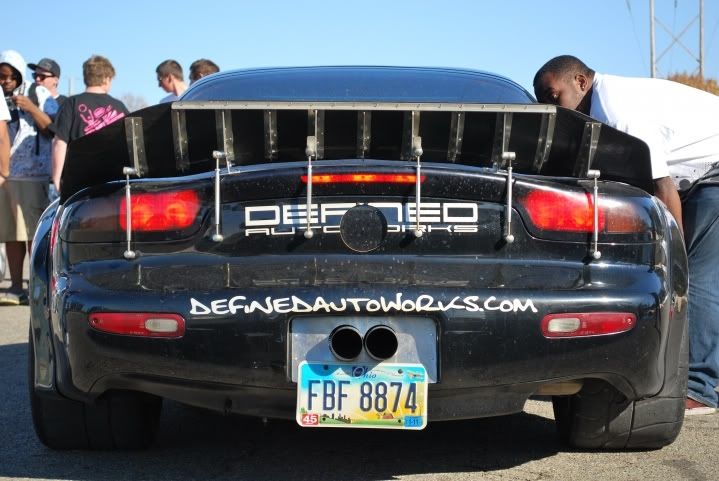
We built a custom rear muffler to test out sound absorbing abilities. I made it a quad pass design, to reduce exhaust noise as much as possible. Its the only muffler on the car. It went a bit too successful, I think the car is a too quiet. But for daily driving it is great
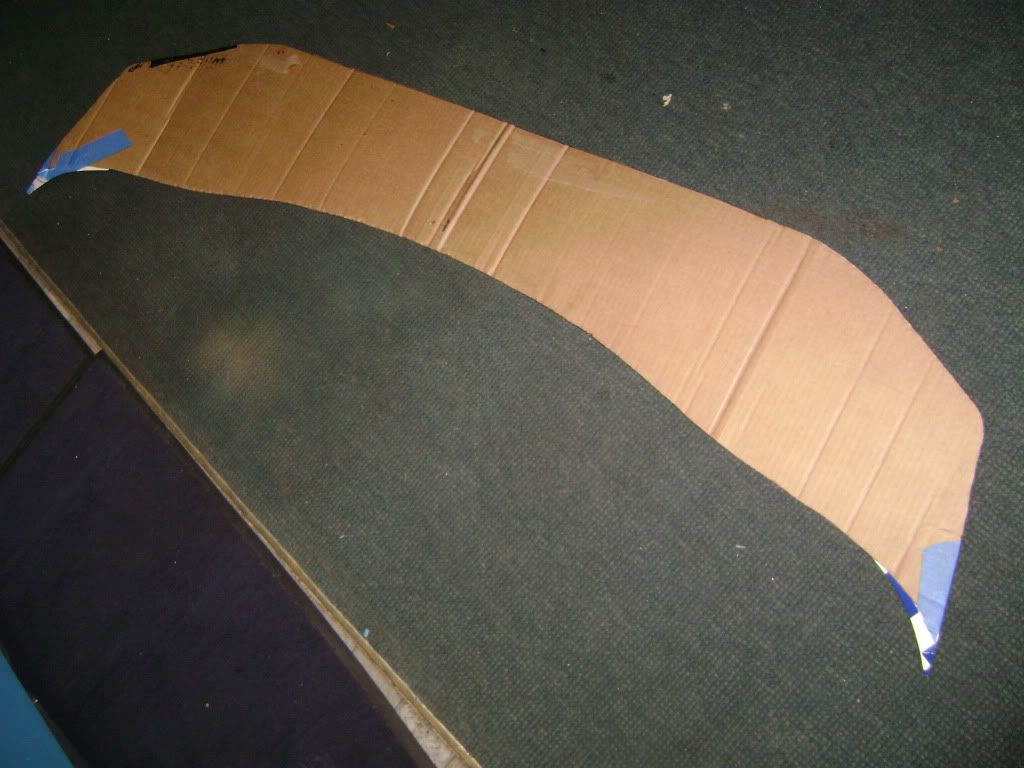
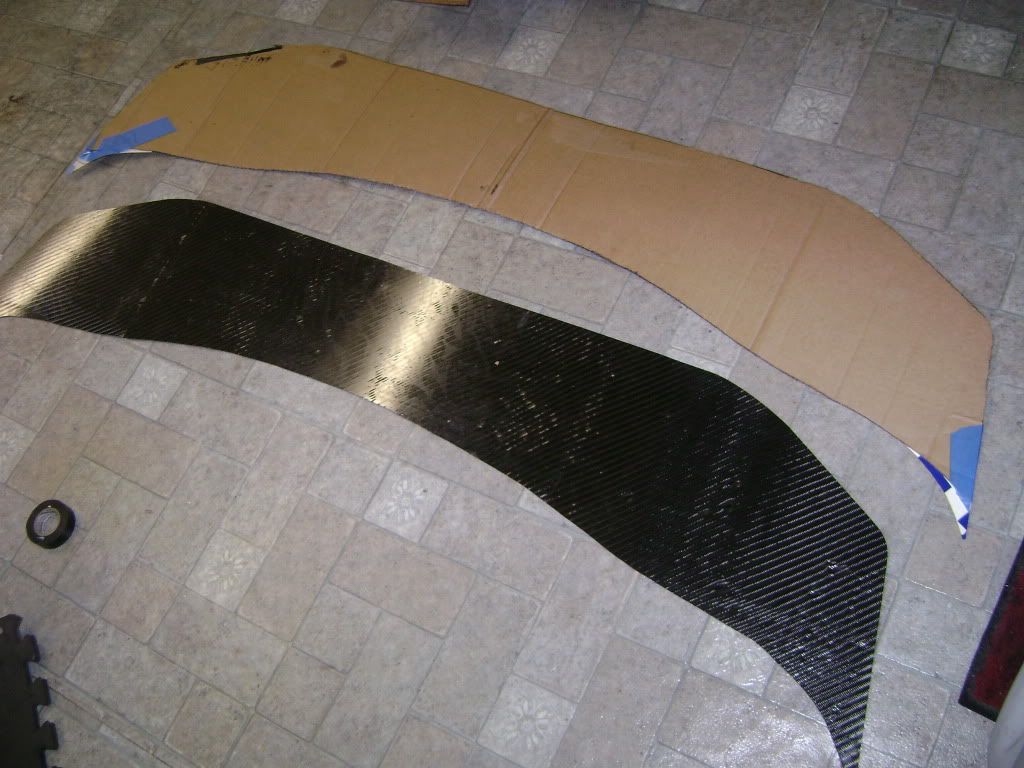
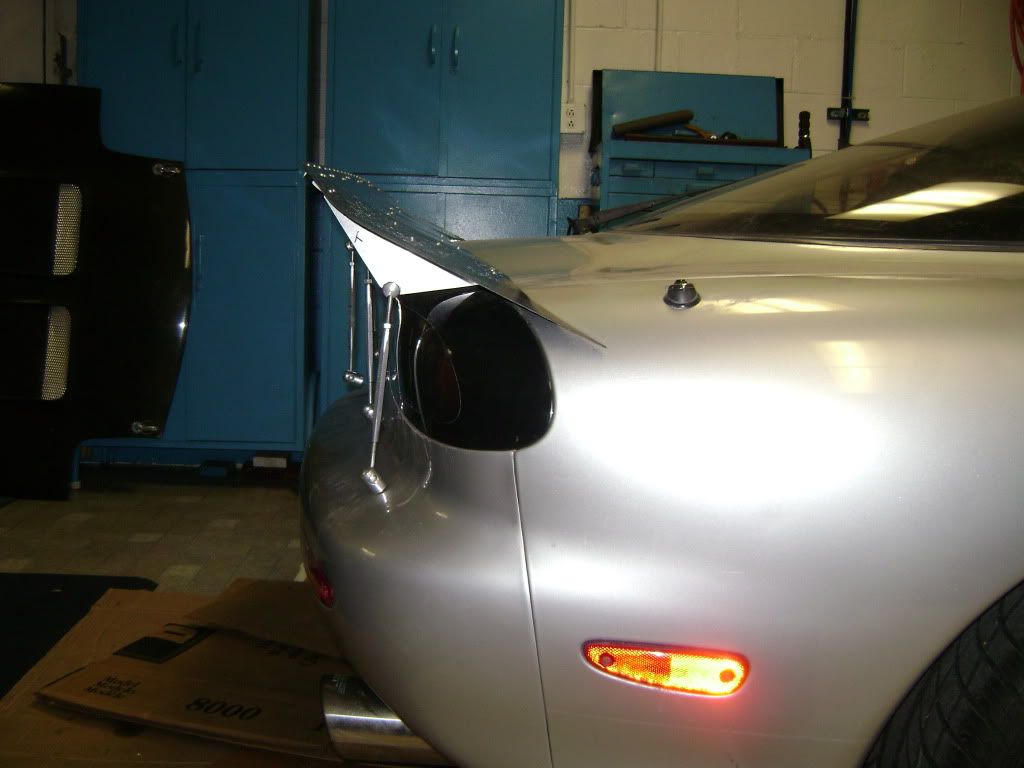
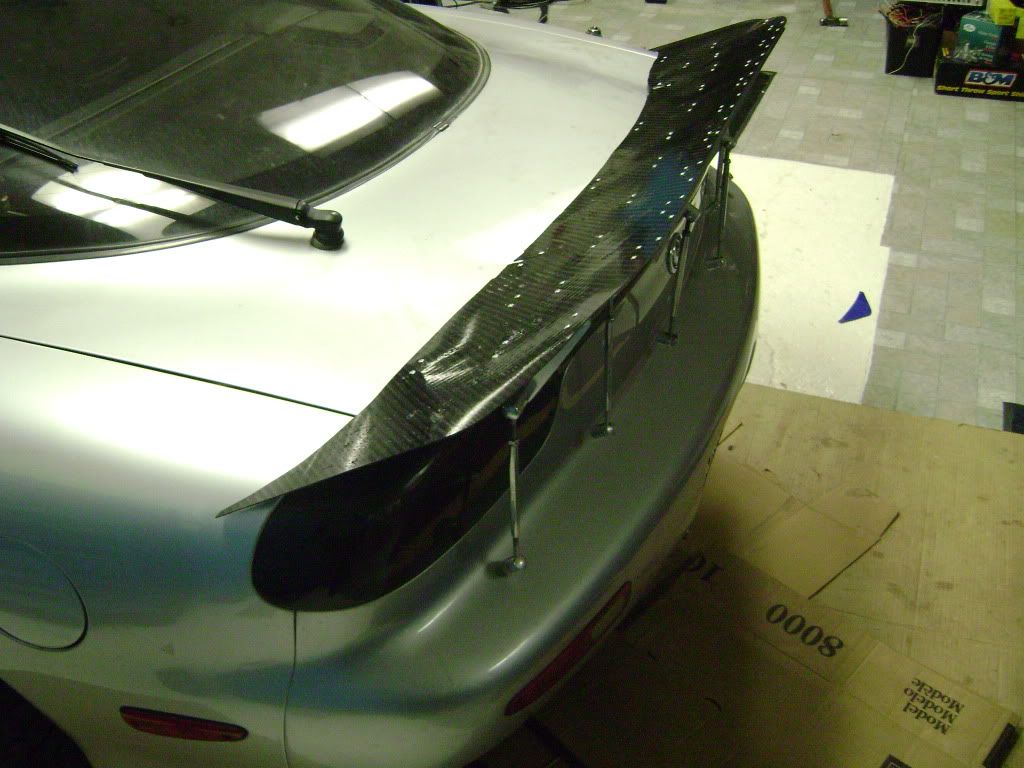
Rear wing was all hand built. While not as effective as a 3D GT wing, it was free to build. With the budget I had in mind, this wing will work fine for a while. And the entire wing weighs 8lbs!
Test fit
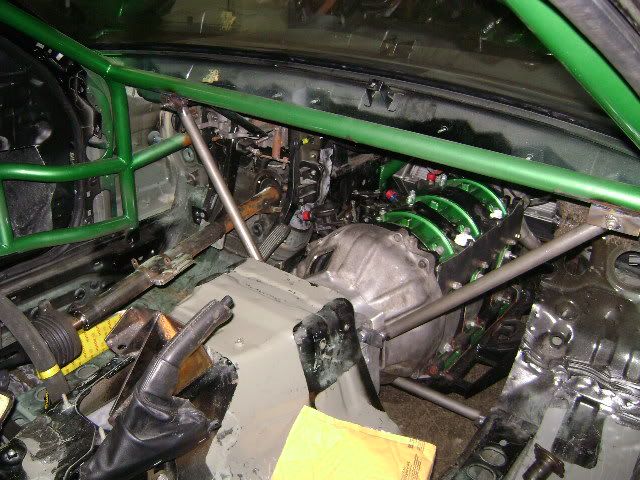
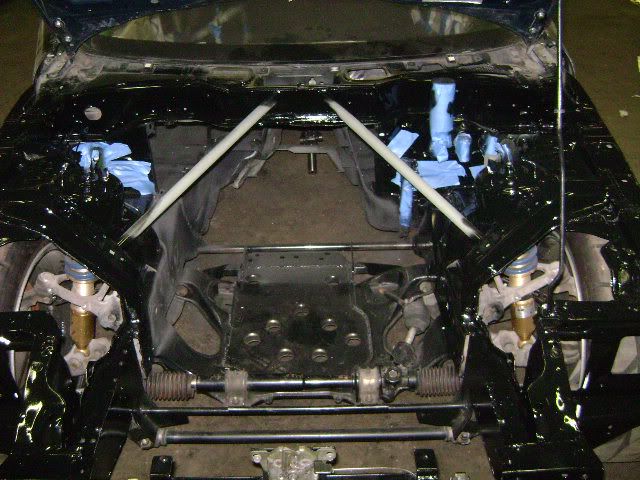
Chassis stiffness was a extreme priority. With the firewall removed and pushed back, I was careful to make unified tubular triangulation. The engine is part of the chassis reinforcement, which ties the entire subframe to the roll cage, which ties directly to the shock towers and frame.
Last edited by GtoRx7.; Jan 12, 2011 at 12:58 AM.
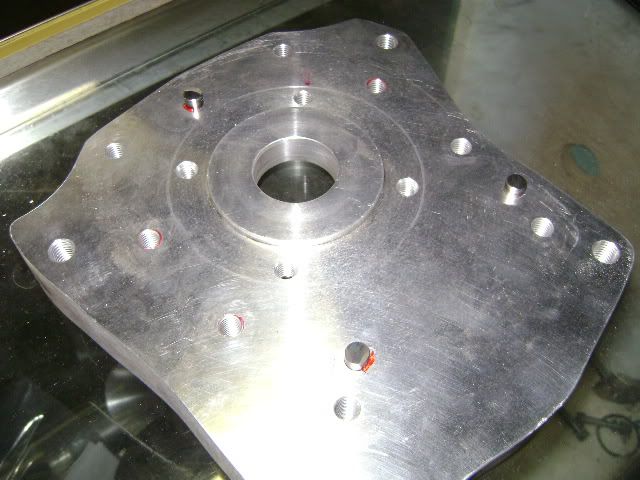
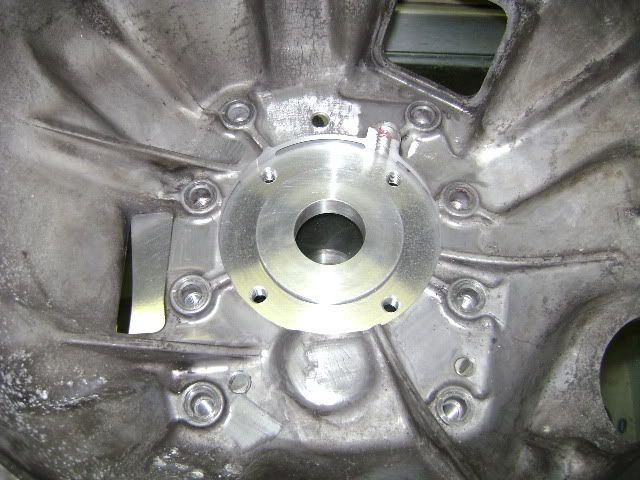
The transmission mount was custom made from chromoly, and ties directly into the roll cage. Keeping the stress off the uni-body thin gauge metal.
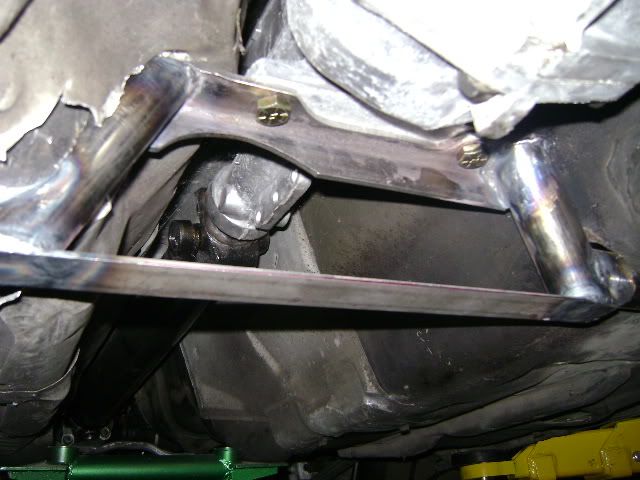
Tubular Differential mount, same one we sell
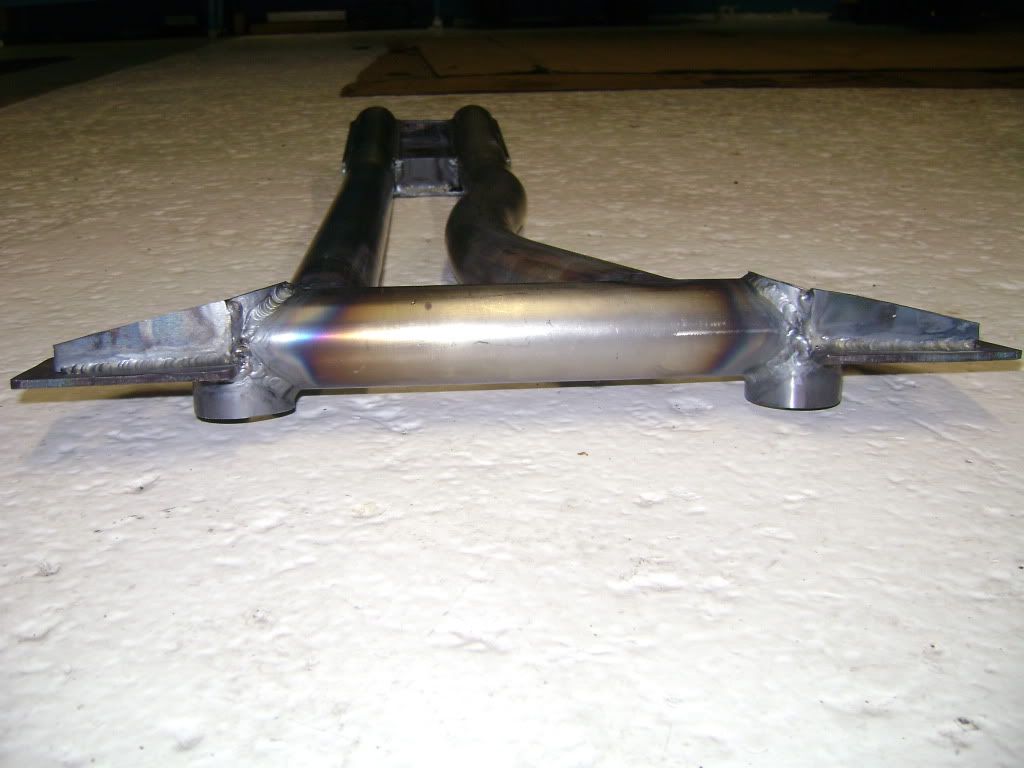
The front "strut brace" which is really a chassis brace that helps tie the roll cage together.
The front flexible sway bar mounts were totally rebuilt and reinforced with 1/8" steel. I then tied them together with a tubular brace which doubles as a radiator mount.

Trending Topics
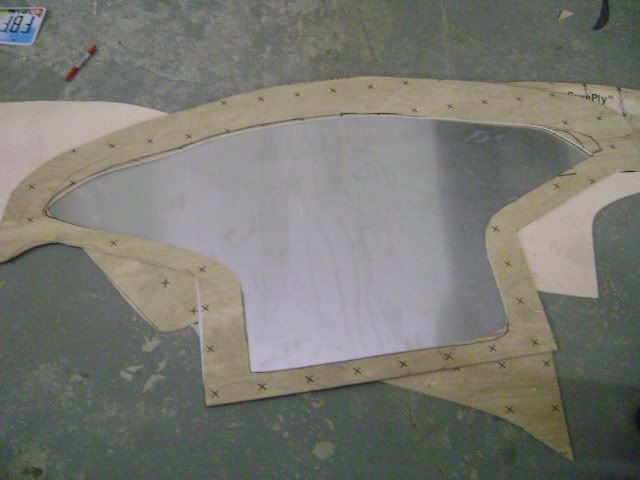
I hand cut sheets of carbon fiber, heated them and bent to shape to form a all-carbon gauge hood. Also made templates of all the vents (which were no longer functional) so they could also be filled in with lightweight carbon while keeping a clean look.
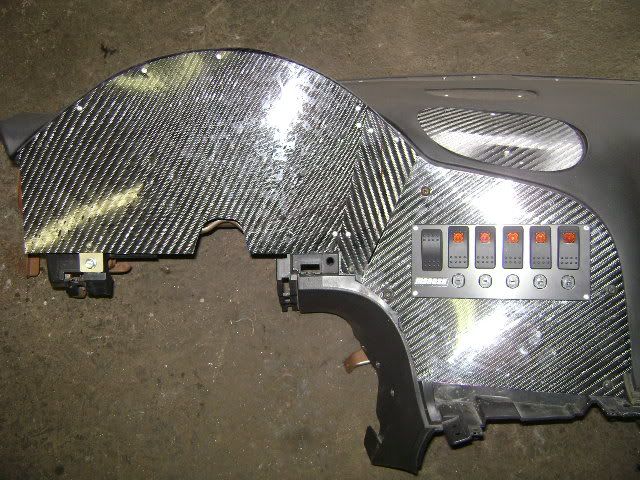
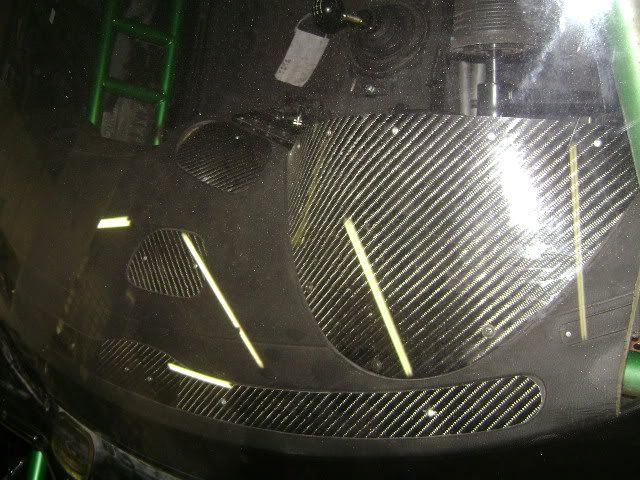
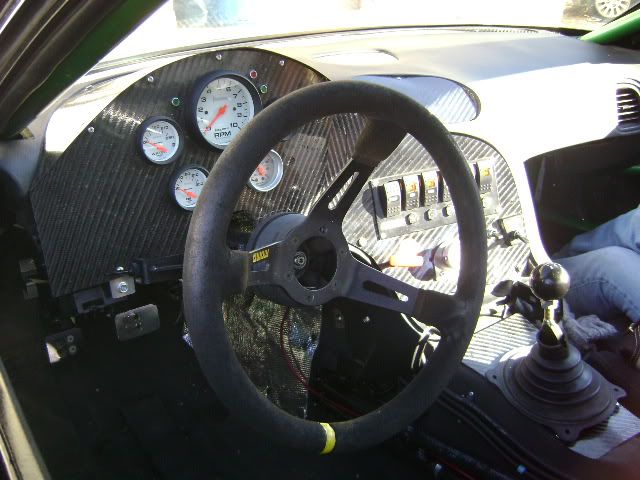
I wanted to keep heat to a minimum, even if it was a race car. So we sprayed the entire interior with Lizzard skin

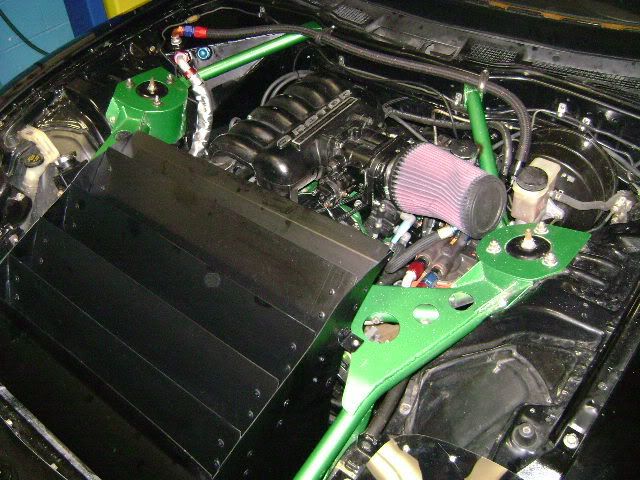
More engine setup progress.
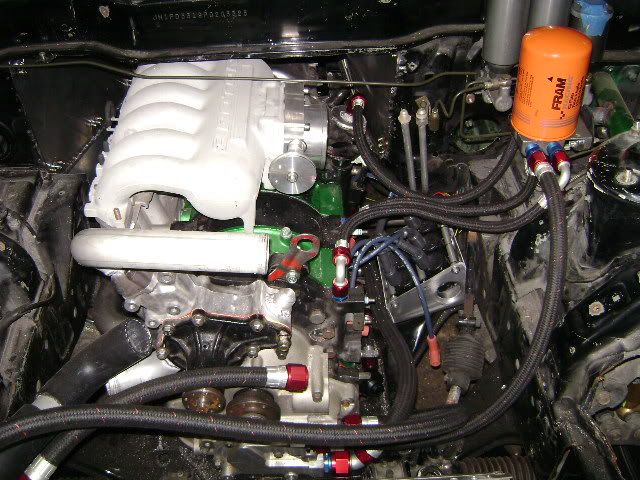
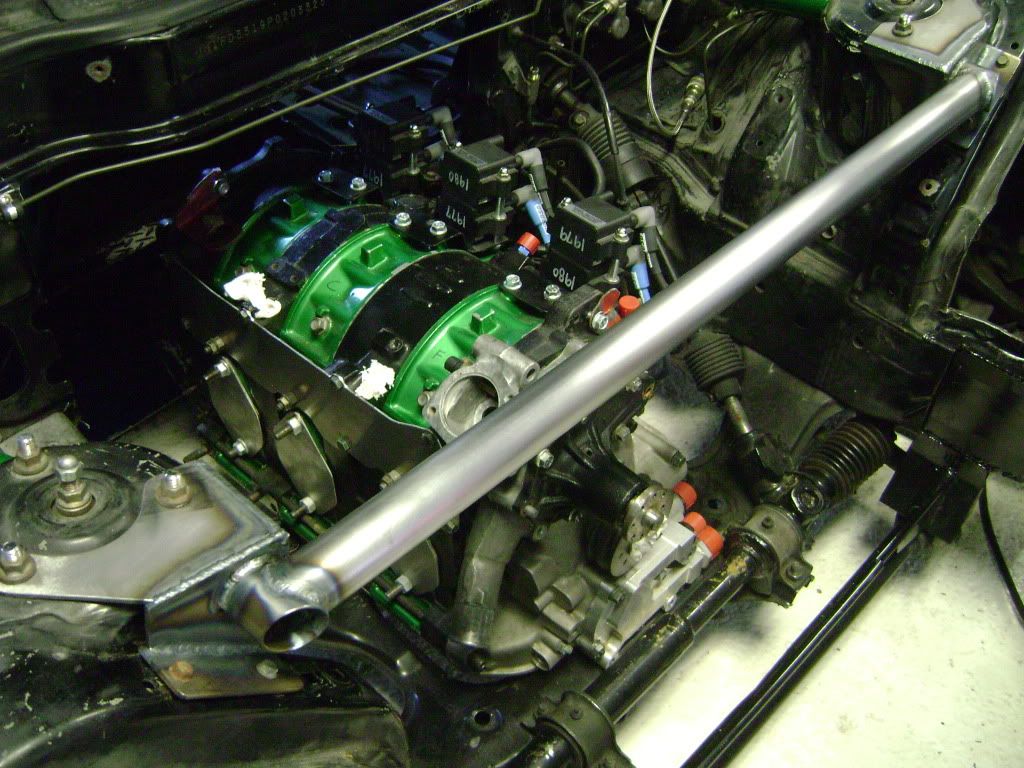
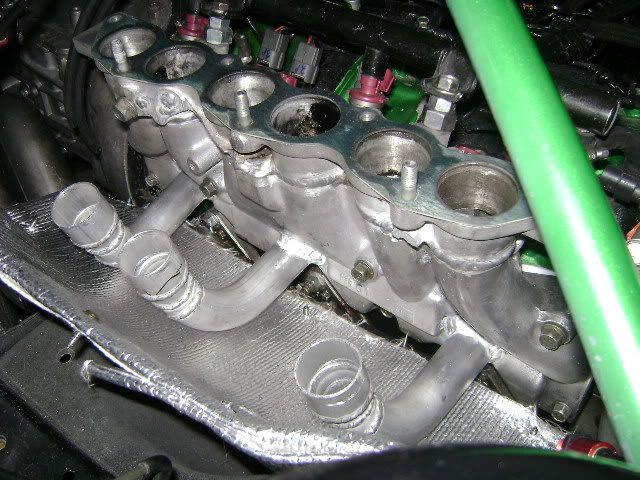
here are some further along pictures of the engine setup. This was when it still had the 90mm throttle body mounted to full stock upper intake.
I wanted to keep heat to a minimum, even if it was a race car. So we sprayed the entire interior with Lizzard skin
More engine setup progress.
here are some further along pictures of the engine setup. This was when it still had the 90mm throttle body mounted to full stock upper intake.
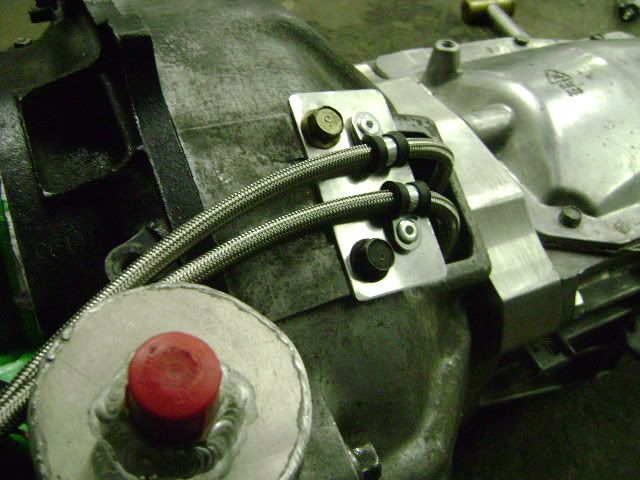
For the transmission, I needed something that would handle 10k+ rpm shift points. The Rx7 transmission does not like this! After dealing with a pissed off OEM trans for quite some time at 9k rpm, I knew it was not going to cut it. Another HUGE factor was finding a transmission that could place the shifter in the right spot with the engine relocated back 14". The G-force T-5 dogbox was the answer. More affordable than most (still expensive) it is a very badass tranny. I paid some extra for them to fit the .90 ratio 5th gear. With a 10k redline, and the much better gear ratios, the car reaches 67 mph in 1st gear.
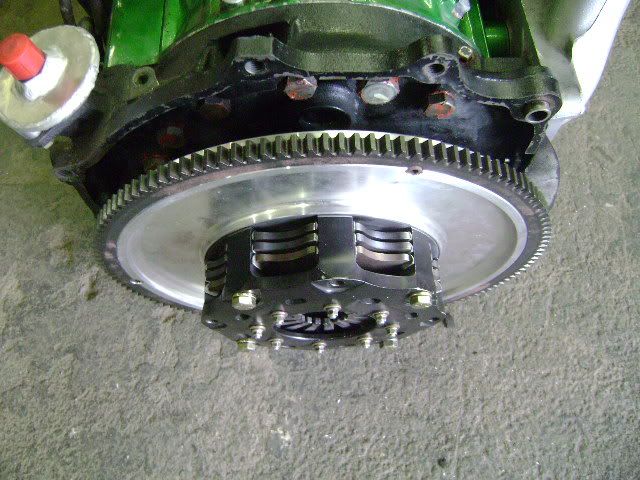
To safely handle 10,000 rpm bursts, I wanted to use a very small race clutch. Naturally this also makes for explosive throttle response. Win/win. The unit I chose was a tilton 5.5" triple disk setup. It was originally a quad disk setup from a nextel cup car, but we machined it to be a triple.

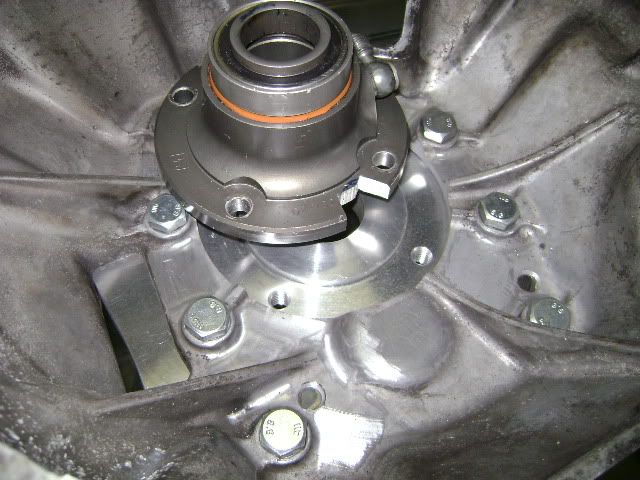
With using a T-5 dogbox, and a 5.5 tilton clutch, the throw-out bearing became a scary problem. OEM throwout arm would not even come close to working. So I picked up a used annular discharge throw-out assembly. Now everyone uses the automatic bellhousing to make this all work. Problem being the auto bell housing is a few inches longer than the TII. And the shifter would not make it. So we machined the TII bellhousing, and pinned it in position. Lots of effort later it all fit together with the *perfect* throwout clearance.
To safely handle 10,000 rpm bursts, I wanted to use a very small race clutch. Naturally this also makes for explosive throttle response. Win/win. The unit I chose was a tilton 5.5" triple disk setup. It was originally a quad disk setup from a nextel cup car, but we machined it to be a triple.
With using a T-5 dogbox, and a 5.5 tilton clutch, the throw-out bearing became a scary problem. OEM throwout arm would not even come close to working. So I picked up a used annular discharge throw-out assembly. Now everyone uses the automatic bellhousing to make this all work. Problem being the auto bell housing is a few inches longer than the TII. And the shifter would not make it. So we machined the TII bellhousing, and pinned it in position. Lots of effort later it all fit together with the *perfect* throwout clearance.
Last edited by GtoRx7.; Jan 12, 2011 at 01:02 AM.
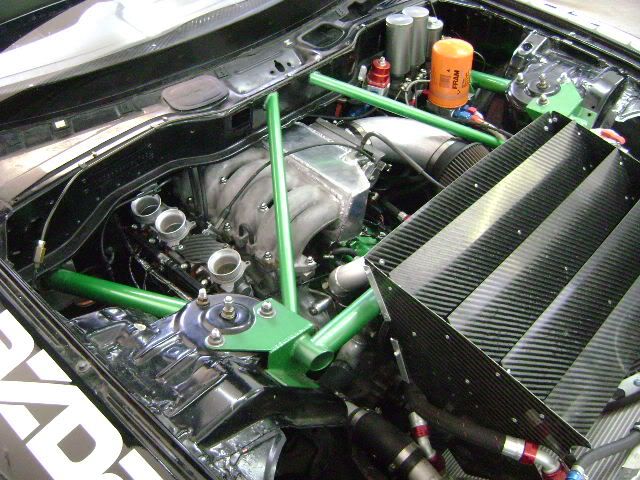
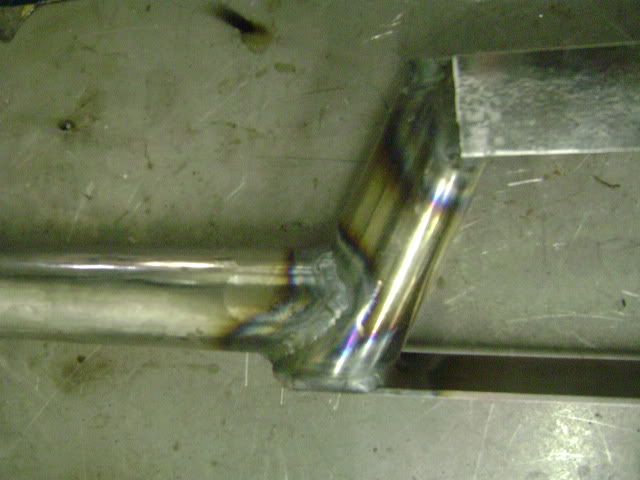
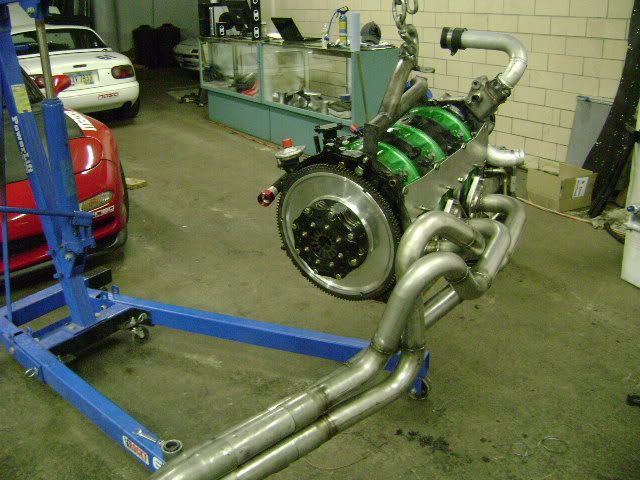
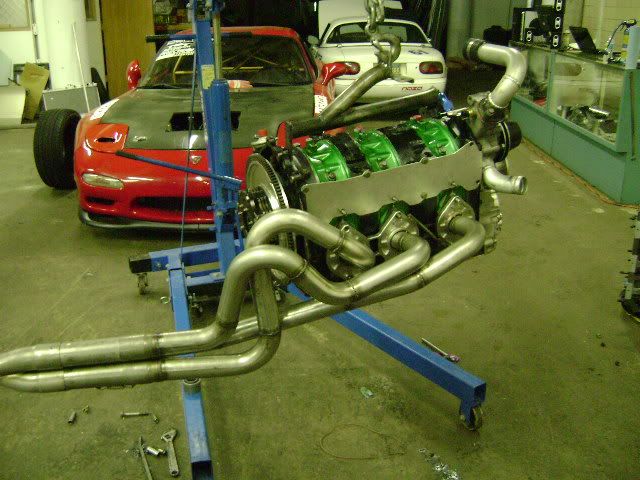
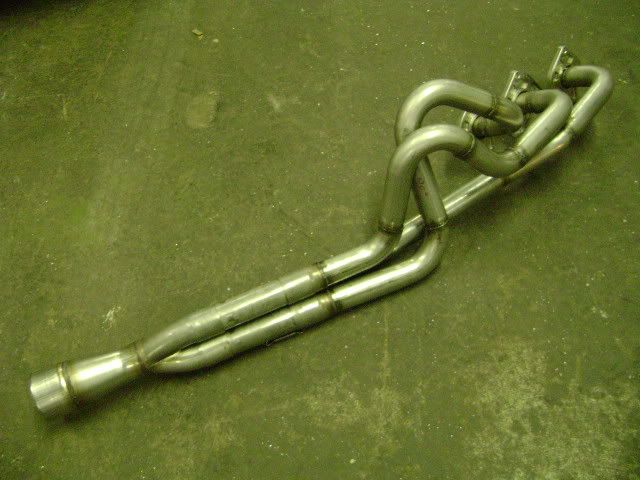
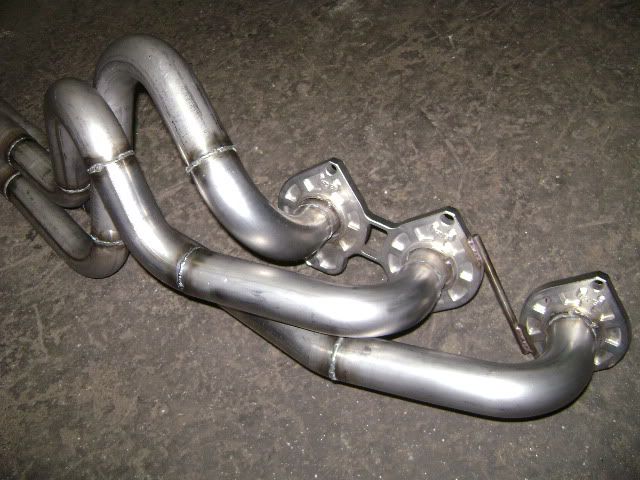
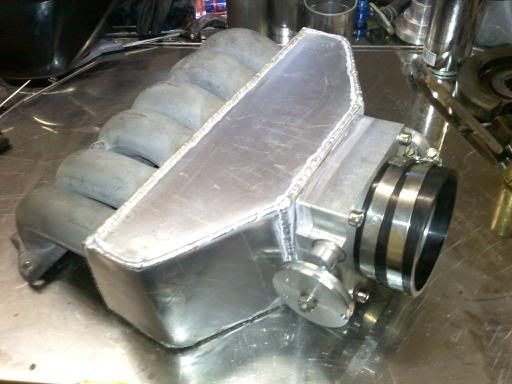
The header was very high up on my list of importance. Over the years we have done a bunch of development on my "test mule" 1st gen Rx7. Which has a 13b-re engine, with identical ports and compression etc as my 20b. Starting with my past successful designs, this header received some even newer and experimental touches. We also made it fully adjustable to find the "sweet spot" of all the intake setups.
1) Full Inconel construction.
2) Stepped runner design, to maintain higher velocity
3) Different sized primary runner diameter
4) The "I-175" mod. Cant give details yet!
These four changes help to produce extremely good torque over a broad range. Previously this engine produced 221 rwtq. Now it is at 246 rwtq. 25 ft-lb gain.
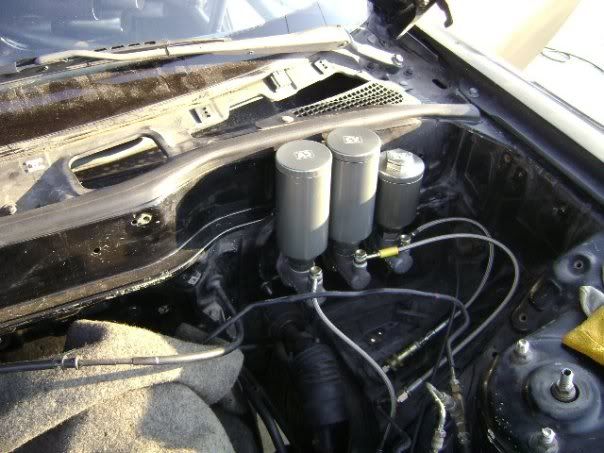
Resting on jackstands as we bled the braking system
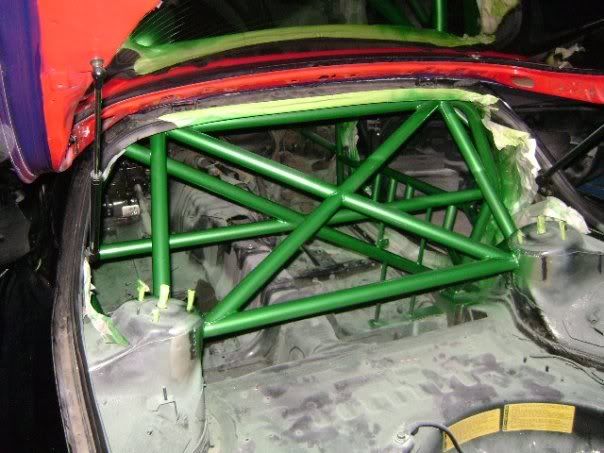
Rear roll cage and fuel cell finished
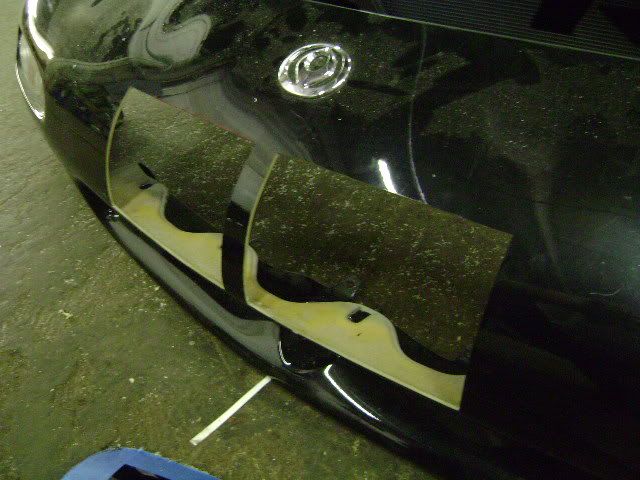
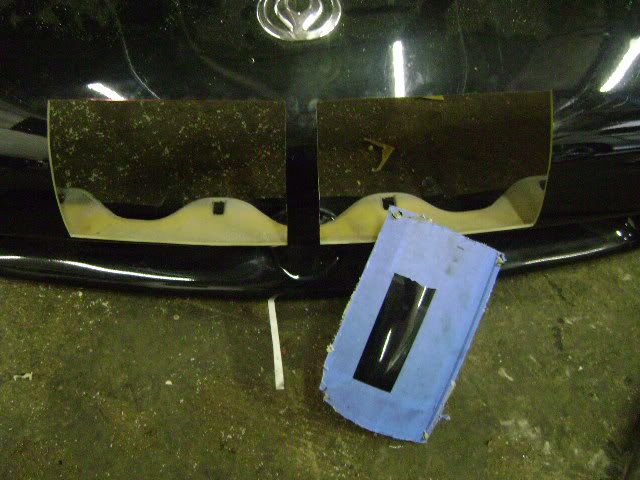
For extra front down force, I fabricated a quick front splitter setup. To keep it lightweight and strong, I used a double layer of aluminum with a piece of plywood in the center for thickness.

After some initial testing, I found the stock upper combined with the 90mm throttle body only gained 18 horsepower. Certainly nothing to sneeze at on a n/a engine, but still a bit off what I thought could be done. So we built this version, which uses the stock intake runners, but with a plenum box, and fully radiuses runner entrances on the inside. Unfortunately I did not get a chance to dyno this intake version without the semi p-ports functioning. It should be a easy 360-370 rwhp on just the street ports.
1) Full Inconel construction.
2) Stepped runner design, to maintain higher velocity
3) Different sized primary runner diameter
4) The "I-175" mod. Cant give details yet!
These four changes help to produce extremely good torque over a broad range. Previously this engine produced 221 rwtq. Now it is at 246 rwtq. 25 ft-lb gain.
Resting on jackstands as we bled the braking system
Rear roll cage and fuel cell finished
For extra front down force, I fabricated a quick front splitter setup. To keep it lightweight and strong, I used a double layer of aluminum with a piece of plywood in the center for thickness.
After some initial testing, I found the stock upper combined with the 90mm throttle body only gained 18 horsepower. Certainly nothing to sneeze at on a n/a engine, but still a bit off what I thought could be done. So we built this version, which uses the stock intake runners, but with a plenum box, and fully radiuses runner entrances on the inside. Unfortunately I did not get a chance to dyno this intake version without the semi p-ports functioning. It should be a easy 360-370 rwhp on just the street ports.
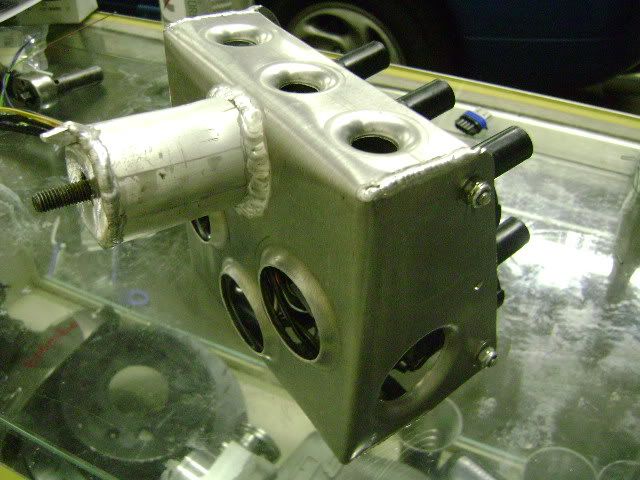
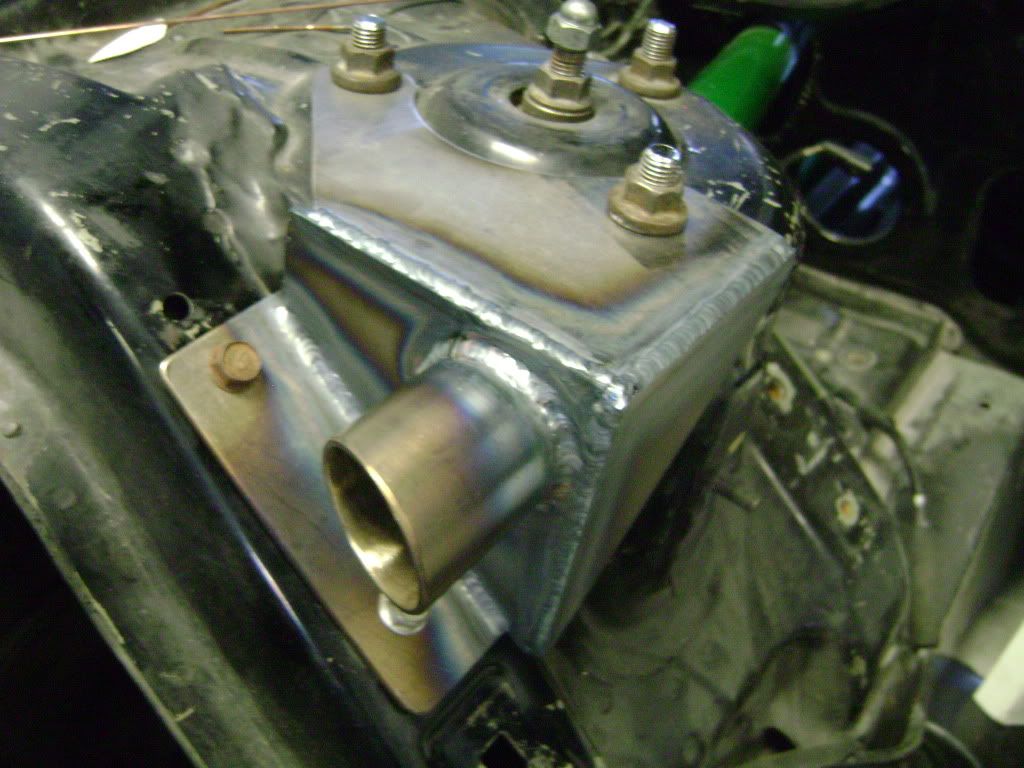
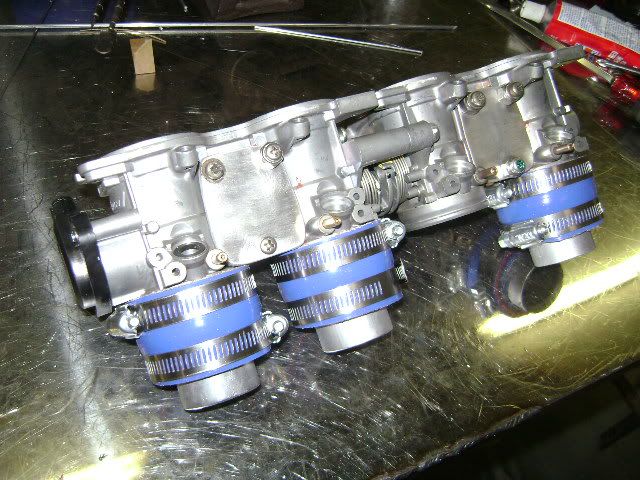
For quick testing of p-port operation, and to get a feel for what throttle body diameters to use, I sourced some motorcycle ITB's. These worked quite flawlessly, and the built in fuel rail with injectors were icing on the cake! Getting them to work for a 20b was not so easy, but went smoothly considering. Obviously I did not use the 4th throttle body in the center. Just simply left the injector un-used, nobody was the wiser.
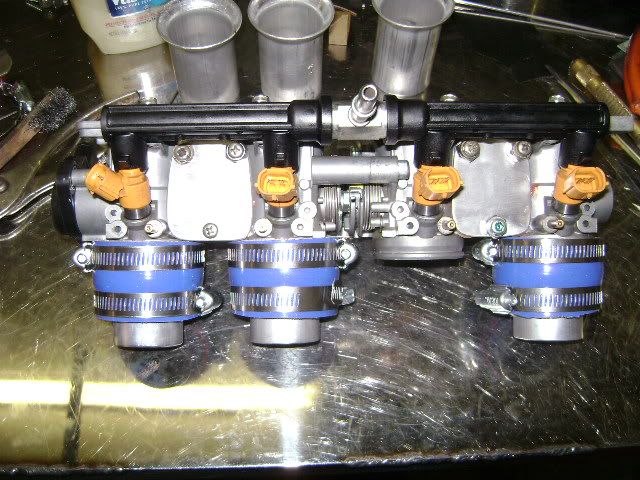
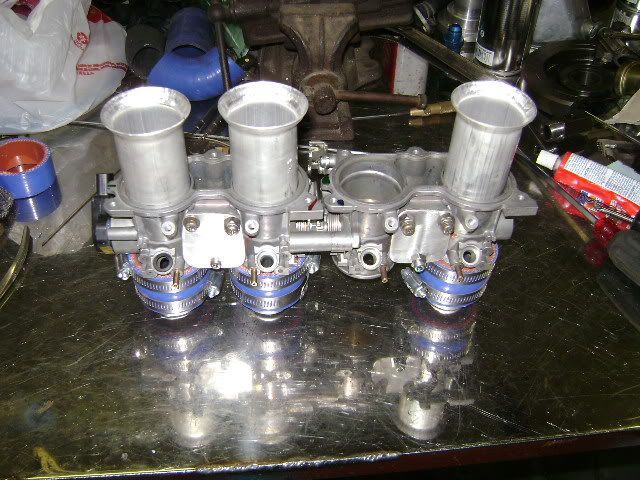

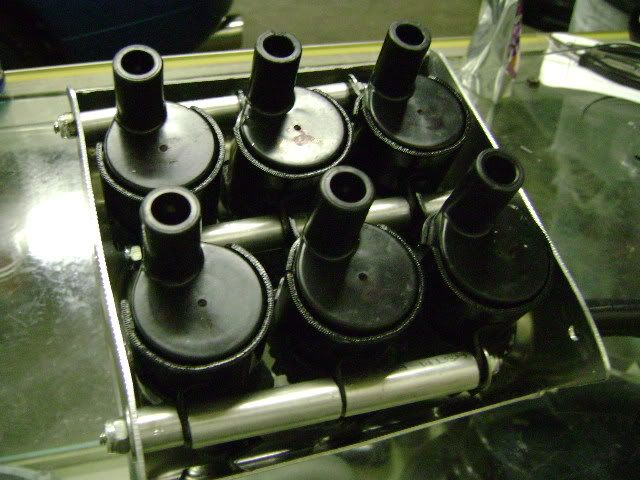
Finished product of the beta semi p-port setup. Turned out to look pretty professional for a prototype
Finished product of the beta semi p-port setup. Turned out to look pretty professional for a prototype
Last edited by GtoRx7.; Jan 12, 2011 at 01:06 AM.
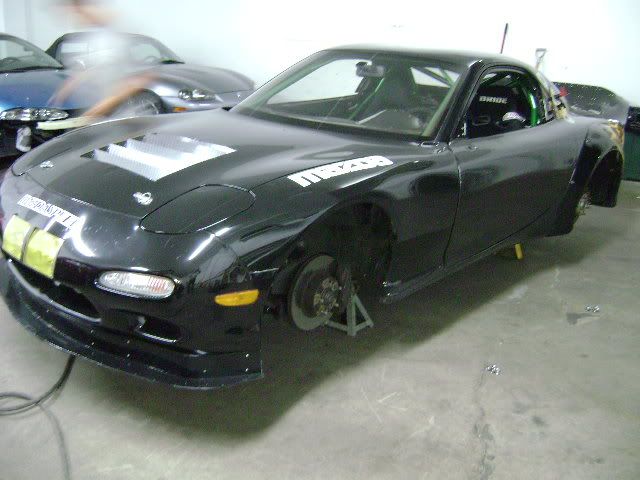
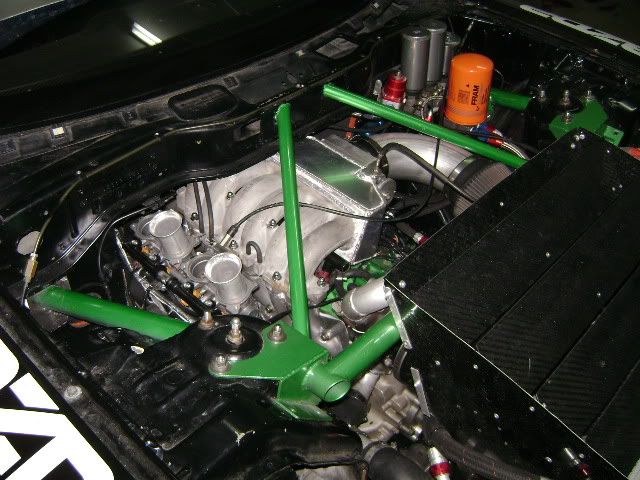
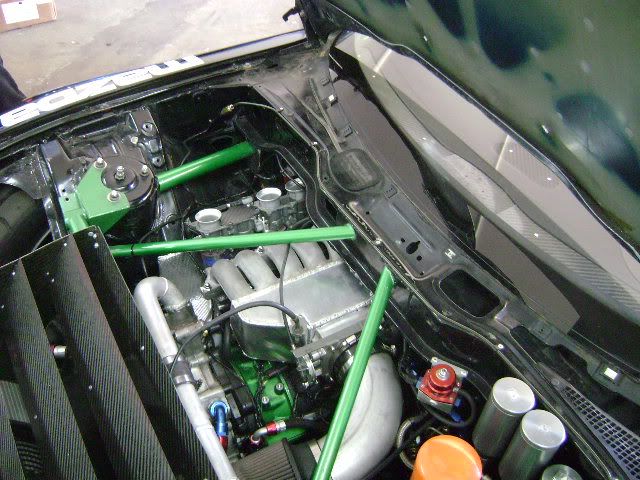
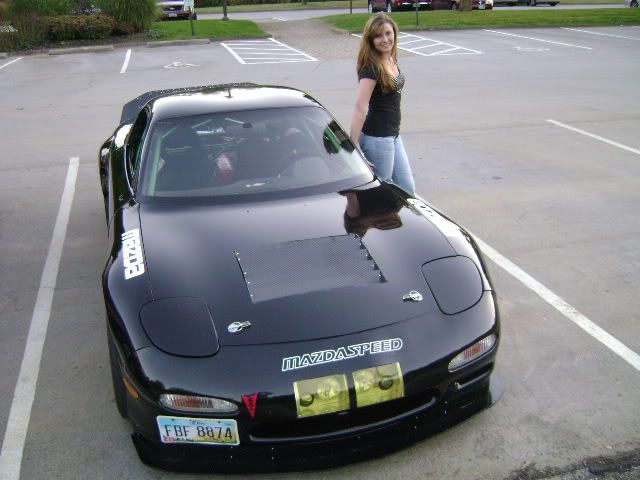
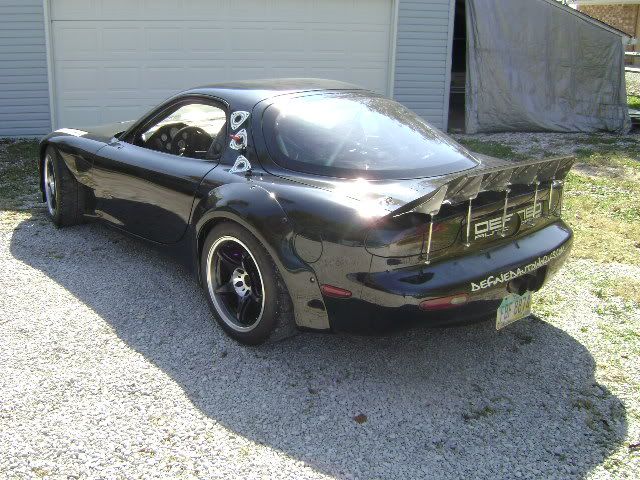
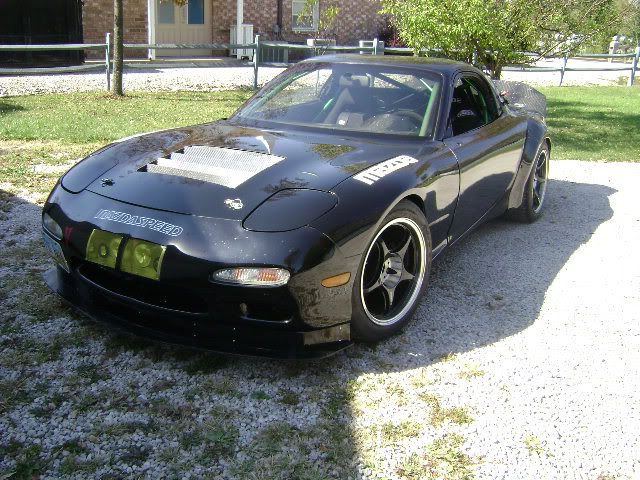
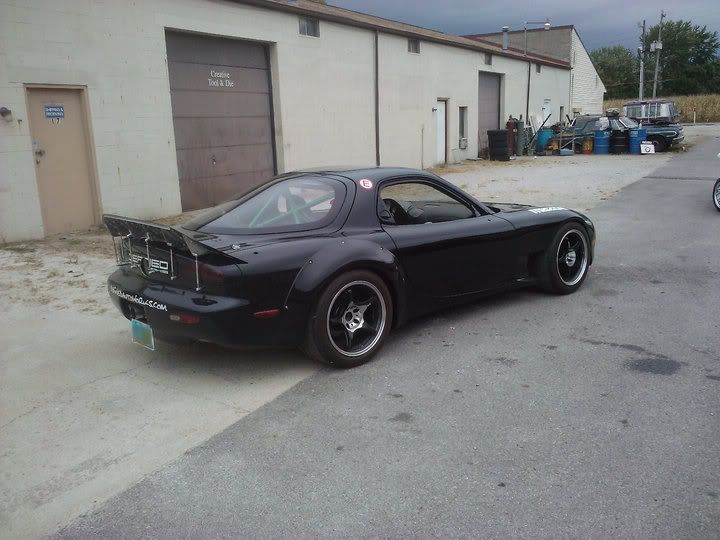
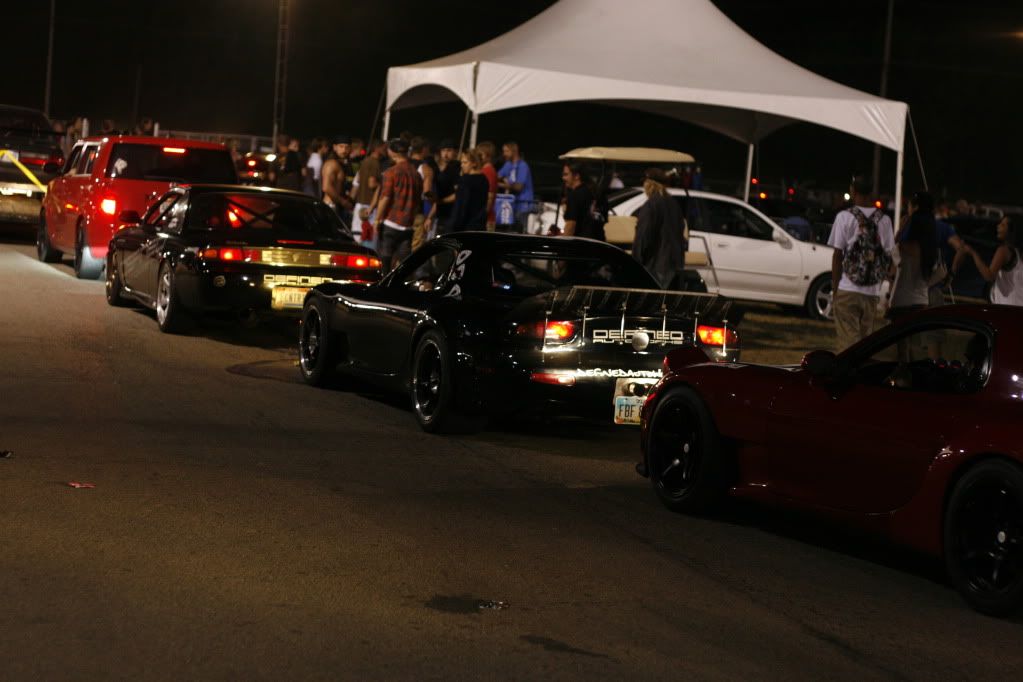
Exterior shots of the finished body, headlight setup, rear carbon wing, center mounted exhaust, and large tires
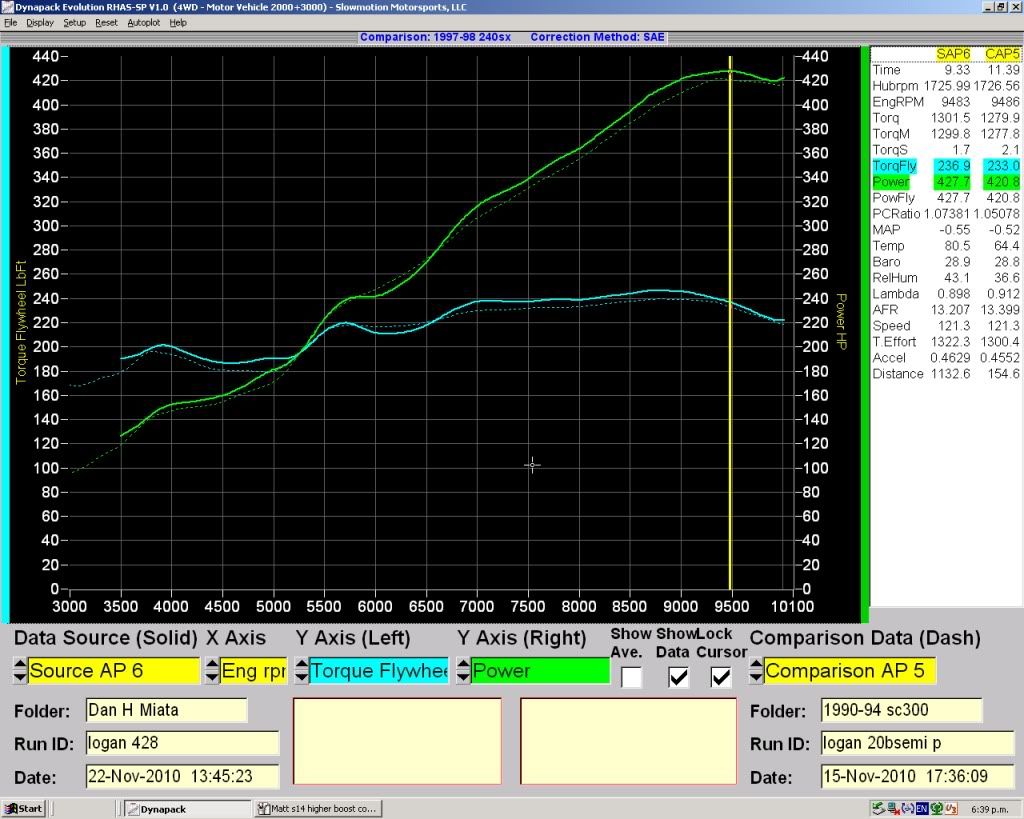
Results---
Dyno Chart of current setup. 428 rear wheel horsepower and 245 rear wheel torque.
Videos
http://www.youtube.com/watch?v=oXzuPuNWpXA
A quick lapping session to test out operating temps and pressures.
http://www.youtube.com/watch?v=6NONJBLooKg&NR=1
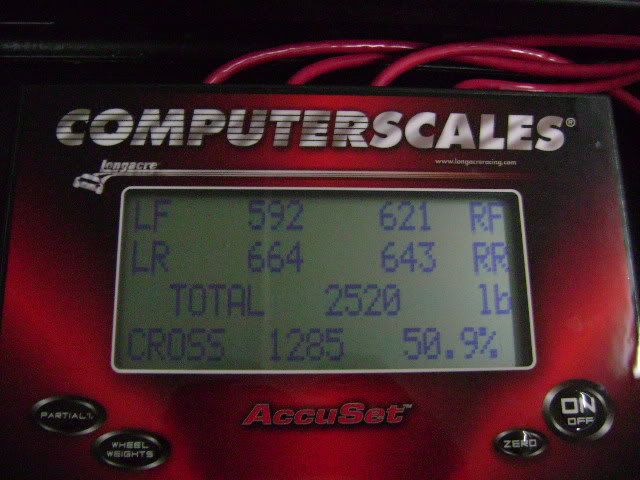
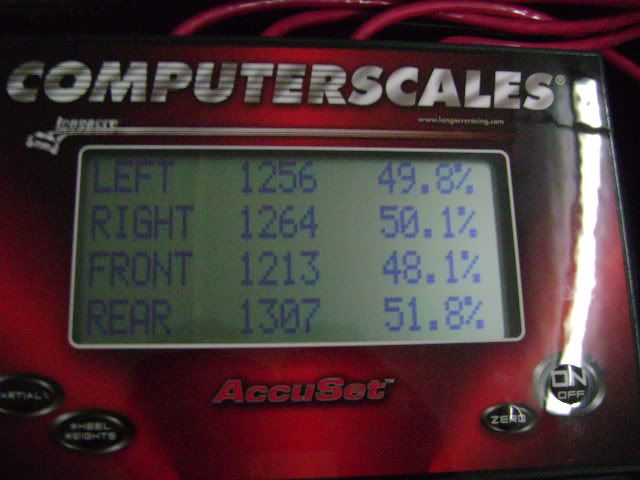
Current weight, and corner weights. 2520lbs. Almost 48% front and 52% rear. Also very very near 50/50 left to right balance. Mission accomplished
Future plans-
Over this winter I will be building a better intake system, ignition system, and muffler assembly. So more power is still to come!
Results---
Dyno Chart of current setup. 428 rear wheel horsepower and 245 rear wheel torque.
Videos
http://www.youtube.com/watch?v=oXzuPuNWpXA
A quick lapping session to test out operating temps and pressures.
http://www.youtube.com/watch?v=6NONJBLooKg&NR=1
Current weight, and corner weights. 2520lbs. Almost 48% front and 52% rear. Also very very near 50/50 left to right balance. Mission accomplished
Future plans-
Over this winter I will be building a better intake system, ignition system, and muffler assembly. So more power is still to come!

Defined Autoworks
Joined: Mar 2007
Posts: 50
Likes: 0
From: OHIO
Thats just not any Fram filter. Its a racing fram filter and those are about the best you can buy. I would agree with the normal fram filters they are pure junk. The race ones are billy bad ***.


Awesome work, as I said in some other thread, Logan. I've been talking to Rich (Goodfella) and others recently about your numbers on this thing. I think its really eye opening for a lot of guys here.
Question. Is the slight dip at 5750-6500 or so related to some transitional issue between the single throttle body and runners down low to adding the ITB's?
This thread put me over on the headers.
Gordon
Question. Is the slight dip at 5750-6500 or so related to some transitional issue between the single throttle body and runners down low to adding the ITB's?
This thread put me over on the headers.
Gordon
Thank you
I would like to take it to seven stock, so maybe see you there?