[Rx7 Boutique] Beginners Tutorial to Installing Coilovers on FD
 06-16-10, 09:24 PM
#1
[Rx7 Boutique] Beginners Tutorial to Installing Coilovers on FD
Prerequisites: I know the majority of your are probably just going to look at the pictures and not read any of this anyways. Please follow my directions exactly how I have written them, step by step. It took me 5 days to do this install because I wanted to find the most efficient and quickest way to install a set of coilovers which meant trying different ways to do the install. I found some useful information here on the club and some on Rob Robinettes website, while this information proved to be useful I found steps missing and a lot of things unclear. This tutorial is written so ANYONE can do the install with some simple hand tools, NO air tools as many have mentioned is impossible to do without. Don't get me wrong, airtools would have made the job a bit easier but they are not needed. For someone doing this for the very first time I would budget about 3 to 4 hours depending how bad your bolts are to take off. Again, this is NOT that complicated of an install, follow my directions and you will thank me later. With that said, I take no responsibility for any damage you cause or pain inflicted upon yourself, expect to get dirty and some nice battle wounds. I am not a master mechanic or know everything about suspension, however I do know the FD like the back of my hand. A lift is not necessary, I did this on the ground in my garage. I suggest you print these instructions out, read them, re-read them, go to bed with them and use them during your install.
Tools/Recommendations:
1/2� Breaker Bar � This is not 100% needed, but it does make it easier to get the bolts off that hold the bottom of the shocks in. Do not cheap out and get a 3/8� drive, it more than likely can not handle that kind of pressure. If you don't have 1/2� sockets, pick up a 17mm socket and that is all you should need for the breaker bar. I would not consider myself strong by any means and had no problem getting the bolts off which had not been touched in 17 years.
PB Blaster / Liquid Wrench � Spray the bolts down with these, it is not mandatory but does help getting those rusted bolts to budge.
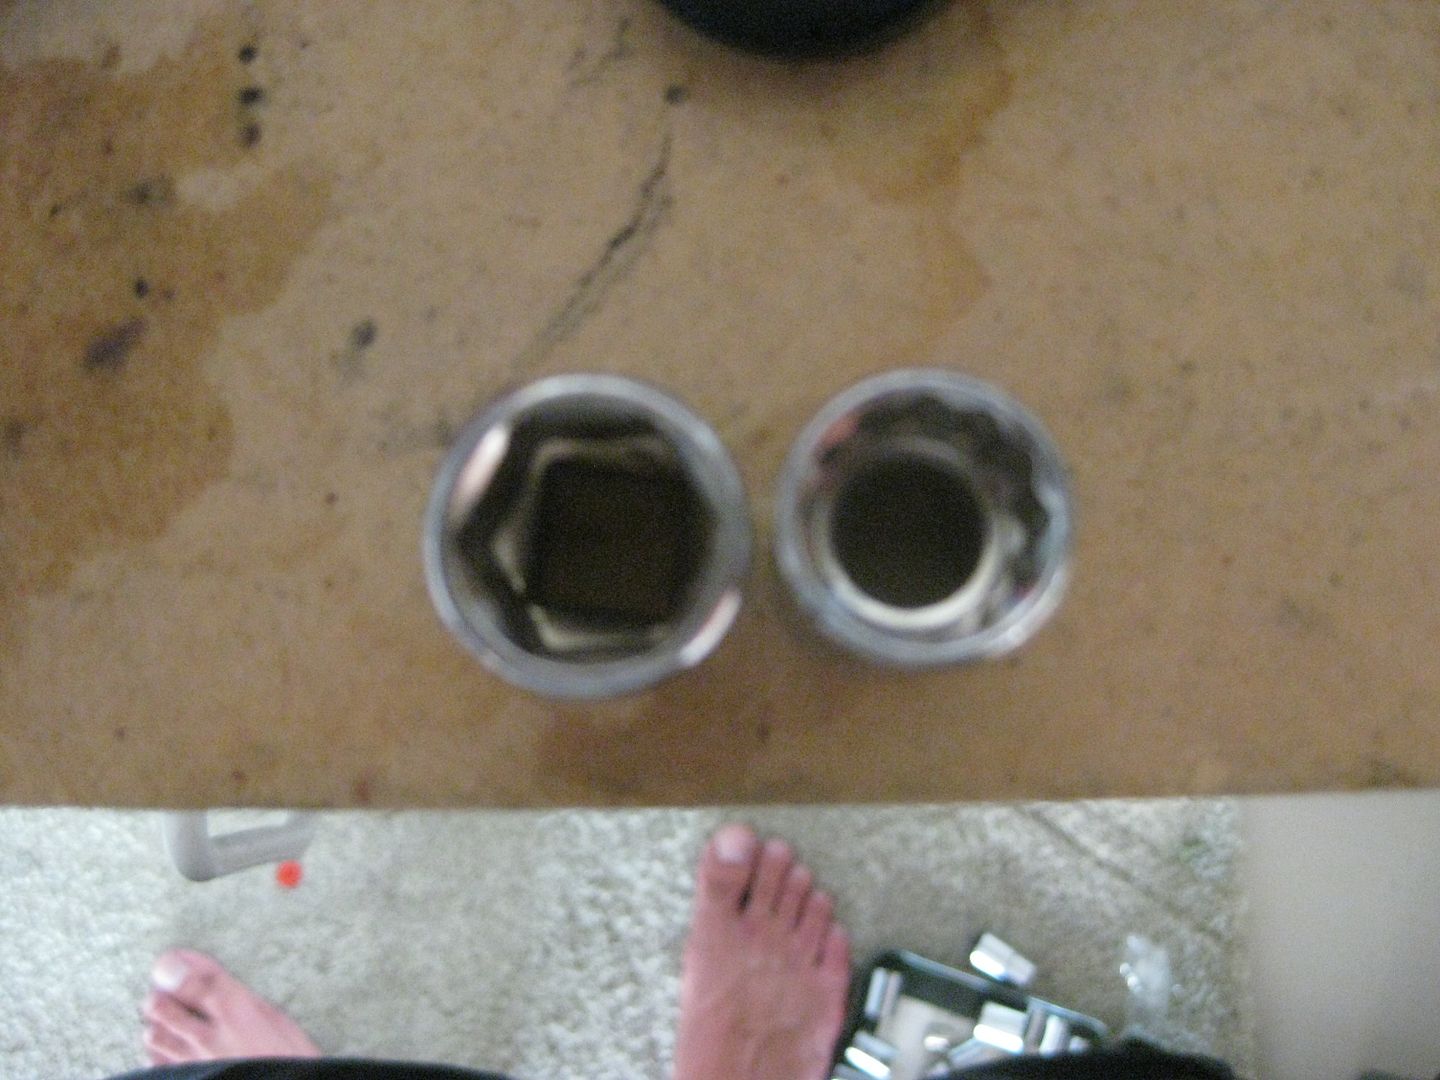
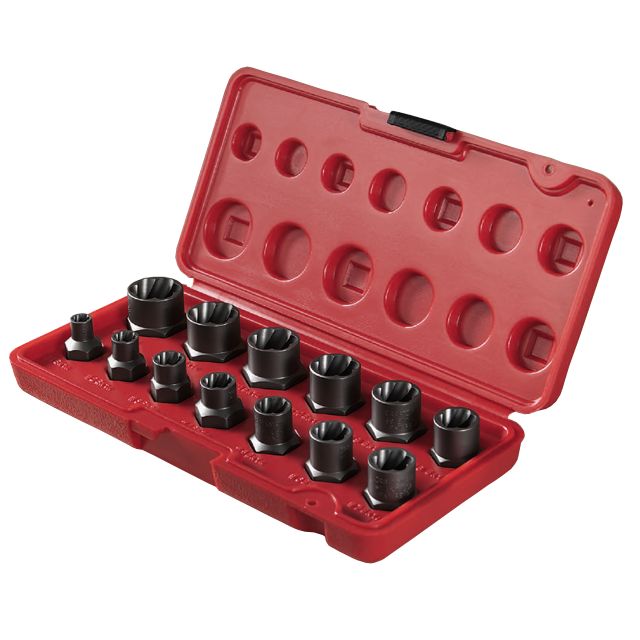
Sockets � When dealing with bolts that are rusted on, it can be easy to strip the bolts which in-return will be a nightmare to get off. Use the right sockets as seen below, you want to use the hexagon type on the left. The socket on the right will strip the bolts easier.
Standard Tools � You will need your standard tools, IE ratchet, socket set, hammer, flathead etc. These are tools you should have laying around. You will also need a jack and jackstands, no need for a lift. I can not imagine owning a FD and not having these tools.
Rear Suspension:
Okay, lets begin! We are going to start with the rear suspension because it is easier, bolts are harder to get off in the rear then the front � at least for me.
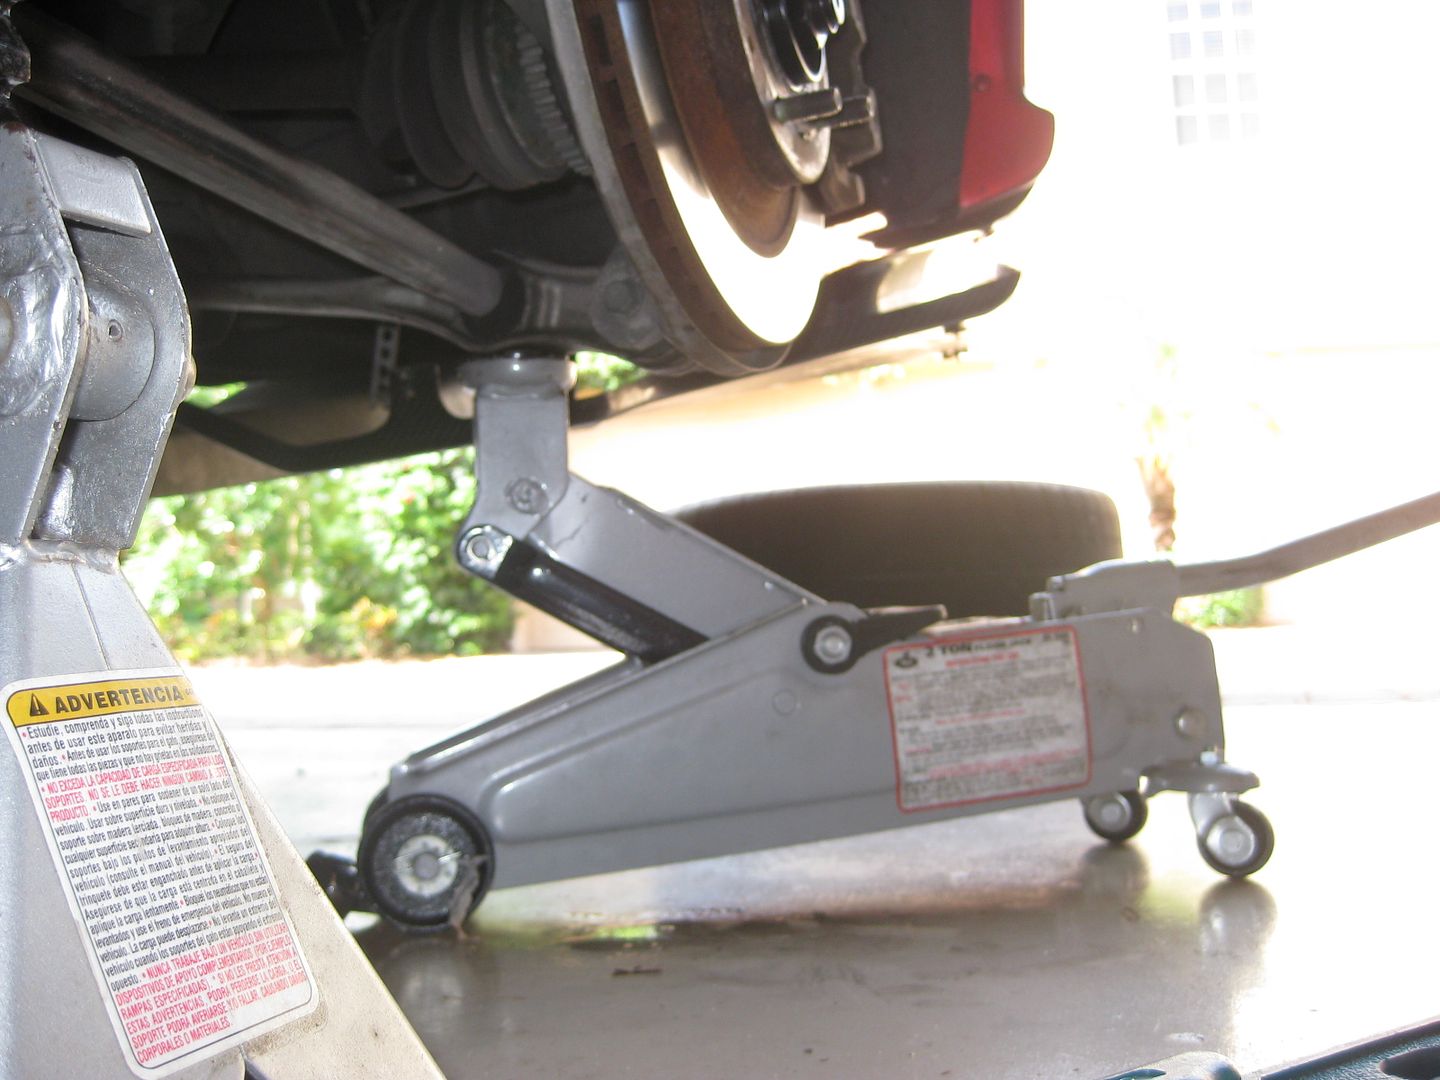
Step 1: Jack the car up, remember to put the stands on the seam welds underneath.
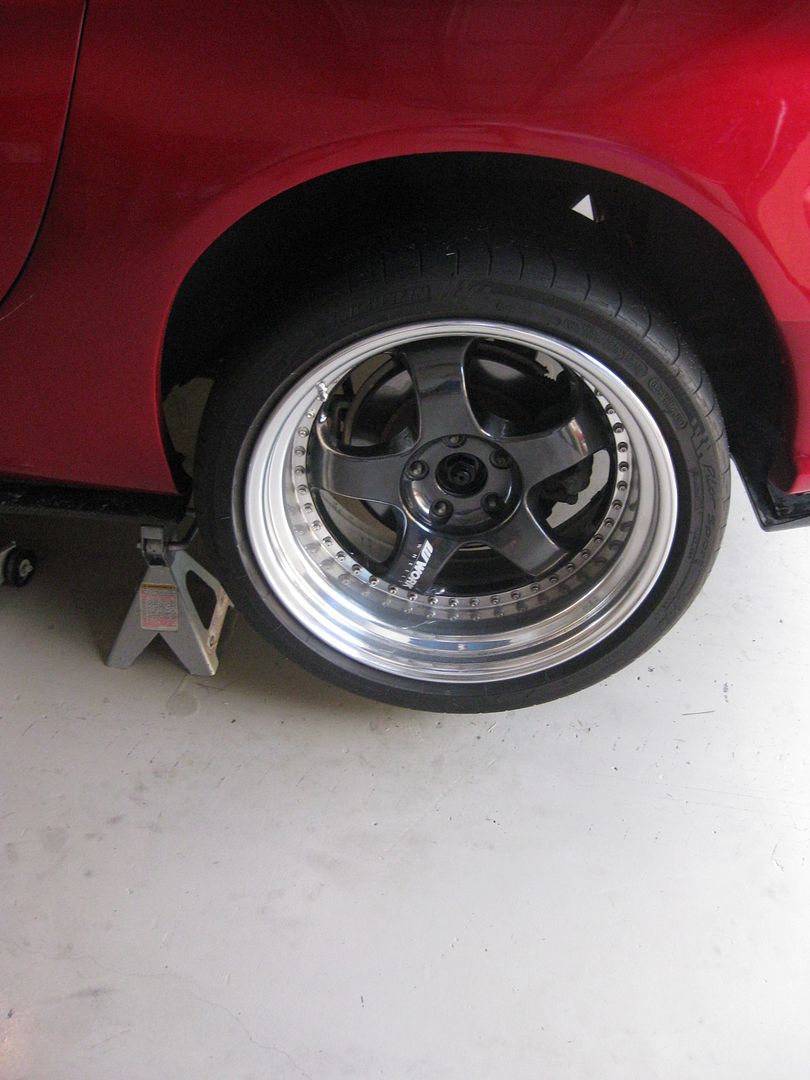
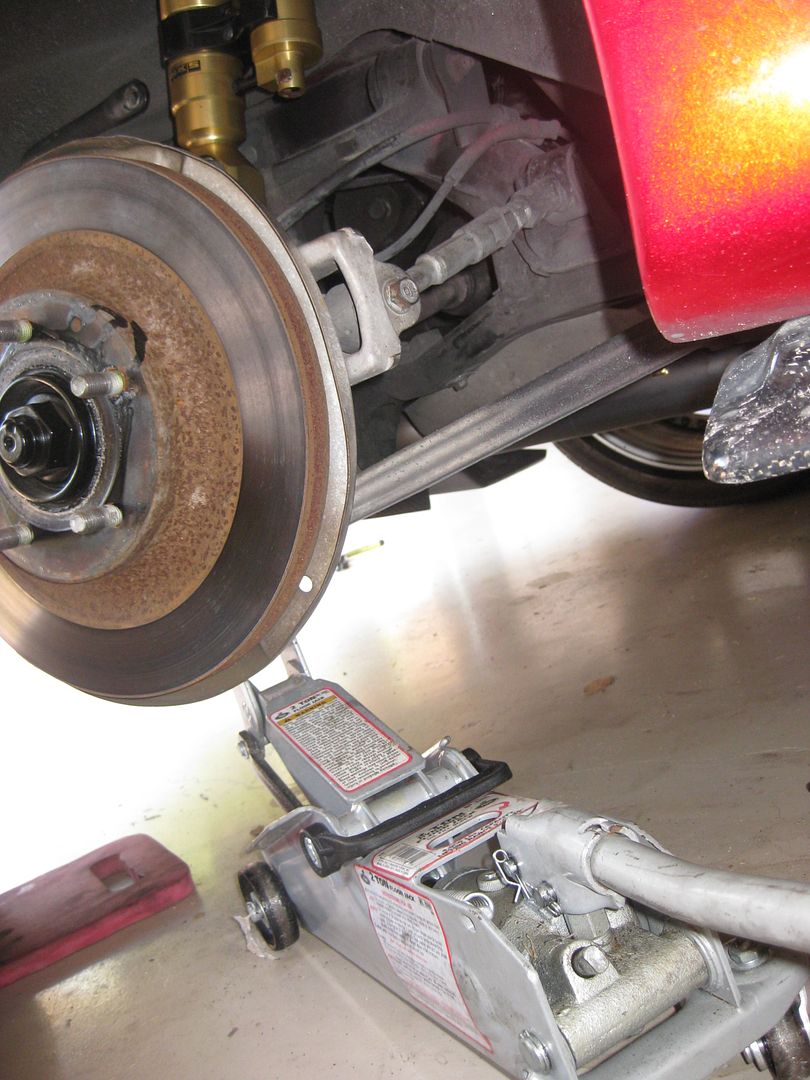
Step 2: Take the wheel off, this area you will be quite familiar with:
Step 3: Pop the trunk and remove the piece that covers the rear strut. You will now expose 14mm nuts, remove all 4. Order is irrelevant.

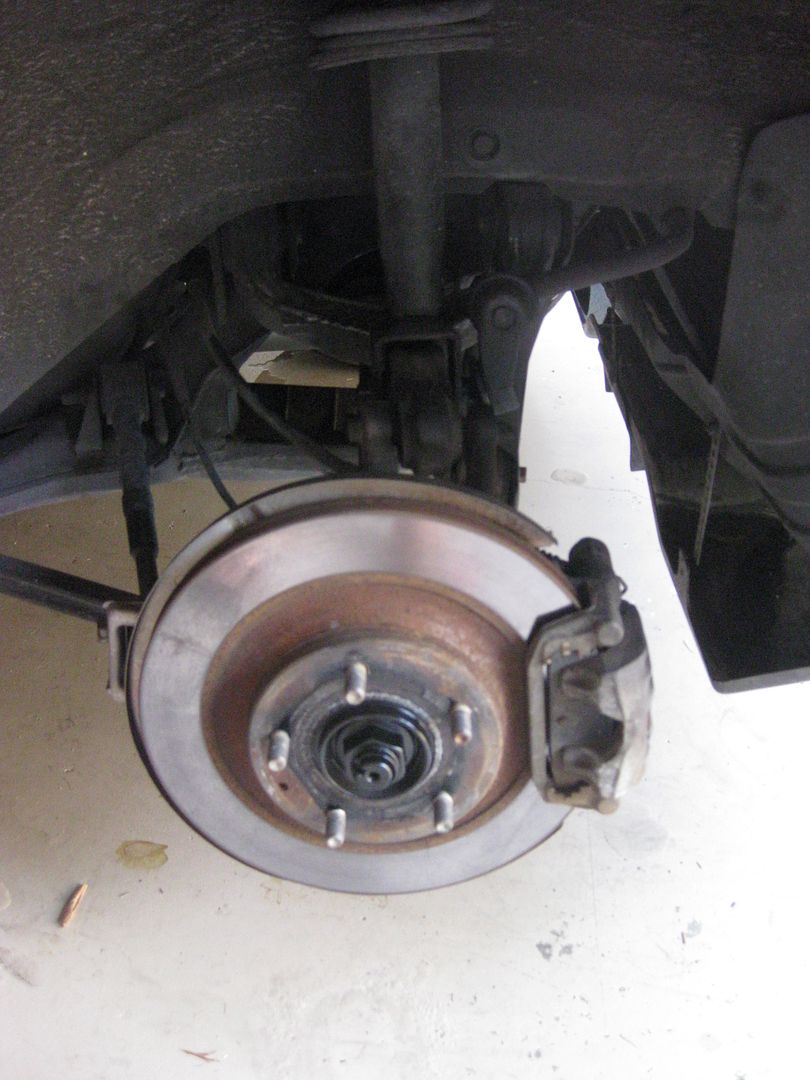
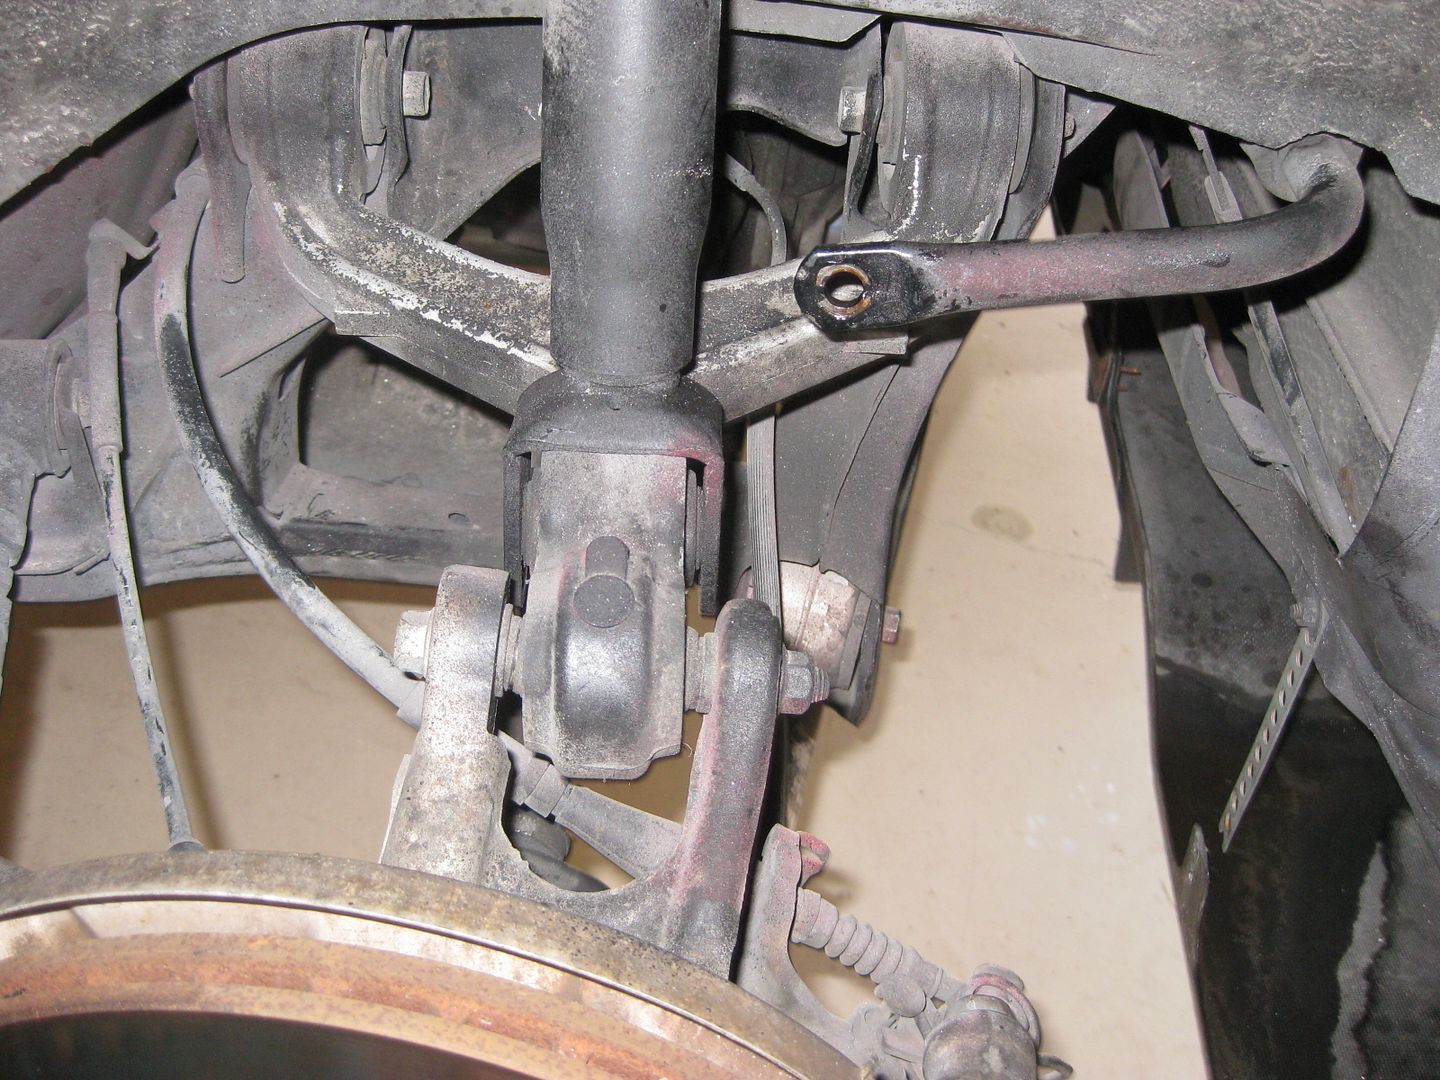
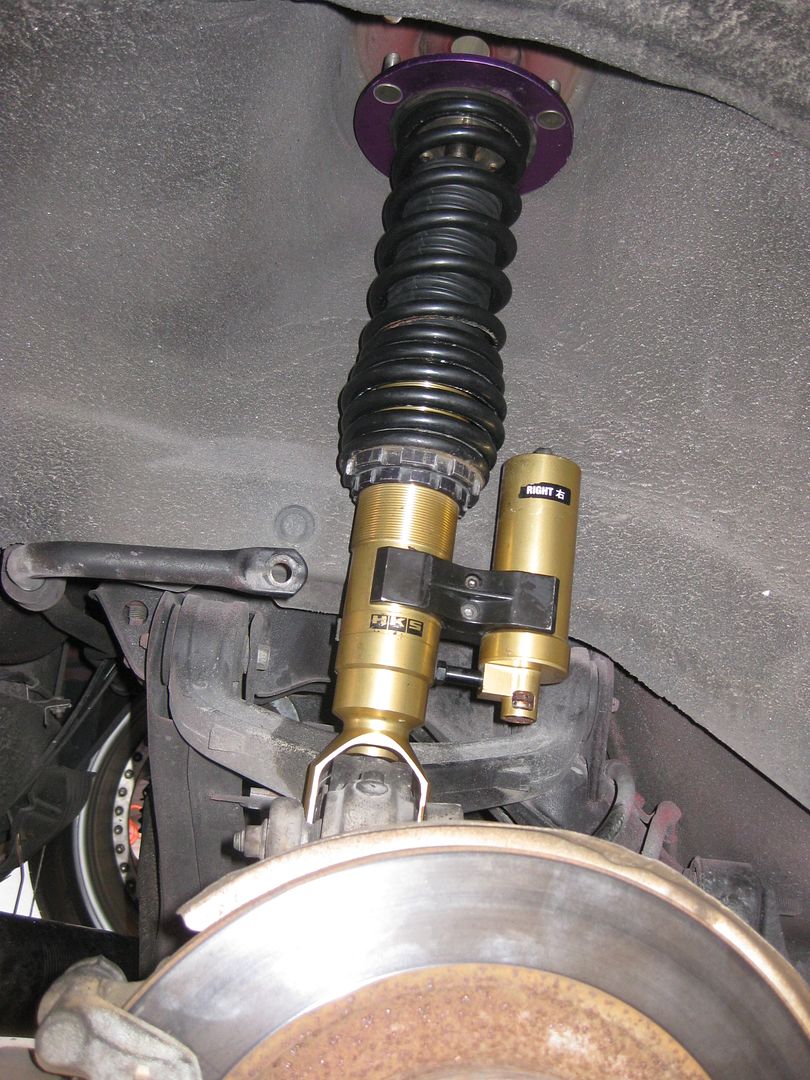
Step 4: This is what it should like after removing everything, remember do NOT remove the bolt on the shock.

Step 5: First bolt is the 17mm bolt that holds the bottom of the shock in. Use the liquid wrench and breaker bar here, this one is the toughest.
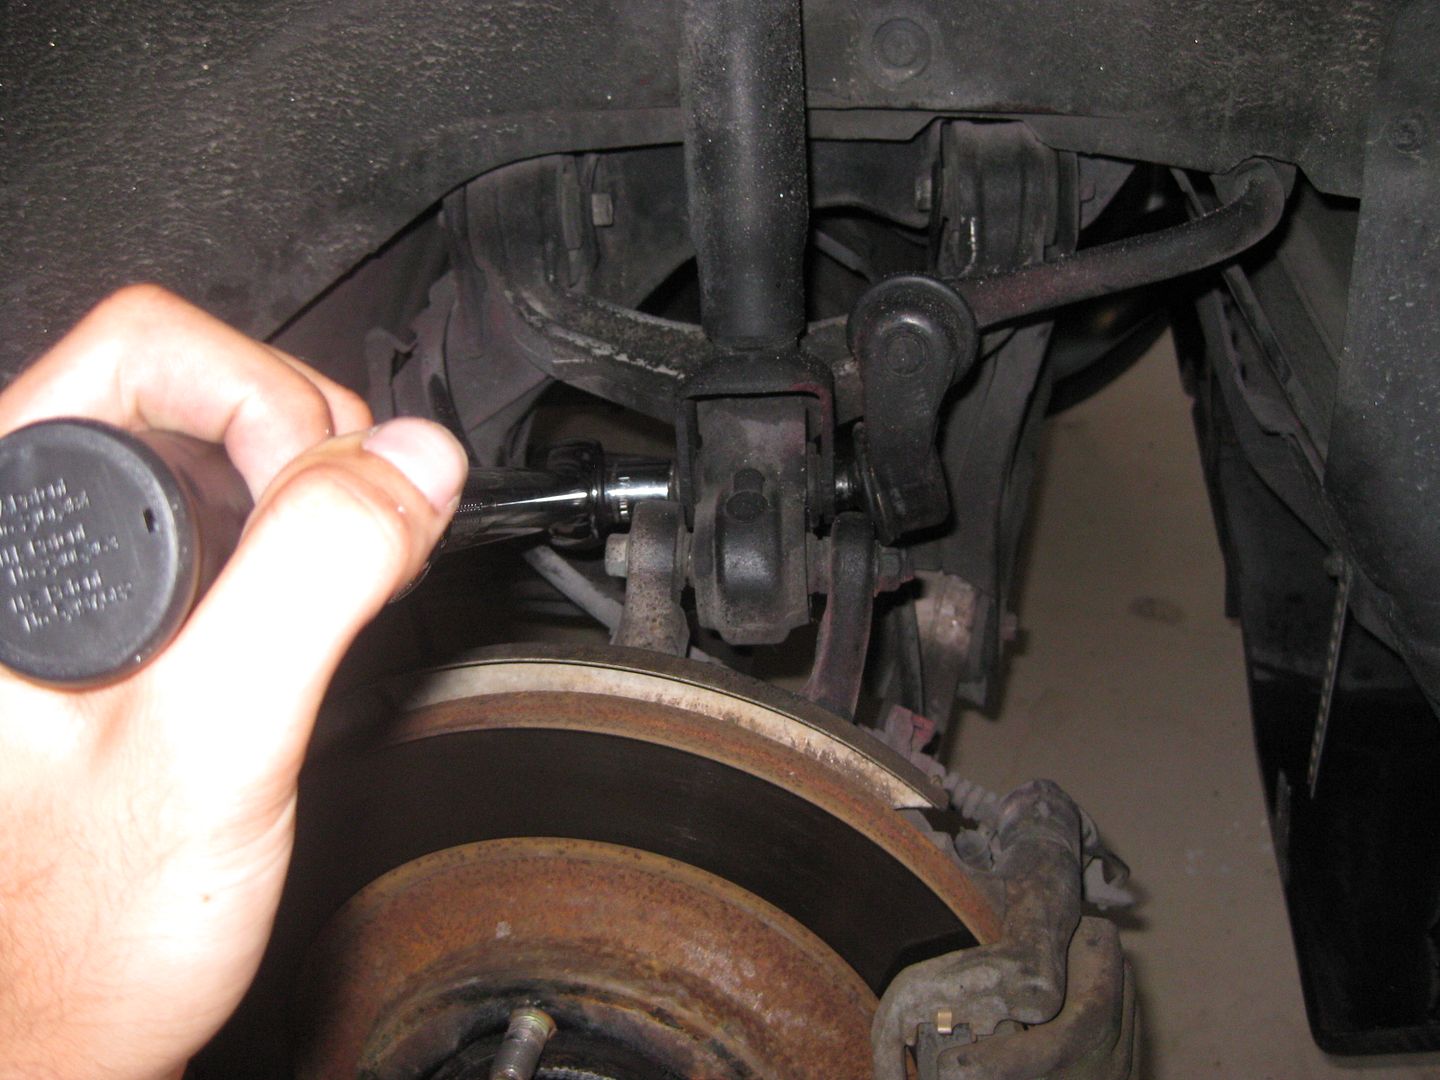
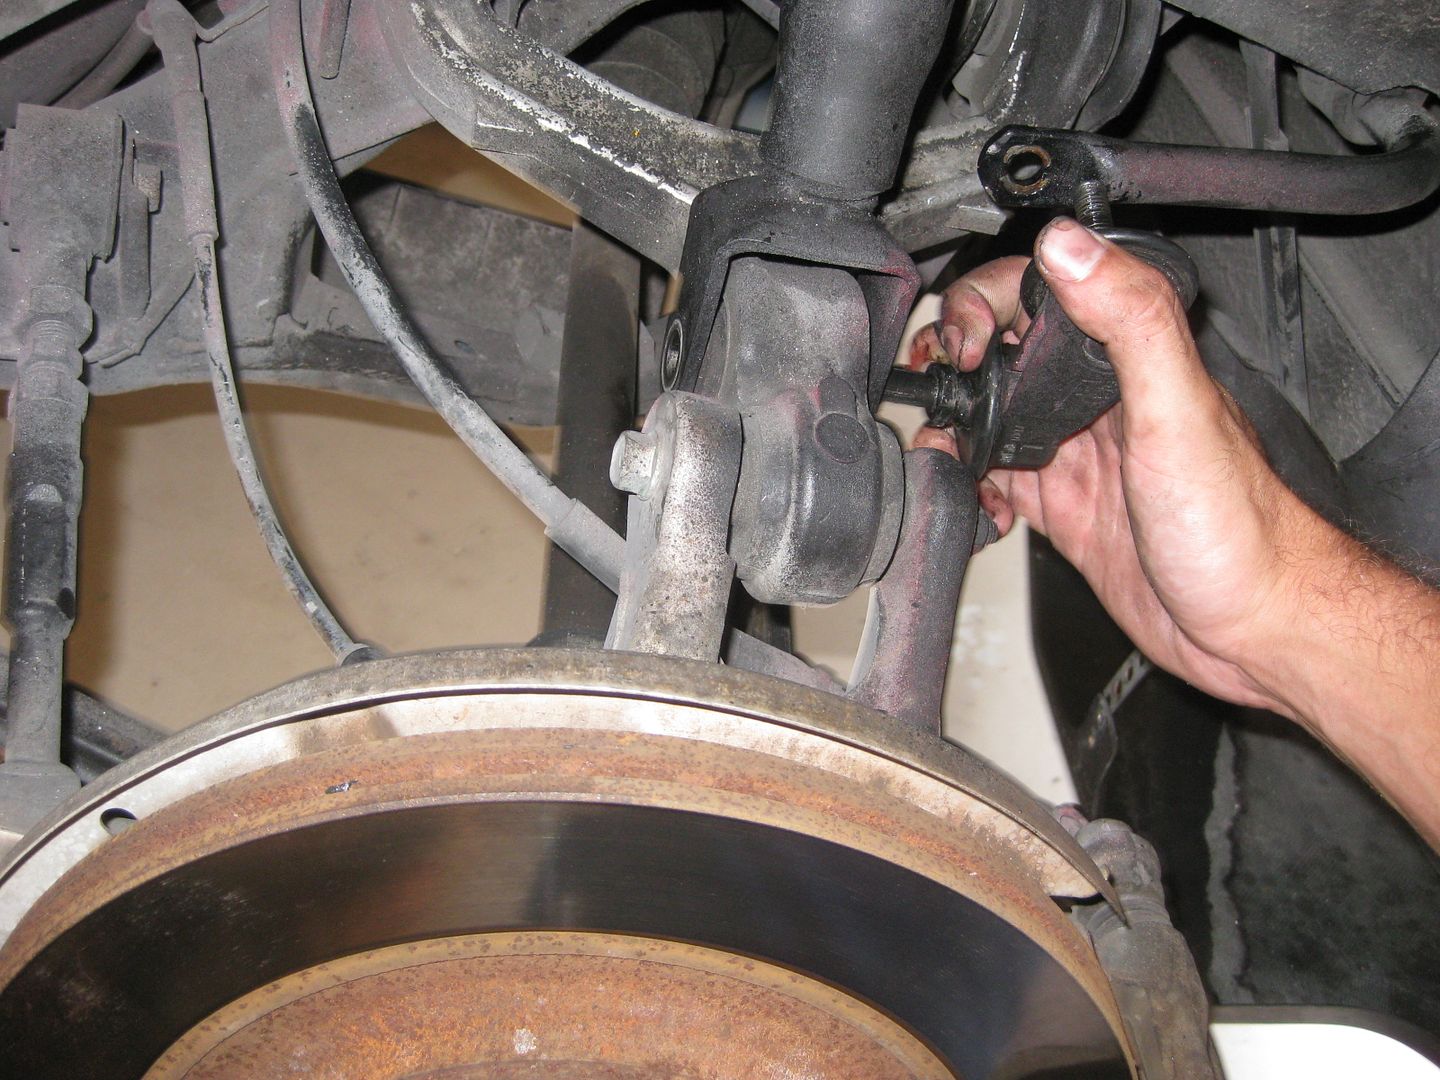
Step 6: Once loosened , you will need to hold the other nut with a pair of pliers or hand wrench to keep it in place, remove the nut. The part that attaches to the anti-roll/sway bar can comeout yet.
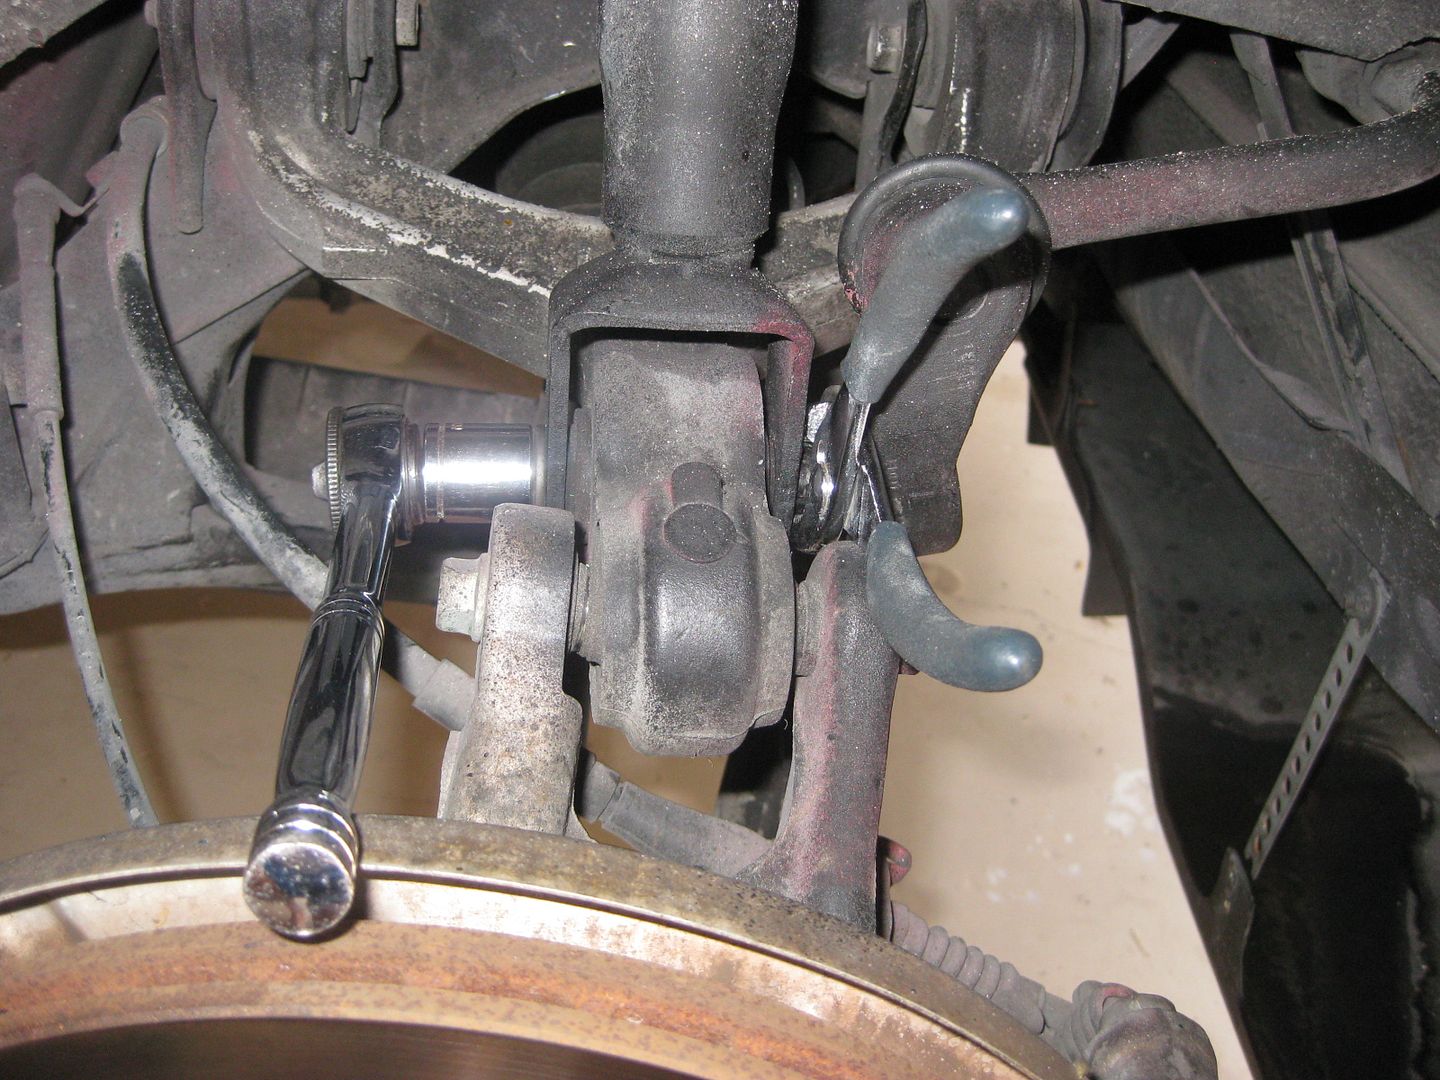
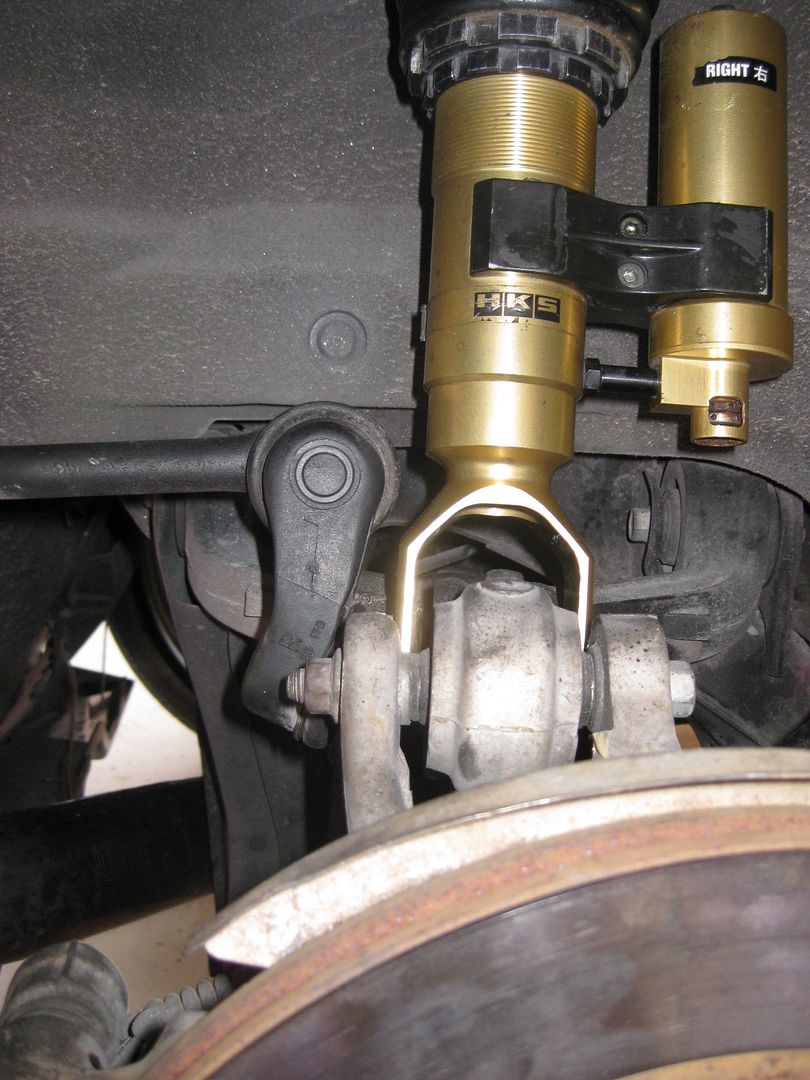
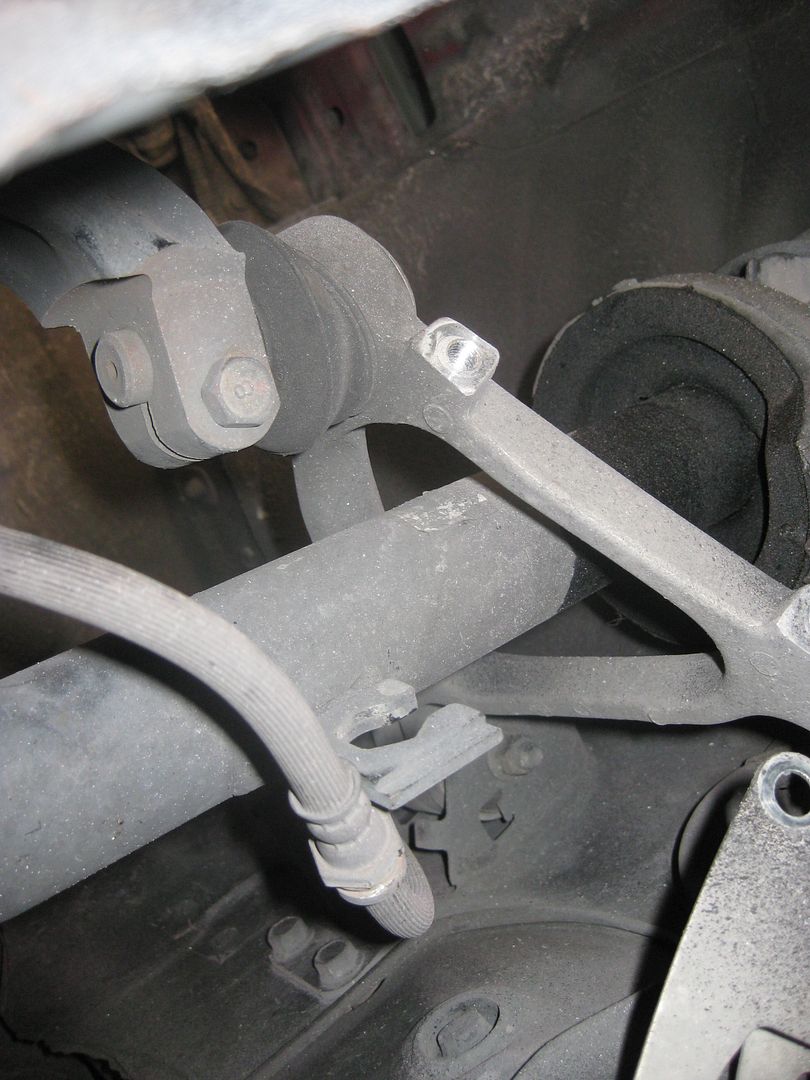
Step 7: Loosen the anti-roll bar 14mm nut as seen here:

Step 8: Hold the other end of the nut with the pliers again like in step 6:
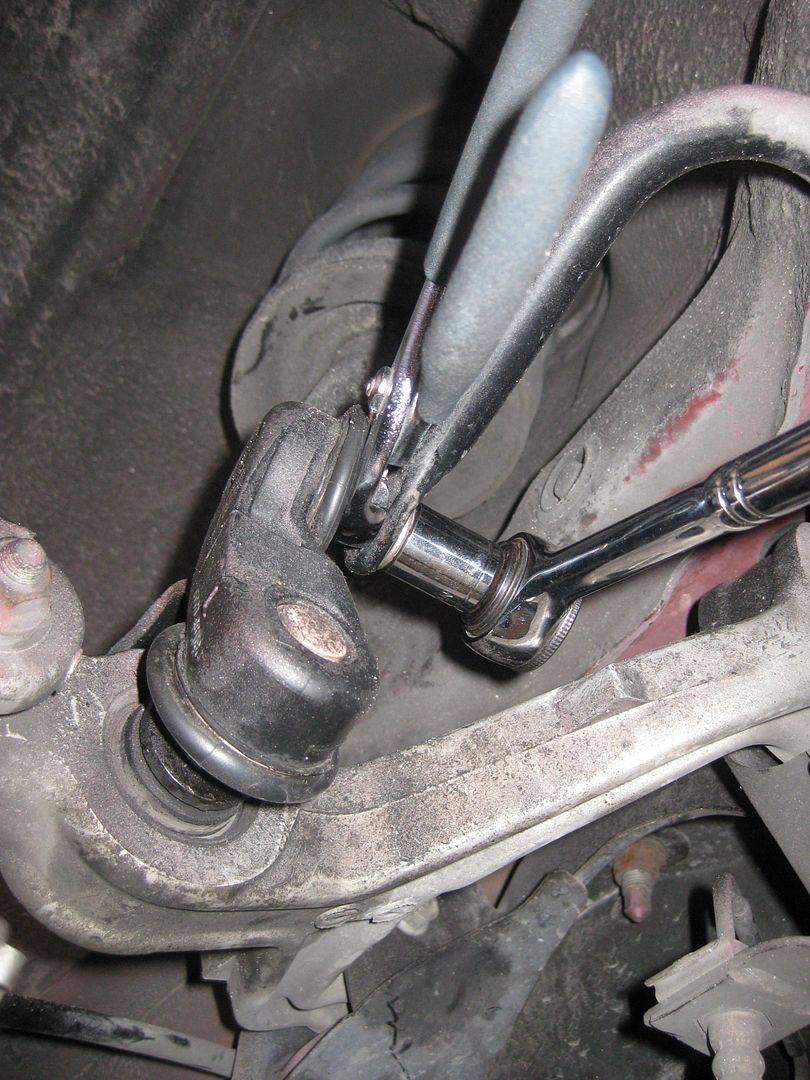
Step 9: Put the jack underneath the control arm to raise it, this will make the antiroll bar nut even with the hole and allow you to pull it out
Tools/Recommendations:
1/2� Breaker Bar � This is not 100% needed, but it does make it easier to get the bolts off that hold the bottom of the shocks in. Do not cheap out and get a 3/8� drive, it more than likely can not handle that kind of pressure. If you don't have 1/2� sockets, pick up a 17mm socket and that is all you should need for the breaker bar. I would not consider myself strong by any means and had no problem getting the bolts off which had not been touched in 17 years.
PB Blaster / Liquid Wrench � Spray the bolts down with these, it is not mandatory but does help getting those rusted bolts to budge.
Sockets � When dealing with bolts that are rusted on, it can be easy to strip the bolts which in-return will be a nightmare to get off. Use the right sockets as seen below, you want to use the hexagon type on the left. The socket on the right will strip the bolts easier.
Standard Tools � You will need your standard tools, IE ratchet, socket set, hammer, flathead etc. These are tools you should have laying around. You will also need a jack and jackstands, no need for a lift. I can not imagine owning a FD and not having these tools.
Rear Suspension:
Okay, lets begin! We are going to start with the rear suspension because it is easier, bolts are harder to get off in the rear then the front � at least for me.
Step 1: Jack the car up, remember to put the stands on the seam welds underneath.
Step 2: Take the wheel off, this area you will be quite familiar with:
Step 3: Pop the trunk and remove the piece that covers the rear strut. You will now expose 14mm nuts, remove all 4. Order is irrelevant.
Step 4: This is what it should like after removing everything, remember do NOT remove the bolt on the shock.
Step 5: First bolt is the 17mm bolt that holds the bottom of the shock in. Use the liquid wrench and breaker bar here, this one is the toughest.
Step 6: Once loosened , you will need to hold the other nut with a pair of pliers or hand wrench to keep it in place, remove the nut. The part that attaches to the anti-roll/sway bar can comeout yet.
Step 7: Loosen the anti-roll bar 14mm nut as seen here:
Step 8: Hold the other end of the nut with the pliers again like in step 6:
Step 9: Put the jack underneath the control arm to raise it, this will make the antiroll bar nut even with the hole and allow you to pull it out
 06-16-10, 09:25 PM
#2
Step 10: Now that the anti-roll bar bolt is out, now you can pull the bolt out from the shock:
Now the piece that connects the two is all out.
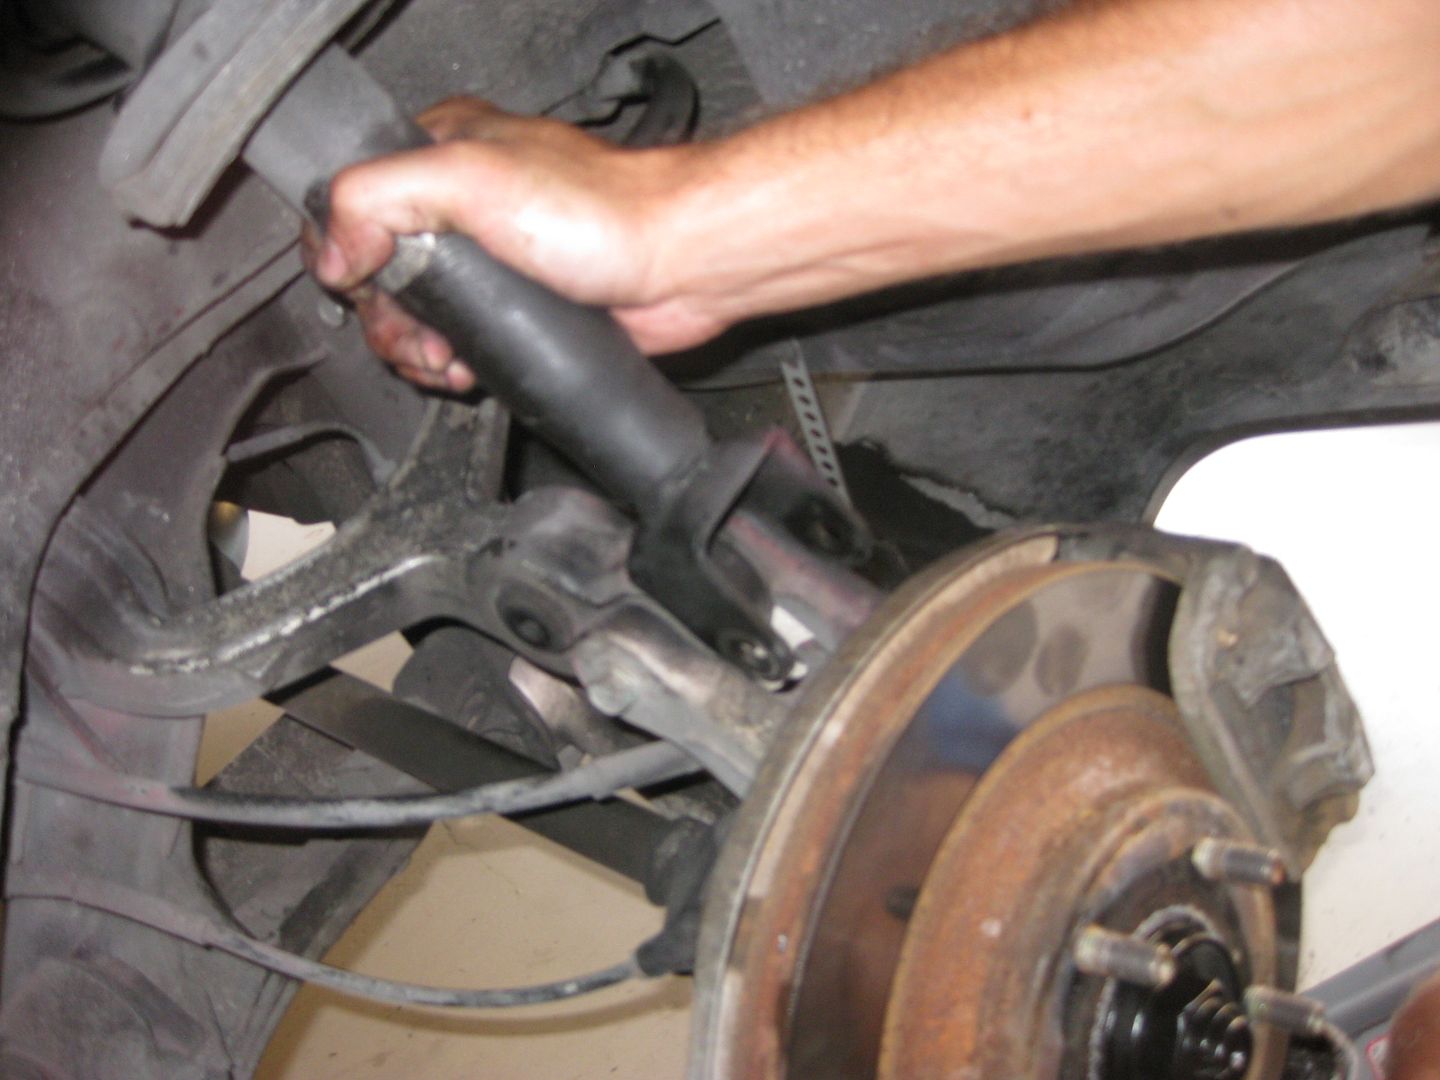
Step 11: Now that the bolts are undone, the shock can be removed. Push down on the wheel hub and pull the shock over the control arm and it should come out.
Step 12:
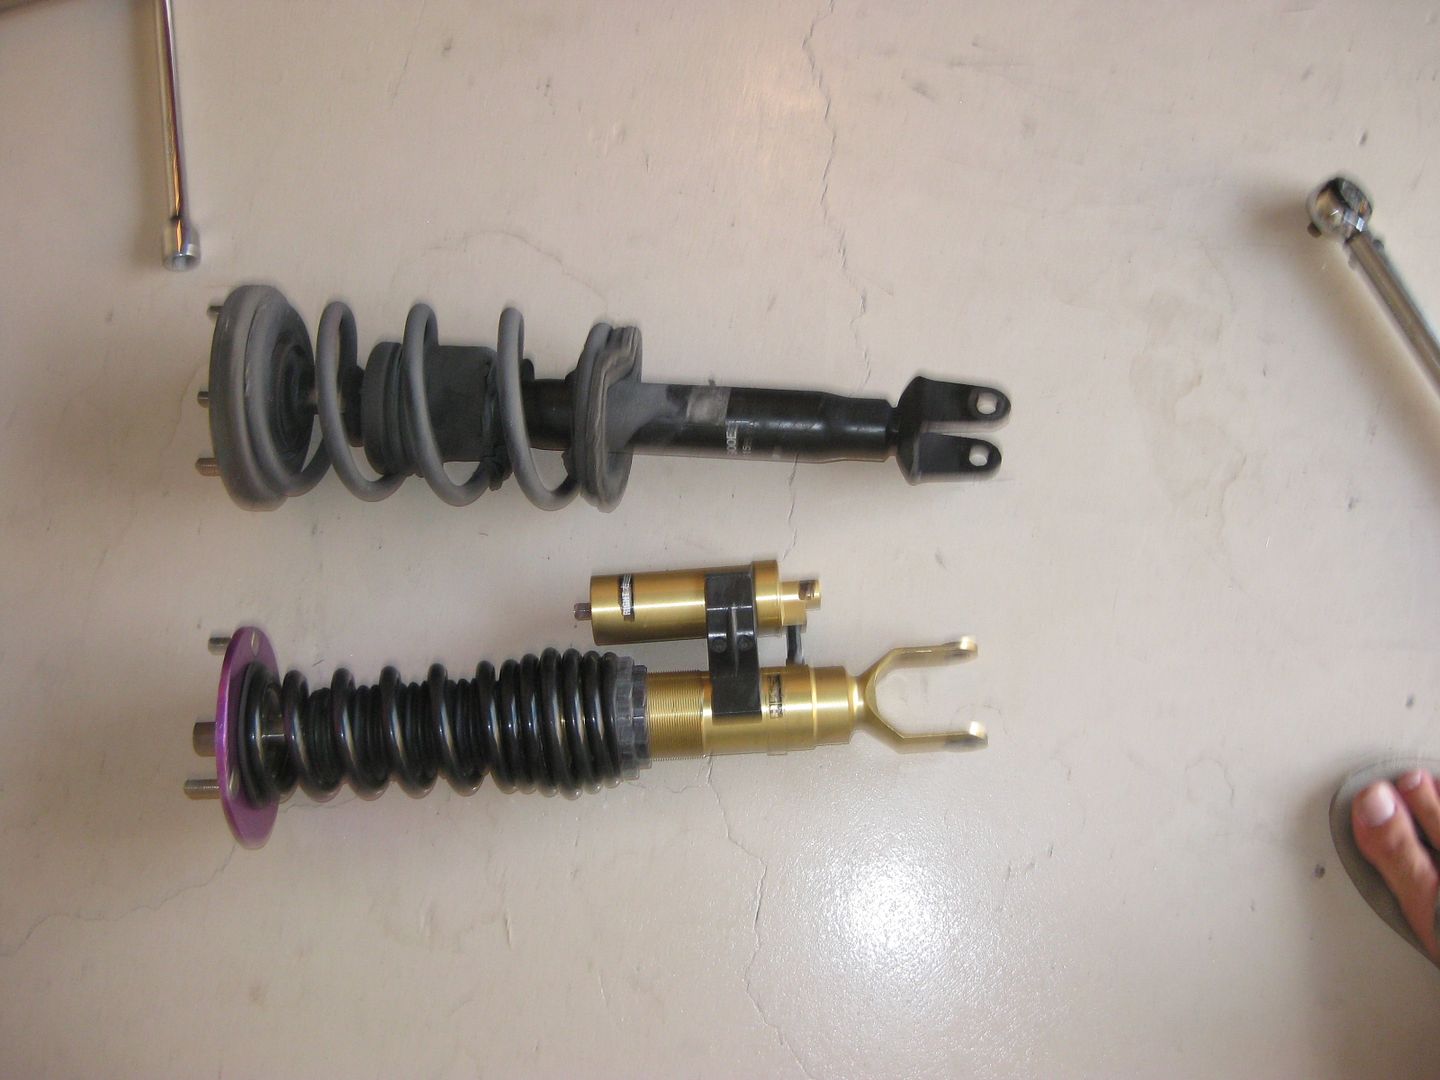
Old vs new coilover. Doesn't matter if your running $600 coilovers or multi-thousand dollar coilovers, process is the same.
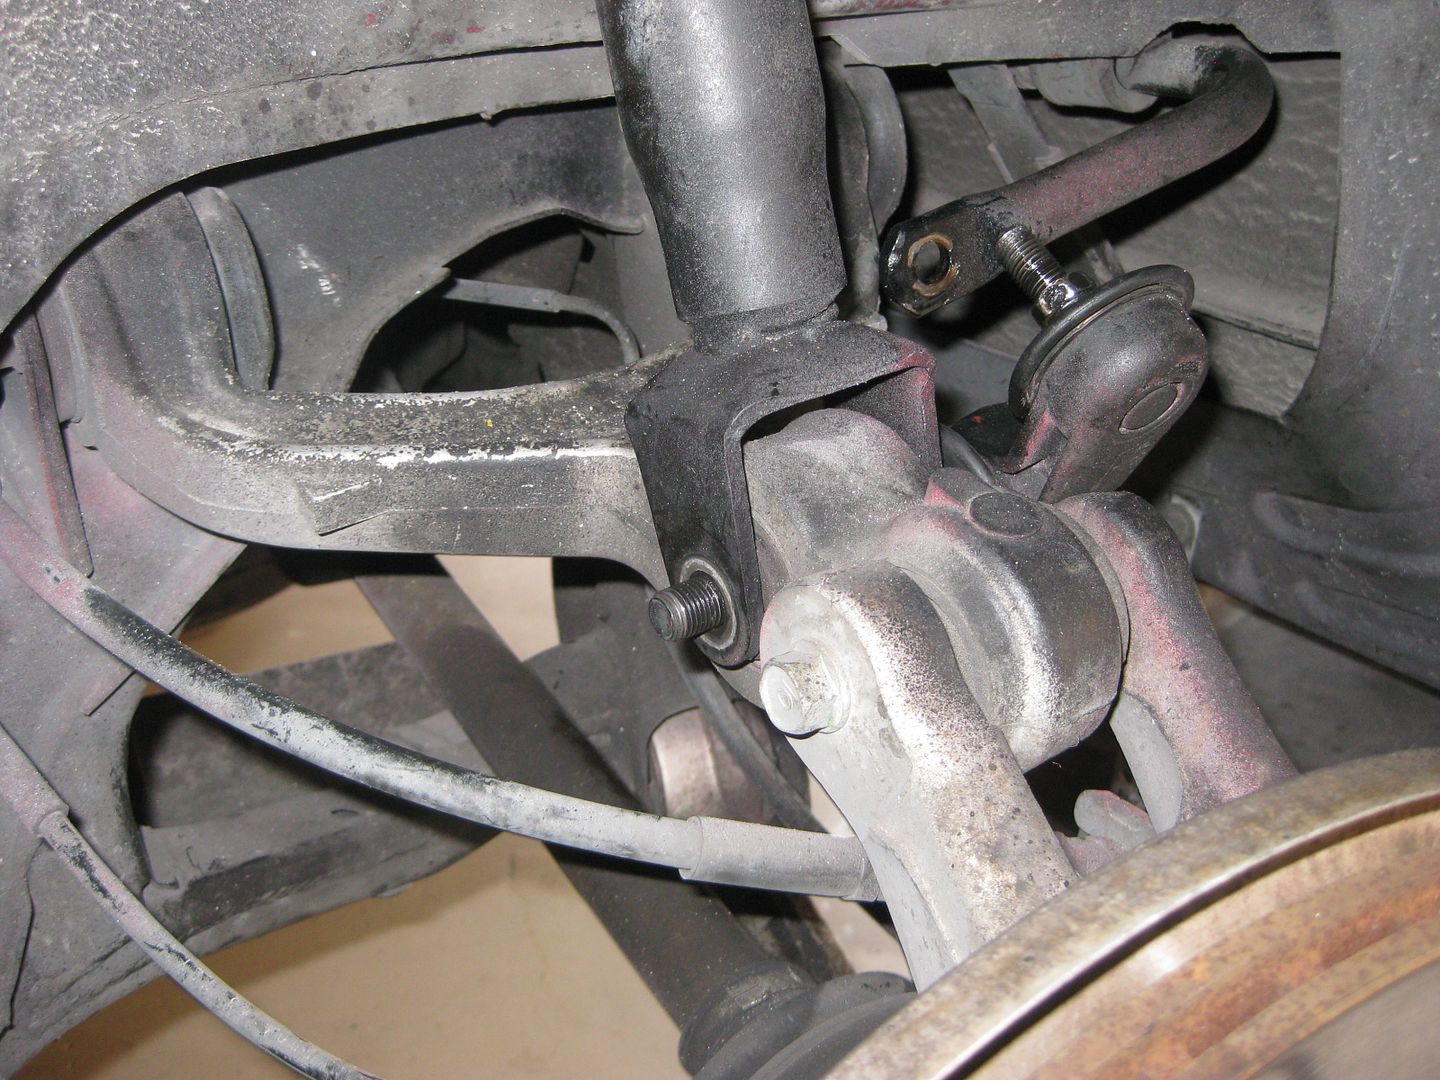
Step 13: Put the bottom of the shock into place first:
Step 14: Alight the top of bolts to the holes by the strut area, obviously there will be a few inches between the top and the top of the coilover. This can be solved by putting the jack under the control arm and pushing it through the holes via the jack.
Step 15: Put the antiroll bar bolt in, then the other end of the bolt through the coilover hole. Tighten the nuts on these two bolts. Make sure the jack pushes the coilover completely through the hole, then tighten the 4 14mm bolts on the top. All finished up:
Thats it, jack the car back down and do the other rear coilover. Not that bad, right?
Front Suspension:
Okay, time for the fronts! Little bit more challenging then the rear, nothing we can't tackle though.
Step 1: Remove the wheel
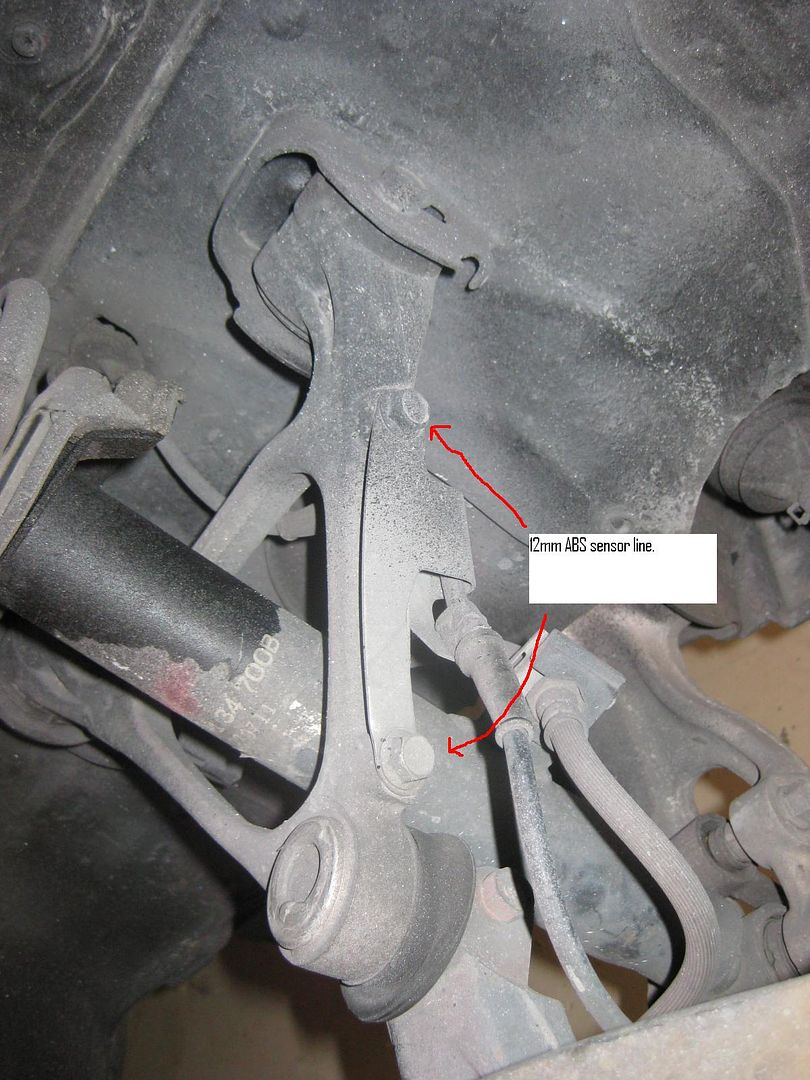
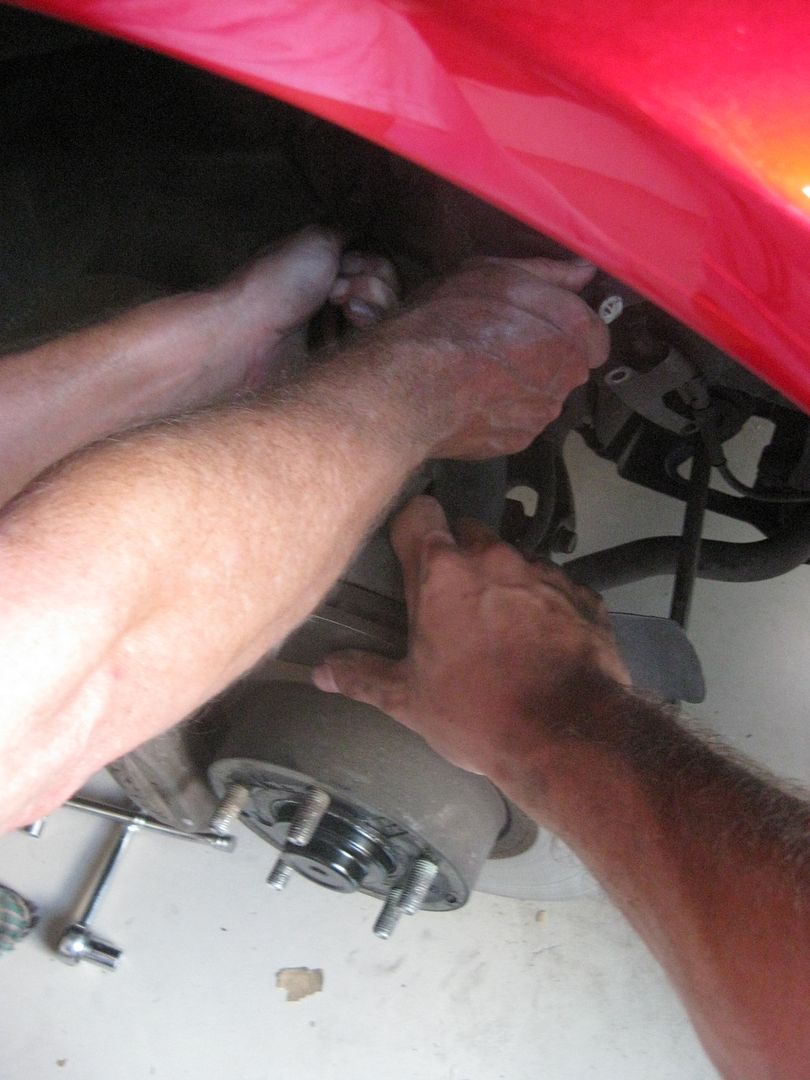
Step 2: Remove the 2 12mm bolts holding the abs sensor line in
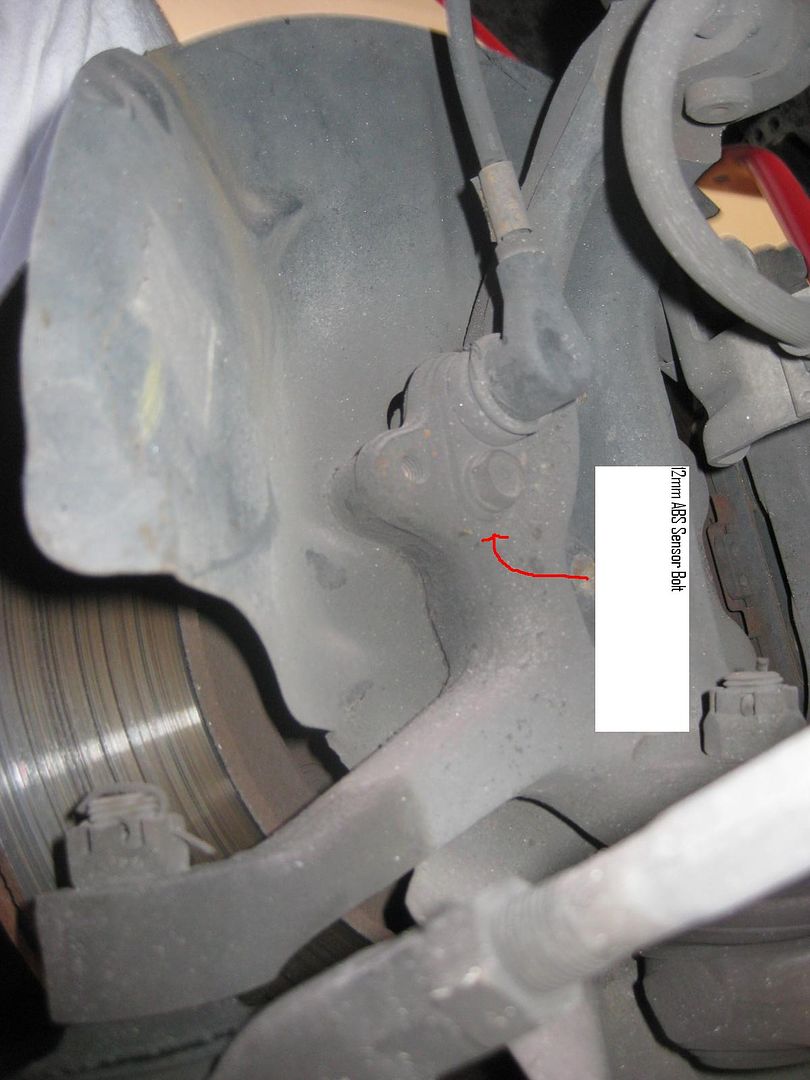
Step 3: Remove the 12mm bolt holding the abs sensor
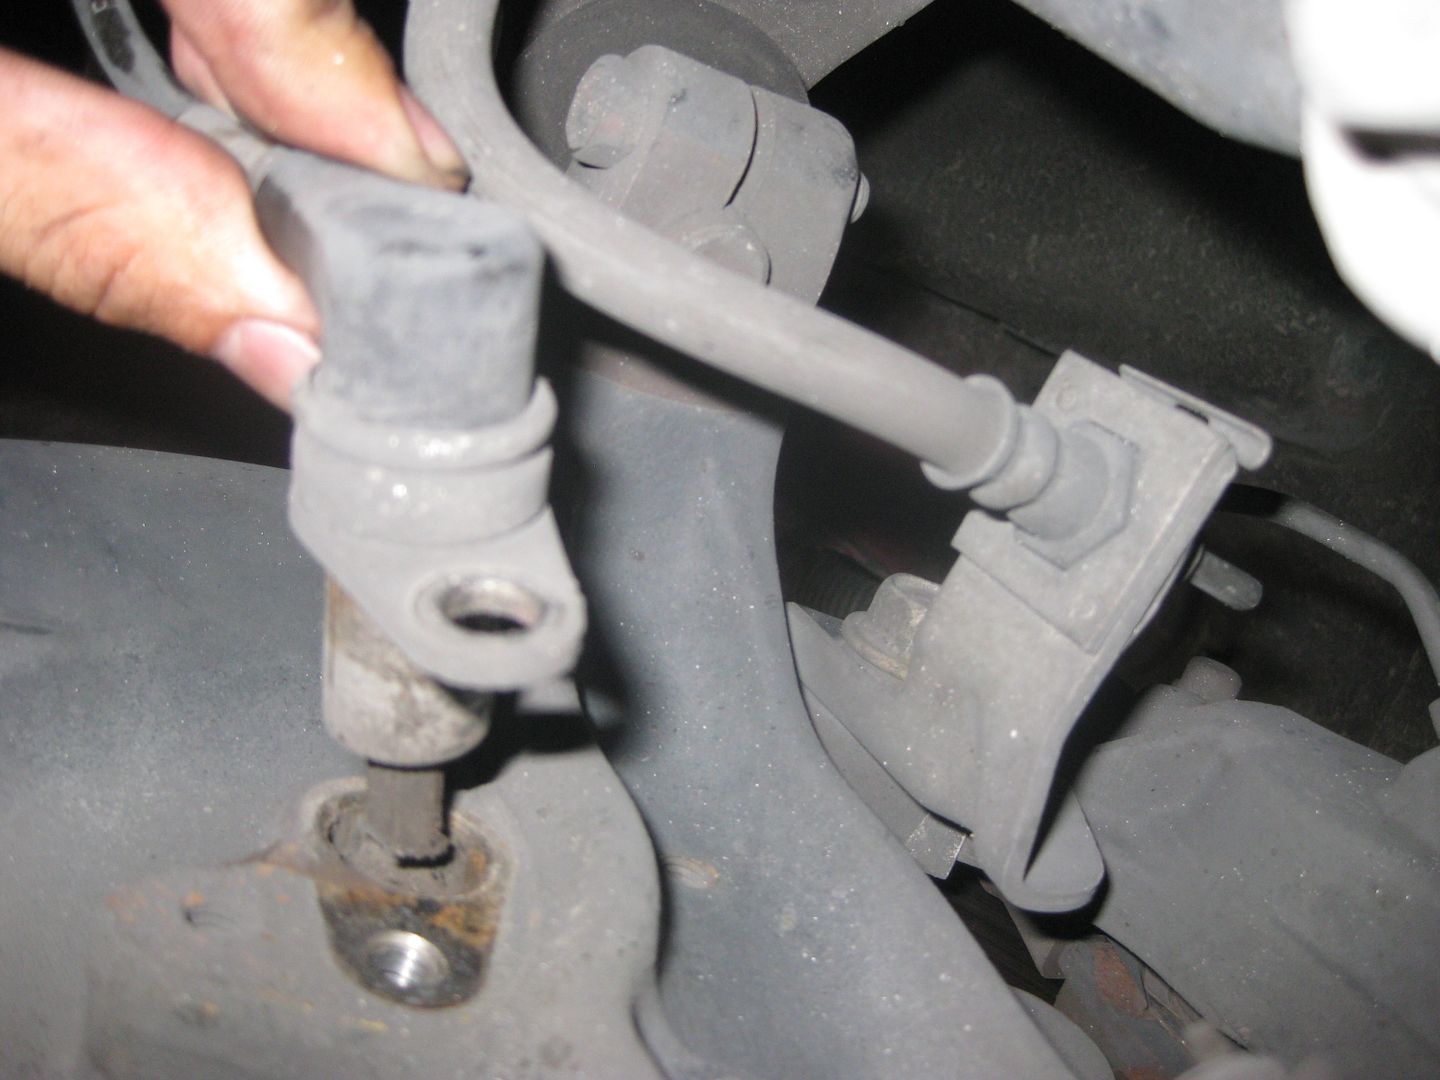
Step 4: Now remove the abs sensor, by twisting it back and forth, then pull it out
Now the piece that connects the two is all out.
Step 11: Now that the bolts are undone, the shock can be removed. Push down on the wheel hub and pull the shock over the control arm and it should come out.
Step 12:
Old vs new coilover. Doesn't matter if your running $600 coilovers or multi-thousand dollar coilovers, process is the same.
Step 13: Put the bottom of the shock into place first:
Step 14: Alight the top of bolts to the holes by the strut area, obviously there will be a few inches between the top and the top of the coilover. This can be solved by putting the jack under the control arm and pushing it through the holes via the jack.
Step 15: Put the antiroll bar bolt in, then the other end of the bolt through the coilover hole. Tighten the nuts on these two bolts. Make sure the jack pushes the coilover completely through the hole, then tighten the 4 14mm bolts on the top. All finished up:
Thats it, jack the car back down and do the other rear coilover. Not that bad, right?
Front Suspension:
Okay, time for the fronts! Little bit more challenging then the rear, nothing we can't tackle though.
Step 1: Remove the wheel
Step 2: Remove the 2 12mm bolts holding the abs sensor line in
Step 3: Remove the 12mm bolt holding the abs sensor
Step 4: Now remove the abs sensor, by twisting it back and forth, then pull it out
06-16-10, 09:25 PM
#3
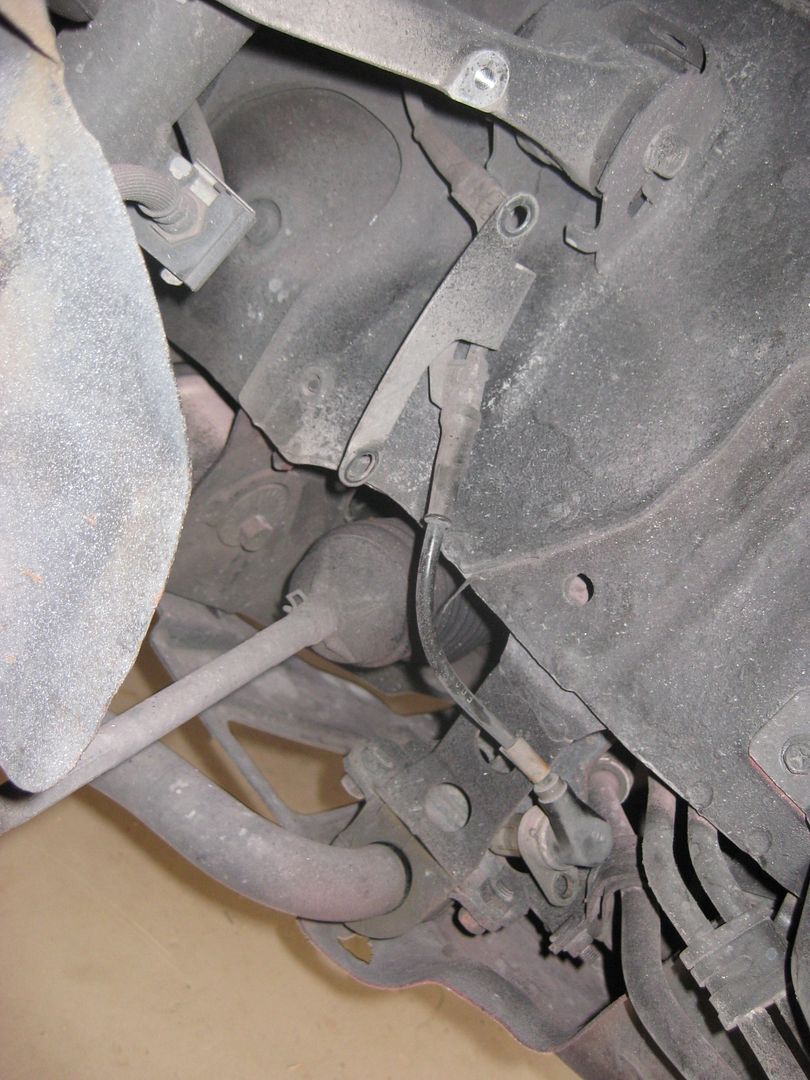
Step 5: Tuck the ABS sensor out of the way.
Step 6: This is the brake line clip we will be removing
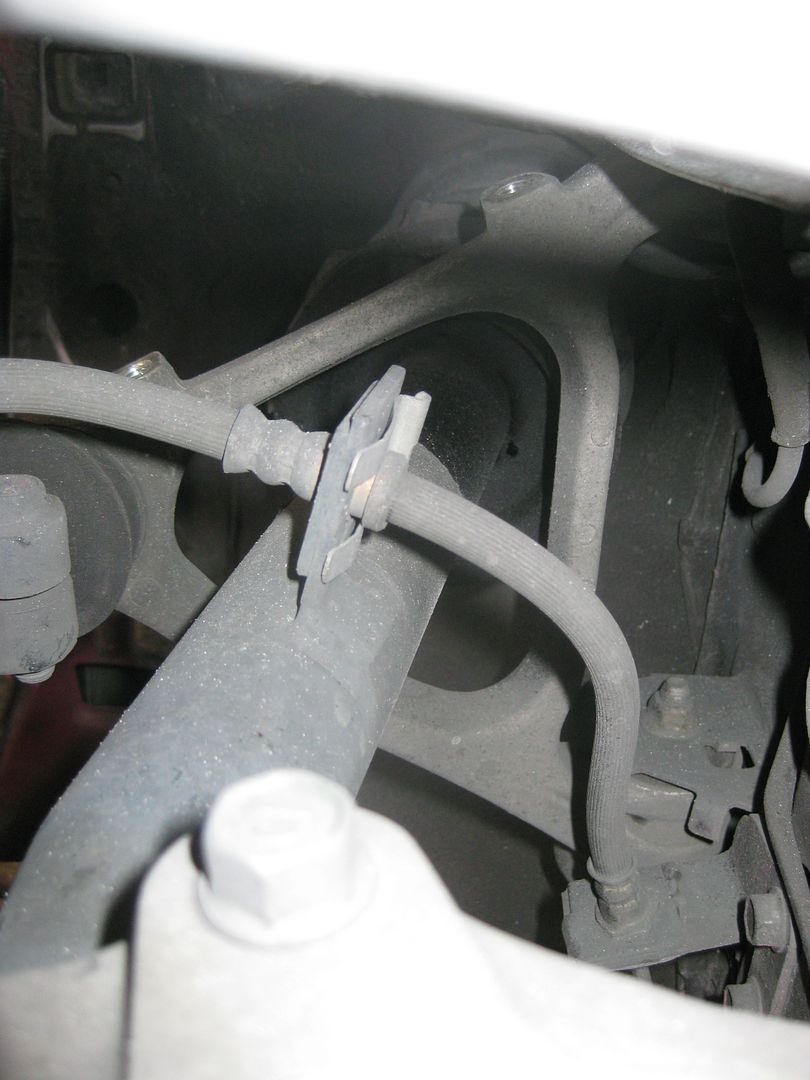
Step 7: Take a flathead and hammer, then gently tap the clip on & off.
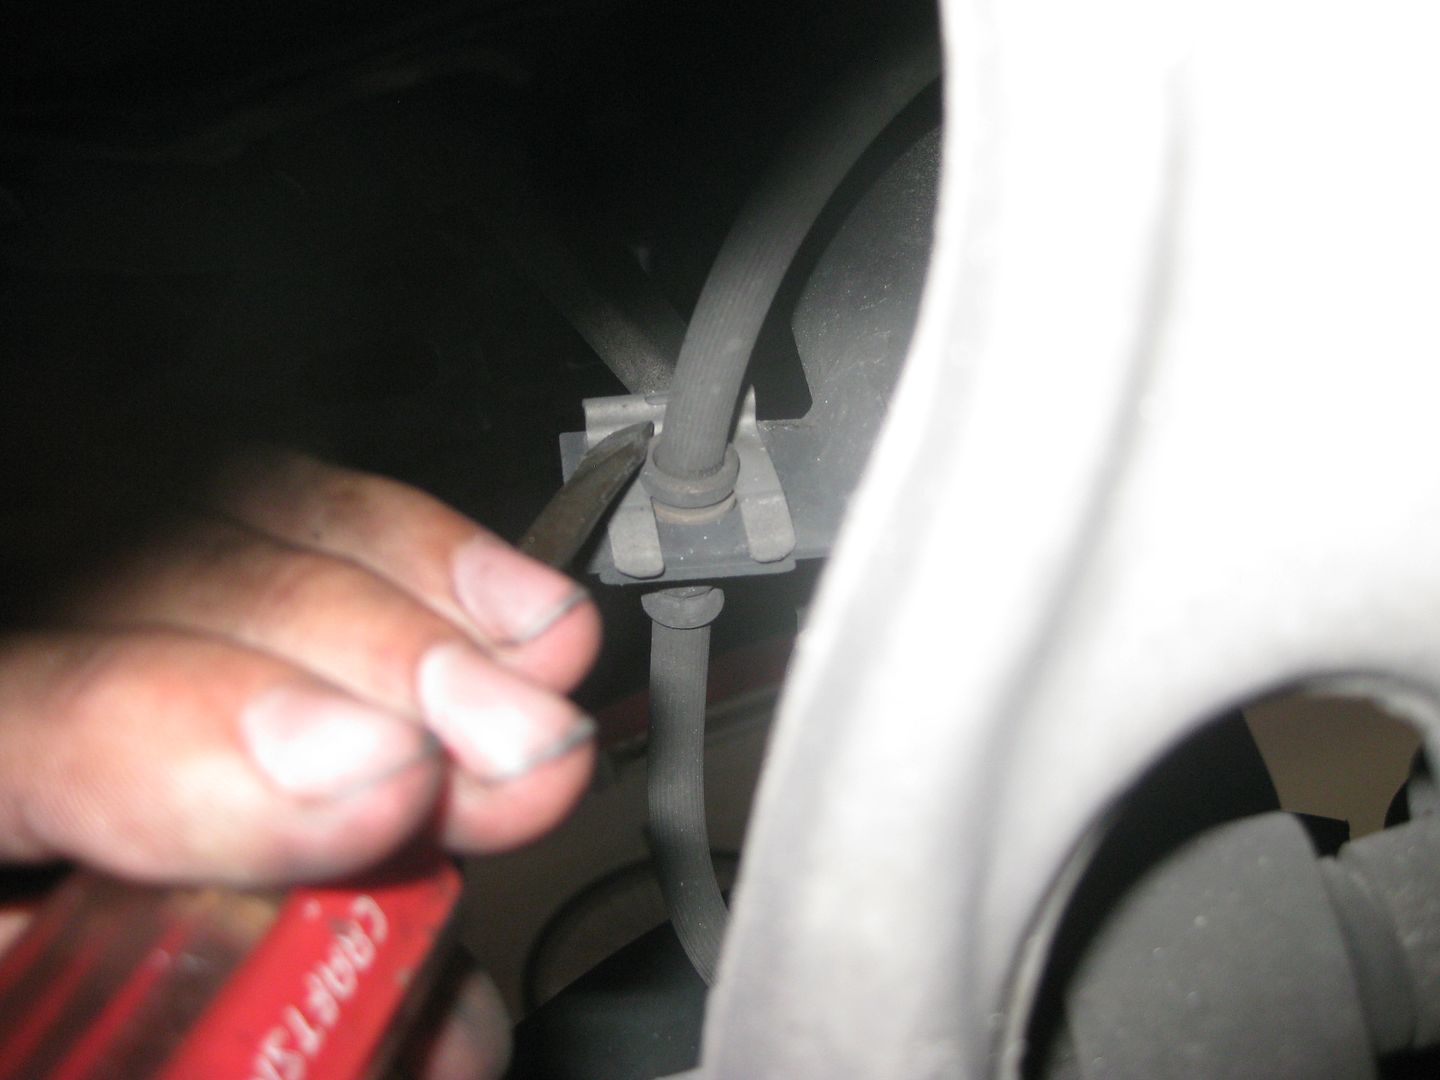
Step 8: Pull the brake line up and off of the clip holding it to the shock
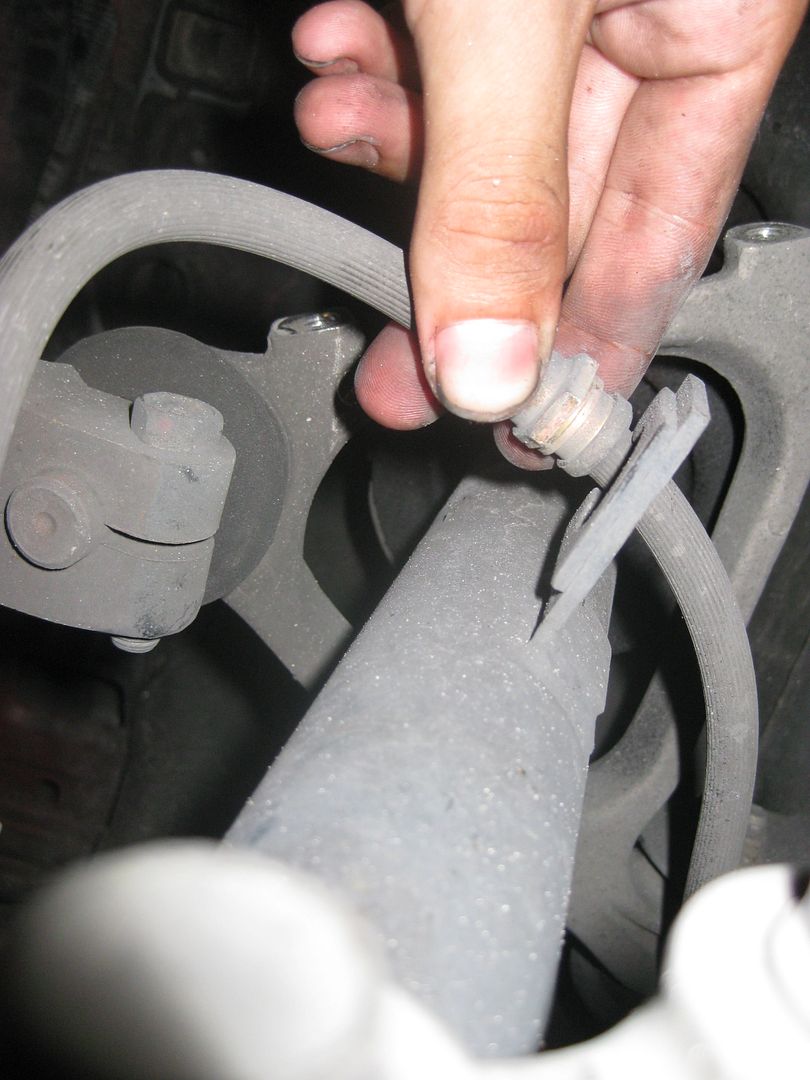
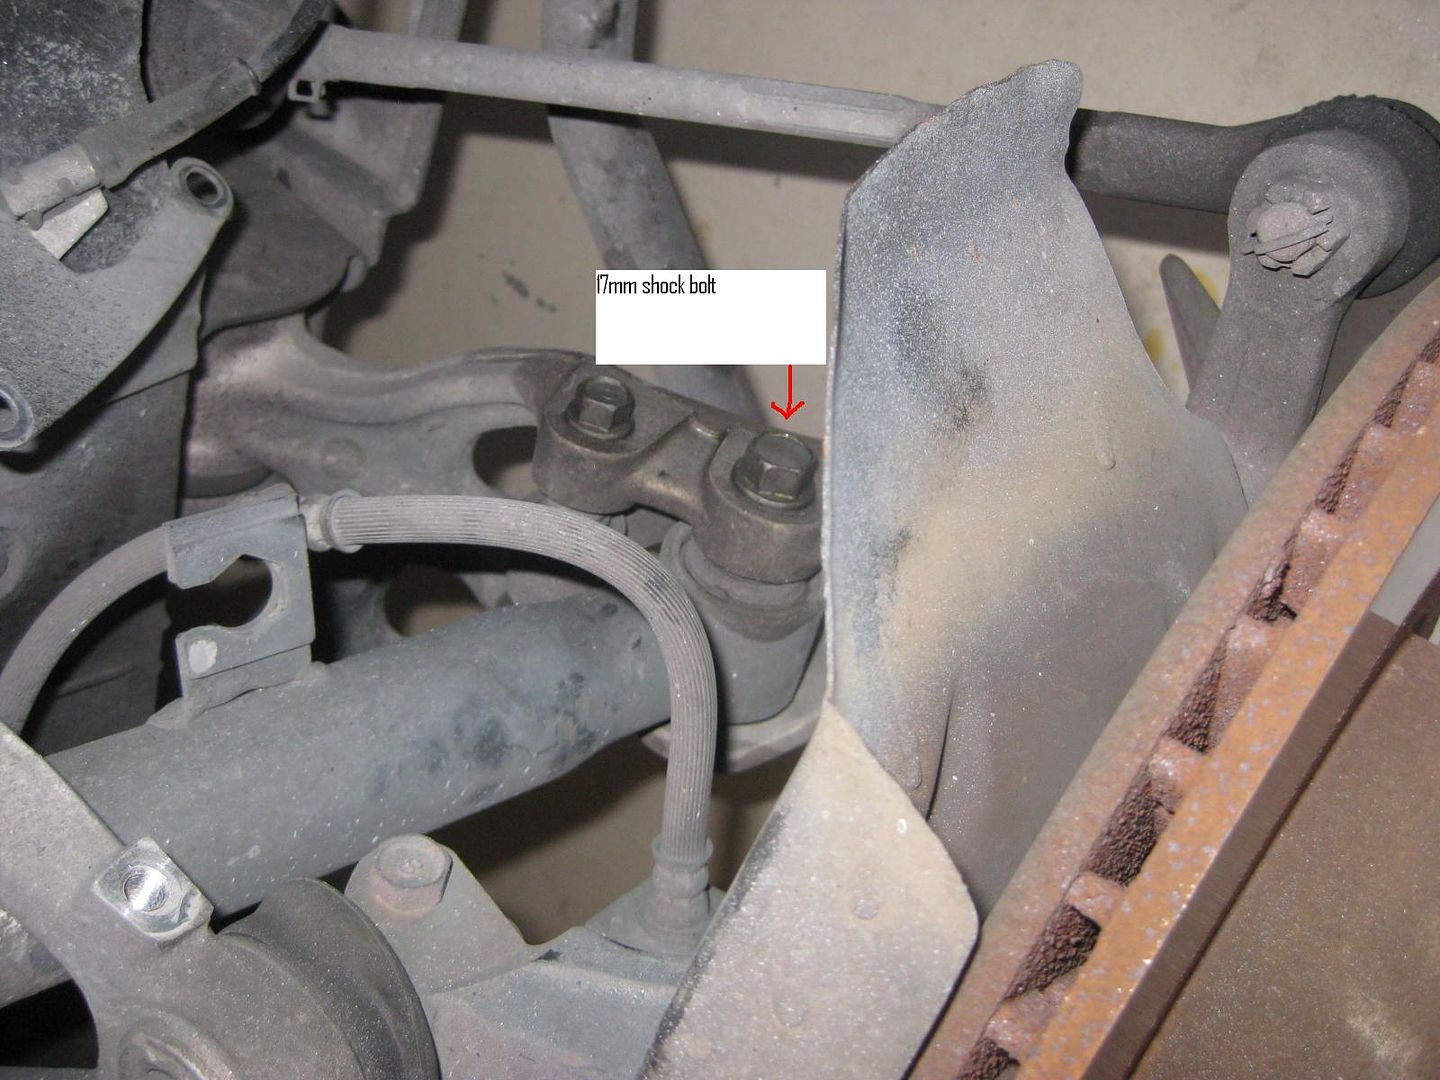
Step 9: Remove the 17mm shock bolt
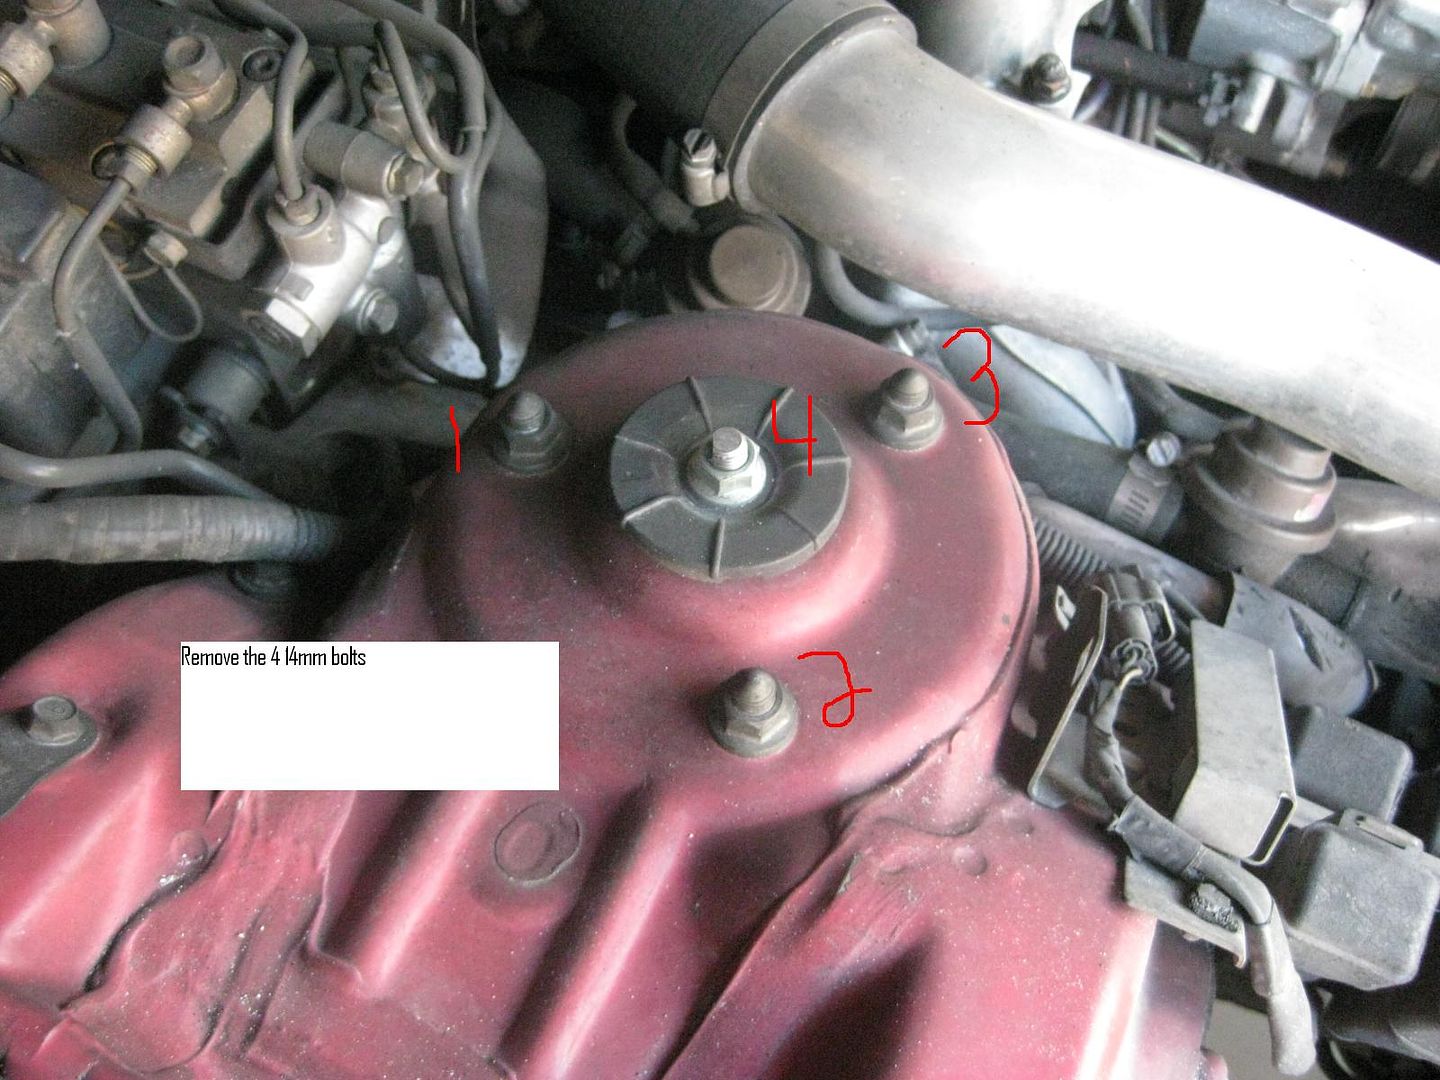
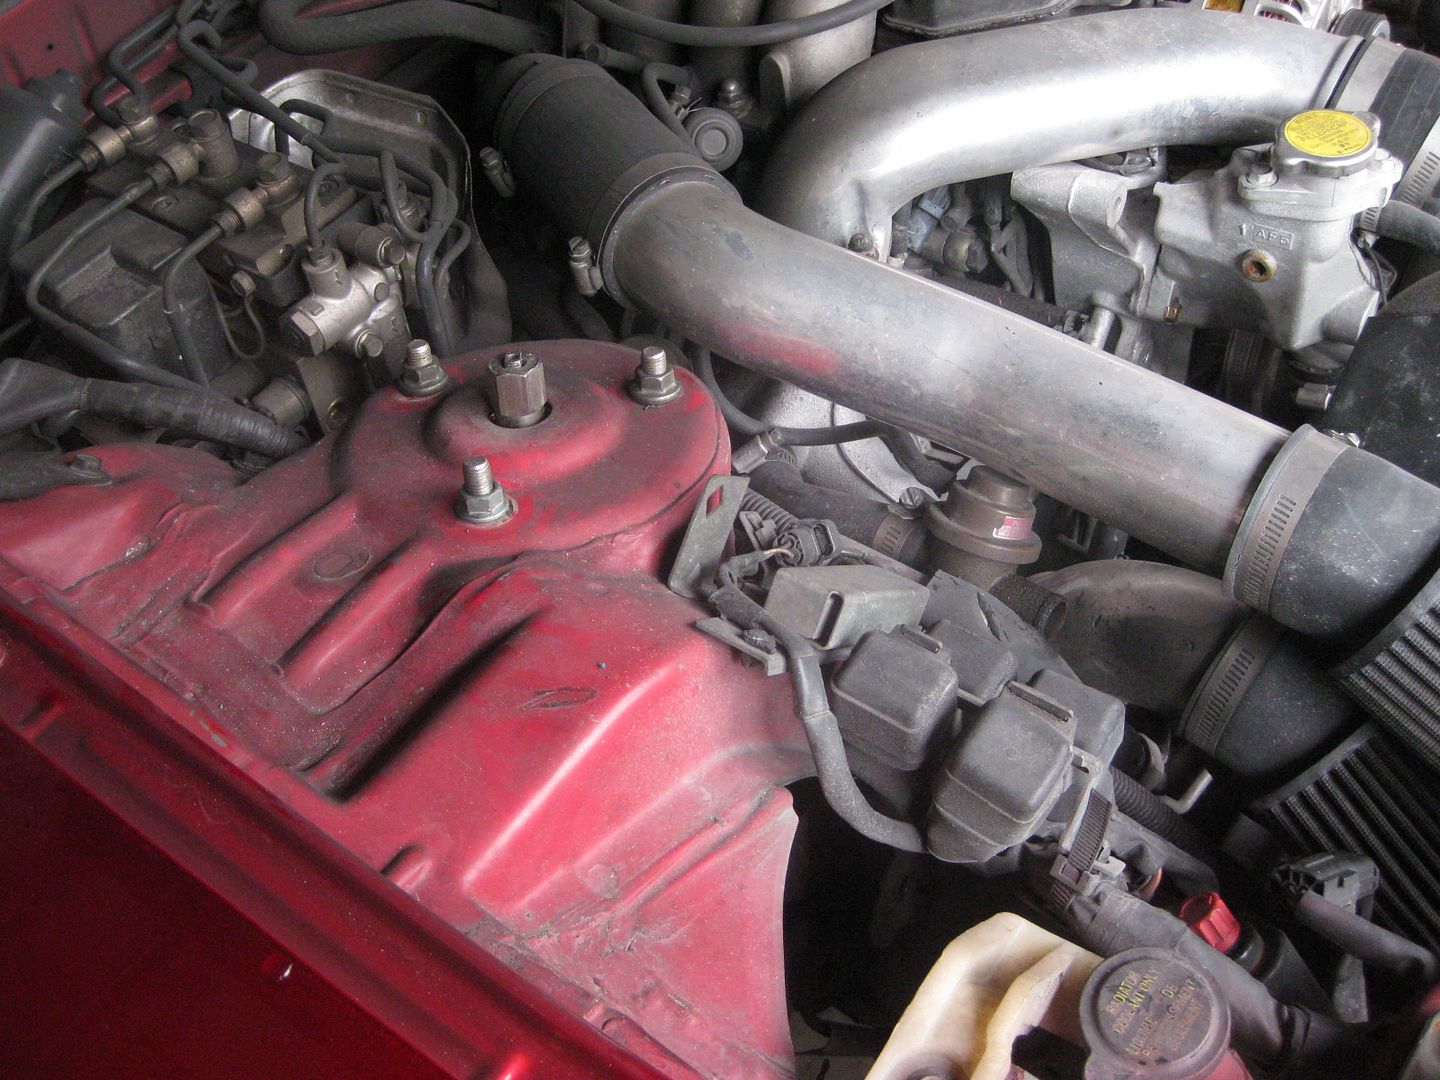
Step 10: Remove the 4 14mm bolts holding the shock in place in the engine bay

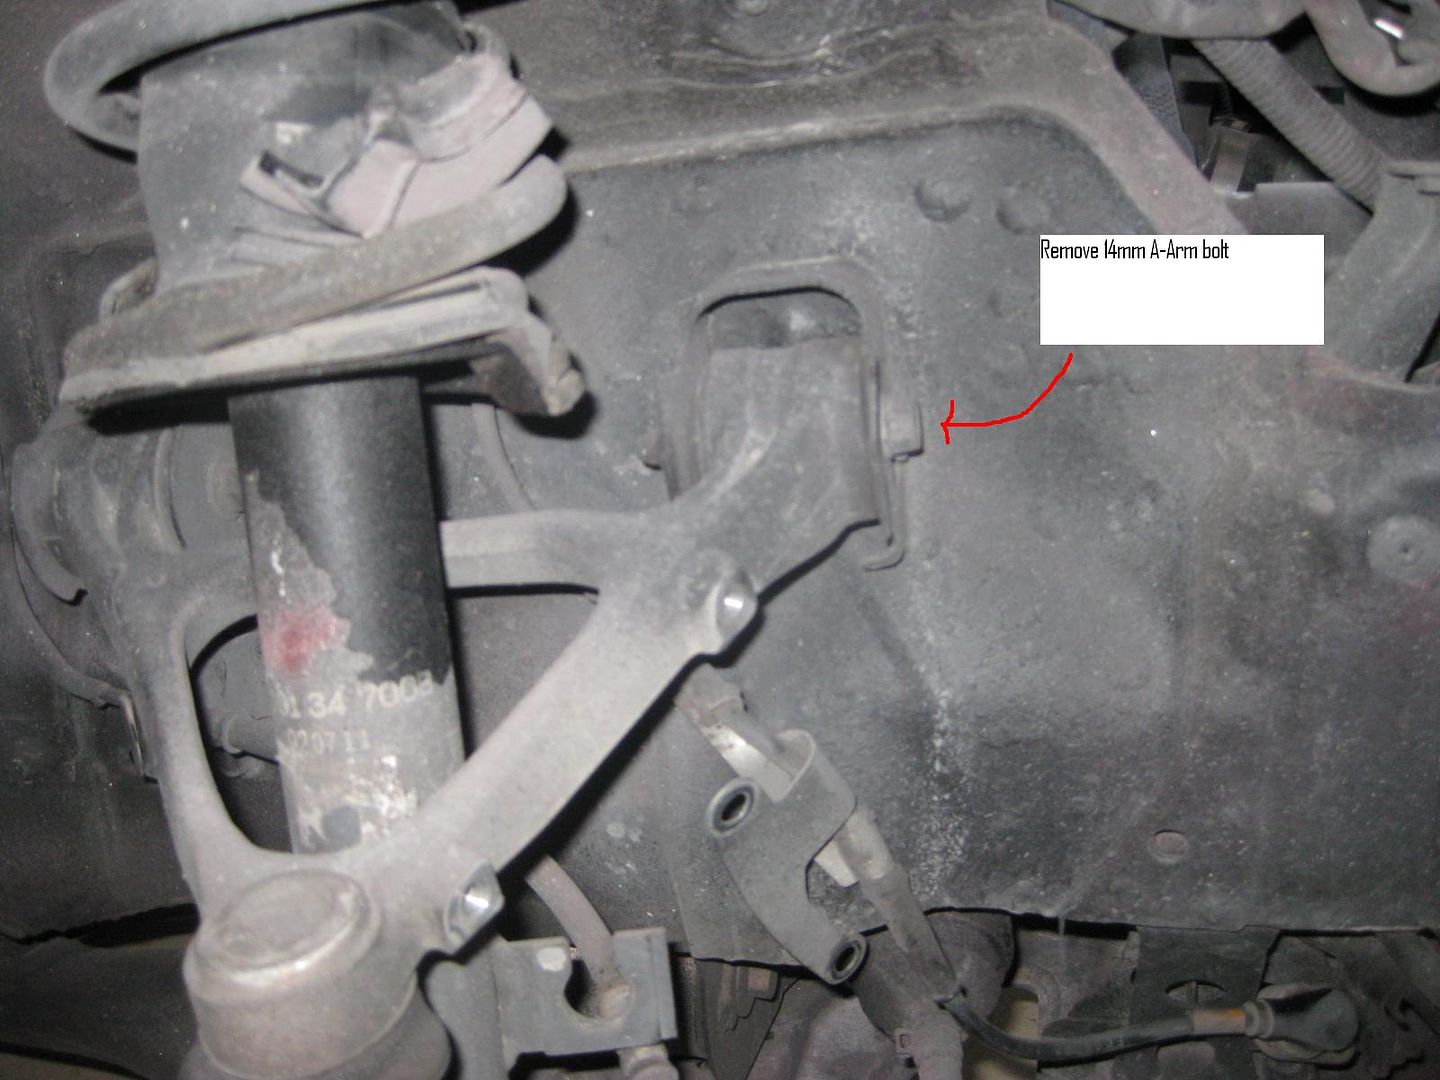
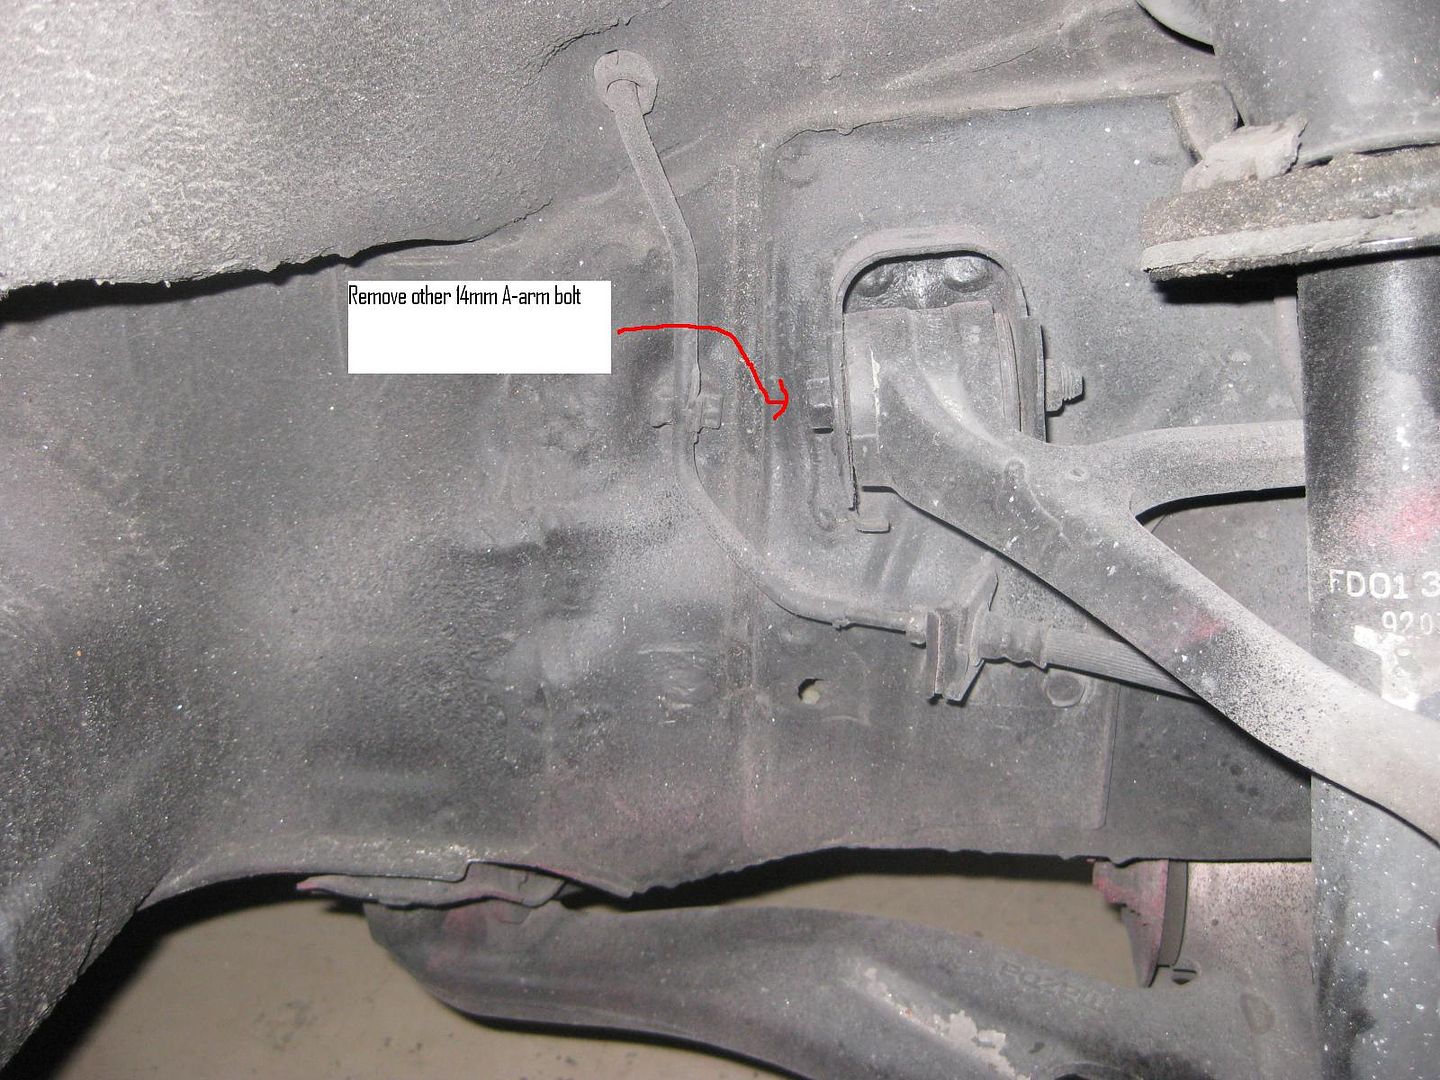
Step 11: Remove the two 14mm bolts holding the a-arm in place
Step 12: Pull the a-arm out of its mount, pull it towards you
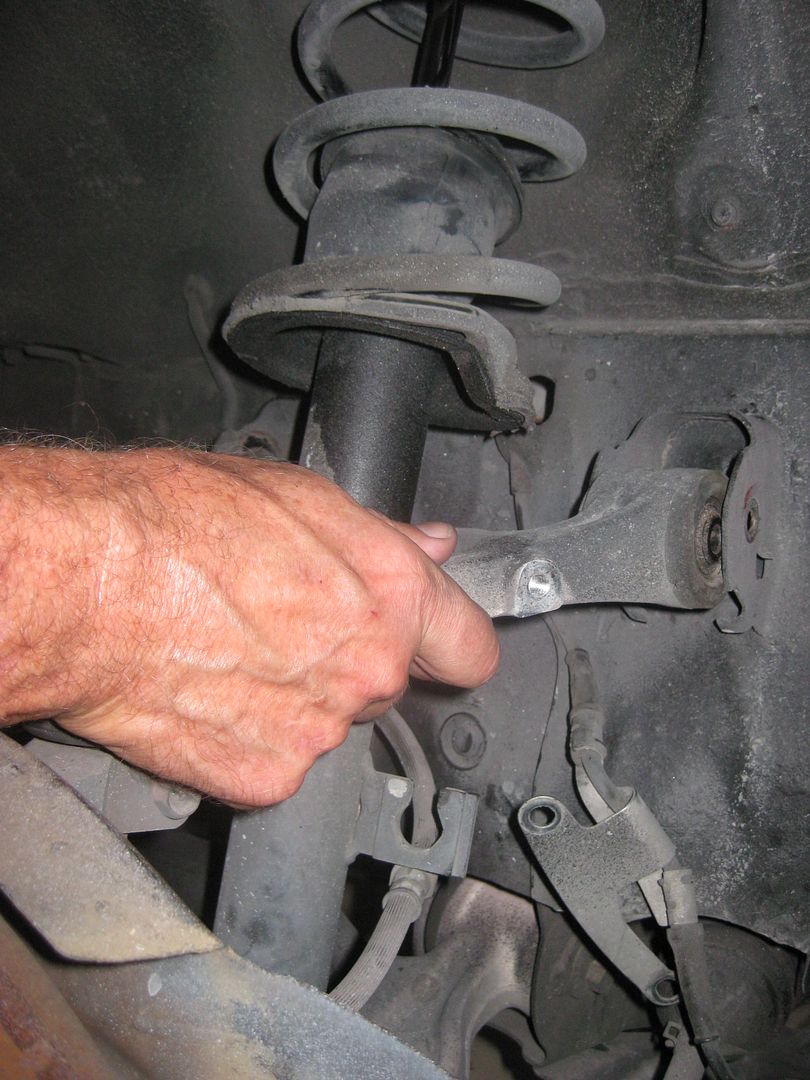
Step 13: Push the hub down, this will allow the bolts to come out of the holes that were holding it in place
Step 6: This is the brake line clip we will be removing
Step 7: Take a flathead and hammer, then gently tap the clip on & off.
Step 8: Pull the brake line up and off of the clip holding it to the shock
Step 9: Remove the 17mm shock bolt
Step 10: Remove the 4 14mm bolts holding the shock in place in the engine bay
Step 11: Remove the two 14mm bolts holding the a-arm in place
Step 12: Pull the a-arm out of its mount, pull it towards you
Step 13: Push the hub down, this will allow the bolts to come out of the holes that were holding it in place
06-16-10, 09:26 PM
#4
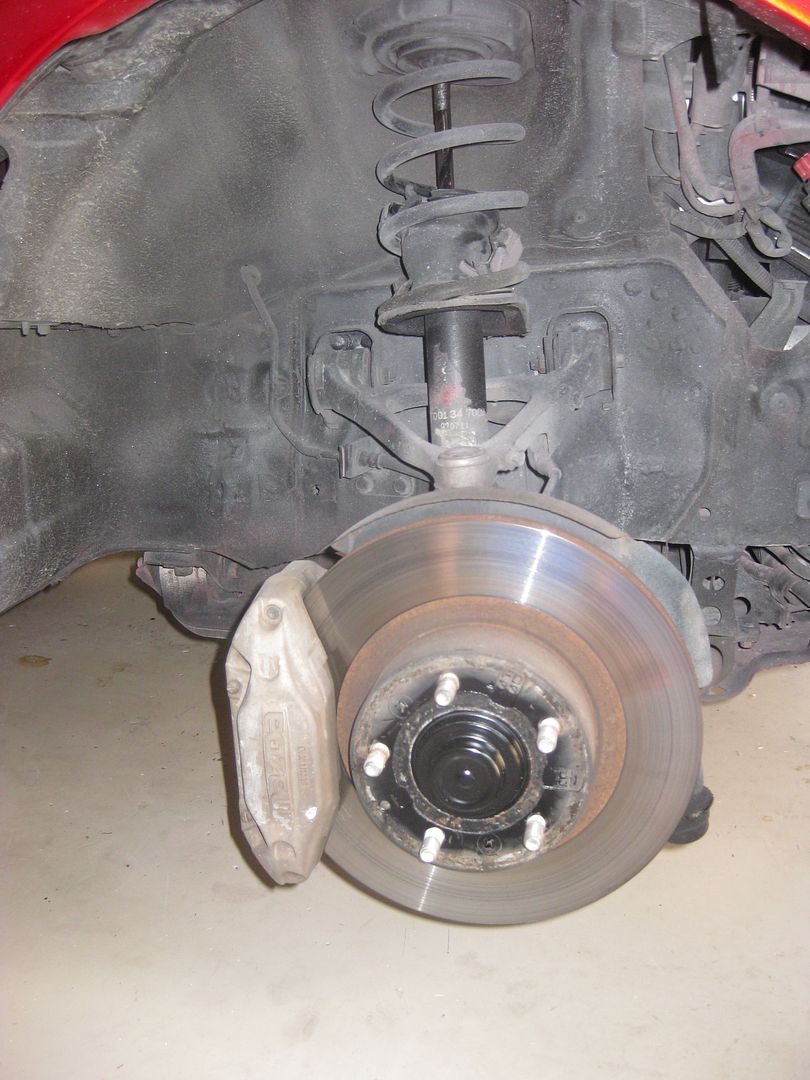
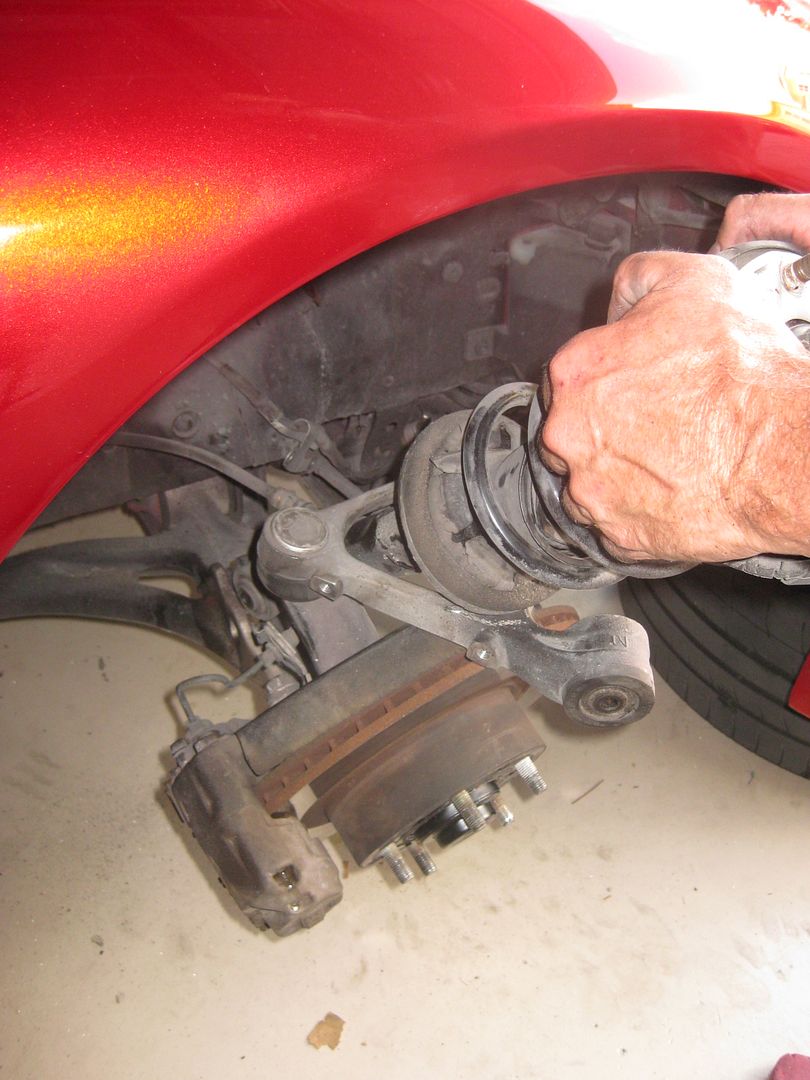
Step 14: Pull the shock towards you and out
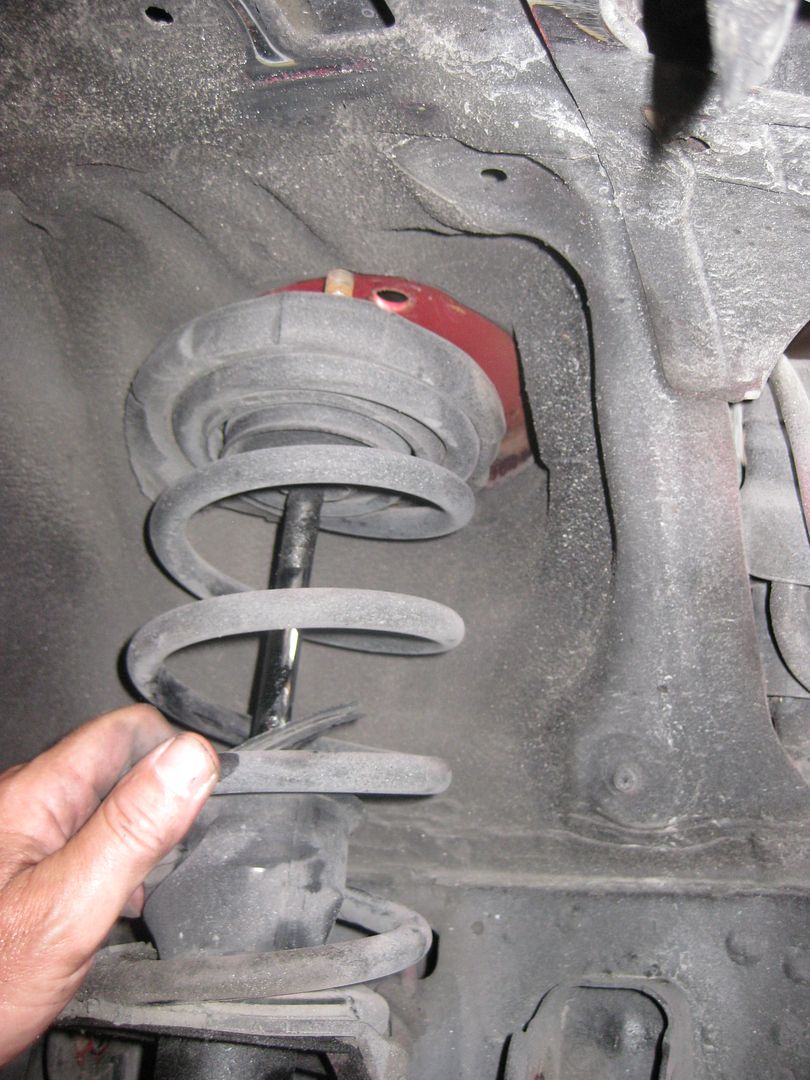
Step 15: Put the new coilover in, bottom of it goes in place first, place the bolt through the bottom of the coilover.
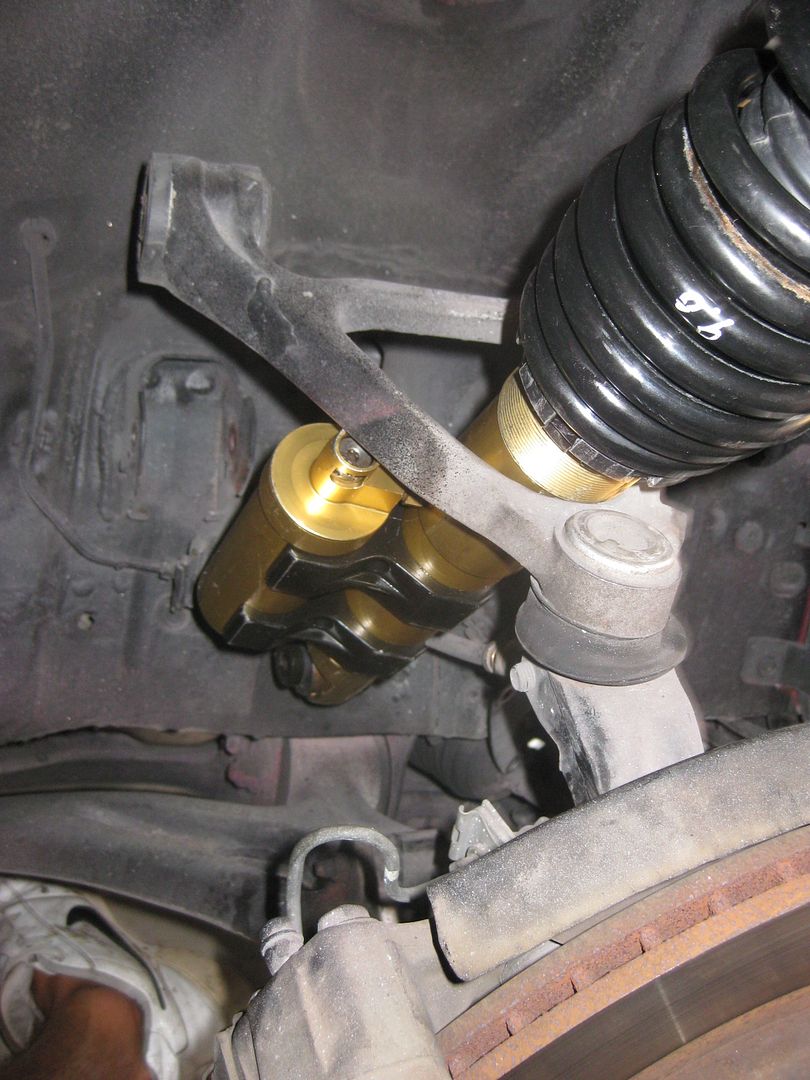
Step 16: Now that the bottom of the coilover is in, push the hub down and push the coilover towards the hole. Line the bolts up into the holes and place the jack under the control arm again. Jack the arm up and push the bolts entirely through the holes.
Step 17: Put the 4 14mm bolts back on to the top of the coilver. Now push the a-arm back into its mount and put the 2 14mm bolts back in. Put the abs sensor bracket back on with the two 12mm bolts, then put the 12mm ABS bolt back in and finally put the ABS sensor back in.
Now the suspension is finally installed! Next step is to adjust the height of the car to your liking. Most coilovers have two collars at the bottom of the spring, one is the height adjust collar and the other is the locking collar.
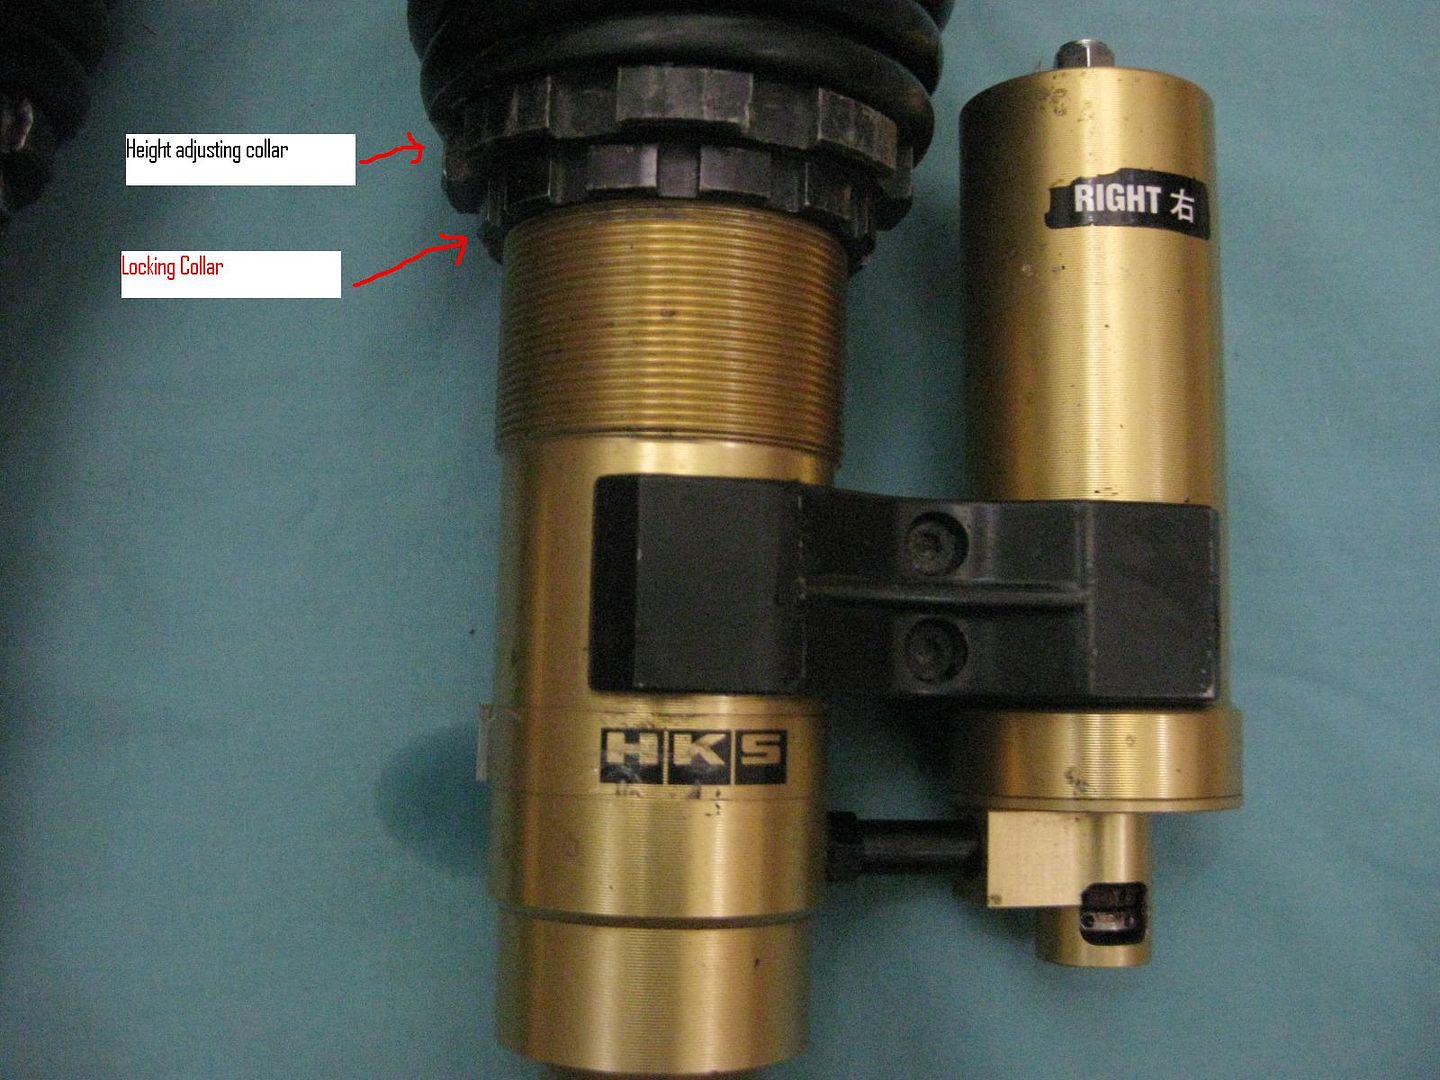
Loosen the locking collar, then move the height collar upwards if you wish to raise the car and downwards if you wish to lower the car. You can use the spanner tool that your coilovers come with, or an oil filter wrench if you do not have the spanner. Getting the ride height just right is time consuming but not difficult. After you have everything dialed in, take it to a suspension shop to get an alignment.
For those who are using the same shocks and changing out the springs, check out http://www.rx7.org/Robinette/shocks.htm to learn how to compress the springs and properly install the new springs onto the old shocks. Shoot us a PM if you have any questions. I am always welcome to feedback and improving this tutorial in anyway possible. I feel I took enough pictures to help anyone succeed in getting their suspension successfully installed. Hope you enjoyed another RX7 BOUTIQUE tutorial. Donations always welcomed .
.
Step 15: Put the new coilover in, bottom of it goes in place first, place the bolt through the bottom of the coilover.
Step 16: Now that the bottom of the coilover is in, push the hub down and push the coilover towards the hole. Line the bolts up into the holes and place the jack under the control arm again. Jack the arm up and push the bolts entirely through the holes.
Step 17: Put the 4 14mm bolts back on to the top of the coilver. Now push the a-arm back into its mount and put the 2 14mm bolts back in. Put the abs sensor bracket back on with the two 12mm bolts, then put the 12mm ABS bolt back in and finally put the ABS sensor back in.
Now the suspension is finally installed! Next step is to adjust the height of the car to your liking. Most coilovers have two collars at the bottom of the spring, one is the height adjust collar and the other is the locking collar.
Loosen the locking collar, then move the height collar upwards if you wish to raise the car and downwards if you wish to lower the car. You can use the spanner tool that your coilovers come with, or an oil filter wrench if you do not have the spanner. Getting the ride height just right is time consuming but not difficult. After you have everything dialed in, take it to a suspension shop to get an alignment.
For those who are using the same shocks and changing out the springs, check out http://www.rx7.org/Robinette/shocks.htm to learn how to compress the springs and properly install the new springs onto the old shocks. Shoot us a PM if you have any questions. I am always welcome to feedback and improving this tutorial in anyway possible. I feel I took enough pictures to help anyone succeed in getting their suspension successfully installed. Hope you enjoyed another RX7 BOUTIQUE tutorial. Donations always welcomed
.
Last edited by purerx7; 06-16-10 at 09:29 PM.
The following 2 users liked this post by purerx7:
IMAGINETHAT (11-12-22),
y0ungjoker (10-04-20)
06-16-10, 09:43 PM
#5
Original Gangster/Rotary!

iTrader: (213)
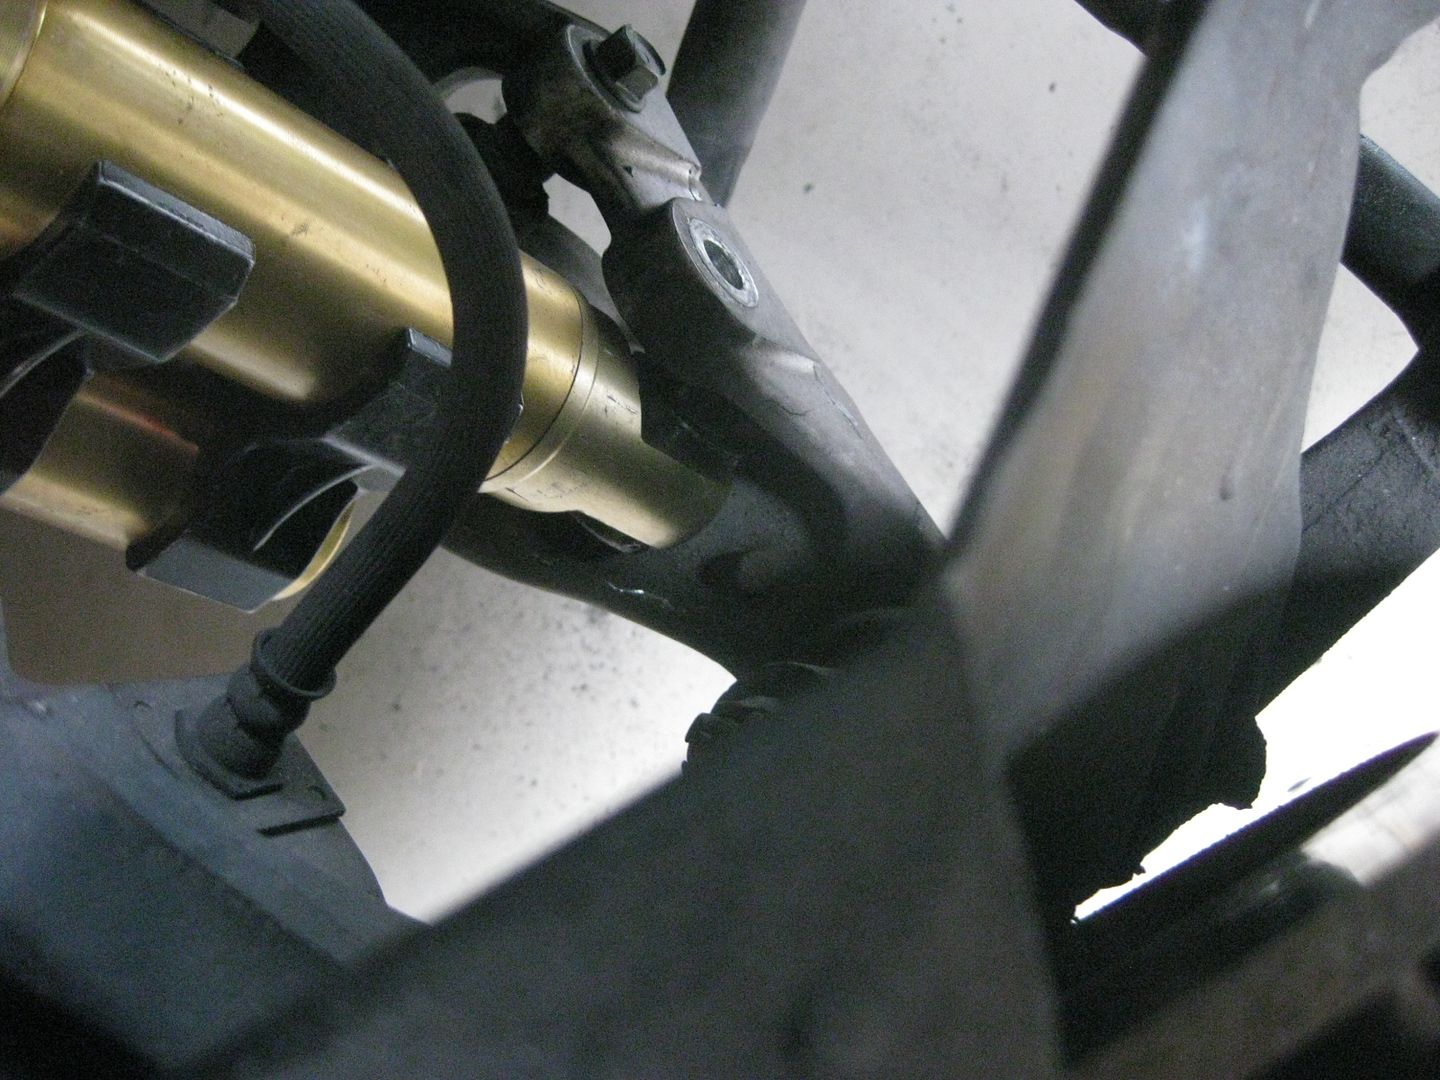
To add to this: on the front suspension, where the coilover bolts to the lower control arm, there is a spacer on the rearmost portion that you can bang out to make room for the bottom of the coilover to slide into the control arm.
Use the bolt and nut that came out of the piece in question---- insert the flat part of the nut inside the control arm (the area where the coilover will slide into) and against the spacer. slide the bolt through from the front and thread it in a few turns to the frontside of the nut, then gently tap with a hammer to push the spacer out. Makes things muuuuuch easier
I hope I described this well enough, I was turning wrenches all day (and helping drop Supernaut's engine back in his FD) and am so tired I can barely think
The following users liked this post:
EZAS (03-13-21)
06-16-10, 09:44 PM
#6
You should add that the car should be jacked up evenly on both sides and the sway bar link removed on both sides. I have run into the sway bar binding or pushing the up on the A-arm making it difficult to pull the bottom of the OEM strut assembly out.
Trending Topics
06-17-10, 06:55 AM
#12
RAWR!!!!!!!!
iTrader: (1)
Join Date: Oct 2003
Location: RR, NC
Posts: 440
Likes: 0
Received 0 Likes
on
0 Posts
You forgot one very important step. You left the wheels off. But we can let it slide because you have pretty feet, and a 3rd arm, which makes you exceptionally unique.
Great write-up none the less.
Great write-up none the less.
06-17-10, 09:46 AM
#14
New FDguy
iTrader: (2)

Join Date: Dec 2006
Location: Canada
Posts: 176
Likes: 0
Received 0 Likes
on
0 Posts
I just finished doing this yesterday. Ok if you are using a metal pillowball mount in the rear, you will notice that the top of the mount has a depression drilled into it, I figured this should match the small bump sticking out in the shock tower area. Can anyone verify this? The bump is near one of the studs on the upper mount.
06-17-10, 10:58 AM
#15
To add to this: on the front suspension, where the coilover bolts to the lower control arm, there is a spacer on the rearmost portion that you can bang out to make room for the bottom of the coilover to slide into the control arm.
Use the bolt and nut that came out of the piece in question---- insert the flat part of the nut inside the control arm (the area where the coilover will slide into) and against the spacer. slide the bolt through from the front and thread it in a few turns to the frontside of the nut, then gently tap with a hammer to push the spacer out. Makes things muuuuuch easier
I hope I described this well enough, I was turning wrenches all day (and helping drop Supernaut's engine back in his FD) and am so tired I can barely think
Use the bolt and nut that came out of the piece in question---- insert the flat part of the nut inside the control arm (the area where the coilover will slide into) and against the spacer. slide the bolt through from the front and thread it in a few turns to the frontside of the nut, then gently tap with a hammer to push the spacer out. Makes things muuuuuch easier
I hope I described this well enough, I was turning wrenches all day (and helping drop Supernaut's engine back in his FD) and am so tired I can barely think
Does removing the spacer you mentioned make it so I don't have to do this by making it so the bottom of the strut will slide out and down first?
Pure, how on earth did you get your fronts out with out unbolting the sway bar mounts (on the body, not where they attach to the knuckle). My A-arm wont lower enough to get the strut out without first doing that.
06-17-10, 12:58 PM
#16
To add to this: on the front suspension, where the coilover bolts to the lower control arm, there is a spacer on the rearmost portion that you can bang out to make room for the bottom of the coilover to slide into the control arm.
Use the bolt and nut that came out of the piece in question---- insert the flat part of the nut inside the control arm (the area where the coilover will slide into) and against the spacer. slide the bolt through from the front and thread it in a few turns to the frontside of the nut, then gently tap with a hammer to push the spacer out. Makes things muuuuuch easier
I hope I described this well enough, I was turning wrenches all day (and helping drop Supernaut's engine back in his FD) and am so tired I can barely think
Use the bolt and nut that came out of the piece in question---- insert the flat part of the nut inside the control arm (the area where the coilover will slide into) and against the spacer. slide the bolt through from the front and thread it in a few turns to the frontside of the nut, then gently tap with a hammer to push the spacer out. Makes things muuuuuch easier
I hope I described this well enough, I was turning wrenches all day (and helping drop Supernaut's engine back in his FD) and am so tired I can barely think
I'm not sure what you mean. I have a racing beat sway bar in the front, and i can't push the lower A-arm down enough to get the top of the strut assembly out of its mounting point unless i unbolt the sway bar mount to let the sway bar drop down a little.
Does removing the spacer you mentioned make it so I don't have to do this by making it so the bottom of the strut will slide out and down first?
Pure, how on earth did you get your fronts out with out unbolting the sway bar mounts (on the body, not where they attach to the knuckle). My A-arm wont lower enough to get the strut out without first doing that.
Thanks to everyone for the kind words, just trying to give back to the community that has given me so much.

 06-17-10, 11:19 PM
#20
It's good that you specified that you need to remove the roll bar connections early. With the car suspended with jack stands, I would use a jack to raise the a-arm to allow that bolt to be disconnected and reconnected.
However I've never had to remove the front a-arm to get coilovers in place. You probably had to do that to fit the coilover and reservoir under the fender and through the arm.
Good job on the pictures and socket sizes.
I've lowered 3 FD's. The first time took almost two hours. The third time I finished in a hour - my personal best.
This tutorial should help others to do this in about the same time.
06-27-10, 10:08 AM
#21
R2 Vintage Red
iTrader: (16)
Join Date: Oct 2007
Location: Houston
Posts: 191
Likes: 0
Received 0 Likes
on
0 Posts
Thanks for the info! I do have one question though. Do you use any kind of rubber on top of the coilover when mounting? There is a piece of rubber on top of the stock shock when I took it out. My coilovers didn't come with any rubber mounting. Is this needed?
07-09-10, 09:38 PM
#22
The top hats of the stockers have rubber around it. Between the top hat and the chassis is an "insulater" that's no more than a thin sheet of plastic. I re-used it but there's no rubber at all between my coilovers and the chassis. I believe this is standard.
I just did the fronts while reading another how-to....just ran into this one. Great post and nice pics. Expanding on post #5 from GoodFella....yes, you have to widen that space to make room for the new coilover. As suggested from the other how-to, you use this type of contraption to do so: 3/8" bolt, 2 nuts, and 2 washers. Basically, just twist the nuts from the inside out to widen it. I missed this point so just making sure no one else does....as it was soooo frustrating when that thing didn't fit. A picture helps. Of course you can hammer it also.
Now my rear left bottom bolt is impossible. Breaker bar, pipe extender, PB Blaster and it's not budging. I'm actually almost stripping the nut. I've been recommended to use a mini-torch next. It seems pretty basic but since it is open flame near the gas tank...and this is just a hobby...can someone please expand on this for me?
Flame directly to bolt and nut? Avoid rubber bushing of A-arm? How long do I keep it on? PB Blaster has been on it, it's not going to cause a chain reaction is it? I'm paranoid.
Thanks.
07-10-10, 09:26 AM
#25
The top hats of the stockers have rubber around it. Between the top hat and the chassis is an "insulater" that's no more than a thin sheet of plastic. I re-used it but there's no rubber at all between my coilovers and the chassis. I believe this is standard.
I just did the fronts while reading another how-to....just ran into this one. Great post and nice pics. Expanding on post #5 from GoodFella....yes, you have to widen that space to make room for the new coilover. As suggested from the other how-to, you use this type of contraption to do so: 3/8" bolt, 2 nuts, and 2 washers. Basically, just twist the nuts from the inside out to widen it. I missed this point so just making sure no one else does....as it was soooo frustrating when that thing didn't fit. A picture helps. Of course you can hammer it also.
Now my rear left bottom bolt is impossible. Breaker bar, pipe extender, PB Blaster and it's not budging. I'm actually almost stripping the nut. I've been recommended to use a mini-torch next. It seems pretty basic but since it is open flame near the gas tank...and this is just a hobby...can someone please expand on this for me?
Flame directly to bolt and nut? Avoid rubber bushing of A-arm? How long do I keep it on? PB Blaster has been on it, it's not going to cause a chain reaction is it? I'm paranoid.
Thanks.
I just did the fronts while reading another how-to....just ran into this one. Great post and nice pics. Expanding on post #5 from GoodFella....yes, you have to widen that space to make room for the new coilover. As suggested from the other how-to, you use this type of contraption to do so: 3/8" bolt, 2 nuts, and 2 washers. Basically, just twist the nuts from the inside out to widen it. I missed this point so just making sure no one else does....as it was soooo frustrating when that thing didn't fit. A picture helps. Of course you can hammer it also.
Now my rear left bottom bolt is impossible. Breaker bar, pipe extender, PB Blaster and it's not budging. I'm actually almost stripping the nut. I've been recommended to use a mini-torch next. It seems pretty basic but since it is open flame near the gas tank...and this is just a hobby...can someone please expand on this for me?
Flame directly to bolt and nut? Avoid rubber bushing of A-arm? How long do I keep it on? PB Blaster has been on it, it's not going to cause a chain reaction is it? I'm paranoid.
Thanks.
These REALLY grasp on to the nut, so when you turn it, the nut applies even more pressure. Was able to remove the nut in about 5 minutes with one of these. Snap on also makes a similar set. I would try that before taking a torch to it.