REPU Creamsicle Build
 10-04-16, 10:30 AM
#26

The gauge cluster is finished and back in the truck. Some of the circuits were fried on the board but the gauges themselves were fine so I wired up the AAW harness direct to each gauge and added diodes where they were needed to get the warning lights to function as originally intended. For some of the lights, I replaced the twist-in bulb holders for pigtails so the power goes direct to the bulb. Tonight was the first time I got to test things in the truck. I still have lots to connect but I'm hearing the new relays click on and off so the end is near.


Also, the intake came in. I need some fabrication done before it will mount up...but at least it is here.


Also, the intake came in. I need some fabrication done before it will mount up...but at least it is here.
 10-21-16, 11:31 PM
#27

Knocked off some more wiring this evening.
1) main fuse with shunt for ammeter is in.
2) stereo amp is all hooked up except for speaker wires
3) gauge cluster is in
4) wiring harness for radio is done
Verified the following which was very exciting: Dash lights work with dimmer switch, I can hear low beam and high beam relays clicking on. Radio turns on and remembers presets. Ammeter works.
Heater 3-way switch does not work. The wiring is pretty beat up. I'm going to have to open it up and clean the contacts. Not looking forward to that because it means disconnecting all the cables and remembering how it all goes back together.
10-22-16, 02:57 PM
#28
maybe mark the cables and take pics?
thats what i try and do
Knocked off some more wiring this evening.
1) main fuse with shunt for ammeter is in.
2) stereo amp is all hooked up except for speaker wires
3) gauge cluster is in
4) wiring harness for radio is done
Verified the following which was very exciting: Dash lights work with dimmer switch, I can hear low beam and high beam relays clicking on. Radio turns on and remembers presets. Ammeter works.
Heater 3-way switch does not work. The wiring is pretty beat up. I'm going to have to open it up and clean the contacts. Not looking forward to that because it means disconnecting all the cables and remembering how it all goes back together.
10-24-16, 10:42 PM
#29
Heater fan switch and controls restored with new harness and cleaned up contacts and stretched springs inside to make sure it will work like new. Hardest part, as I expected, was connecting back up the cables and making sure they have the correct range from side to side.


 10-26-16, 08:38 PM
#31
Awesome work. What do you plan on doing w TB's? Run two per rotor? They look really nice!!!
Heater fan switch and controls restored with new harness and cleaned up contacts and stretched springs inside to make sure it will work like new. Hardest part, as I expected, was connecting back up the cables and making sure they have the correct range from side to side.
10-27-16, 09:59 AM
#32
Originally Posted by papsmagu
Awesome work. What do you plan on doing w TB's? Run two per rotor? They look really nice!!!
Center console is in, checking off more circuits...


1) Radio is wired up and sending audio to the amplifier
2) Heater controls are wired up and functioning
3) All dash lights work with the dimmer
4) 12v acc works
5) Parking brake light works
6) harness for trailer brake controller is ready to go
7) Exhaust Overheat light is wired, but haven't tested the sensor, not even sure i will install it. I might use the light to display something from ECU instead.
10-27-16, 11:19 PM
#33
Not much to show tonight but I did manage to connect the wipers and verify my relay work from months ago was done right. It's so exciting to see the wipers move and stop at the right spot!
I also connected the heater core and played around with the exhaust temp sensor. This little thing is supposed to be bolted to the passenger floor and set off a light in the dash if it gets too hot. Only problem, it takes a serious amount of heat to set it off. You'd smell your shoes burning before this thing alerted you. I got it to trigger outside the car, but I couldn't get it to trigger mounted to the floor...so I'm not going to bother hooking up the warning light.

I also connected the heater core and played around with the exhaust temp sensor. This little thing is supposed to be bolted to the passenger floor and set off a light in the dash if it gets too hot. Only problem, it takes a serious amount of heat to set it off. You'd smell your shoes burning before this thing alerted you. I got it to trigger outside the car, but I couldn't get it to trigger mounted to the floor...so I'm not going to bother hooking up the warning light.
11-13-16, 10:59 PM
#34
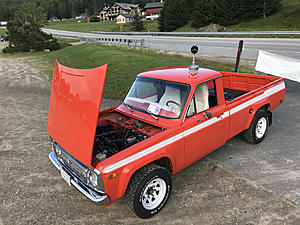
Wire tuck for the front end complete. I can check off turn signals, marker lights, head lights, high beams, horn, and electric fan. It's nice to see this old face again.


I'm also working on a panel to mount the ECU and O2 sensor module.


I'm also working on a panel to mount the ECU and O2 sensor module.


 05-19-17, 09:56 PM
#42
Making progress this week.
Rear lights and trailer hitch are all wires up now. Turn signals, hazards, brake lights, and reverse lights are all up and running.
O2 sensor, reverse switch on transmission and starter are all plugged in.

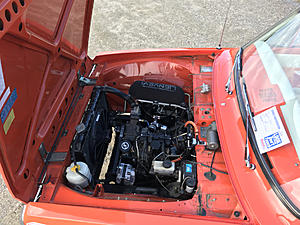
Coils are mounted and custom short spark plug wires connected.

I fabbed up a bracket to mount the vacuum line manifold to the back side of the throttle bodies using some angle aluminum from Home Depot.

Lui stopped by to help out with the engine wiring harness.


Meanwhile I snaked 8ga wire through the cabin to connect the alternator to the fuse box.

We need to figure out what size injectors fit this fuel rail and procure a few more fittings, then we should see this truck up and running in a week or two.
Rear lights and trailer hitch are all wires up now. Turn signals, hazards, brake lights, and reverse lights are all up and running.
O2 sensor, reverse switch on transmission and starter are all plugged in.
Coils are mounted and custom short spark plug wires connected.
I fabbed up a bracket to mount the vacuum line manifold to the back side of the throttle bodies using some angle aluminum from Home Depot.
Lui stopped by to help out with the engine wiring harness.
Meanwhile I snaked 8ga wire through the cabin to connect the alternator to the fuse box.
We need to figure out what size injectors fit this fuel rail and procure a few more fittings, then we should see this truck up and running in a week or two.


 07-21-17, 07:00 AM
#48
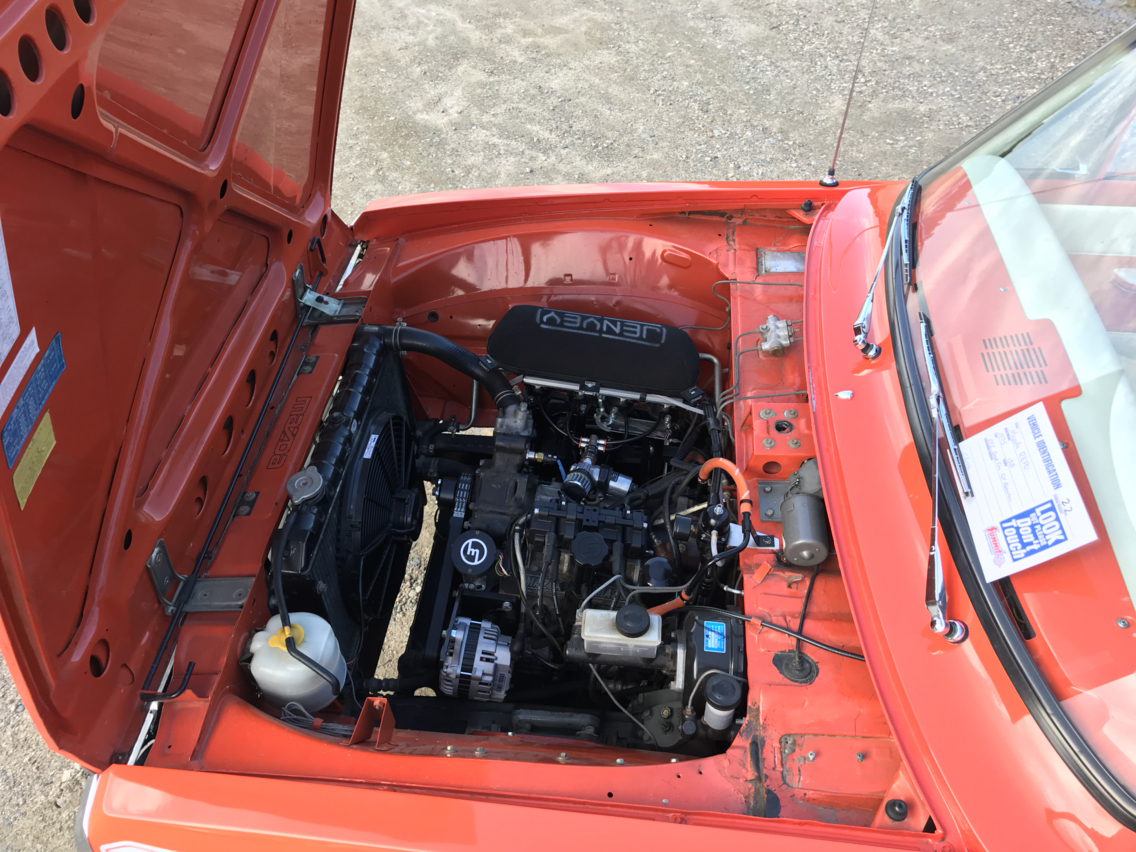
Started the truck up for the first time yesterday. It still needs to be tuned but we got it to idle. There were a few things to iron out over the last few days but it's all sorted now.
Fuel pump was junk. I diagnosed everything else and had it working at one point but as soon as I upped the fuel pressure it conked out. I picked up an OEM replacement for an '89 Ford F-150 at the parts store that comes with a lifetime warranty.
Alternator wires were reversed so the dash lights weren't coming on. Easy fix.
Throttle position sensor was on backwards. It was symmetrical to mount on either side and the instructions weren't all that clear...but it was another quick fix once we saw the values reversed on the ECU.
Thermostat wasn't opening so I replaced that to be safe.
08-07-18, 07:12 PM
#50
I've got the tune about 85% there. Some timing issues off throttle I may need an expert to look into, and I think I'm having some fuel starvation issues messing with transients...or I just need a better flowing fuel filter. Anyway, it was good enough to get me to the top of Mount Washington and back down.