Just another 13B MG Midget swap.


 04-03-17, 02:51 PM
#53

From what others have said about this swap, the exhaust is the trickiest part to get right. So I'm going a little overboard to try and head that problem off at the pass.
04-08-17, 02:26 PM
#55
 04-09-17, 12:09 AM
#56
Full Member

Keep up the good work! Builds like this are killer! That's where creativity and ideas come out that we can take bits and pieces of and transition it to our builds!
Greg
Greg
04-10-17, 11:49 AM
#57
common sense prevails....
iTrader: (7)
Join Date: Jul 2008
Location: Chino and Lake Arrowhead Calif
Posts: 1,669
Likes: 0
Received 9 Likes
on
9 Posts
What a cool project! Just don't give up. I know with my Rotary Powered Lotus Kit Car I have spent 3 years getting to where I am and will probably spend 6 months to another year to completely finish it..... (I guess we never completely finish projects like this!!!...)
Anyhow this has been a great read and reminded me a lot of my Lotus 7 project. When I was doing my car, nothing fit and everything had to be custom built. Custom radiator, custom exhaust, custom intercooler piping, custom fuel system, wiring, transmission mounts, rear end housing fabrication, custom built driveshaft..... The lot!
Never give up!
04-13-17, 06:26 PM
#58
What a cool project! Just don't give up. I know with my Rotary Powered Lotus Kit Car I have spent 3 years getting to where I am and will probably spend 6 months to another year to completely finish it..... (I guess we never completely finish projects like this!!!...)
Anyhow this has been a great read and reminded me a lot of my Lotus 7 project. When I was doing my car, nothing fit and everything had to be custom built. Custom radiator, custom exhaust, custom intercooler piping, custom fuel system, wiring, transmission mounts, rear end housing fabrication, custom built driveshaft..... The lot!
Never give up!
Anyhow this has been a great read and reminded me a lot of my Lotus 7 project. When I was doing my car, nothing fit and everything had to be custom built. Custom radiator, custom exhaust, custom intercooler piping, custom fuel system, wiring, transmission mounts, rear end housing fabrication, custom built driveshaft..... The lot!
Never give up!
Thanks guys. Not likely to give up as this is my version of therapy. Probably costs less than a shrink as well.
04-16-17, 08:49 PM
#59
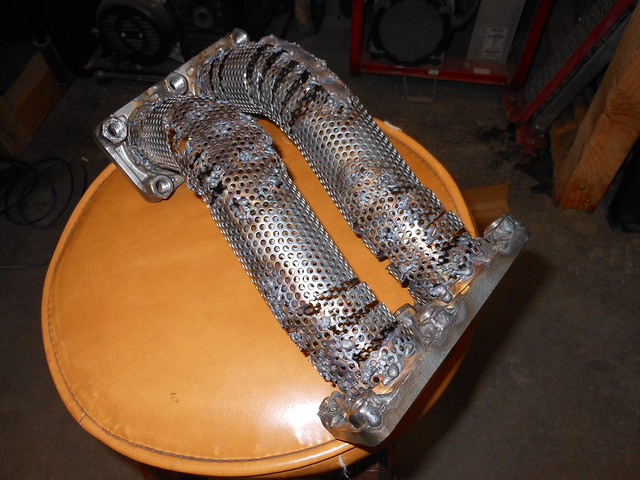
Finally got the middle muffler cut, bent, and tacked with the TIG. The thin wall perforated pipe is a stone cold b***** to try and TIG. Ugly, but it's going to get wrapped in steel wool and closed up in a case so ... meh.
by https://www.flickr.com/photos/gysgtfrank/, on Flickr
in other news, The latest snow has mostly melted off and I broke out the FC today. Zipped it around for a bit to get everything lubed and let the battery come back to a full charge. It's nice to be driving something fun for a change.
in other news, The latest snow has mostly melted off and I broke out the FC today. Zipped it around for a bit to get everything lubed and let the battery come back to a full charge. It's nice to be driving something fun for a change.
05-03-17, 11:15 AM
#60
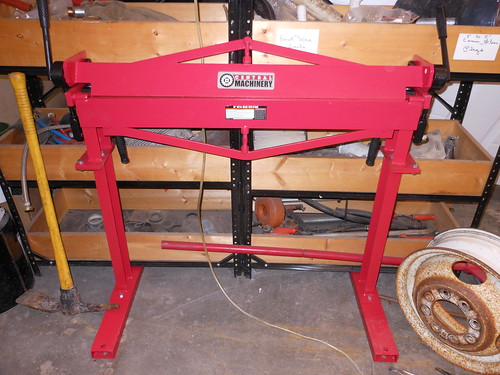
New tool to get the outer case bent for the muffler from hell. This is going to be one of the most expensive little mufflers in history I'm afraid.
Getting the core wrap around all the bends has been a painful experience. My fingers have been poked so many times with wire from the screen and wool that they will be hurting for a week.
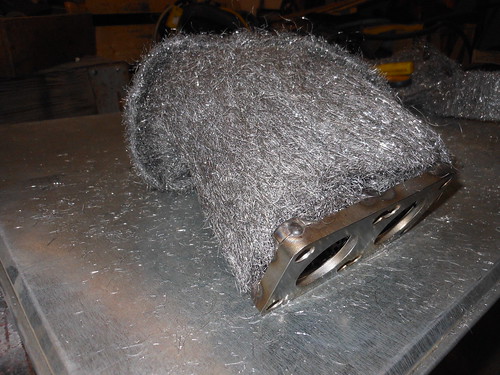
Getting the core wrap around all the bends has been a painful experience. My fingers have been poked so many times with wire from the screen and wool that they will be hurting for a week.
Last edited by GySgtFrank; 05-03-17 at 11:19 AM.
05-17-17, 05:35 PM
#63
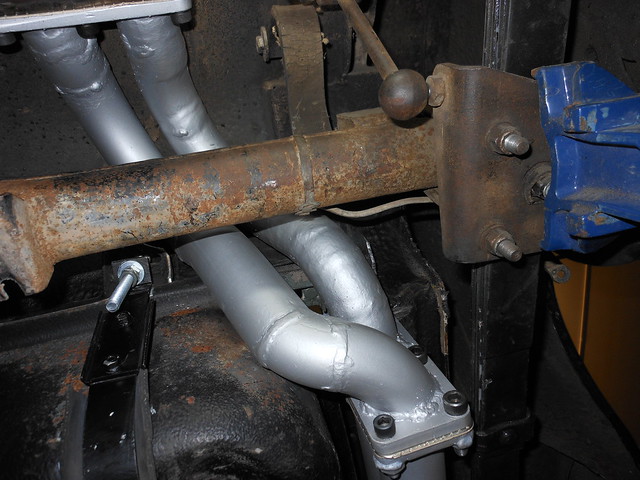
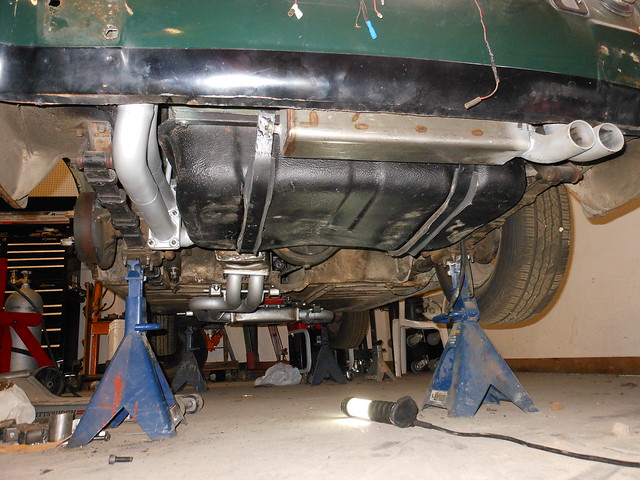
Middle muffler done and installed, crappy looking welds and all. I don't think I have any pinholes left. I spent enough time grinding the welds and re-welding to make sure I got them all. We'll find out (most likely with extreme disappointment) when it get's fired up the first time.
Pictures of it installed, which should shed some light on why it is such an oddball shape and size.
view from the bottom of the car ...
[/img][/url]
passenger side ...
[/img][/url]
driver's side ...
[/img][/url]
Pictures of it installed, which should shed some light on why it is such an oddball shape and size.
view from the bottom of the car ...
[/img][/url]
passenger side ...
[/img][/url]
driver's side ...
[/img][/url]
05-29-17, 07:42 PM
#64
... and the over the axle pipe is done. Lots of fiddling with this piece. Had to re-do the first pipe three times to get the clearances correct. Pipe looked like absolute crap by the time I had it fitting and then I ground it too far, producing lots of pin holes. Got it sealed and in paint finally. This was the last piece in the piping, so I can move on to something else at last.
[/url]
[/url]
06-07-17, 08:10 PM
#65
I got the exhaust system bolted together and everything fitting. I only had one area where I had to clearance some of my previous work on the gas tank surround for clearance on a flange.
Over the axle pipe bolted and in final position. Lots of odd bends and offsets to make this work.
This is about the best shot I can get of the entire exhaust system finished and bolted together without putting it on a lift. (which I do not have anyway)
Over the axle pipe bolted and in final position. Lots of odd bends and offsets to make this work.
This is about the best shot I can get of the entire exhaust system finished and bolted together without putting it on a lift. (which I do not have anyway)
06-13-17, 07:03 PM
#67
Thanks Brett. I wish I could get a better picture of the system, but I would need to get it way up in the air on a lift to get it all in the frame. Pretty happy with the fit, which was a real turd to manage. Of course I haven't run it yet to find out how many pinholes I missed after welding and checking the pipe. Lots of welds means lots of opportunities to screw up 
07-08-17, 12:07 PM
#68
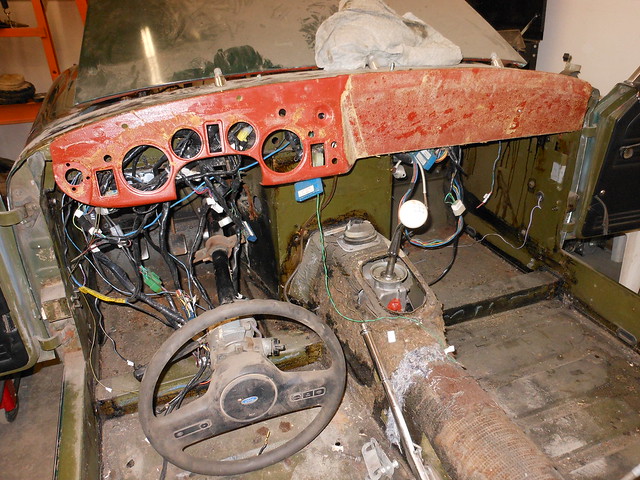
I didn't especially care for the late model Midget dash (which was pretty thrashed anyway) and getting the FC instrument cluster in there was going to be next to impossible. Which leads me to build a new dash fron stainless steel sheet and try to get a different steering column with tilt to fit in there somehow.
Original dash stripped of padding to make a template.
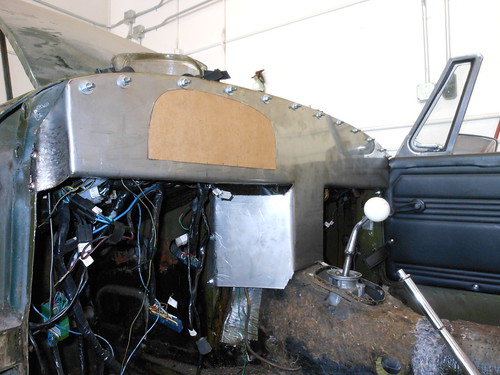
Steel portion of the dash roughed in and bolted.

dash bent, fitted and bolted. I need to weld in some finishing bits to make it all look integrated with the car.
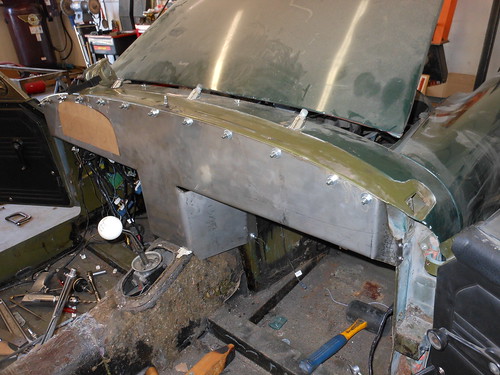
The bolts will eventually be replaced with SS allen head button screws like I have bolting down the sides of the dash. I plan to adhere a sheet of walnut to the face of the steel when I have the openings in final configuration. The foot well sides are to be covered in carpet.
Original dash stripped of padding to make a template.
Steel portion of the dash roughed in and bolted.
dash bent, fitted and bolted. I need to weld in some finishing bits to make it all look integrated with the car.
The bolts will eventually be replaced with SS allen head button screws like I have bolting down the sides of the dash. I plan to adhere a sheet of walnut to the face of the steel when I have the openings in final configuration. The foot well sides are to be covered in carpet.

Thread
Thread Starter
Forum
Replies
Last Post