Just another 13B MG Midget swap.
 07-20-15, 06:08 PM
#26
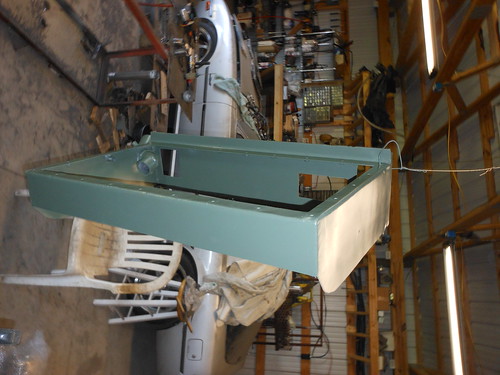
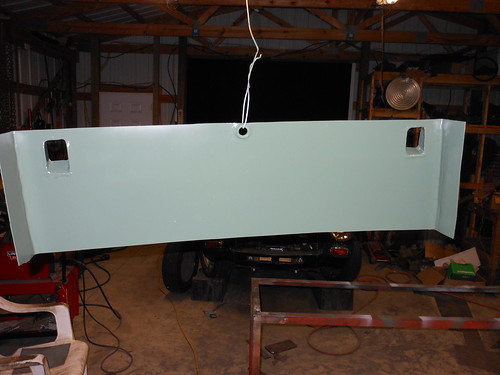
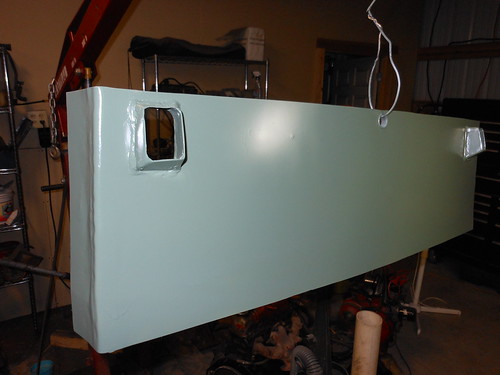
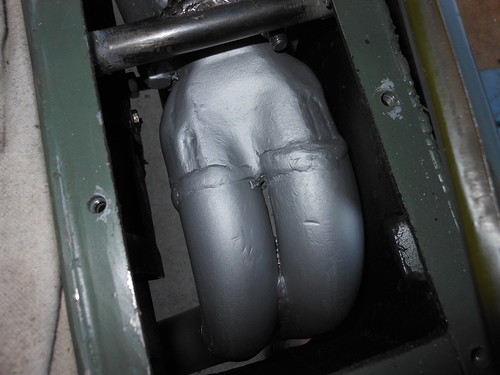
... and the fuel tank enclosure in paint.
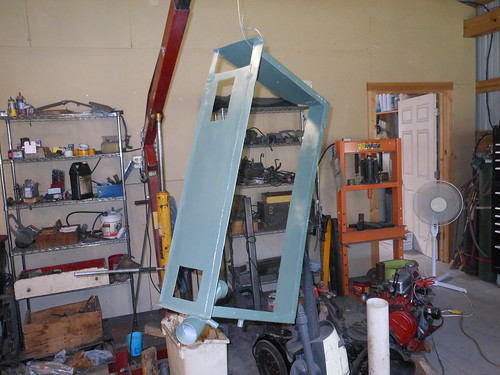 fuel tank enclosure 1 by Kevin Frank, on Flickr
 fuel tank enclosure 2 by Kevin Frank, on Flickr
The muffler enclosure, which fits behind this piece, will have to be done in the car. The entire tank and muffler piece will not fit in the trunk opening so it needs to be done in two pieces.
fuel tank enclosure 1 by Kevin Frank, on Flickrfuel tank enclosure 2 by Kevin Frank, on FlickrThe muffler enclosure, which fits behind this piece, will have to be done in the car. The entire tank and muffler piece will not fit in the trunk opening so it needs to be done in two pieces.
 07-23-15, 10:52 PM
#27
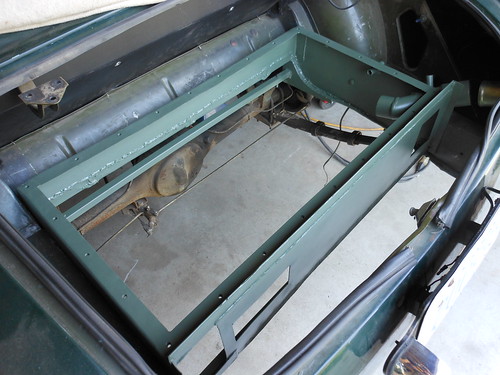
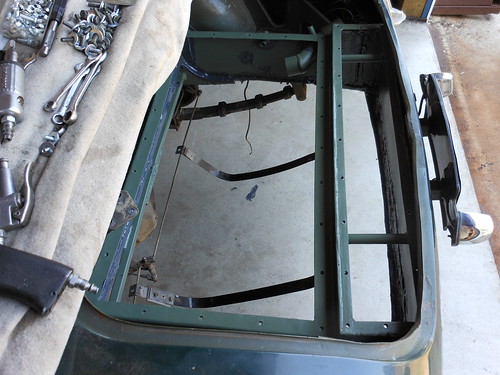
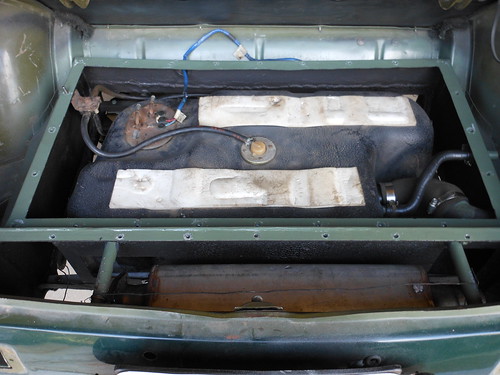
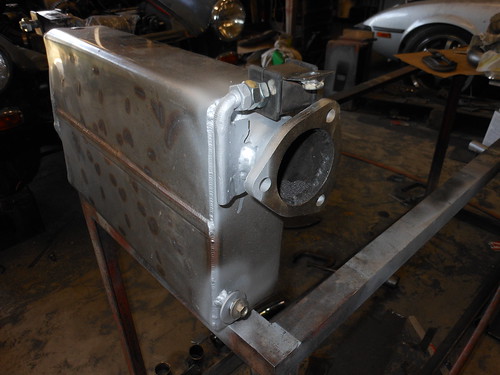
Finished the fuel tank portion of the rear enclosure.
 fuel enclosure welded in by Kevin Frank, on Flickr
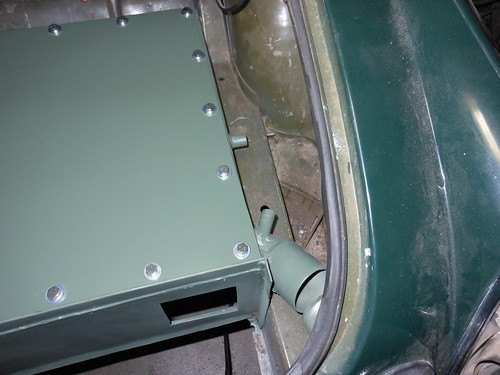
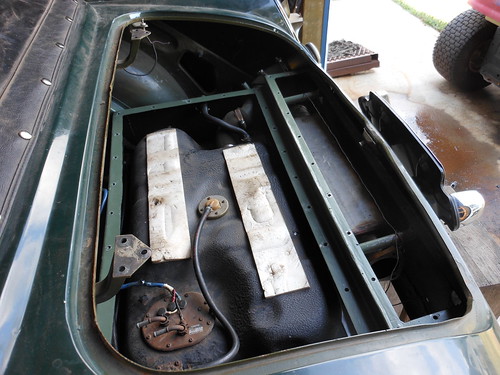
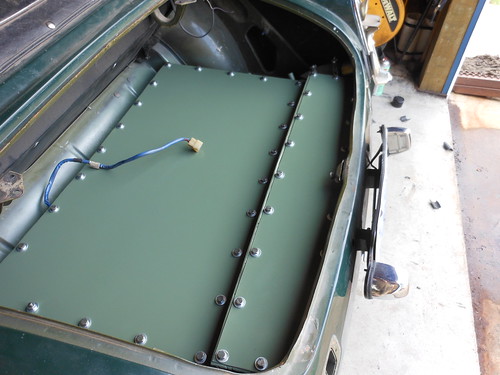
... and with the top bolted on. I went with a bolt on top cover so That I would have easy access to the pump and lines in the future.
 fuel enclosure with top by Kevin Frank, on Flickr
I did have a bit of a problem. When I built the enclosure I fitted it to the car, then removed it for final welding. Checked it by re-installing and everything was fine. Cut out the top piece, drilled all the holes, and welded the nuts on the bottom. Re-fitted, everything was fine. Welded the enclosure in without the top so I could reach the areas I needed to weld, prepped, and painted all the bare metal and places the paint bubbled. Put the top on (some of you know where this is going already) and Voila! none of the holes matched up anymore. It distorted enough that I couldn't put the bolts in. I had to break out the carbide bit and grind out each hole so that the bolts would go in. Sometimes I ain't the sharpest spine on the cactus.
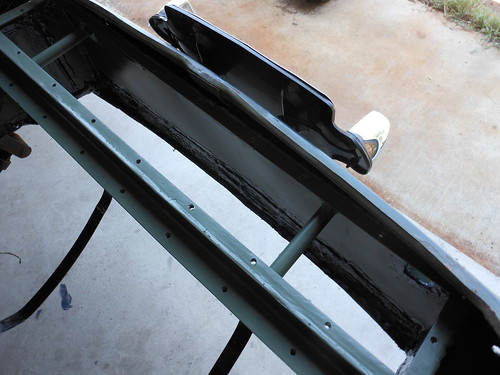
I did add an extra vent to the fuel inlet pipe to try and prevent premature cutoff of the fuel station pump when filling up. I plan to run this together with the tank vent, then both to a rollover valve mounted where the original valve was at. It was located well above the new enclosure on an inside trunk brace, then routed to a bulkhead fitting in the side floor of the trunk area. The vent at the tank (and my new fittings) are all 1/2 inch inside diameter tubing. I believe this should be sufficient as it was what the stock setup was using.
I will need to coat all the weld areas in seam sealer, and undercoat all the exposed parts underneath, when completely finished. High density foam will be used around the top flange to seal the top cover, an aluminum plate will replace the heavy steel one eventually. I had planned to cover the trunk area in carpet to match the interior when done so that it has a nice finished look to it.
 fuel enclosure pass throughs by Kevin Frank, on Flickr
Now on to the muffler enclosure directly behind this one. The metal plate at the back (the one with the ventilation holes in it) is only there as a heat shield to prevent heat transfer from the hot muffler to the fuel tank.
fuel enclosure welded in by Kevin Frank, on Flickr... and with the top bolted on. I went with a bolt on top cover so That I would have easy access to the pump and lines in the future.
fuel enclosure with top by Kevin Frank, on FlickrI did have a bit of a problem. When I built the enclosure I fitted it to the car, then removed it for final welding. Checked it by re-installing and everything was fine. Cut out the top piece, drilled all the holes, and welded the nuts on the bottom. Re-fitted, everything was fine. Welded the enclosure in without the top so I could reach the areas I needed to weld, prepped, and painted all the bare metal and places the paint bubbled. Put the top on (some of you know where this is going already) and Voila! none of the holes matched up anymore. It distorted enough that I couldn't put the bolts in. I had to break out the carbide bit and grind out each hole so that the bolts would go in. Sometimes I ain't the sharpest spine on the cactus.
I did add an extra vent to the fuel inlet pipe to try and prevent premature cutoff of the fuel station pump when filling up. I plan to run this together with the tank vent, then both to a rollover valve mounted where the original valve was at. It was located well above the new enclosure on an inside trunk brace, then routed to a bulkhead fitting in the side floor of the trunk area. The vent at the tank (and my new fittings) are all 1/2 inch inside diameter tubing. I believe this should be sufficient as it was what the stock setup was using.
I will need to coat all the weld areas in seam sealer, and undercoat all the exposed parts underneath, when completely finished. High density foam will be used around the top flange to seal the top cover, an aluminum plate will replace the heavy steel one eventually. I had planned to cover the trunk area in carpet to match the interior when done so that it has a nice finished look to it.
fuel enclosure pass throughs by Kevin Frank, on FlickrNow on to the muffler enclosure directly behind this one. The metal plate at the back (the one with the ventilation holes in it) is only there as a heat shield to prevent heat transfer from the hot muffler to the fuel tank.
07-24-15, 12:48 AM
#29
Yep. It would go a lot faster if I had the metal brake and other tools to work sheet metal instead of having to hand form it all. Oh well, ya do what ya gotta do to get **** done. The FC tank capacity will come in rather handy for long trips and not having to source parts for a new high pressure fuel system will cut down on the necessary build time later on.
07-27-15, 11:29 PM
#30
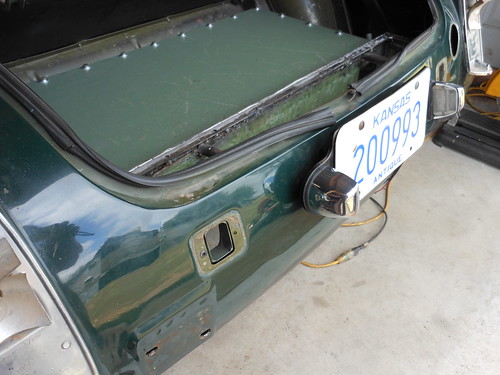
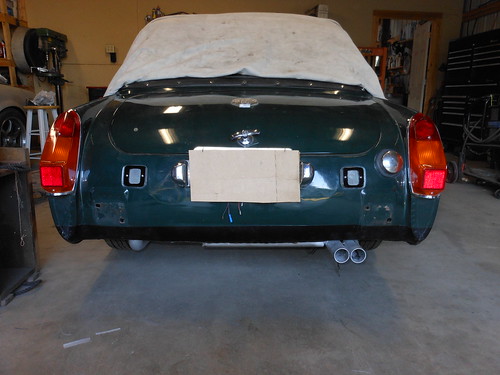
The rear panel is finished and ready to be welded in. This panel will sit at the very back of the trunk area, forming the rear bulkhead of the enclosure. I thought this one would be simple and quick to fabricate. Again I was ... uhh ... less than correct. Getting the exact width took a few tries. I then had to weld in one of my extra oxygen sensor bungs and plugs to provide access to a phillips head screw, the screw retains the trunk lid latch. Once the panel is welded in it would have been impossible to remove the trunk latch without some sort of an access port. I thought about using a rubber grommet, but the heat in this area may have been a problem with a grommet. I formed two hot air vent ducts after that. They slide into the rear backup light openings on the rear valence of the car. They were a bit finicky to get exactly right. The rear backup lights will be moved and the vents covered with mesh screen. Bezels will be fabricated to hold down the screen and provide a finished look to the vents. I did this to provide more ventilation around the muffler. I was concerned that I would get too much heat buildup in that enclosed area without some way to exhaust the hot air from the top of the box.
 rear panel 2 by Kevin Frank, on Flickr
 rear panel 1 by Kevin Frank, on Flickr
rear panel 2 by Kevin Frank, on Flickrrear panel 1 by Kevin Frank, on Flickr
08-08-15, 04:36 PM
#31
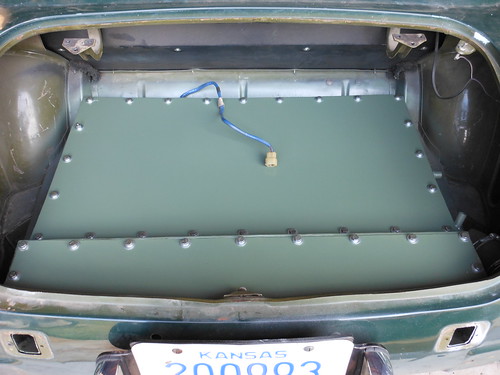
I am more or less finished with the rear enclosure. Once the seam sealer dries I will coat the entire under side with black undercoating. I figured everyone already knows what that looks like and it's easier to see with just the paint and sealer.
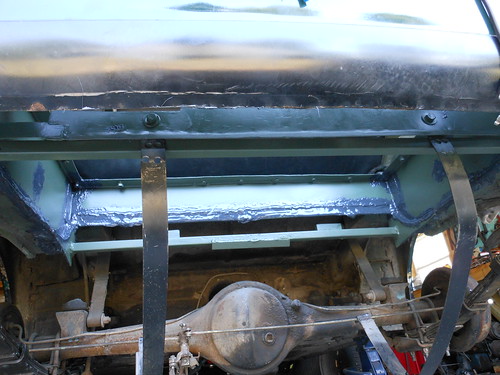
For those of you that haven't been following along, and are wondering exactly what kind of lunacy I'm up to, I raised the trunk (boot) floor to provide room for a 1987 FC RX7 fuel tank and a separate area behind it so I could fit a full size muffler. The RX7 tank is longer wider and taller than the original necessitating a little bit of modification for it to fit. It will fit between the rails with about three inches of clearance on the left side for exhaust pipe routing and still have enough room behind it for a muffler.
 rear enclosure - painted and sealed 1 by Kevin Frank, on Flickr
It doesn't look like much, but it took a lot of time and work to get it built and welded in. I used seam sealer on all welds that could leak if there are any pinholes that I may have missed. The top lids are removable for servicing the fuel system and muffler (not shown). I installed cross braces in the muffler box to provide solid mounting points for the muffler without hanging them from the top cover. That would be a real inconvenience when I remove the cover. I will get it sprayed with undercoating and re-install the tank (again), then take a few more pictures with it installed.
For anyone contemplating this swap, all this rigamarole is not absolutely necessary. You could use an external high pressure pump with the original tank and small mufflers that fit in the existing space. Unfortunately then you are stuck with the tiny fuel capacity, a noisy pump, and it will probably be louder than you would like for street use. I decided to address these issues ahead of time with the in tank pump/16 gallon tank and large muffler.
more pictures from different angles.
 rear enclosure - painted and sealed 2 by Kevin Frank, on Flickr
 rear enclosure - painted and sealed 3 by Kevin Frank, on Flickr
 rear enclosure - painted and sealed 4 by Kevin Frank, on Flickr
and a picture of the vents exiting the original holes for the back up lights.
 rear enclosure - muffler 4 - vents by Kevin Frank, on Flickr
They still need to be sealed to the body with some caulking and covered with wire mesh and finished off with bezels. I plan to build a rear bumper later and incorporate the back up lights into that.
For those of you that haven't been following along, and are wondering exactly what kind of lunacy I'm up to, I raised the trunk (boot) floor to provide room for a 1987 FC RX7 fuel tank and a separate area behind it so I could fit a full size muffler. The RX7 tank is longer wider and taller than the original necessitating a little bit of modification for it to fit. It will fit between the rails with about three inches of clearance on the left side for exhaust pipe routing and still have enough room behind it for a muffler.
rear enclosure - painted and sealed 1 by Kevin Frank, on FlickrIt doesn't look like much, but it took a lot of time and work to get it built and welded in. I used seam sealer on all welds that could leak if there are any pinholes that I may have missed. The top lids are removable for servicing the fuel system and muffler (not shown). I installed cross braces in the muffler box to provide solid mounting points for the muffler without hanging them from the top cover. That would be a real inconvenience when I remove the cover. I will get it sprayed with undercoating and re-install the tank (again), then take a few more pictures with it installed.
For anyone contemplating this swap, all this rigamarole is not absolutely necessary. You could use an external high pressure pump with the original tank and small mufflers that fit in the existing space. Unfortunately then you are stuck with the tiny fuel capacity, a noisy pump, and it will probably be louder than you would like for street use. I decided to address these issues ahead of time with the in tank pump/16 gallon tank and large muffler.
more pictures from different angles.
rear enclosure - painted and sealed 2 by Kevin Frank, on Flickrrear enclosure - painted and sealed 3 by Kevin Frank, on Flickrrear enclosure - painted and sealed 4 by Kevin Frank, on Flickrand a picture of the vents exiting the original holes for the back up lights.
rear enclosure - muffler 4 - vents by Kevin Frank, on FlickrThey still need to be sealed to the body with some caulking and covered with wire mesh and finished off with bezels. I plan to build a rear bumper later and incorporate the back up lights into that.
 08-10-15, 02:37 PM
#33
Thanks.
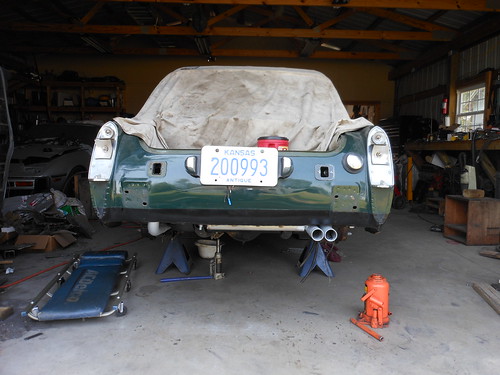
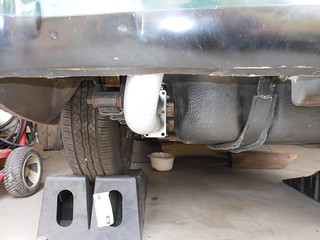
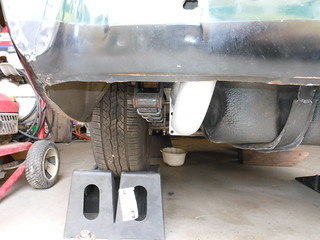
Tank installed and everything hooked up except the fuel lines. The muffler is just hanging in there for fitment. Now that I have the final area for hanging the muffler I can get back to building the exhaust. One thing always seems to need done before you can get to what you were originally trying to do in the first place. Waiting on some more mandrel bends to continue that.
 rear enclosure - done 1 by Kevin Frank, on Flickr
 rear enclosure - done 2 by Kevin Frank, on Flickr
 rear enclosure - done 3 by Kevin Frank, on Flickr
 rear enclosure - done 4 by Kevin Frank, on Flickr
 rear enclosure - done 5 by Kevin Frank, on Flickr
... and pictures of it buttoned up.
 rear enclosure - done 6 by Kevin Frank, on Flickr
 rear enclosure - done 7 by Kevin Frank, on Flickr
Lots of bolts, but they're needed to clamp the gasket material tightly between the lids and the body of the enclosure.
Tank installed and everything hooked up except the fuel lines. The muffler is just hanging in there for fitment. Now that I have the final area for hanging the muffler I can get back to building the exhaust. One thing always seems to need done before you can get to what you were originally trying to do in the first place. Waiting on some more mandrel bends to continue that.
rear enclosure - done 1 by Kevin Frank, on Flickrrear enclosure - done 2 by Kevin Frank, on Flickrrear enclosure - done 3 by Kevin Frank, on Flickrrear enclosure - done 4 by Kevin Frank, on Flickrrear enclosure - done 5 by Kevin Frank, on Flickr... and pictures of it buttoned up.
rear enclosure - done 6 by Kevin Frank, on Flickrrear enclosure - done 7 by Kevin Frank, on FlickrLots of bolts, but they're needed to clamp the gasket material tightly between the lids and the body of the enclosure.
08-14-15, 10:33 PM
#34
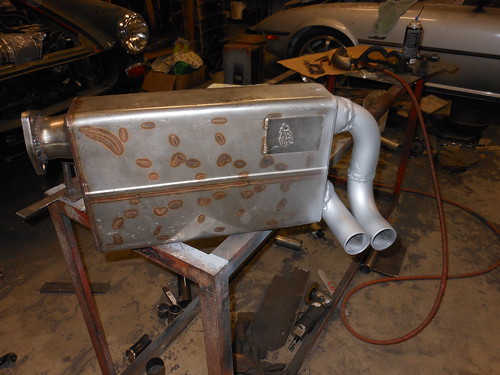
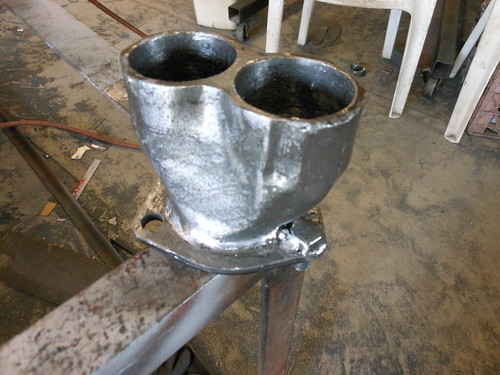
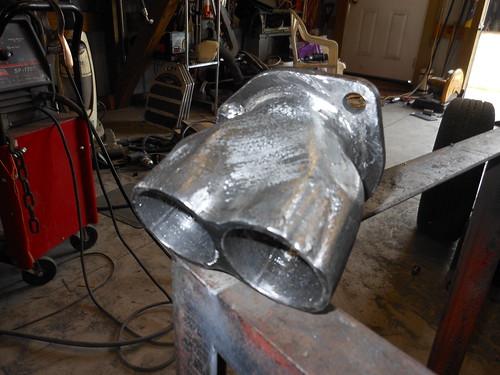
After a protracted struggle I finished modifying my muffler.
 muffler - after modifications by Kevin Frank, on Flickr
I replaced the two 2.5 inch outlet pipes with 1.75 ID pipes (same as the header pipes). I'm hoping that by decreasing the size of the outlet pipes it will help to muffle the noise a little better. Getting the bottom pipe to make multiple curves in a lot of directions, so that it would exit in the correct place, was a real nightmare. I had to cut it off and re-section it 4 times to get it right. At this point I think it has as many welds on it as it does pipe. Getting the top pipe to exit inline with, and on the same angle, as the bottom wasn't easy. It was a lot easier than the bottom pipe though.
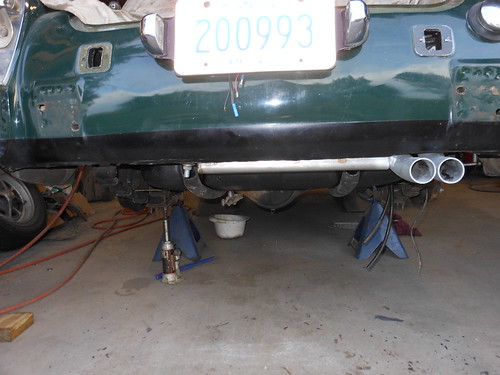
and a picture with the muffler in (before hanging it permanently) showing the exhaust tips exiting where I wanted them to.
 tail pipes - before hanging muffler by Kevin Frank, on Flickr
I have to get the muffler hung and then on to the rest of the exhaust system.
muffler - after modifications by Kevin Frank, on FlickrI replaced the two 2.5 inch outlet pipes with 1.75 ID pipes (same as the header pipes). I'm hoping that by decreasing the size of the outlet pipes it will help to muffle the noise a little better. Getting the bottom pipe to make multiple curves in a lot of directions, so that it would exit in the correct place, was a real nightmare. I had to cut it off and re-section it 4 times to get it right. At this point I think it has as many welds on it as it does pipe.
Getting the top pipe to exit inline with, and on the same angle, as the bottom wasn't easy. It was a lot easier than the bottom pipe though.and a picture with the muffler in (before hanging it permanently) showing the exhaust tips exiting where I wanted them to.
tail pipes - before hanging muffler by Kevin Frank, on FlickrI have to get the muffler hung and then on to the rest of the exhaust system.
08-15-15, 10:39 AM
#35
Engine, Not Motor
iTrader: (1)
Join Date: Feb 2001
Location: London, Ontario, Canada
Posts: 29,789
Likes: 0
Received 108 Likes
on
91 Posts
Be concerned about EGTs with that setup. I wouldn't expect the interior of that muffler to last very long being directly subjected to thermal/acoustic energy directly from the headers.
08-16-15, 09:35 PM
#36
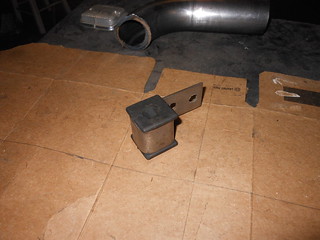
I am going to document how I got the muffler mounted in the tight space I have to work with. This may seem like piddley details to some, but if you've ever had to mount an exhaust and muffler into a tight space (where you could not have a lot of movement) you will know that it is important. Get it wrong and it will cause you no end of headaches.
The mounts that I am using are a common mount you can get from most muffler shops. It is a fully captured rubber mount. This makes it possible to isolate movement in all directions (with the use of jams nuts on the center mounting rod), but still maintain rubber isolation between the exhaust system and the body of the car. There is still some movement so that I "hopefully" don't break anything, but not enough for it to contact any of the surrounding metal when I hit bumps.
 exhaust mounts by Kevin Frank, on Flickr
I used 1/2" threaded dowel to make the hangers so that I could adjust the position of the mounting point and secure it down with jam nuts on either side of the rubber block. I used three mounting points so that it stayed secured in all directions and could be moved into the optimum position. The inlet side has two mounts, top and bottom, the outlet side has only one mount up top. Mount on inlet side:
 muffler mounts - inlet side by Kevin Frank, on Flickr
Mount on outlet side:
 muffler mount - exit side by Kevin Frank, on Flickr
These are the pictures of how I mounted it in the box. It doesn't look like it in the pictures, but there is at least one inch of air space all around the muffler. The box sides act as a heat shield to minimize heat transfer to the fuel tank and the body.
 muffler - mounted 1 by Kevin Frank, on Flickr
 muffler - mounted 2 by Kevin Frank, on Flickr
... and another picture of how the muffler and tailpipes actually ended up looking from the rear once mounted. I was pretty happy with it, as it came out just the way I wanted it to.
 muffler - mounted bottom by Kevin Frank, on Flickr
08-17-15, 02:52 PM
muffler - mounted bottom by Kevin Frank, on Flickr
08-17-15, 02:52 PM
#38
08-21-15, 04:57 PM
#39
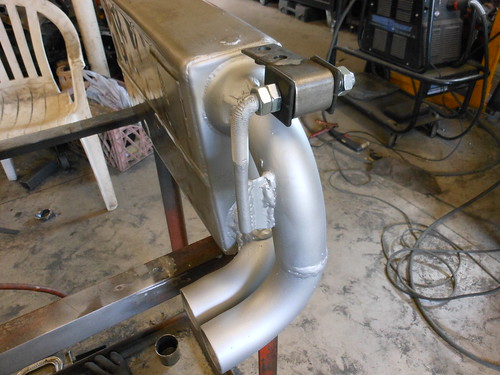
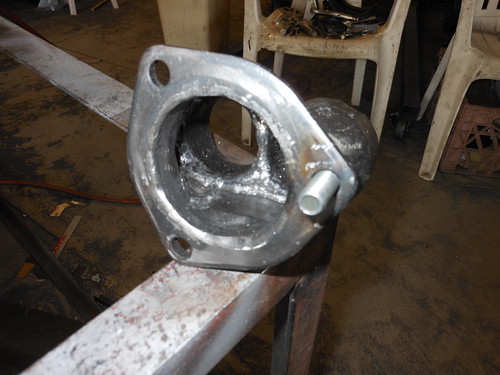
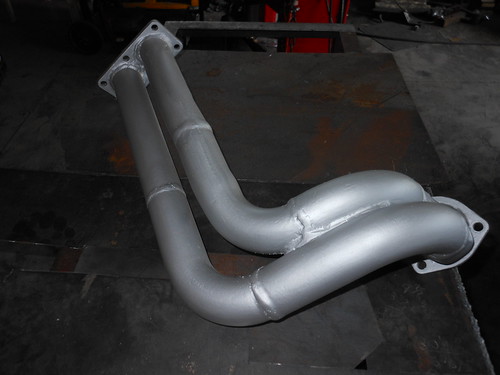
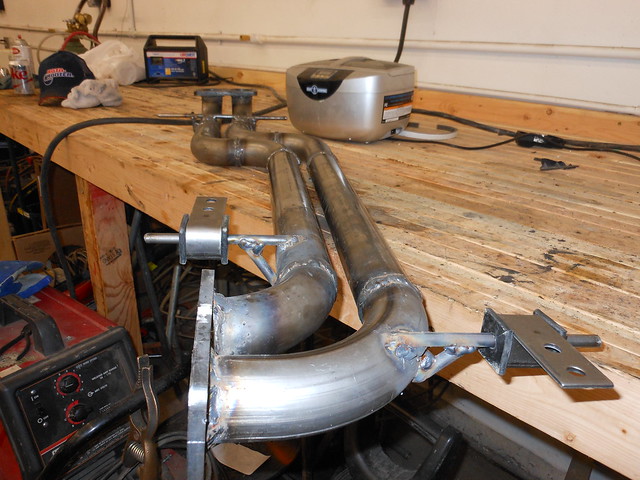
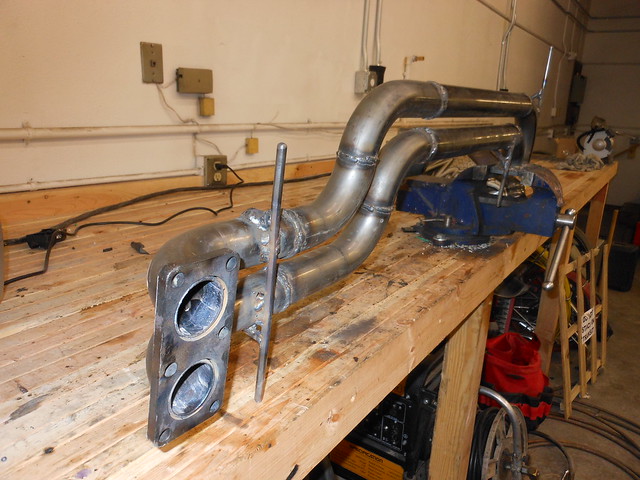
I had to build a merge collector to feed the two 1.75 inch ID pipes into the single 2.5 inch ID inlet for my muffler. It was a far bigger chore than it had any right to be. I had planned to use a header collector flange that would allow me to swivel the pipe around to make it fit if I moved the muffler. Unfortunately I couldn't find that style of 2.5 inch collector that would fit my existing flange on the muffler. If I had to do it over again, I would cut the flange off the muffler and use the other style flange, but I didn't, so this will have to work.
 muffler merge collector 1 by Kevin Frank, on Flickr
 muffler merge collector 2 by Kevin Frank, on Flickr
 muffler merge collector 3 by Kevin Frank, on Flickr
I used a 2.5 inch ID flange that would fit my muffler flange, a short section of 2.5 inch ID exhaust pipe, and two short pieces of 1.75 inch ID (2" OD) to make the piece. I had to split and form the 2.5" pipe in four directions after it was welded to the flange. I then formed it onto the two short pieces of 2" OD pipe, that I had already welded together, and tacked it down. I cut out and formed some fill pieces for the gaps where the split pipe no longer covered and put a lot of welds inside and out to ensure that I have no leaks. Clean up on all those welds was not fun. As I said, far more work than was reasonable. I would suggest using an off the shelf part if at all possible, the high cost of parts like this are for a reason, time and effort. I couldn't as no one makes a part like this to join the pieces that I am planning to use.
This piece will allow me to connect the two pipes side by side to be run over and dropped down with 90s. They will run forward between the fuel tank and frame rail, one stacked on top of the other with a small gap between them. It is going to be enough of a battle trying to get the pipes in the right position without having to worry about the fit at the muffler end as well.
muffler merge collector 1 by Kevin Frank, on Flickrmuffler merge collector 2 by Kevin Frank, on Flickrmuffler merge collector 3 by Kevin Frank, on FlickrI used a 2.5 inch ID flange that would fit my muffler flange, a short section of 2.5 inch ID exhaust pipe, and two short pieces of 1.75 inch ID (2" OD) to make the piece. I had to split and form the 2.5" pipe in four directions after it was welded to the flange. I then formed it onto the two short pieces of 2" OD pipe, that I had already welded together, and tacked it down. I cut out and formed some fill pieces for the gaps where the split pipe no longer covered and put a lot of welds inside and out to ensure that I have no leaks. Clean up on all those welds was not fun. As I said, far more work than was reasonable. I would suggest using an off the shelf part if at all possible, the high cost of parts like this are for a reason, time and effort. I couldn't as no one makes a part like this to join the pieces that I am planning to use.
This piece will allow me to connect the two pipes side by side to be run over and dropped down with 90s. They will run forward between the fuel tank and frame rail, one stacked on top of the other with a small gap between them. It is going to be enough of a battle trying to get the pipes in the right position without having to worry about the fit at the muffler end as well.
08-23-15, 01:47 PM
#40
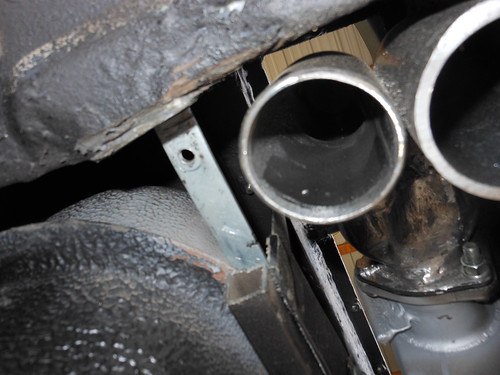
in the interest of full disclosure ... oops!
 oops by Kevin Frank, on Flickr
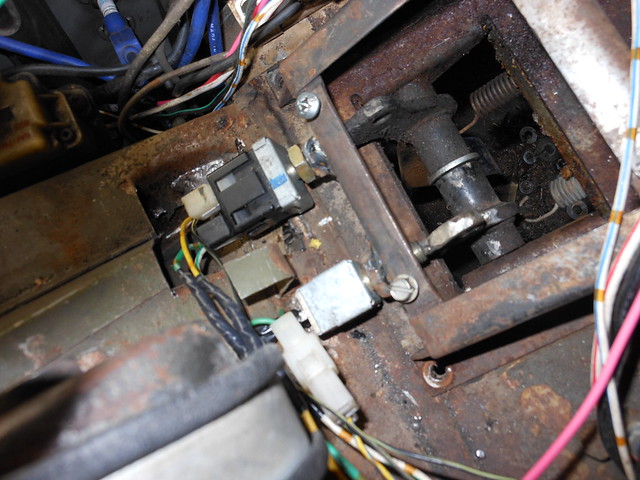
Routing the pipe down and back I found that I had goofed. The cross bar supporting the back of the fuel tank was in the way of the radius on the top exhaust pipe. I could have just run it lower, but then the pipes would be a lot further down than I wanted. Solution: break out the cut off wheel and trim that out of the way. I will need to remove the tank again and put an L shaped piece in there after I get the rest of the exhaust run back between the tank and the rear spring. Always some niggling little thing to brighten the day.
oops by Kevin Frank, on FlickrRouting the pipe down and back I found that I had goofed. The cross bar supporting the back of the fuel tank was in the way of the radius on the top exhaust pipe. I could have just run it lower, but then the pipes would be a lot further down than I wanted. Solution: break out the cut off wheel and trim that out of the way. I will need to remove the tank again and put an L shaped piece in there after I get the rest of the exhaust run back between the tank and the rear spring. Always some niggling little thing to brighten the day.
08-26-15, 03:44 PM
#41
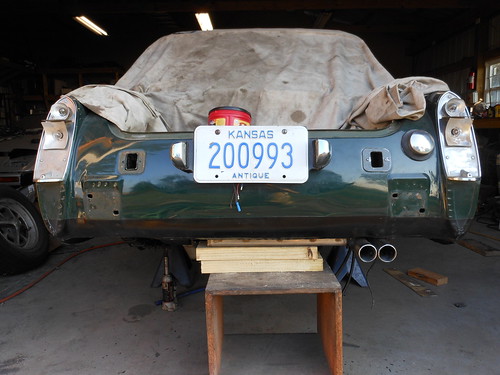
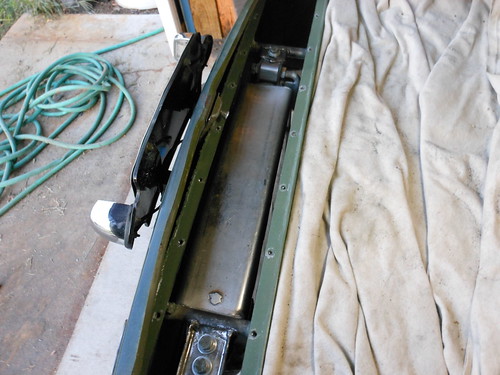
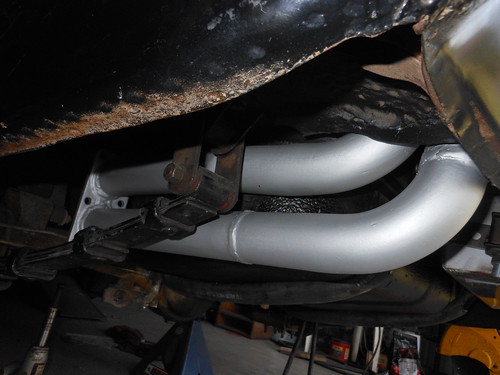
Rear pipe section done connecting the muffler to the axle portion of the exhaust system.
 rear muffler connector pipe by Kevin Frank, on Flickr
bolted in:
 rear muffler connector pipe - installed 3 by Kevin Frank, on Flickr
 rear muffler connector pipe - installed 2 by Kevin Frank, on Flickr
 rear muffler connector pipe - installed 1 by Kevin Frank, on Flickr
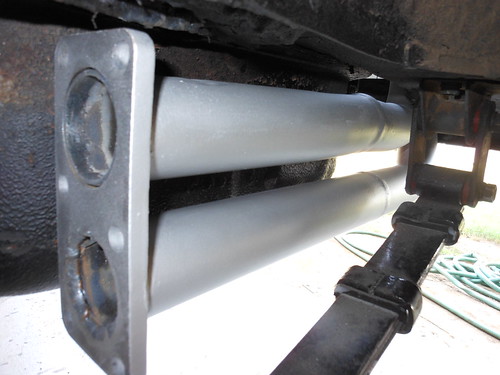
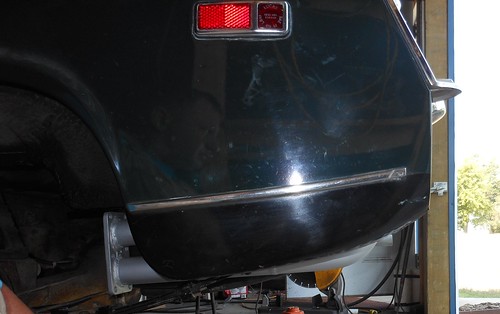
Some shots of the exterior view for those of you wondering how far it sticks out below the car.
 rear muffler connector pipe - exterior 2 by Kevin Frank, on Flickr
 rear muffler connector pipe - exterior 1 by Kevin Frank, on Flickr
rear muffler connector pipe by Kevin Frank, on Flickrbolted in:
rear muffler connector pipe - installed 3 by Kevin Frank, on Flickrrear muffler connector pipe - installed 2 by Kevin Frank, on Flickrrear muffler connector pipe - installed 1 by Kevin Frank, on FlickrSome shots of the exterior view for those of you wondering how far it sticks out below the car.
rear muffler connector pipe - exterior 2 by Kevin Frank, on Flickrrear muffler connector pipe - exterior 1 by Kevin Frank, on Flickr
10-04-15, 12:06 PM
#42
Realized I hadn't updated this in a bit. So while I had a day off from harvesting, I figured I would get it updated with a few things I got done before having to go to work.
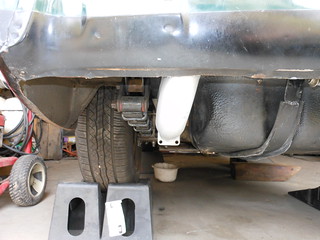
While waiting for more funds to purchase pipe and flanges (which explains the misfortune of having to work ), I figured this was a good time to address some of my goofs and concerns. There was some concern about how close the exhaust pipe would be to the tank. Indeed it was a bit closer than I cared for as I had it. So I pulled the tank and bent the right side flange downward. This allowed me to move the tank over a little bit more to the right. I also massaged the left rear corner of the tank with a big rubber mallet. After re-fitting the tank, I found that probably wasn't necessary. The extra 3/4", or so, that I gained by moving the tank had given me plenty of room.
 exhaust clearance - tank & spring 1 by Kevin Frank, on Flickr
 exhaust clearance - tank & spring 2 by Kevin Frank, on Flickr
 exhaust clearance - tank & spring 3 by Kevin Frank, on Flickr
I also used a half moon cut section of thick wall pipe to bridge the gap created when I had to trim my rear tank support. The tank was remounted so that the back flange of the tank sits up against the bottom of the support, instead of over the top of it. I did this because I am looking at putting in either a watts link or panhard rod. Getting the tank in and out would have been a problem the way I had it. There will be very little room left behind the differential so the stock emergency brake pedestal has to be moved/rethought to get a panhard bar in there. From the little bit that I have been able to drive the car I could tell that it needs positive axle location badly.
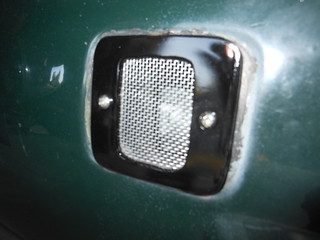
A few more minor things done. I haven't accomplished a whole lot, but I did manage to finish fabricating and installing the muffler box heat vents. These replaced the back up lights in the rear panel.
 heat vents 1 by Kevin Frank, on Flickr
 heat vents 2 by Kevin Frank, on Flickr
The focus on the first picture wasn't very good, but you get the idea.
While waiting for more funds to purchase pipe and flanges (which explains the misfortune of having to work
), I figured this was a good time to address some of my goofs and concerns. There was some concern about how close the exhaust pipe would be to the tank. Indeed it was a bit closer than I cared for as I had it. So I pulled the tank and bent the right side flange downward. This allowed me to move the tank over a little bit more to the right. I also massaged the left rear corner of the tank with a big rubber mallet. After re-fitting the tank, I found that probably wasn't necessary. The extra 3/4", or so, that I gained by moving the tank had given me plenty of room. exhaust clearance - tank & spring 1 by Kevin Frank, on Flickrexhaust clearance - tank & spring 2 by Kevin Frank, on Flickrexhaust clearance - tank & spring 3 by Kevin Frank, on FlickrI also used a half moon cut section of thick wall pipe to bridge the gap created when I had to trim my rear tank support. The tank was remounted so that the back flange of the tank sits up against the bottom of the support, instead of over the top of it. I did this because I am looking at putting in either a watts link or panhard rod. Getting the tank in and out would have been a problem the way I had it. There will be very little room left behind the differential so the stock emergency brake pedestal has to be moved/rethought to get a panhard bar in there. From the little bit that I have been able to drive the car I could tell that it needs positive axle location badly.
A few more minor things done. I haven't accomplished a whole lot, but I did manage to finish fabricating and installing the muffler box heat vents. These replaced the back up lights in the rear panel.
heat vents 1 by Kevin Frank, on Flickrheat vents 2 by Kevin Frank, on FlickrThe focus on the first picture wasn't very good, but you get the idea.
11-25-15, 04:19 PM
#43
An update on the project would probably be good. Now that I finished with the harvest and have money for car parts again I ordered in a few more things to get this show on the road.
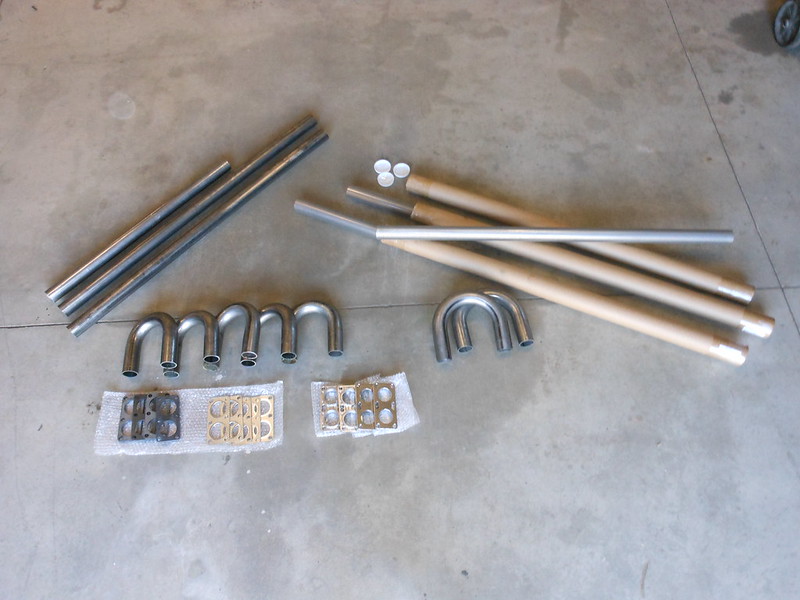 exhaust parts by Kevin Frank, on Flickr
2 - 48" long straight pieces of 2"OD .120 wall tubing (The extra shorter piece is what I have left from my earlier adventures)
3 - 48" long pieces of perforated 409 SS tube (The ones in the cardboard tubes. I probably got more than I am going to need for this project, but they weren't that expensive.)
5 - 3" radius 180 degree mandrel bends (same tube as the straight pieces)
2 - 4" radius 180 degree mandrel bends (again, same tube as the straight pieces)
4 - SS Racing beat road race flanges
4 - Mild steel Racing beat road race flanges
5 - Exhaust gaskets for above flanges
The only pieces that I should need to complete the exhaust system now should be SS wool for muffler packing, more hangers, aluminum sheet for heat shielding, and SS sheet to make the muffler cases. I am not too sure that I want to total up what the exhaust system for this thing is going to end up costing. :shudders:
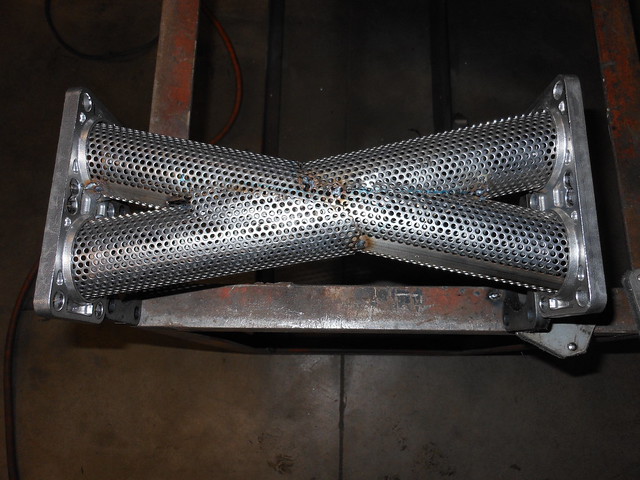
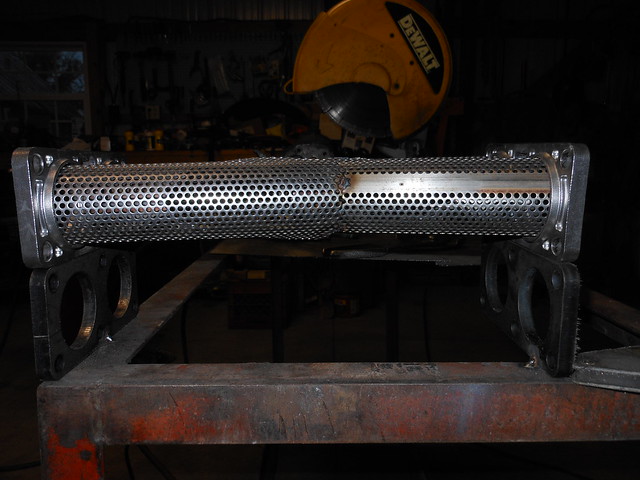
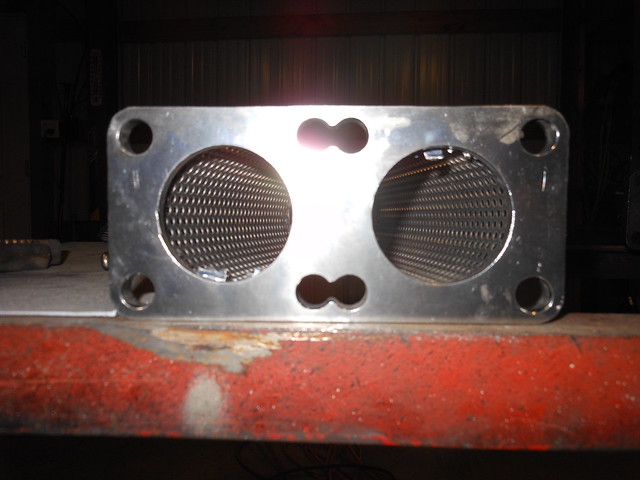
Finished cutting, fitting and tacking the inside portion of the muffler/X pipe/collector/pre-silencer (or whatever you want to call it) that fits under the transmission opening.
 presilencer (inside) 1 by Kevin Frank, on Flickr
 presilencer (inside) 2 by Kevin Frank, on Flickr
 presilencer (inside) 3 by Kevin Frank, on Flickr
This needs to be finish tig'ed and wrapped in medium and coarse stainless steel wool before being enclosed in a stainless steel case. The bolts that will attach it to the rest of the exhaust system need to be tig'ed into the flange holes with the flanges sealed and tig'ed to the case. Not perfect alignment on the one leg, but pretty close. I hope that between the exhaust pulses merging and the slight angle in the wrapped case, it will cut down a little on the noise before it hits the other two mufflers. It isn't going to be a very big case (approx. 12" x 10 - 12") so I had to use a couple of other strategies to quiet things down with this one. I may be kidding myself that this will help, but it certainly can't hurt.
I purchased the necessary packing and stainless steel sheet. I don't have a TIG welder so I packaged it up and sent it off to a friend to get it welded up. Once that is done, I will build back to my over the axle muffler, get that built and sent off for welding.
One 1987 GXL RX-7 wiring harness, complete front to rear, ready for transplant into the MG.
 RX7 wiring harness by Kevin Frank, on Flickr
I figured I would work on this while waiting for my muffler stuff and radiator.
This is the harness that came out of the same 1987 GXL FC as the engine and transmission. I will need to do a fair amount of modification to make it work with all the MG peripherals. Considering how 40 years of previous owners have performed a Texas chainsaw massacre on my original MG harness, it will be necessary to replace the wiring anyway. This way I know everything matches and I get a relatively modern fusebox and connectors for everything in the car, not to mention being able to keep the cruise control and other modern refinements if I need them. This will be a street driven car, so a few creature comforts will make it more enjoyable to use.
Now for stripping the MG harnes out and fitting the FC harness. I seem to have a bit of a mess.
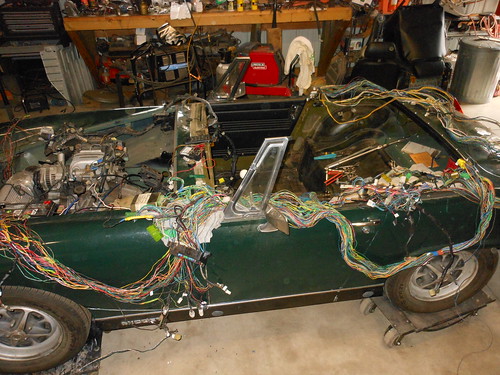 wiring mess by Kevin Frank, on Flickr
Working on stripping the unnecessary stuff from the FC harness and paring it down to what I actually will need/want.
exhaust parts by Kevin Frank, on Flickr2 - 48" long straight pieces of 2"OD .120 wall tubing (The extra shorter piece is what I have left from my earlier adventures)
3 - 48" long pieces of perforated 409 SS tube (The ones in the cardboard tubes. I probably got more than I am going to need for this project, but they weren't that expensive.)
5 - 3" radius 180 degree mandrel bends (same tube as the straight pieces)
2 - 4" radius 180 degree mandrel bends (again, same tube as the straight pieces)
4 - SS Racing beat road race flanges
4 - Mild steel Racing beat road race flanges
5 - Exhaust gaskets for above flanges
The only pieces that I should need to complete the exhaust system now should be SS wool for muffler packing, more hangers, aluminum sheet for heat shielding, and SS sheet to make the muffler cases. I am not too sure that I want to total up what the exhaust system for this thing is going to end up costing. :shudders:
Finished cutting, fitting and tacking the inside portion of the muffler/X pipe/collector/pre-silencer (or whatever you want to call it) that fits under the transmission opening.
presilencer (inside) 1 by Kevin Frank, on Flickrpresilencer (inside) 2 by Kevin Frank, on Flickrpresilencer (inside) 3 by Kevin Frank, on FlickrThis needs to be finish tig'ed and wrapped in medium and coarse stainless steel wool before being enclosed in a stainless steel case. The bolts that will attach it to the rest of the exhaust system need to be tig'ed into the flange holes with the flanges sealed and tig'ed to the case. Not perfect alignment on the one leg, but pretty close. I hope that between the exhaust pulses merging and the slight angle in the wrapped case, it will cut down a little on the noise before it hits the other two mufflers. It isn't going to be a very big case (approx. 12" x 10 - 12") so I had to use a couple of other strategies to quiet things down with this one. I may be kidding myself that this will help, but it certainly can't hurt.
I purchased the necessary packing and stainless steel sheet. I don't have a TIG welder so I packaged it up and sent it off to a friend to get it welded up. Once that is done, I will build back to my over the axle muffler, get that built and sent off for welding.
One 1987 GXL RX-7 wiring harness, complete front to rear, ready for transplant into the MG.
RX7 wiring harness by Kevin Frank, on FlickrI figured I would work on this while waiting for my muffler stuff and radiator.
This is the harness that came out of the same 1987 GXL FC as the engine and transmission. I will need to do a fair amount of modification to make it work with all the MG peripherals. Considering how 40 years of previous owners have performed a Texas chainsaw massacre on my original MG harness, it will be necessary to replace the wiring anyway. This way I know everything matches and I get a relatively modern fusebox and connectors for everything in the car, not to mention being able to keep the cruise control and other modern refinements if I need them. This will be a street driven car, so a few creature comforts will make it more enjoyable to use.
Now for stripping the MG harnes out and fitting the FC harness. I seem to have a bit of a mess.
wiring mess by Kevin Frank, on FlickrWorking on stripping the unnecessary stuff from the FC harness and paring it down to what I actually will need/want.
 12-07-15, 10:58 AM
#46
It is definitely getting rather involved.
I was already pretty well acquainted with the FC harness, but I'm surprised how much I have forgotten in the 4 or 5 years since I last had this harness apart. It doesn't look like much, but this is what I've managed to accomplish in modifying the harness. Stripping out a lot of the functions I will not need is also taking a bit of effort.
Fuse box, CPU, and Cruise Control box mounted.
 Fuse box, CPU, CC unit mounted by Kevin Frank, on Flickr
There was an unbelievable amount of time in de-pinning and putting new plug ins on wires to accomplish this. It drives home why it is expensive to have custom wiring done. The amount of time involved is ridiculous.
... and the ECU mounted.
 ECU mounted by Kevin Frank, on Flickr
This was a lot easier as all it required was running the harness through the firewall and mounting the box to the underside of the passenger foot well.
* you very well may recognize that cruise control box Brett.
I was already pretty well acquainted with the FC harness, but I'm surprised how much I have forgotten in the 4 or 5 years since I last had this harness apart. It doesn't look like much, but this is what I've managed to accomplish in modifying the harness. Stripping out a lot of the functions I will not need is also taking a bit of effort.
Fuse box, CPU, and Cruise Control box mounted.
Fuse box, CPU, CC unit mounted by Kevin Frank, on FlickrThere was an unbelievable amount of time in de-pinning and putting new plug ins on wires to accomplish this. It drives home why it is expensive to have custom wiring done. The amount of time involved is ridiculous.
... and the ECU mounted.
ECU mounted by Kevin Frank, on FlickrThis was a lot easier as all it required was running the harness through the firewall and mounting the box to the underside of the passenger foot well.
* you very well may recognize that cruise control box Brett.
Last edited by GySgtFrank; 12-07-15 at 11:04 AM.
12-15-15, 02:11 PM
#48
No sense wasting parts, your parts are finding another good home. 
 clutch and brake switches by Kevin Frank, on Flickr
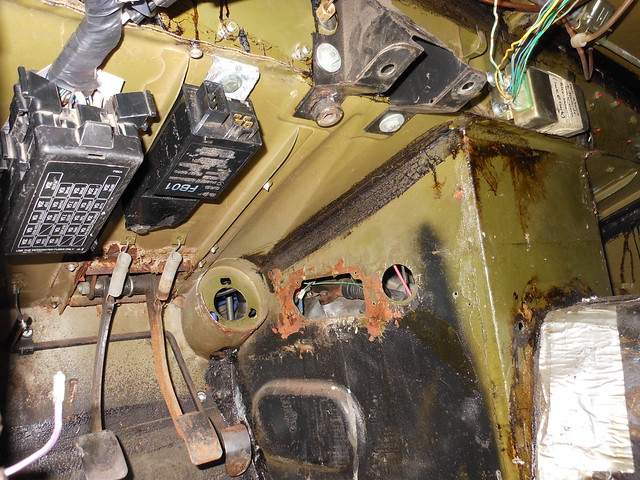
Mazda brake and clutch switches mounted to the MG pedal box. I had to modify the box a bit and provide a small relief cutout in the inner fender area. The Midget came with a single brake switch and no clutch switch. The Mazda uses a slightly larger double brake switch and a clutch switch for the cruise control. I eliminated the clutch interlock switch as it would have been a pain to adapt and is really an unnecessary doodad. The wires had to be extended to run up to the loom going through the firewall, but that wasn't a big deal.
clutch and brake switches by Kevin Frank, on FlickrMazda brake and clutch switches mounted to the MG pedal box. I had to modify the box a bit and provide a small relief cutout in the inner fender area. The Midget came with a single brake switch and no clutch switch. The Mazda uses a slightly larger double brake switch and a clutch switch for the cruise control. I eliminated the clutch interlock switch as it would have been a pain to adapt and is really an unnecessary doodad. The wires had to be extended to run up to the loom going through the firewall, but that wasn't a big deal.
04-01-17, 01:06 PM
#49
After a long hiatus with moving and then having to set up a shop so I can work on something again, I'm still at it.
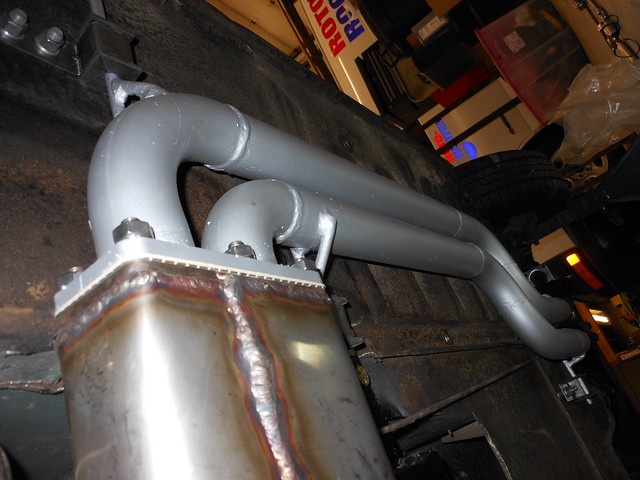
I got the center muffler finished and mounted, then built the mid-pipe to the axle area.
by https://www.flickr.com/photos/gysgtfrank/, on Flickr
Another of those little piddley details that take so much time when you are bolting things to thin sheet metal.
by https://www.flickr.com/photos/gysgtfrank/, on Flickr
Mid Pipe supports finally done. Probably a bit overboard on support, but this puppy is somewhat heavy and I don't want to have to turn around to go find which side of the road my exhaust slid off of.
by https://www.flickr.com/photos/gysgtfrank/, on Flickr
by https://www.flickr.com/photos/gysgtfrank/, on Flickr
... and done with the midpipe ... finally. I got the welds smoothed out, primered and painted. Bolted into final installed position. Now on to creating a really screwy muffler that fits in front of the rear axle, in the little bit of space that I have. Then I have to go over the axle with the pipe and connect it to the rear section and muffler I already did. The things we won't go through to ensure a relatively free flowing exhaust that has a chance of surviving backfires. :o
by https://www.flickr.com/photos/gysgtfrank/, on Flickr
by https://www.flickr.com/photos/gysgtfrank/, on Flickr
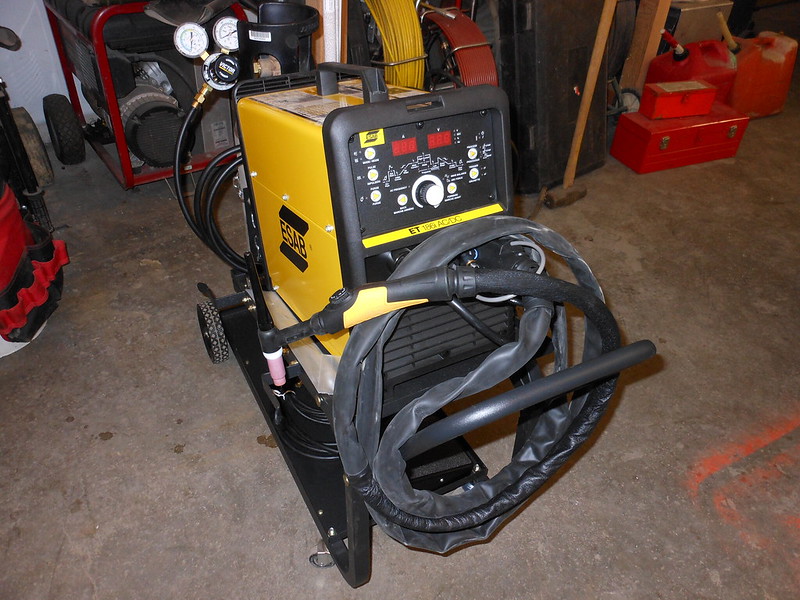
Newest purchase, so I can get the muffler built that will sit in front of the axle. It's an ESAB 186i AC/DC unit. (Formerly Thermal Arc until they were recently bought out, same machine though) Supposed to be a good machine, now I just have to learn what I'm doing all over again. Old folks don't like change.
by https://www.flickr.com/photos/gysgtfrank/, on Flickr
I got the center muffler finished and mounted, then built the mid-pipe to the axle area.

Another of those little piddley details that take so much time when you are bolting things to thin sheet metal.

Mid Pipe supports finally done. Probably a bit overboard on support, but this puppy is somewhat heavy and I don't want to have to turn around to go find which side of the road my exhaust slid off of.
... and done with the midpipe ... finally. I got the welds smoothed out, primered and painted. Bolted into final installed position. Now on to creating a really screwy muffler that fits in front of the rear axle, in the little bit of space that I have. Then I have to go over the axle with the pipe and connect it to the rear section and muffler I already did. The things we won't go through to ensure a relatively free flowing exhaust that has a chance of surviving backfires. :o

Newest purchase, so I can get the muffler built that will sit in front of the axle. It's an ESAB 186i AC/DC unit. (Formerly Thermal Arc until they were recently bought out, same machine though) Supposed to be a good machine, now I just have to learn what I'm doing all over again. Old folks don't like change.
Last edited by GySgtFrank; 04-01-17 at 01:17 PM.