Jap Spec Series 5 FC3S - Twin turbo rew conversion!
 11-12-18, 11:00 PM
#151
Full Member
Thread Starter

Soo it happened!
Was a very nerve racking day, triple checked everything i could.
Loaded it up with all spare fluids, plugs etc a bag of tools, wiring kit. Everything needed if she didnt make it but low and behold it ran perfect!

Drive was 12ks on the freeway (80kmh) just cruised on the left at like 70.
32 degree Celsius out and very humid.
oil temp got to like 70 max water sat constant at 82 and theres still no ducting for the v-mount either.
afrs were rich but safe cruised at like 12.5- 13
Jurgen is a great bloke, plenty of awesome car in his shop we chatted **** for a while.
He was super impressed with the setup, agreed with just about everyone that this is the hardest way to go about this but ultimately liked it.
We are on the same path that everything currently with the setup will max out about the same. said hes going to put 12psi in it and see how it goes and im happy with that.
Wasnt sure on the bright red roll cage for a streeter but if thats the only thing i need to take out for rwc ill be stoked.
Now its just the waiting game, hes the only one at his shop at the moment said a week or soo
Was a very nerve racking day, triple checked everything i could.
Loaded it up with all spare fluids, plugs etc a bag of tools, wiring kit. Everything needed if she didnt make it but low and behold it ran perfect!
Drive was 12ks on the freeway (80kmh) just cruised on the left at like 70.
32 degree Celsius out and very humid.
oil temp got to like 70 max water sat constant at 82 and theres still no ducting for the v-mount either.
afrs were rich but safe cruised at like 12.5- 13
Jurgen is a great bloke, plenty of awesome car in his shop we chatted **** for a while.
He was super impressed with the setup, agreed with just about everyone that this is the hardest way to go about this but ultimately liked it.
We are on the same path that everything currently with the setup will max out about the same. said hes going to put 12psi in it and see how it goes and im happy with that.
Wasnt sure on the bright red roll cage for a streeter but if thats the only thing i need to take out for rwc ill be stoked.
Now its just the waiting game, hes the only one at his shop at the moment said a week or soo
Last edited by squeakm; 11-13-18 at 09:22 PM. Reason: Dead picture link

 11-19-18, 12:30 AM
#153
Full Member
Thread Starter
DYNO TUNED!!!
Unfortunately i couldnt be there for dyno session but as reported by the Jurgen:
Car ran really well, took some time to get it setup properly, power is nice and smooth as shown by the curve.
Its been tuned for 10psi he tried to put some more in it but apparently wasnt repsonding and there was some wastegate creep.
I suspect the bovs might have been opening aswell, as i forgot to mention they may need to be tightened.
Needs the idle brought up a little too but other then that runs good.
Made 174kw at 10psi

He also had time today the rwc already failed first inspection which is to be expected, but the list is quite small.
Diff stub axel seals need replacing
Drivers window there is the smallest chip no where near wiper path
exhaust muffler bushings
remove roll cage
im getting jurgen to do the diff seals and window at his shop and then the other two little things ill smash out.
Unfortunately i couldnt be there for dyno session but as reported by the Jurgen:
Car ran really well, took some time to get it setup properly, power is nice and smooth as shown by the curve.
Its been tuned for 10psi he tried to put some more in it but apparently wasnt repsonding and there was some wastegate creep.
I suspect the bovs might have been opening aswell, as i forgot to mention they may need to be tightened.
Needs the idle brought up a little too but other then that runs good.
Made 174kw at 10psi
He also had time today the rwc already failed first inspection which is to be expected, but the list is quite small.
Diff stub axel seals need replacing
Drivers window there is the smallest chip no where near wiper path
exhaust muffler bushings
remove roll cage
im getting jurgen to do the diff seals and window at his shop and then the other two little things ill smash out.
12-09-18, 06:08 AM
#154
Full Member
Thread Starter
Havent been posting as ive been driving
But where we left off, pulled the cage out, we did the diff seals at mazworx and then the following friday the window got done

While it was at his shop doing the diff seals jurgen was nice enough to let me do a spanner check on everything underneath, looks like my chassis rails already dislike my car park


once the windscreen was doing had lunch with jurgen then visited phoenix car club, solid club very well presented guy was pretty good took some photos payed my fees then off to vic roads.
took a bit over an hour at vic roads which aint bad for no appointment.
there was some slight issues there, luckily the car had been registered in vic before but not for over 9 years.
This is the only details vic roads had and the vin didnt even fully line up
Mazda white coupe 1989
Regardless lady punch in what she could, took my money and handed me the plates!!

the offset number plate has grown on me lining it up with the mazda logo is the only way to do this in my opinion.


But where we left off, pulled the cage out, we did the diff seals at mazworx and then the following friday the window got done
While it was at his shop doing the diff seals jurgen was nice enough to let me do a spanner check on everything underneath, looks like my chassis rails already dislike my car park
once the windscreen was doing had lunch with jurgen then visited phoenix car club, solid club very well presented guy was pretty good took some photos payed my fees then off to vic roads.
took a bit over an hour at vic roads which aint bad for no appointment.
there was some slight issues there, luckily the car had been registered in vic before but not for over 9 years.
This is the only details vic roads had and the vin didnt even fully line up
Mazda white coupe 1989
Regardless lady punch in what she could, took my money and handed me the plates!!
the offset number plate has grown on me lining it up with the mazda logo is the only way to do this in my opinion.
12-09-18, 06:19 AM
#155
Full Member
Thread Starter
Soo stoked seems to be running great,
the diff is fucked but other then that fine.

And not too worry, ill never be done fixing things up haha
Flushed the coolant, oil change then worked on some ducting and fixed up a much better mount for the beer can coolant resivoir


Followed by my first cruise ausrotary hoedown, port melbourne to hanging rock


Friends!!

the diff is fucked but other then that fine.
And not too worry, ill never be done fixing things up haha
Flushed the coolant, oil change then worked on some ducting and fixed up a much better mount for the beer can coolant resivoir
Followed by my first cruise ausrotary hoedown, port melbourne to hanging rock
Friends!!
12-09-18, 10:21 AM
#156
Moderator
iTrader: (3)
Join Date: Mar 2001
Location: https://www2.mazda.com/en/100th/
Posts: 30,792
Received 2,573 Likes
on
1,829 Posts
congrats on getting plates!
12-16-18, 11:09 AM
#157
I thoroughly enjoyed your build. So much to comment on, but I think one of my favorite parts is the work you did in the rear interior (the flooring and custom storage bins). I loved that! I also liked the 3D printing (particularly the Haltech mounts - no provision for mounting is perhaps the dumbest thing about Haltech) and all the little custom touches that, at least, I don't see everyday. I like how you kept it simple, yet saucy. Congrats on how things are going with it so far. Definitely one of my favorite cars on the board. Well done. 
01-14-19, 05:45 AM
#158
Full Member
Thread Starter
Bride Passenger Seat.
Soo i sold the stock seats and picked up another bride, keen eye will see its slightly different. if you havent worked it out yet i like to do things differently haha and i really wanted the passenger seat to be slightly more comfortable and have the ability to recline.
i mounted it much the same as the drivers side by adapting the stock sliders to the seat frame, this is actually more difficult with the reclining frame as its not as universally designed.

Height and everything lines up nicely

Really ties everything together

Soo i sold the stock seats and picked up another bride, keen eye will see its slightly different. if you havent worked it out yet i like to do things differently haha and i really wanted the passenger seat to be slightly more comfortable and have the ability to recline.
i mounted it much the same as the drivers side by adapting the stock sliders to the seat frame, this is actually more difficult with the reclining frame as its not as universally designed.
Height and everything lines up nicely
Really ties everything together
01-15-19, 01:24 AM
#159
Full Member
Thread Starter
Classic Japan!
Hopefully a few of you already know this but i entered the fc into classic japan, there were a couple of other fc's but seeing how it was the year of the rx7 definately not enough.
My favourite part for multiple reasons of the day was upon entering one of the officials goes "Hero car, this way then park up in the centre near the colourful ***** statue", made for a solid laugh.
Didnt spend much time near the car pretty much parked it up then went exploring with the girl friend, few intereactions i got were all super positive and was a greaet day, even with melbourne weather wanting to rain all day, great spot down on the yarra.
 02-02-19, 07:59 PM
#161
Full Member
Thread Starter
Radiator Pipework.
Re-did the radiator piping and flushed the system, had been worried about the consistent change in colour of the coolant.
Turns out the rust had been coming from the universal hoses, from electrolysis as there is no earth and the core would have been getting charged. Cool to see first hand glade its fixed.

Knowing this car back the front is now paying dividends i could have gotten away with less straight tube but order the exact right parts for the job first time just from "Feel"
Silicon hose
3 x 90 degree 38mm
1 x 135 degree 38mm
1m 38mm alloy pipe
90 degree alloy bend (which i already had)
Top hose consists of two 90s trimmed down to perfection and a small piece of pipe.

Lower hose is a lot more complex hard to see in the first picture but the 135 bend had to also have a small piece of straight silicon added also, then to 90 alloy bend, cut a little section out of the stock radiator support to keep things straight then through two straight alloy pipes, to the 90 silicon cut down on one side and done. There is a lot of hose clamps on this line and if i have any issues will definitely take it to get welded up and ends rolled.

Buttoned up

Bent up some better,ducting panels, much happier with these!


Been a while since ive taken a shot like this,
Everything is soo clean for how much is bundled in there and custom made.

Re-did the radiator piping and flushed the system, had been worried about the consistent change in colour of the coolant.
Turns out the rust had been coming from the universal hoses, from electrolysis as there is no earth and the core would have been getting charged. Cool to see first hand glade its fixed.
Knowing this car back the front is now paying dividends i could have gotten away with less straight tube but order the exact right parts for the job first time just from "Feel"
Silicon hose
3 x 90 degree 38mm
1 x 135 degree 38mm
1m 38mm alloy pipe
90 degree alloy bend (which i already had)
Top hose consists of two 90s trimmed down to perfection and a small piece of pipe.
Lower hose is a lot more complex hard to see in the first picture but the 135 bend had to also have a small piece of straight silicon added also, then to 90 alloy bend, cut a little section out of the stock radiator support to keep things straight then through two straight alloy pipes, to the 90 silicon cut down on one side and done. There is a lot of hose clamps on this line and if i have any issues will definitely take it to get welded up and ends rolled.
Buttoned up
Bent up some better,ducting panels, much happier with these!
Been a while since ive taken a shot like this,
Everything is soo clean for how much is bundled in there and custom made.
02-04-19, 04:40 AM
#163
Full Member
Thread Starter
Really appreciate the kind words guys, its simply such a pleasure to be able to drive the thing,
Its running great its, however been super hot in melbourne as of late and shes not (neither am i) when the temps are above 35 Celsius sitting in traffic once the oil temps over take coolant the fans dont have the capacity to keep it cool. Its uncomfortable but putting the heat on in the cabin cools it down.
Thinking of putting a couple of small fans on the oil coolers, or simply not going out in the heat, at least not on roads ill be sitting in traffic.
The love for the interior is high, im super happy with how it has turned out still need to do a few things, the very rear carpet still isnt even trimmed up lol.
But have moved onto finishing up the exterior!
Rocket Bunny Side Skirts!
86/brz rocket bunny v1 side skirts to match the same front lip. I went for copies because i knew they were plastic and cheap lol.
lined up next to the car as you can see just a little long again approx 10cm.

Mocked up!
I really like the lines and decided on that extension was good, pretty aggressive but lined up nicely.


Basically i just used the chassis seam and ran the skirts hard up against it, then used the factory side skirt fixing points and drilled holes through the side skirts.
super happy with how easy it was. All then was needed was to trim the front to size and round it off.
There is of course a bit of hard edge at the front and looks to be floating due to a jack point cut out but still very happy, it really completes the look.


You may also notice the sleep eyes, i have made a plug and play kit for fc's
and a finally shot in the street under better lighting.

Its running great its, however been super hot in melbourne as of late and shes not (neither am i) when the temps are above 35 Celsius sitting in traffic once the oil temps over take coolant the fans dont have the capacity to keep it cool. Its uncomfortable but putting the heat on in the cabin cools it down.
Thinking of putting a couple of small fans on the oil coolers, or simply not going out in the heat, at least not on roads ill be sitting in traffic.
The love for the interior is high, im super happy with how it has turned out still need to do a few things, the very rear carpet still isnt even trimmed up lol.
But have moved onto finishing up the exterior!
Rocket Bunny Side Skirts!
86/brz rocket bunny v1 side skirts to match the same front lip. I went for copies because i knew they were plastic and cheap lol.
lined up next to the car as you can see just a little long again approx 10cm.
Mocked up!
I really like the lines and decided on that extension was good, pretty aggressive but lined up nicely.
Basically i just used the chassis seam and ran the skirts hard up against it, then used the factory side skirt fixing points and drilled holes through the side skirts.
super happy with how easy it was. All then was needed was to trim the front to size and round it off.
There is of course a bit of hard edge at the front and looks to be floating due to a jack point cut out but still very happy, it really completes the look.
You may also notice the sleep eyes, i have made a plug and play kit for fc's
and a finally shot in the street under better lighting.
02-16-19, 12:24 AM
#165
Full Member
Thread Starter
Small update,
Finished the rear carpet, finally!
I have no idea why i put this off, once again super happy with the result.
Worked with cardboard to come up with this shape, was originally going to get some mdf and put hinges etc but this is soo much easier.
The other side of the cardboard is laminated, soo was able to put relief cuts to get the bends nice.

Committed and cut the carpet off.

You can see here how it tucks up under the weather strip nicely, just used contact adhesive on the cardboard

Really wanted to take the photo from this angle, but the lighting was **** but did so anyway.

Finished the rear carpet, finally!
I have no idea why i put this off, once again super happy with the result.
Worked with cardboard to come up with this shape, was originally going to get some mdf and put hinges etc but this is soo much easier.
The other side of the cardboard is laminated, soo was able to put relief cuts to get the bends nice.
Committed and cut the carpet off.
You can see here how it tucks up under the weather strip nicely, just used contact adhesive on the cardboard
Really wanted to take the photo from this angle, but the lighting was **** but did so anyway.
02-16-19, 12:43 AM
#166
Full Member
Thread Starter
Car meet!
Went to a meet up in docklands for slow life or something not sure just want to go check out cliffs rx7, thou he didnt show up till super late.
Anyway thought id share the photos i found online from people who actually know how to use a camera.


Went to a meet up in docklands for slow life or something not sure just want to go check out cliffs rx7, thou he didnt show up till super late.
Anyway thought id share the photos i found online from people who actually know how to use a camera.
03-05-19, 07:01 AM
#167
Full Member
Thread Starter
Few little updates,
Just procrastinating on swapping over the diff, which i really need to do soon!
3d printed some parcel tray holders, no idea what they should look like so just winged it.


Power steering line blew off when i was parking, i know a span the wheel a little hard but would have thought it would have been pretty solid by now apparently not, ill give the braided line another go and if this fails again will get a hydraulic shop to make me something up.
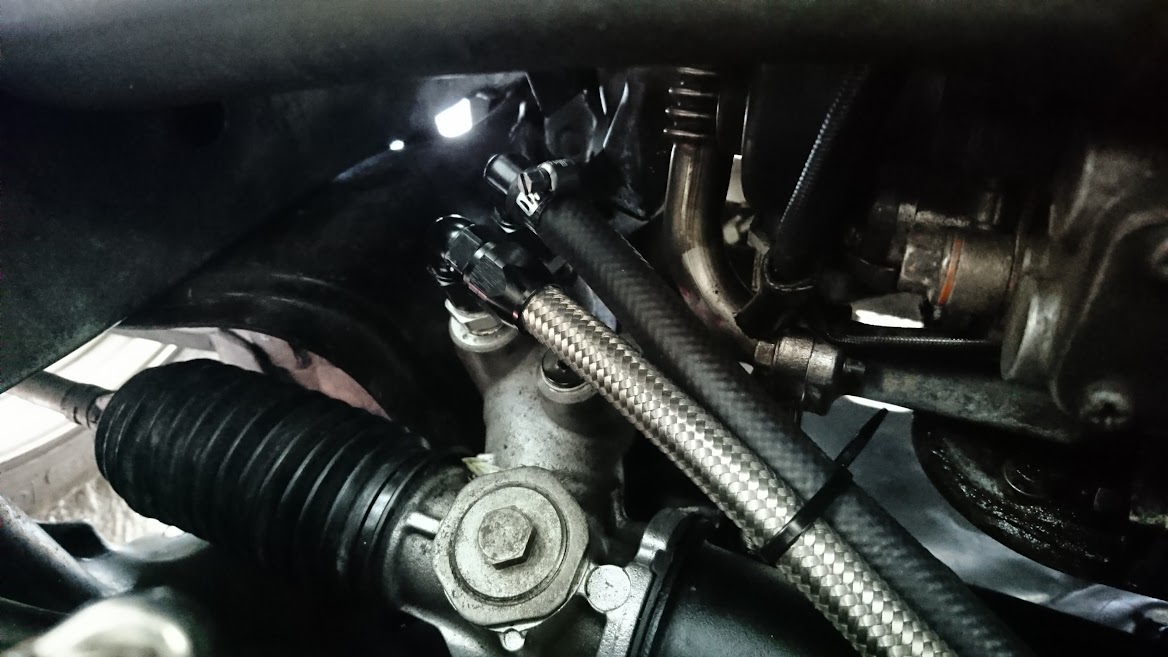
Also a little while back installed a switch for the power steering pump, shown by the blue led. still super happy with the pump location makes putting fluid in super easy.

Also for the lols i thought id chuck on the full wheel nuts i got ages ago, not a fan of the spikes but really like the extended studs.


Just procrastinating on swapping over the diff, which i really need to do soon!
3d printed some parcel tray holders, no idea what they should look like so just winged it.
Power steering line blew off when i was parking, i know a span the wheel a little hard but would have thought it would have been pretty solid by now apparently not, ill give the braided line another go and if this fails again will get a hydraulic shop to make me something up.
Also a little while back installed a switch for the power steering pump, shown by the blue led. still super happy with the pump location makes putting fluid in super easy.
Also for the lols i thought id chuck on the full wheel nuts i got ages ago, not a fan of the spikes but really like the extended studs.
03-13-19, 07:33 AM
#168
Full Member
Thread Starter
Axle Rebuild
Finally getting around to put the s5 diff back in for those not aware the s4 welded diff is ruined, the bearings are grinding and flogged out.
also havent been a fan of the welded diff, its just a pain on the street.
The axle boots were in bad shape this was one of the original factors in using the s4 diff.

After pulling the boots off and dissembling the cv joint, pretty easy theres a retaining ring on the inner cup, pull that out and then everything nearly falls out, circlip on the back of the final bearing case and ya done.
Ive marked them and kept the ***** in an order just so wear is the same.

lots of rust build up

After flapper disc

All the bits, laid out.
have already painted the inner hub in the background.

Taped up to protect spline and to lay some paint down to stop further rust.

For those playing at home Kelpro boots
CIB-729
COB-002
They are said to fit 1989 series 3 rx7 axles, also no reference to do with turbo or not, but they fit fine.

Previous mentioned circlip and bearing housing, note the outer cage already on the shaft

Cage slid into place.

Grease'n

And all back together

And my contraption for doing the clamps, screw driver cable ties and needle noses pliers, works a treat you just grab the band and turn the pliers.

Finally getting around to put the s5 diff back in for those not aware the s4 welded diff is ruined, the bearings are grinding and flogged out.
also havent been a fan of the welded diff, its just a pain on the street.
The axle boots were in bad shape this was one of the original factors in using the s4 diff.
After pulling the boots off and dissembling the cv joint, pretty easy theres a retaining ring on the inner cup, pull that out and then everything nearly falls out, circlip on the back of the final bearing case and ya done.
Ive marked them and kept the ***** in an order just so wear is the same.
lots of rust build up
After flapper disc
All the bits, laid out.
have already painted the inner hub in the background.
Taped up to protect spline and to lay some paint down to stop further rust.
For those playing at home Kelpro boots
CIB-729
COB-002
They are said to fit 1989 series 3 rx7 axles, also no reference to do with turbo or not, but they fit fine.
Previous mentioned circlip and bearing housing, note the outer cage already on the shaft
Cage slid into place.
Grease'n
And all back together
And my contraption for doing the clamps, screw driver cable ties and needle noses pliers, works a treat you just grab the band and turn the pliers.


The following users liked this post:
Relisys190 (03-14-19)
03-13-19, 04:18 PM
#170
Red Pill Dealer
iTrader: (10)

Thank you, kind sir.
I edited because of issues with posting the pic but, this is in reference to the plier, zip tie, CV joint boot clamp pic.
I edited because of issues with posting the pic but, this is in reference to the plier, zip tie, CV joint boot clamp pic.
Last edited by TonyD89; 03-13-19 at 04:21 PM.
03-14-19, 06:55 AM
#171
Full Member
Thread Starter
what was wrong with the picture?
I direct copy these post to another forum and there were no issues there.
Just for future reference mainly
03-14-19, 06:56 AM
#172
Full Member
Thread Starter
Diff Swap,
Really didnt take many photos as its just a very labor intensive task, you have two options drop entire subframe or lower it down and try and squeeze the diff out.
I was committed to dropping the subframe as i knew this was ultimately the smarter option.
The only complication was that with the solid mounts they got hung up on the mounting bolts for the diff its self, had to lever them off.
That then got me to this point.

The best thing about solid mounts, they are easily punched out with a soft hammer and back in the same way.
Put some fresh oil in the diff then put it back into the subframe, threw the old drive shaft back and the fresh axles and ready to go.

Ready to go,
Install isnt as one would think lining everything up two jacks and its and easy task.

Went for a quick spin around the block and my god welded diff sucks, it doesnt bog down in low speed turns and everything is just smoother, reversing and maneuvering the vehicle is a breeze now.
Theres a slight whirring still, just hope thats the solid mounts.
soo glad to tick that off the list have been putting it off for ages
Really didnt take many photos as its just a very labor intensive task, you have two options drop entire subframe or lower it down and try and squeeze the diff out.
I was committed to dropping the subframe as i knew this was ultimately the smarter option.
The only complication was that with the solid mounts they got hung up on the mounting bolts for the diff its self, had to lever them off.
That then got me to this point.
The best thing about solid mounts, they are easily punched out with a soft hammer and back in the same way.
Put some fresh oil in the diff then put it back into the subframe, threw the old drive shaft back and the fresh axles and ready to go.
Ready to go,
Install isnt as one would think lining everything up two jacks and its and easy task.
Went for a quick spin around the block and my god welded diff sucks, it doesnt bog down in low speed turns and everything is just smoother, reversing and maneuvering the vehicle is a breeze now.
Theres a slight whirring still, just hope thats the solid mounts.
soo glad to tick that off the list have been putting it off for ages
The following users liked this post:
Relisys190 (03-14-19)
03-19-19, 09:59 AM
#173
Full Member
Thread Starter
New Plastic Bits.
Just one of the random missing pieces of interior my car never had, ive googled and wasnt able to find a picture of what its meant to look like but does that matter
Fuel/boot lever cover.

I did 1 protype print, it fitted perfect so refined the shape and got this, no option for a screw this part uses pins that fit very snug into the existing holes. And of course my little 3d print logo.

Bam!

Next up this area was always well, it looked like this.
Picked up a boot light, ill wire it in enough day, probably get a nice bright led for it for it first.
I did cut out the provisions for the light to be auto but that doesnt worry me, i could always re join it.

Tools required, people enjoy this part right? do i need to explain how i used them?

I got this, that should be enough right.

Just one of the random missing pieces of interior my car never had, ive googled and wasnt able to find a picture of what its meant to look like but does that matter
Fuel/boot lever cover.
I did 1 protype print, it fitted perfect so refined the shape and got this, no option for a screw this part uses pins that fit very snug into the existing holes. And of course my little 3d print logo.
Bam!
Next up this area was always well, it looked like this.
Picked up a boot light, ill wire it in enough day, probably get a nice bright led for it for it first.
I did cut out the provisions for the light to be auto but that doesnt worry me, i could always re join it.
Tools required, people enjoy this part right? do i need to explain how i used them?
I got this, that should be enough right.
07-06-19, 10:26 PM
#174
Full Member
Thread Starter
Still doing bits a pieces but ultimately everything is working great!
It actually amazes me how little issues im having, I do check over the basic before most drives; coolant, oils, injectors, vacuum leaks, etc.
Got a fancy oil and radiator cap, knock off ebay what not but it does the job

In saying that ive been keep an eye on my coil mounts, they were printed in pla and thus were likely to deform or melt over time still they've held up for 7 months now.
how they were you can see them coming away from the alloy support bracket.

Soo order some ABS plastic, i dont have a heated bed but still managed a really good print, I used some cut down bolts instead of printed pins this time for added strength.

All mounted ready to be re-installed print time for those 4 is about 14 hours for those playing at home...

It actually amazes me how little issues im having, I do check over the basic before most drives; coolant, oils, injectors, vacuum leaks, etc.
Got a fancy oil and radiator cap, knock off ebay what not but it does the job
In saying that ive been keep an eye on my coil mounts, they were printed in pla and thus were likely to deform or melt over time still they've held up for 7 months now.
how they were you can see them coming away from the alloy support bracket.
Soo order some ABS plastic, i dont have a heated bed but still managed a really good print, I used some cut down bolts instead of printed pins this time for added strength.
All mounted ready to be re-installed print time for those 4 is about 14 hours for those playing at home...
07-06-19, 10:34 PM
#175
Full Member
Thread Starter
Diffuser!
Soo i bought this universal diffuser from ebay a while back and really liked how it tested fitted.

From there i hatched a plan to purchase another and then combine the two into something hopefully cool.
Some mock up of combining the two.

Nothing mounted still just mock up.


And then the mounted final result, im super happy and set me back $90 which im even more stoked about, plus another one off custom part.
You can see i moved the outer parts further inwards, and pulled the edges closer up towards the body, maybe another little extension on the sides and then would be pretty spot on.


Soo i bought this universal diffuser from ebay a while back and really liked how it tested fitted.
From there i hatched a plan to purchase another and then combine the two into something hopefully cool.
Some mock up of combining the two.
Nothing mounted still just mock up.
And then the mounted final result, im super happy and set me back $90 which im even more stoked about, plus another one off custom part.
You can see i moved the outer parts further inwards, and pulled the edges closer up towards the body, maybe another little extension on the sides and then would be pretty spot on.