84 12a bridgeport drift car

 01-10-15, 11:22 AM
#30
Full Member
Thread Starter

Finally back at working on this car again, it's been way too long!
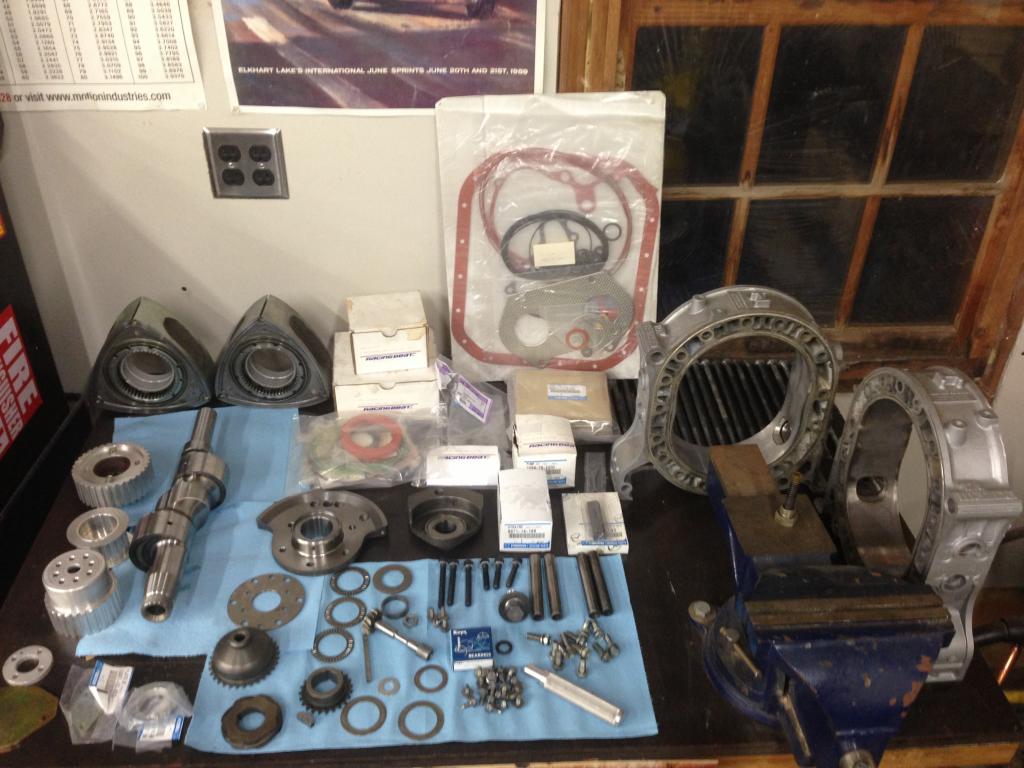
Found some time to work on the engine over the holidays, took me way longer than expected just to get everything clean and laid out for assembly.
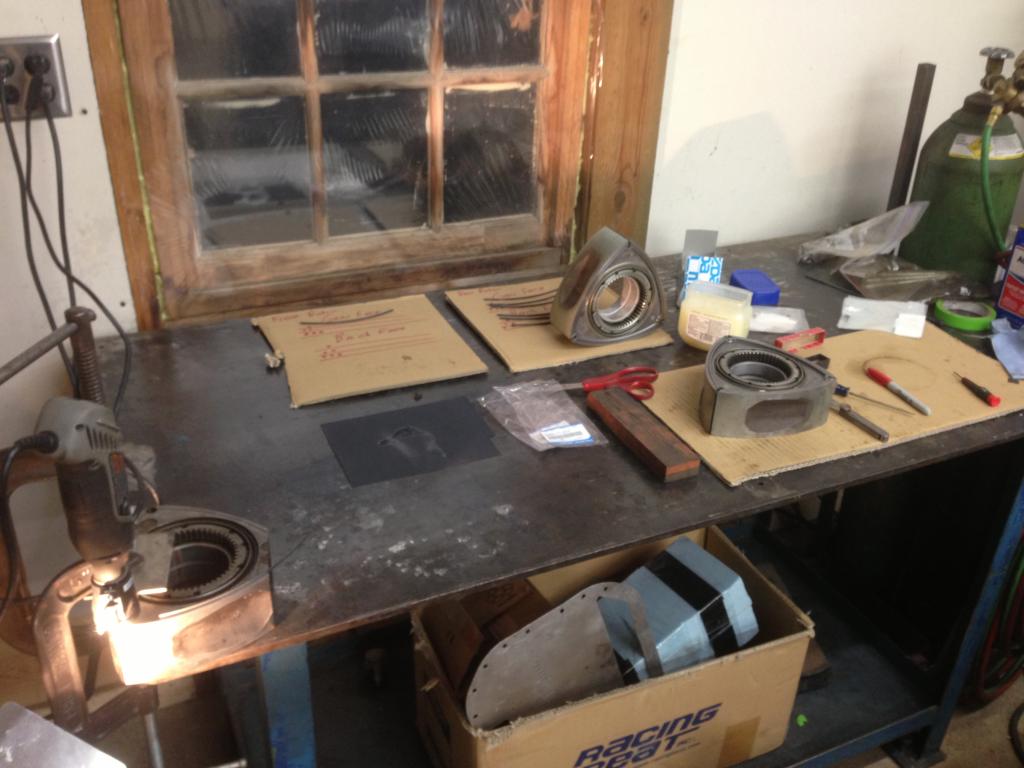
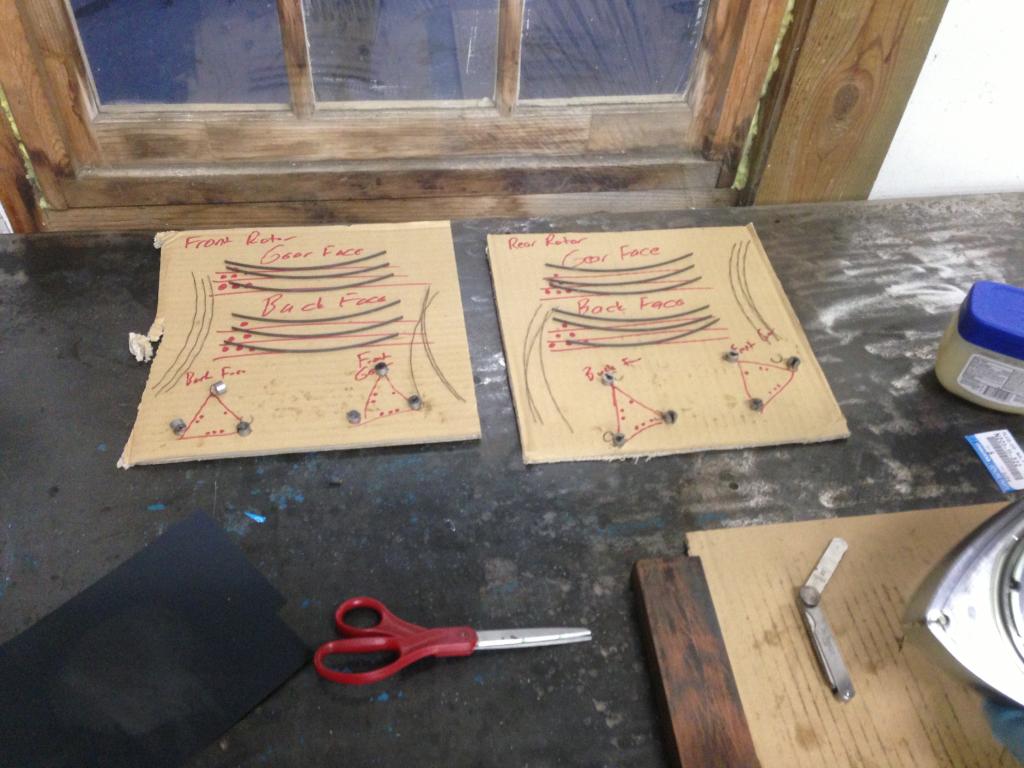
Built a little fixture for grinding the side seals using a dremel tool spinning an abrasive stone in the corner seal spot and cut the tip off a junk rotor so i can slide a side seal up against the stone at the correct angle for grinding.
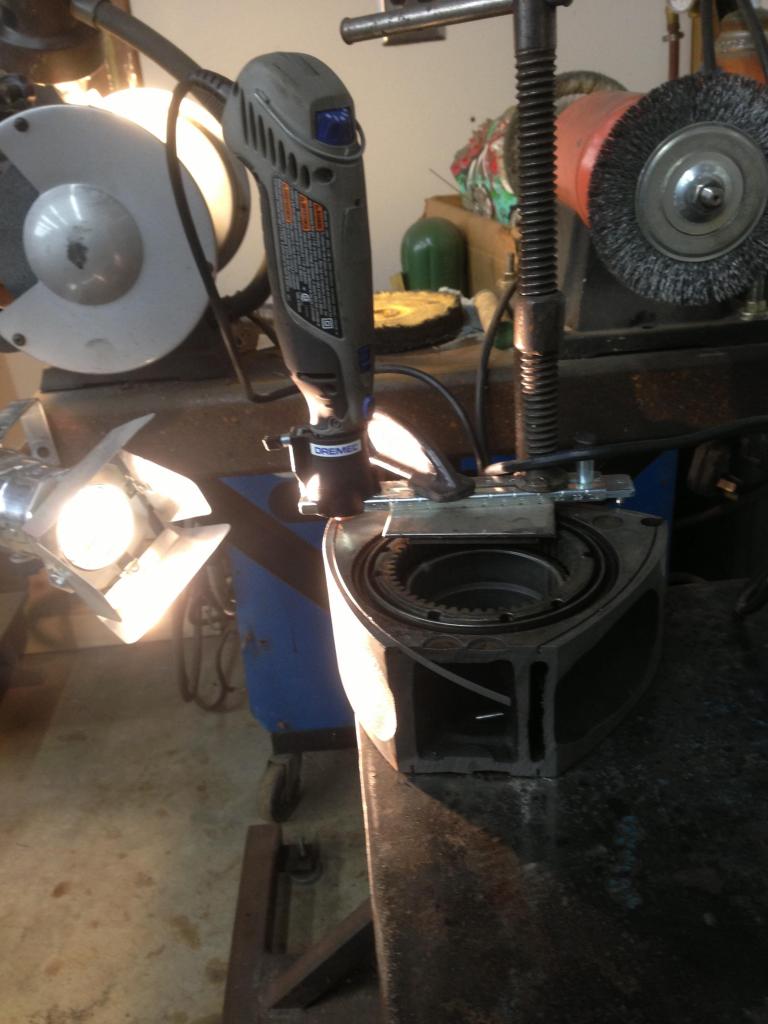
Result of the tedious job of side seal clearancing...
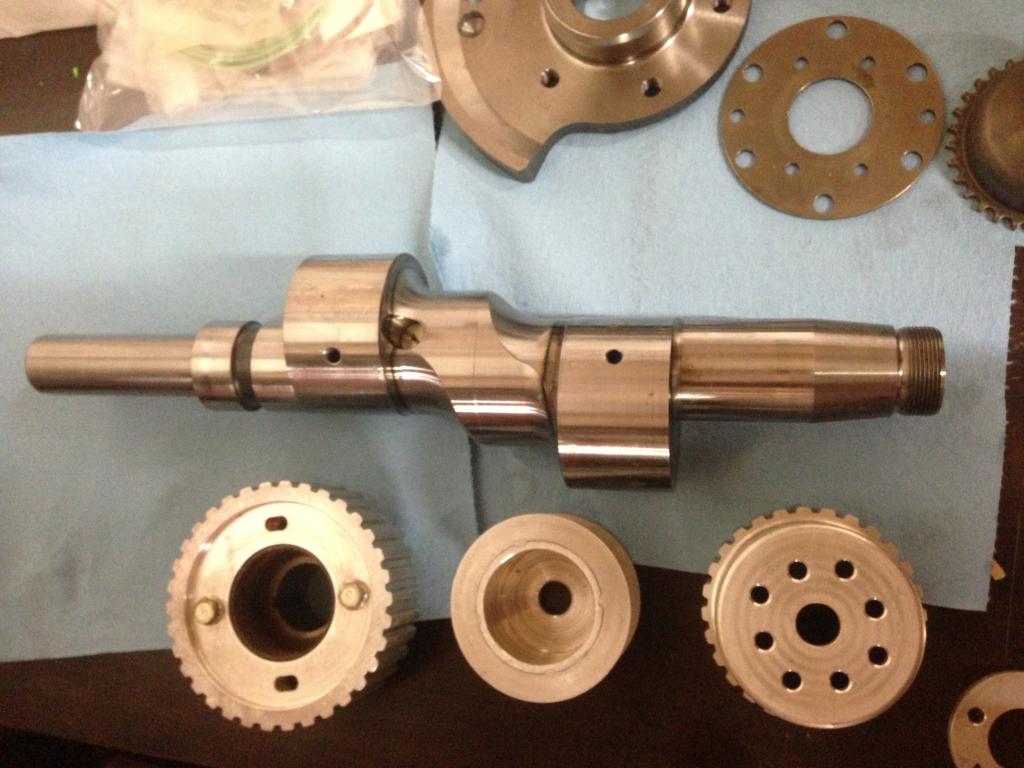
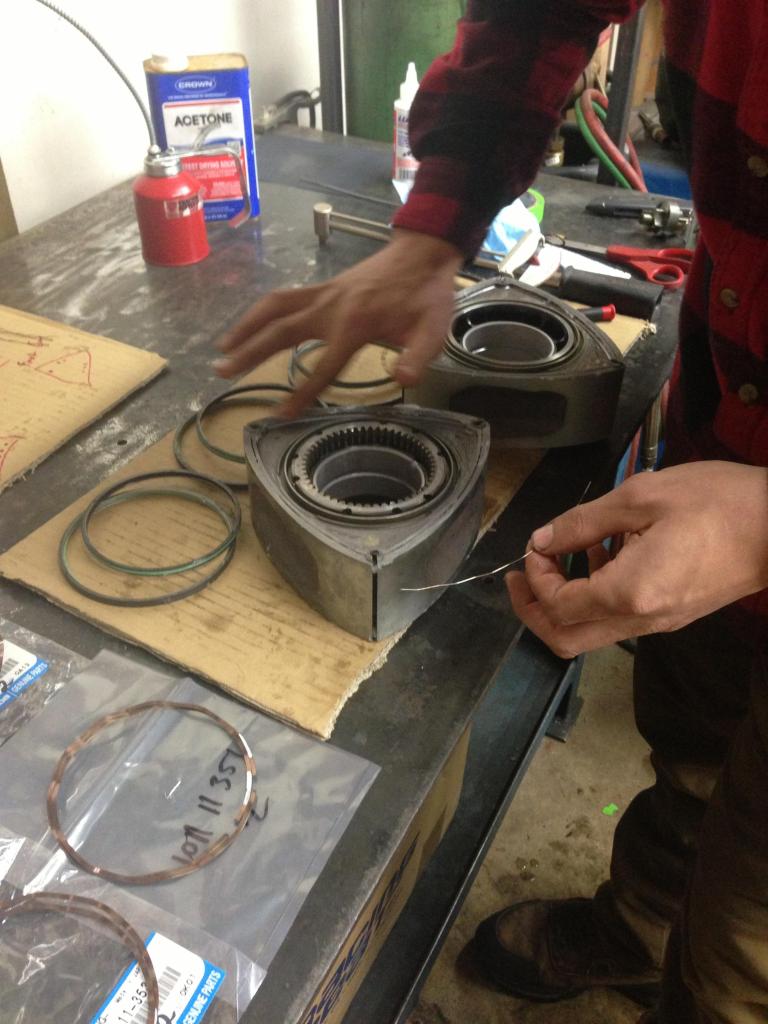
Finally on to final assembly. First engine I've ever built but I was happy with the way everything turned out, seemed to hit all tolerances without much of an struggle or ruining seals. Rotor side seals and corner seals all moved freely up and down without binding. Did have to take some time on combination stone with the spacer to get the front stack up endplay in spec since I was only showing 0.010" endplay at first.

And here it is all together
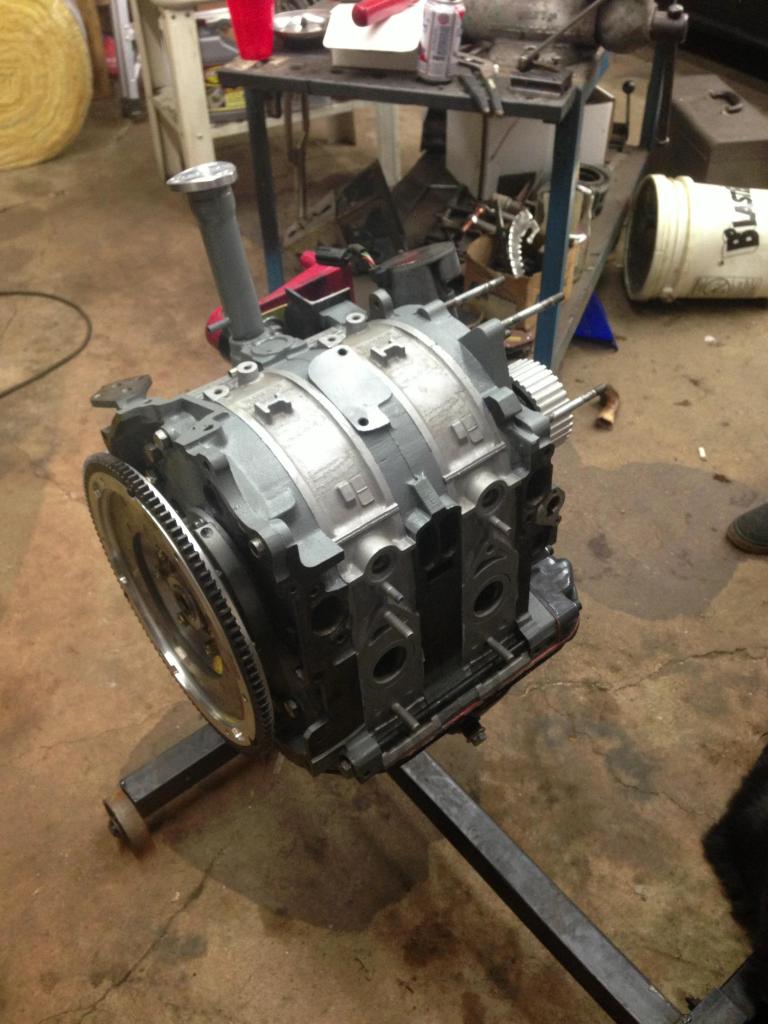
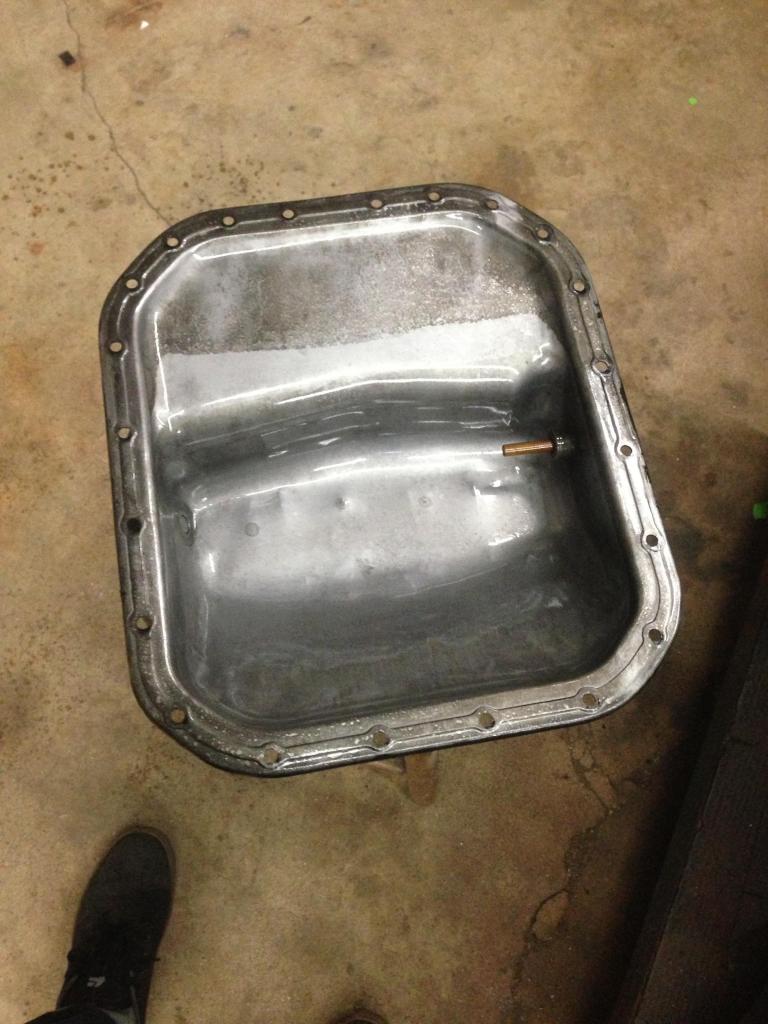
Ignore the crank angle sensor, just a placeholder till I figure out how to time this gilmer pulley assembly and drop a distributor in. All seems well with the engine, spins freely and I can hear compression as the seals go by. I finished mounting up the clutch and pressure plate but when I tried to install into the car I can get the engine and transmission to mount up OK but when I try and lower the engine to meet the front engine mount I'm hitting the steering link with the oil pan. Seems like the whole engine needs to move about 1 inch forward to clear the steering link but I'm not sure how that's going to be possible. There is room to put the pan sump between the back of the subframe and the steering link but the alignment seems off front to back and the pan hangs up on the link by at least the back inch of the sump. Maybe I'm missing something obvious during the install or maybe I've got a goofy pan on it? Not sure, had so many engines apart in the garage to get parts for this one I may have mixed and matched pans but its a 12a going into a car that had a 12a in it originally, not sure what I'm missing. Here's a picture of the oil pan I'm using if anyone has a clue for me?
So that's it for now. Hopefully I'll solve the clearance issue and be back at it shortly.
Found some time to work on the engine over the holidays, took me way longer than expected just to get everything clean and laid out for assembly.


Built a little fixture for grinding the side seals using a dremel tool spinning an abrasive stone in the corner seal spot and cut the tip off a junk rotor so i can slide a side seal up against the stone at the correct angle for grinding.


Result of the tedious job of side seal clearancing...

Finally on to final assembly. First engine I've ever built but I was happy with the way everything turned out, seemed to hit all tolerances without much of an struggle or ruining seals. Rotor side seals and corner seals all moved freely up and down without binding. Did have to take some time on combination stone with the spacer to get the front stack up endplay in spec since I was only showing 0.010" endplay at first.


And here it is all together

Ignore the crank angle sensor, just a placeholder till I figure out how to time this gilmer pulley assembly and drop a distributor in. All seems well with the engine, spins freely and I can hear compression as the seals go by. I finished mounting up the clutch and pressure plate but when I tried to install into the car I can get the engine and transmission to mount up OK but when I try and lower the engine to meet the front engine mount I'm hitting the steering link with the oil pan. Seems like the whole engine needs to move about 1 inch forward to clear the steering link but I'm not sure how that's going to be possible. There is room to put the pan sump between the back of the subframe and the steering link but the alignment seems off front to back and the pan hangs up on the link by at least the back inch of the sump. Maybe I'm missing something obvious during the install or maybe I've got a goofy pan on it? Not sure, had so many engines apart in the garage to get parts for this one I may have mixed and matched pans but its a 12a going into a car that had a 12a in it originally, not sure what I'm missing. Here's a picture of the oil pan I'm using if anyone has a clue for me?

So that's it for now. Hopefully I'll solve the clearance issue and be back at it shortly.
01-14-15, 08:30 PM
#33
Full Member
Thread Starter
Thank you! I figured someone would know what was up. Here's another picture just to confirm but from what I've seen on Mazdatrix website the 12a rx7 pan is certainly different than what I have.

Unfortunately no one seems to have them in stock new so I'll have to try and track down a used one. Thanks again for the help
01-14-15, 08:51 PM
#34
Full Member
iTrader: (1)
Join Date: May 2013
Location: Phoenix
Posts: 80
Likes: 0
Received 0 Likes
on
0 Posts
I've learned quite a bit. First thing is to completely remove the steering stops on the control arm. Also I'm running 15x8 rims with 0 offset. I have no clearance issues. I just came from a NASA practice drift event and was happy with this but I can see where I'm in need. I have a few ideas that I can't share yet because I want to make sure it will work but it will definitely give me more angle. One other thing I would definitely recommend is to get adjustable control arms. Camber is a really big thing in drifting. It's actually a functional thing not just cause Honda guys think it looks cool. Also castor/camber plates. I've been talking to techno toy tuning and he actually made steering arms but you must run a 17" rim for them to work. Trying to get my hands on his set just to try them out. Will keep you posted on my findings as well as any more ideas or recommendations. If you find anything let me know. Btw, I'm trying to build my other car so it can compete in Vegas drift and formula drift. Which makes it really hard so that's why I have to think out of the box on the suspension setup.
01-24-15, 09:09 PM
#37

Awesome thread so far, can't wait for more! Thank you for sharing and happy sliding!
Excited for videos!
This is some awesome information I have been asking/looking for about wheel sizing on the RX7... Thank you!
Excited for videos!
I've learned quite a bit. First thing is to completely remove the steering stops on the control arm. Also I'm running 15x8 rims with 0 offset. I have no clearance issues. I just came from a NASA practice drift event and was happy with this but I can see where I'm in need. I have a few ideas that I can't share yet because I want to make sure it will work but it will definitely give me more angle. One other thing I would definitely recommend is to get adjustable control arms. Camber is a really big thing in drifting. It's actually a functional thing not just cause Honda guys think it looks cool. Also castor/camber plates. I've been talking to techno toy tuning and he actually made steering arms but you must run a 17" rim for them to work. Trying to get my hands on his set just to try them out. Will keep you posted on my findings as well as any more ideas or recommendations. If you find anything let me know. Btw, I'm trying to build my other car so it can compete in Vegas drift and formula drift. Which makes it really hard so that's why I have to think out of the box on the suspension setup.
01-26-15, 06:10 PM
#39
Full Member
Thread Starter
Media blasted and painted the proper rx7 oil pan and the engine went right into the car over the weekend. Decided to use solid aluminum engine mounts and was suprised to see how much taller they were than my stock rubber worn out mounts. Might turn them down a bit to compensate for the difference. Also thought it was strange how the engine is offset towards the drivers side. Drew a string down centerline and the front of the engine is offset and approaches center as you go backwards towards the trans. Figure there is no other way to install it so I'll let the Ujoints handle that?
Still have to block off the intake manifold coolant passages in the housing since the racing beat weber manifold doesnt use them. I'm reading that the preferred method is dorman part #555-101 20mm freeze plug so I'm going to order some of those and try that out before I resort to JB welding a quarter in there. Couldn't resist mocking up the carb setup anyways... Exciting times! haha

More progress and should have another update soon.
 01-27-15, 03:35 PM
#41
Your aluminum mounts look way too tall. You should machine them down a bit. I'd think a stock motor mount with no weight on it would be an ok reference for height. What are your thoughts? Unfortunately I don't have a brand new motor mount to measure.
Yes the offset is normal. It was apparently for right hand drive cars. It makes life easier for us though because we can fit longer straighter primary headers or a big turbo there.
If you're going as far as installing freeze plugs, you might as well fill the ACV port with quicksteel. Why? Because exhaust pulses up the intermediate plate and can contact your intake manifold resulting in some heat transfer. It's not a whole lot of additional heat, especially considering that the aftermarket manifold is simply flat right there, but after several hundred thousand exhaust pulses during a drive, doesn't it make sense that there will be some heat buildup over time? Isn't it a good idea to reduce unwanted heat whenever possible? Especially when it's an easy thing to do?
The reason I'm mentioning this is because some folks don't believe it's problem. Well, ever felt the ACV area of an intake manifold on an idling engine and noticed it's pretty hot right there? What happens when the engine is being driven hard and generating some considerable heat? This holds especially true for stock manifolds with chambers for coolant and exhaust where if you block the coolant ports, there is nothing to take the exhaust heat away other than the carb's venturi effect. An aftermarket manifold is just flat right there so the effect is less but a good rule to follow is when you block one you need to block the other. Does that make sense?
02-01-15, 02:29 PM
#42
Full Member
Thread Starter
Your aluminum mounts look way too tall. You should machine them down a bit. I'd think a stock motor mount with no weight on it would be an ok reference for height. What are your thoughts? Unfortunately I don't have a brand new motor mount to measure.
Yes the offset is normal. It was apparently for right hand drive cars. It makes life easier for us though because we can fit longer straighter primary headers or a big turbo there.
If you're going as far as installing freeze plugs, you might as well fill the ACV port with quicksteel. Why? Because exhaust pulses up the intermediate plate and can contact your intake manifold resulting in some heat transfer. It's not a whole lot of additional heat, especially considering that the aftermarket manifold is simply flat right there, but after several hundred thousand exhaust pulses during a drive, doesn't it make sense that there will be some heat buildup over time? Isn't it a good idea to reduce unwanted heat whenever possible? Especially when it's an easy thing to do?
The reason I'm mentioning this is because some folks don't believe it's problem. Well, ever felt the ACV area of an intake manifold on an idling engine and noticed it's pretty hot right there? What happens when the engine is being driven hard and generating some considerable heat? This holds especially true for stock manifolds with chambers for coolant and exhaust where if you block the coolant ports, there is nothing to take the exhaust heat away other than the carb's venturi effect. An aftermarket manifold is just flat right there so the effect is less but a good rule to follow is when you block one you need to block the other. Does that make sense?
Yes the offset is normal. It was apparently for right hand drive cars. It makes life easier for us though because we can fit longer straighter primary headers or a big turbo there.
If you're going as far as installing freeze plugs, you might as well fill the ACV port with quicksteel. Why? Because exhaust pulses up the intermediate plate and can contact your intake manifold resulting in some heat transfer. It's not a whole lot of additional heat, especially considering that the aftermarket manifold is simply flat right there, but after several hundred thousand exhaust pulses during a drive, doesn't it make sense that there will be some heat buildup over time? Isn't it a good idea to reduce unwanted heat whenever possible? Especially when it's an easy thing to do?
The reason I'm mentioning this is because some folks don't believe it's problem. Well, ever felt the ACV area of an intake manifold on an idling engine and noticed it's pretty hot right there? What happens when the engine is being driven hard and generating some considerable heat? This holds especially true for stock manifolds with chambers for coolant and exhaust where if you block the coolant ports, there is nothing to take the exhaust heat away other than the carb's venturi effect. An aftermarket manifold is just flat right there so the effect is less but a good rule to follow is when you block one you need to block the other. Does that make sense?
Thanks for the info on the offset, and I like your reasoning on making things easier haha! Building a header that makes use of the space is on the to do list for sure, never understood why racing beat chose to turn the front pipe so quickly...
Very interesting point about the acv port. I never even thought about that being an issue but I can absolutely understand why you're thinking that way. I suppose it cant hurt either way if I block it off on the engine side with some putty, probably will end up helping a small amount anyways. I thought I had to put freeze plugs in, am I mistaken? Do some people just use the o rings and gasket and it doesnt leak?
Back to the ACV thing, can't say I've felt the intake temp on an aftermarket intake, first one I've head. Would be interesting to have someone hit the same point on the intake mani with an IR laser thermometer before and after blocking it off to see what the difference is.
I've got my hands on a CNC plasma cutter table now so I played around and made some brackets for the aftermarket oil cooler im using that mount it right behind the front bumper and center.


Also made some support brackets for the radiator. Here is one side mocked up, painting them black today.

Going to try and tidy up the plumbing (fuel, oil and water) next. Curious what size hose people are using to feed weber IDA carbs. It looks like using -AN adapter in the threads will narrow the inlet ID to the point where using anything more than -6an line would be overkill. Any thoughts? Am currently planning on running -8 up to the pressure regulator on the firewall.
Another issue I have to overcome is the crappy gilmer belt drive kit alignment that I have. The water pump and main pulley are in the same centerline, but the alternator pulley is offset about a 1/4" towards the front of the car. See in the picture how belt isn't centered on the main or water pump pulleys.

So I figure I'll probably machine down a bit of the water pump housing and alternator mounting tab to bring everything back in line. Talked to mazdatrix about it and they didnt have an answer, maybe I have some screwed up combo of parts or the part quality isnt very good. I'll make it work somehow.
02-01-15, 04:03 PM
#43
Cool project man! I'm in the waukesha area also. Maybe I will run in to you at a drift event some time this summer, I'm currently building my REPU in to a skid truck. Keep up the good work.
02-02-15, 02:02 PM
#44
Moderator
iTrader: (3)
Join Date: Mar 2001
Location: https://www2.mazda.com/en/100th/
Posts: 30,763
Received 2,556 Likes
on
1,819 Posts
cool project.
for the IDA, i'm just running stock rubber 8mm fuel hose to the carb, simple.
for the oil cooler/radiator plumbing, back in the day they used to stack the oil cooler and radiator, and then run a sheet of aluminum between them to the front of the car. you adjust the height of the thing in the nose until the temps balance, you could do something similar...
02-02-15, 04:54 PM
#45
Yes, still install freeze plugs. It prevents coolant from running out all over the ground if you ever need to take the intake manifold off.
Take the alt pulley off, take out the spacer and see if you can trim it a little. It might align the belt ok. I've had to deal with 1/8" of misalignment on several engines lately while doing pulley swaps. You might get lucky where 1/8" is all you need.
Or machine the inside of the gilmer down a little. Think about what happens when/if your current alt dies and you get another. You'd have to machine that one down as well which might not let you return it as a core.
02-10-15, 08:06 AM
#46
Full Member
iTrader: (1)
Join Date: May 2013
Location: Phoenix
Posts: 80
Likes: 0
Received 0 Likes
on
0 Posts
Hey man, did you get a chance to see my new videos and pictures on Facebook? Last weekend was awesome. After the extended control arms my steering felt better than any fb out there. Little bit of bump steering but absolutely love this setup.


 02-28-15, 08:30 PM
#47
Full Member
Thread Starter
I've been working on plumbing the car and finally finished up. Few hose clamps etc to sort out but the rest of the hoses are done and installed.
Got a pre/post inline filter setup for fuel pump. -8 line, moroso 40 micron post filter, earls little blue 100 micron inline filter. Holley blue pump

Bent up some wire templates and searched around the back of the auto parts store till I found 2 radiator hoses I could cut sections out of to fit my radiator install. I think it turned out pretty good. I still have to machine down the motor mounts which will adjust the alignment slightly but should be ok.
Found a Earls carb fitting that adapts -6 into the M12x1.5mm inlet on the Weber carb. First generic M12x1.5 to -6 adapter fitting I tried was too long and bottomed out in the carb before sealing against the washer.

Another view of the finished radiator and oil cooler mounting brackets and well as the oil cooler plumbing routing before I plumbed in the radiator overflow tank


Starting to get an ignition system figured out. I think I am going to use a mallory 6AL to run the leading coils. Read up on how to do that conversion, using blaster coils and a dead ignitor for a plug adapter into the distributor.
Not sure about all the locked timing stuff etc so I'll run mech timing advance only and block off the vacuum ports I think. Opinions welcome on the topic...
Also not sure how people run rev limiters on these since the ignition box will rev limit the leading plugs at whatever setting but the stock ignition system for the trailing plugs wouldnt be hooked up to that limiter. So I'm currently planning on setting up a old autometer procontrol I have to rev limit the trailing plugs a few hundred rpm lower than the leadings... Let me know what you guys think and if I'm way off track on that one
03-01-15, 12:25 AM
#48
Don't block the vacuum nipples on the dizzy. Leave them open to atmosphere. Why you ask? I'll answer by asking you a series of questions.
Do you like to drive up and down a lot of hills? What happens when you have an air chamber that is connected to your pickups in the dizzy and referenced to the outside air pressure on one side of a diaphram, but the other side is blocked off like you were thinking about doing? Now tell me how many degrees your timing will "drift" and at what altitude? Think about it and get back to me.
Do you like to drive up and down a lot of hills? What happens when you have an air chamber that is connected to your pickups in the dizzy and referenced to the outside air pressure on one side of a diaphram, but the other side is blocked off like you were thinking about doing? Now tell me how many degrees your timing will "drift" and at what altitude? Think about it and get back to me.
03-01-15, 10:41 AM
#49
Moderator
iTrader: (3)
Join Date: Mar 2001
Location: https://www2.mazda.com/en/100th/
Posts: 30,763
Received 2,556 Likes
on
1,819 Posts
Not sure about all the locked timing stuff etc so I'll run mech timing advance only and block off the vacuum ports I think. Opinions welcome on the topic...
Also not sure how people run rev limiters on these since the ignition box will rev limit the leading plugs at whatever setting but the stock ignition system for the trailing plugs wouldnt be hooked up to that limiter. So I'm currently planning on setting up a old autometer procontrol I have to rev limit the trailing plugs a few hundred rpm lower than the leadings... Let me know what you guys think and if I'm way off track on that one
Also not sure how people run rev limiters on these since the ignition box will rev limit the leading plugs at whatever setting but the stock ignition system for the trailing plugs wouldnt be hooked up to that limiter. So I'm currently planning on setting up a old autometer procontrol I have to rev limit the trailing plugs a few hundred rpm lower than the leadings... Let me know what you guys think and if I'm way off track on that one
for the rev limiter, you need to be a little careful, if you're going to hit it once in a while, its fine to do anything, but if you are going to hit it for long periods of time, it is often better to not have one. the stop/start of the rev limiter can cause huge catastrophic damage. this is an engine that decided it didn't like the 8250rpm limiter FC3S Pro v2.0:  K2RD HOF
cutting the trailing plugs only might actually be a good idea though, instead of scattering the engine, you'd just get a drop in power.
 thank you!

