Engine Removal, Rebuild, and Install on a 95 RHD FD
 01-11-15, 03:12 PM
#1
Full Member
Thread Starter

Engine Removal, Rebuild, and Install on a 95 RHD FD
Well, here's the deal. I'm going to be removing, rebuilding, and installing the motor in my 95 RHD FD. I figured as long as I'm doing it I could take a little time to document everything. My entire point of this thread is for me to have a reference in case I forget anything in the future and for the newbies. I want to do this in a fashion that would allow a home mechanic to read this thread and have no question on how to remove, rebuild, and install a motor in an FD. At least a RHD FD.
I plan on doing this rebuild in a series of seasons and episodes. I know this sounds retarded, but I figured it would let me organize my thoughts a little better and maybe make this thread easier to follow. That being said, the seasons will be named as such:
Season 1: This is the removal of the engine. I don't know how many episodes there will be, because each episode will essentially be an update. And that just depends how often I get to make a major update in this thread.
Season 2: This will be the rebuilding of the engine. Same rules about episodes/updates applies.
Season 3: This is the install. Once again, same rules on the episodes/updates.
A couple of quick notes:
1: I suck at taking pictures and the camera is not the best. Some pics are slightly fuzzy, but they still do the job.
2: When I write out what to do, the numbers are not necessarily ordered steps. They are more of a way to reference what I am saying with the arrows on the images. That way when I say "1: Remove these three bolts", you should know that I mean remove the three bolts pointed out by red arrows that are labeled with a "1".
Now this is my disclaimer:
I am not a professional mechanic; I do not have a garage that has every tool imaginable. I am just a dude working in his tiny *** two car garage with the tools I have acquired since I started wrenching. Same goes for knowledge, I am not professionally trained, I'm just relying on the knowledge I acquired the same way as my tools, just getting out there and doing it. As far as rotaries go, I've never worked on one. EVER. So this will be a learning experience for me. A big one.
I have one simple request for this thread. Please don't be a dick. I may do things that are a little different than the way a next guy does it. If you feel I'm doing something wrong, or could do something better, don't act like a douche about it. Kindly point it out. That way anyone referencing this thread later on will see logical advice and conversation versus a bunch of idiots having a forum war on the best way to remove any random part. The way I'm doing it is the way that seemed best to me, or the only way I could. So please contribute to the thread that way it doesn't fall flat on its face, which I would like to avoid. Additionally, the reason I may be doing something differently is because this car has different parts or non-OEM parts on it. Finally, I try my best with the grammar and punctuation and explaining things thoroughly. So if you don't understand what I am saying, just ask and I'll try to expand or rewrite that particular are. I also try to proofread what I write, but mistakes will get through.
Anyways, on to the beginning of the tear down.
Season 1 - Episode 1
In this episode we will be removing: the batter and tray, throttle cable, intake, intercooler piping, air separator tank, intercooler, radiator fans, radiator and hoses, accessory belts, couple vacuum lines, fuel lines, and heater core lines.
First things first, remove the battery in your car. This is a good thing to get in the habit of. Mainly because it sucks to flop a tool down without paying attention and jump the hot post to the body or negative post. I assume if you're planning on pulling a motor in an FD, you are capable of figuring out how to remove a battery. However, if you're not, here are some quick instructions.
1: Remove the two battery terminals. Simply loosen the nut and pop them off. Congrats, your car is now dead.
2: Remove the tie down. I already did this by the time I took this picture, but the arrows show the locations of the nuts that tie the battery down. Just remove them and the bracket and the battery will lift out.

1: Remove these three bolts and the battery tray will lift out. Super simple. Right?

Alright, let's get the throttle cable out of the way.
1: Loosen one of these nuts, it doesn't really matter which one as you can adjust the tension. Once they are loose, pry the cable up out of the bracket, it may be stuck pretty good.
2: Remove the cable from this bracket. You can do this easily by rotating the bracket counter clockwise and slipping the cable out of the notch the end hooks into.
Once the cable is loose, just tuck it off to the side out of the way.

Alright, now for the pain in the *** intake.
1: Remove these three clamps and slide the hoses off.

1: Remove this clamp as well, it's tucked up under the filter and kind of hard to get to. But, with enough convincing you'll get it. Also remove the hose.

1: Remove this bracket bolt.

1: Remove this bracket bolt as well.
At this point, the air filter and attached hoses should lift out.

Now on to removing the intercooler piping.
1: Loosen up this clamp.
2: Remove both of these bolts.
3: Loosen up this clamp as well.
Once you've done that, the entire pipe will come loose and lift out.

Now, for the other intercooler pipe.
1: Remove this clamp.
2: Remove these nuts. I only show two of them, but there are four. Two are on the underside and impossible to get a picture of. However, the next picture will show all four stud locations.
Once these nuts are off, you can remove the pipe.

1: These four studs are the previously mentioned studs.

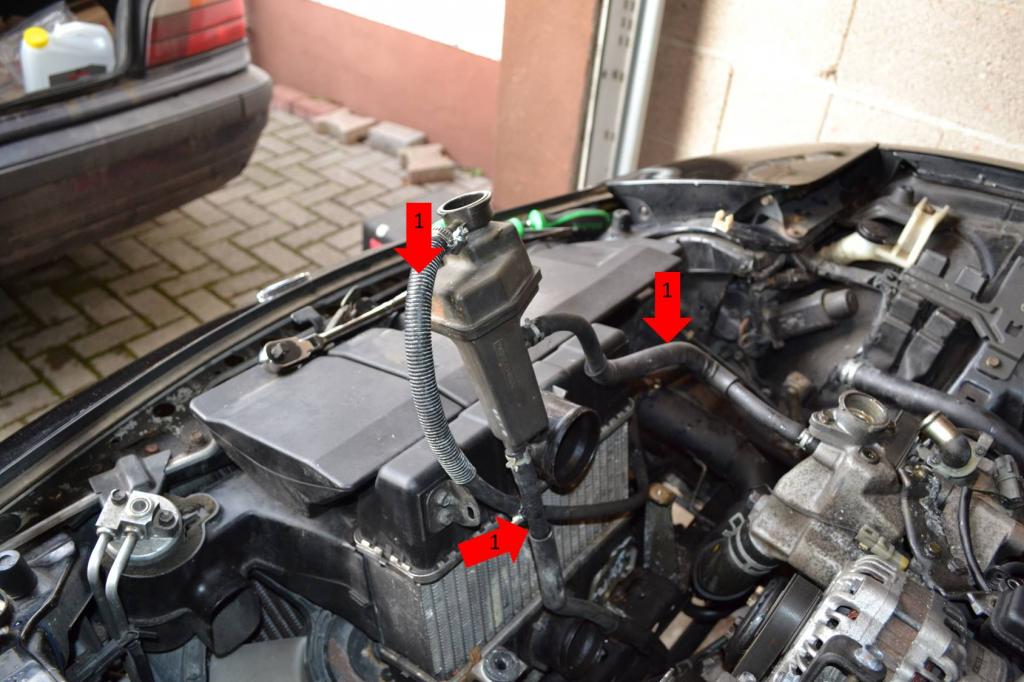
Alright, next up is the removal of the air separator, intercooler, and radiator. Before we get going we need to drain the radiator so we aren't spilling fluid everywhere later on. As a quick note, all of the under-trays were removed before I bought the car, I have them, but I did not remove them. So you will have to remove them before you can get to the drain, at least I think you will.
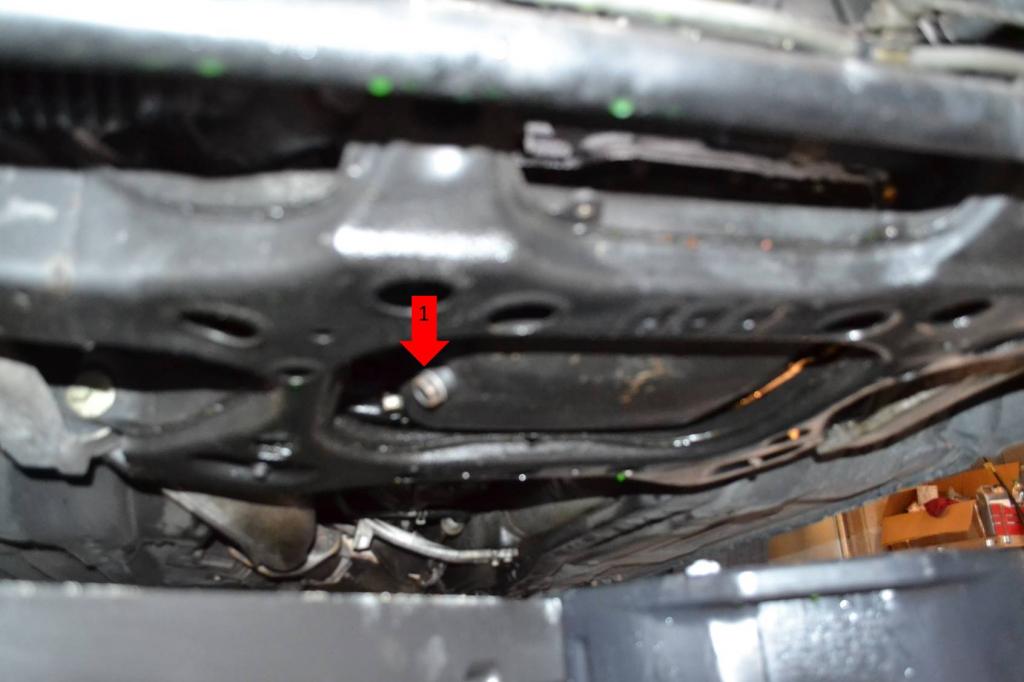
1: Get a bucket/pan and put it under this drain plug. Once you have the pan, remove the plug and let the coolant drain.

Now remove the air separator tank.
1: Remove this bolt. This is the only bolt holding the air separator tank in.
2: This is just a mount hole. As you can see, somebody didn't put this together correctly when they worked on it, all well. The air separator tank will just pull out of this mount.

The air separator tank removal will be continued in the next post. I've apparently hit an image limit. lol
Last edited by misterstyx69; 01-14-15 at 03:08 PM.
 01-11-15, 07:40 PM
#2
Full Member
Thread Starter
Season 1 - Episode 1 Continued
This is continuing the removal of the air separator tank.
1: Remove these three lines. You can either take them off the air separator tank or trace them and take them loose at the other end of the line. It's up to you, just remember if you take them off the air separator tank you'll still have the lines in the bay and they will likely be in the way later on.
Once these lines are loose, you can set the tank aside.
Now, let�s get the intercooler out.
1: Remove these two bolts, this will allow this plastic air duct to lift out of place.
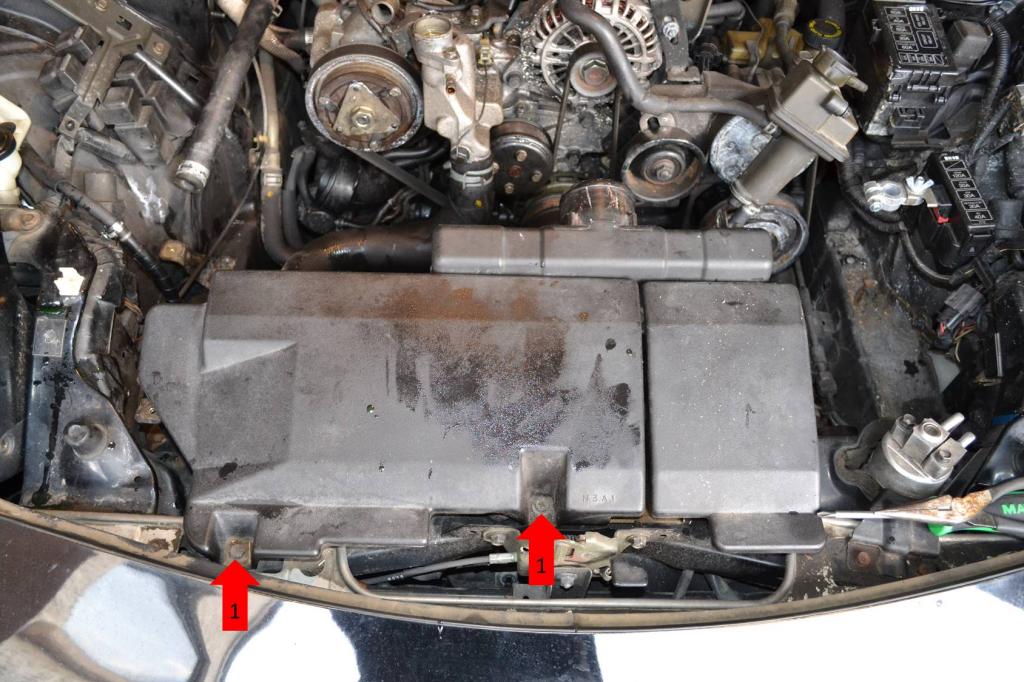
1: Remove these six bolts.
2: This plug will pull out of the duct below it. Just pop it out. Once you do this, the intercooler will lift out of place.
Now let�s get this air duct, that�s marked with a red star, out of the engine bay.
1: Remove these two bolts and this A/C component can be lifted out of the way. Be gentle with it, as you will be bending the lines to it just a little bit. But it will move without much force at all. Once you have moved this, just lift the duct out.
Ok, now on to the most frustrating part, getting the fan shroud and radiator out. I personally thought this was a pain just because everything is packed in rather well. But with enough wiggling, everything comes out. We�ll start with removing the main coolant hoses.
1: Remove these clamps and pull the hoses off.
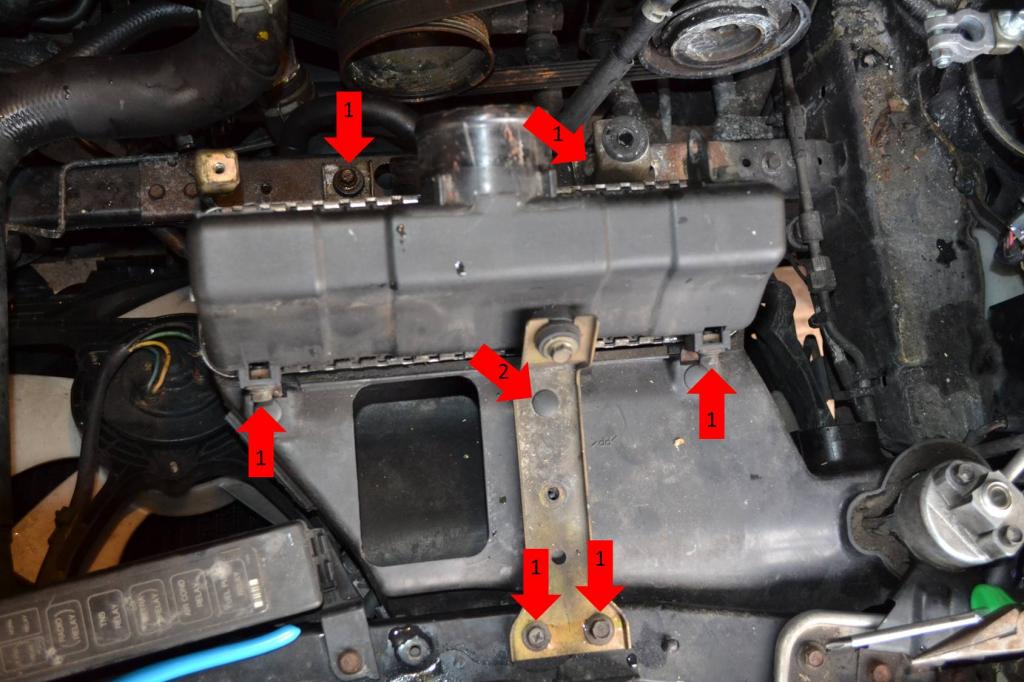
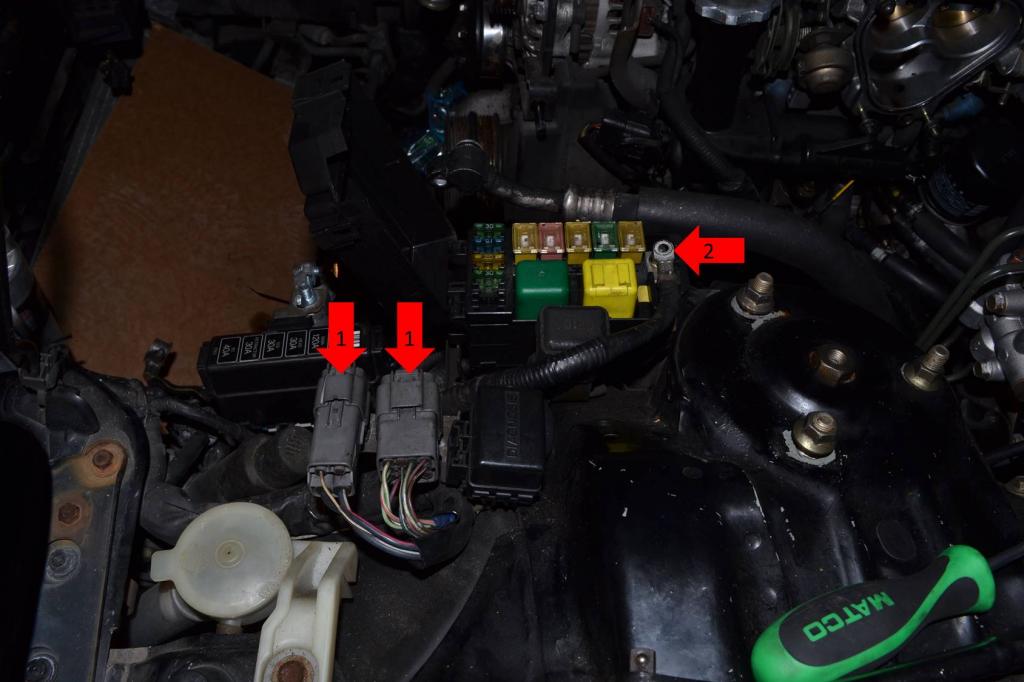
1: Remove these two bolts. I know you can only see one, the other is hiding underneath my screwdriver. By doing this, you can remove the fuse/relay box and easily access the fan plugs and shroud bolts.
2: Unplug the fans. There are two plugs.
3: Remove these three bolts. Well, I assume there were once bolts. Maybe they were plastic clips. I don�t know, because the previous owner was apparently so concerned with weight savings he used zip ties (lol). Anyways, removing those three will loosen up the shroud and let you get it out of the way.
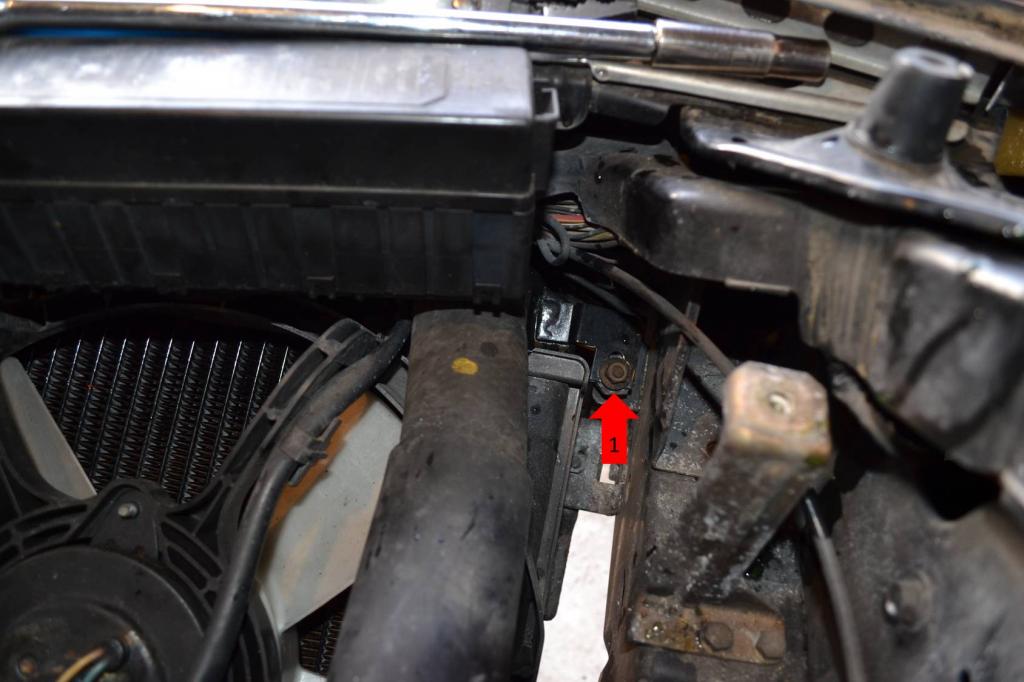
4: Buried back here is one of the nuts holding the radiator in place. You can remove it.
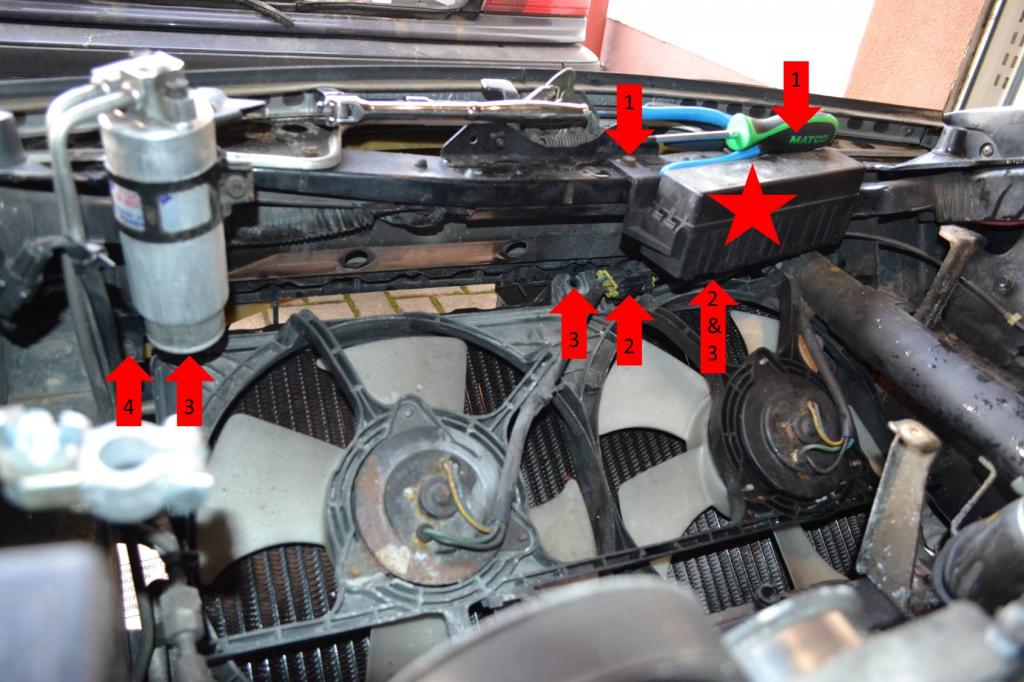
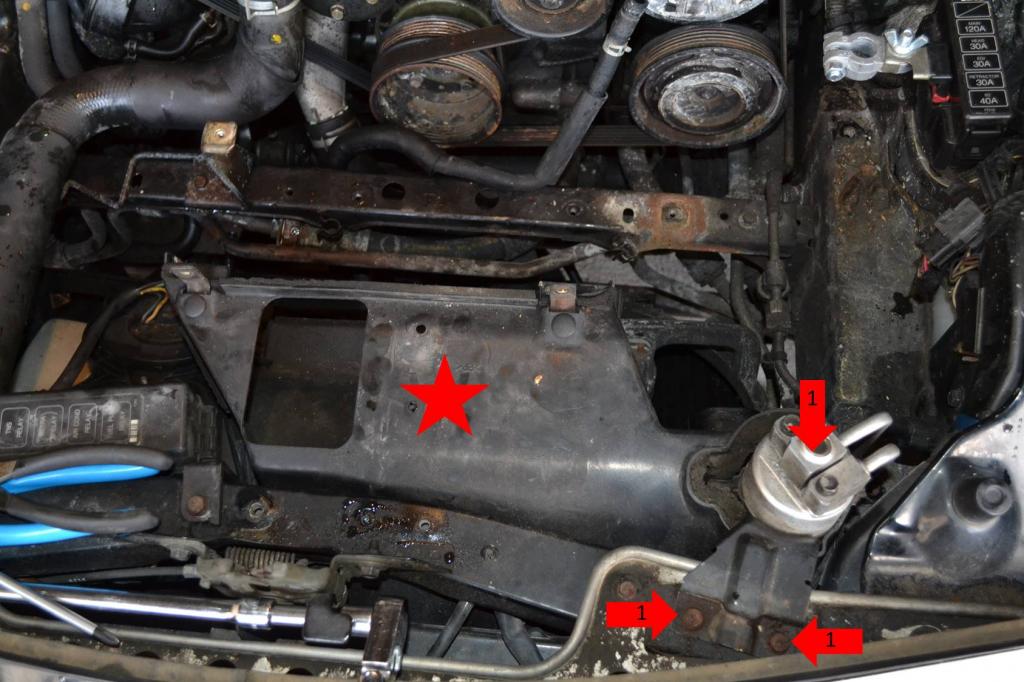
1: This is the last radiator nut, over on the right hand side of the car. Remove it.
Once you have that done, all you have to do is unlock the secret combination of wiggling, wriggling, cussing, and crying that is required to get the shroud and radiator out. But that�s it, you can set the shroud/fans and radiator aside.
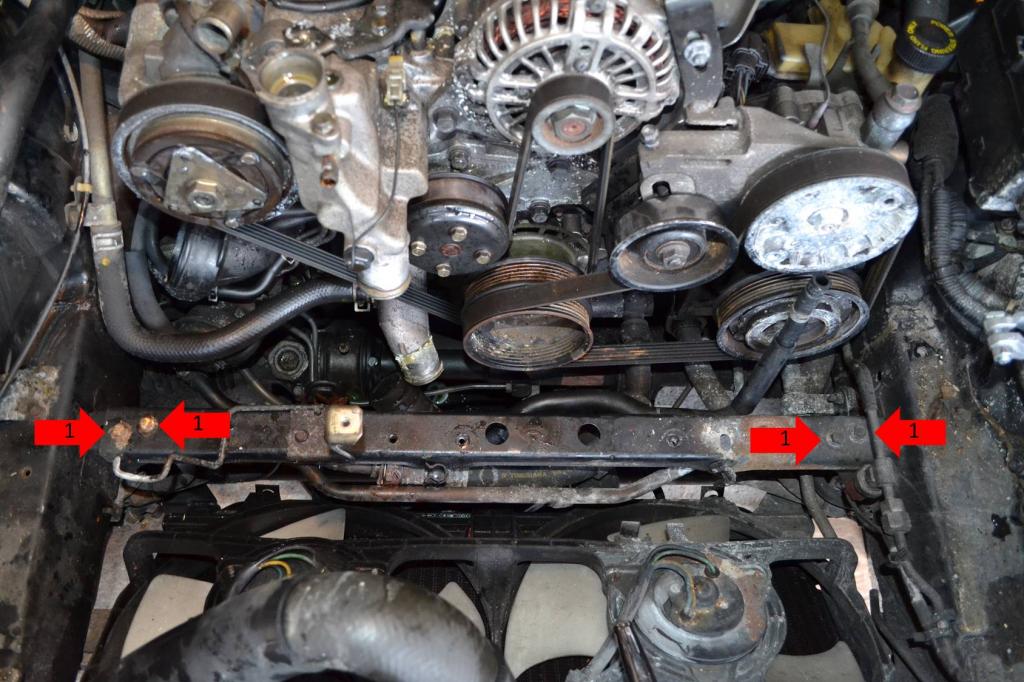
Now remove the cross beam between the radiator and engine.
1: Remove these four bolts and it will lift out.
Now onto the belts.
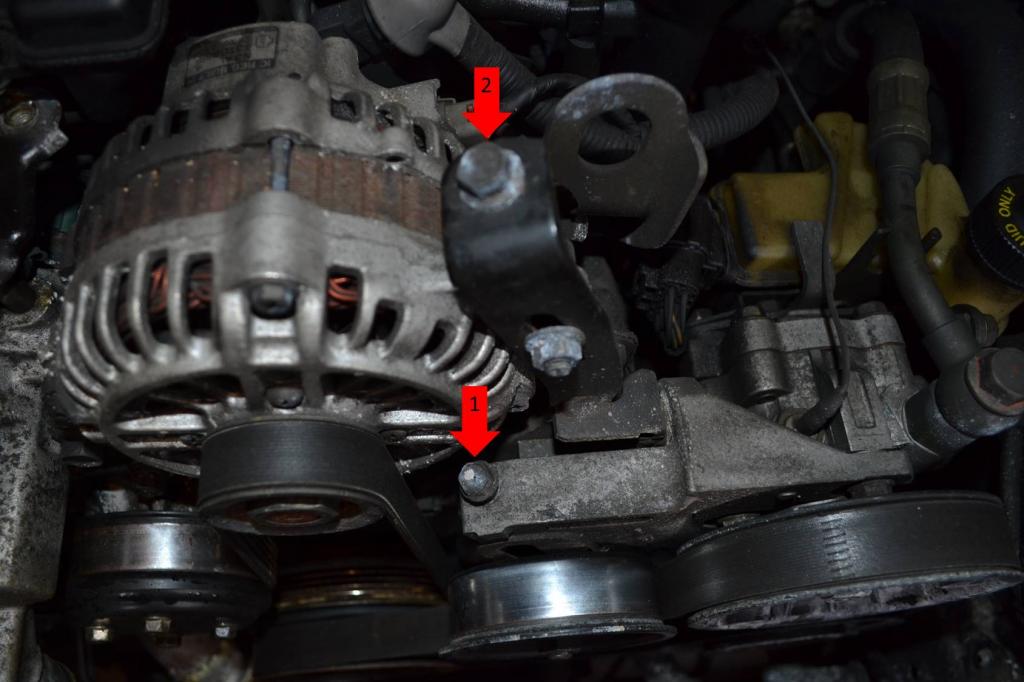
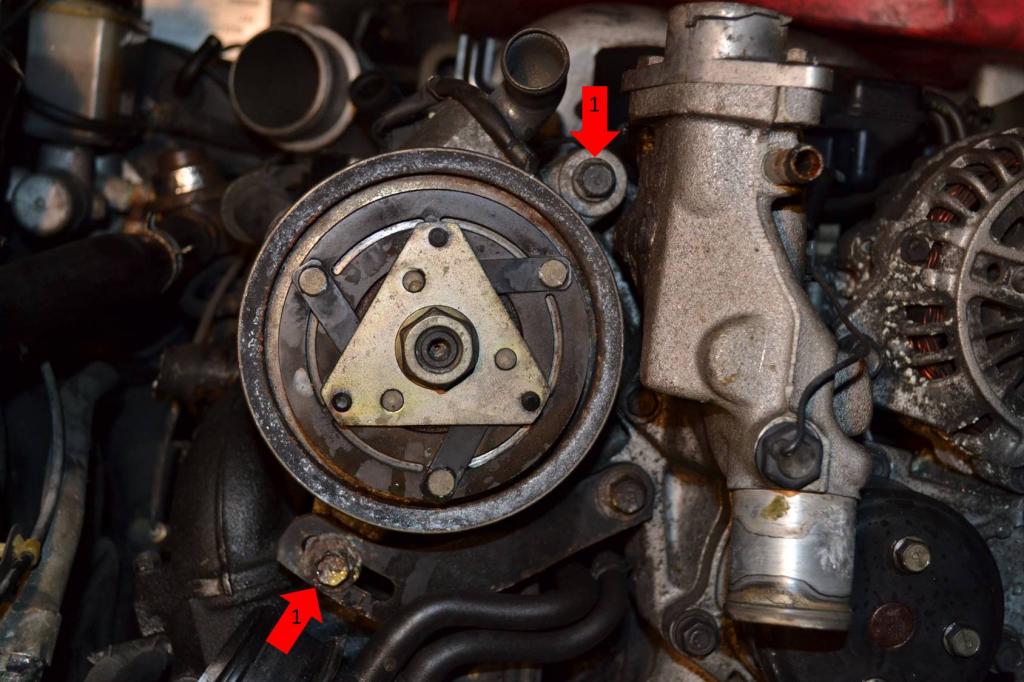
1: Loosen this nut. This will allow the tensioner to slide.
2: Loosen this nut. This will allow the alternator to rotate.
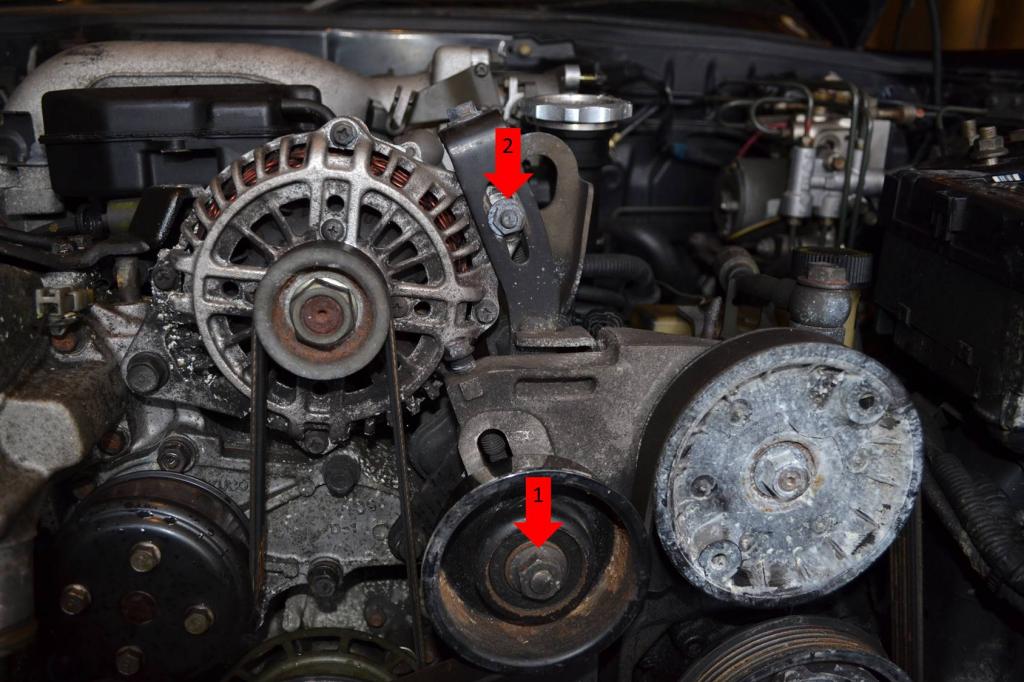
1 & 2: These are the tensioner bolts, just loosen them and the belts will begin to get slack. You can then slip the belts off the pulleys.
Ok, now for a couple of vacuum lines.
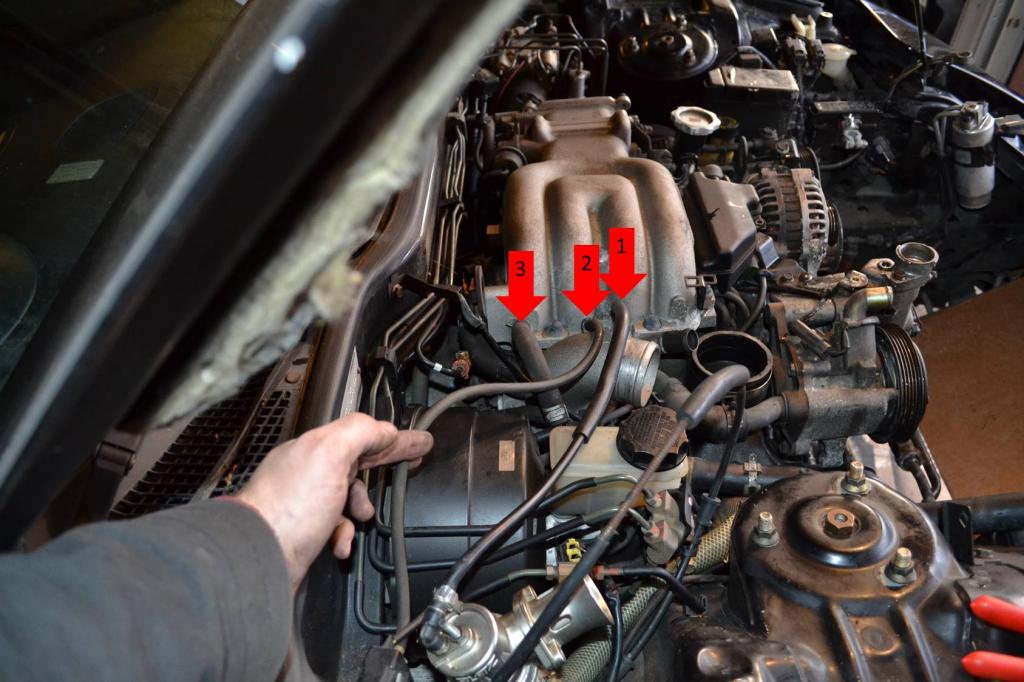
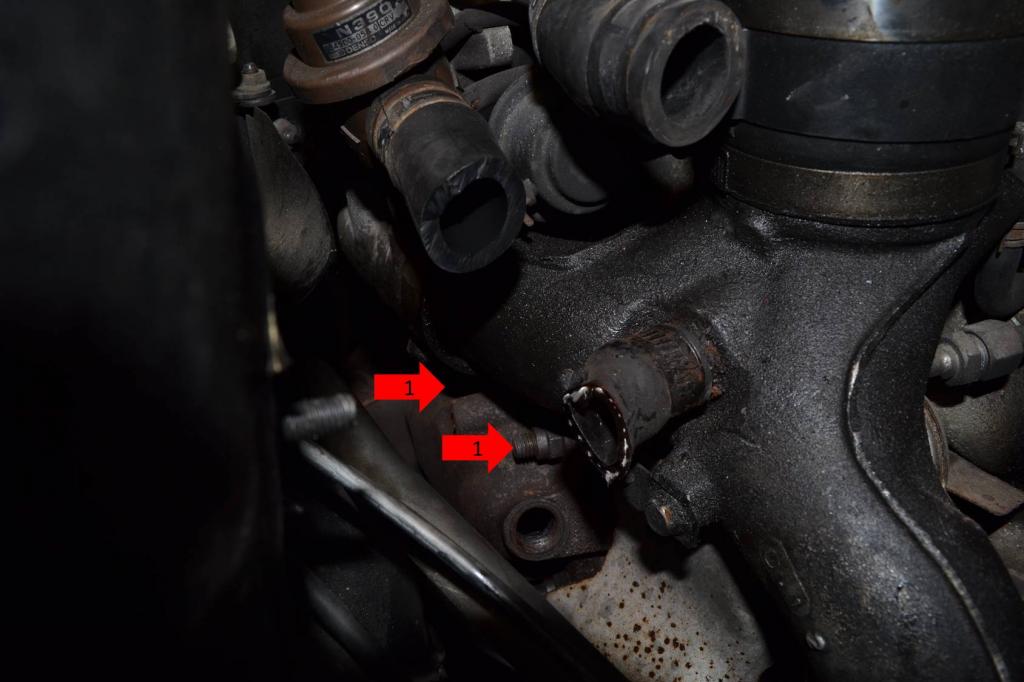
1: This is the boost line for the BOV, just remove it from the intake manifold.
2: This is a boost line to a little solenoid, just remove it from the intake as well.
3: This is the brake booster line, remove it from the intake. You can swing it out of the way. Unfortunately, mine was so brittle it fell apart in my hands. So mine got removed entirely.
Alright, final part for the day. Removal of the heater core hoses and fuel lines.
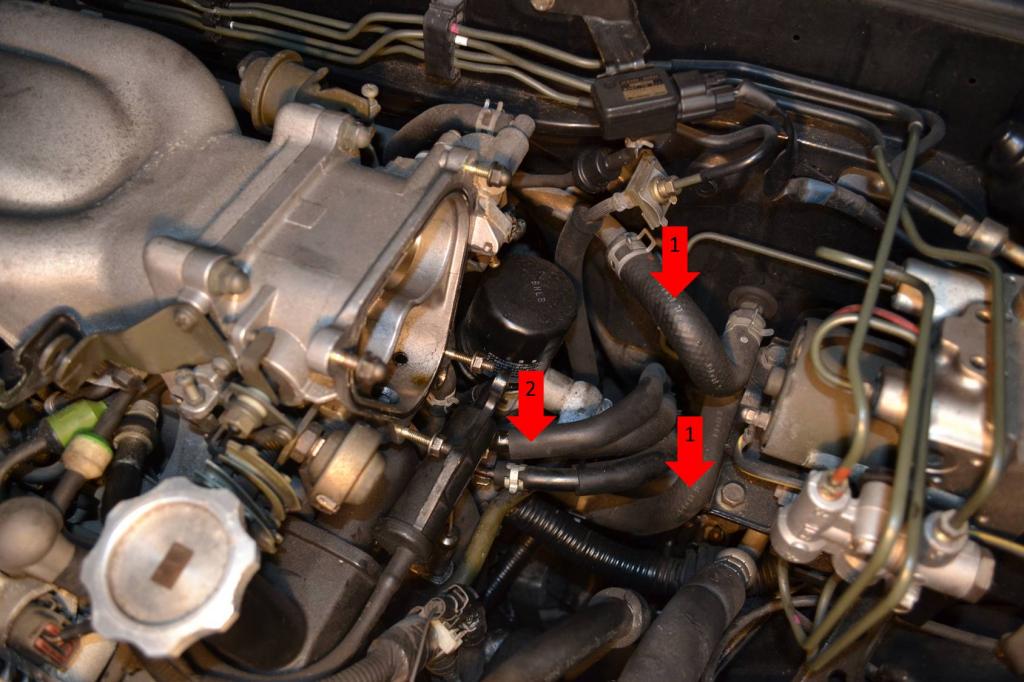
1: These are the heater core hoses. Remove the clamps on both ends and wiggle them off. The upper hose was fairly easy. The lower hose was another story, it was a pain.
2: This is actually a bundle of 3 fuel lines. Just remove the clamps and pry them off. Be prepared with some napkins or rags, some fuel will come out.
Well, that is as far as I�ve gotten for the day.. I�ll update this again sometime in the future. Hopefully the near future.
1: Remove these three lines. You can either take them off the air separator tank or trace them and take them loose at the other end of the line. It's up to you, just remember if you take them off the air separator tank you'll still have the lines in the bay and they will likely be in the way later on.
Once these lines are loose, you can set the tank aside.

Now, let�s get the intercooler out.
1: Remove these two bolts, this will allow this plastic air duct to lift out of place.

1: Remove these six bolts.
2: This plug will pull out of the duct below it. Just pop it out. Once you do this, the intercooler will lift out of place.

Now let�s get this air duct, that�s marked with a red star, out of the engine bay.
1: Remove these two bolts and this A/C component can be lifted out of the way. Be gentle with it, as you will be bending the lines to it just a little bit. But it will move without much force at all. Once you have moved this, just lift the duct out.

Ok, now on to the most frustrating part, getting the fan shroud and radiator out. I personally thought this was a pain just because everything is packed in rather well. But with enough wiggling, everything comes out. We�ll start with removing the main coolant hoses.
1: Remove these clamps and pull the hoses off.

1: Remove these two bolts. I know you can only see one, the other is hiding underneath my screwdriver. By doing this, you can remove the fuse/relay box and easily access the fan plugs and shroud bolts.
2: Unplug the fans. There are two plugs.
3: Remove these three bolts. Well, I assume there were once bolts. Maybe they were plastic clips. I don�t know, because the previous owner was apparently so concerned with weight savings he used zip ties (lol). Anyways, removing those three will loosen up the shroud and let you get it out of the way.
4: Buried back here is one of the nuts holding the radiator in place. You can remove it.

1: This is the last radiator nut, over on the right hand side of the car. Remove it.

Once you have that done, all you have to do is unlock the secret combination of wiggling, wriggling, cussing, and crying that is required to get the shroud and radiator out. But that�s it, you can set the shroud/fans and radiator aside.
Now remove the cross beam between the radiator and engine.
1: Remove these four bolts and it will lift out.

Now onto the belts.
1: Loosen this nut. This will allow the tensioner to slide.
2: Loosen this nut. This will allow the alternator to rotate.

1 & 2: These are the tensioner bolts, just loosen them and the belts will begin to get slack. You can then slip the belts off the pulleys.

Ok, now for a couple of vacuum lines.
1: This is the boost line for the BOV, just remove it from the intake manifold.
2: This is a boost line to a little solenoid, just remove it from the intake as well.
3: This is the brake booster line, remove it from the intake. You can swing it out of the way. Unfortunately, mine was so brittle it fell apart in my hands. So mine got removed entirely.

Alright, final part for the day. Removal of the heater core hoses and fuel lines.
1: These are the heater core hoses. Remove the clamps on both ends and wiggle them off. The upper hose was fairly easy. The lower hose was another story, it was a pain.
2: This is actually a bundle of 3 fuel lines. Just remove the clamps and pry them off. Be prepared with some napkins or rags, some fuel will come out.

Well, that is as far as I�ve gotten for the day.. I�ll update this again sometime in the future. Hopefully the near future.
 01-12-15, 06:48 AM
#4
Another good DIY'er thread from one of the forum mods:
https://www.rx7club.com/3rd-generati...k-pics-411874/
Removal, rebuild and installation:
FSM C-14 to C-111
http://www.wright-here.net/files/man.../_C_engine.pdf
https://www.rx7club.com/3rd-generati...k-pics-411874/
Removal, rebuild and installation:
FSM C-14 to C-111
http://www.wright-here.net/files/man.../_C_engine.pdf
01-14-15, 02:08 PM
#6
Full Member
Thread Starter
Season 1 - Episode 2
So, I got to spend a couple hours in the garage today. So here's the next update.
Today I decided to work on removing the power steering, A/C, air pump, and oil cooler line, and a couple other random things. Since I was removing the oil cooler lines and I hadn't drained the oil already, I began with that.
Once again, this is something you should probably already be fully capable of. But in case you're not, follow this simple step:
1: Remove the drain bolt shown here from the oil pan. That will let all the dead dinosaurs out.
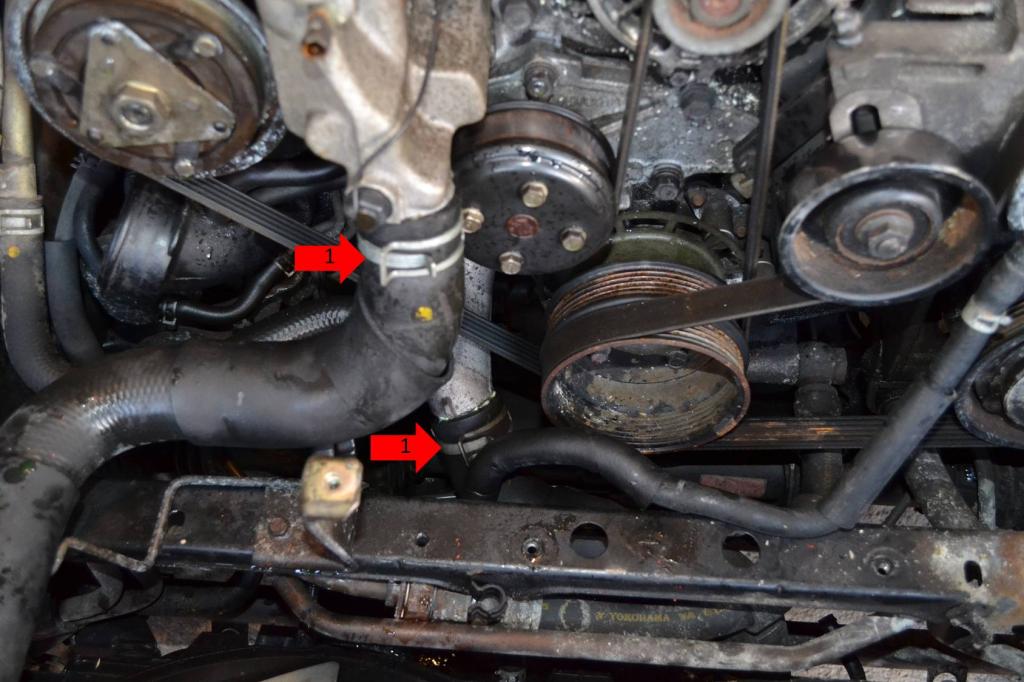
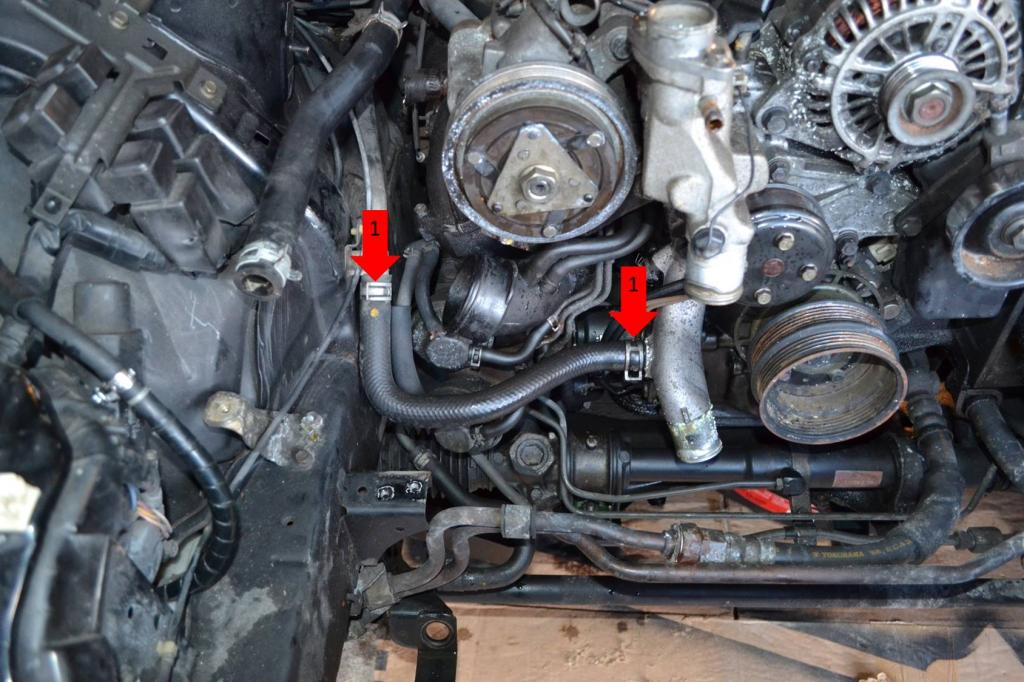
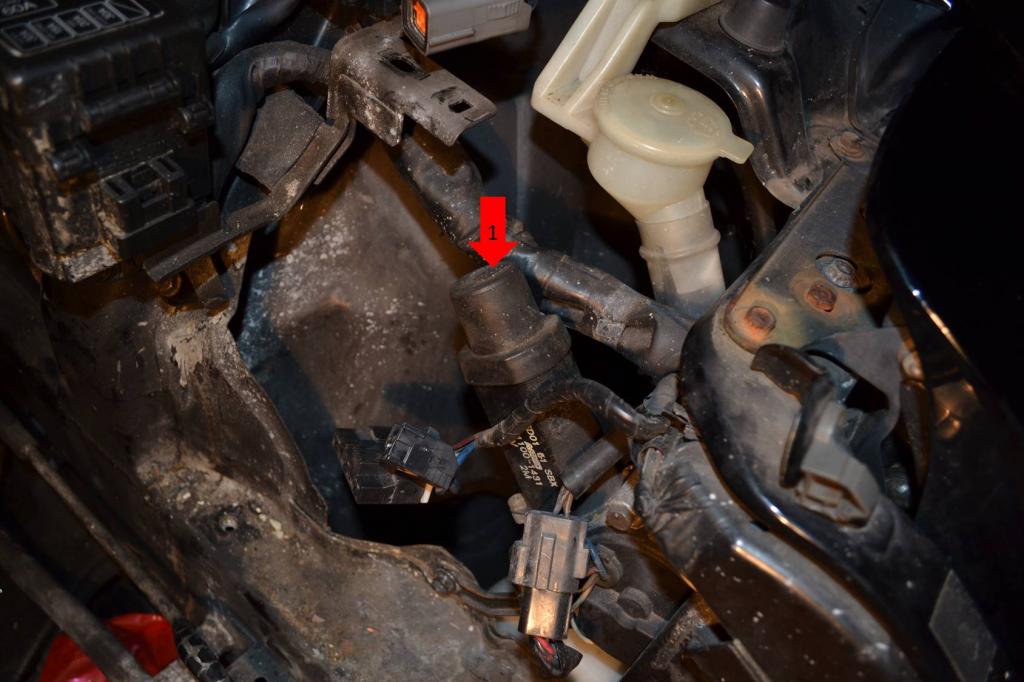
After the oil was drained, I decided to get off one more coolant hose. This is actually at the front right side of the engine.
1: Remove both of these clamps and remove the hose.
Now time to get cracking on the power steering, A/C, and oil lines.
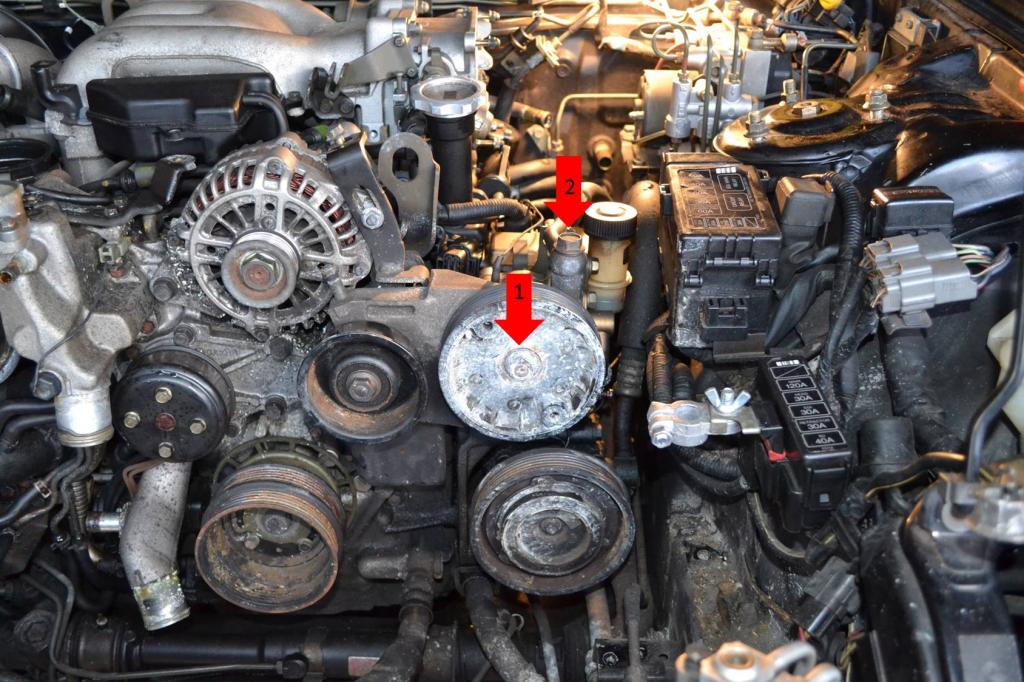
1: Remove the 17mm nut that holds the power steering pulley on. I did this by using a pry bar to hold the pulley still while I broke the nut loose.
2: Remove the banjo bolt for the high pressure line. I decided to remove the line from the pump because the line has a pretty inaccessible (at the time) bracket. Removal from the pump is easiest.
1: Remove the low pressure line. You can't really see the line in this picture at all, however the arrow is pointing directly at one of the tabs on the clamp. Get ready for power steering fluid to flow freely.
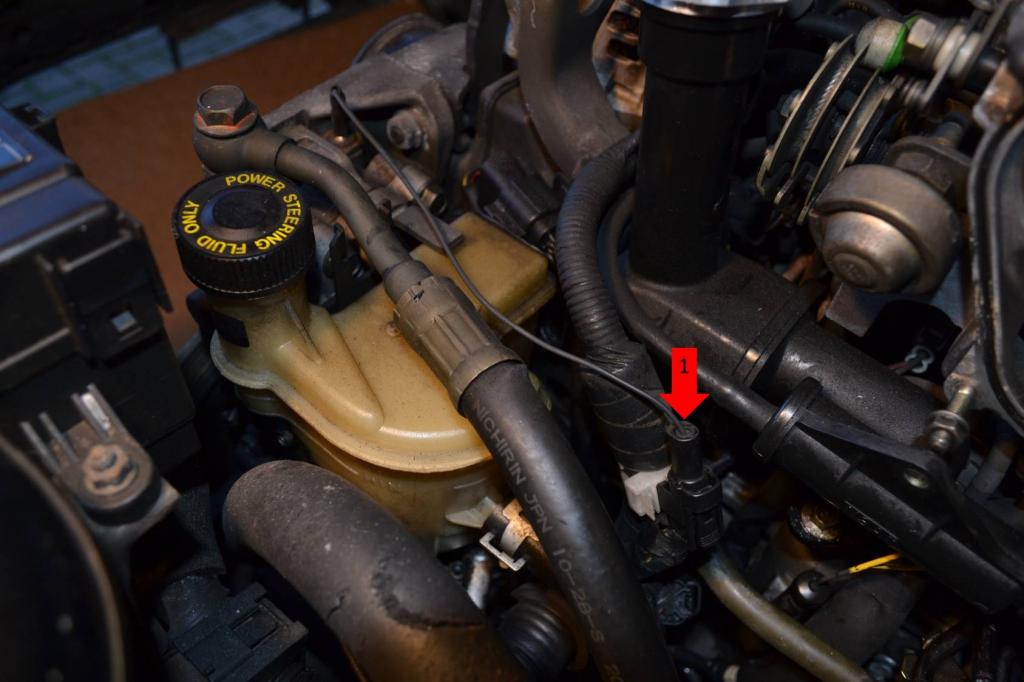
1: Now unplug this connector that goes to the pump.
Once the lines and wiring are unhooked, we can move on to actually removing the pump itself.
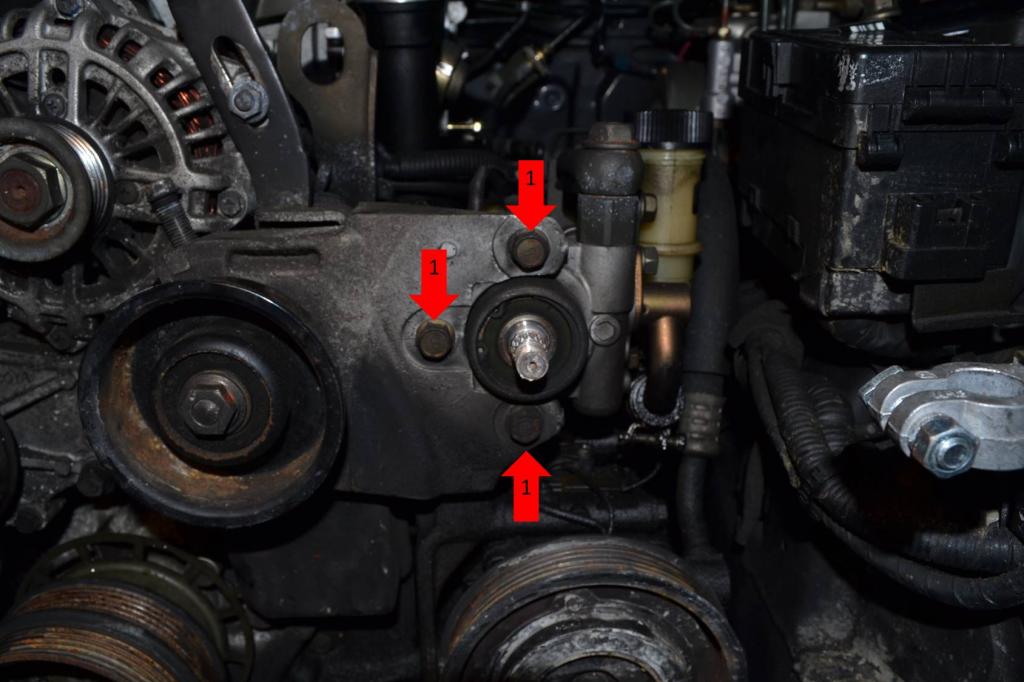
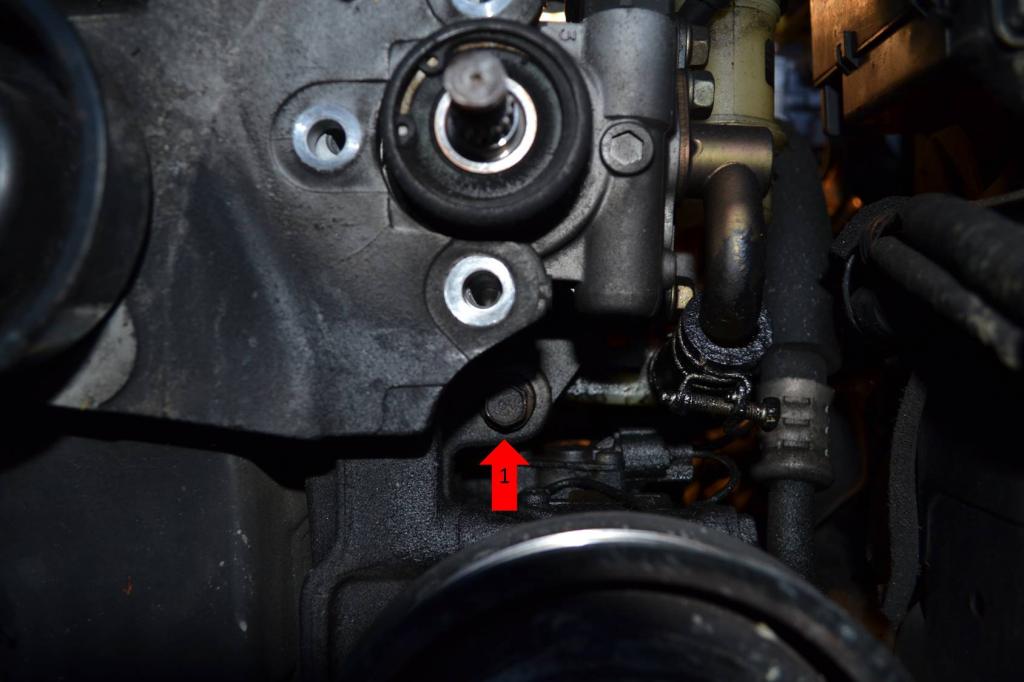
1: There are four bolts holding the pump on. This picture only shows three, the second picture shows the fourth. Once these bolts are out, the pump will simply lift out, you can lay it aside.
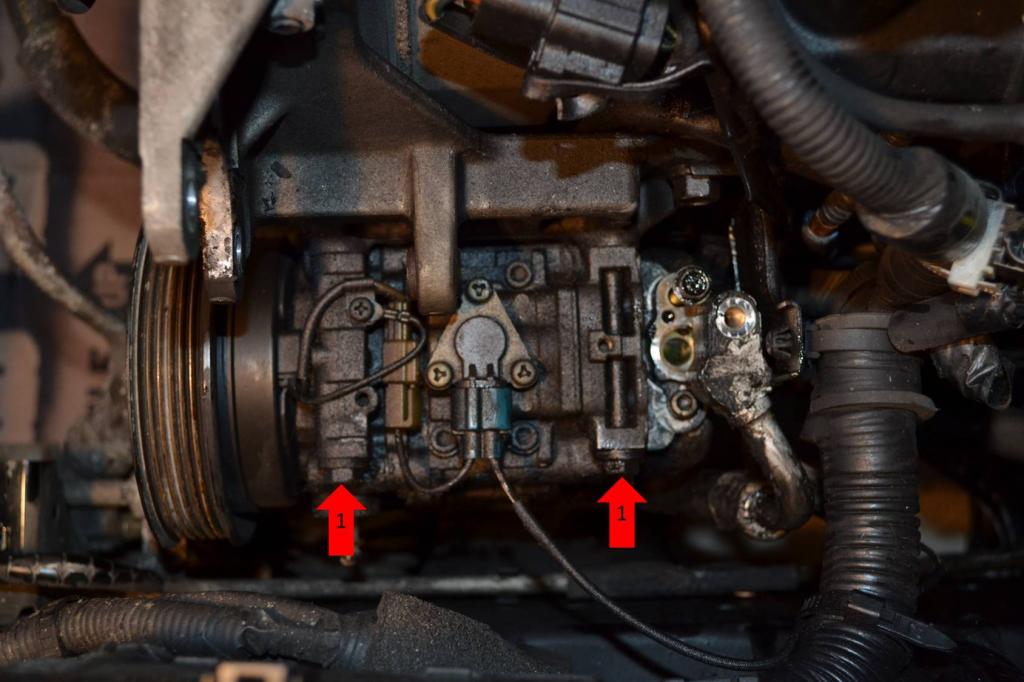
After the power steering pump is out, we can move on to removing the A/C compressor. My car's A/C system had been evacuated before I got the car. So I was able to remove the lines without any concern to the environment. I would advise that you have the A/C evacuated in a safe and legal manner. If you choose not to, I am in no way responsible.
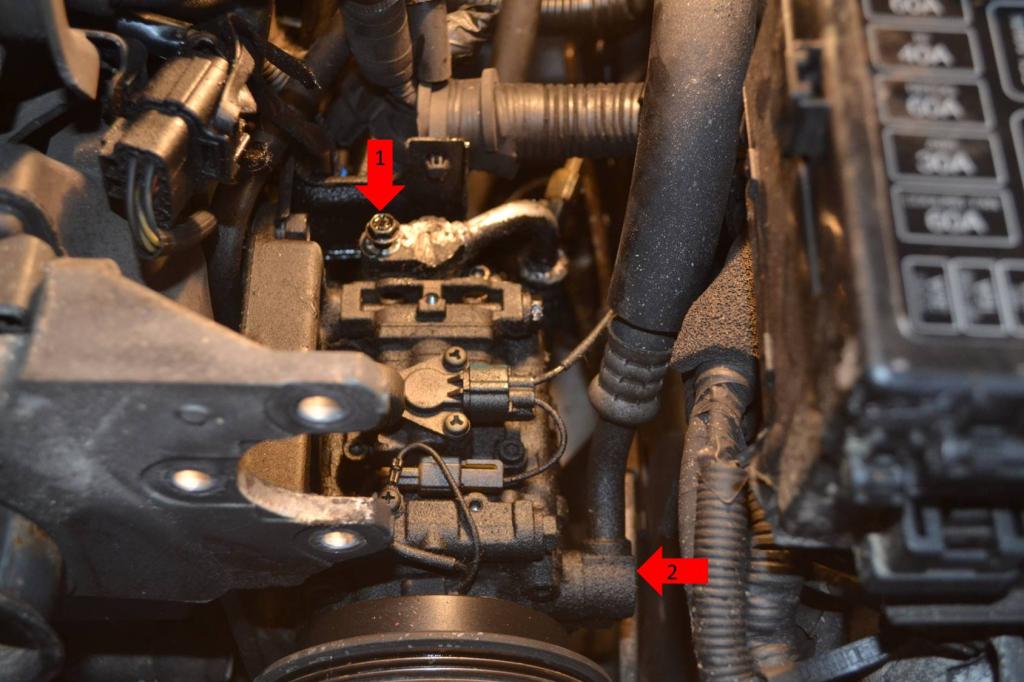
1: Both of these fittings have a single 10mm bolt. Remove the bolts and the hoses will pop free.
1: Next unplug the compressor from the wiring harness by unplugging this connector.
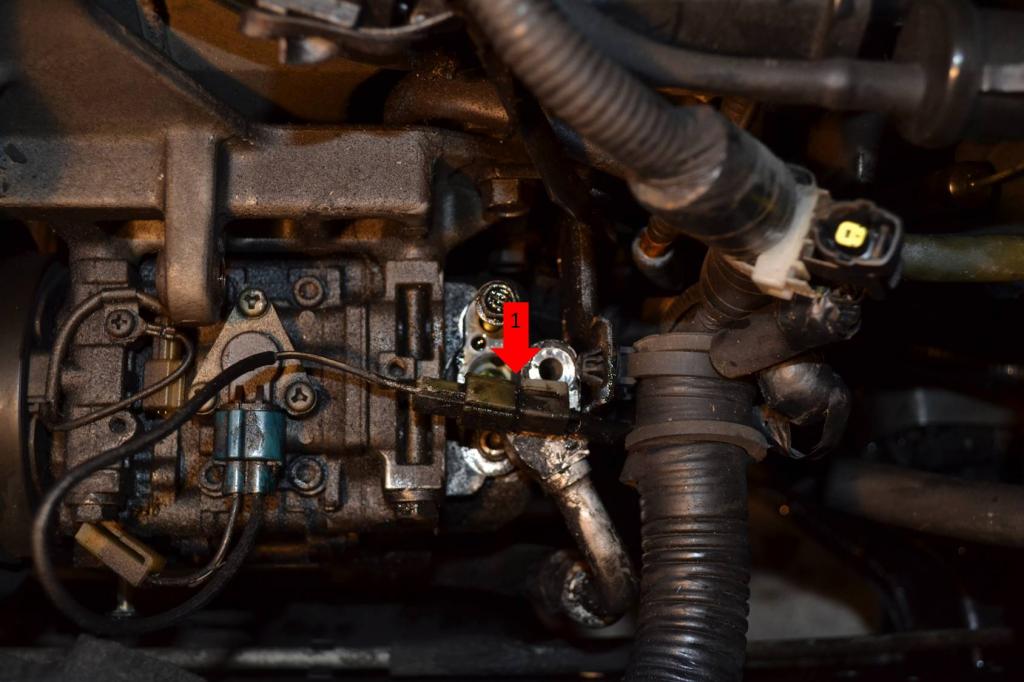
Once the hoses and wiring are disconnected, you can move on to actually removing the compressor.
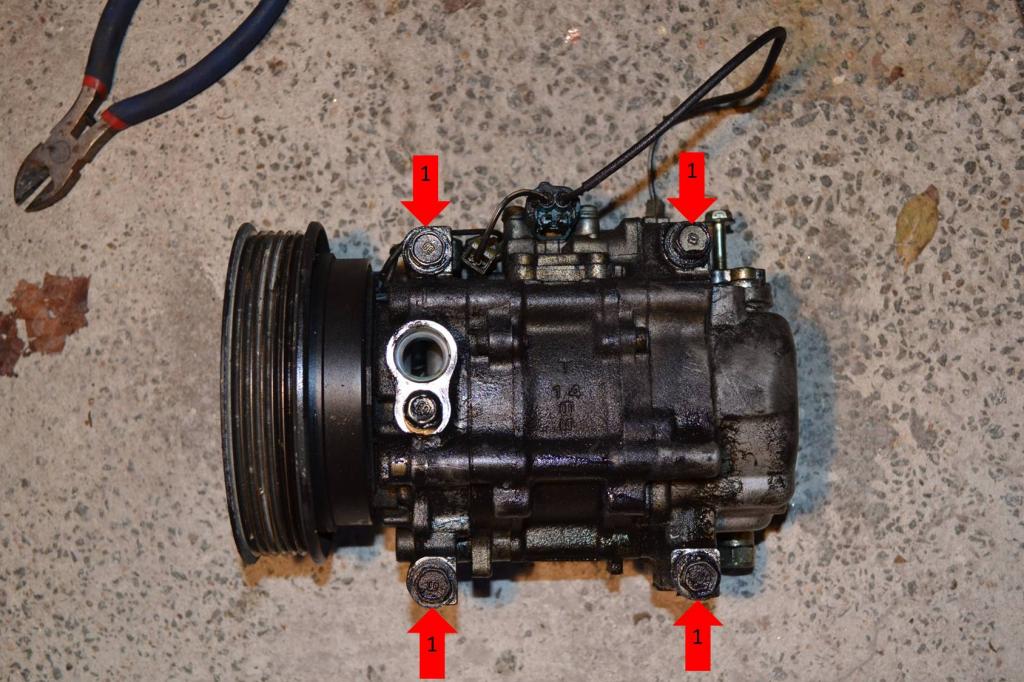
1: There are four bolts holding the compressor, only two are shown in this picture but the other two are directly below the uppers. They form a square pattern which is shown in the second picture. Remove these four bolts and the compressor will lift out, lay it aside.
Today I decided to work on removing the power steering, A/C, air pump, and oil cooler line, and a couple other random things. Since I was removing the oil cooler lines and I hadn't drained the oil already, I began with that.
Once again, this is something you should probably already be fully capable of. But in case you're not, follow this simple step:
1: Remove the drain bolt shown here from the oil pan. That will let all the dead dinosaurs out.

After the oil was drained, I decided to get off one more coolant hose. This is actually at the front right side of the engine.
1: Remove both of these clamps and remove the hose.

Now time to get cracking on the power steering, A/C, and oil lines.
1: Remove the 17mm nut that holds the power steering pulley on. I did this by using a pry bar to hold the pulley still while I broke the nut loose.
2: Remove the banjo bolt for the high pressure line. I decided to remove the line from the pump because the line has a pretty inaccessible (at the time) bracket. Removal from the pump is easiest.

1: Remove the low pressure line. You can't really see the line in this picture at all, however the arrow is pointing directly at one of the tabs on the clamp. Get ready for power steering fluid to flow freely.

1: Now unplug this connector that goes to the pump.

Once the lines and wiring are unhooked, we can move on to actually removing the pump itself.
1: There are four bolts holding the pump on. This picture only shows three, the second picture shows the fourth. Once these bolts are out, the pump will simply lift out, you can lay it aside.


After the power steering pump is out, we can move on to removing the A/C compressor. My car's A/C system had been evacuated before I got the car. So I was able to remove the lines without any concern to the environment. I would advise that you have the A/C evacuated in a safe and legal manner. If you choose not to, I am in no way responsible.
1: Both of these fittings have a single 10mm bolt. Remove the bolts and the hoses will pop free.

1: Next unplug the compressor from the wiring harness by unplugging this connector.

Once the hoses and wiring are disconnected, you can move on to actually removing the compressor.
1: There are four bolts holding the compressor, only two are shown in this picture but the other two are directly below the uppers. They form a square pattern which is shown in the second picture. Remove these four bolts and the compressor will lift out, lay it aside.


Last edited by RLaCasse1; 01-14-15 at 02:13 PM.
01-14-15, 02:10 PM
#7
Full Member
Thread Starter
Season 1 - Episode 2 Continued
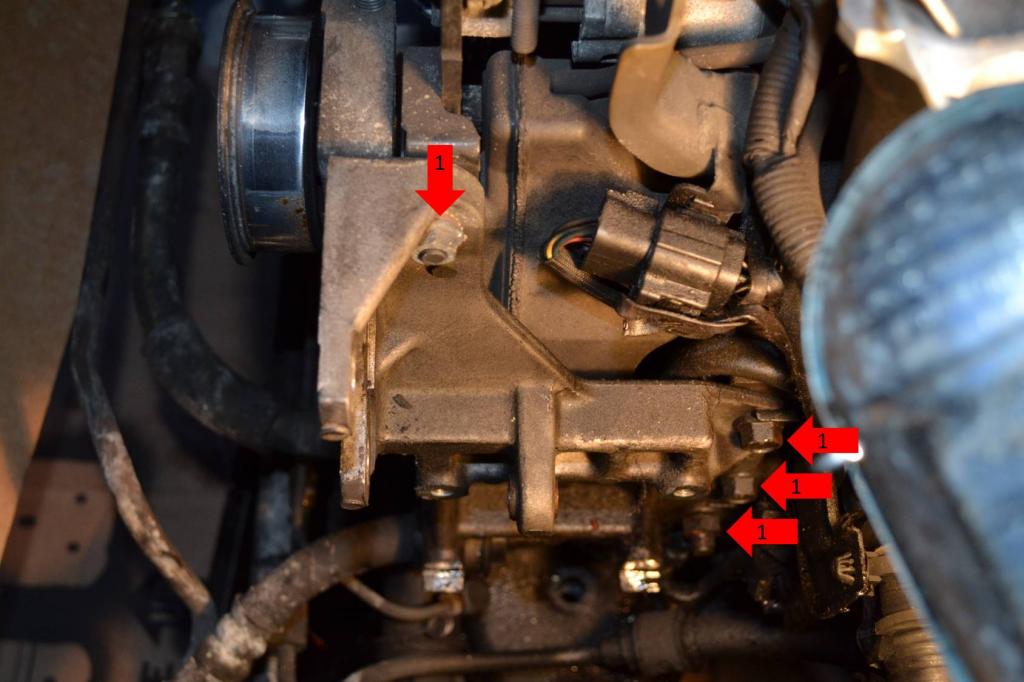
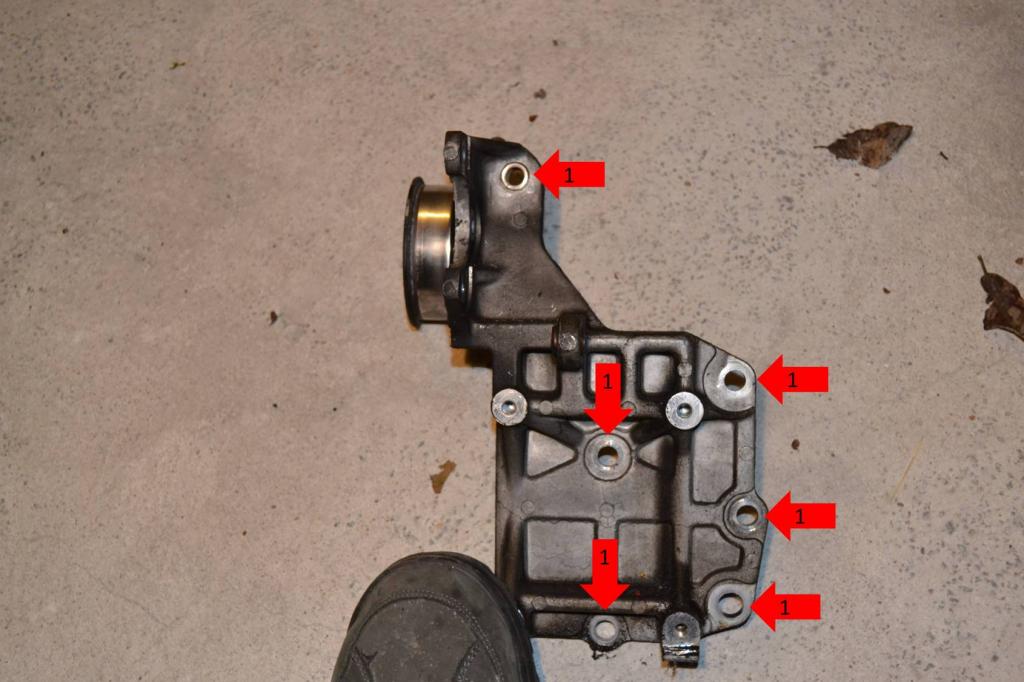
Now that the A/C compressor has been removed, we are going to remove the large bracket that held the power steering pump and A/C compressor. The reason we're removing the bracket, rather than leaving it in, is because one of the oil cooler lines runs behind it.
1: Remove the six bolts/nuts that hold the bracket on. 5 of these are 14mm and there is one 17mm on the bottom right. This picture only shows 4 of these bolts/nuts because that's all that were visible, the second picture shows the layout of all six.
Now everything in the way of the oil cooler lines has been removed. Removing the oil cooler lines themselves is really simple.
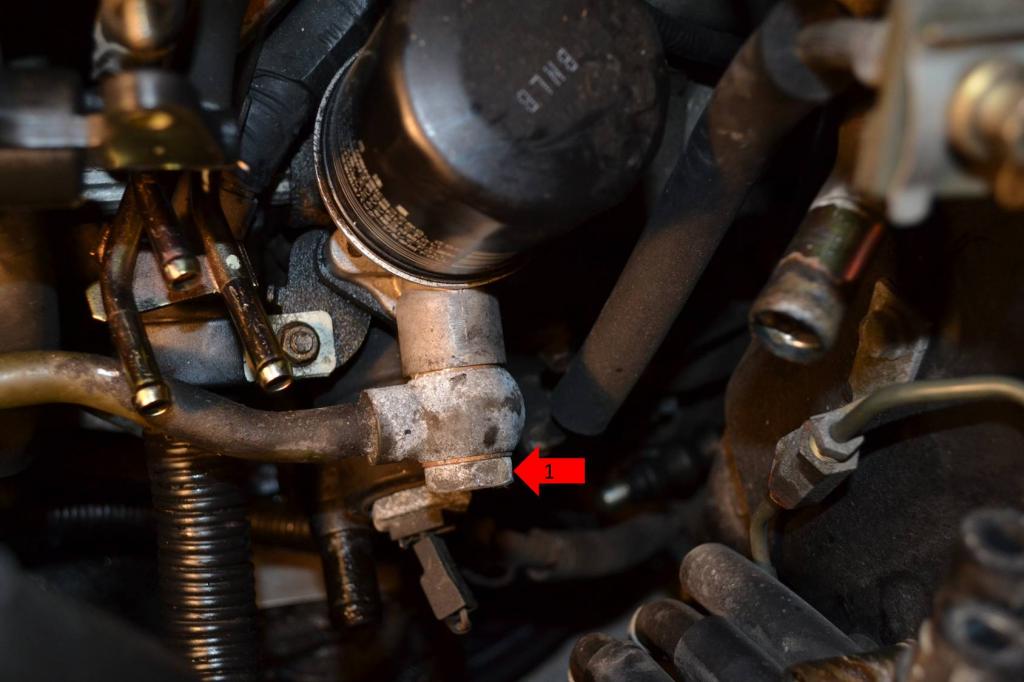
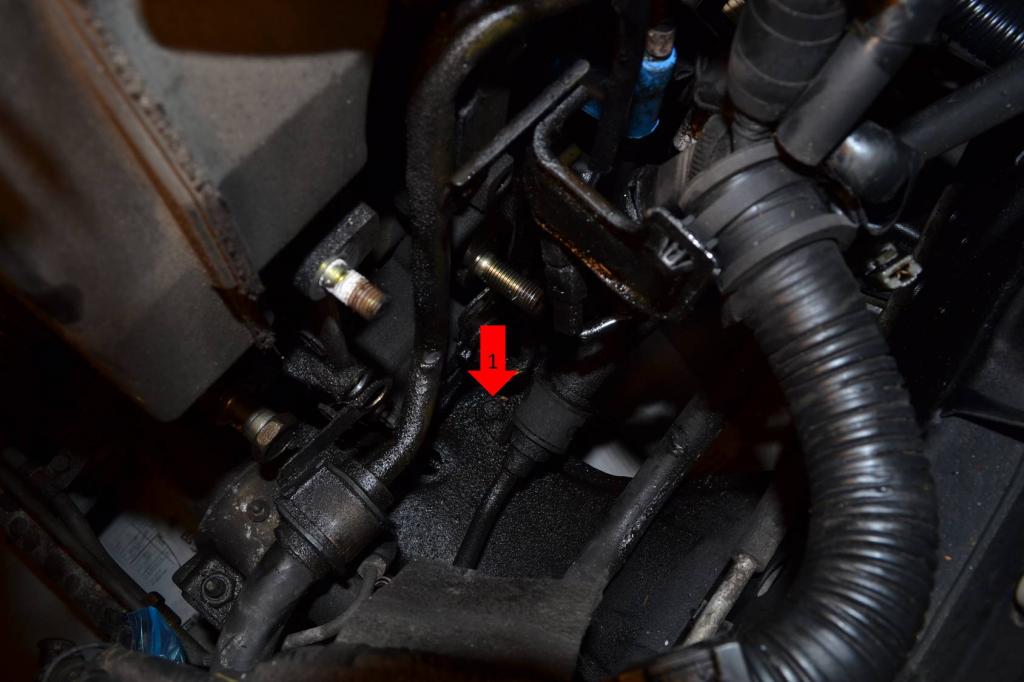
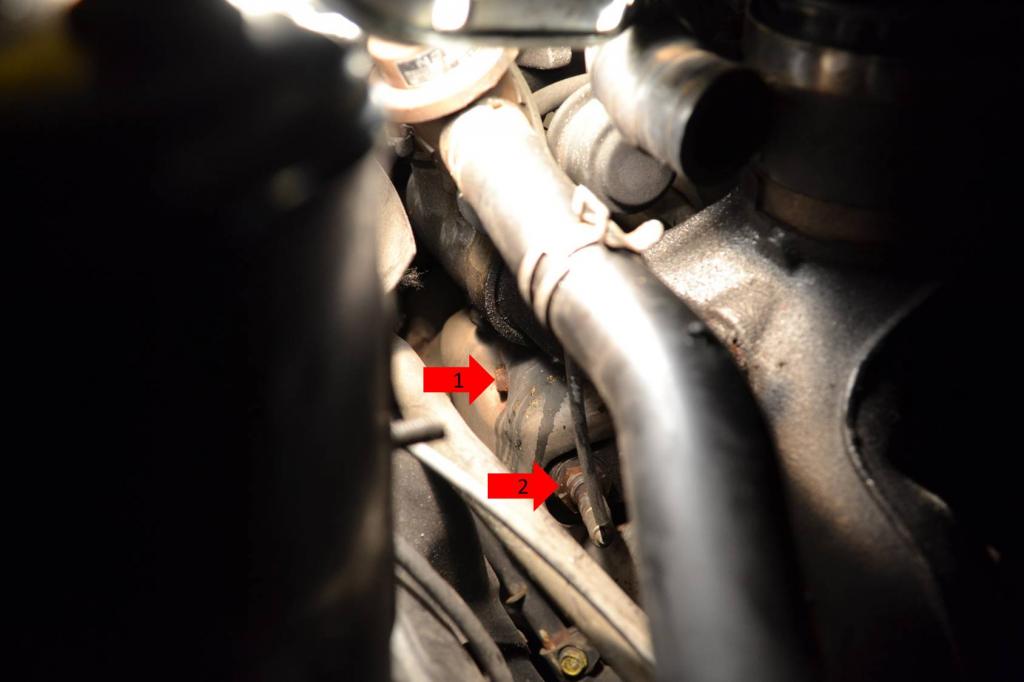
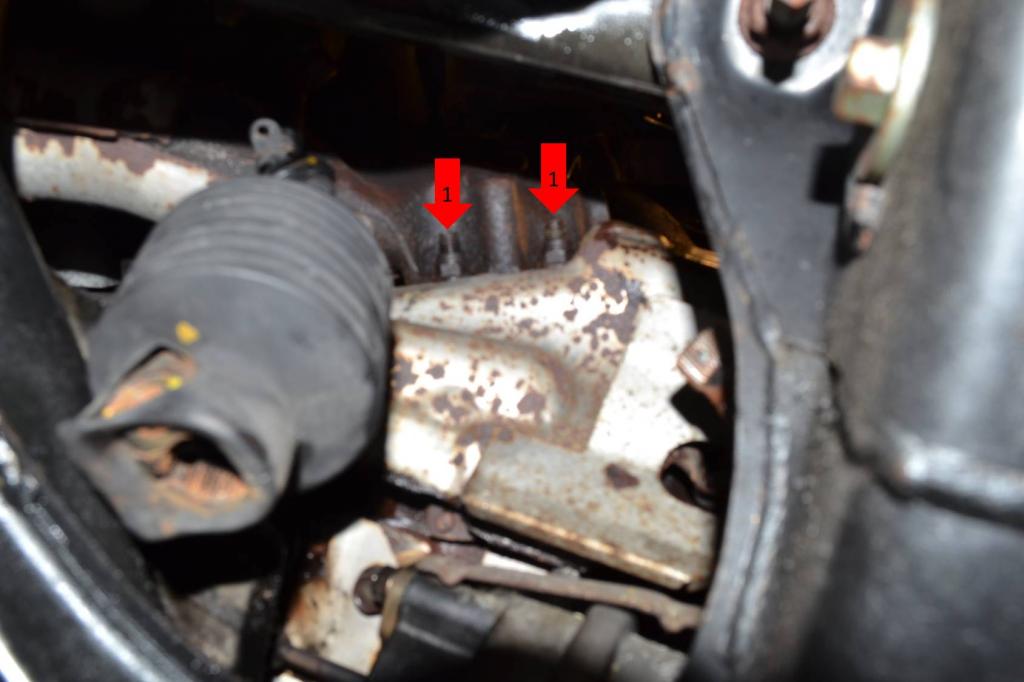
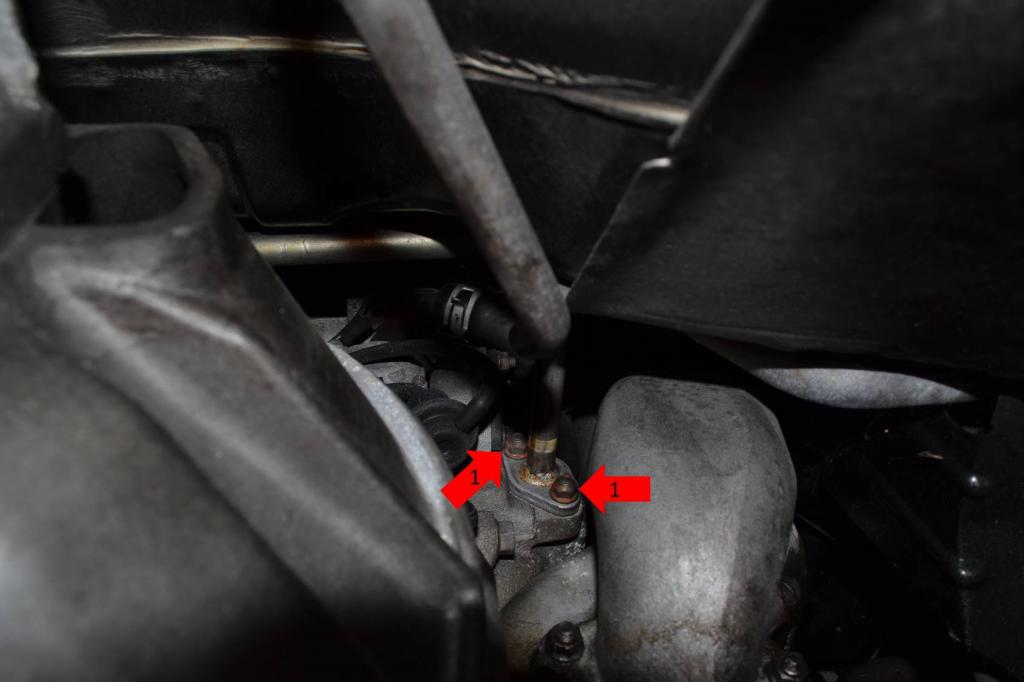
1: Remove this banjo bolt next to the oil filter, be prepared for oil to leak. One of the lines will now be free.
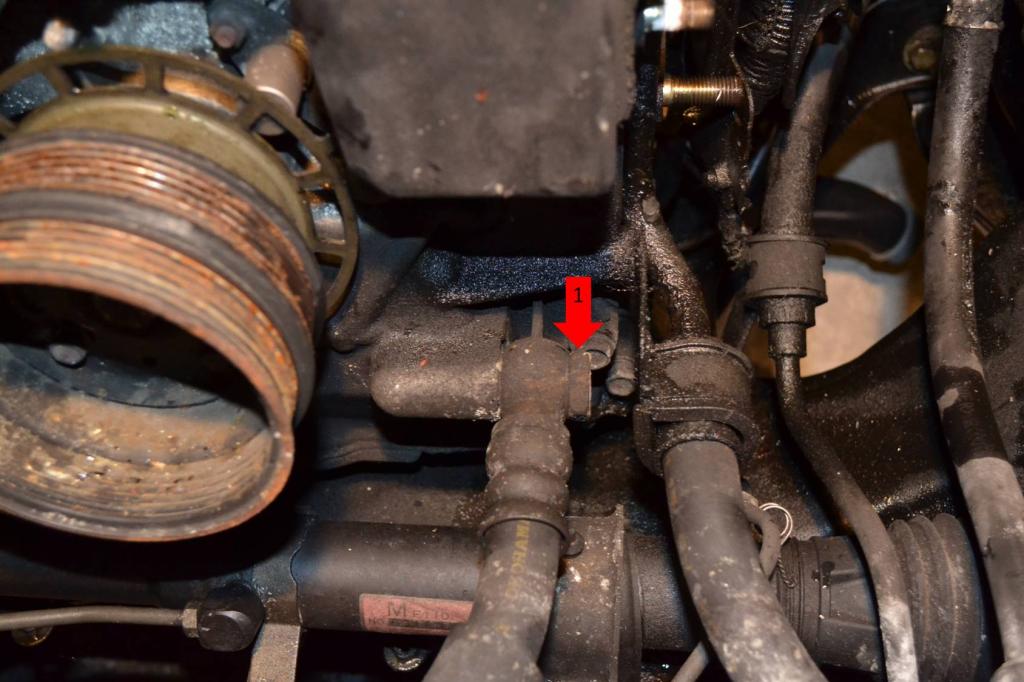
1: Remove this banjo bolt on the lower front of the engine, once again, be prepared for a small oil spill. The second line is now loose.
Next, move on to removing the air pump.
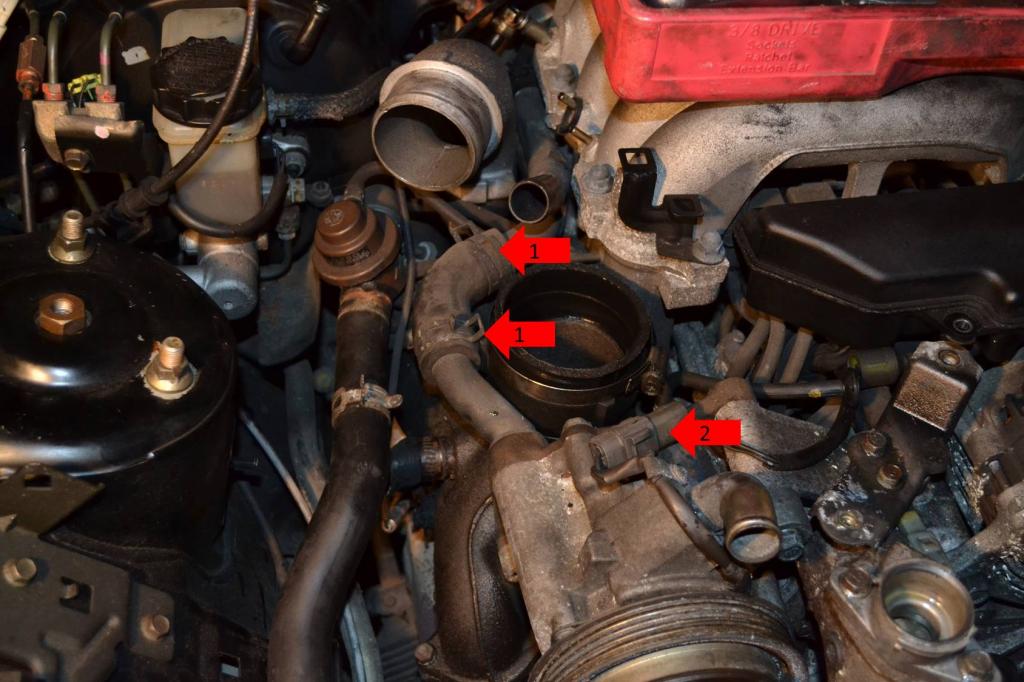
1: Remove both of these clamps and remove the hose.
2: Unplug the pump by disconnecting this plug.
1: Remove both of these bolts. The air pump is now free, you can lift it out and set it aside.
This is where I stopped for the evening.

Once again, I will be updating this thread in the short future, I hope.
1: Remove the six bolts/nuts that hold the bracket on. 5 of these are 14mm and there is one 17mm on the bottom right. This picture only shows 4 of these bolts/nuts because that's all that were visible, the second picture shows the layout of all six.


Now everything in the way of the oil cooler lines has been removed. Removing the oil cooler lines themselves is really simple.
1: Remove this banjo bolt next to the oil filter, be prepared for oil to leak. One of the lines will now be free.

1: Remove this banjo bolt on the lower front of the engine, once again, be prepared for a small oil spill. The second line is now loose.

Next, move on to removing the air pump.
1: Remove both of these clamps and remove the hose.
2: Unplug the pump by disconnecting this plug.

1: Remove both of these bolts. The air pump is now free, you can lift it out and set it aside.

This is where I stopped for the evening.

Once again, I will be updating this thread in the short future, I hope.
Trending Topics
01-14-15, 03:10 PM
#9
It wasn't necessary to open the AC system for engine removal. The compressor can be unbolted. Remove the top two, raise the engine a little and then access the bottom bolts. Then the compressor can then simply be set off to the side as in the attached (note the special "MAZDA" SST" supporting the bellhousing.  ) Also note the PS pump similarly set aside in-tact in the upper right and supported by a bungie cord.

Since you're rebuilding, it didn't hurt anything, but the easier, and more efficient way to disconnect the oil cooler lines is to simply pull the 'C' Clips. This is also specified on page C-19 of the FSM.

) Also note the PS pump similarly set aside in-tact in the upper right and supported by a bungie cord.
Since you're rebuilding, it didn't hurt anything, but the easier, and more efficient way to disconnect the oil cooler lines is to simply pull the 'C' Clips. This is also specified on page C-19 of the FSM.
01-14-15, 03:19 PM
#10
Full Member
Thread Starter
Absolutely right, the power steering and A/C compressor can be just unbolted and tied up out of the way.
Personally, I've worked on so many cars, I've gotten to the point of where I'm constantly tired of trying to keep things out of the way when trying to wriggle an engine out. So now I prefer to just remove the majority of what I can from the engine bay.
Personally, I've worked on so many cars, I've gotten to the point of where I'm constantly tired of trying to keep things out of the way when trying to wriggle an engine out. So now I prefer to just remove the majority of what I can from the engine bay.
01-15-15, 08:12 AM
#11
Absolutely right, the power steering and A/C compressor can be just unbolted and tied up out of the way.
Personally, I've worked on so many cars, I've gotten to the point of where I'm constantly tired of trying to keep things out of the way when trying to wriggle an engine out. So now I prefer to just remove the majority of what I can from the engine bay.
Personally, I've worked on so many cars, I've gotten to the point of where I'm constantly tired of trying to keep things out of the way when trying to wriggle an engine out. So now I prefer to just remove the majority of what I can from the engine bay.
01-15-15, 11:32 AM
#13
Full Member
Thread Starter
For example, if you plan on deleting the A/C or the system is already dry, then there is no reason to not just remove it.
But like I said, this is just how I'm doing it. Others may prefer to leave the A/C intact and in the bay.
01-20-15, 02:20 PM
#14
Full Member
Thread Starter
Edit: I apparently clicked something that put a frowny face on the title. However, there is nothing negative about this post, and I'm not sad.
Alright, I got to work out in the garage today, finally. However, I spent most of the day working on a couple of BMWs and only got an hour or two to work on the RX-7. Anyways, here we go again.
I started out with removing the wiring harness. I removed the first half, which is basically just the main power cabled and one of the small fuse boxes. After I removed that, I spent a little time thinking on whether I want to remove the rest of the harness from the engine or pull if out from under the dash. I'll probably end up removing it from the engine.
Anyways, here's how to remove the first part of it.
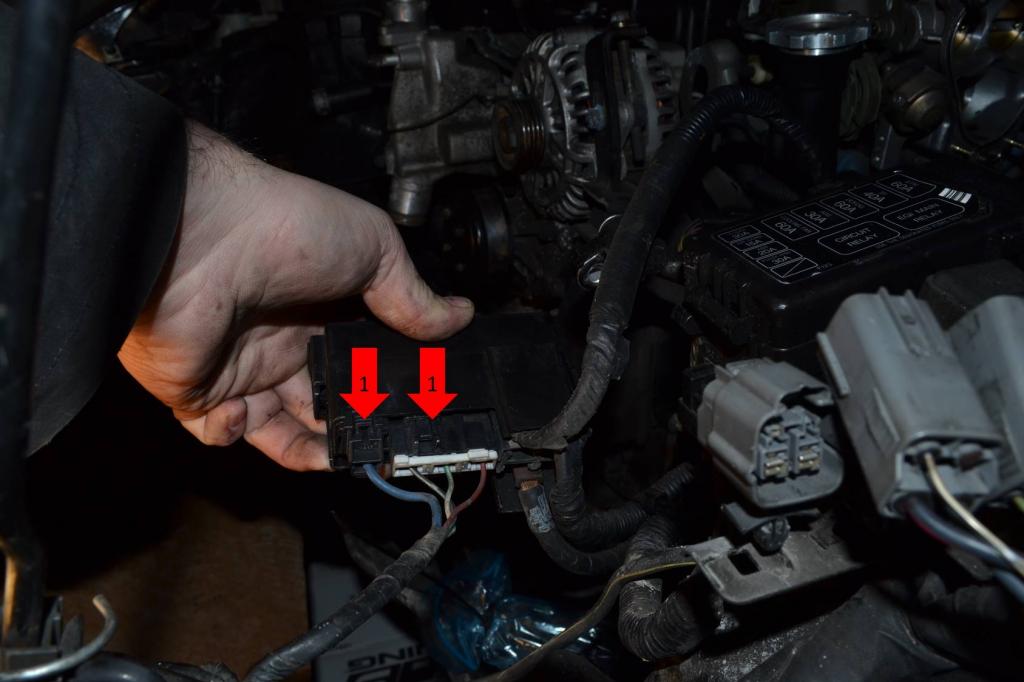
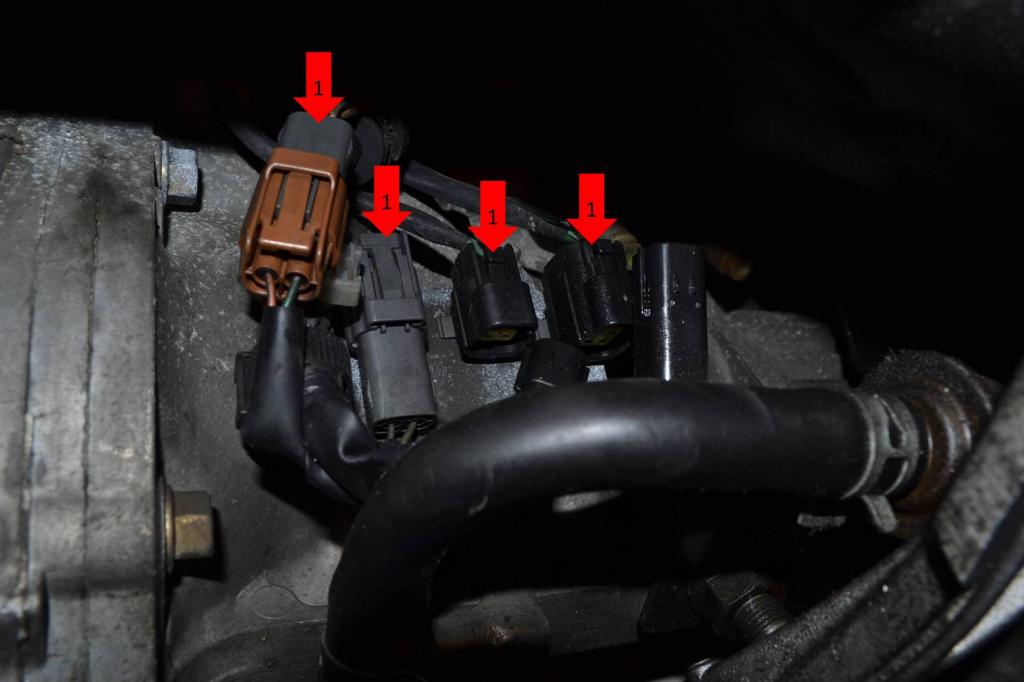
1: Unplug these two plugs.
2: Take the nut holding this wire off, I believe it's a 10mm (don't remember for sure).
1: Unplug both of these plugs.
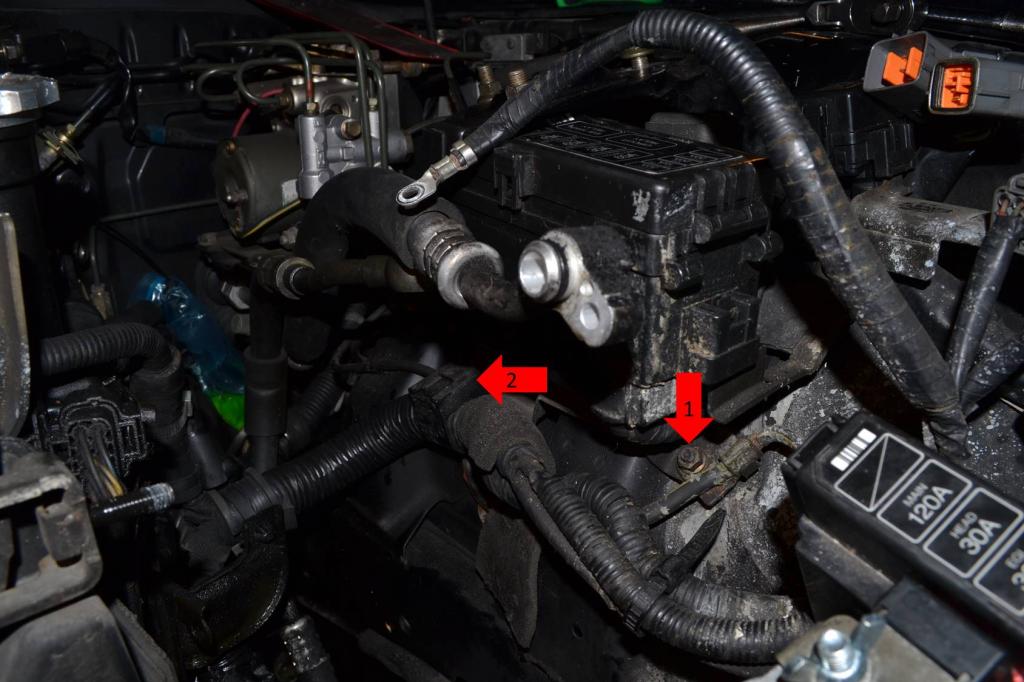
1: Remove this small nut holding the ground wire.
2: Remove this clip from the bracket it's being held by.
There, a small portion of the wiring harness is now loose. Like I said, I'm contemplating whether to remove the rest of the harness from the engine or pulling it through the firewall. I will likely remove it from the engine and that's what the next episode will be about.
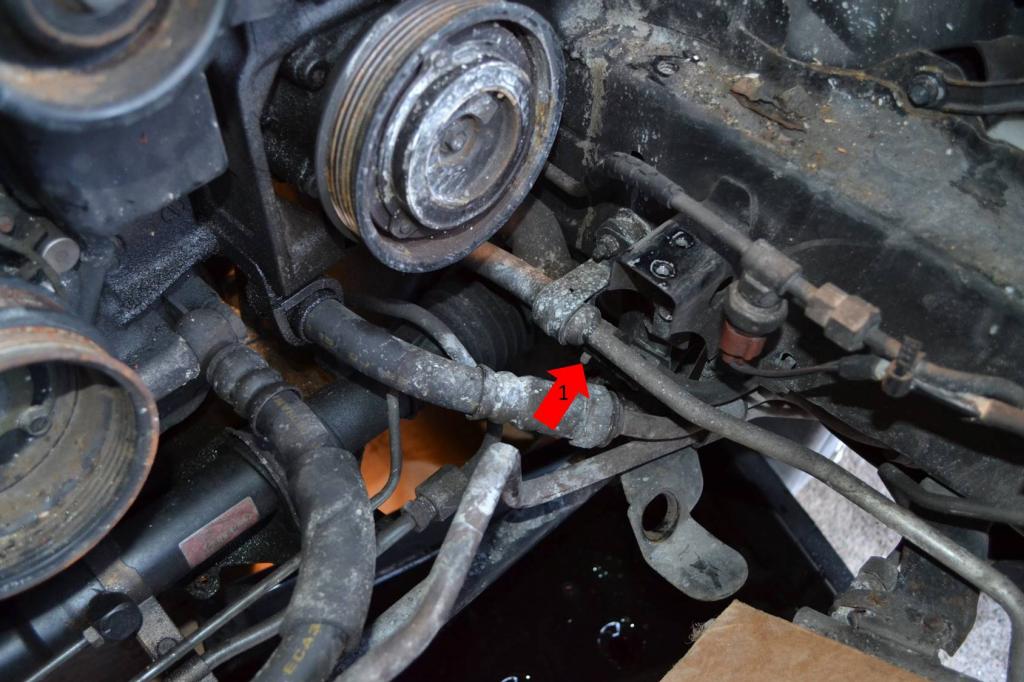
Anyways, while pondering the wiring harness, I moved on to removing the power steering high pressure line. Do you remember earlier when I mentioned a fairly inaccessible bracket holding the high pressure line? Here it is.......
1: Just remove this one 10mm bolt and the line will come out. I know it's borderline impossible to see under all of the grease, but it's there.
After getting the line out, I got under the car and went to town.
First remove the starter.
1: The lower plug just slides off. For the upper one, pop the plastic cap back and remove the nut that's holding the large starter wire.
2: Remove both of these bolts, the lower one has a nut on the other end, it's not just a bolt. Then the starter will come out.

Now move on to pulling the down pipe. To get the down pipe off we have to: remove the lower steering shaft knuckle, remove the O2 sensor, remove a heat shield, and then actually unbolt the pipes.
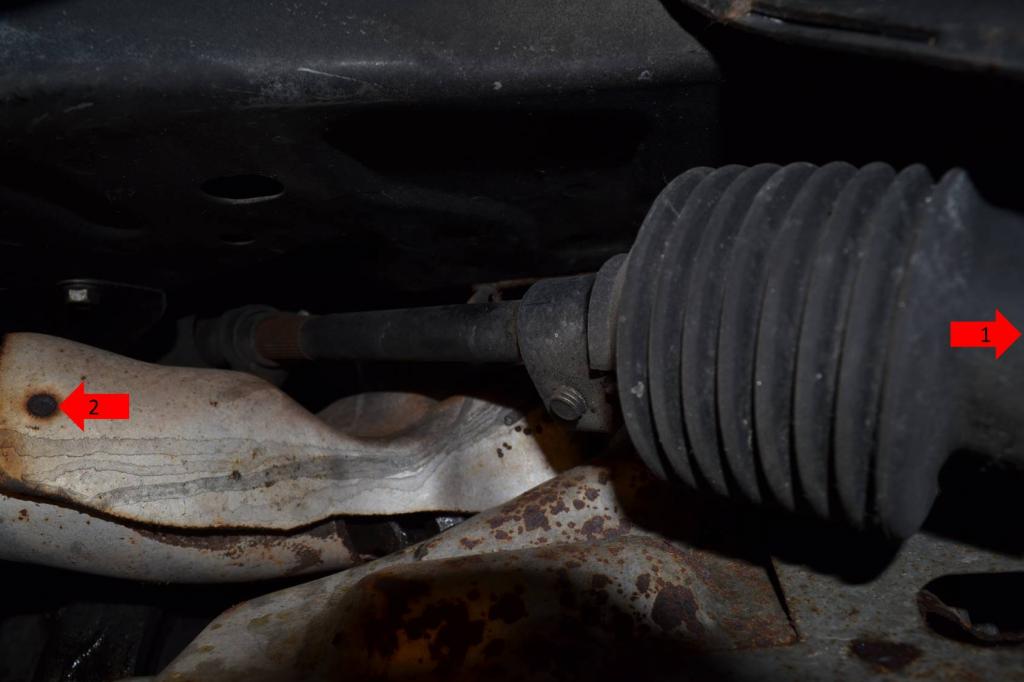
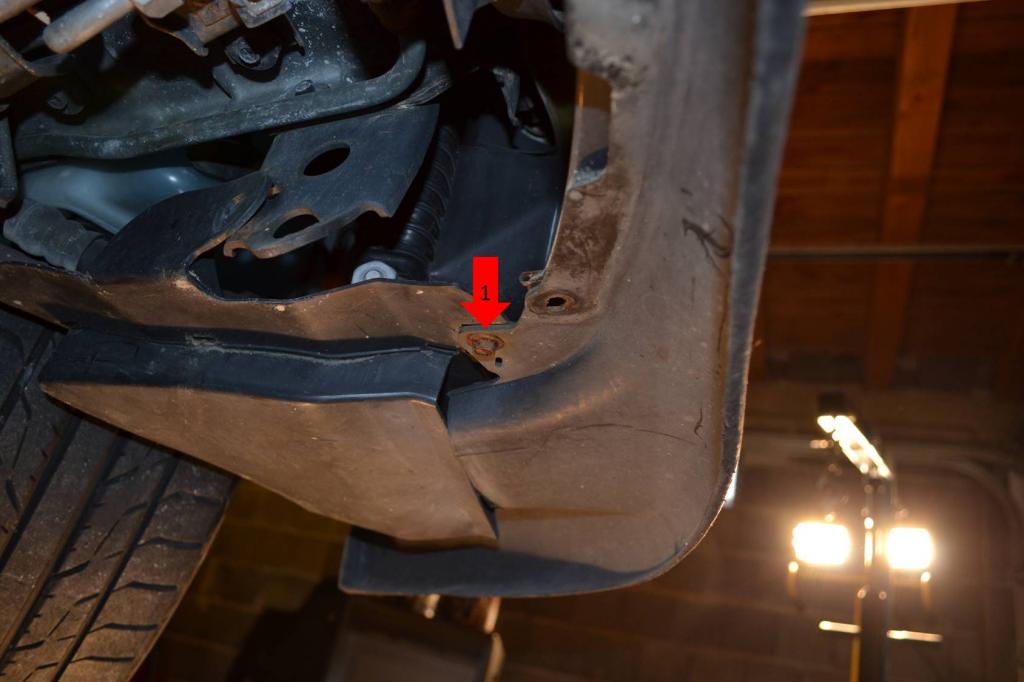
1: Remove the single bolt on the knuckle, it's not shown in this picture, but it's directly to the right of the arrow. This picture is taken from below the car, looking up through the sub-frame. Just remove the bolt and use a pry bar to pop the knuckle off the steering rack. This will give enough room for the heat shield to actually come out.
2: Remove the lower heat shield bolt.
1: Remove the upper heat shield bolt.
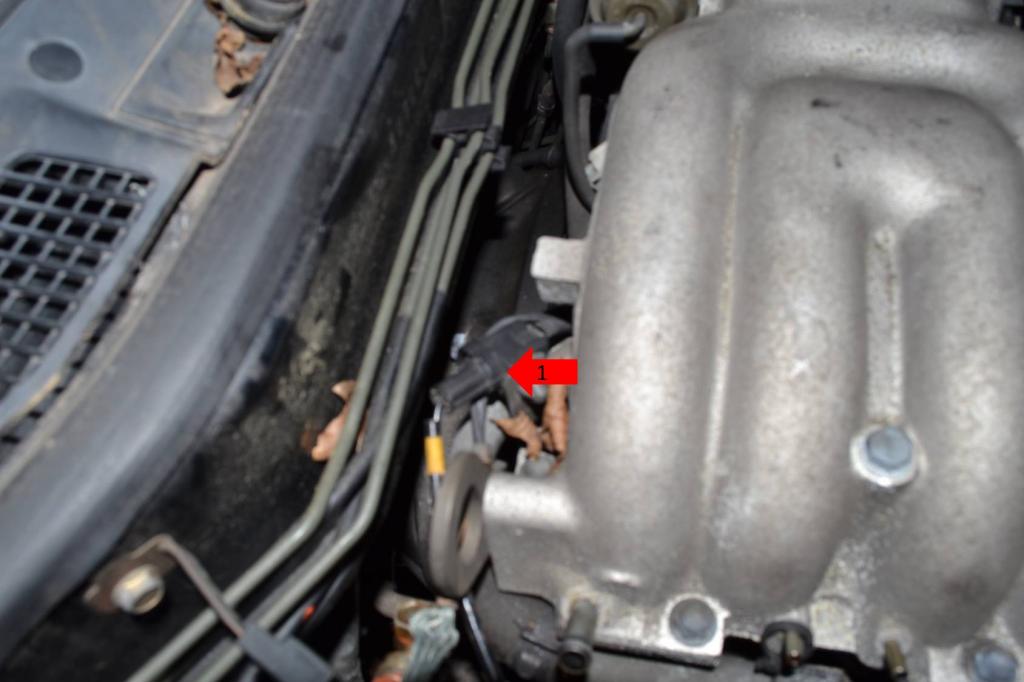
2: Remove the O2 sensor and unplug it, the next picture shows the plug location.
1: This is the O2 plug that needs to be unplugged.
The heat shield will now come out and expose the four nuts/studs that hold the down pipe to the turbo.
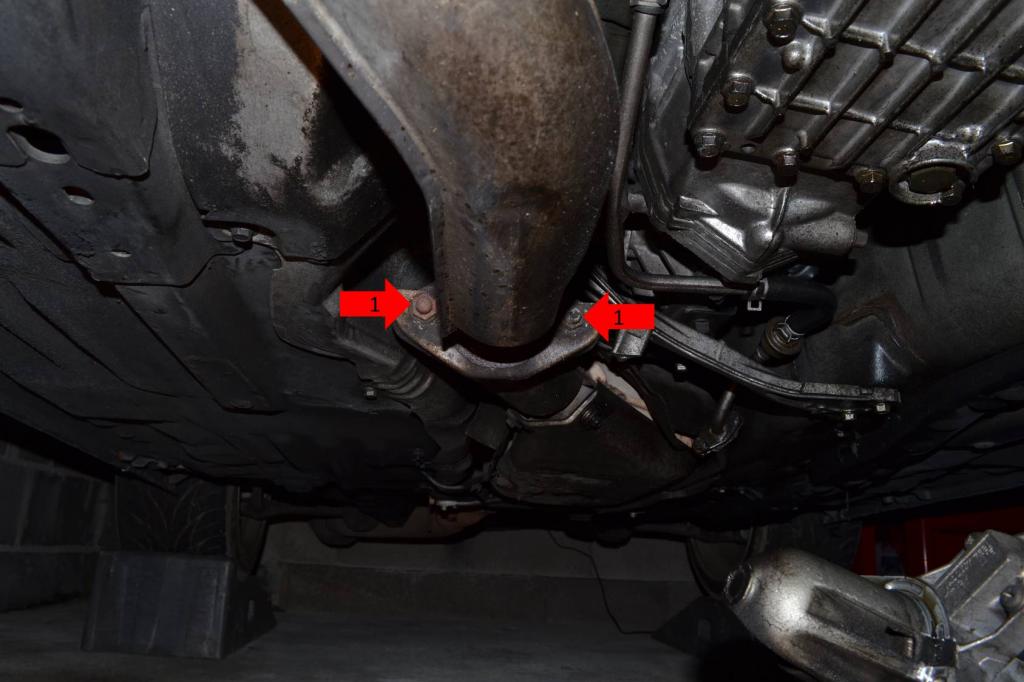
1: Remove both of these nuts, you can't see the rear one, but it is there. Both of these are the upper nuts/studs on the down pipe. The nut came off of one, and the other the stud and nut came out.
1: These are the two lower nuts, remove them. Both studs came out with the nuts.
After those are removed, you can remove the three bolts that hold the down pipe to the mid-pipe.
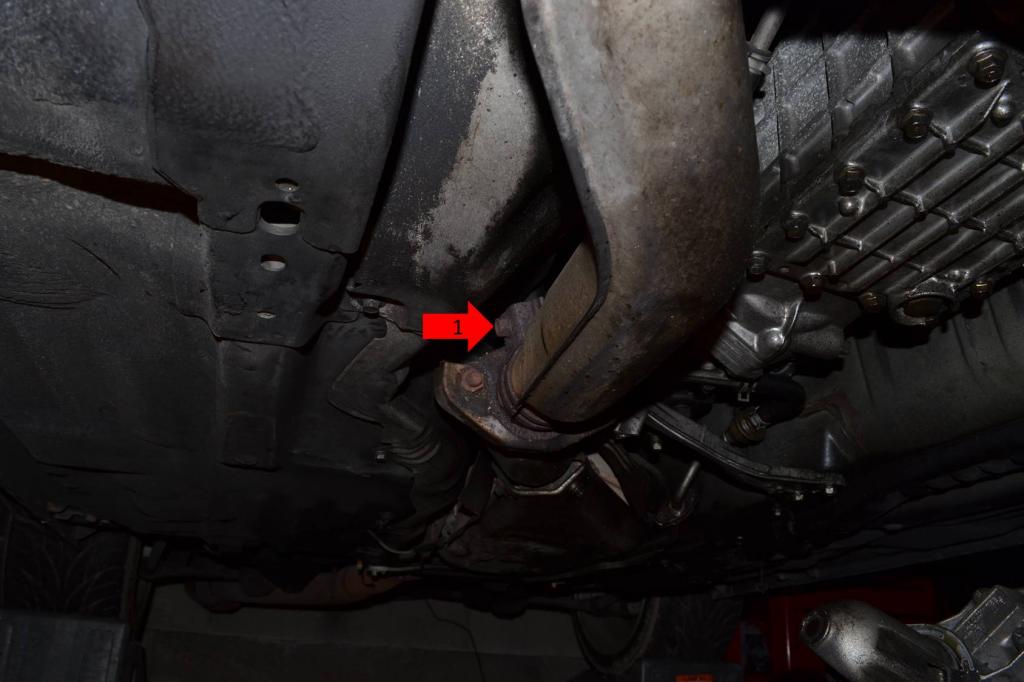
1: Remove these two bolts.
1: Remove this bolt. After this bolt is removed, the entire down pipe can be pulled out and laid aside.
I will continue with the trans bolts in the next post.
Alright, I got to work out in the garage today, finally. However, I spent most of the day working on a couple of BMWs and only got an hour or two to work on the RX-7. Anyways, here we go again.
I started out with removing the wiring harness. I removed the first half, which is basically just the main power cabled and one of the small fuse boxes. After I removed that, I spent a little time thinking on whether I want to remove the rest of the harness from the engine or pull if out from under the dash. I'll probably end up removing it from the engine.
Anyways, here's how to remove the first part of it.
1: Unplug these two plugs.
2: Take the nut holding this wire off, I believe it's a 10mm (don't remember for sure).

1: Unplug both of these plugs.

1: Remove this small nut holding the ground wire.
2: Remove this clip from the bracket it's being held by.

There, a small portion of the wiring harness is now loose. Like I said, I'm contemplating whether to remove the rest of the harness from the engine or pulling it through the firewall. I will likely remove it from the engine and that's what the next episode will be about.
Anyways, while pondering the wiring harness, I moved on to removing the power steering high pressure line. Do you remember earlier when I mentioned a fairly inaccessible bracket holding the high pressure line? Here it is.......
1: Just remove this one 10mm bolt and the line will come out. I know it's borderline impossible to see under all of the grease, but it's there.

After getting the line out, I got under the car and went to town.
First remove the starter.
1: The lower plug just slides off. For the upper one, pop the plastic cap back and remove the nut that's holding the large starter wire.
2: Remove both of these bolts, the lower one has a nut on the other end, it's not just a bolt. Then the starter will come out.

Now move on to pulling the down pipe. To get the down pipe off we have to: remove the lower steering shaft knuckle, remove the O2 sensor, remove a heat shield, and then actually unbolt the pipes.
1: Remove the single bolt on the knuckle, it's not shown in this picture, but it's directly to the right of the arrow. This picture is taken from below the car, looking up through the sub-frame. Just remove the bolt and use a pry bar to pop the knuckle off the steering rack. This will give enough room for the heat shield to actually come out.
2: Remove the lower heat shield bolt.

1: Remove the upper heat shield bolt.
2: Remove the O2 sensor and unplug it, the next picture shows the plug location.

1: This is the O2 plug that needs to be unplugged.

The heat shield will now come out and expose the four nuts/studs that hold the down pipe to the turbo.
1: Remove both of these nuts, you can't see the rear one, but it is there. Both of these are the upper nuts/studs on the down pipe. The nut came off of one, and the other the stud and nut came out.

1: These are the two lower nuts, remove them. Both studs came out with the nuts.

After those are removed, you can remove the three bolts that hold the down pipe to the mid-pipe.
1: Remove these two bolts.

1: Remove this bolt. After this bolt is removed, the entire down pipe can be pulled out and laid aside.

I will continue with the trans bolts in the next post.
01-20-15, 02:32 PM
#15
I may have missed it if it was discussed earlier, but that looks like the stock Pre-cat/downpipe. If so, damn good thing you're getting rid of it. Huge under hood radiant heater that bakes everything. They also had a reputation for collapsing and taking out the main cat...which then took out the engine.
You'll want a good quality aftermarket dp to replace that. Heat-coating or at minimum header wrap it before installing. Should flow better too. It's a "2 for 1"...both a reliability and performance mod.
You'll want a good quality aftermarket dp to replace that. Heat-coating or at minimum header wrap it before installing. Should flow better too. It's a "2 for 1"...both a reliability and performance mod.
01-20-15, 02:33 PM
#16
Full Member
Thread Starter
Season 1 - Episode 3 Continued
Now to remove the air pipe to the catalytic converter.
1: Remove these two nuts.
1: Now remove this clamp and pop the hose off. The entire tube will come out now.

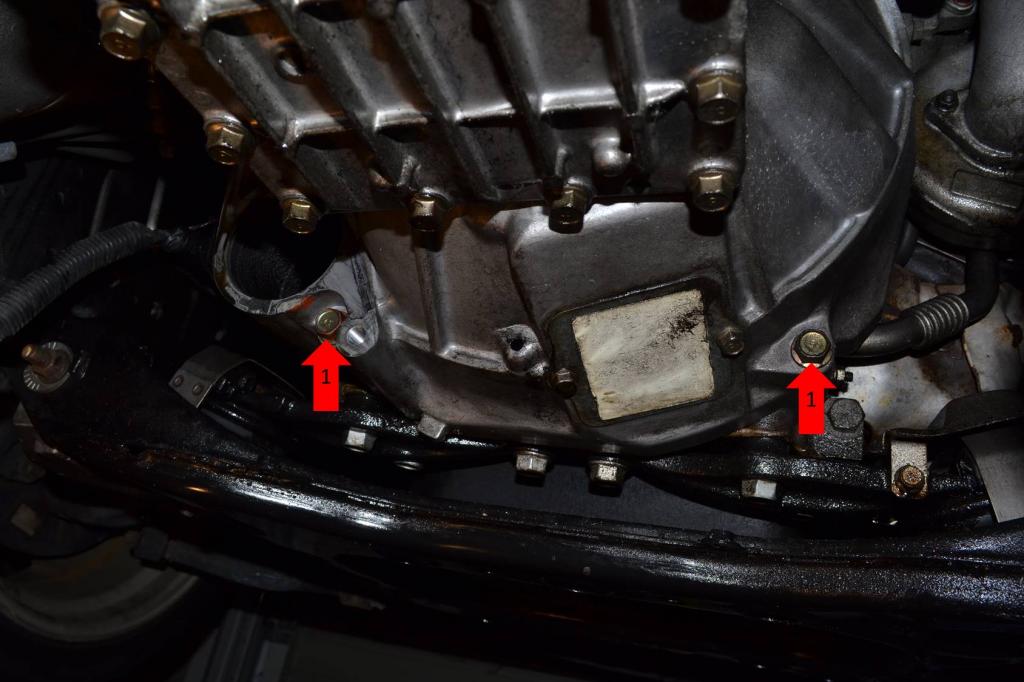
Alright, moving on to transmission bolts. I can only take a picture of two of them and they are the two lower ones. There are five total though. If you just follow the bell-housing up and around, you will hit the other three. There is one more on each side and one basically at the very top. Four of the bolts are the same length, the lower left bolt is longer than the rest.
1: Remove these lower two bolts. Then feel up the sides of the trans to find the other three. Now your trans is basically free from the engine, but don't worry, it'll stay in place.
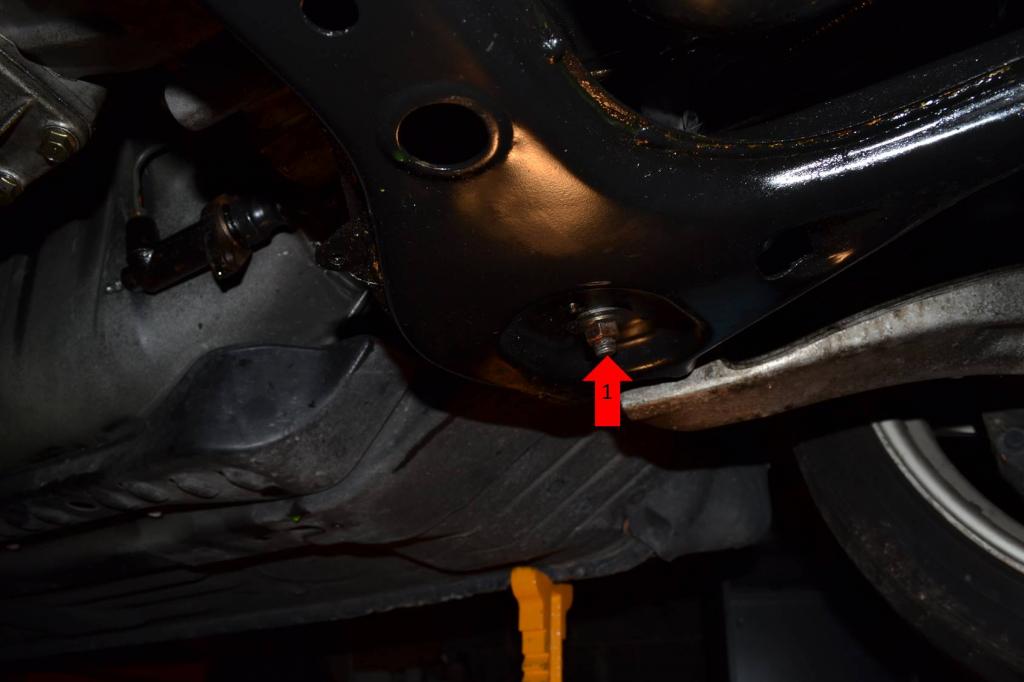
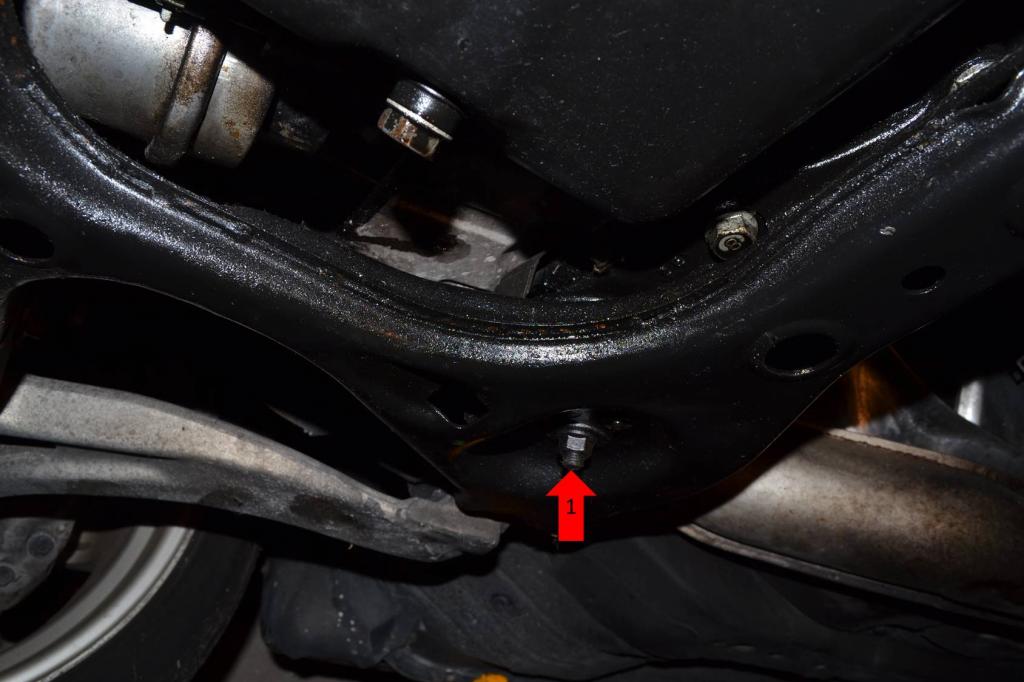
The last big thing to do under the car is free up the engine mounts. This is relatively simple, it's just two nuts that have to be removed.
1: Remove the nut from the left side engine mount.
1: Remove the nut from the right side engine mount.
And now the motor is just sitting in place.
That is as far as I got today.
The next episode will be the removal of the wiring harness, a few other misc items, and actually pulling the engine out.
1: Remove these two nuts.

1: Now remove this clamp and pop the hose off. The entire tube will come out now.

Alright, moving on to transmission bolts. I can only take a picture of two of them and they are the two lower ones. There are five total though. If you just follow the bell-housing up and around, you will hit the other three. There is one more on each side and one basically at the very top. Four of the bolts are the same length, the lower left bolt is longer than the rest.
1: Remove these lower two bolts. Then feel up the sides of the trans to find the other three. Now your trans is basically free from the engine, but don't worry, it'll stay in place.

The last big thing to do under the car is free up the engine mounts. This is relatively simple, it's just two nuts that have to be removed.
1: Remove the nut from the left side engine mount.

1: Remove the nut from the right side engine mount.

And now the motor is just sitting in place.
That is as far as I got today.
The next episode will be the removal of the wiring harness, a few other misc items, and actually pulling the engine out.
01-20-15, 02:36 PM
#17
Full Member
Thread Starter
I may have missed it if it was discussed earlier, but that looks like the stock Pre-cat/downpipe. If so, damn good thing you're getting rid of it. Huge under hood radiant heater that bakes everything. They also had a reputation for collapsing and taking out the main cat...which then took out the engine.
You'll want a good quality aftermarket dp to replace that. Heat-coating or at minimum header wrap it before installing. Should flow better too. It's a "2 for 1"...both a reliability and performance mod.
You'll want a good quality aftermarket dp to replace that. Heat-coating or at minimum header wrap it before installing. Should flow better too. It's a "2 for 1"...both a reliability and performance mod.
Additionally, I'm actually thinking about converting it to a small single setup anyways, but that may be a while after I get it going.
01-24-15, 02:25 PM
#18
Full Member
Thread Starter
Season 1 - Episode 4
Today I focused on getting the engine wiring harness free from the chassis and releasing the throw-out-bearing (TOB) from the clutch.
In my last post I had said I was thinking of just pulling the harness from the engine and leaving the harness in the car. My reasoning for this was that the harness would be removed from the engine in the process of rebuilding, so I figured I would do it as I removed the engine. However, once I pulled the upper intake manifold off, I immediately changed my mind. So I began to pull the harness from the chassis.
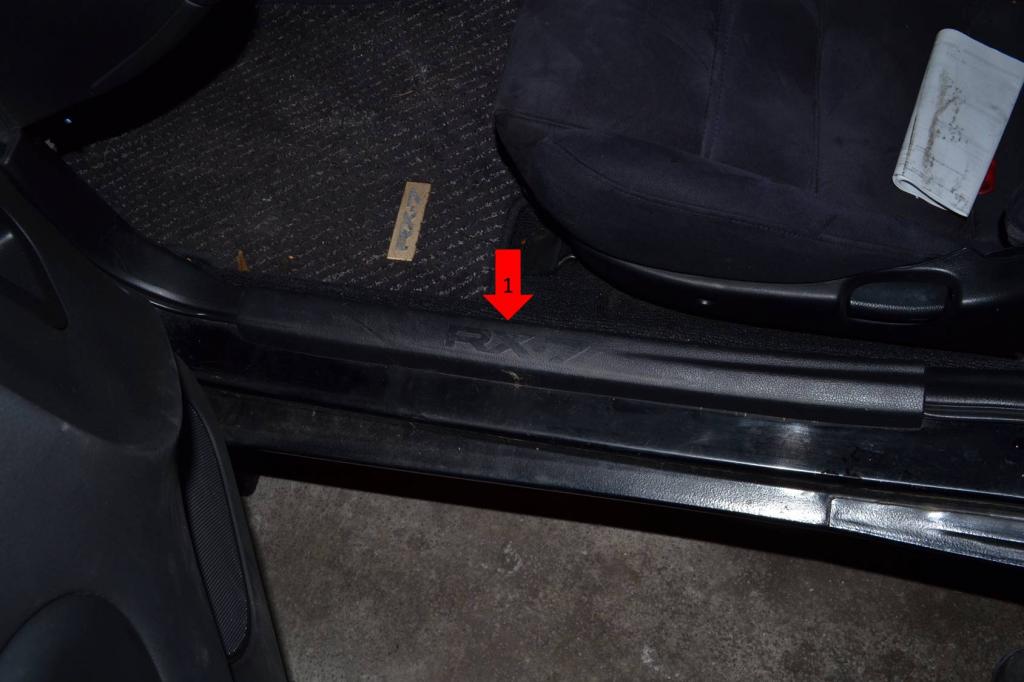
1: First off, remove the trim on the bottom of the left side door sill.
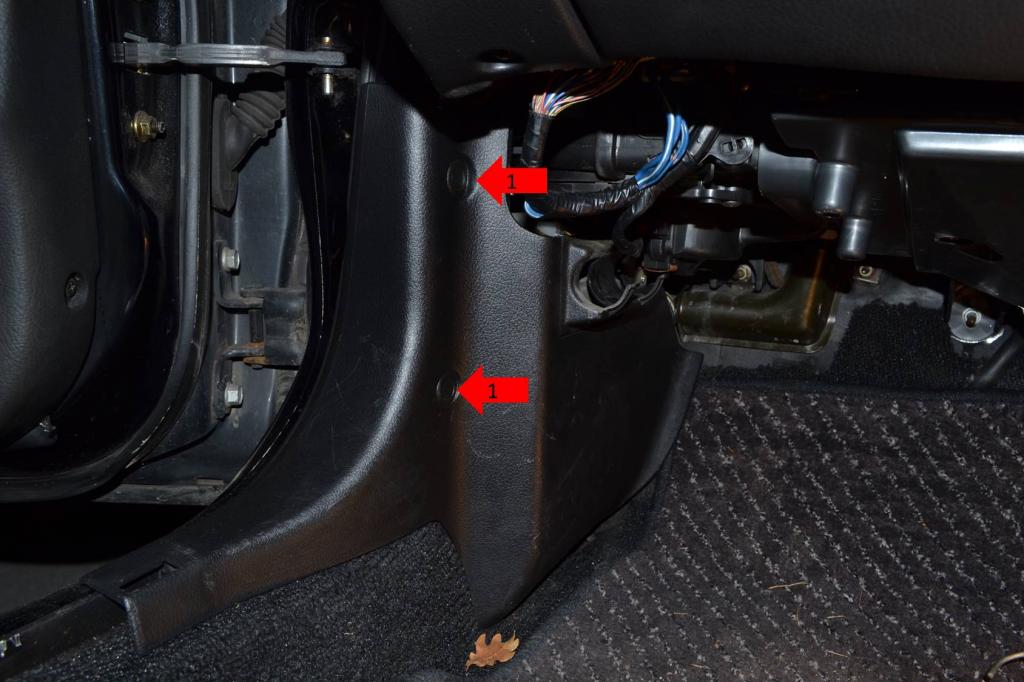
1: Now remove these two fastener from the kick panel. Use a small flat-head screwdriver or a pick to pop the centers out, then the entire fastener will come out.
1: Remove these two nuts. Then the little metal brace/protector for the harness will come out of place.
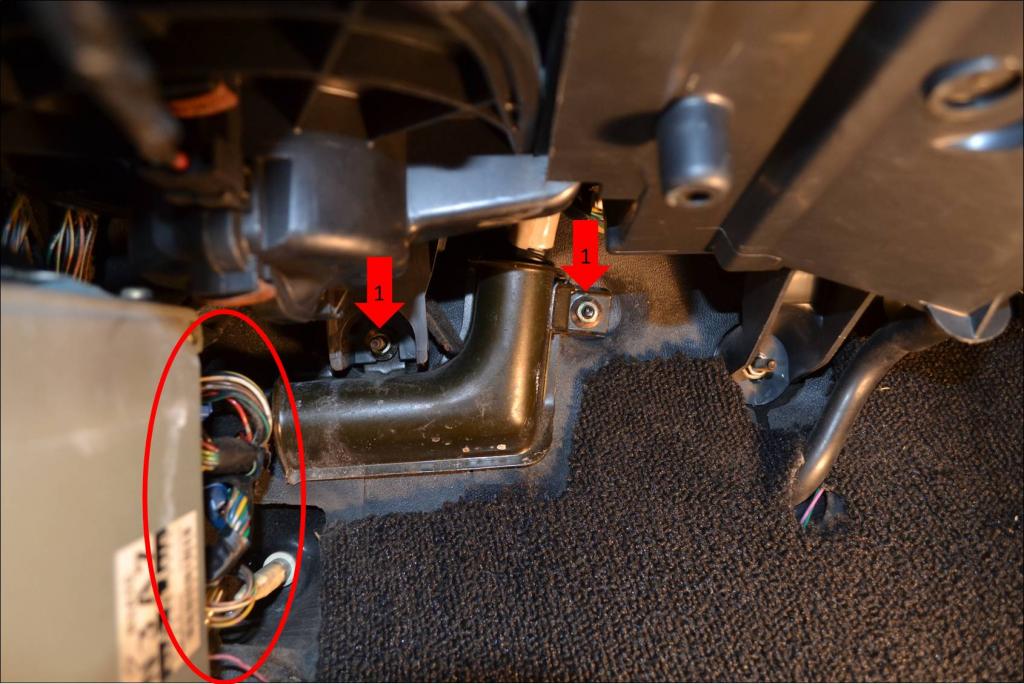
I didn't get a picture of this, but there are 3 bolts, 1 nut, and a little plastic screw that need to me removed to get the ECU out. There are two bolts on the bracket below the ecu, 1 bolt and plastic screw on the upper bracket, and there is a nut that has a ground wire. Remove them all and the ECU will come free. Once you do that, remove the four plugs from the ECU (circled in the picture). There is one final plug tucked up behind the HVAC. Once those five plugs are loose, you can pull the harness through the firewall, out into the engine bay.
The last thing to do for the harness, is to free the trans portion of the harness.
1: This is the harness, follow it back along the trans and free it from all the clips that secure it.
1: Free these four plugs that are at the end of the trans harness.
The entire wiring harness is now free.
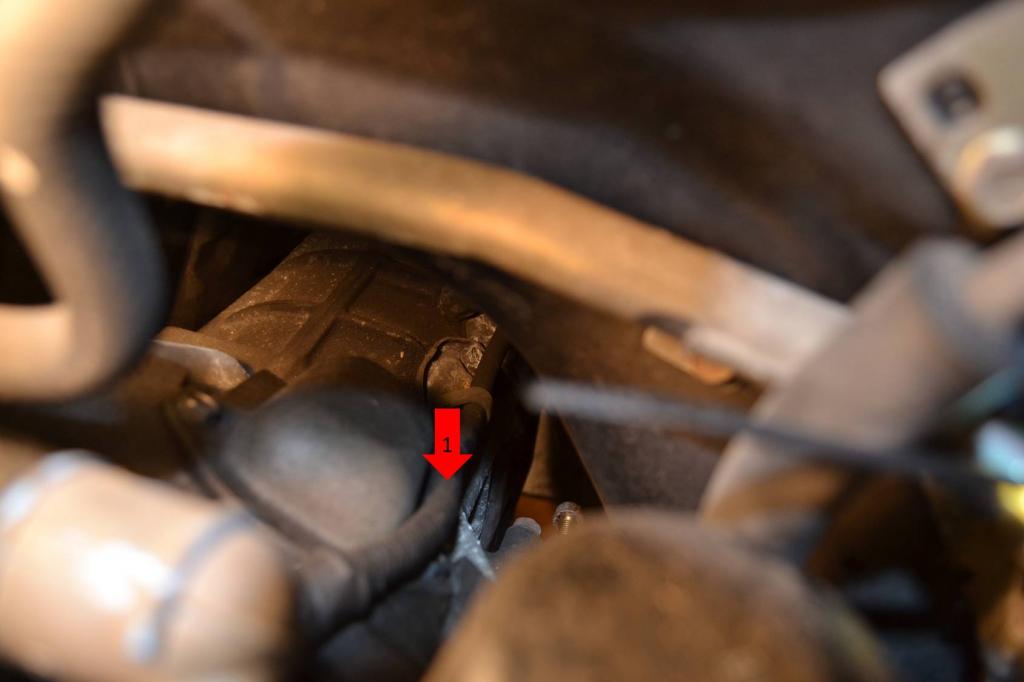
The last thing I needed to do is release the TOB from the clutch. First, the access plate must be removed.
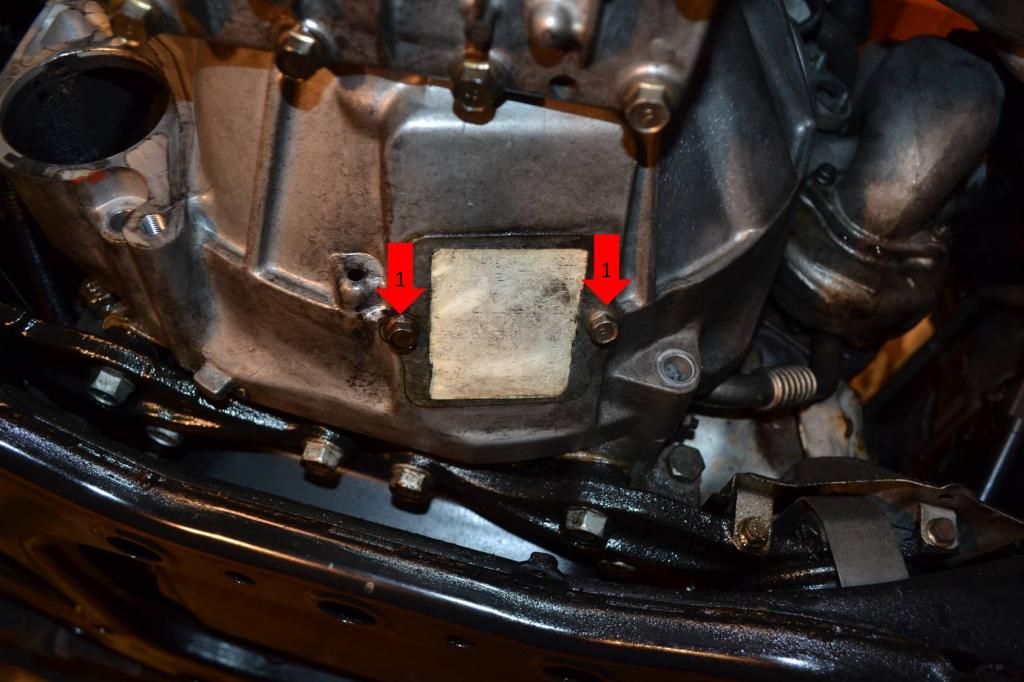
1: Remove these two bolts. This plate is on the lower right side of the transmission bell-housing.
I can't really explain how to release the TOB, but this video gives a perfect demonstration.
Next up I started on removing the hood, but I'll wait until tomorrow when a friend is here.
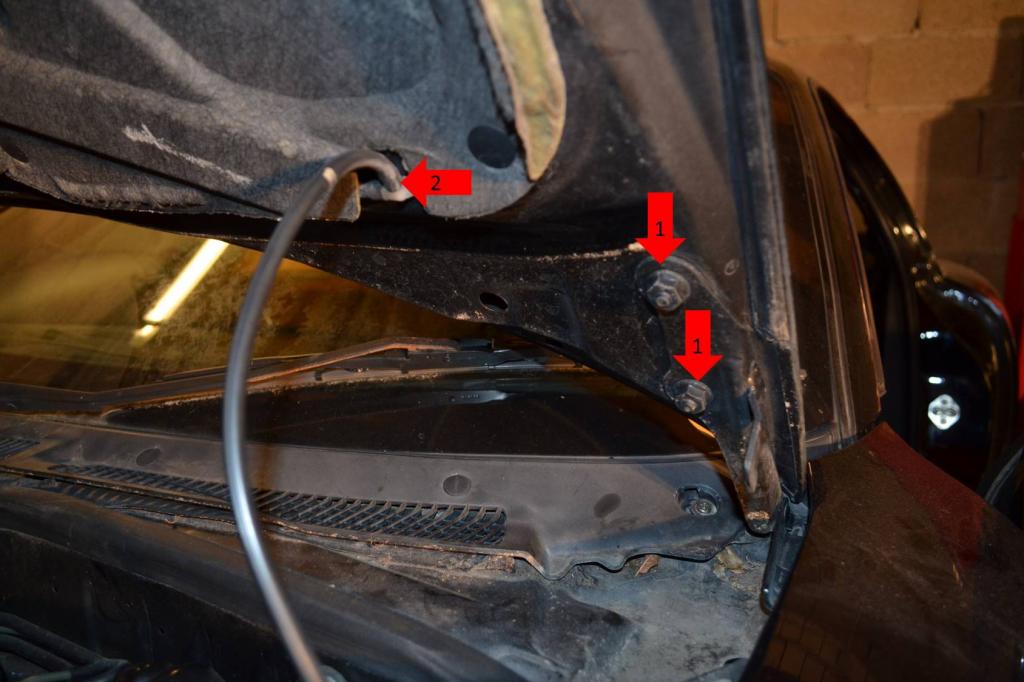
1: Remove these 2 nuts, the other side will have the same nuts.
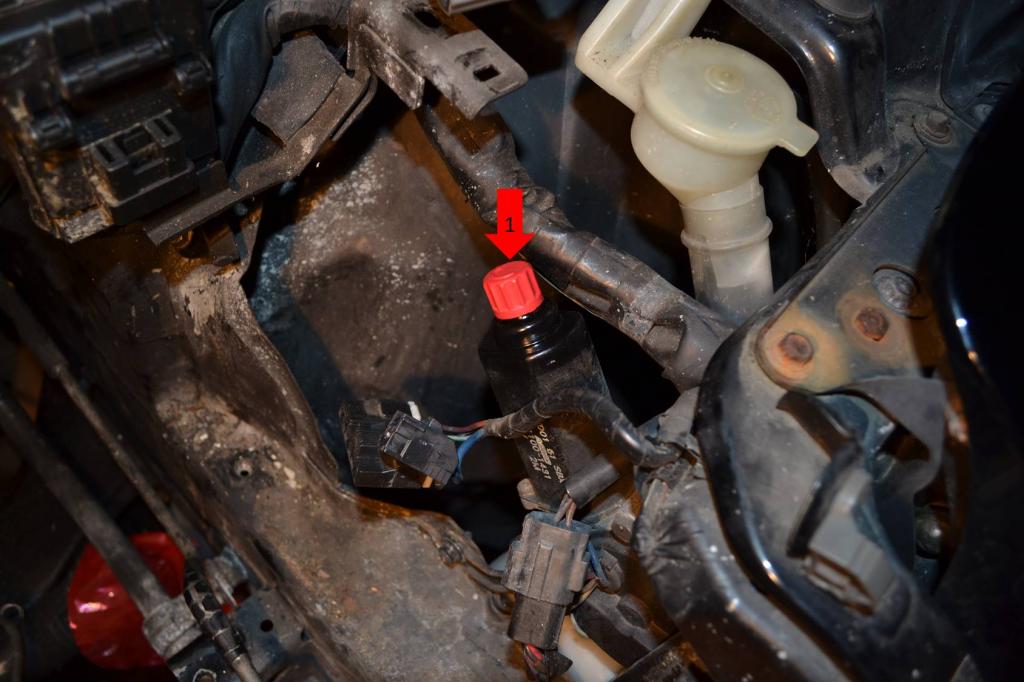
2: Remove the windshield fluid hose.
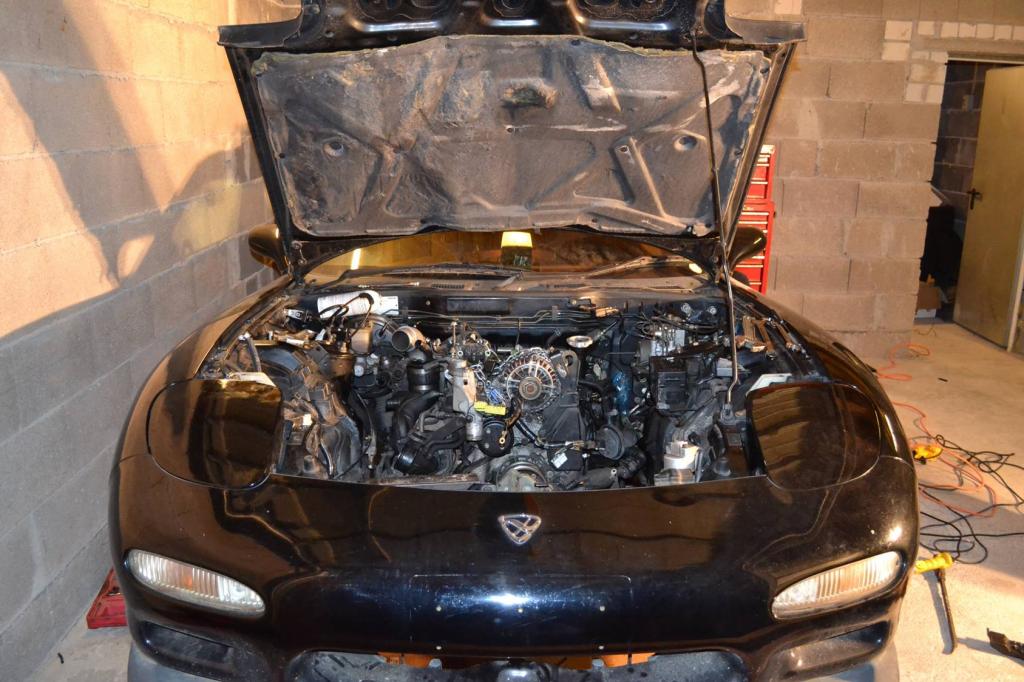
And this is how she now sits, ready to have the motor pulled.
In my last post I had said I was thinking of just pulling the harness from the engine and leaving the harness in the car. My reasoning for this was that the harness would be removed from the engine in the process of rebuilding, so I figured I would do it as I removed the engine. However, once I pulled the upper intake manifold off, I immediately changed my mind. So I began to pull the harness from the chassis.
1: First off, remove the trim on the bottom of the left side door sill.

1: Now remove these two fastener from the kick panel. Use a small flat-head screwdriver or a pick to pop the centers out, then the entire fastener will come out.

1: Remove these two nuts. Then the little metal brace/protector for the harness will come out of place.
I didn't get a picture of this, but there are 3 bolts, 1 nut, and a little plastic screw that need to me removed to get the ECU out. There are two bolts on the bracket below the ecu, 1 bolt and plastic screw on the upper bracket, and there is a nut that has a ground wire. Remove them all and the ECU will come free. Once you do that, remove the four plugs from the ECU (circled in the picture). There is one final plug tucked up behind the HVAC. Once those five plugs are loose, you can pull the harness through the firewall, out into the engine bay.

The last thing to do for the harness, is to free the trans portion of the harness.
1: This is the harness, follow it back along the trans and free it from all the clips that secure it.

1: Free these four plugs that are at the end of the trans harness.

The entire wiring harness is now free.
The last thing I needed to do is release the TOB from the clutch. First, the access plate must be removed.
1: Remove these two bolts. This plate is on the lower right side of the transmission bell-housing.

I can't really explain how to release the TOB, but this video gives a perfect demonstration.
Next up I started on removing the hood, but I'll wait until tomorrow when a friend is here.
1: Remove these 2 nuts, the other side will have the same nuts.
2: Remove the windshield fluid hose.

And this is how she now sits, ready to have the motor pulled.
 01-24-15, 02:27 PM
#19
Full Member
Thread Starter
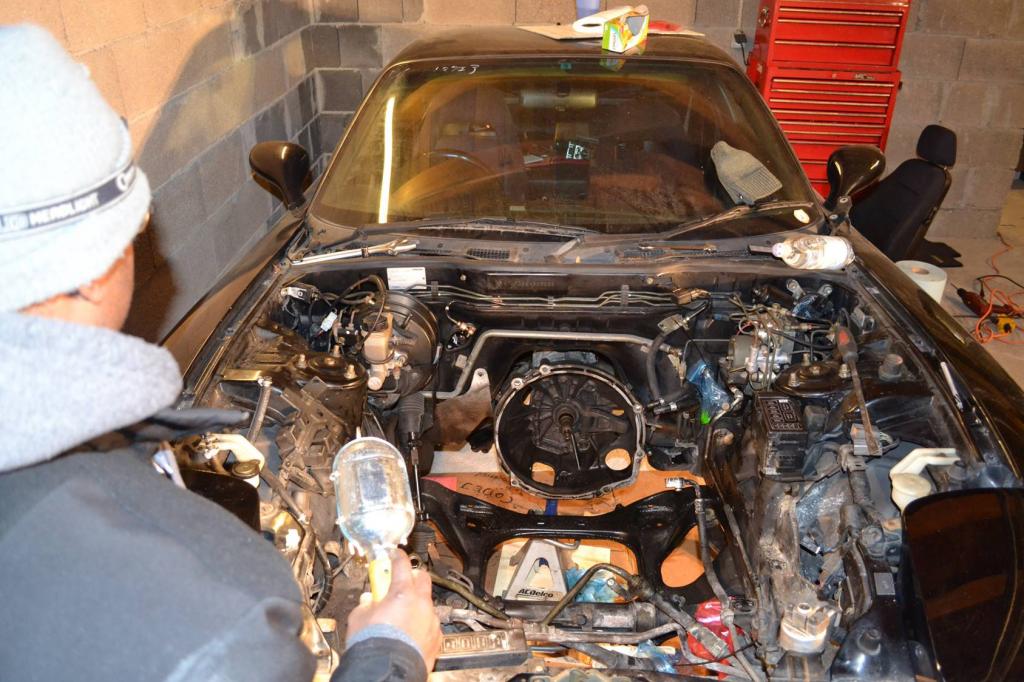
You may notice that my upper intake manifold is already gone, and I didn't do a write-up on how it was removed. That's because I was going to include that in the engine tear down portion. So although it's already gone, that part will be done in my next post.
Oh, I found this buried in the dash. I wonder what "Fun Factry" is, and all of the little squiggle marks.
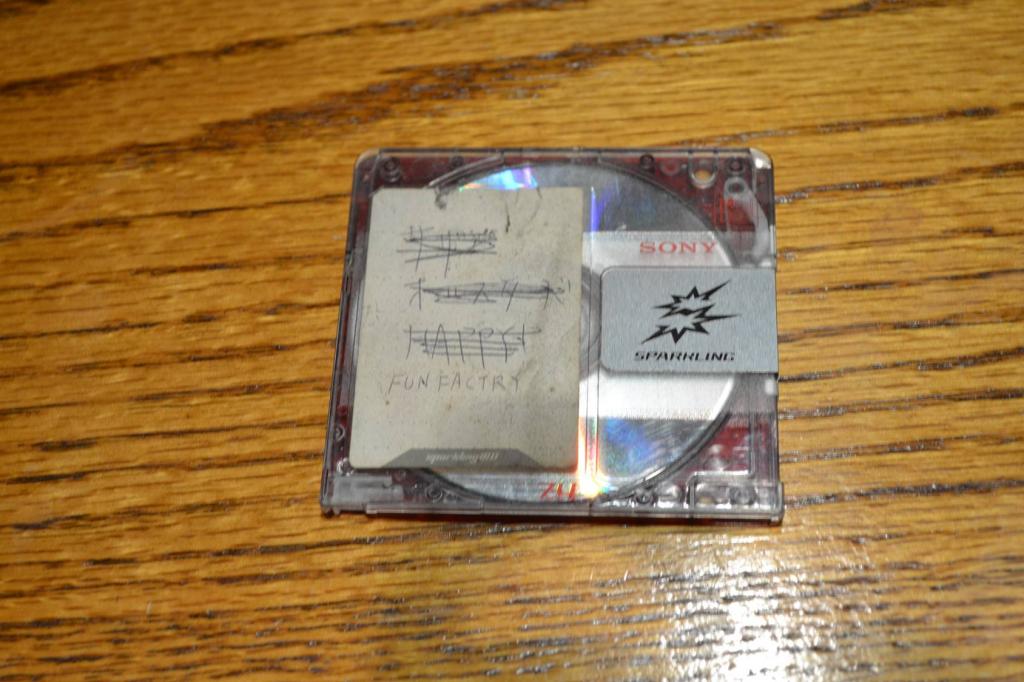
Oh, I found this buried in the dash. I wonder what "Fun Factry" is, and all of the little squiggle marks.
 01-25-15, 11:31 AM
#21
Full Member
Thread Starter
Season 1 - Episode 5
Well, today was suppose to be a simple day. I was supposed to be able to just roll the cherry picker up to the car and pull the engine out. However, the car had other plans.
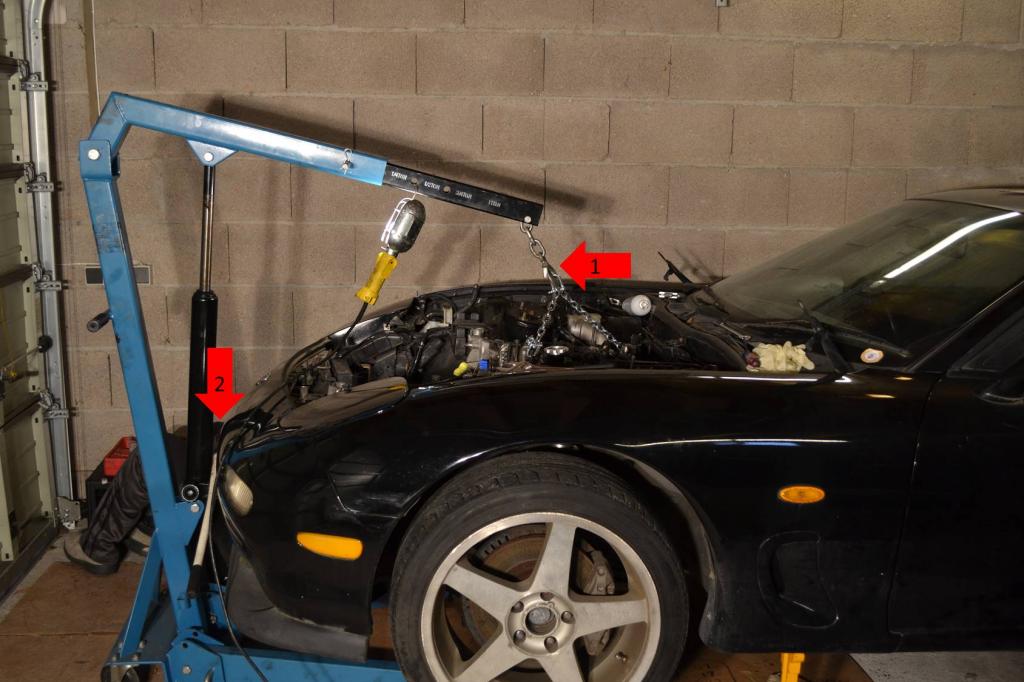
As you can see in the following picture, the cherry picker's arm was not quite long enough to lift the engine out of the bay without becoming borderline unsafe and probably breaking things. You can see the angel the chain is at, marked with a "1". This would result in the cherry picker trying to lift the rear wheels off the ground. Also, it would be trying to pull the engine towards the front of the car, once again not good. Since as soon as the engine came loose, it would come springing forward. Also, you can see the cherry picker was up against the front bumper, marked with a "2". As I lifted the engine, the cherry picker would continue to crush the bumper.
Well, all of that was no good. So the solution, remove the damn bumper. That way I get the clearance I need to lift the engine.
First things first, remove the wheels, this will make it easier to access the fasteners in the wheel well and the nuts securing the bumper to the fender. After that, remove the fog lights and raise the headlights.
NOTE: The following steps are the same for both sides. I'm only going to show one side, as showing both would just be a duplicate and a waste of time. I will add another note when I end the whole "Do this to both side" series of steps.
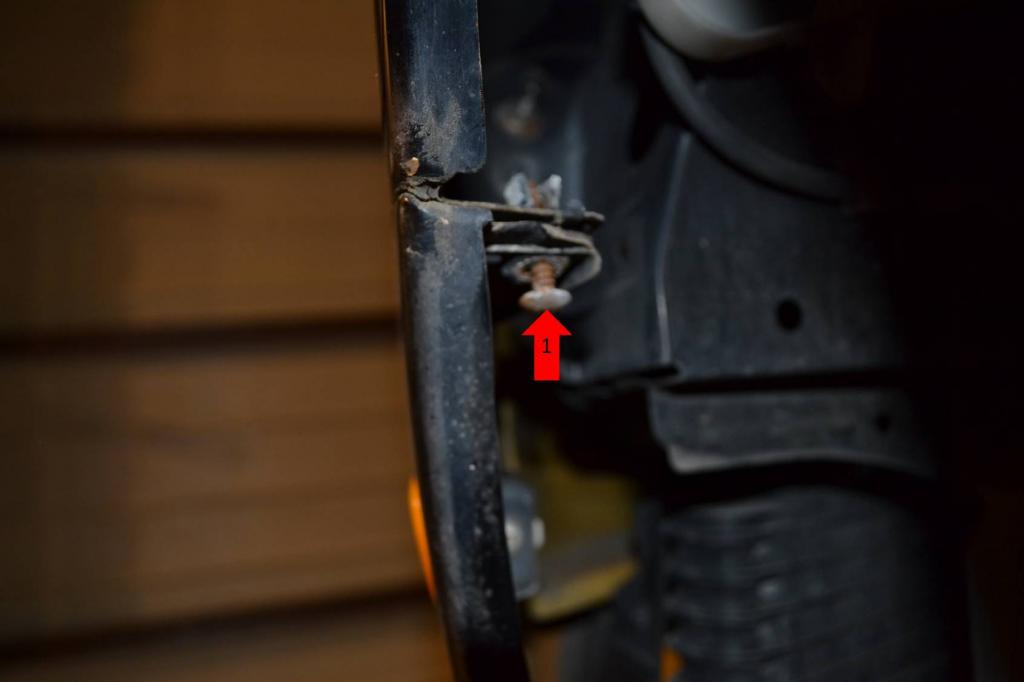
1: Remove this screw. Once you do that, pull the outside edge of the fog light out, while you push the inside edge in to the bumper. That will release the fog light.
1: Disconnect this plug. The fog light will now be free.

Now raise the headlights. The reason we're going to raise the headlights, is so we can access one of the nuts that holds the bumper to the fender.
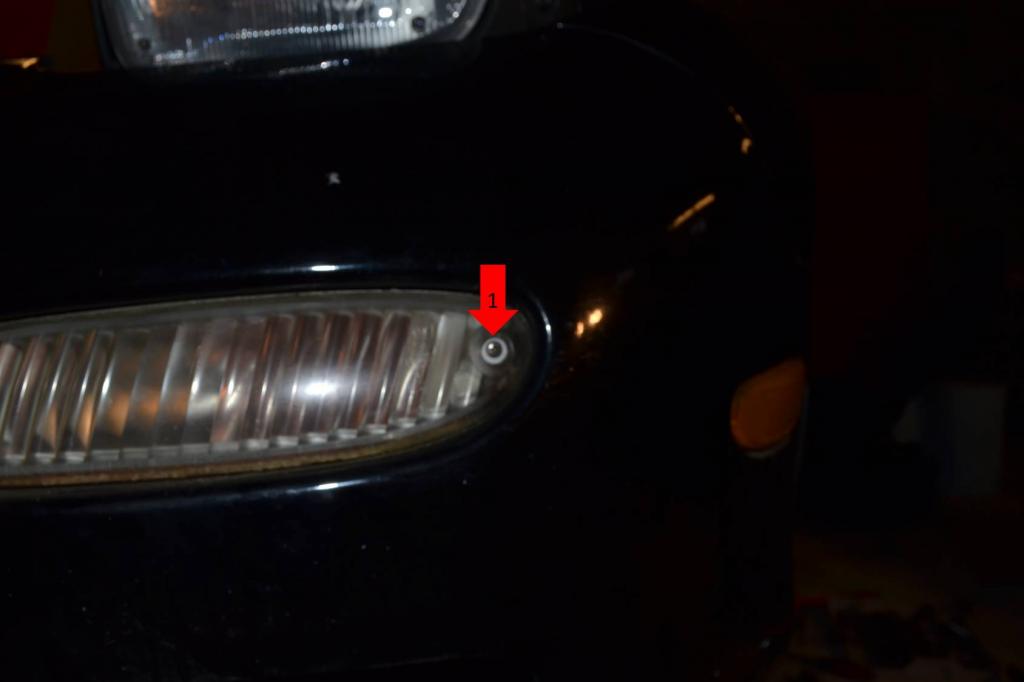
1: Find this rubber cap on the headlight motor and remove it, a little red **** will then be exposed.
1: This is the little red ****. Turn it clockwise and it will manually raise the headlight.
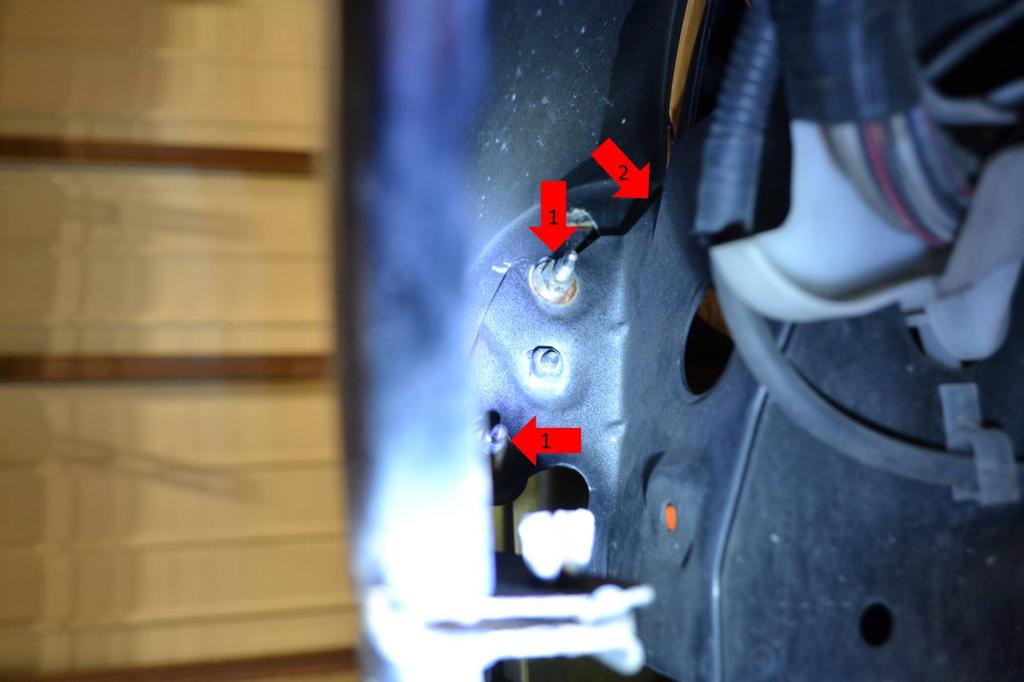
1: Remove these two bolts. This is the bracket right next to the headlight that holds the bumper to the upper support.
1: Remove this bolt. It ties the bumper into an air duct.
Now start removing the fender liner.
1: Remove all of these plastic fasteners. Do not put pressure on them, just spin them. If you put pressure on them, they will likely strip and not back out. They will just turn in place without coming out. If they start doing that, use a pick or small flat-head screwdriver to get under them and apply outward pressure while you turn them, that will make them come out.
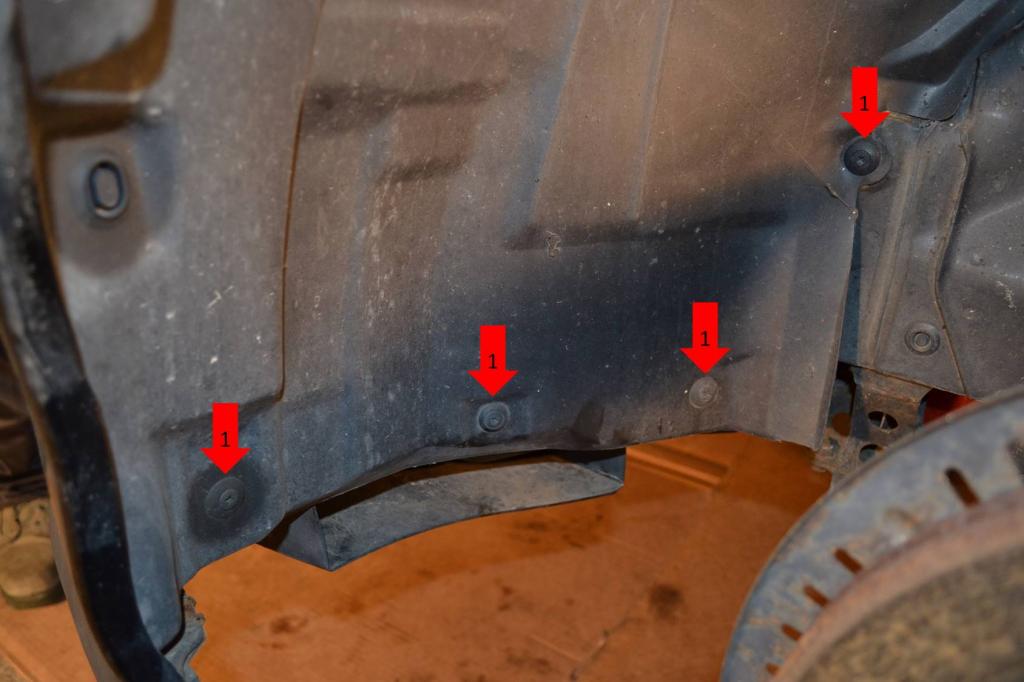
1: Remove these plastic fasteners.
2: Remove this screw.
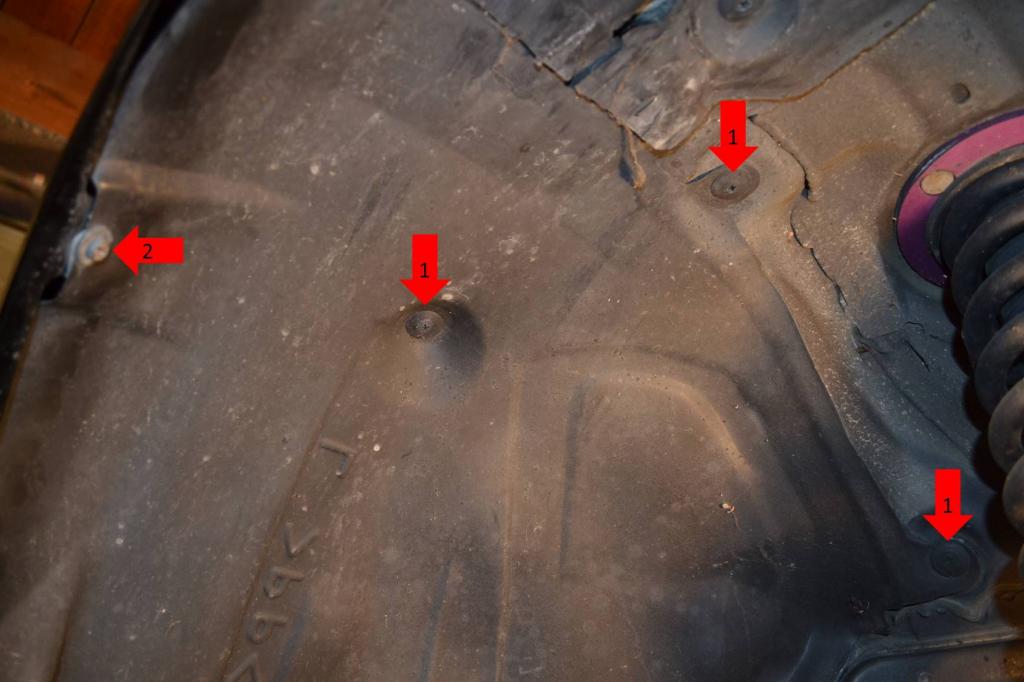
1: Remove this final fastener.
2: You removed this one already.
At this point the fender liner will be free to move around, but will still not come out. That's ok. Just bend it back out of the way, just roll it back towards the hub so you can access the inside of the fender and bumper.
To be continued............
As you can see in the following picture, the cherry picker's arm was not quite long enough to lift the engine out of the bay without becoming borderline unsafe and probably breaking things. You can see the angel the chain is at, marked with a "1". This would result in the cherry picker trying to lift the rear wheels off the ground. Also, it would be trying to pull the engine towards the front of the car, once again not good. Since as soon as the engine came loose, it would come springing forward. Also, you can see the cherry picker was up against the front bumper, marked with a "2". As I lifted the engine, the cherry picker would continue to crush the bumper.

Well, all of that was no good. So the solution, remove the damn bumper. That way I get the clearance I need to lift the engine.
First things first, remove the wheels, this will make it easier to access the fasteners in the wheel well and the nuts securing the bumper to the fender. After that, remove the fog lights and raise the headlights.
NOTE: The following steps are the same for both sides. I'm only going to show one side, as showing both would just be a duplicate and a waste of time. I will add another note when I end the whole "Do this to both side" series of steps.
1: Remove this screw. Once you do that, pull the outside edge of the fog light out, while you push the inside edge in to the bumper. That will release the fog light.

1: Disconnect this plug. The fog light will now be free.

Now raise the headlights. The reason we're going to raise the headlights, is so we can access one of the nuts that holds the bumper to the fender.
1: Find this rubber cap on the headlight motor and remove it, a little red **** will then be exposed.

1: This is the little red ****. Turn it clockwise and it will manually raise the headlight.

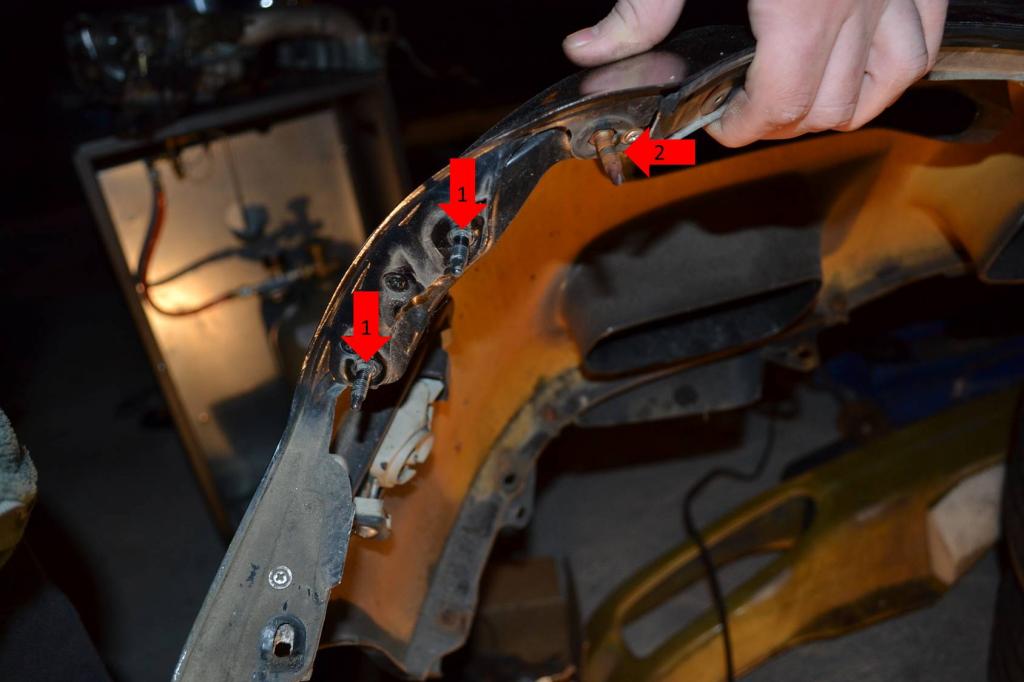
1: Remove these two bolts. This is the bracket right next to the headlight that holds the bumper to the upper support.

1: Remove this bolt. It ties the bumper into an air duct.

Now start removing the fender liner.
1: Remove all of these plastic fasteners. Do not put pressure on them, just spin them. If you put pressure on them, they will likely strip and not back out. They will just turn in place without coming out. If they start doing that, use a pick or small flat-head screwdriver to get under them and apply outward pressure while you turn them, that will make them come out.

1: Remove these plastic fasteners.
2: Remove this screw.

1: Remove this final fastener.
2: You removed this one already.

At this point the fender liner will be free to move around, but will still not come out. That's ok. Just bend it back out of the way, just roll it back towards the hub so you can access the inside of the fender and bumper.
To be continued............
01-25-15, 11:48 AM
#22
Full Member
Thread Starter
Season 1 - Episode 5 Continued
You are still doing these steps on both sides.
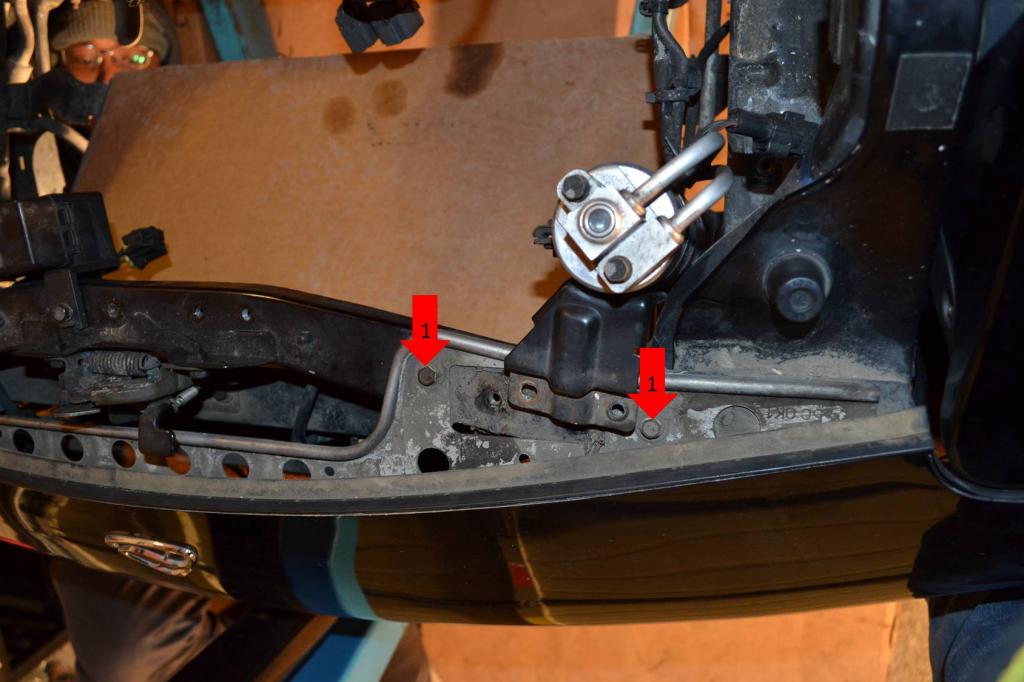
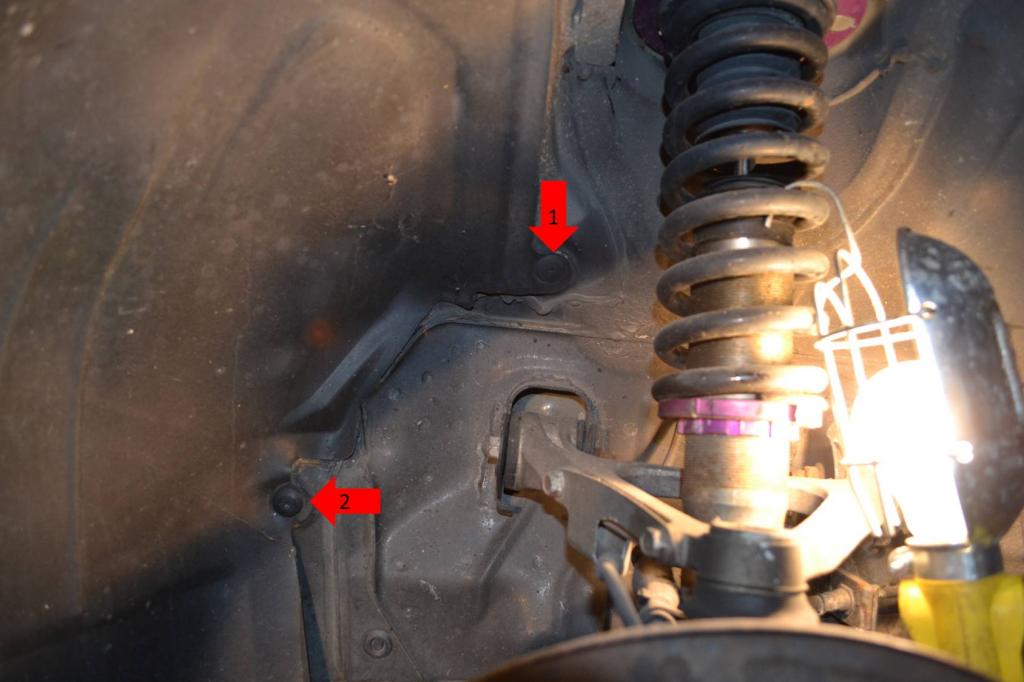
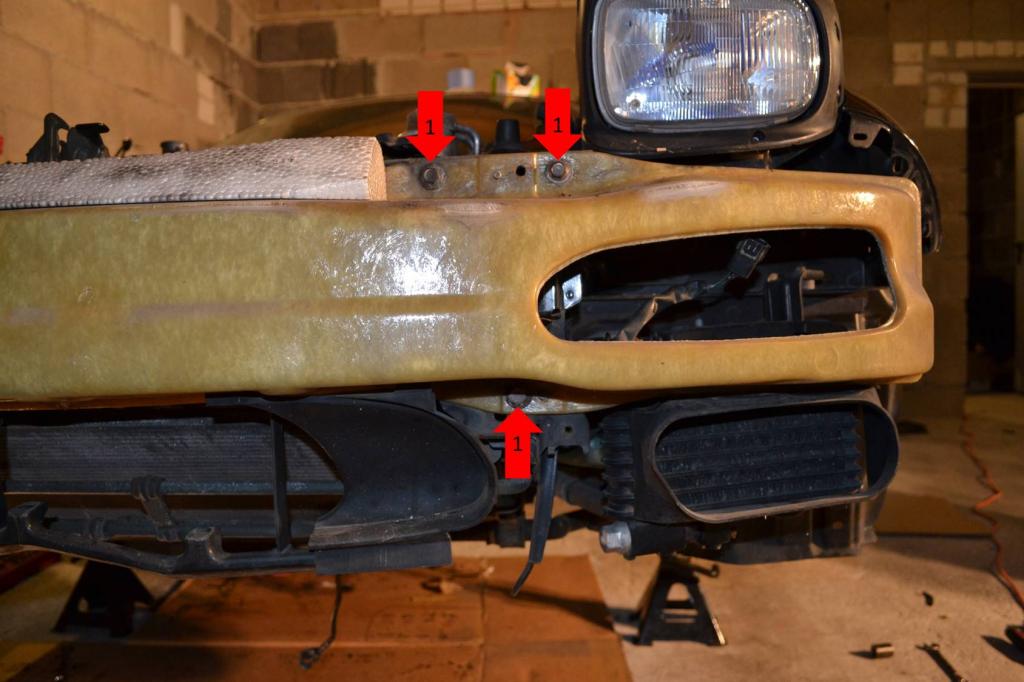
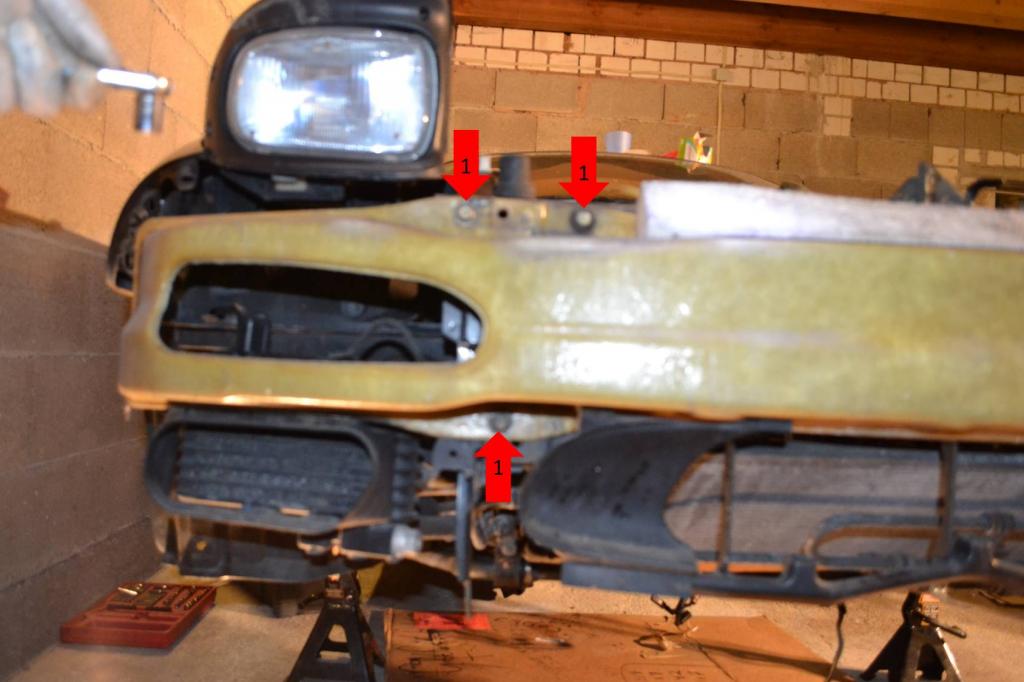
Now that the fender liner is rolled back and out of the way. We can remove the 1 screw and 3 nuts that secure the bumper to the fender.
1: Remove this screw.
There are three nuts securing the bumper to the fender. This first pic will plainly show two, the third is hidden. But the next pic will show the location of all three.
1: Remove these two nuts.
2: You can't see this nut, but it's there. This is the nut we had to raise the headlights to access. The easiest way to access this nut is to reach your hand in the hole where the fog light goes and reach up towards the headlight until you find the nut.
This picture shows the layout of where the nuts are.
1: These are the two nuts that are visible in the last pic.
2: This was the hidden one you accessed through the fog light hole.
NOTE: The "Do these steps to both sides" series stops now. At this point, if you duplicated all of these steps, from the last post until now, on both sides, the bumper is mostly free.
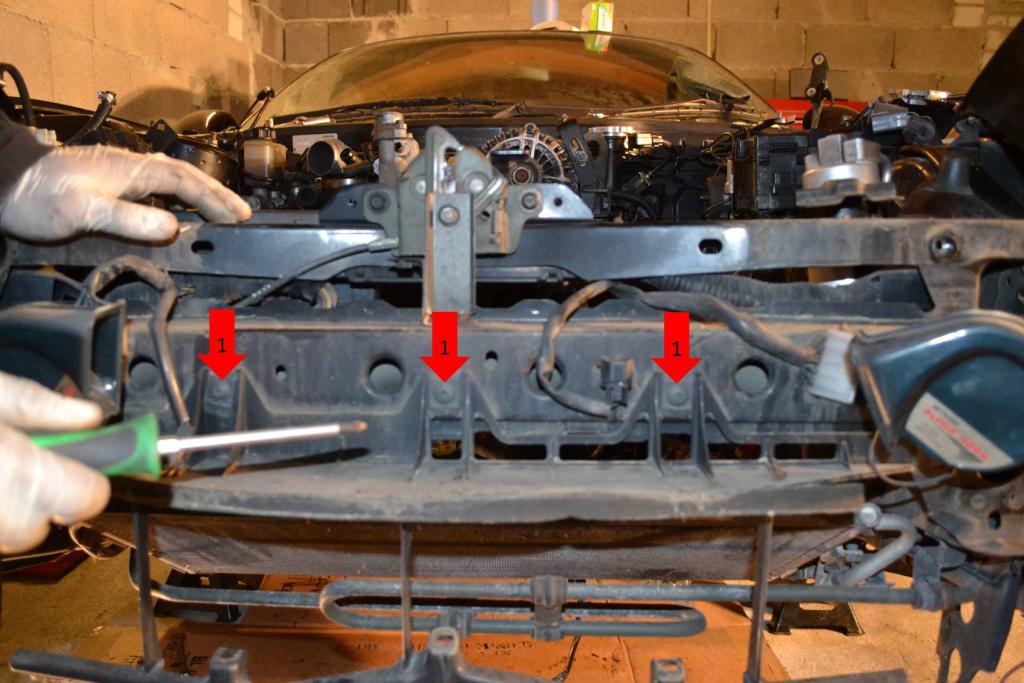
1: Remove these four fasteners.
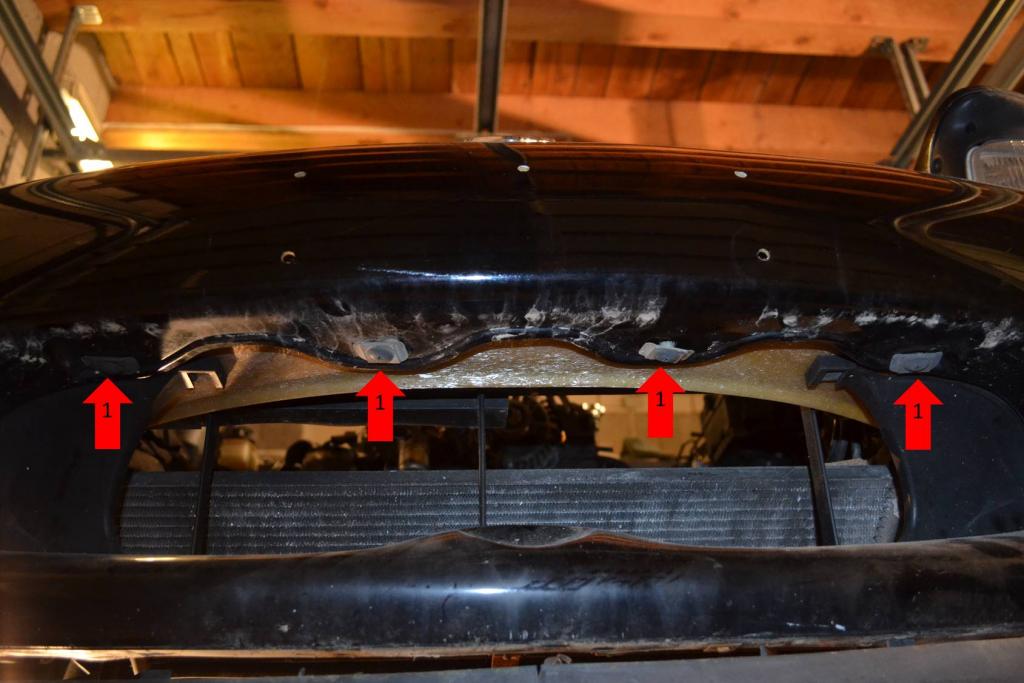
1: Remove these three fasteners.
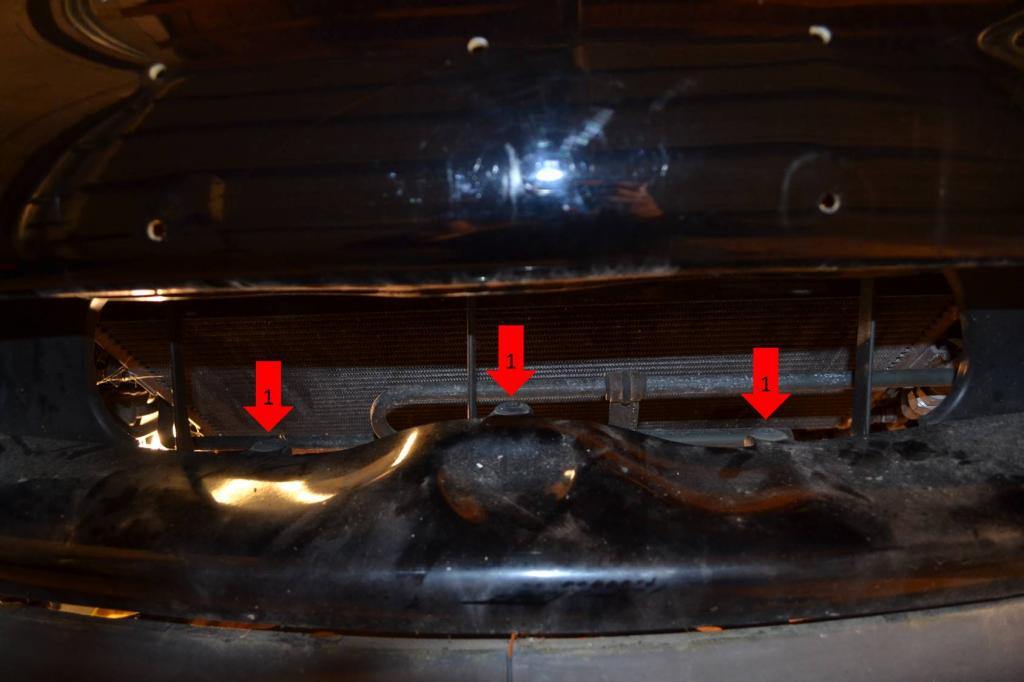
The bumper will now slide free of the car. Go lay it aside somewhere.
Now, to remove the crash bar and a little plastic air duct.
1: Remove these 3 bolts on the left side of the crash bar.
1: Remove these three nuts on the right side of the crash bar.
The crash bar is now free, lay it aside.
Now to remove this air duct.
1: Remove these three fasteners.
Lay the plastic piece aside.
As you can see, the car is now pretty naked. So let's get the cherry picker back in there and get the engine out.
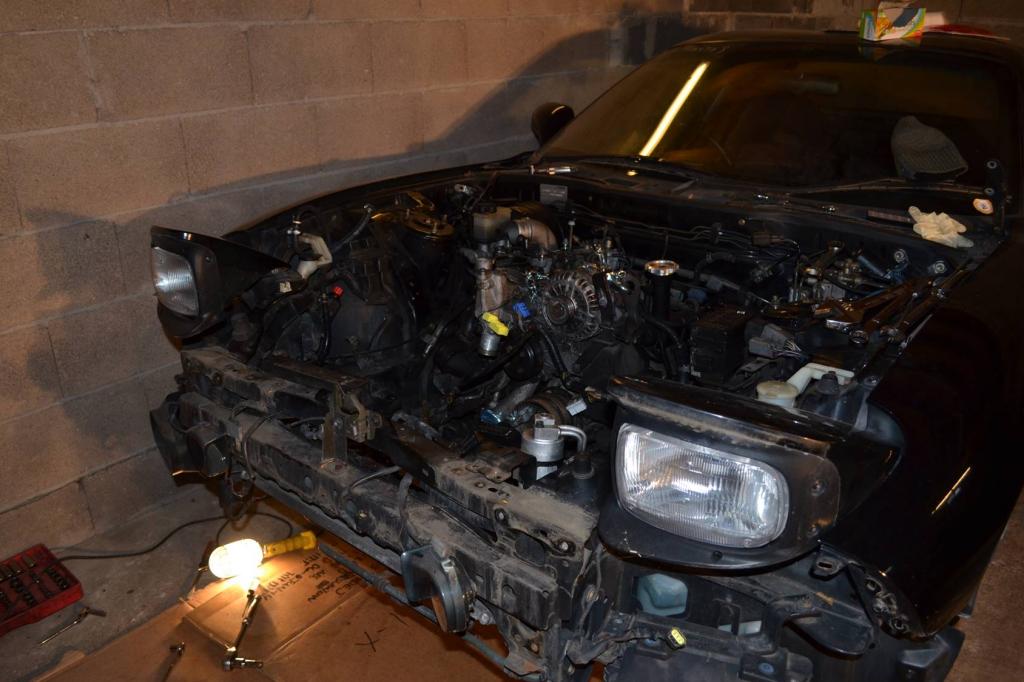
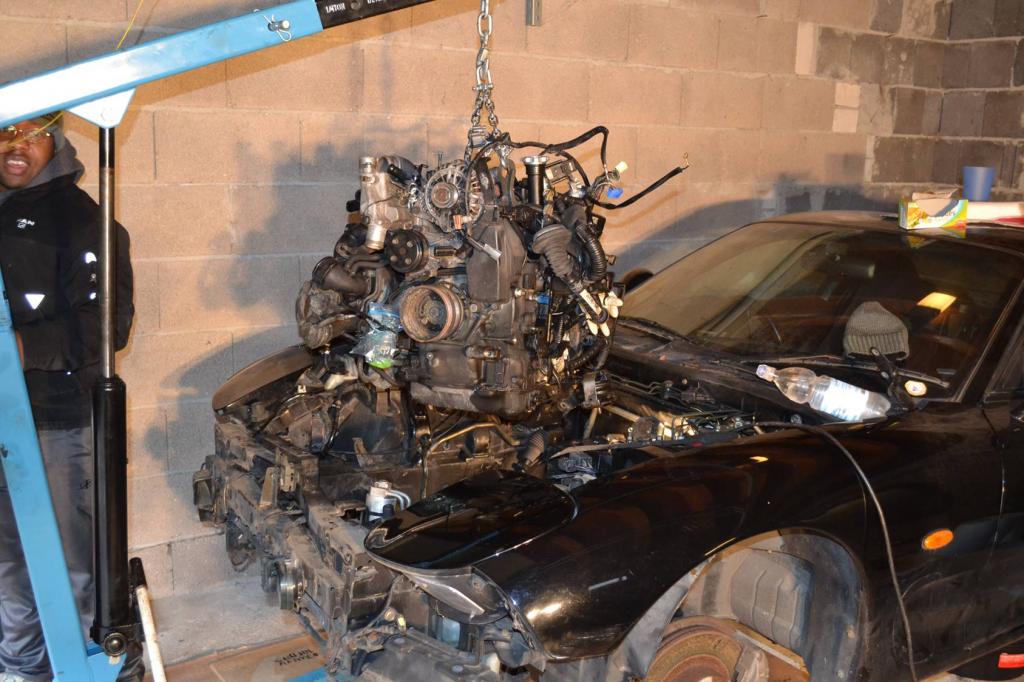
Lift the engine a bit with the cherry picker. Once you've lifted it, grab a jack stand and brace the transmission under the bell housing.
Once you have the jack stand in place, lower the engine a little until the transmission rests on the jack stand. This will reduce the bind between the motor and transmission. Now start wiggling the motor towards the front end of the car, and she will come free.
There she is, half way out.
And there's the car minus an engine, she's quite the gaper. That's a friend you see to the side there.
Now that the fender liner is rolled back and out of the way. We can remove the 1 screw and 3 nuts that secure the bumper to the fender.
1: Remove this screw.

There are three nuts securing the bumper to the fender. This first pic will plainly show two, the third is hidden. But the next pic will show the location of all three.
1: Remove these two nuts.
2: You can't see this nut, but it's there. This is the nut we had to raise the headlights to access. The easiest way to access this nut is to reach your hand in the hole where the fog light goes and reach up towards the headlight until you find the nut.

This picture shows the layout of where the nuts are.
1: These are the two nuts that are visible in the last pic.
2: This was the hidden one you accessed through the fog light hole.

NOTE: The "Do these steps to both sides" series stops now. At this point, if you duplicated all of these steps, from the last post until now, on both sides, the bumper is mostly free.
1: Remove these four fasteners.

1: Remove these three fasteners.

The bumper will now slide free of the car. Go lay it aside somewhere.
Now, to remove the crash bar and a little plastic air duct.
1: Remove these 3 bolts on the left side of the crash bar.

1: Remove these three nuts on the right side of the crash bar.

The crash bar is now free, lay it aside.
Now to remove this air duct.
1: Remove these three fasteners.

Lay the plastic piece aside.
As you can see, the car is now pretty naked. So let's get the cherry picker back in there and get the engine out.

Lift the engine a bit with the cherry picker. Once you've lifted it, grab a jack stand and brace the transmission under the bell housing.

Once you have the jack stand in place, lower the engine a little until the transmission rests on the jack stand. This will reduce the bind between the motor and transmission. Now start wiggling the motor towards the front end of the car, and she will come free.
There she is, half way out.

And there's the car minus an engine, she's quite the gaper. That's a friend you see to the side there.
 01-25-15, 11:50 AM
#23
Full Member
Thread Starter
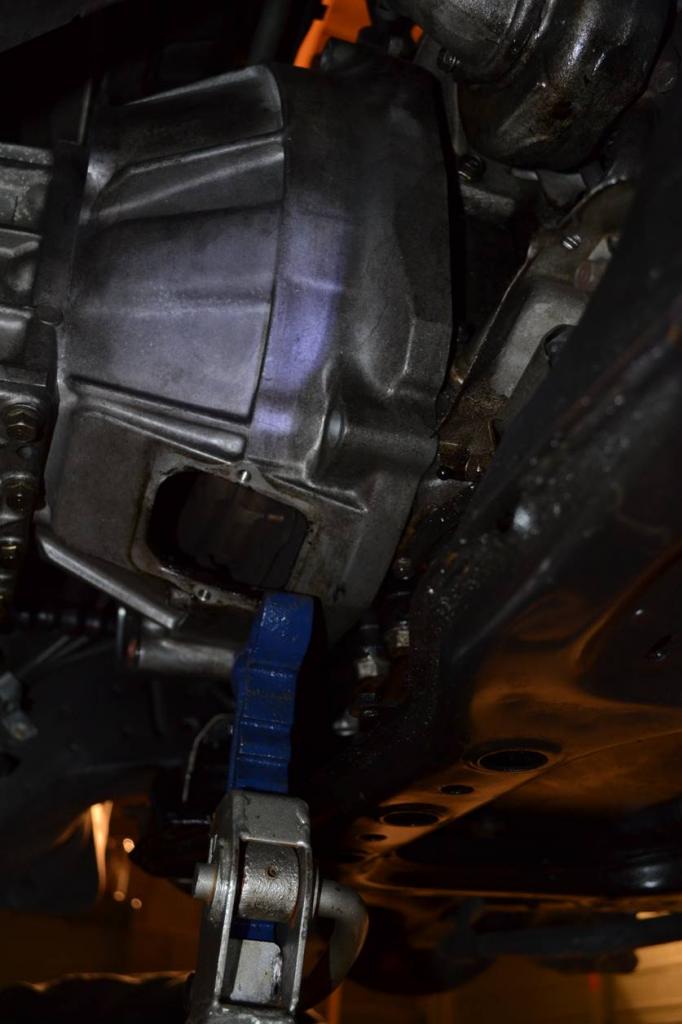
And there's the *** end of the motor.
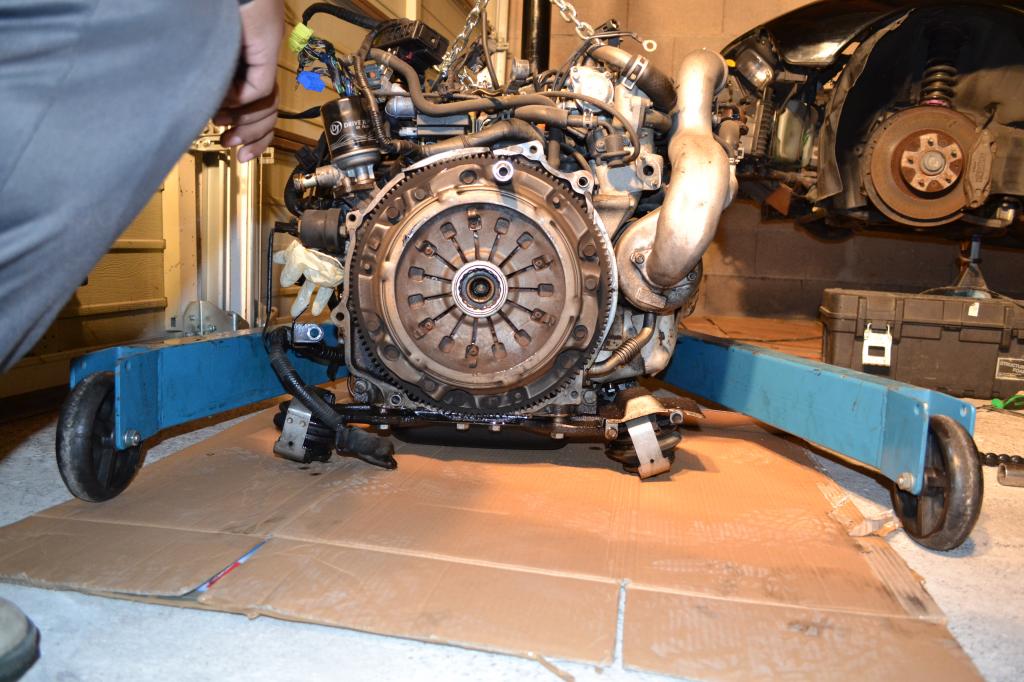
Well, that's all there is to removing the engine from your RHD FD. Not too bad. That concludes Season 1 of this little show. The engine is now out, resting on the ground. Once I get my motor stand in, I'll throw the motor on it and proceed with Season 2: The Tear Down and Rebuild.

Well, that's all there is to removing the engine from your RHD FD. Not too bad. That concludes Season 1 of this little show. The engine is now out, resting on the ground. Once I get my motor stand in, I'll throw the motor on it and proceed with Season 2: The Tear Down and Rebuild.