Deesan's slammed BP20B Street Weapon
 06-18-16, 10:54 AM
#101

Not much to show for the time being, most of the setup is welded and ready to go. Gave special treatment to the air filter flange, I didn't want to have a rubber coupler in my engine bay  plus this will let me rapidly swap between air filter and velocity stack on the go!
Since I preferred having the quick release clamp on the TB, I cut the OEM TB in order to make it possible to fit the clamp on top instead of where it used to be. Anyway, all I needed on it was the final butterflies and this way it's easier to take out the cold side piping section to work on the car or whatever.
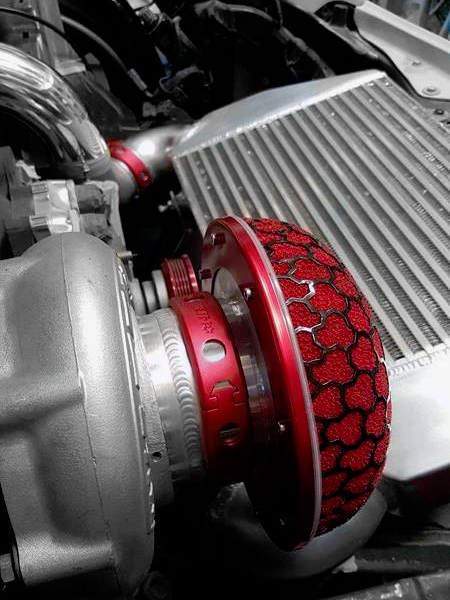
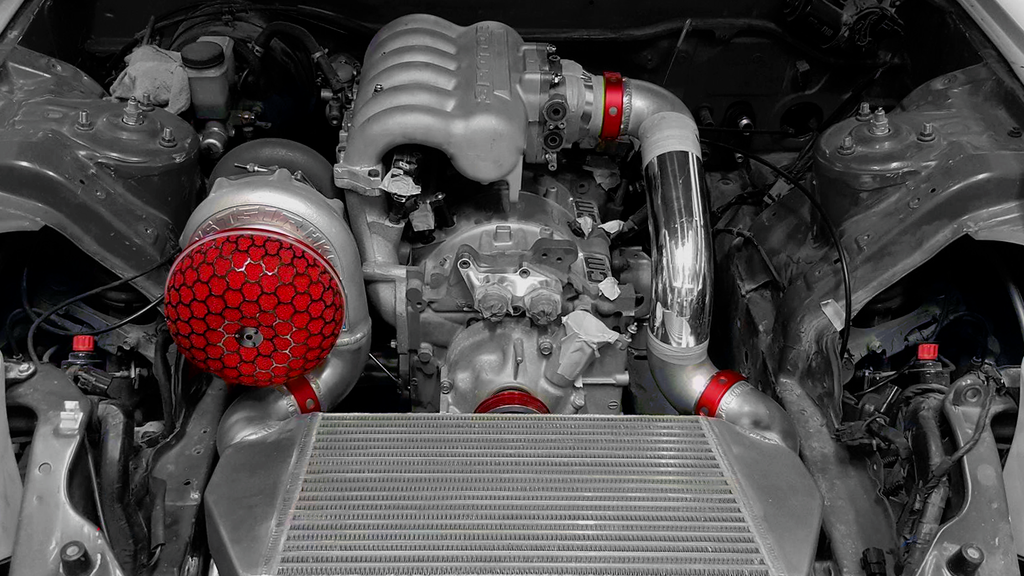
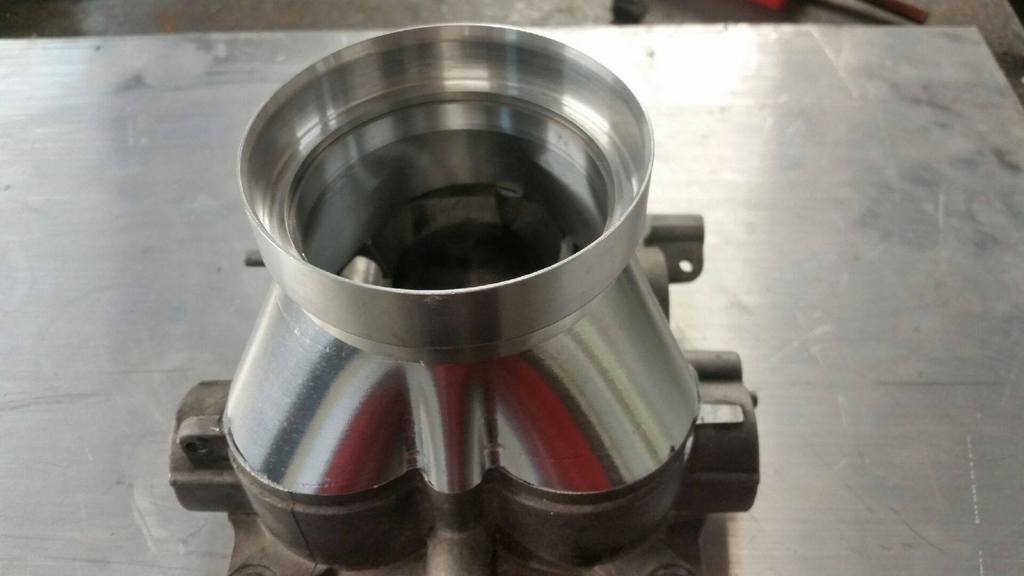
plus this will let me rapidly swap between air filter and velocity stack on the go! Since I preferred having the quick release clamp on the TB, I cut the OEM TB in order to make it possible to fit the clamp on top instead of where it used to be. Anyway, all I needed on it was the final butterflies and this way it's easier to take out the cold side piping section to work on the car or whatever.


 09-17-16, 11:47 PM
#107
Sorry guys, it's been a good while since my last update and I don't have much to show you neither. Things aren't going my way it seems...
Actually, I'm now looking to sell all these Aeroflow Kryptalon AN hose ends and hoses (there's about 2.6k in there). If anyone is interested in buying the whole lot, let me know.. I can make you a good deal! The reason I want to sell might sound stupid... but I just can't deal with gray lines. It'll look out of place once everything around is coated black. In any case, it's good stuff and there's pretty much everything you'd need to re-new or upgrade complete fuel / coolant / oil setups.
1x Aeroflow Kryptalon Series Ultra-Light Flexible Kevlar Braided Hose -8AN (AF7000-08-5M)
1x Aeroflow Kryptalon Series Ultra-Light Flexible Kevlar Braided Hose -10AN (AF7000-10-5M)
1x Aeroflow Kryptalon Series Ultra-Light Flexible Kevlar Braided Hose -12AN (AF7000-12-2M)
1x Aeroflow Kryptalon Series One Piece Full Flow Swivel 45� Hose End -8AN (AF7022-08)
2x Aeroflow Kryptalon Series Full Flow Swivel 180� Hose End -8AN (AF7026-08)
3x Aeroflow Kryptalon Series One Piece Full Flow Swivel 90� Hose End -8AN (AF7023-08)
8x Aeroflow Kryptalon Series Full Flow Swivel Straight Hose End -8AN (AF7021-08)
3x Aeroflow Kryptalon Series Full Flow Swivel Straight Hose End -10AN (AF7021-10)
1x Aeroflow Kryptalon Series Full Flow Swivel 30� Hose End -10AN (AF7027-10)
6x Aeroflow Kryptalon Series Full Flow Swivel 90� Hose End -10AN (AF7023-10)
2x Aeroflow Kryptalon Series Full Flow Swivel 90� Hose End -12AN (AF7023-12)
2x Aeroflow Kryptalon Series Full Flow Swivel 60� Hose End -12AN (AF7028-12)
4x Aeroflow 90� Tube to Female AN Adapter 3/8"to -6AN (AF139-06BLK)
2x Aeroflow 45� Tube to Female AN Adapter 3/8" to -6AN (AF129-06BLK)


Since clearance in the front is tight like a virgin, I had to machine the pulley to fit the hall sensor's wheel.

New billet alternator, it's made by March Performance (it's an LS1 alt) and is simply STUNNING in person! That other thing is my oil filter relocation pedestal, billet too of course!


An old pic I recently came across of the car back when I started taking it apart... it was so clean!

Bonus and completely unrelated... I got this render done by Ash from Hero Prints in reminiscence of my last project.

Last edited by DeeSan; 09-17-16 at 11:50 PM.

 09-25-16, 08:11 PM
#111
Thanks guys!
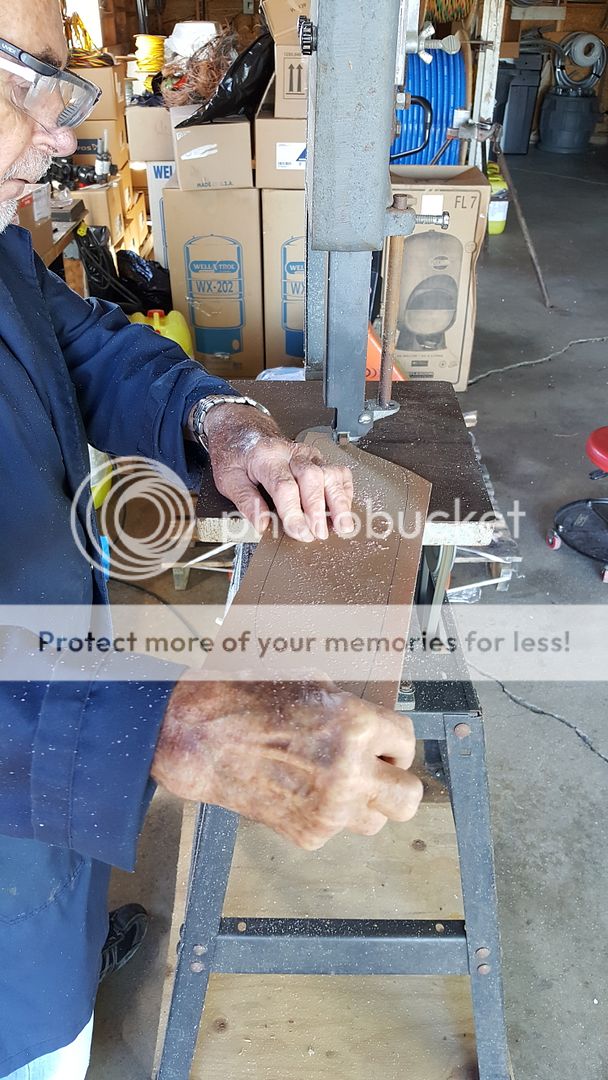
Still waiting for some parts to come in. Meanwhile, I started working on my tail lights project! Worked on this today with my dad and we LOVE the result so far, let's see what you guys think!
Mats list:
- ACRYLITE� LED sign grade (SG) Red 3RK32 GT
- ACRYLITE� LED (P95) Black/White 9H04 SC
- 30x Deep Red (655nm) LUXEON Rebel LED on a SinkPAD-II 10mm Square Base
- 4x 700 mA, Dimmable, FlexBlock DC Driver - With Leads
I've always had plans to do update the look, had a couple ideas... then I saw LO7's photoshop https://s-media-cache-ak0.pinimg.com...e8afe523e3.jpg
It gave me some ideas and I went back to the drawing board, learned how to use illustrator and turned it into this more simple and smoother design. The small red part (island) will be the blinker.

69 years old young, went through a back/neck surgery back in May and he's still out here working his *** off!
There's just no stopping him!
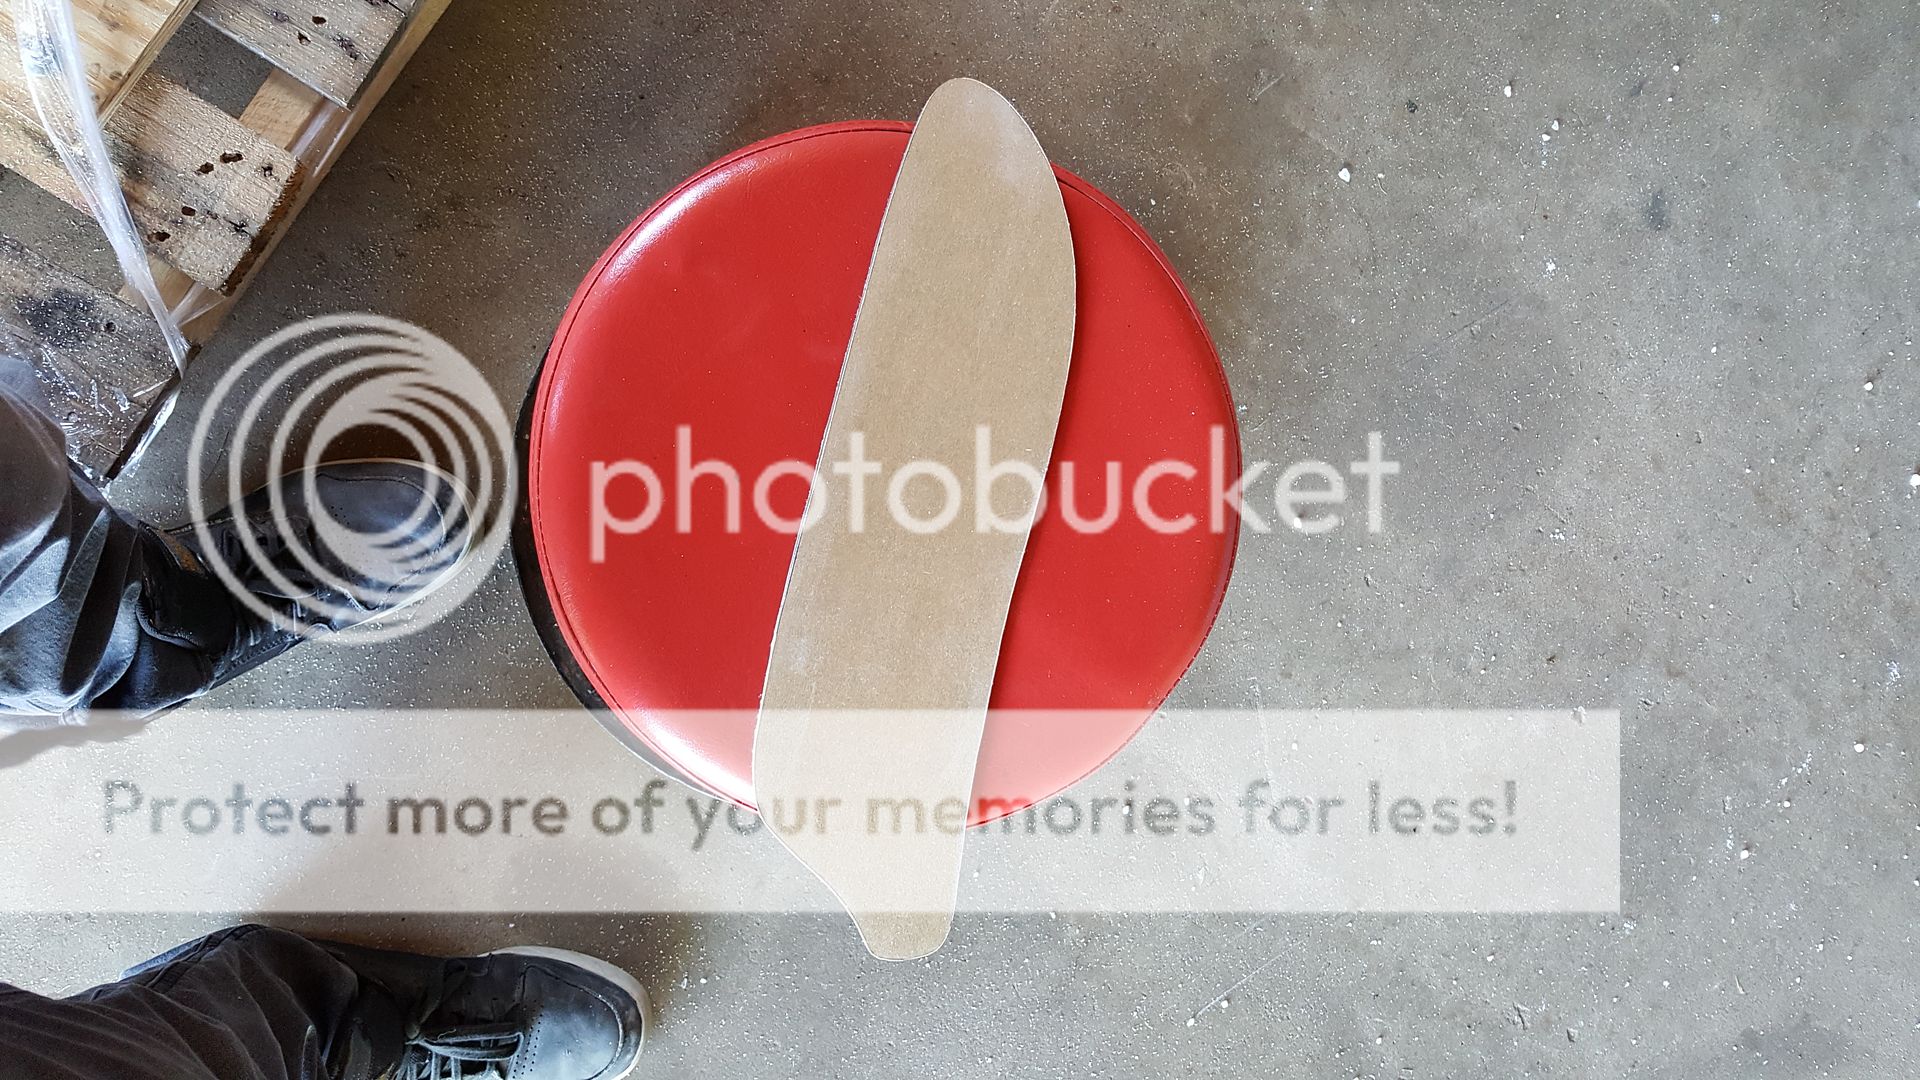
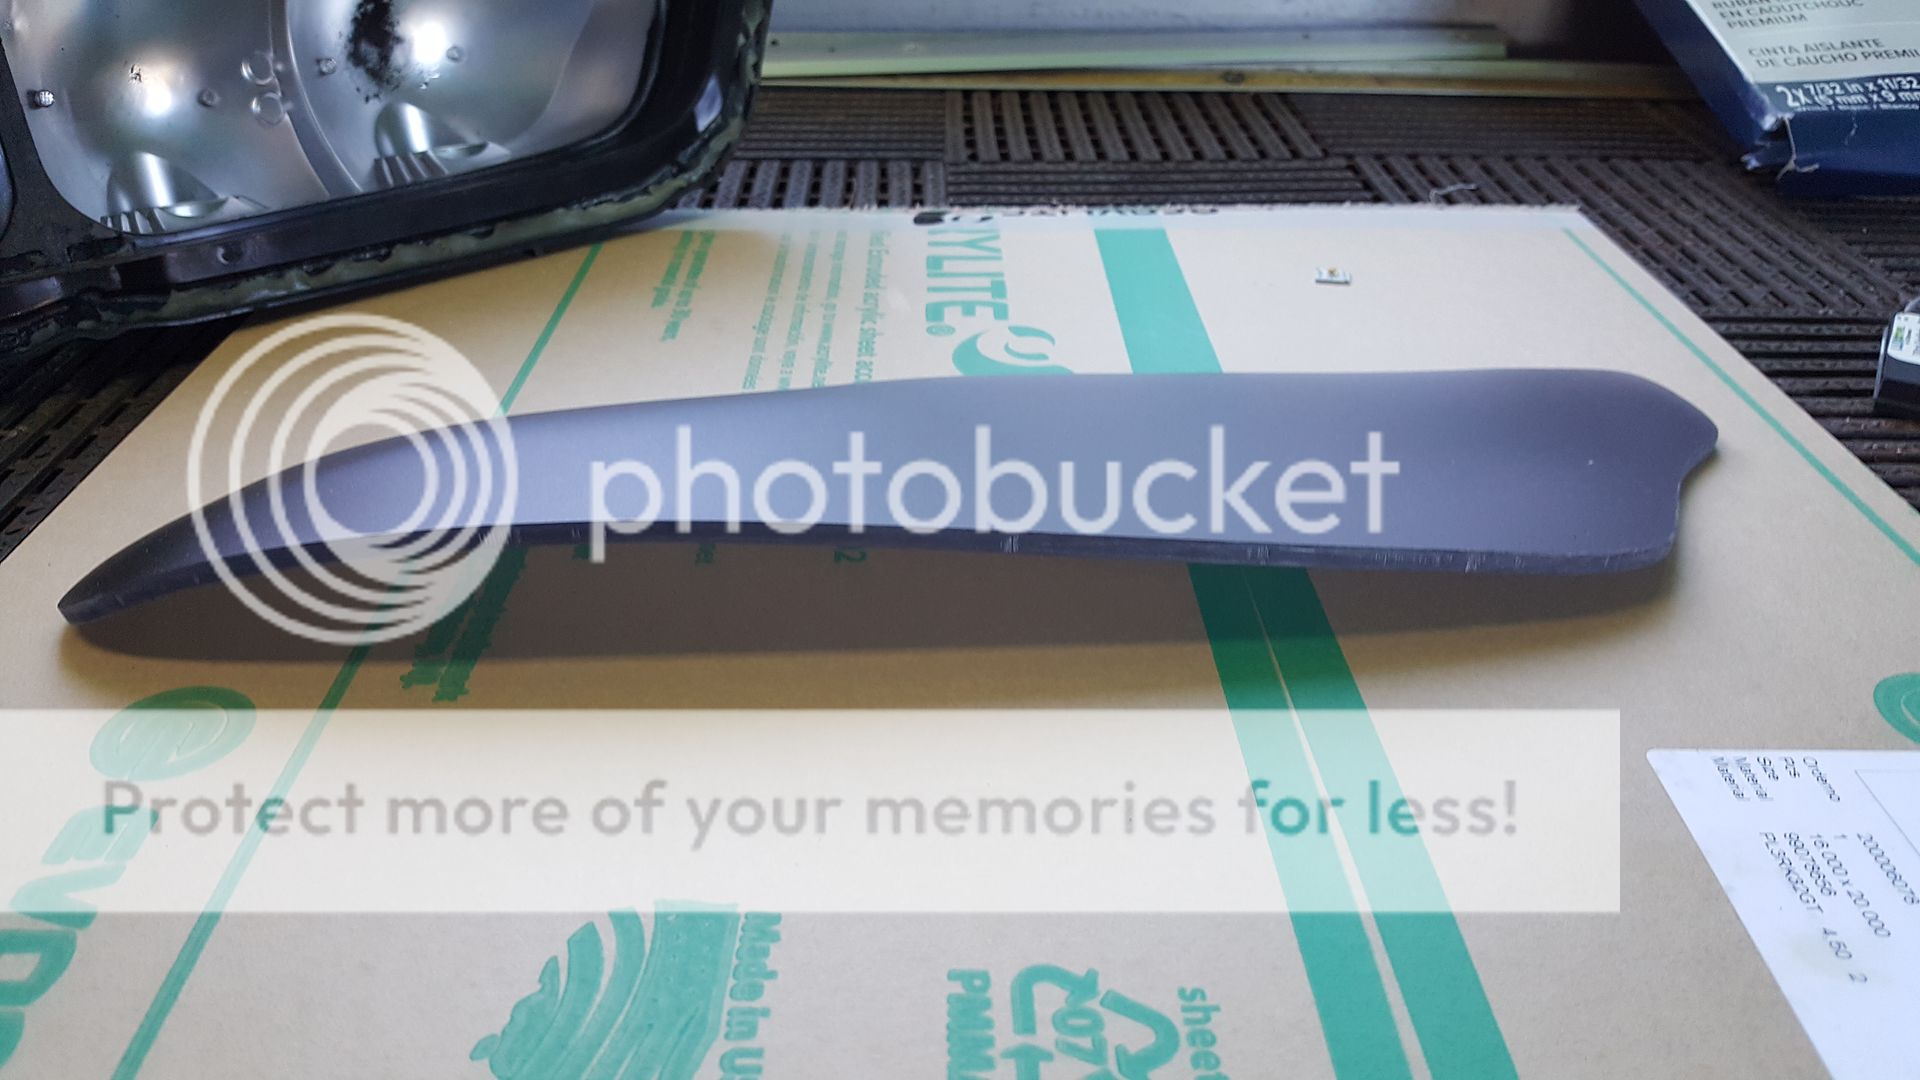
Part all cleaned up and ready for the next step.

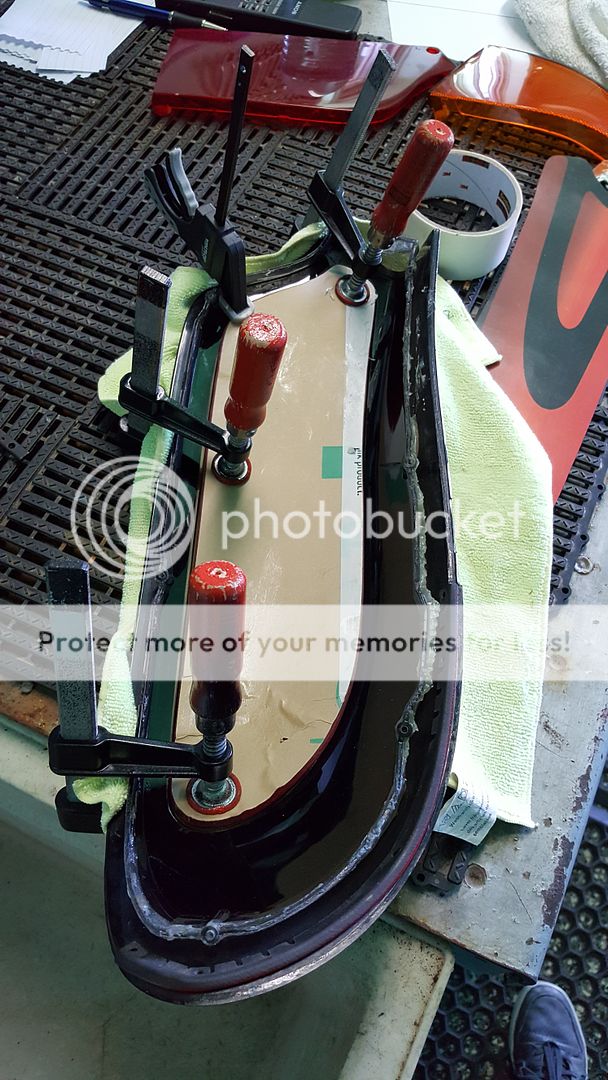
Thermoforming the acrylic to the tail light housing's window.


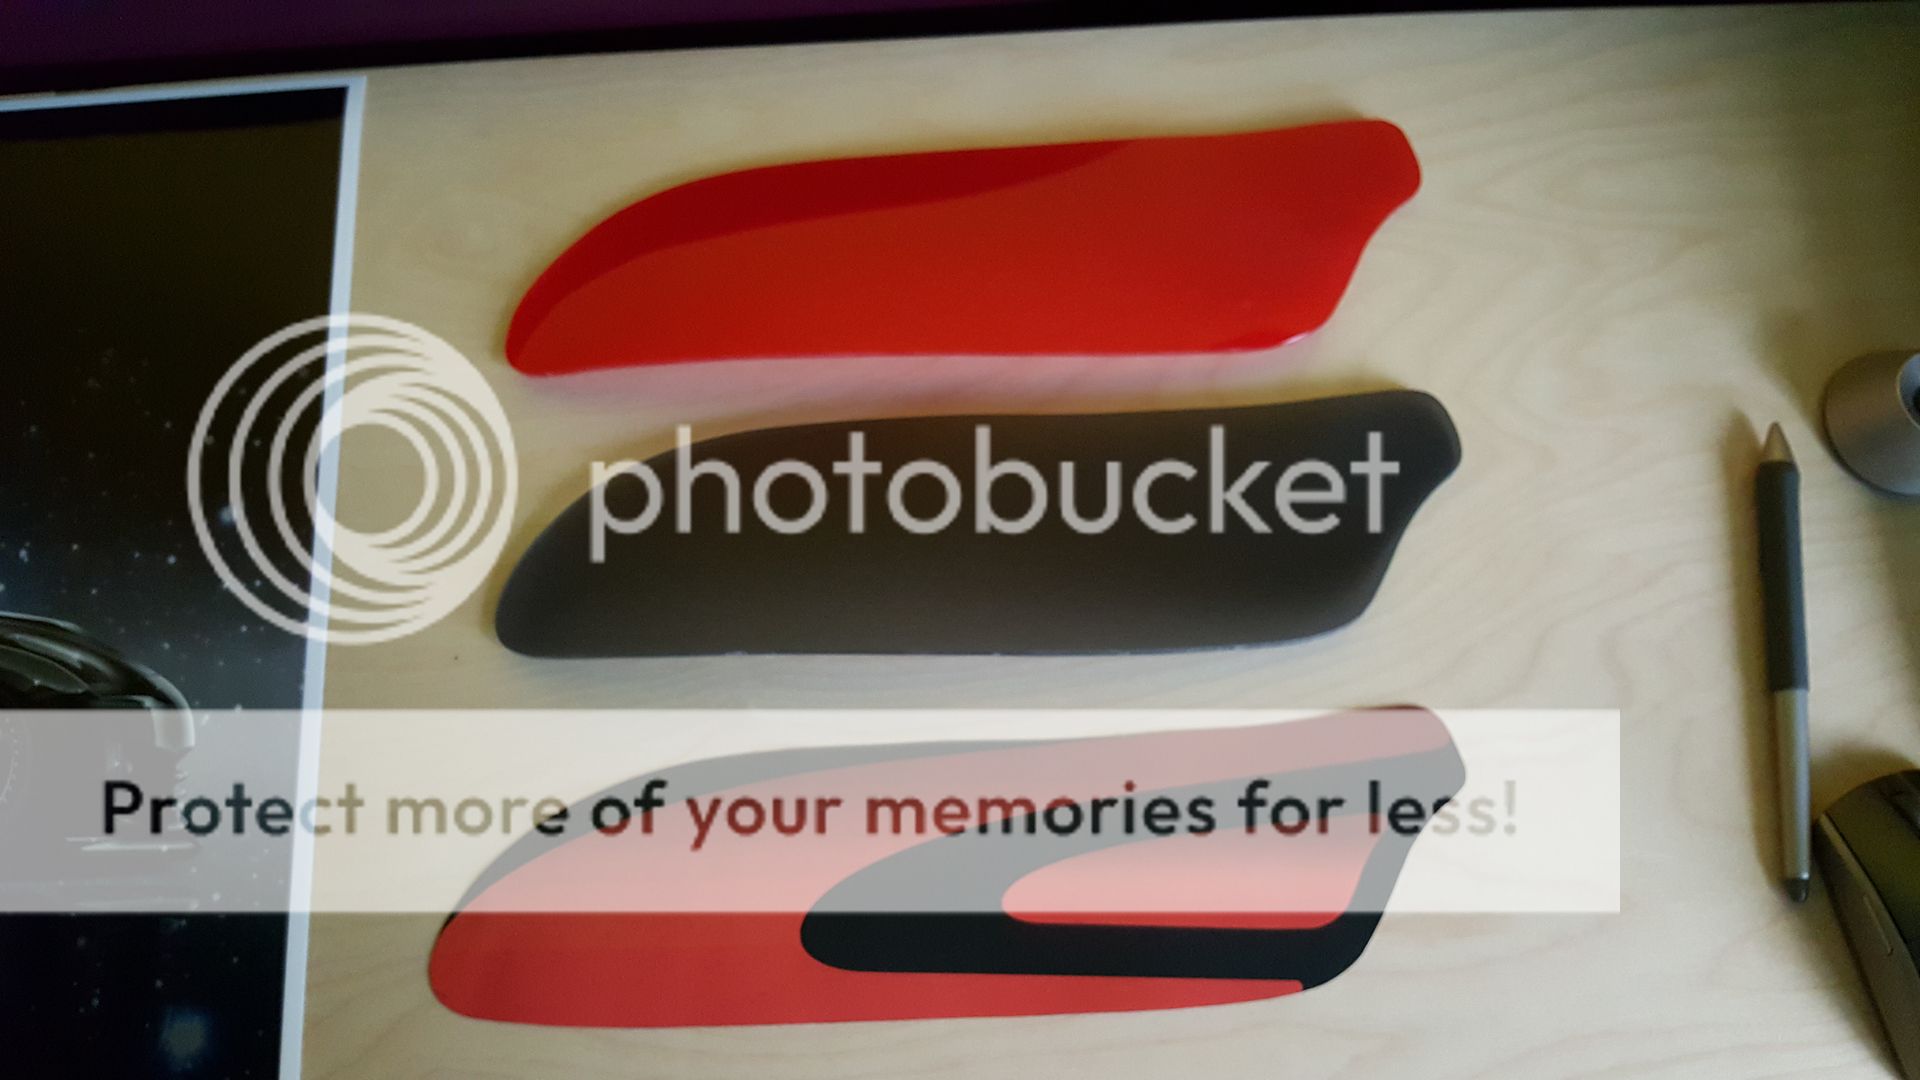
Made 2 samples, one in red and one in black to see which one I would like better. The black P95 acrylic looks incredibly nice in the housing but with the tight space we have to work with, the LEDs are too close and we could clearly see hotspots from the LEDs.

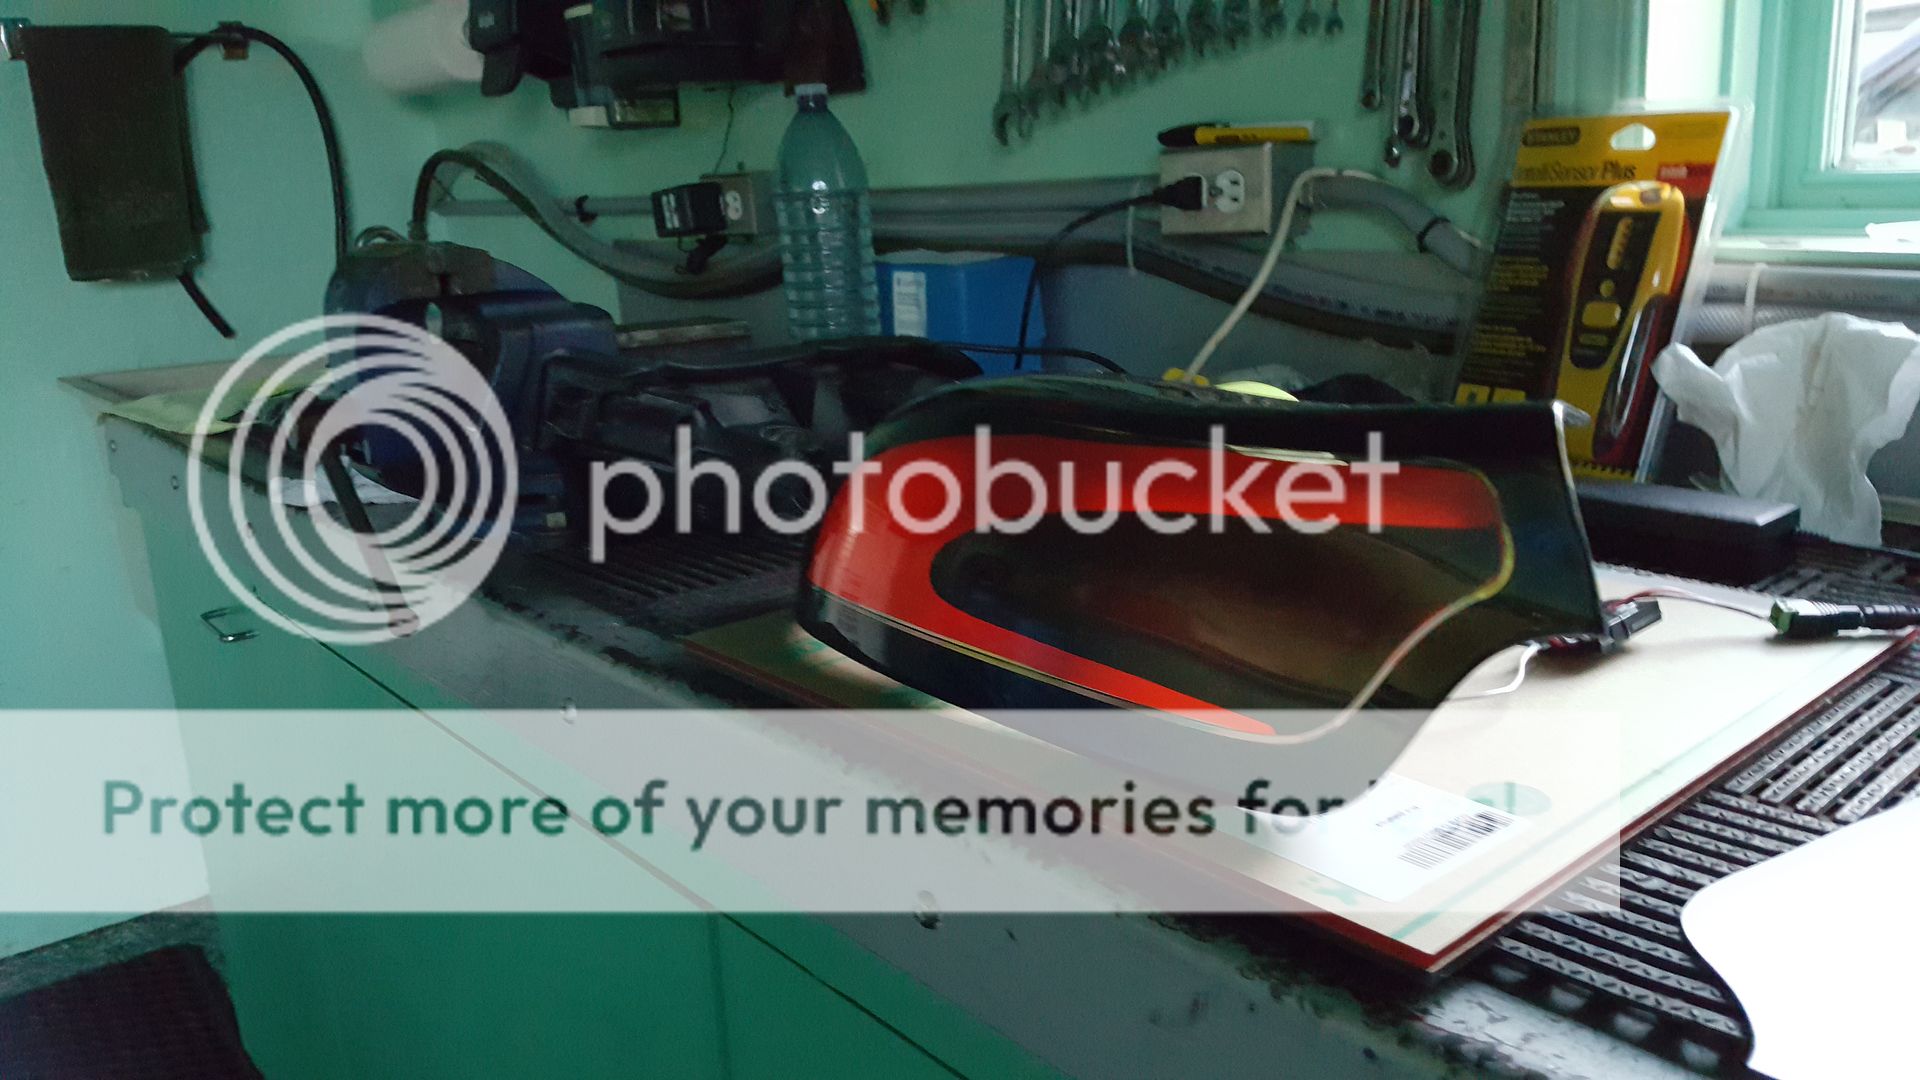
and I couldn't wait any longer to see how this would actually look... so got on the pc printed my image and cut the black parts to make a quick mock up! Obviously, it'll look much better once we do it properly. I'm still debating between getting vinyls cut vs painting the black parts... vinyls seem like an easier/sure path to take.
Note: I need to black out the small gap around the lens opening.

Here it is with back lighting. This is with only 4 LEDs flat on the counter in the open aimed toward the ceiling, only the lens no housing and it's already crazy bright! I was planning to use 11 LEDs on each sides for the main light section and 3 each for the blinkers, but now it feels like it would be overkill... we'll see as we make more progress.

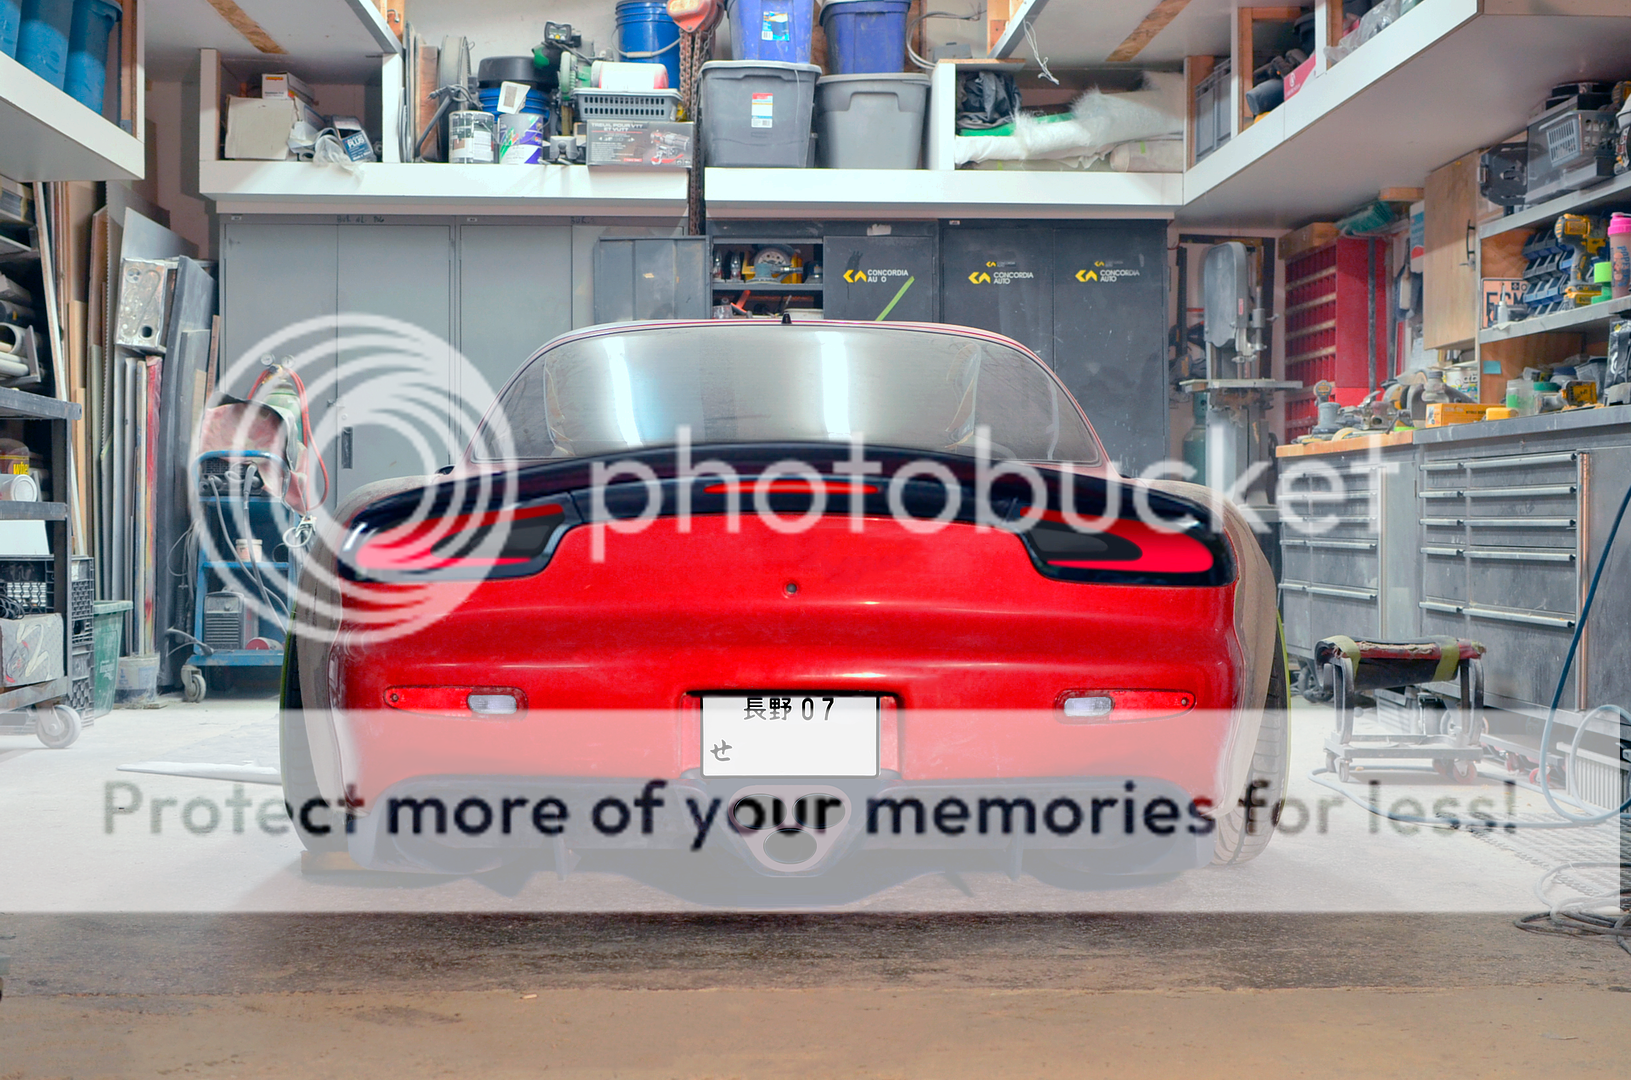
Finally, what it should look like on the car! You might also notice that I made some little adjustment to the diffuser, the main thing is a shorter middle section... it's too low as it currently sits and I feel the diffuser will look better and overall more proportional with the center and sides closer height wise.


 10-10-16, 10:09 PM
#122
Senior Member
iTrader: (2)
I've always had plans to do update the look, had a couple ideas... then I saw LO7's photoshop https://s-media-cache-ak0.pinimg.com...e8afe523e3.jpg
It gave me some ideas and I went back to the drawing board, learned how to use illustrator and turned it into this more simple and smoother design. The small red part (island) will be the blinker.
It gave me some ideas and I went back to the drawing board, learned how to use illustrator and turned it into this more simple and smoother design. The small red part (island) will be the blinker.
Also looking foreward to seeing how your custom exhaust turns out; decided I'm going to be doing something completely different on that front as well, thanks to some inspirations garnered from your builds direction. Will your triple tip design be finished any time soon?
Last edited by LO7; 10-11-16 at 01:16 AM.
10-14-16, 11:35 PM
#123
140 AMP I wish they made a more powerful one... still more than OEM though!
Thanks guys!
Still waiting for some parts to come in. Meanwhile, I started working on my tail lights project! Worked on this today with my dad and we LOVE the result so far, let's see what you guys think!
Mats list:
- ACRYLITE� LED sign grade (SG) Red 3RK32 GT
- ACRYLITE� LED (P95) Black/White 9H04 SC
- 30x Deep Red (655nm) LUXEON Rebel LED on a SinkPAD-II 10mm Square Base
- 4x 700 mA, Dimmable, FlexBlock DC Driver - With Leads
I've always had plans to do update the look, had a couple ideas... then I saw LO7's photoshop https://s-media-cache-ak0.pinimg.com...e8afe523e3.jpg
It gave me some ideas and I went back to the drawing board, learned how to use illustrator and turned it into this more simple and smoother design. The small red part (island) will be the blinker.
69 years old young, went through a back/neck surgery back in May and he's still out here working his *** off! There's just no stopping him!
Part all cleaned up and ready for the next step.
Thermoforming the acrylic to the tail light housing's window.
Made 2 samples, one in red and one in black to see which one I would like better. The black P95 acrylic looks incredibly nice in the housing but with the tight space we have to work with, the LEDs are too close and we could clearly see hotspots from the LEDs.
and I couldn't wait any longer to see how this would actually look... so got on the pc printed my image and cut the black parts to make a quick mock up! Obviously, it'll look much better once we do it properly. I'm still debating between getting vinyls cut vs painting the black parts... vinyls seem like an easier/sure path to take.
Note: I need to black out the small gap around the lens opening.
Here it is with back lighting. This is with only 4 LEDs flat on the counter in the open aimed toward the ceiling, only the lens no housing and it's already crazy bright! I was planning to use 11 LEDs on each sides for the main light section and 3 each for the blinkers, but now it feels like it would be overkill... we'll see as we make more progress.

Finally, what it should look like on the car! You might also notice that I made some little adjustment to the diffuser, the main thing is a shorter middle section... it's too low as it currently sits and I feel the diffuser will look better and overall more proportional with the center and sides closer height wise.
Thanks guys!
Still waiting for some parts to come in. Meanwhile, I started working on my tail lights project! Worked on this today with my dad and we LOVE the result so far, let's see what you guys think!
Mats list:
- ACRYLITE� LED sign grade (SG) Red 3RK32 GT
- ACRYLITE� LED (P95) Black/White 9H04 SC
- 30x Deep Red (655nm) LUXEON Rebel LED on a SinkPAD-II 10mm Square Base
- 4x 700 mA, Dimmable, FlexBlock DC Driver - With Leads
I've always had plans to do update the look, had a couple ideas... then I saw LO7's photoshop https://s-media-cache-ak0.pinimg.com...e8afe523e3.jpg
It gave me some ideas and I went back to the drawing board, learned how to use illustrator and turned it into this more simple and smoother design. The small red part (island) will be the blinker.
69 years old young, went through a back/neck surgery back in May and he's still out here working his *** off!
There's just no stopping him!Part all cleaned up and ready for the next step.
Thermoforming the acrylic to the tail light housing's window.
Made 2 samples, one in red and one in black to see which one I would like better. The black P95 acrylic looks incredibly nice in the housing but with the tight space we have to work with, the LEDs are too close and we could clearly see hotspots from the LEDs.
and I couldn't wait any longer to see how this would actually look... so got on the pc printed my image and cut the black parts to make a quick mock up! Obviously, it'll look much better once we do it properly. I'm still debating between getting vinyls cut vs painting the black parts... vinyls seem like an easier/sure path to take.
Note: I need to black out the small gap around the lens opening.
Here it is with back lighting. This is with only 4 LEDs flat on the counter in the open aimed toward the ceiling, only the lens no housing and it's already crazy bright! I was planning to use 11 LEDs on each sides for the main light section and 3 each for the blinkers, but now it feels like it would be overkill... we'll see as we make more progress.
Finally, what it should look like on the car! You might also notice that I made some little adjustment to the diffuser, the main thing is a shorter middle section... it's too low as it currently sits and I feel the diffuser will look better and overall more proportional with the center and sides closer height wise.


 10-15-16, 04:35 PM
#125
Appreciate the mention above- Glad I could provide some creative inspiration on your most excellent taillight diffuser design. I acquired some junk tails to make a set of shaped diffusers for my ARC LED tails recently, should be fun to experiment with that- to include some circuit board re-programming..
Also looking foreward to seeing how your custom exhaust turns out; decided I'm going to be doing something completely different on that front as well, thanks to some inspirations garnered from your builds direction. Will your triple tip design be finished any time soon?
Also looking foreward to seeing how your custom exhaust turns out; decided I'm going to be doing something completely different on that front as well, thanks to some inspirations garnered from your builds direction. Will your triple tip design be finished any time soon?
What's your new plan for the front man?