94 Build... GT35R, RE Vmount and a whole lot more............ NOW WITH PISTONS!!


 03-14-15, 01:43 AM
#1003
Go time!!
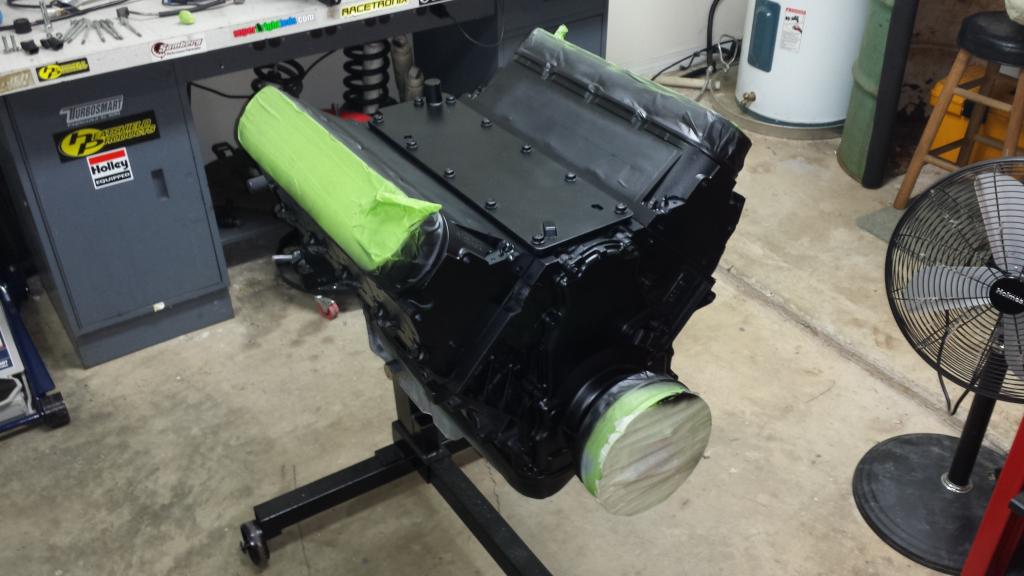
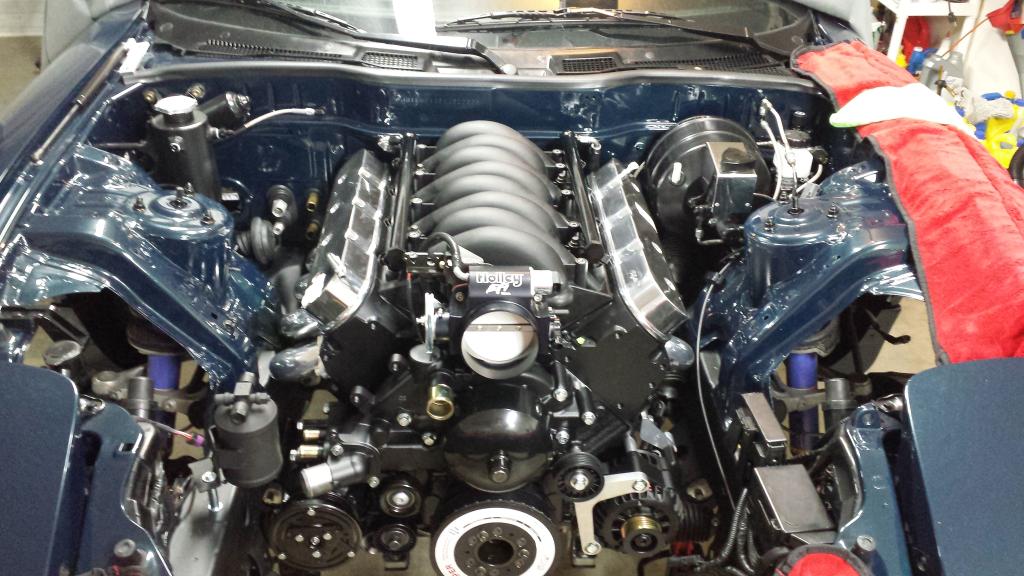
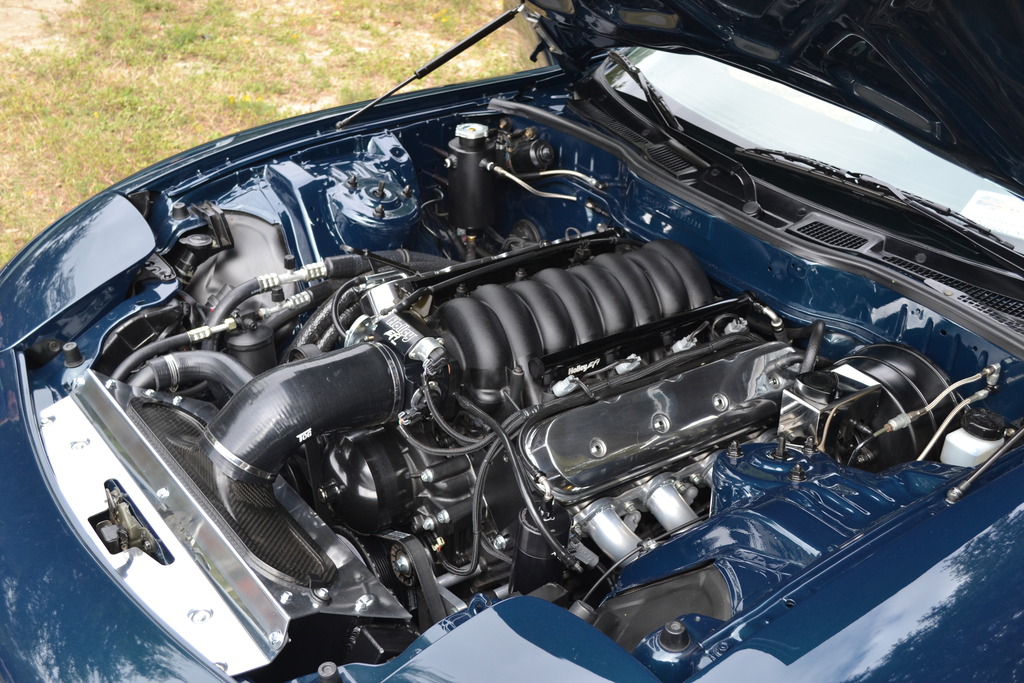
To continue my master plan I masked everything off and laid down a coat of satin black on the entire engine. I'm sure many folks think I'm crazy for painting an all aluminum engine, but I have a specific vision in mind. It's going to look very unique, clean, and sharp when finished. Should be pretty quick too.
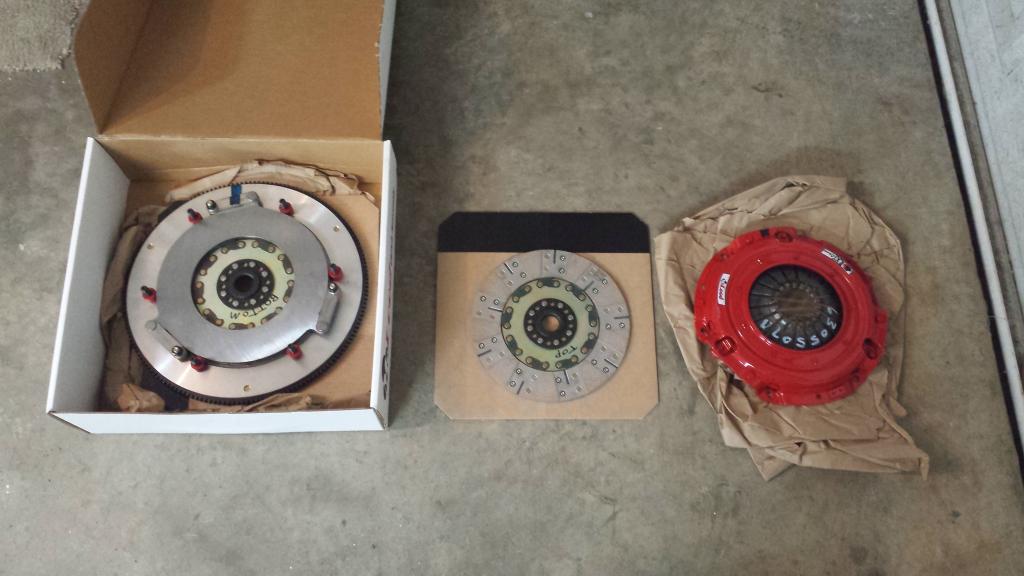
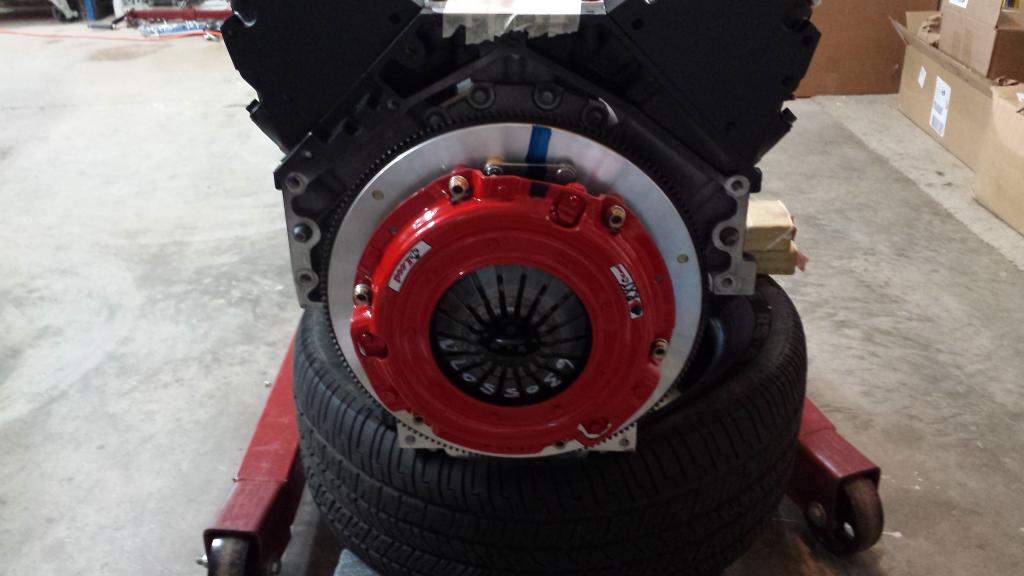
The Mcleod RXT install went smoothly.
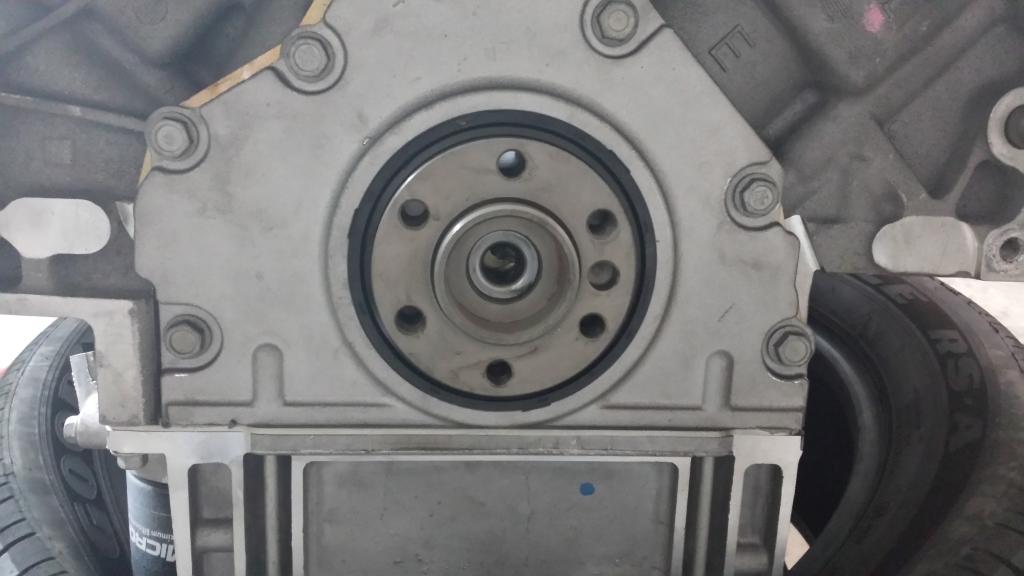
Pilot bearing
I did go with the aluminum flywheel. Using ARP hardware as well.
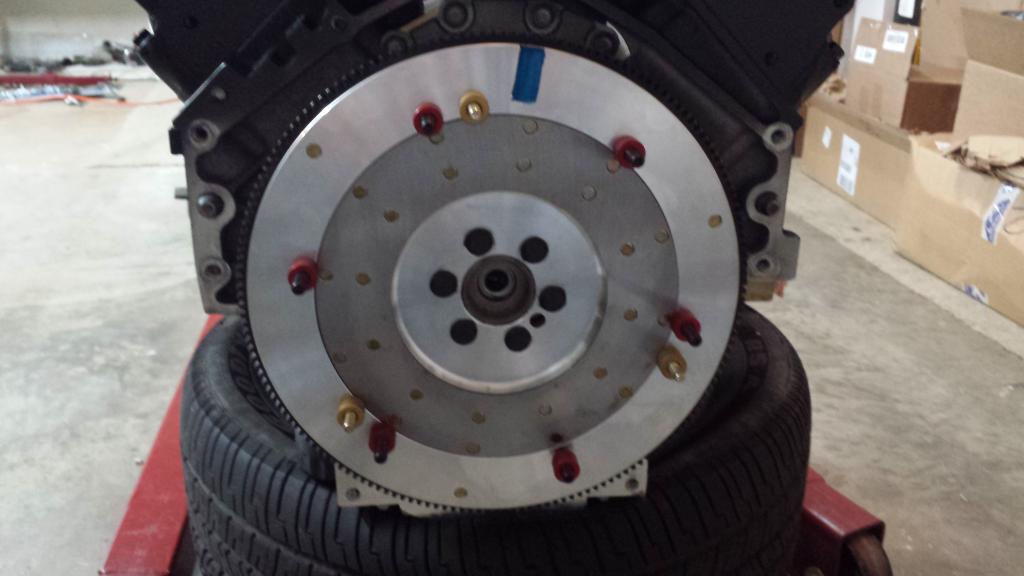
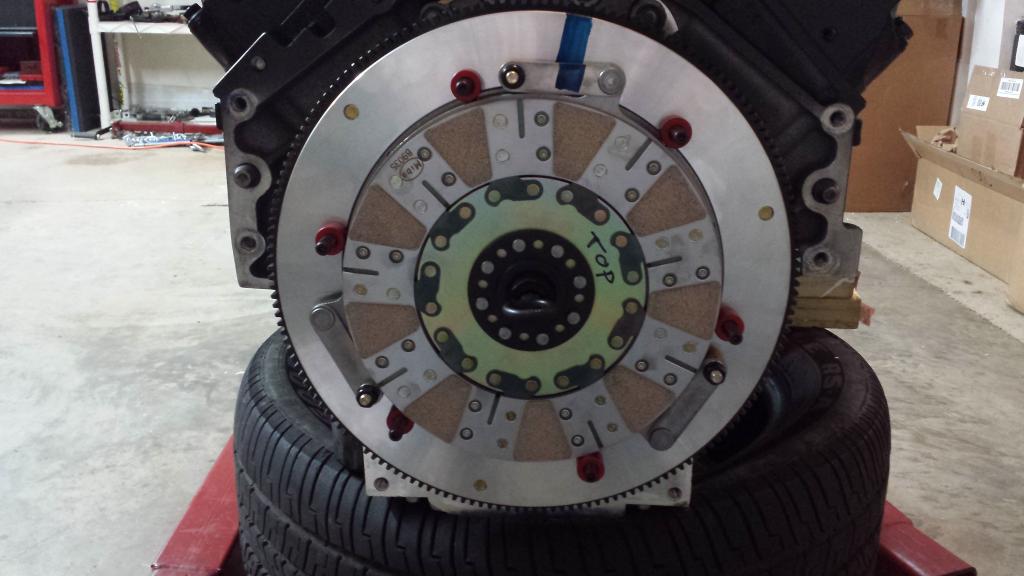
Disc one

Disc Two
Buttoned up
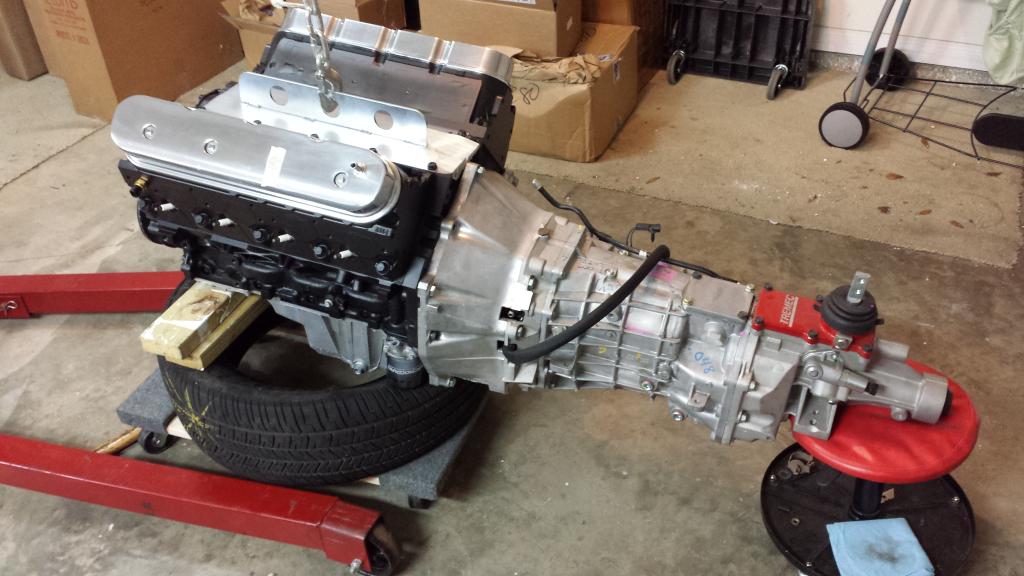
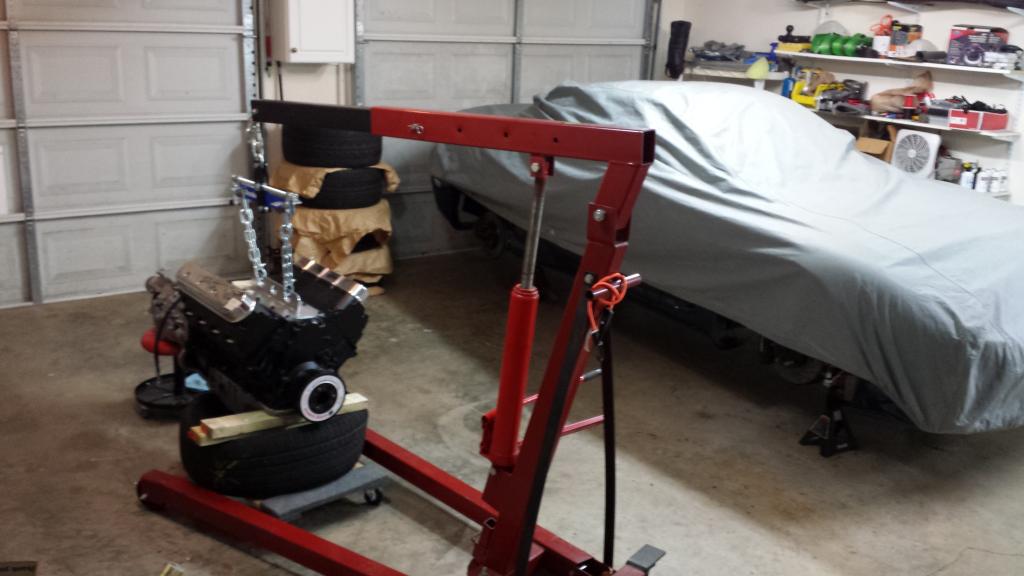
Joining the tranny and engine was easy with no frills. I called it a night and had it set up for dropping it in first thing in the morning.
To continue my master plan I masked everything off and laid down a coat of satin black on the entire engine. I'm sure many folks think I'm crazy for painting an all aluminum engine, but I have a specific vision in mind. It's going to look very unique, clean, and sharp when finished. Should be pretty quick too.
The Mcleod RXT install went smoothly.
Pilot bearing
I did go with the aluminum flywheel. Using ARP hardware as well.
Disc one
Disc Two
Buttoned up
Joining the tranny and engine was easy with no frills. I called it a night and had it set up for dropping it in first thing in the morning.
03-14-15, 01:44 AM
#1004
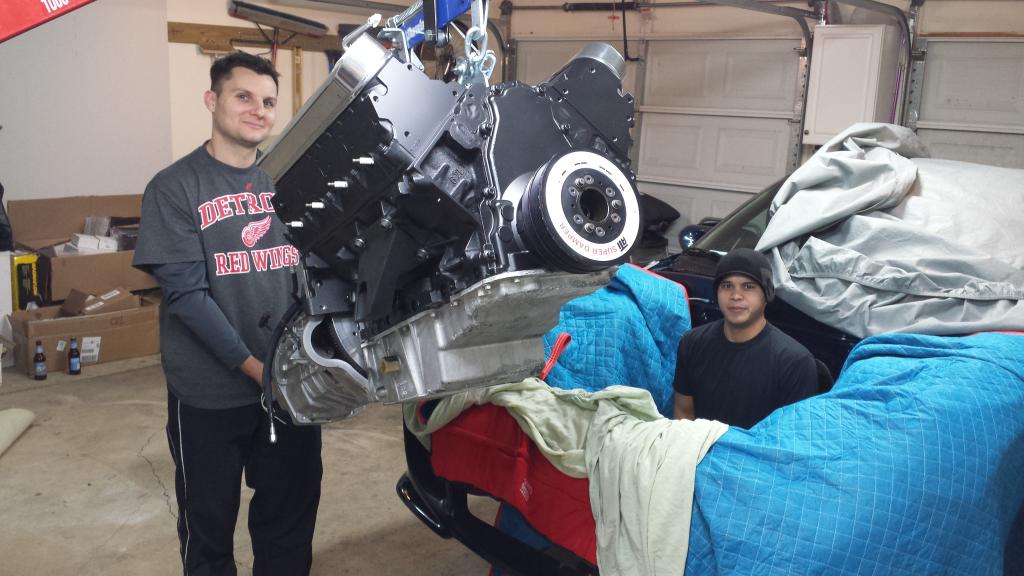
The install went really smooth. I had help from a few friends so plenty of eyes and hands to help guide things. Easy.
 [/URL]
 [/URL]
 [/URL]
The crossmember was a bear since I was once again by myself. I got it done, but it took awhile. All lined up and everything looks good. I ended up with about a 6" measurement from the top tranny tunnel, which is not out of the norm apparently. I do think I am going to weld the backside flanges just for insurance and added support. Gnx7 gave me a "top tip" with using a 2x4 to prop up the carpet. It worked great and I wasn't fighting it the entire time.
The drivetrain is installed!!
[/URL][/URL][/URL]The crossmember was a bear since I was once again by myself. I got it done, but it took awhile. All lined up and everything looks good. I ended up with about a 6" measurement from the top tranny tunnel, which is not out of the norm apparently. I do think I am going to weld the backside flanges just for insurance and added support. Gnx7 gave me a "top tip" with using a 2x4 to prop up the carpet. It worked great and I wasn't fighting it the entire time.
The drivetrain is installed!!
03-14-15, 01:45 AM
#1005
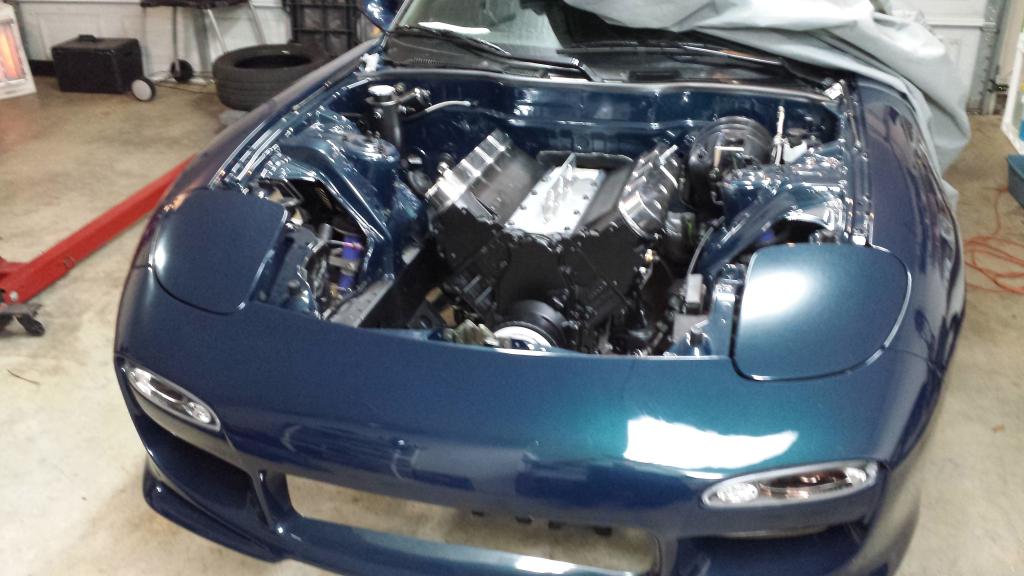
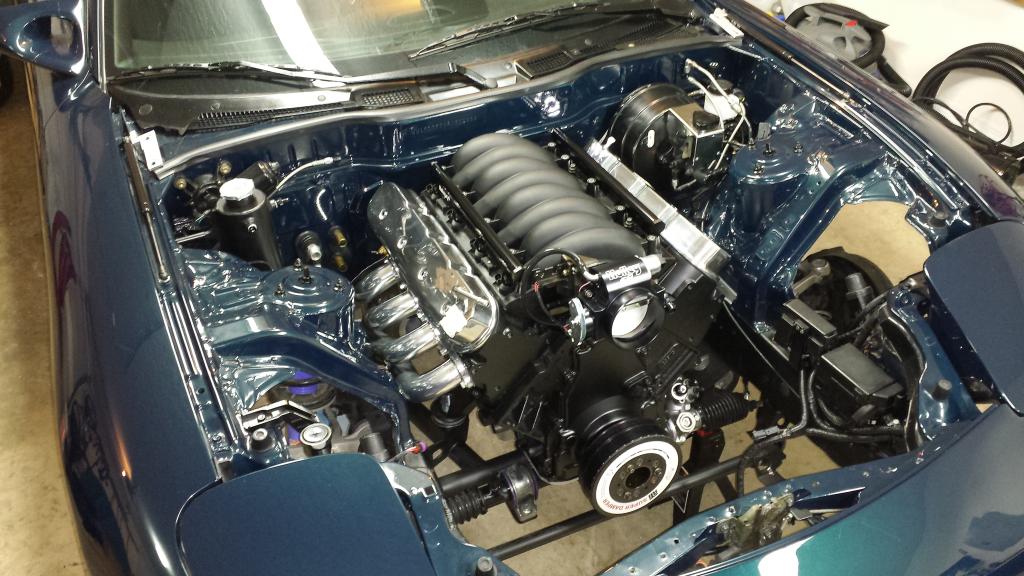
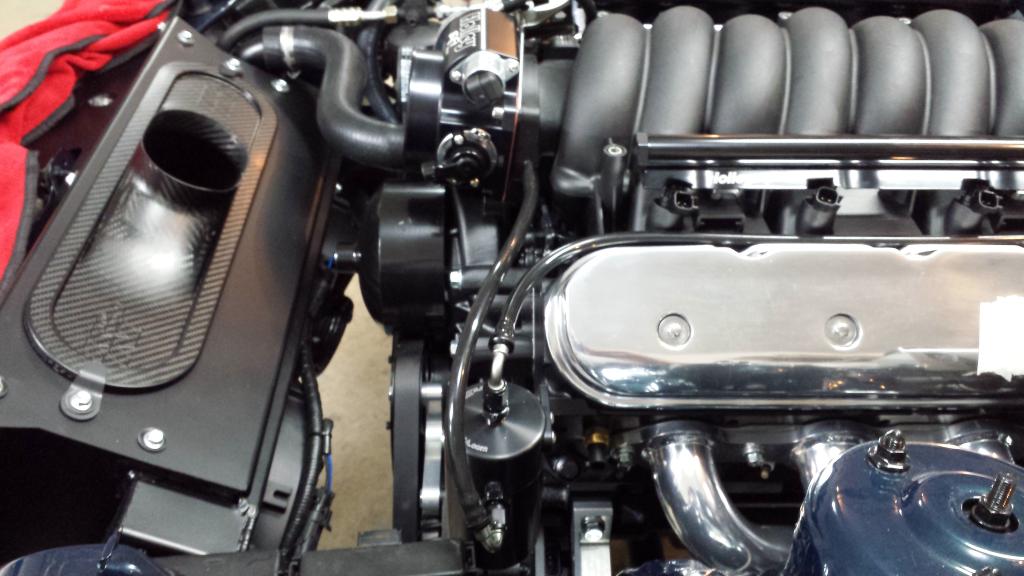
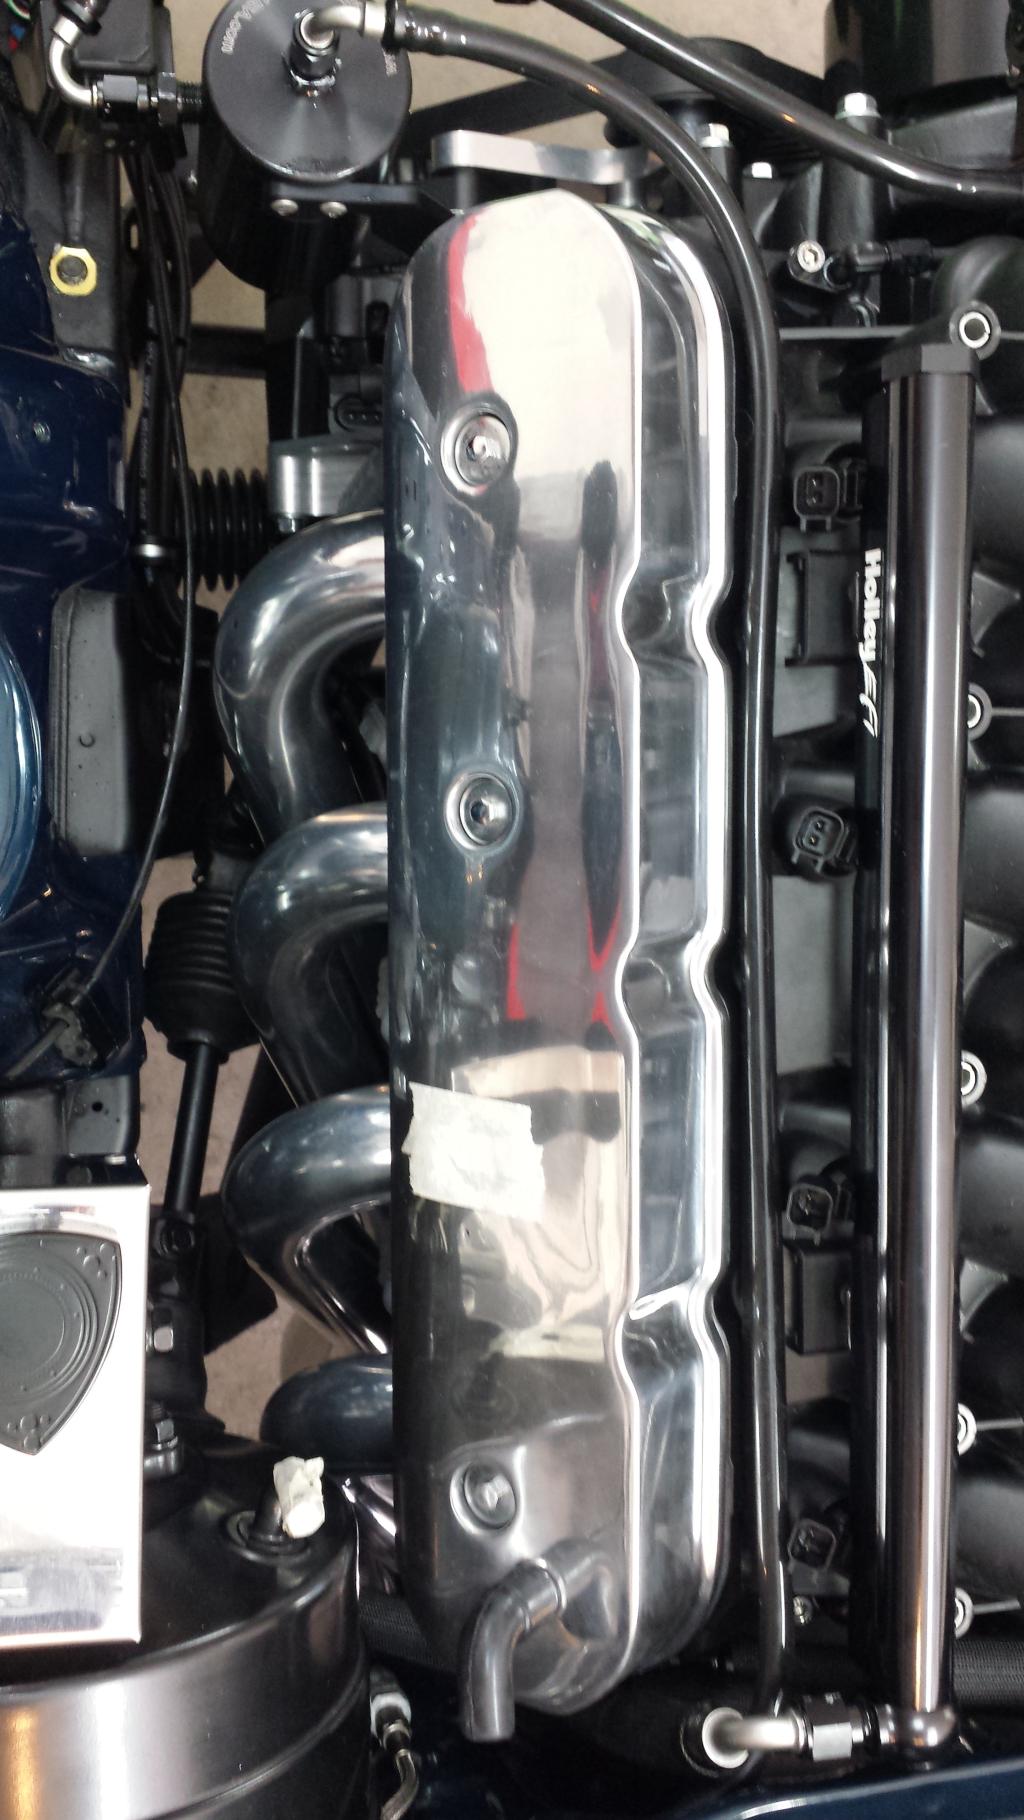
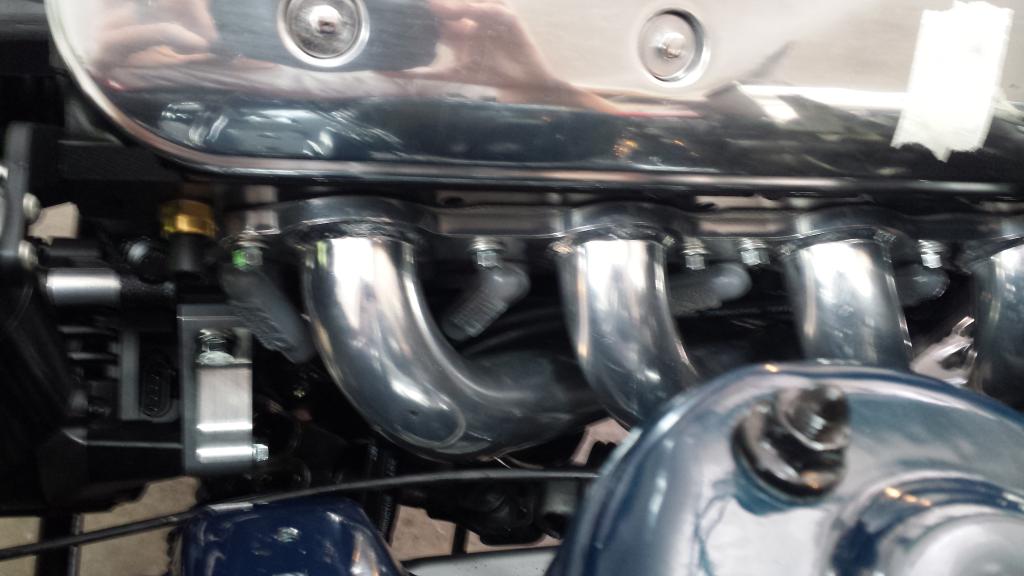
Headers
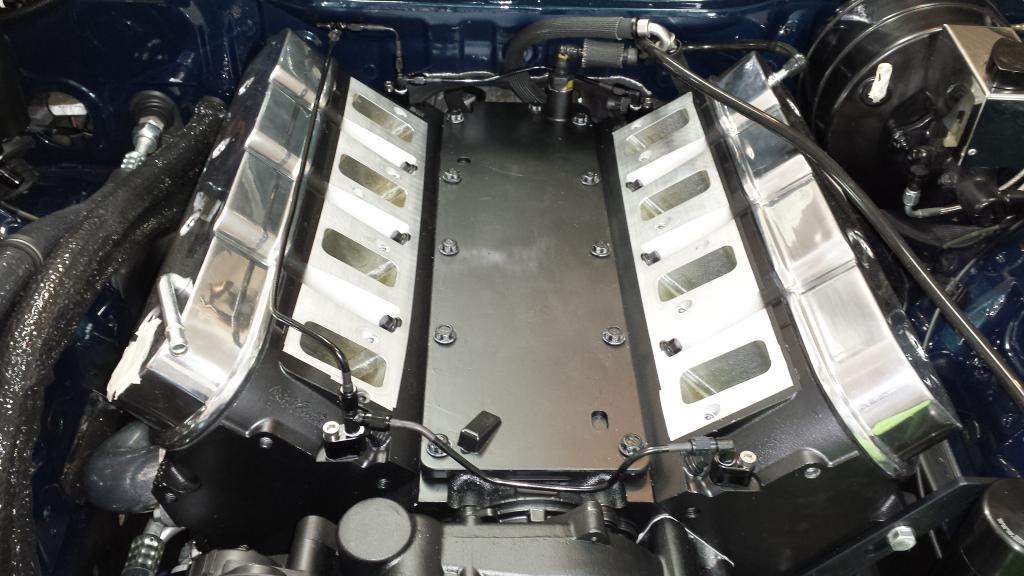
The headers wen't in very smoothly. These are Spoolin's 1 7/8" "premium" merge headers that I bought during a group buy many months ago. I was very pleased how they looked when I received them but after installing them, I can say that I am extremely pleased with the fitment as well. I didn't even have to bend a heat shield!! These things truly fit perfect with the Samberg subframe! They compliment my valve covers exactly how I planned.

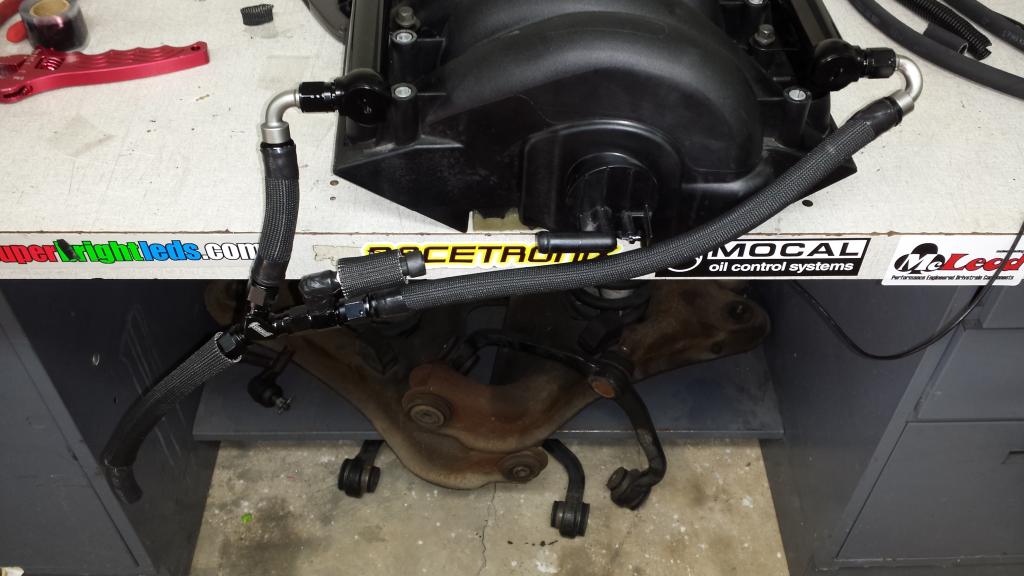
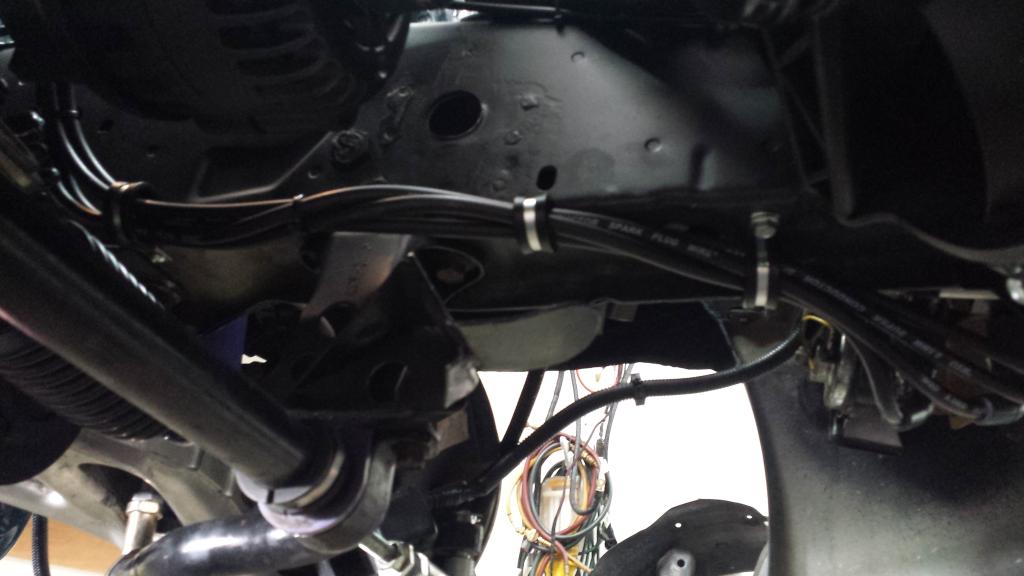
FUEL Lines
I finished up my lines this weekend with basically no issues. I had to experiment a little to get the fitment right simply because everything is so tight back there. I also have a lot going on back there with wanting the Holley to view both oil and fuel pressure, as well as my steam vent lines making their way. I have been determined from day 1 not to cut the firewall lip off my car, so I had to get a little creative. Another complication was to not use a front cross line on the rails. Below is my solution..
Aeromotive makes this little gem and it worked PERFECTLY. -8AN to -6AN banjo bolt.
I also added heat sleeving all the way down past the OEM firewall hardline. I can definitely see the need now the headers are in place.
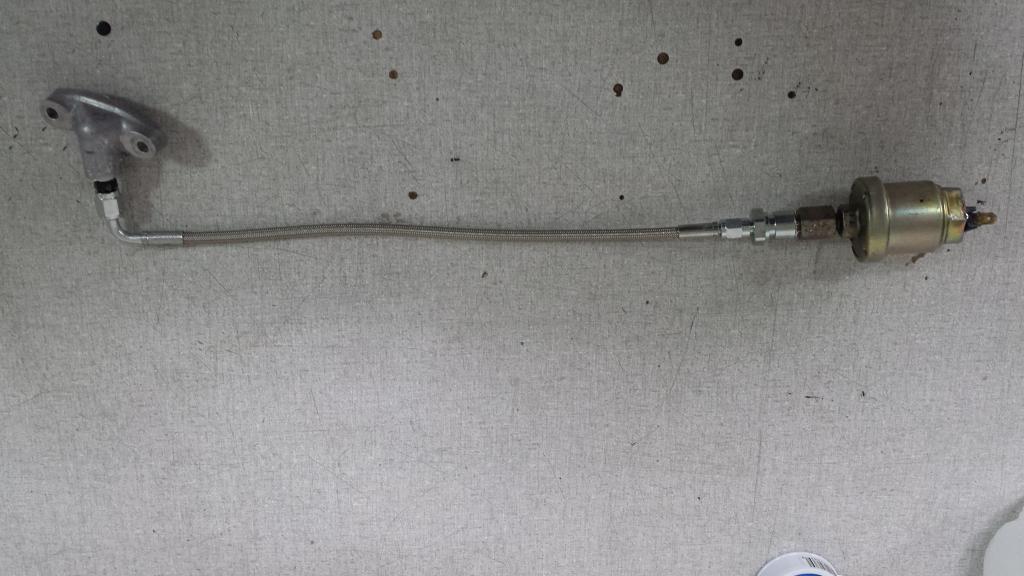
Holley oil pressure sensor.
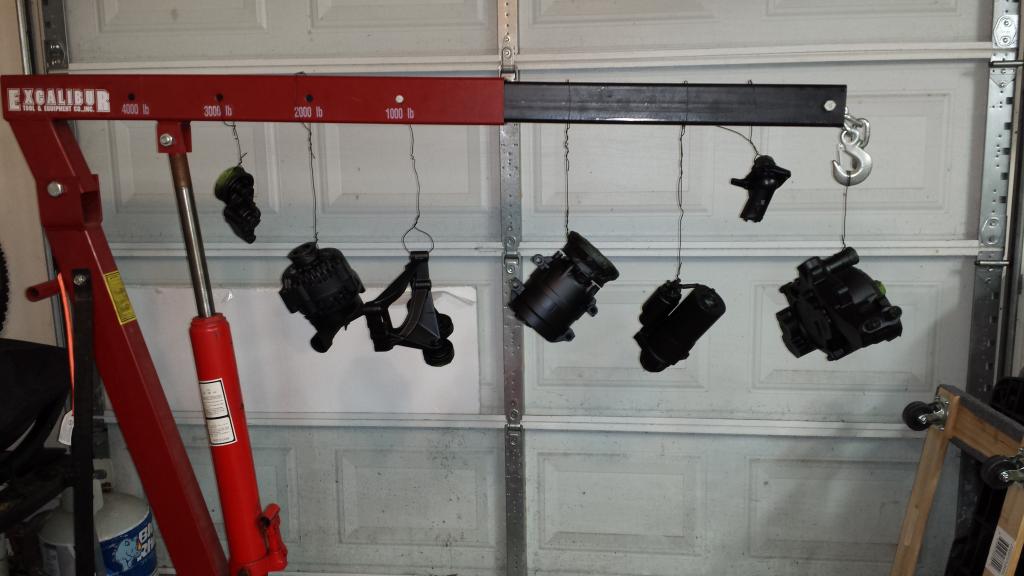
ACCESORIES
I am using all Fbody accessories. I purchased everything from Rockauto and used solely AC Delco, and Gates parts (cooling). I will update my build file as I was originally going to use polished OEM components from Tuff Stuff. I think everything turned out well. I used a factory tensioner but added DigitalSolo's pulley mod. We shall see how it does.
The headers wen't in very smoothly. These are Spoolin's 1 7/8" "premium" merge headers that I bought during a group buy many months ago. I was very pleased how they looked when I received them but after installing them, I can say that I am extremely pleased with the fitment as well. I didn't even have to bend a heat shield!! These things truly fit perfect with the Samberg subframe! They compliment my valve covers exactly how I planned.
FUEL Lines
I finished up my lines this weekend with basically no issues. I had to experiment a little to get the fitment right simply because everything is so tight back there. I also have a lot going on back there with wanting the Holley to view both oil and fuel pressure, as well as my steam vent lines making their way. I have been determined from day 1 not to cut the firewall lip off my car, so I had to get a little creative. Another complication was to not use a front cross line on the rails. Below is my solution..
Aeromotive makes this little gem and it worked PERFECTLY. -8AN to -6AN banjo bolt.
I also added heat sleeving all the way down past the OEM firewall hardline. I can definitely see the need now the headers are in place.
Holley oil pressure sensor.
ACCESORIES
I am using all Fbody accessories. I purchased everything from Rockauto and used solely AC Delco, and Gates parts (cooling). I will update my build file as I was originally going to use polished OEM components from Tuff Stuff. I think everything turned out well. I used a factory tensioner but added DigitalSolo's pulley mod. We shall see how it does.
 03-14-15, 12:13 PM
#1007
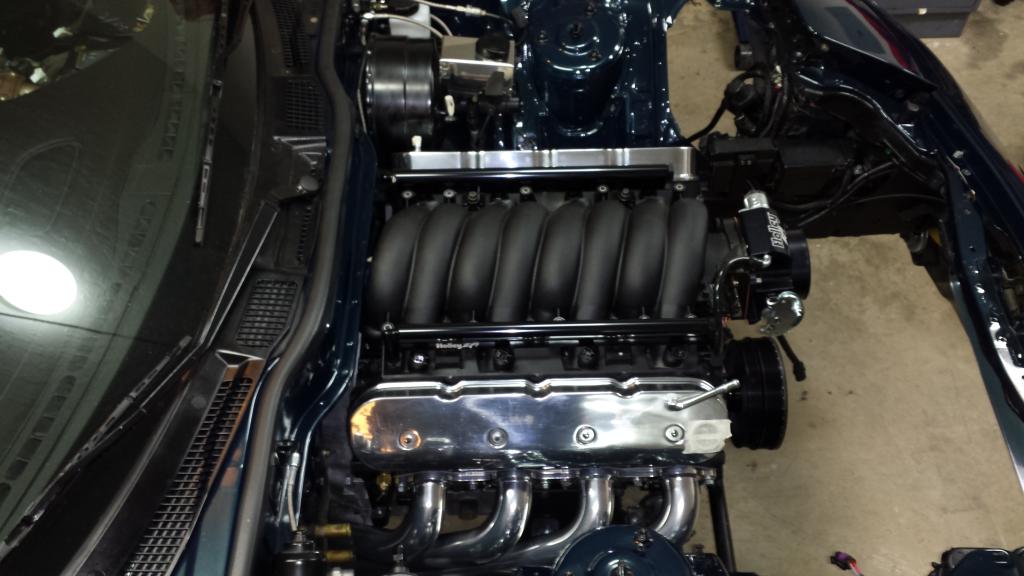
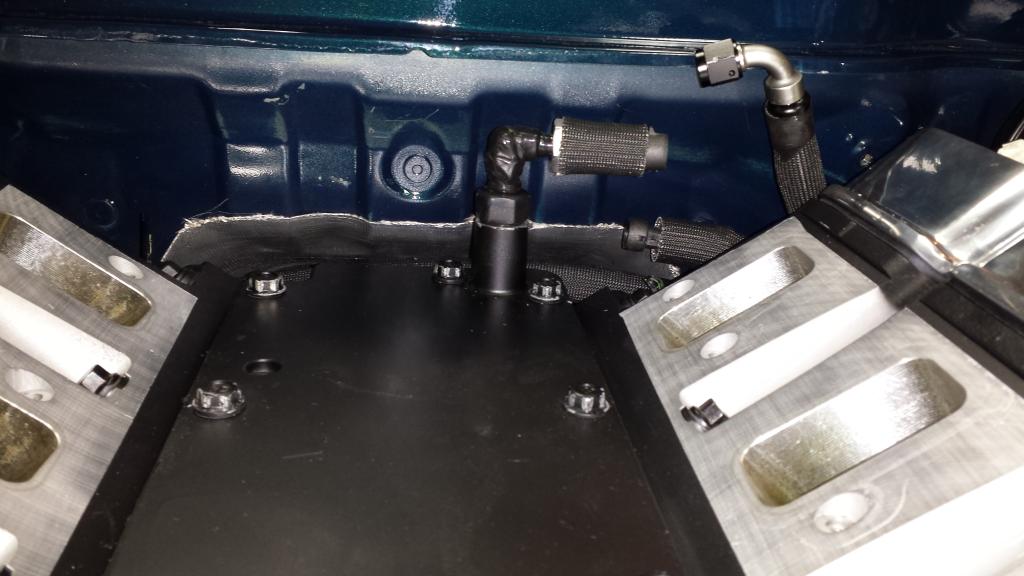
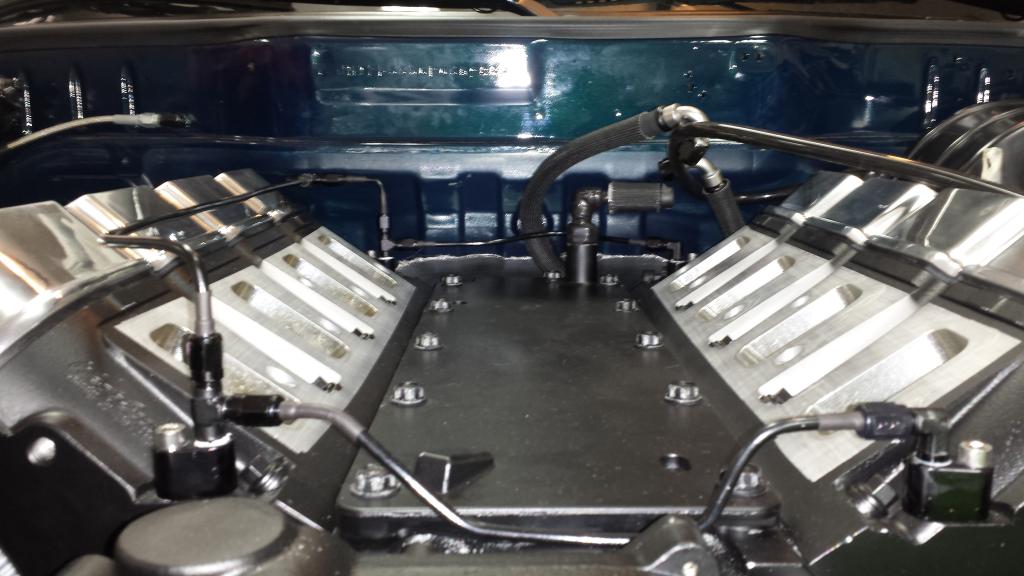
Steam Ports...Take 2.
Well, I completed my steam port lines today and I am happy with how they turned out. One last line to run to the surge tank but it will be SS braided. I want to keep the play of a flexible line from the engine to the body for vibration. It should be here soon.
I am pretty pleased with how it turned out. I can even take the intake on and off without disconnecting them.
 ]
]
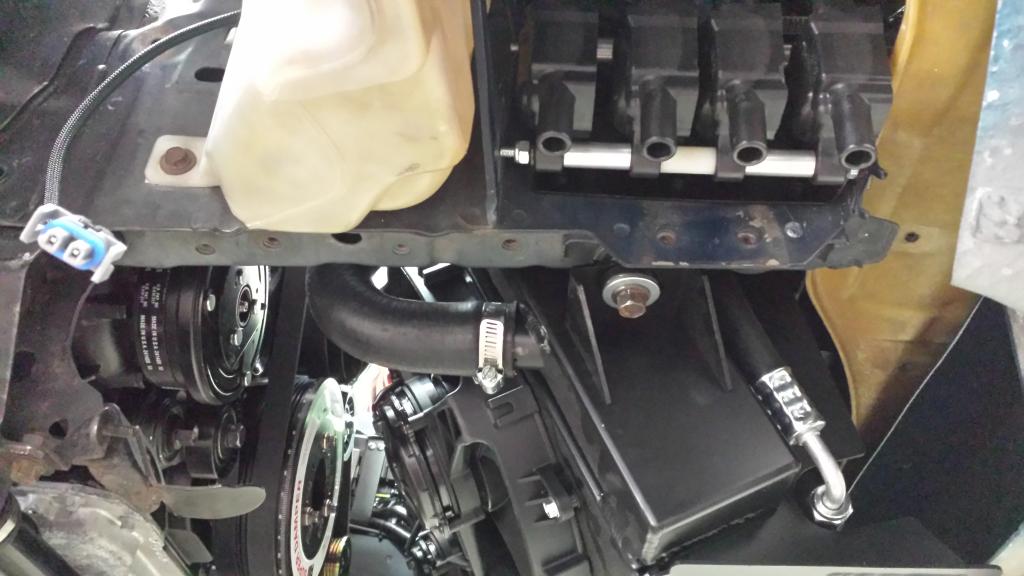
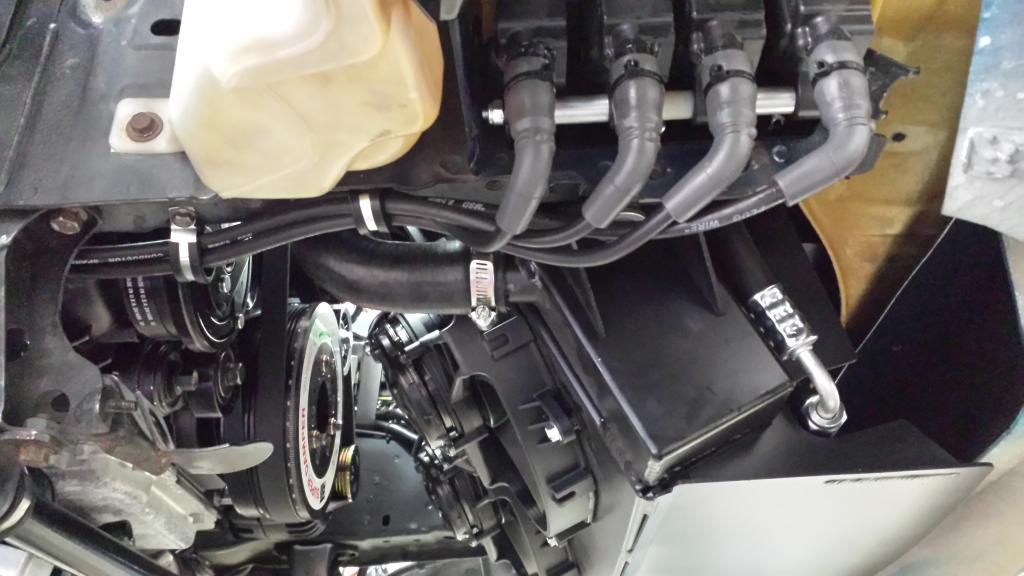
A/C and Coolant Lines
I got Halfspec's A/C line kit installed as well. The wiring portion has been in place for awhile, as I was pre-wiring it with my Holley ECU. The relay is mounted down where it's designed to go in the ECU pocket on the passenger footwell. The lines went in easily with pretty much no issues. Halfspec's instructions are easy to follow and spot on. I did deviate a little from his drier mounting. I made a bracket and moved it a few inches closer to the wheel. This made the lines align a little nicer for running them back to that cluster on the firewall.
For the heater core I used the standard Gates coolant lines that most folks use. I put the DEI sleeving on them to help keep the protection up. If I were building a car from the ground up, I would definitely relocate those firewall outputs for the heater core. It all sits very close to the exhaust and there just isn't a need for it. In any case, what I did should work well.

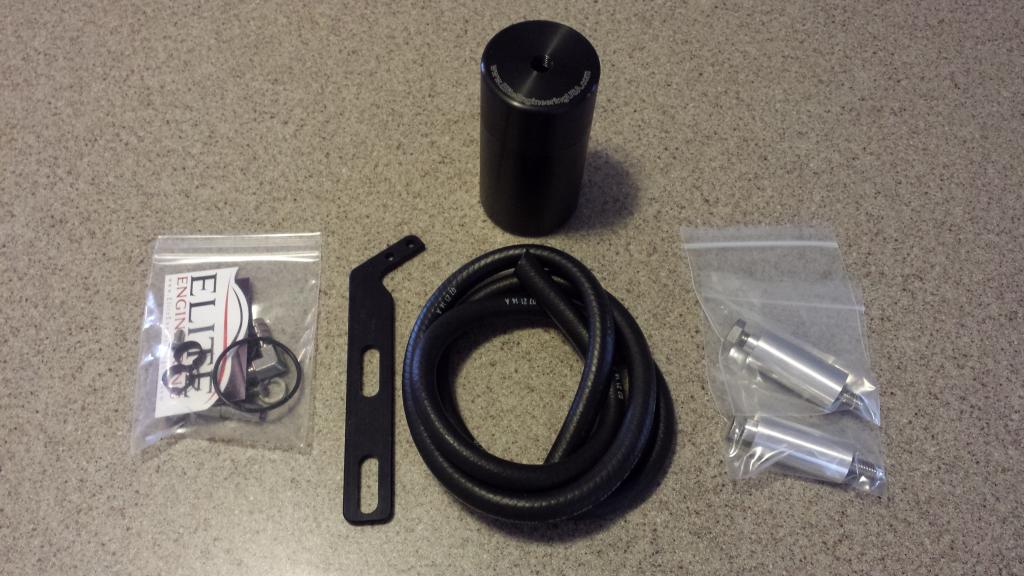
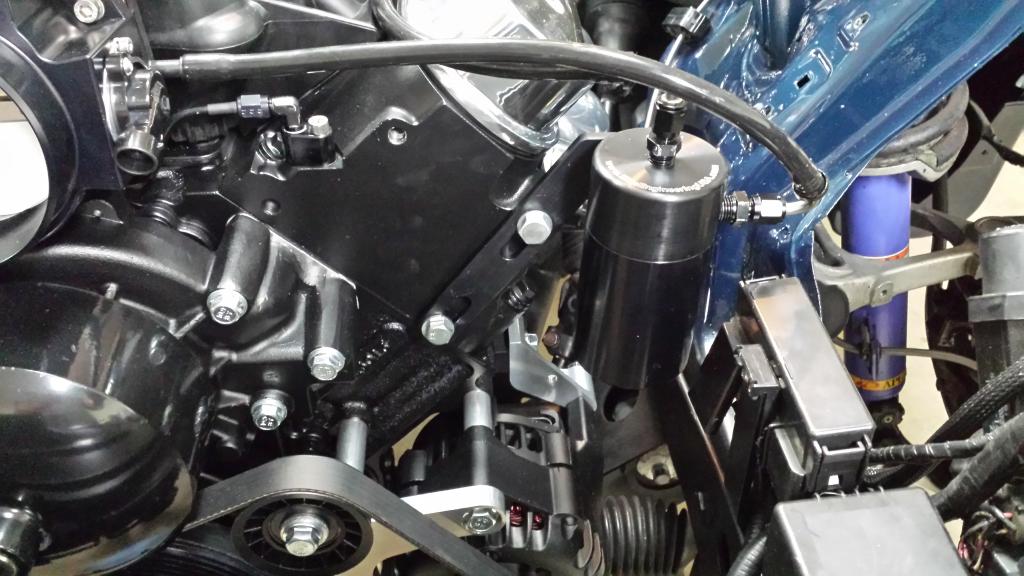
Elite Engineering Catch Can
After some searching I read nothing but great things about these cans. Their customer service is also excellent! I asked for a spare spacer and bolt (that I didn't end up using) and they didn't hesitate to send it to me. I chose to mount it on the passenger head. I am not completely satisfied with the "mounting" I have in place. I will likely change it and bring it closer to the center of the head. I think it will look cleaner and make the hose runs more straightforward. But for now, it's in place. I used silicone hose because it's easy to work with. I had some spare -4AN pushlocks from my dual wastegate rotary madness setup so I figured I better use them. I am feeding fresh air using the throttle body feed on the passenger side. Dirty air feed from the rear port on the drivers cover, and fresh air is fed back into the manifold on that side as well. The passenger side port is capped for now, but it is likely getting clipped, drilled and tapped to put my IAT sensor in that very place.
Coil Madness!!
Well, I looked everything over really well and I don't have a lot of options. I was really hoping the coils would fit on the bottom passenger frame rail but there is just too much going on down there. It's mostly the radiator hose that is getting me. The drivers side is money. I have been flirting with the idea below. Some may think it's a "dangerous" location but I don't think it's too bad, especially for what I use my car for.
The bracket is just mocked up and not permanent. There are some obvious issues with putting them here and I have thought about each one. I gladly will take input from you gentlemen.
- Wire length - Pretty much a non-issue in my mind. The added resistance of the length doesn't seem to be a problem on high HP setups.
- Water - Well, I don't daily drive my car, or drive it in the rain. BUT, there are those occasions when I may of course get got in a down poor. Deep standing water or whatnot could pose an issue. For the most part, coils are water proof. They have a weather pack connector on the backside and the plug wire is sealed quite well with a quality boot and dielectric grease. The only real issue would be if the coil was submerged. If water is that high, I have bigger problems.
- Road debris - I plan to build a sheet metal plate that surrounds the coil on both the front and bottom sides to protect the coils from road debris. Honestly, I don't see alot of debris really getting to them, but they would be protected nonetheless. This plate will also have a second piece run the length of the rail guiding my wires past the A/C compressor and then up to the plugs under the header. One picture I didn't take was how the coils are exposed from the front bumper opening. You can see them on the two smaller inlets at the very edge of the hole. This is where the front plate will come in.
- Permanence - It isn't. If this just doesn't work the way I want than it's a easy to change. I can slap on a set of Holley valve covers, mount the coils on there, and be done.
Well, I completed my steam port lines today and I am happy with how they turned out. One last line to run to the surge tank but it will be SS braided. I want to keep the play of a flexible line from the engine to the body for vibration. It should be here soon.
I am pretty pleased with how it turned out. I can even take the intake on and off without disconnecting them.
]A/C and Coolant Lines
I got Halfspec's A/C line kit installed as well. The wiring portion has been in place for awhile, as I was pre-wiring it with my Holley ECU. The relay is mounted down where it's designed to go in the ECU pocket on the passenger footwell. The lines went in easily with pretty much no issues. Halfspec's instructions are easy to follow and spot on. I did deviate a little from his drier mounting. I made a bracket and moved it a few inches closer to the wheel. This made the lines align a little nicer for running them back to that cluster on the firewall.
For the heater core I used the standard Gates coolant lines that most folks use. I put the DEI sleeving on them to help keep the protection up. If I were building a car from the ground up, I would definitely relocate those firewall outputs for the heater core. It all sits very close to the exhaust and there just isn't a need for it. In any case, what I did should work well.
Elite Engineering Catch Can
After some searching I read nothing but great things about these cans. Their customer service is also excellent! I asked for a spare spacer and bolt (that I didn't end up using) and they didn't hesitate to send it to me. I chose to mount it on the passenger head. I am not completely satisfied with the "mounting" I have in place. I will likely change it and bring it closer to the center of the head. I think it will look cleaner and make the hose runs more straightforward. But for now, it's in place. I used silicone hose because it's easy to work with. I had some spare -4AN pushlocks from my dual wastegate rotary madness setup so I figured I better use them. I am feeding fresh air using the throttle body feed on the passenger side. Dirty air feed from the rear port on the drivers cover, and fresh air is fed back into the manifold on that side as well. The passenger side port is capped for now, but it is likely getting clipped, drilled and tapped to put my IAT sensor in that very place.
Coil Madness!!
Well, I looked everything over really well and I don't have a lot of options. I was really hoping the coils would fit on the bottom passenger frame rail but there is just too much going on down there. It's mostly the radiator hose that is getting me. The drivers side is money. I have been flirting with the idea below. Some may think it's a "dangerous" location but I don't think it's too bad, especially for what I use my car for.
The bracket is just mocked up and not permanent. There are some obvious issues with putting them here and I have thought about each one. I gladly will take input from you gentlemen.
- Wire length - Pretty much a non-issue in my mind. The added resistance of the length doesn't seem to be a problem on high HP setups.
- Water - Well, I don't daily drive my car, or drive it in the rain. BUT, there are those occasions when I may of course get got in a down poor. Deep standing water or whatnot could pose an issue. For the most part, coils are water proof. They have a weather pack connector on the backside and the plug wire is sealed quite well with a quality boot and dielectric grease. The only real issue would be if the coil was submerged. If water is that high, I have bigger problems.
- Road debris - I plan to build a sheet metal plate that surrounds the coil on both the front and bottom sides to protect the coils from road debris. Honestly, I don't see alot of debris really getting to them, but they would be protected nonetheless. This plate will also have a second piece run the length of the rail guiding my wires past the A/C compressor and then up to the plugs under the header. One picture I didn't take was how the coils are exposed from the front bumper opening. You can see them on the two smaller inlets at the very edge of the hole. This is where the front plate will come in.
- Permanence - It isn't. If this just doesn't work the way I want than it's a easy to change. I can slap on a set of Holley valve covers, mount the coils on there, and be done.
03-14-15, 12:14 PM
#1008
Coil Relocation
The coil relocation went well. The wires were a pain to work with at first, but I got it squared away. Most of it really was dealing with the boots. The wires ran really clean and overall I am very pleased with it. I made a little video on how to build the wires for those who may do it in the future. I haven't made the coil shields yet, but it's on the list.

How To: MSD custom wires
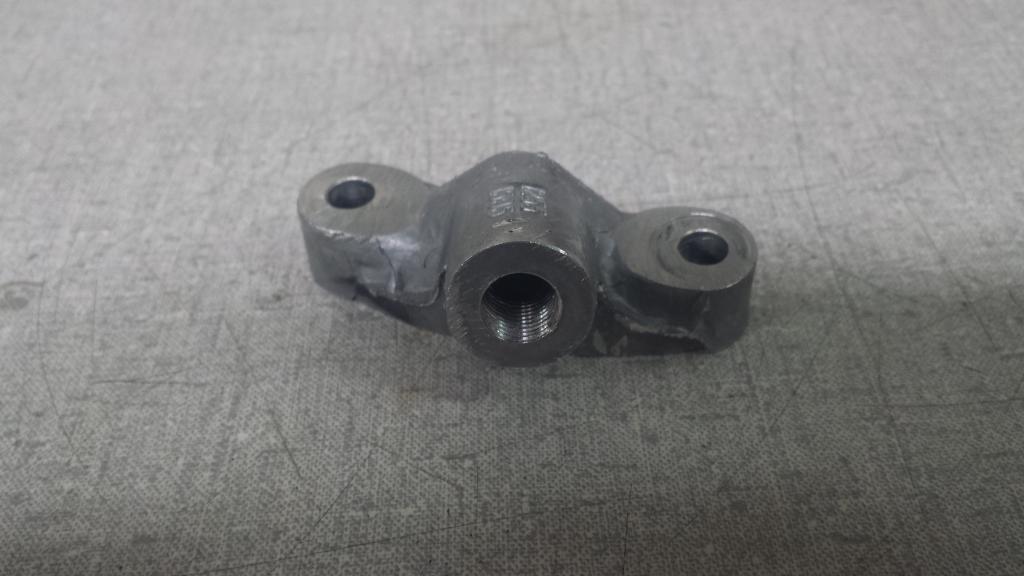
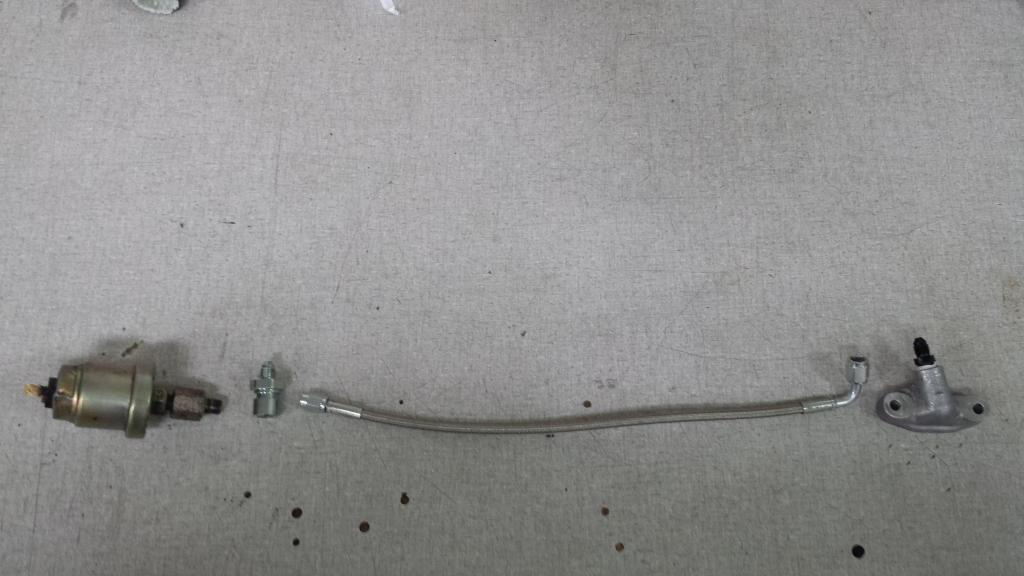
Mazda Oil Pressure
I tapped the OFAC above the oil filter for my Mazda oil pressure sensor. I used a remote SS braided line to move it forward away from the headers. It's all very tight in there. The fitting taps to a 1/8npt perfectly. I literally just had to drill past the closed end. Easy.
Clutch Bleed
Gotta admit I was a little nervous about this one. If anything was weird, dropping the tranny would be needed and I just wasn't looking forward to that possibility. BUT, it bled like a champ. I used Blake's method with the MightyVac and it worked like a charm! I didn't open a bleeder once!! Again, I made a video of the process, the link that DigitalSolo explains his method is also below.
http://www.norotors.com/index.php?topic=17322.0
Shift Panel
I jumped on this band wagon! I had to modify it slightly since my shifter throws back so far, but after a little cutting disc work, it fit perfectly!
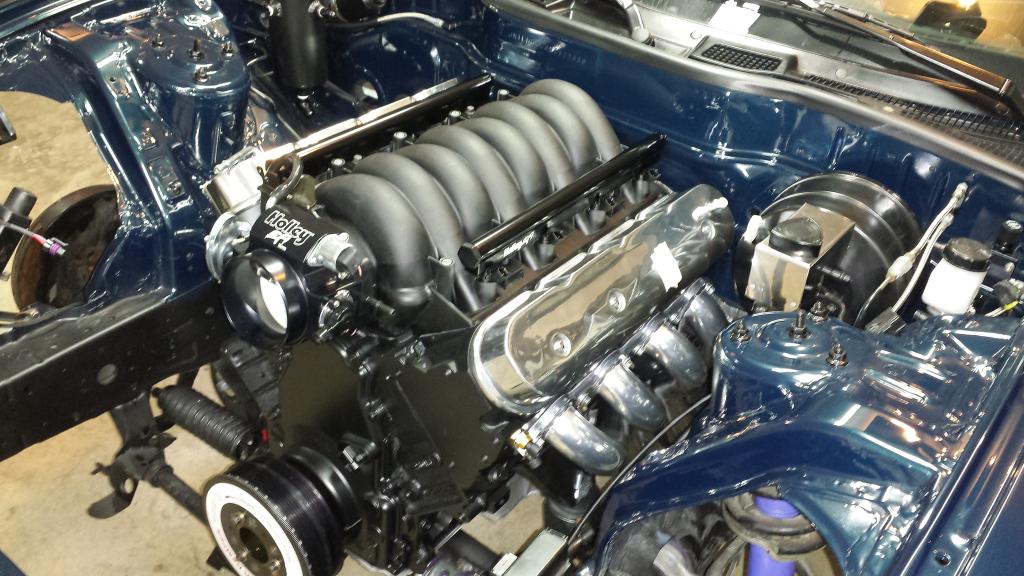
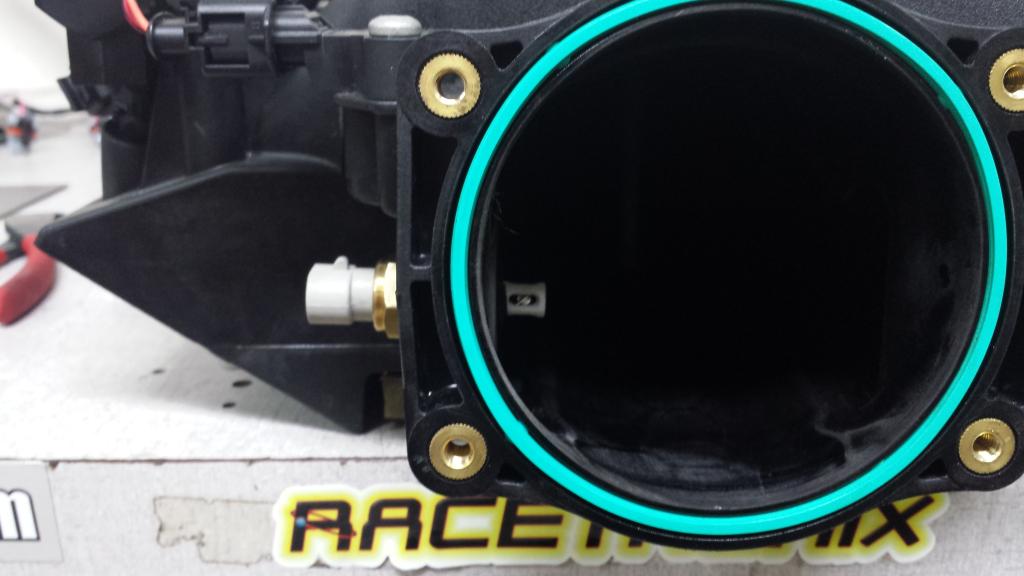
IAT Relocation
I decided to go with the IAT in the manifold. I drilled the whole, and it essentially tapped itself. I used some teflon and she is snug as a bug.
 [/URL]
The coil relocation went well. The wires were a pain to work with at first, but I got it squared away. Most of it really was dealing with the boots. The wires ran really clean and overall I am very pleased with it. I made a little video on how to build the wires for those who may do it in the future. I haven't made the coil shields yet, but it's on the list.
How To: MSD custom wires
Mazda Oil Pressure
I tapped the OFAC above the oil filter for my Mazda oil pressure sensor. I used a remote SS braided line to move it forward away from the headers. It's all very tight in there. The fitting taps to a 1/8npt perfectly. I literally just had to drill past the closed end. Easy.
Clutch Bleed
Gotta admit I was a little nervous about this one. If anything was weird, dropping the tranny would be needed and I just wasn't looking forward to that possibility. BUT, it bled like a champ. I used Blake's method with the MightyVac and it worked like a charm! I didn't open a bleeder once!! Again, I made a video of the process, the link that DigitalSolo explains his method is also below.
http://www.norotors.com/index.php?topic=17322.0
Shift Panel
I jumped on this band wagon! I had to modify it slightly since my shifter throws back so far, but after a little cutting disc work, it fit perfectly!
IAT Relocation
I decided to go with the IAT in the manifold. I drilled the whole, and it essentially tapped itself. I used some teflon and she is snug as a bug.
[/URL]
03-14-15, 12:22 PM
#1009
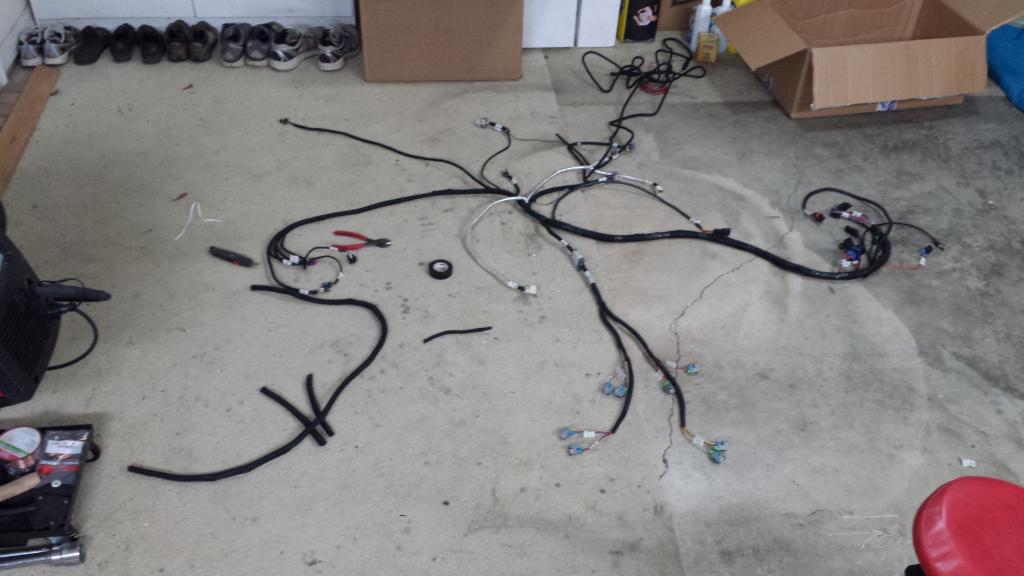
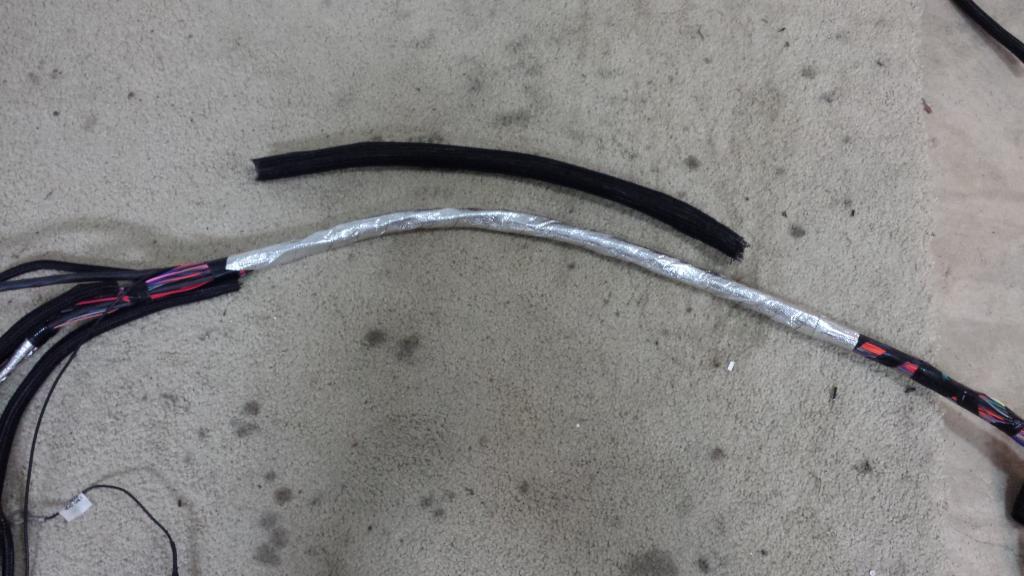
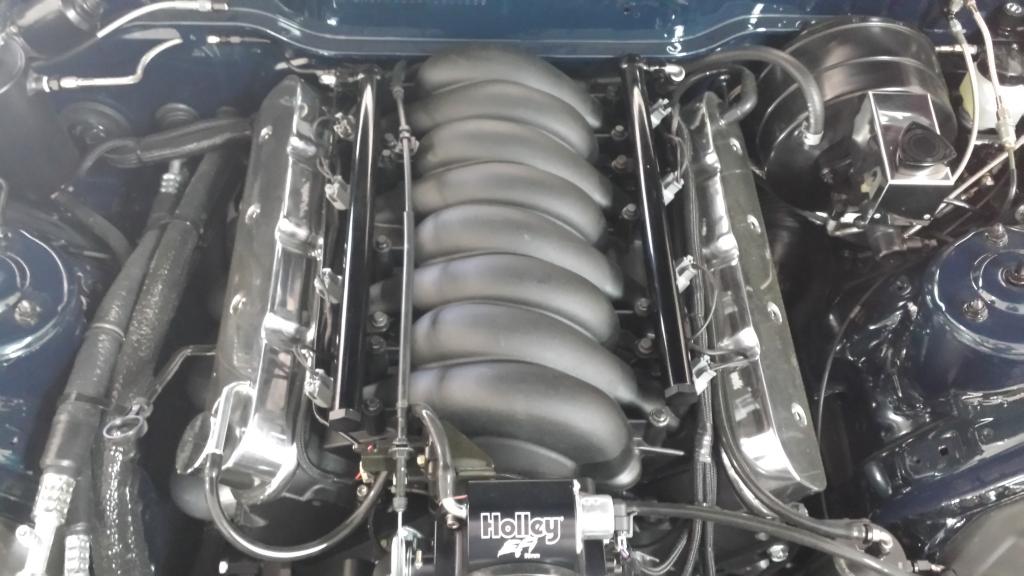
Bay Wiring
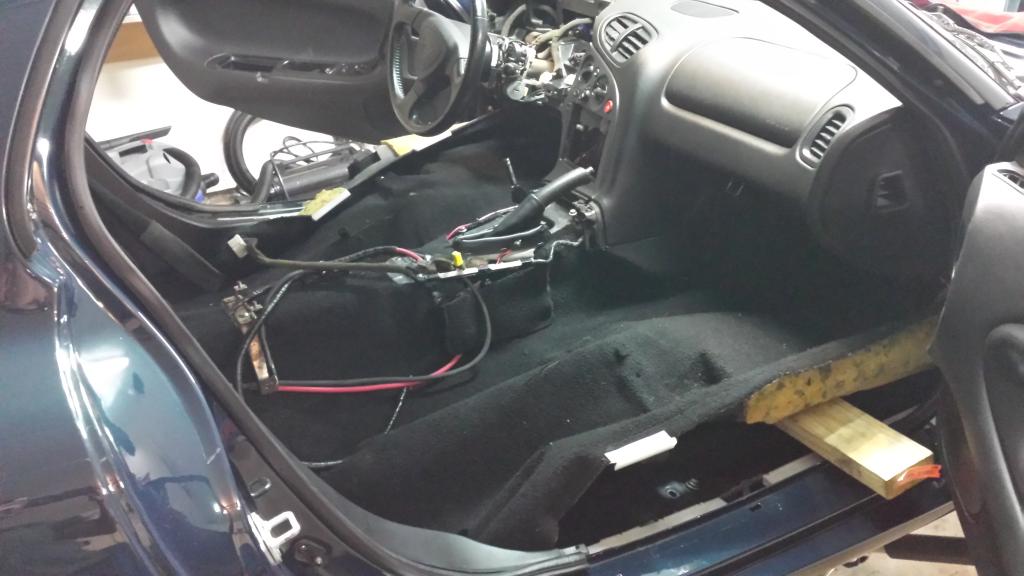
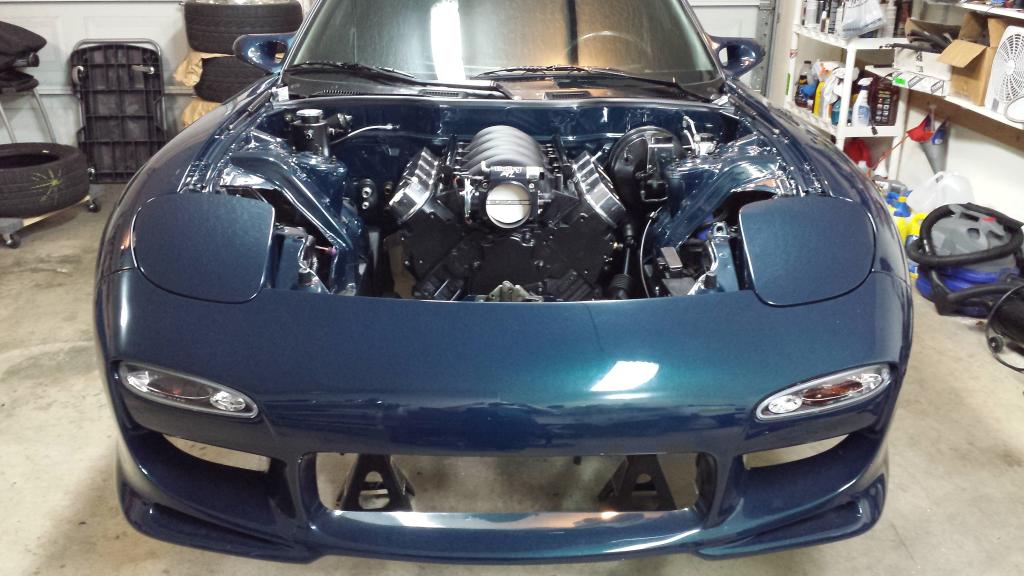
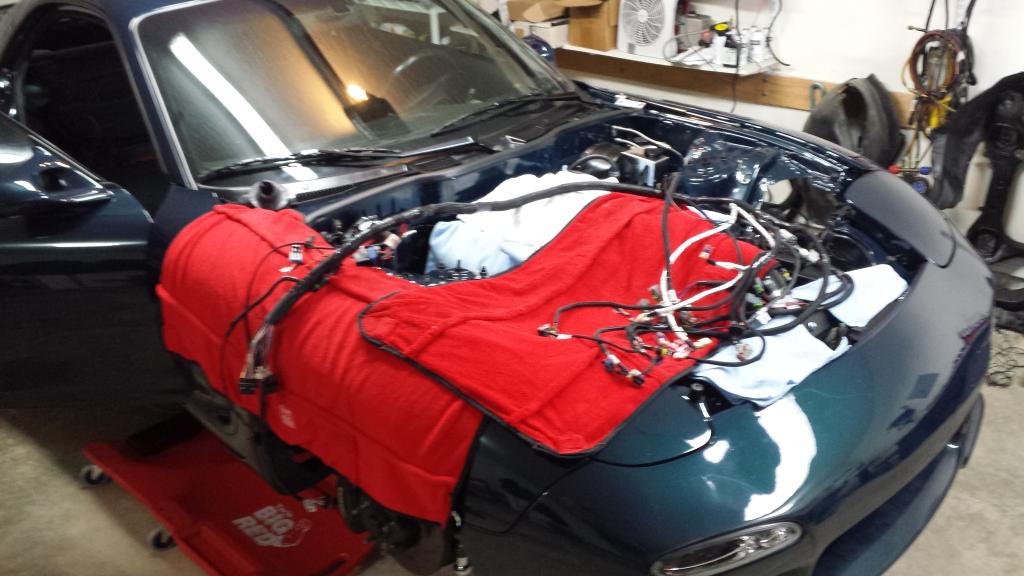
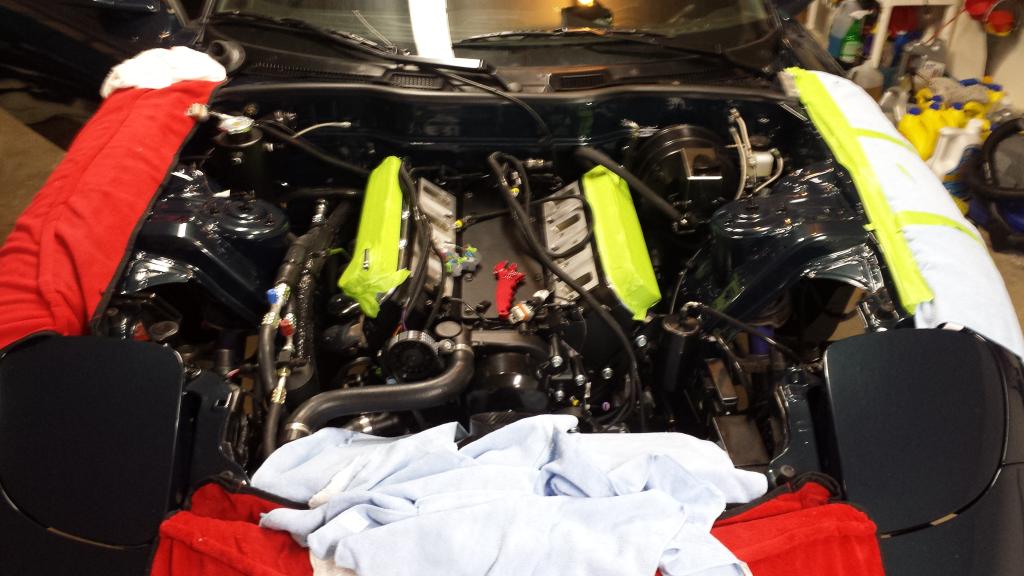
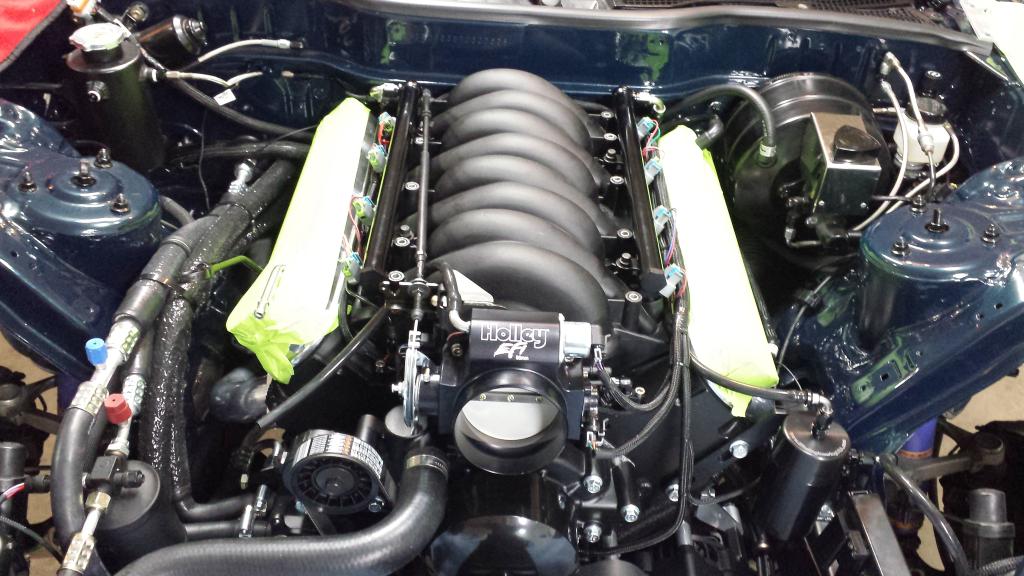
Wiring up the Holley harness on the engine side went pretty well. Holley gives you plenty of meat to work with so overall I spent most of my time figuring out what to do with the extra length. I did have to modify the harness in a few places. I added heat sleeving under the black sleeve in a few places where the harness would cross the header's path. Coil relocation caused me to separate the plug from the main harness and bring it back. Remember, it's designed for a factory car so the plugs sit where the top of the heads would be. I also had to tap into the 5v power and ground for the GM pressure switch I am using in my A/C system. Holley specifically says their sensors have no issues sharing so that was straight forward. It mostly just took time to route everything cleanly. I was covering everything up, and I masked my valve covers just to be safe. One thing about shiny stuff, it scratches easy. Oh, and the intake came off again, likely 30 times since I started...lol.
Ready to START!?!?!?
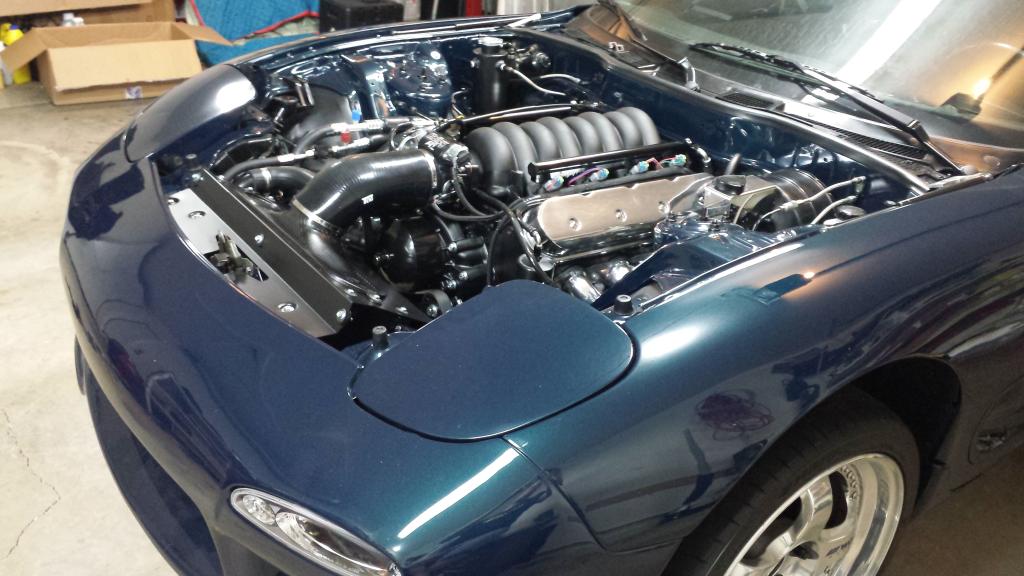
Actually, it is. The ECU has power, the engine wiring is complete, and all fluids are full. I filled her up with 5 gallons of 93 in there, and tested the fuel system; not a single leak. I have to admit, I was impressed. All of the plumbing from rear to front was solid. There are still a few things to wrap up such as all the wiring from the "X-14" connector (reverse lights, Mazda temp sensor, Digital Dakota), but that will have to wait until I get the pigtail. All of the wiring for the ECU is hanging out. The interior is still apart but the carpet is back in place. I need to power up the ECU, and go through the map adding my custom I/O's.
Next weekend I will fire this thing up!! And start my exhaust fabrication.
Wiring up the Holley harness on the engine side went pretty well. Holley gives you plenty of meat to work with so overall I spent most of my time figuring out what to do with the extra length. I did have to modify the harness in a few places. I added heat sleeving under the black sleeve in a few places where the harness would cross the header's path. Coil relocation caused me to separate the plug from the main harness and bring it back. Remember, it's designed for a factory car so the plugs sit where the top of the heads would be. I also had to tap into the 5v power and ground for the GM pressure switch I am using in my A/C system. Holley specifically says their sensors have no issues sharing so that was straight forward. It mostly just took time to route everything cleanly. I was covering everything up, and I masked my valve covers just to be safe. One thing about shiny stuff, it scratches easy. Oh, and the intake came off again, likely 30 times since I started...lol.
Ready to START!?!?!?
Actually, it is. The ECU has power, the engine wiring is complete, and all fluids are full. I filled her up with 5 gallons of 93 in there, and tested the fuel system; not a single leak. I have to admit, I was impressed. All of the plumbing from rear to front was solid. There are still a few things to wrap up such as all the wiring from the "X-14" connector (reverse lights, Mazda temp sensor, Digital Dakota), but that will have to wait until I get the pigtail. All of the wiring for the ECU is hanging out. The interior is still apart but the carpet is back in place. I need to power up the ECU, and go through the map adding my custom I/O's.
Next weekend I will fire this thing up!! And start my exhaust fabrication.
03-14-15, 12:23 PM
#1010
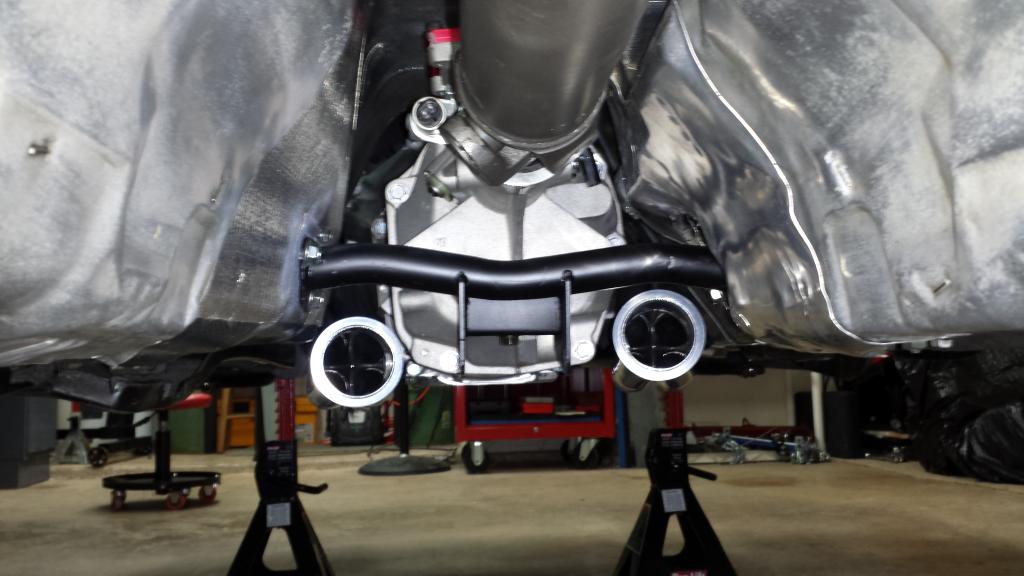
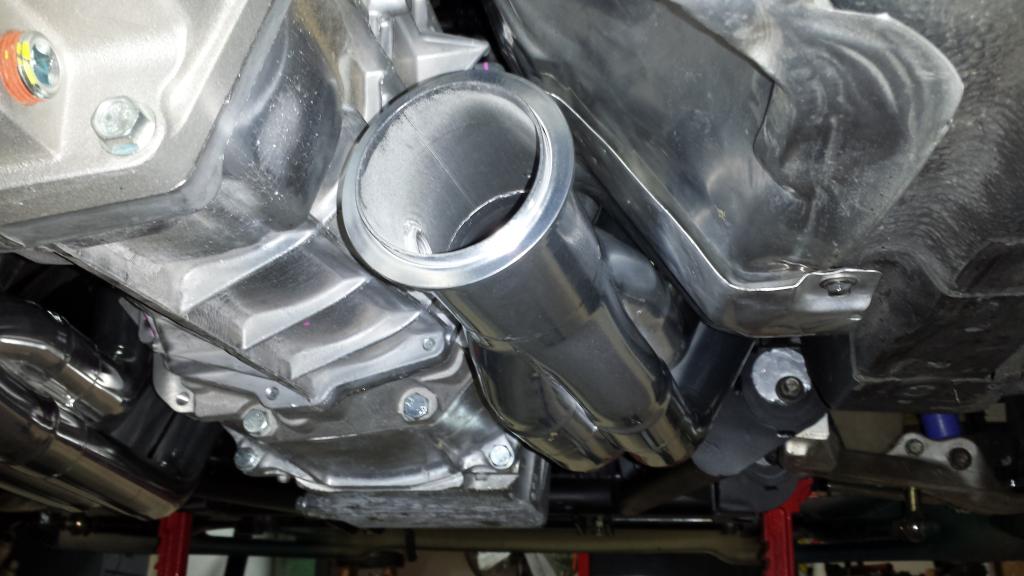
Exhaust
I figured I would need to tackle this sooner or later, so I opted for sooner. With the first startup right around the corner, I thought it would be nice to hear the sweet sound of my actual exhaust as opposed to open headers. Especially waiting for the thermostat to open, and confirm my fans are doing what they should be.
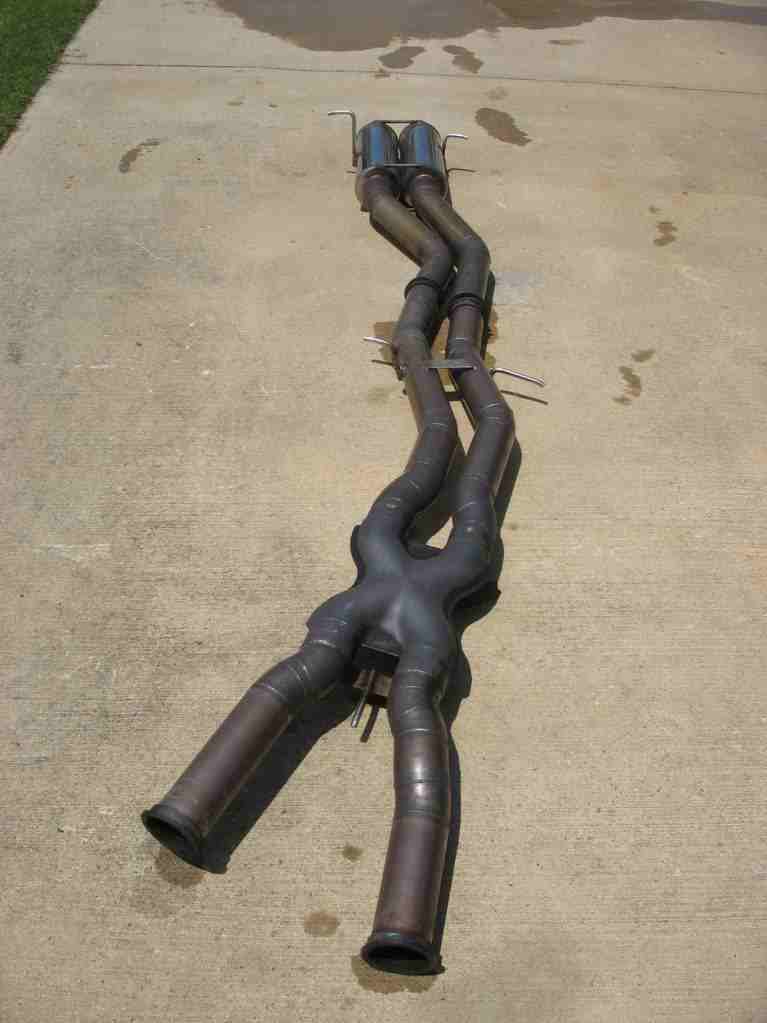
As many of you know, I have had the pleasure of starting with Kevin Doe's dual exhaust, purchased from Mr. Halfspec himself.
Below is the modification and fitment of the process.
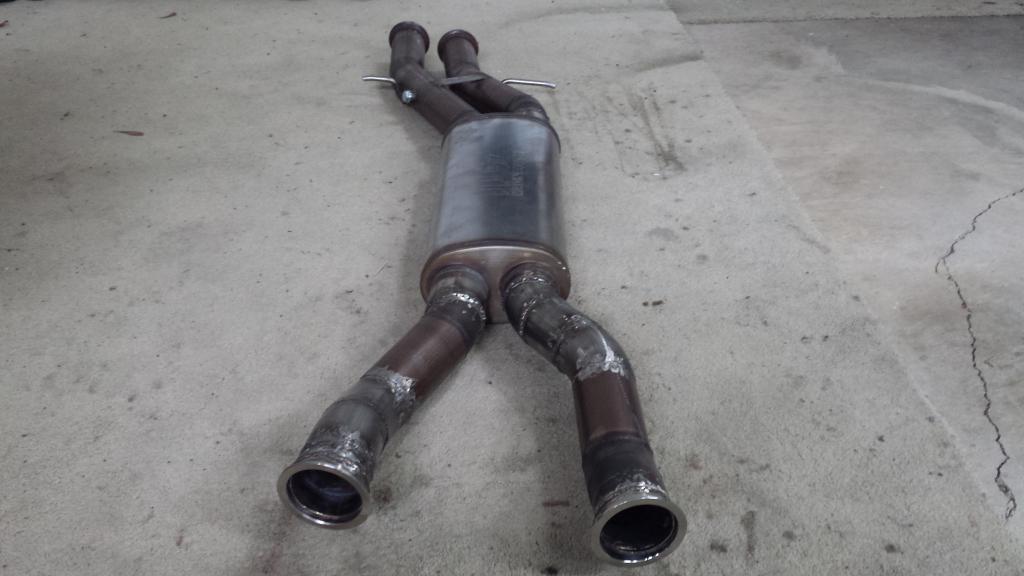
Firstly, this is what I was starting with.
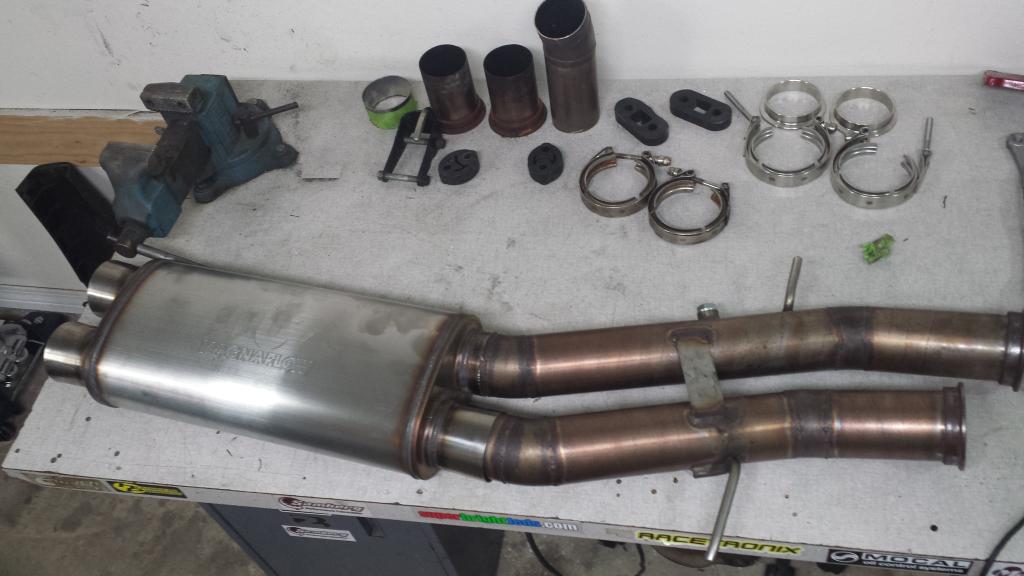
As Lane mentioned, and I previously stated, this bad boy is loud. With the true-X in place and barely any muffling coming from the straight through rear mufflers, it just wasn't going to be enough for a "semi-civil" street car. I opted to add a Magnaflow X-flow muffler 3" in/out in hopes that it would tame it down a little. I also had to modify the front section for it to mate to my Spoolin headers. But first, I need to chop off the old X and put in the manifold. Manifold fitted in place.
From there, it was a series of test fitting mandrel angles and tacking them into place. I had to duck the Samberg transmission mount with my angles so that is why it swoops a little. I also had to drop the center section (muffler) enough to clear the driveshaft.
I realize my welding skills aren't amazing. The welds weren't pretty by any means, but they are strong. I opted to use 309ss flux wire. I chose this as it eliminated the need for back purging and it was easy to order up and get moving.

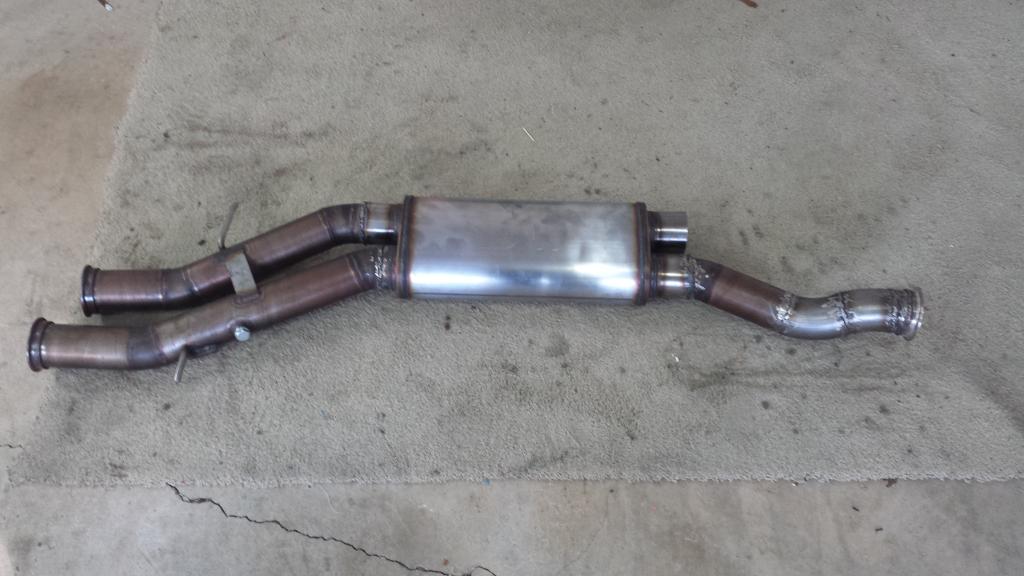
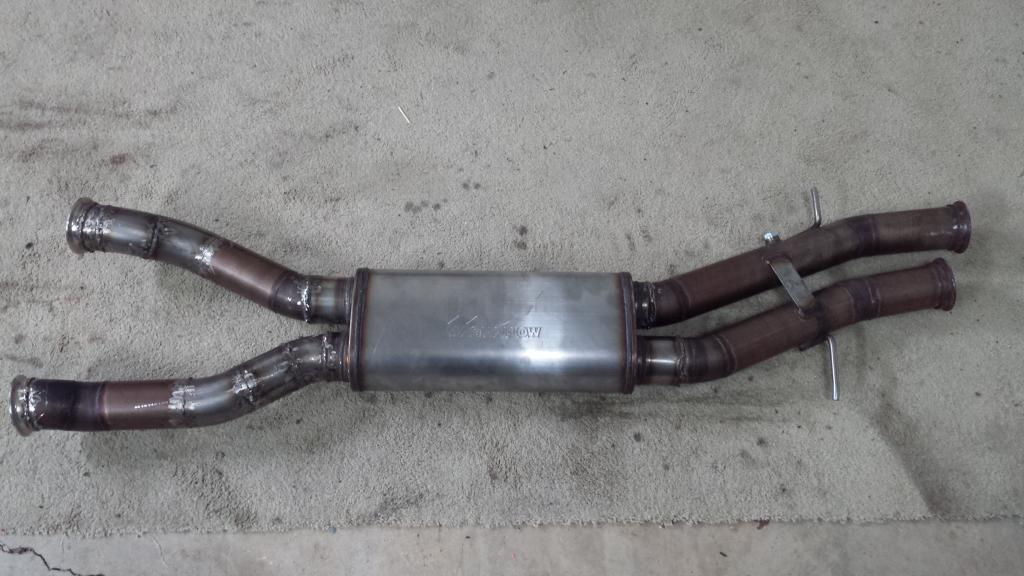
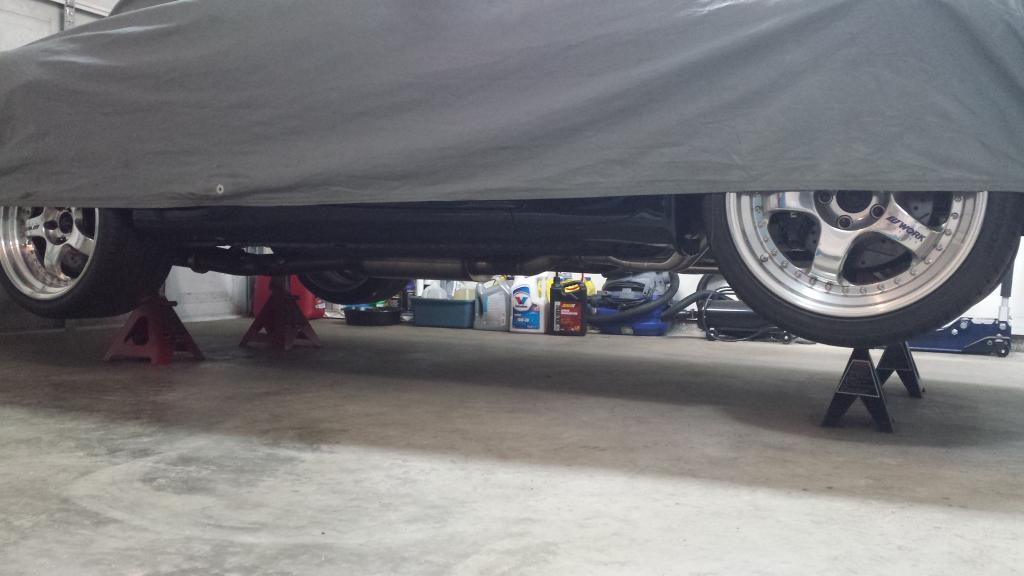
Bolted into place, and ready to rock. The middle hangers will be added to the Samberg cradle next weekend when I get some material. Overall, I am happy with it. It seems a little low but camera angles play tricks. I will see how it looks once it's on the ground. I got it as tight as possible around the rear subframe without it constantly banging against anything from movement. I have a few extra inches above the muffler before it hits the driveshaft, but again, I didn't want it to be too close. Overall, I am pleased with it.
If it is too low or needs modified, then I will drop her down and fix it. Gives me a reason to play with my welder some more.

I figured I would need to tackle this sooner or later, so I opted for sooner. With the first startup right around the corner, I thought it would be nice to hear the sweet sound of my actual exhaust as opposed to open headers. Especially waiting for the thermostat to open, and confirm my fans are doing what they should be.
As many of you know, I have had the pleasure of starting with Kevin Doe's dual exhaust, purchased from Mr. Halfspec himself.
Below is the modification and fitment of the process.
Firstly, this is what I was starting with.
As Lane mentioned, and I previously stated, this bad boy is loud. With the true-X in place and barely any muffling coming from the straight through rear mufflers, it just wasn't going to be enough for a "semi-civil" street car. I opted to add a Magnaflow X-flow muffler 3" in/out in hopes that it would tame it down a little. I also had to modify the front section for it to mate to my Spoolin headers. But first, I need to chop off the old X and put in the manifold. Manifold fitted in place.
From there, it was a series of test fitting mandrel angles and tacking them into place. I had to duck the Samberg transmission mount with my angles so that is why it swoops a little. I also had to drop the center section (muffler) enough to clear the driveshaft.
I realize my welding skills aren't amazing. The welds weren't pretty by any means, but they are strong. I opted to use 309ss flux wire. I chose this as it eliminated the need for back purging and it was easy to order up and get moving.
Bolted into place, and ready to rock. The middle hangers will be added to the Samberg cradle next weekend when I get some material. Overall, I am happy with it. It seems a little low but camera angles play tricks. I will see how it looks once it's on the ground. I got it as tight as possible around the rear subframe without it constantly banging against anything from movement. I have a few extra inches above the muffler before it hits the driveshaft, but again, I didn't want it to be too close. Overall, I am pleased with it.
If it is too low or needs modified, then I will drop her down and fix it. Gives me a reason to play with my welder some more.
03-14-15, 12:28 PM
#1011
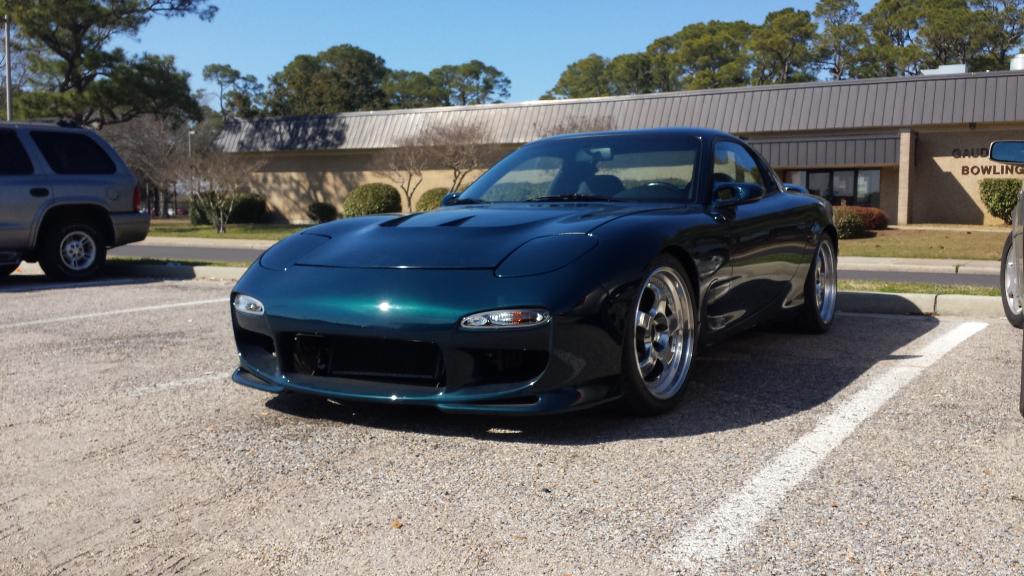
The Real Beginning...
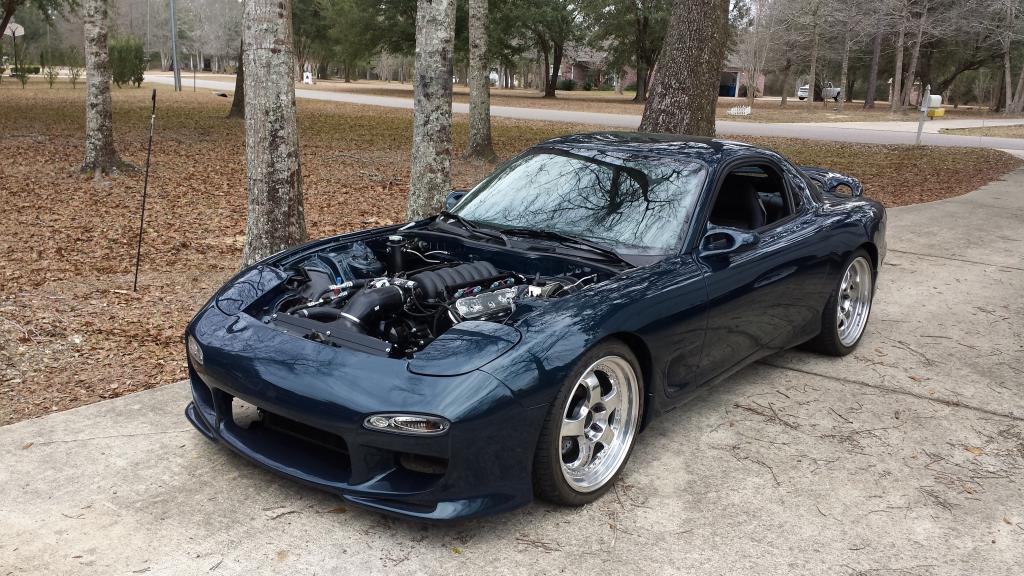
Well gentlemen, it starts, runs, and drives. We are working to get it idling lower than 1100rpm without surging and dying. BUT, it's getting there. First and foremost, I want to thank ZBrown for his time and effort. After chasing my tail for a day and a half, he looked over my map and saw that she was mega rich down low. No wonder it seamed like it was missing, it was drowning in fuel. The only issue I had with my setup was the coil harness was backwards on the even bank. I identified that in my search for answers. After quite a bit of sending logs, modifying, sending logs, modifying, we got it really close. I took the maiden voyage today and it felt great. Quite a few things still need addressed, but I can say that it runs, drives, and we are moving forward. :cheers: :bacon: :bacon:
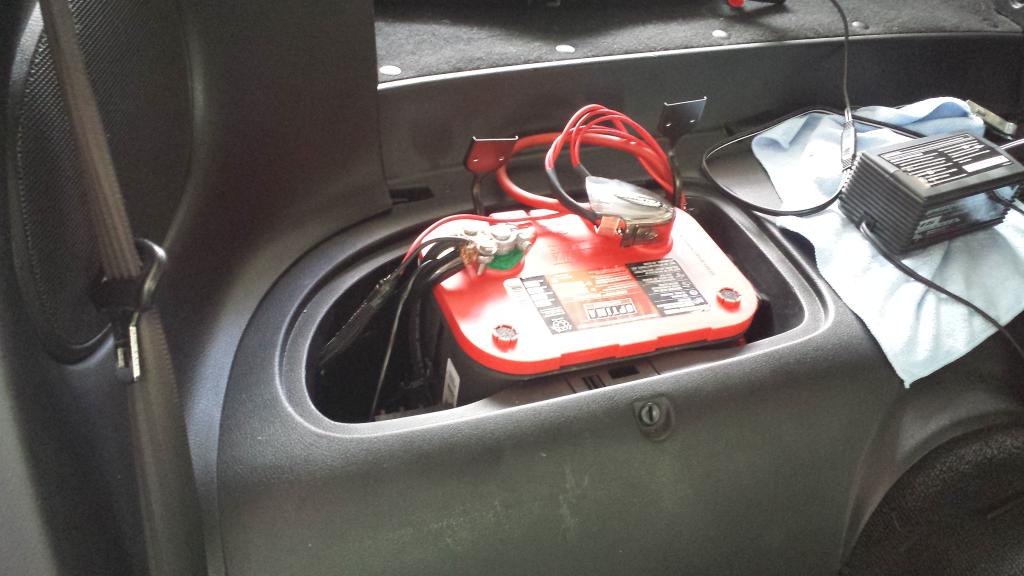
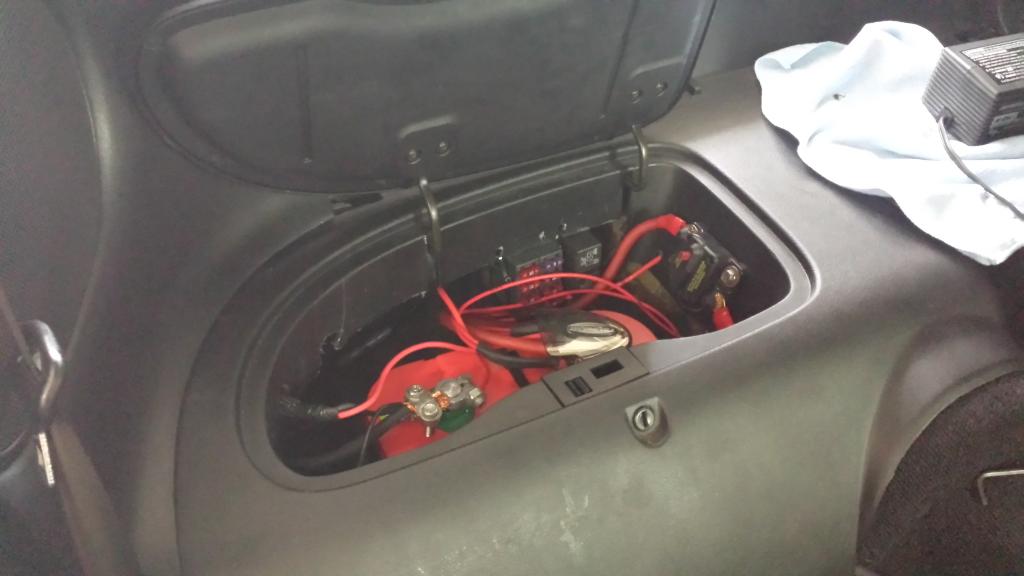
When I first started troubleshooting, I immediately noticed I needed a bigger battery. The Wesco Miata battery I have been using for the past 5 years just wasn't cutting it. It became apparent when I was cranking it for 4-5 tries, and it would die. I went and bought a new Optima Red Top with 800cca. She did the trick! Nice to have a battery that just keeps going! Of course, it wasn't going to fit in the storage bin so I had to "modify" it.
She was just getting me by in the first picture...lol
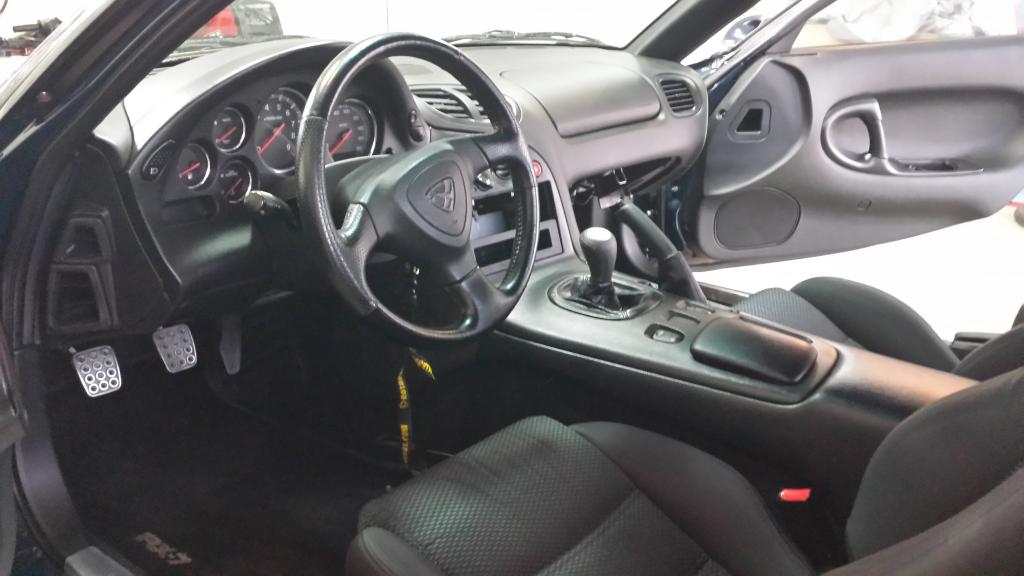
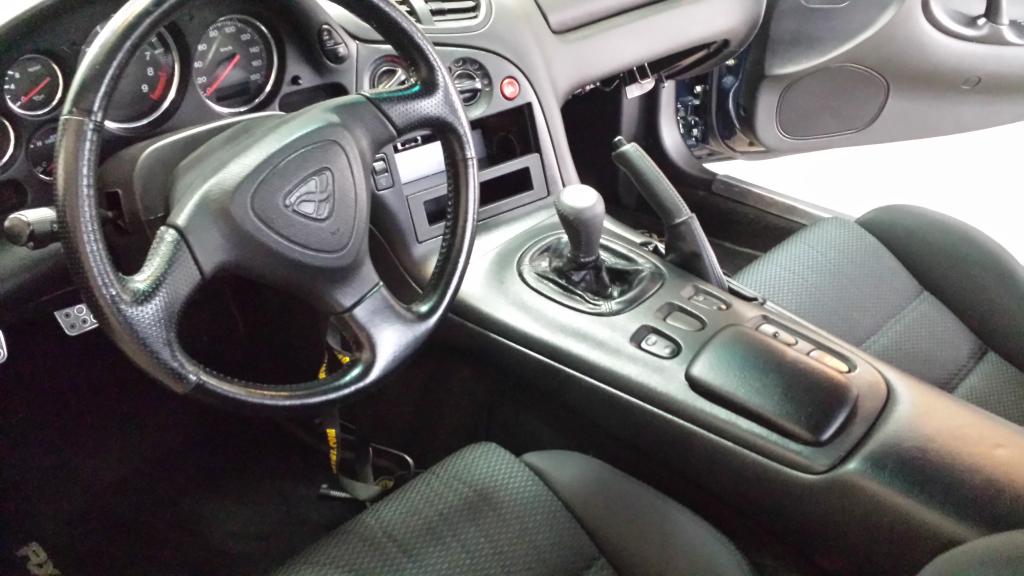
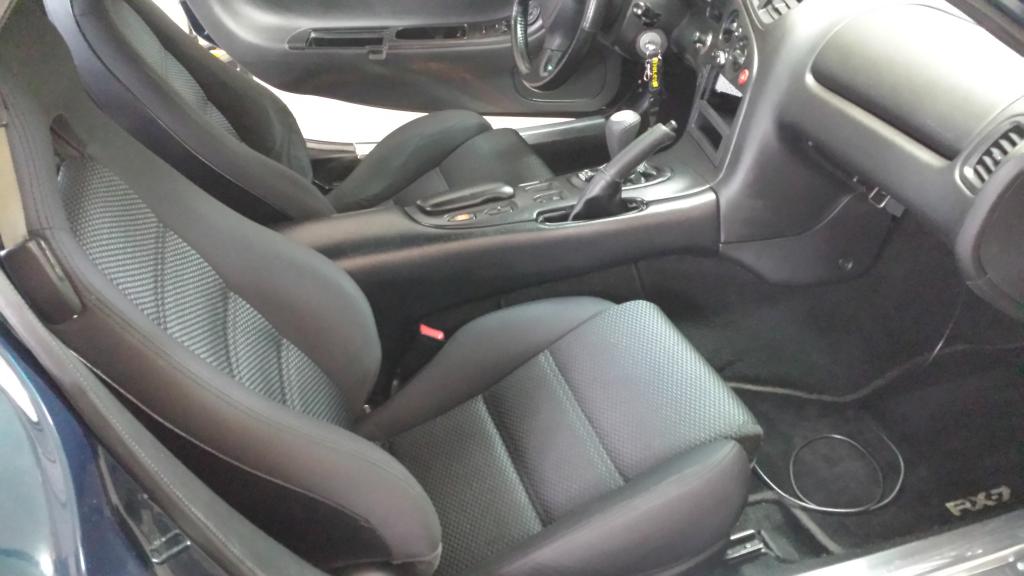
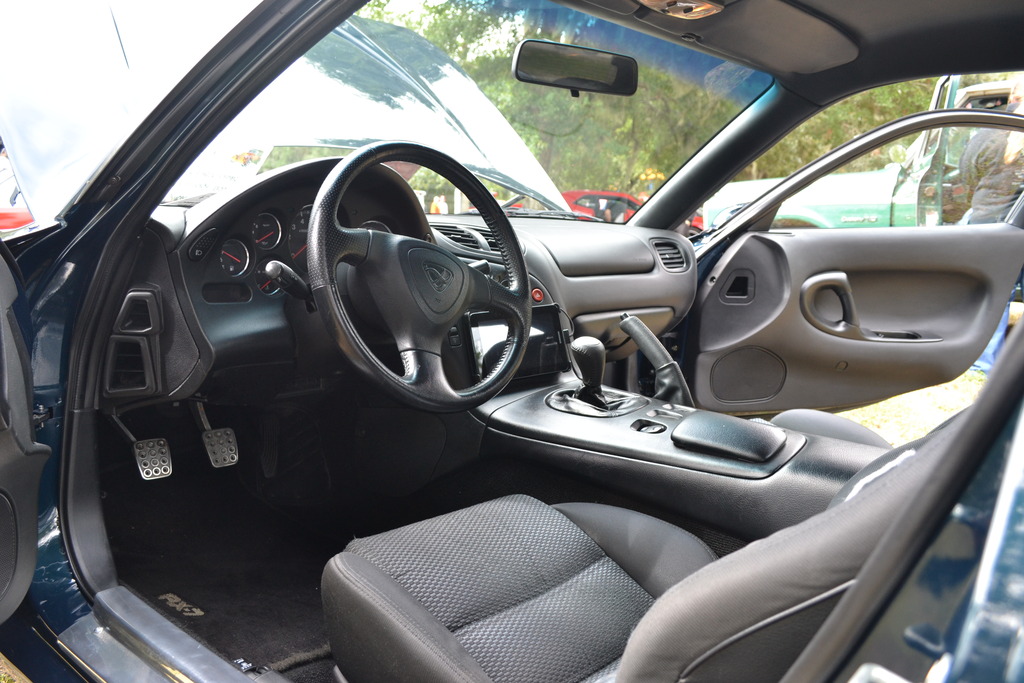
Once we got it started it was nice to see that I had ZERO leaks of any kind. I was pretty surprised. I was especially worried about the heater core pipes that I had issues sealing last time. Turns out, it was just the dents in the pipes. This time around I added Indian Head shellac to all coolant hoses. Worked like a champ. After we got the tune headed in the right direction and started trying to get it to idle, I figured it was time to assemble and clean the interior. I was working at it between sending ZBrown logs, trying his map, and sending more logs...lol. Holy crap it was nice to put the seats back in. The only thing I left out was the glovebox. My Dakota Digital is mounted back there so I will need to set it up yet.
Maiden Voyage
 [/URL]
I snapped this picture and took this video right after I returned. I took it a few miles down the road to a local corner store. I was really low on gas so I figured it would be cool to go put a few gallons in it. No leaks or weirdness. The Holley was changing the low end transitions very well. I could feel some slight hesitations during shifting and then they would disappear and it would clear up. My learn table populated a fair amount even from the short drive. I am really happy with the progress. But there is still some things to work out.
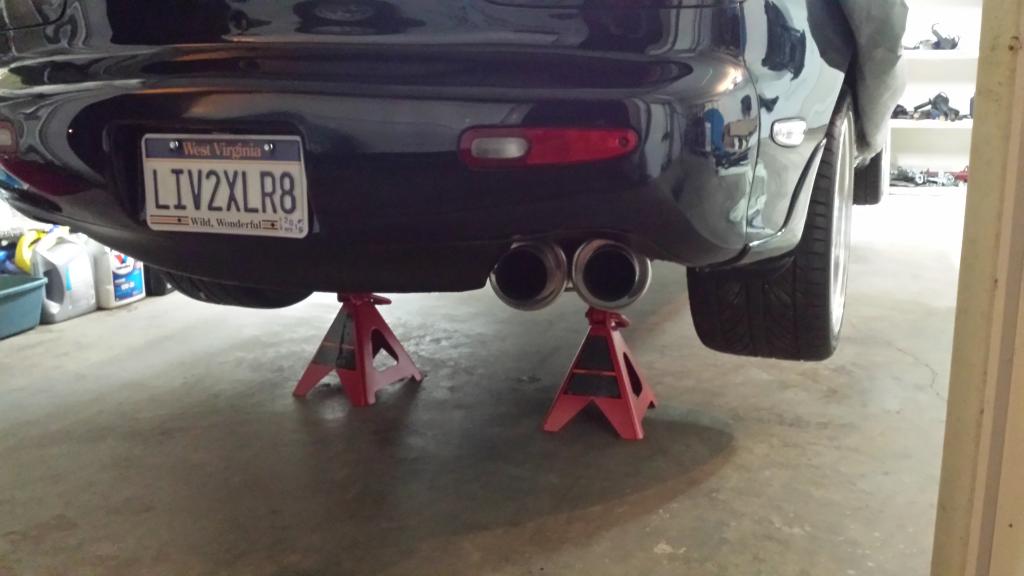
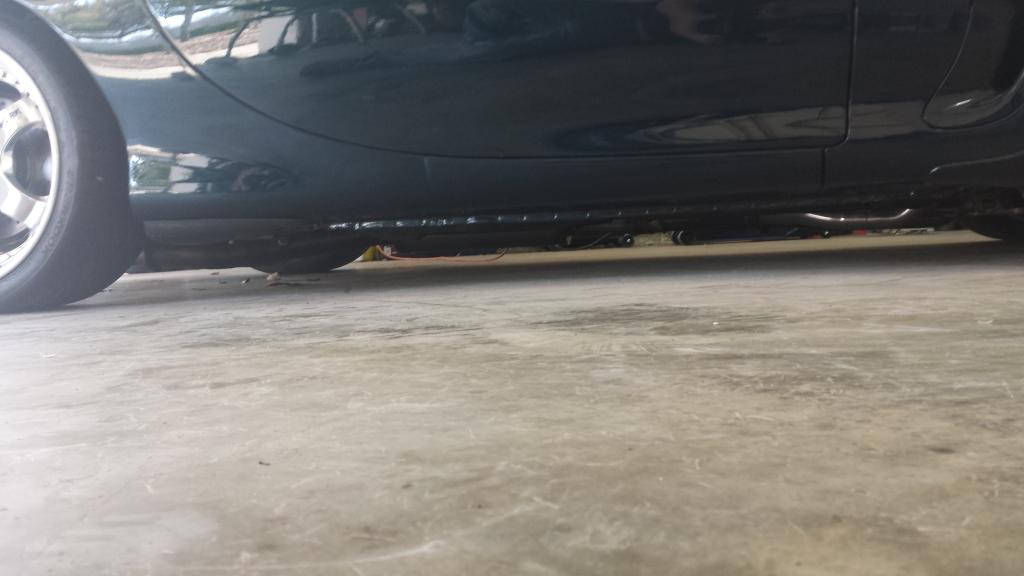
1. Exhaust needs redone. My center muffler sits about 2" off the ground. An obvious oversight in my first exhaust modification attempt. That is the first order of business.
2. Get the idle sorted. Obviously it's a pain to drive around with it surging and dying so once we get it steady, more driving can happen.
3. Oil change and plug change. After a day of many very rich attempts, I think it would be good to get fresh oil in there and start with another set of fresh plugs.
4. Check differential. My Cobra diff is a stocker with 39k out of a known good car. I noticed at around 40mph and above it started humming pretty good. I want to get under it to make sure everything looks good. When I was filling it, most of my friction modifier came out. Oversight on my part with the fill tube. I will probably add another pint and keep an eye on it. Everything looked good when I had the cover off, but we will see.
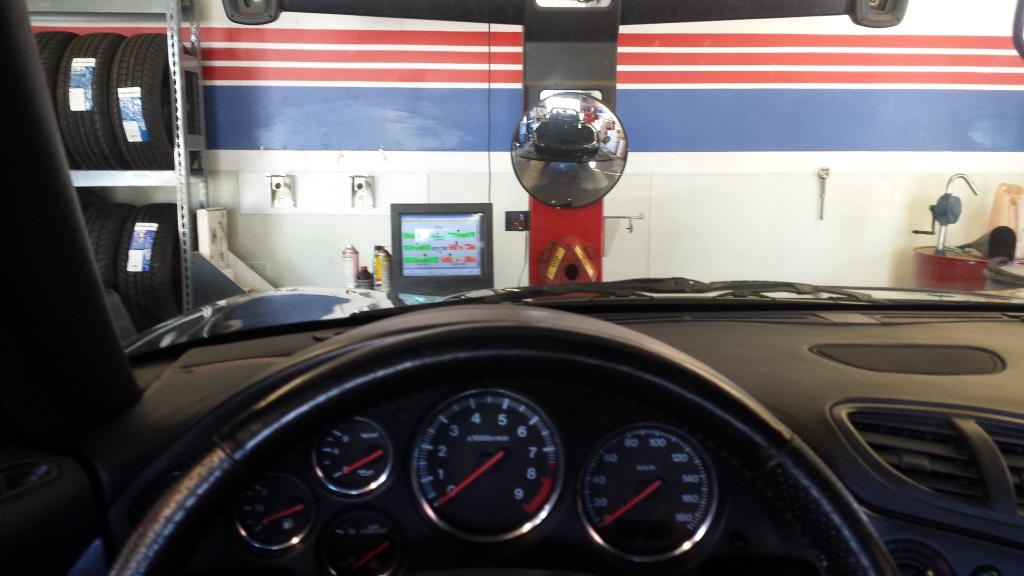
5. Alignment. It needs one...bad. Rear and front are both out.
6. Dakota Digital programming.
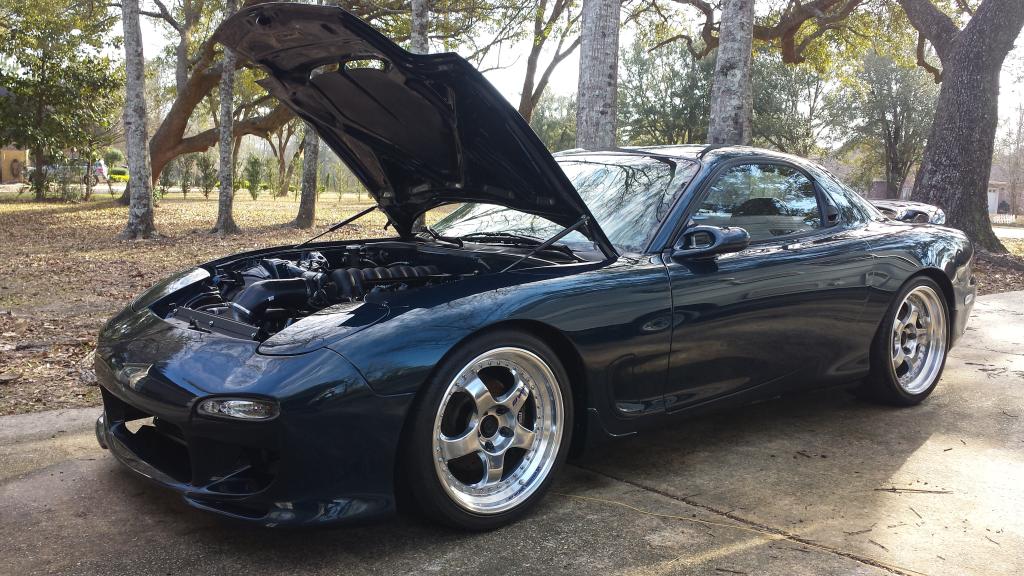
7. Hood fitment. Still not sure if the Mazdaspeed hood will fit, but I am about to find out.
Oh, did I mention that life is good. :drive: :halo: :drive:
Well gentlemen, it starts, runs, and drives. We are working to get it idling lower than 1100rpm without surging and dying. BUT, it's getting there. First and foremost, I want to thank ZBrown for his time and effort. After chasing my tail for a day and a half, he looked over my map and saw that she was mega rich down low. No wonder it seamed like it was missing, it was drowning in fuel. The only issue I had with my setup was the coil harness was backwards on the even bank. I identified that in my search for answers. After quite a bit of sending logs, modifying, sending logs, modifying, we got it really close. I took the maiden voyage today and it felt great. Quite a few things still need addressed, but I can say that it runs, drives, and we are moving forward. :cheers: :bacon: :bacon:
When I first started troubleshooting, I immediately noticed I needed a bigger battery. The Wesco Miata battery I have been using for the past 5 years just wasn't cutting it. It became apparent when I was cranking it for 4-5 tries, and it would die. I went and bought a new Optima Red Top with 800cca. She did the trick! Nice to have a battery that just keeps going! Of course, it wasn't going to fit in the storage bin so I had to "modify" it.
She was just getting me by in the first picture...lol
Once we got it started it was nice to see that I had ZERO leaks of any kind. I was pretty surprised. I was especially worried about the heater core pipes that I had issues sealing last time. Turns out, it was just the dents in the pipes. This time around I added Indian Head shellac to all coolant hoses. Worked like a champ. After we got the tune headed in the right direction and started trying to get it to idle, I figured it was time to assemble and clean the interior. I was working at it between sending ZBrown logs, trying his map, and sending more logs...lol. Holy crap it was nice to put the seats back in. The only thing I left out was the glovebox. My Dakota Digital is mounted back there so I will need to set it up yet.
Maiden Voyage
[/URL]I snapped this picture and took this video right after I returned. I took it a few miles down the road to a local corner store. I was really low on gas so I figured it would be cool to go put a few gallons in it. No leaks or weirdness. The Holley was changing the low end transitions very well. I could feel some slight hesitations during shifting and then they would disappear and it would clear up. My learn table populated a fair amount even from the short drive. I am really happy with the progress. But there is still some things to work out.
1. Exhaust needs redone. My center muffler sits about 2" off the ground. An obvious oversight in my first exhaust modification attempt. That is the first order of business.
2. Get the idle sorted. Obviously it's a pain to drive around with it surging and dying so once we get it steady, more driving can happen.
3. Oil change and plug change. After a day of many very rich attempts, I think it would be good to get fresh oil in there and start with another set of fresh plugs.
4. Check differential. My Cobra diff is a stocker with 39k out of a known good car. I noticed at around 40mph and above it started humming pretty good. I want to get under it to make sure everything looks good. When I was filling it, most of my friction modifier came out. Oversight on my part with the fill tube. I will probably add another pint and keep an eye on it. Everything looked good when I had the cover off, but we will see.
5. Alignment. It needs one...bad. Rear and front are both out.
6. Dakota Digital programming.
7. Hood fitment. Still not sure if the Mazdaspeed hood will fit, but I am about to find out.
Oh, did I mention that life is good. :drive: :halo: :drive:
03-14-15, 12:30 PM
#1012
Getting There!
I figured I would give some updates on progress. I knocked out a few things off of my list, but I still have some to go.
1. I ordered 2 more full U bends, and a 4ft section of pipe. I was definitely going in with a little more foresight this time around. I dropped the exhaust and raised the center muffler as far as she will go. It sits about 1" from the driveshaft with excellent fitment all through. It's WAY better than it was before. I have yet to drag driving around.
2. I got the idle settled in perfectly at 900rpm. Still working on cold starts. It also still wants to die if I free rev it too high. Zack has been helping me and I can't thank him enough for his time and knowledge.
3. Both oil and tranny fluid are fresh. That oil was black as night and smelly.
4. Added more modifier and it's WAY quieter. Still making noise, but from what I am reading, it's at an acceptable level. Going to drive it and see how it plays out.
5. The alignment went well and everything straightened out nicely. I debated where to take it, but after talking to a few folks locally, the Firestone on base turned out to be the pick. Now I have never been a big fan of Firestone but the guys on base are pretty cool. I stopped in the day before to chat with them and get a feel for what was feasible. They definitely let me get involved with the process, which is what I wanted. They also aligned the car with me sitting in the drivers seat, which was great. It was a very nerving experience getting in on the rack and back off without scraping or messing anything up... but we made it unscathed, and she drives excellent!
6. Dakota Digital programming........Still gotta do this. I also need to order a box for my tach.
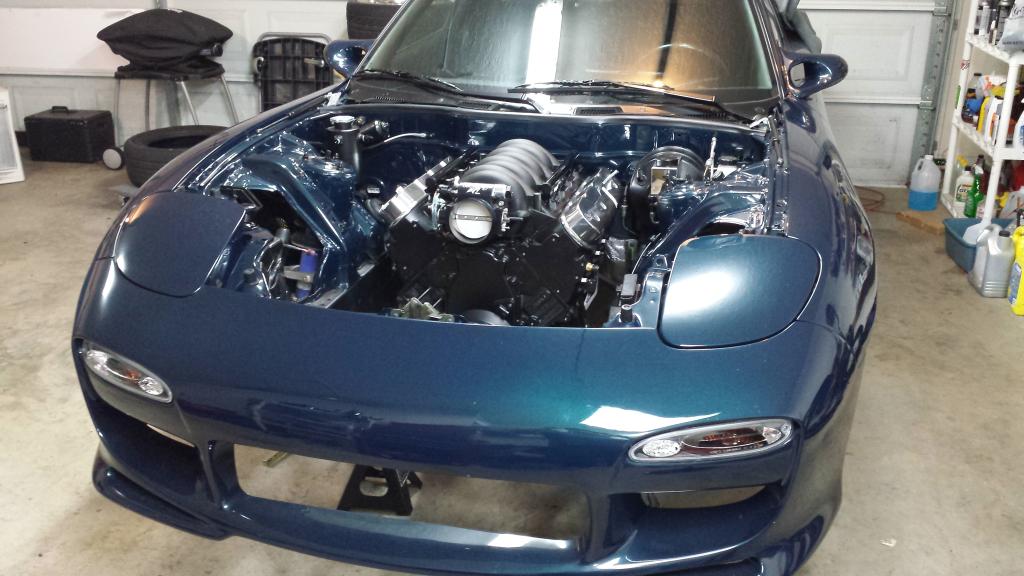
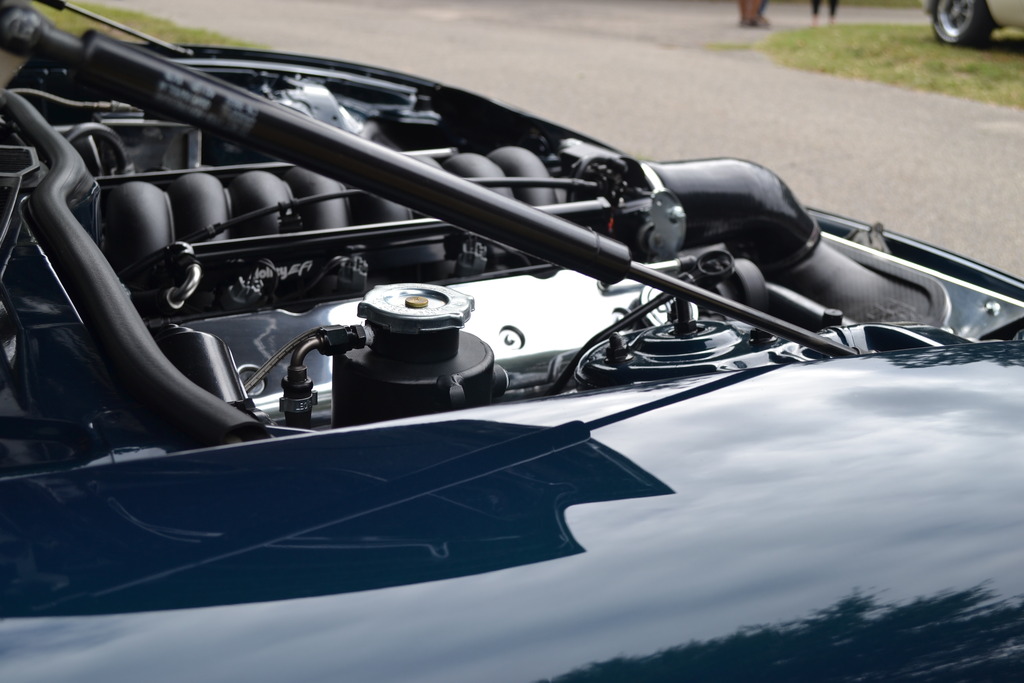
7. The hood, it fits!! It rubs the silicone coupler slightly but it causes no issues from what I have seen. Another reason I like the all silicone intake pipe is that there isn't alot of tension on it. In the place where the hood does hit, it's soft and doesn't seem like it will cause an issue. It actually fits better than the pic below, as I adjusted my latch a little to get the hood gaps and height perfect. Nonetheless, she is on with no issues.
I also spent some time eliminating the biggest eye sore on the entire project!! I depinned each bright colorful injector wire and sheeth'd it with black shrink tube. I also removed both blue and bright green clip locks from each of the injector plugs. Ahhh...much cleaner.
 [/URL]
On the Road!
I have put about 100 miles on the car and I am loving every minute of driving it. My first impressions are that I absolutely love this setup. Lag?...it doesn't know the meaning. It makes the rotary feel like a lazy bum. All of my "power pulls" have been partial throttle to about 4000rpm max. Everything is still settling in of course so I can't romp on it yet. The Magnum is shifting better and better with smooth effortless precision. I also really like the 3.55 rear end gearing and I'm glad I stayed there. It feels perfect for a street cruiser.
More videos coming soon, but here is a quick one.
Catching the Crap
With about 100 miles on the setup I was curious to see if there was anything collected in my catch can. I'm glad I'm using this unit.
And finally, I took the time to give her a much deserved detail. :drive:
I figured I would give some updates on progress. I knocked out a few things off of my list, but I still have some to go.
1. I ordered 2 more full U bends, and a 4ft section of pipe. I was definitely going in with a little more foresight this time around. I dropped the exhaust and raised the center muffler as far as she will go. It sits about 1" from the driveshaft with excellent fitment all through. It's WAY better than it was before. I have yet to drag driving around.
2. I got the idle settled in perfectly at 900rpm. Still working on cold starts. It also still wants to die if I free rev it too high. Zack has been helping me and I can't thank him enough for his time and knowledge.
3. Both oil and tranny fluid are fresh. That oil was black as night and smelly.
4. Added more modifier and it's WAY quieter. Still making noise, but from what I am reading, it's at an acceptable level. Going to drive it and see how it plays out.
5. The alignment went well and everything straightened out nicely. I debated where to take it, but after talking to a few folks locally, the Firestone on base turned out to be the pick. Now I have never been a big fan of Firestone but the guys on base are pretty cool. I stopped in the day before to chat with them and get a feel for what was feasible. They definitely let me get involved with the process, which is what I wanted. They also aligned the car with me sitting in the drivers seat, which was great. It was a very nerving experience getting in on the rack and back off without scraping or messing anything up... but we made it unscathed, and she drives excellent!
6. Dakota Digital programming........Still gotta do this. I also need to order a box for my tach.
7. The hood, it fits!! It rubs the silicone coupler slightly but it causes no issues from what I have seen. Another reason I like the all silicone intake pipe is that there isn't alot of tension on it. In the place where the hood does hit, it's soft and doesn't seem like it will cause an issue. It actually fits better than the pic below, as I adjusted my latch a little to get the hood gaps and height perfect. Nonetheless, she is on with no issues.
I also spent some time eliminating the biggest eye sore on the entire project!! I depinned each bright colorful injector wire and sheeth'd it with black shrink tube. I also removed both blue and bright green clip locks from each of the injector plugs. Ahhh...much cleaner.
[/URL]On the Road!
I have put about 100 miles on the car and I am loving every minute of driving it. My first impressions are that I absolutely love this setup. Lag?...it doesn't know the meaning. It makes the rotary feel like a lazy bum. All of my "power pulls" have been partial throttle to about 4000rpm max. Everything is still settling in of course so I can't romp on it yet. The Magnum is shifting better and better with smooth effortless precision. I also really like the 3.55 rear end gearing and I'm glad I stayed there. It feels perfect for a street cruiser.
More videos coming soon, but here is a quick one.
Catching the Crap
With about 100 miles on the setup I was curious to see if there was anything collected in my catch can. I'm glad I'm using this unit.
And finally, I took the time to give her a much deserved detail. :drive:
03-14-15, 12:33 PM
#1013
This build thread is now current. I am still working on some small stuff but I will be updating it as I go. I have been trying to do more driving and breaking everything in, but the weather doesn't want to cooperate. Nonetheless, I'm on the down hill slide.
More updates coming soon!
Including: WOT pulls, Dyno day, Holley Digitial dash install, and Davis Traction Control
More updates coming soon!
Including: WOT pulls, Dyno day, Holley Digitial dash install, and Davis Traction Control
 Bet youre happy to have it all back together and running. Get the tune sorted and post some 4th hear rolling burnout vids
 02-21-16, 04:55 AM
#1023
UPDATE:
Well gents, it's been awhile and I have definitely had some developments in how the car has been running and driving.
Vibration
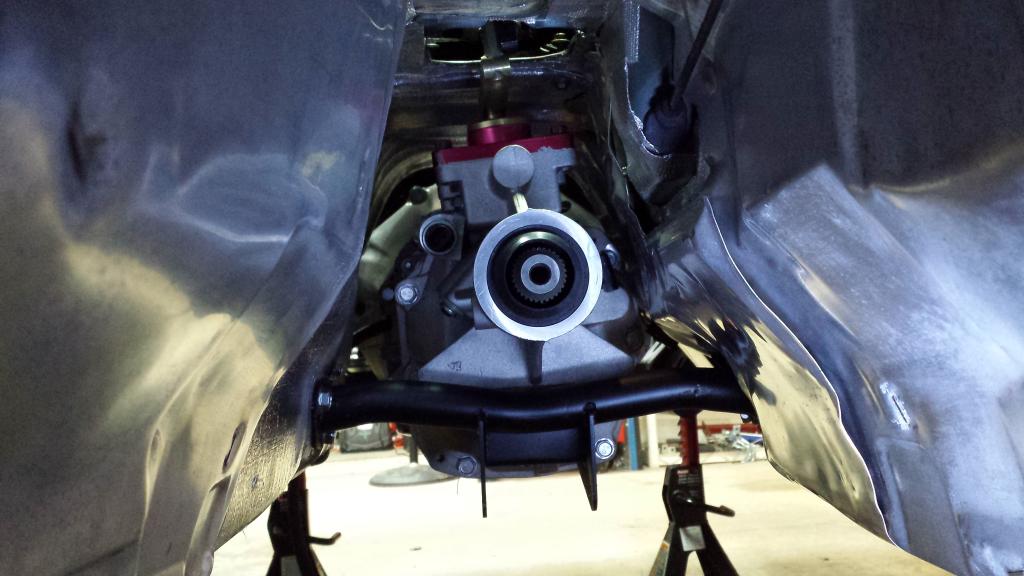
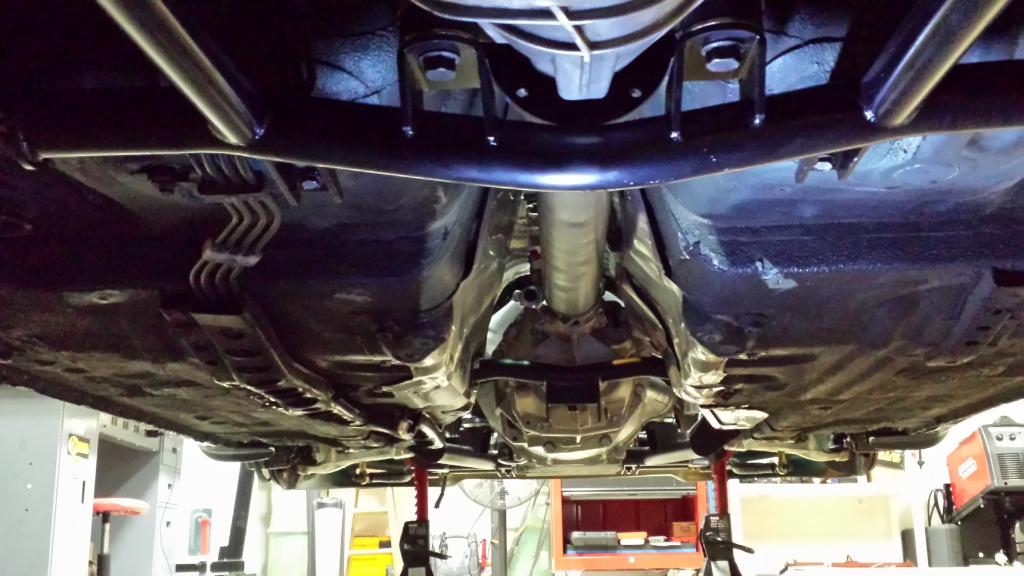
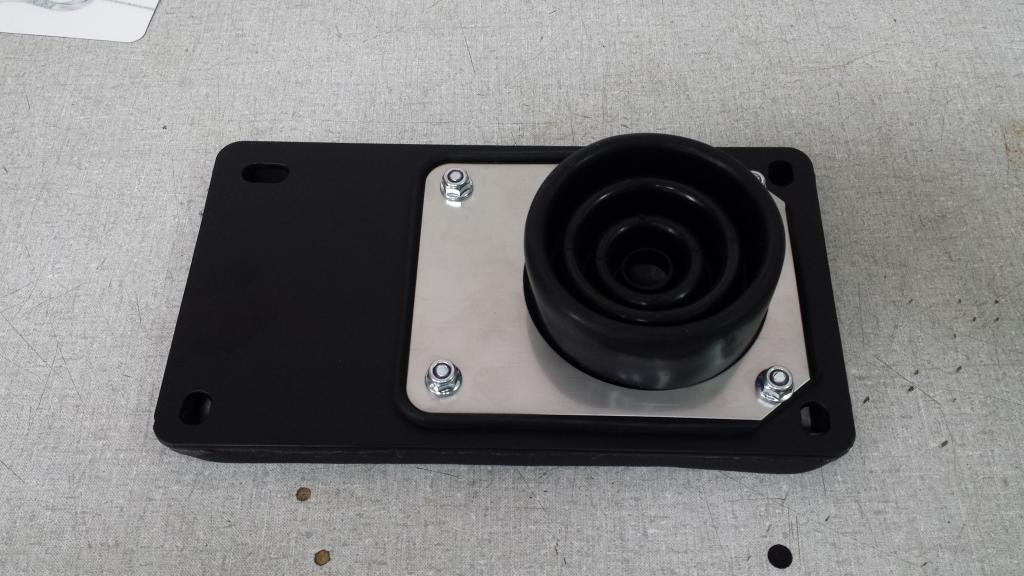
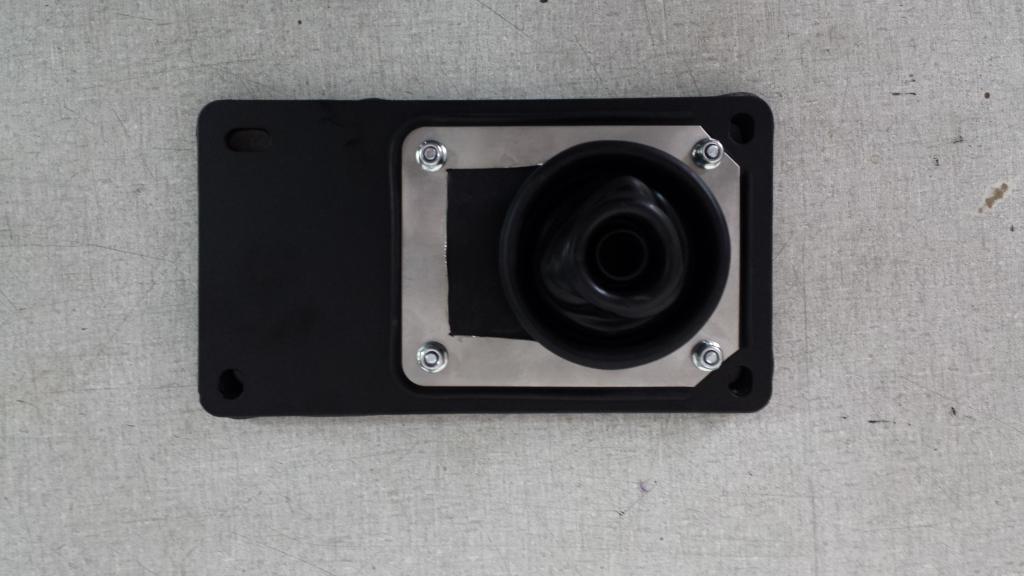
I have had a vibration issue since the swap was first driven. It took me some time to really address it as I spent some time reworking the exhaust, and doing some initial tuning to get the car driveable. But once I started actually looking at the vibration, it was a bit worse then I originally thought. Under 40mph it was pretty much nonexistent but once speed increased it slowly got worse. Any pull beyond 80mph would vibrate the car badly. The vibration had a very high frequency, which pretty much dismissed tire vibration or bent axle. Nonetheless, looked them over with no avail. So I knew it had to be in the drivetrain portion that spins faster. At first, I dismissed it as a likely a bad pinion bearing since the differential was howling pretty loud. As previously stated, in my build thread, it was a low mileage unit from a good seller. After a rebuild, the bearings were found to be fine, BUT the spider gears were chipped, so it wasn't a complete waste of time. Of course, when I bolt up the new differential, nothing changed and the vibration was still present.
- Working Angles
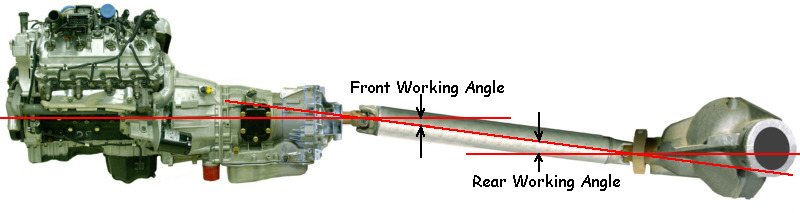
So I started looking closer at my u-joint working angles. They were definitely out of whack. The rules dictate that u-joint angles for the front and rear of my driveshaft must be equal and opposite, less than 3 degrees but not 0 degrees. The closer to 0 the better. Samberg instructions dictate a 5.5" distance from center of the transmission output shaft, to the tranny tunnel surface. After things were mounted, wedged and bolted in, I was sitting at about 6.25". After a little inspection, this was a problem. By changing the pitch of the transmission, it ultimately was changing the front working angle. Furthermore, the pitch of the pinion on the diff was not right either. So it was an easy fix. Added some shims (washers) to each side and got them right where they needed to be. My front and rear working angles now sit perfectly at .5 degrees. Unfortunately, this didn't change a thing....
- Axle ABS Ring
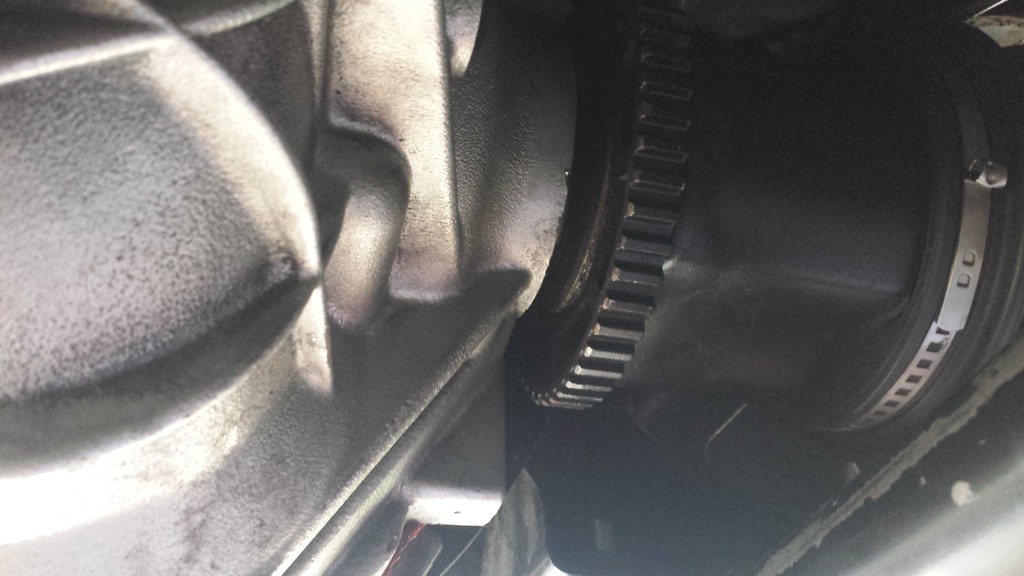
Totally stumped I took an air gun to my pinion bolt while the rear was in the air. I just wanted to see it all move so if anything presented itself. Sure enough, when spinning the diff and the subsequent axles, I could see the inner cobra ABS ring wobbling like crazy. After looking closer, it seemed the ring was pressed on crooked. Why I didn't remove these damn things when I built the axles, I don't know. But, I pulled the axles, removed the ring on both side and took it for a drive!! I was pretty excited and thought for certain I had found the vibration source. Unfortunately, this didn't change a thing....
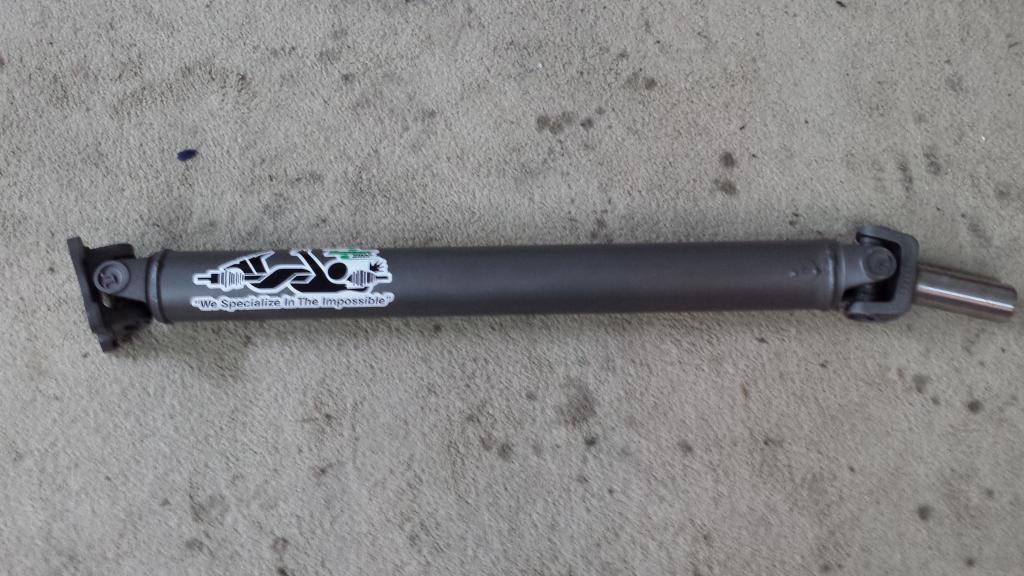
So I was stumped. The transmission is a new Magnum, driveshaft is new from Drive Shaft Shop, diff was freshly rebuilt, axles had no play in the CV, and the rear tires were checked for runout and flat spots just to be sure. So what the F.... Well... I figured I would have the driveshaft balance checked just in case...
- Drive Shaft
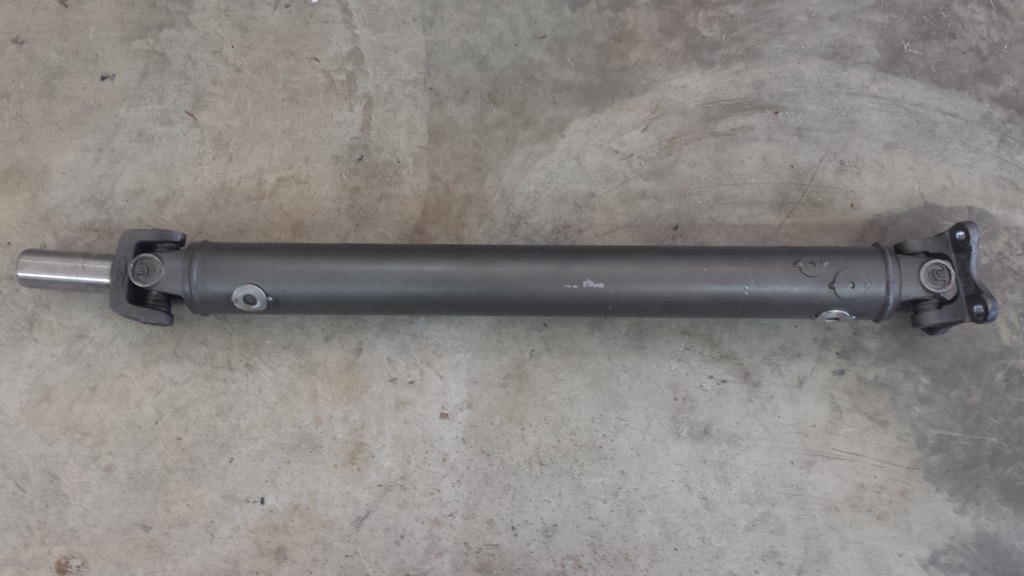
Boom! My brand new DSS driveshaft was out of balance, by a good bit. I was pretty pissed, but also relieved. I had a local shop look it over and they got it sorted. I've had it up to 110mph and it's smooth as silk. I truly couldn't be more happy. You can see from the picture above, the silver washers are the weight the local shop added. FINALLY the car is smooth and drives like it should. Chasing a vibration is one of the most frustrating things I have done. Very happy to have it sorted out.
Well gents, it's been awhile and I have definitely had some developments in how the car has been running and driving.
Vibration
I have had a vibration issue since the swap was first driven. It took me some time to really address it as I spent some time reworking the exhaust, and doing some initial tuning to get the car driveable. But once I started actually looking at the vibration, it was a bit worse then I originally thought. Under 40mph it was pretty much nonexistent but once speed increased it slowly got worse. Any pull beyond 80mph would vibrate the car badly. The vibration had a very high frequency, which pretty much dismissed tire vibration or bent axle. Nonetheless, looked them over with no avail. So I knew it had to be in the drivetrain portion that spins faster. At first, I dismissed it as a likely a bad pinion bearing since the differential was howling pretty loud. As previously stated, in my build thread, it was a low mileage unit from a good seller. After a rebuild, the bearings were found to be fine, BUT the spider gears were chipped, so it wasn't a complete waste of time. Of course, when I bolt up the new differential, nothing changed and the vibration was still present.
- Working Angles
So I started looking closer at my u-joint working angles. They were definitely out of whack. The rules dictate that u-joint angles for the front and rear of my driveshaft must be equal and opposite, less than 3 degrees but not 0 degrees. The closer to 0 the better. Samberg instructions dictate a 5.5" distance from center of the transmission output shaft, to the tranny tunnel surface. After things were mounted, wedged and bolted in, I was sitting at about 6.25". After a little inspection, this was a problem. By changing the pitch of the transmission, it ultimately was changing the front working angle. Furthermore, the pitch of the pinion on the diff was not right either. So it was an easy fix. Added some shims (washers) to each side and got them right where they needed to be. My front and rear working angles now sit perfectly at .5 degrees. Unfortunately, this didn't change a thing....
- Axle ABS Ring
Totally stumped I took an air gun to my pinion bolt while the rear was in the air. I just wanted to see it all move so if anything presented itself. Sure enough, when spinning the diff and the subsequent axles, I could see the inner cobra ABS ring wobbling like crazy. After looking closer, it seemed the ring was pressed on crooked. Why I didn't remove these damn things when I built the axles, I don't know. But, I pulled the axles, removed the ring on both side and took it for a drive!! I was pretty excited and thought for certain I had found the vibration source. Unfortunately, this didn't change a thing....
So I was stumped. The transmission is a new Magnum, driveshaft is new from Drive Shaft Shop, diff was freshly rebuilt, axles had no play in the CV, and the rear tires were checked for runout and flat spots just to be sure. So what the F.... Well... I figured I would have the driveshaft balance checked just in case...
- Drive Shaft
Boom! My brand new DSS driveshaft was out of balance, by a good bit. I was pretty pissed, but also relieved. I had a local shop look it over and they got it sorted. I've had it up to 110mph and it's smooth as silk. I truly couldn't be more happy. You can see from the picture above, the silver washers are the weight the local shop added. FINALLY the car is smooth and drives like it should. Chasing a vibration is one of the most frustrating things I have done. Very happy to have it sorted out.
02-21-16, 05:02 AM
#1024
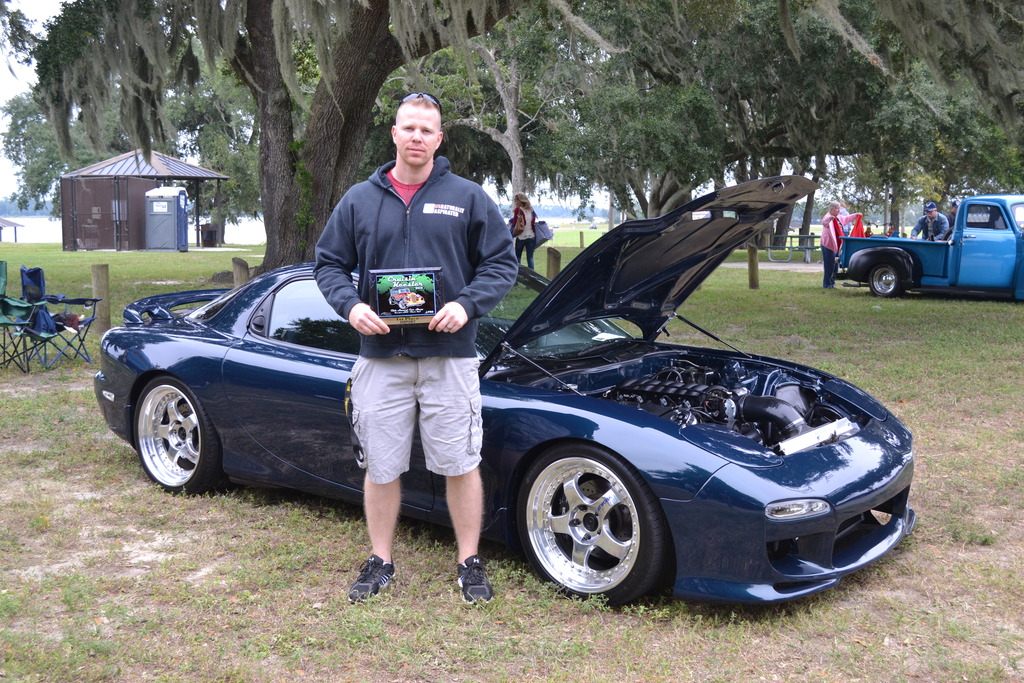
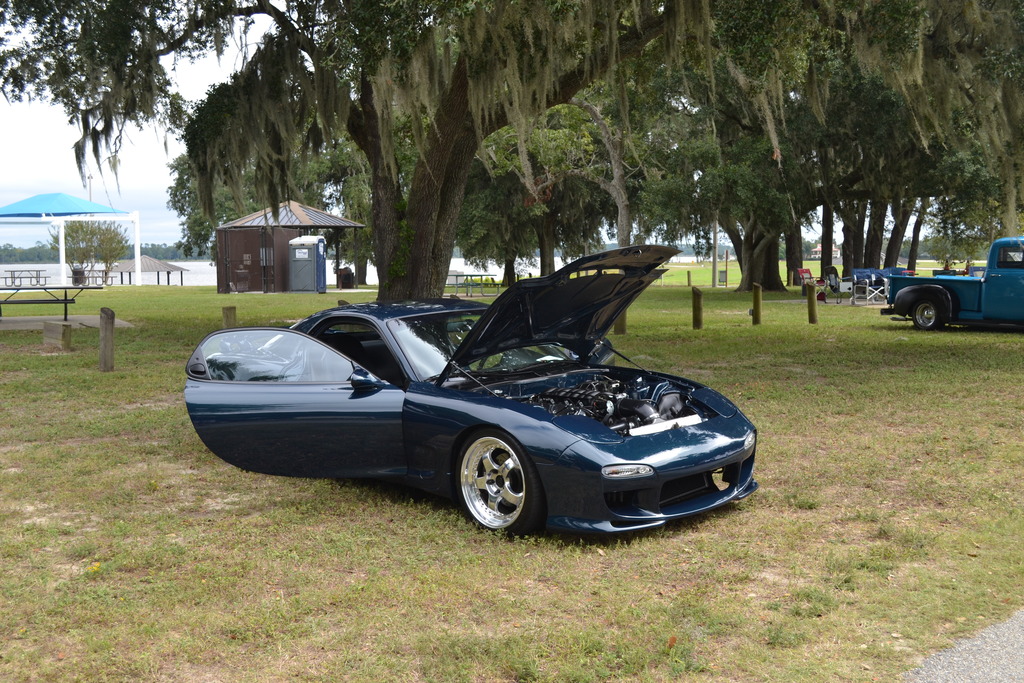
Showtime!
After getting some things sorted, I got a chance to take it out and drive it more! I even got a chance to win a local car show for Best Import. Felt pretty good to get the attention in the sea of muscle cars.
After getting some things sorted, I got a chance to take it out and drive it more! I even got a chance to win a local car show for Best Import. Felt pretty good to get the attention in the sea of muscle cars.
02-21-16, 05:13 AM
#1025
This brings it all up to day fellas. Life is on hold for awhile as I knock out another deployment. Plans for the car when I return...
- Change output shaft seal on Magnum. Pretty sure my driveshaft got it leaking
- TUNE!! My street tuning has been going well as I learn the Holley and more about tuning. The car pulls hard safely, but it needs a professional's touch, and of course dyno pulls. There are some great options down south for Holley Tuners. I will likely take it to these guys..
Home
- Under tray and front cowling. My bumper has large openings and leaves a lot of space throughout. I plan to build an under shield and side vents to protect my coils, direct air to the radiator, and keep you from seeing through the bumper to the ground.
- Holley 3.5" LCD. It's going to be the perfect add for what I need. It's very similar to a Power Commander. Supplies basic tuning functions, a gauge display, stylus, and data logging straight to an SD card. Pretty trick.
- Standard stereo receiver - With the LCD I will have access to all the ecu data and gauges I need. With that, I will install a nice clean stereo. Nothing crazy, just something that is quality.