When you click on links to various merchants on this site and make a purchase, this can result in this site earning a commission. Affiliate programs and affiliations include, but are not limited to, the eBay Partner Network.
Not RX-7 related, but ran a 1/2 marathon today. Finished in 1 hour 57 minutes. Not bad for a 54 year old guy. Will work on the RX-7 today after I recoup a little.
Jeez. I walked five miles in two hours earlier this year and I was sore for a week...
On the FB front: Bought a grease gun, a needle adapter, and a tube of "Green Death" hyper-sticky waterproof megagrease, and packed the new wheel bearings for the '81. Then installed the rotors, nearly-new calipers and front hoses, and used my Mityvac to bleed the completely-empty brake system. Then put the driveshaft back on, and mocked up the new intake manifold setup. Need to get some more 10x1.25 bolts to plug off the OMP injection holes, see if I have a ACV blockoff plate somewhere, and I'd really like to eliminate the 6 port rods as well, but I stopped there for the day.
I just installed a new aem wideband last week on my car. I have a 13b with a 51 IDA in the car. Does the wideband need to be calibrated? Or is it good to go straight out the box?
I just installed a new aem wideband last week on my car. I have a 13b with a 51 IDA in the car. Does the wideband need to be calibrated? Or is it good to go straight out the box?
Thanks,
Ernie
my innovative one needed to be calibrated on first time install. and is good unless disconnect it while powered (or something like that). i would take a look at the manual, should clearly state it. and if you don't have it, look it up online...google is incredible. lol.
Just placed an order, on eBay, for some 15x7 4x110 Konig Rewinds in graphic with machined lip from Discount Tire Direct. They have them for $100 off. Not bad for $356 + free shipping.
Last edited by KansasCityREPU; 10-19-17 at 10:10 PM.
Put the interior the rest of the way together on the '81. Somehow the steering wheel trim piece is rubbing hard against the column surround so I left that loose until I get a good flat file to shave it down.
Finished making a new air filter for the Racing Beat Dell'Orto air cleaner assembly. RB doesn't offer replacement elements. After hunting around trying to figure out what K&N might work for the goofy design, I found out that you can buy air filter foam in bulk. You have to cut it to fit and then glue it together with an adhesive that won't melt the foam. I used weatherstrip adhesive. The first version didn't come out as good as OCD-me would like, I could have made it fit more tightly. I'll probably do it a second time, this time with photos if anyone is interested, but for now I will call it good enough.
Still waiting for the replacement master cylinder to some in (bought an actual NEW one) and still looking for a flange with 80mm bolt centers so I can attach some sort of exhaust to the manifold downpipe. Probably going to have to make that one. Once the exhaust and brakes are sorted, the wheels can go back on and it can sit on the ground for the first time in a year or so.
More progress on the '81. After falling flat on my *** last week at work, my range of motion has been pretty crappy, but tonight I was able to roll under the car and connect the rear oil line to the engine. Was happy that the line bracket bolts up to the 13B just fine. Spun the oil filter on and now the engine is oil tight and can be safely cranked over.
Turned my attention to the intake manifold. Tried to remove the actuator rods from the lower manifold, and the screws wouldn't budge. I didn't feel comfortable leaving them flapping in the breeze, so I did a first for me and put the sleeves back in and put the actuators on. Not sure how I will control them but they are bolted up at least, first things first. Found some 10x1.25 bolts in a box of stuff, a pair of copepr washers in another box of stuff, and blanked out the manifold-side oil ports. Borrowed the ACV blockoff plate from the original 12A's manifold and stuck that on. All I need to do now is cap off the coolant hoses and replace the 13B's temp sensor with a 12A's choke switch.
Painted the wiper arms with some semi-gloss black, and cleaned more guck from the windshield and roof in preparation for putting trim back on. Looked in the big box of trim parts I acquired and realized that I'm missing all of the little plastic retainers that hold the windshield trim to the body. Oops.
So, needed: All of those little clips, the finishing piece that bridges the two upper windshield trims, a FC fan and fan adaptor, an FC air pump mounting bracket (and air pump if 12A won't work), and I'd like to find an '81-82 engine harness so I don't have to hack up my 12A one.
Just placed an order, on eBay, for some 15x7 4x110 Konig Rewinds in graphic with machined lip from Discount Tire Direct. They have them for $100 off. Not bad for $356 + free shipping.
Nice, you will like the Konigs. Easy to clean and look great. I got mine on Amazon for about that price, I think they were $105.00 per wheel. I do know the Dunlop Start II cost more than the wheels.
More progress on the '81. After falling flat on my *** last week at work, my range of motion has been pretty crappy, but tonight I was able to roll under the car and connect the rear oil line to the engine. Was happy that the line bracket bolts up to the 13B just fine. Spun the oil filter on and now the engine is oil tight and can be safely cranked over.
Turned my attention to the intake manifold. Tried to remove the actuator rods from the lower manifold, and the screws wouldn't budge. I didn't feel comfortable leaving them flapping in the breeze, so I did a first for me and put the sleeves back in and put the actuators on. Not sure how I will control them but they are bolted up at least, first things first. Found some 10x1.25 bolts in a box of stuff, a pair of copepr washers in another box of stuff, and blanked out the manifold-side oil ports. Borrowed the ACV blockoff plate from the original 12A's manifold and stuck that on. All I need to do now is cap off the coolant hoses and replace the 13B's temp sensor with a 12A's choke switch.
Painted the wiper arms with some semi-gloss black, and cleaned more guck from the windshield and roof in preparation for putting trim back on. Looked in the big box of trim parts I acquired and realized that I'm missing all of the little plastic retainers that hold the windshield trim to the body. Oops.
So, needed: All of those little clips, the finishing piece that bridges the two upper windshield trims, a FC fan and fan adaptor, an FC air pump mounting bracket (and air pump if 12A won't work), and I'd like to find an '81-82 engine harness so I don't have to hack up my 12A one.
Parts needed:
Give this windshield trim kit a try,have used successfully on three 1st gens now,reasonable price. I think the last one(from ebay) cost about $15 with shipping. Has clips necessary for all the trim.
Nice! I was happy to see that Atkins has the trim clips I need at $4.75 each, and they tell you how many you need. Still need the center finishing piece though.
Sad to say i actually paid nearly that apiece for several (5) of those clips a couple years ago. I bought three of these kits when i found them,just because...need to find someone doing a part out and see if they still have that center piece. There's a 1st gen in a boneyard not far from me that iv'e picked rather clean,i should look and see if w/shield trim is still on it.
The junkyards around here scrap cars after they have been on the lot for two weeks and anything over ten years old goes straight to the shredder without going to the lot at all. There isn't enough money in cars that old to make the real estate pay for itself, the money is in insurance-fed bodywork.
When I go junkyarding, I search on car-part.com and usually end up driving an hour-plus away once I find something. It's usually easier to just look for whatever I want on eBay.
Did today: Installed air pump/fan/fan shroud, found out that the strut tower bar won't fit a 13B without modification. Installed GSL-SE master cylinder after adjusting the brake booster for minimal endplay. It was something like .060" endplay, now it is "minimal". Went home after that because I started feeling like crap and didn't feel like trying to bleed the system out.
I looked at mine in the garage today. Gonna fire it up again for maybe one of the last times before winter in the next week here, sad day.
Oh well, it'll be back better than ever next season
'81: Pumped 7 gallons of brownish red sludge out of the fuel tank, for the third time. I hate to admit it but I may have to drop the fuel tank and get it boiled out. I really don't want to do this because I fear the sending unit may not want to come out, and every time I've had a tank boiled out it came back full of pinholes. Depressed by that, I changed tacks and went back to being depressed by my inability to find an exhaust flange that is 3.25" center-center, so I'm going to give up and just cut the flange off of the 12A downpipe and sleeve it for a slip fit connection to the 2" Magnaflow muffler I bought to use as a presilencer.
'84: Armed with finally having acquired a vise to work with (WOW vises are expensive!), I was able to modify the spring seats that I bought for my 9". I had bought Allstar seats that are supposed to clamp over a 3" axle tube. Problem is my axle tubes are flattish on top. So I cut the curved portion off of the bottom of the seats so I can weld them straight to the tubes. (Not using an angle grinder to may long deep cuts on something I'm holding by hand!!!) Then I used the vise again so I could finish making my rod end sleeves. I am going to be using 5/8" ID rod ends, and to mate them up with the 14mm bolts for the chassis, I bought some tube from McMaster-Carr that is a shade over 14mm ID and 5/8" OD. That slips into the rod end and locates the rod end on the bolt. Then I used some 5/8" ID - 3/4" OD tube to make sleeves that fit over that first sleeve, so the bolt tightens against the rod end and holds it in place. The problem was, the chop saw I used to cut the outer tube was less than accurate, so I needed to spend a LOT of time filing the ends flat and to size so that the total width of the assembly is 50mm just like a Mazda link's inner sleeve.
I'm working on modeling a prototype for an oil filter bypass block that will allow me to feed oil in the rear iron at the lower point where the banjo bolt normally goes, up through the block to the oil filter pedestal (remote mounted with dual filters) and then return to the block with another fitting to feed the front main bearing directly. This will allow me to run solid dowels in the engine build this winter, more to come on that later.
After working on my 1985 GSL auto-to-manual conversation for 14 years, I drove my car out into the sunshine yesterday. I still have a lot of little things let to do, but this thing will finally be road worthy this month. It's been a long 14 years. I'll be starting a build thread here shortly with all the details.
After working on my 1985 GSL auto-to-manual conversation for 14 years, I drove my car out into the sunshine yesterday. I still have a lot of little things let to do, but this thing will finally be road worthy this month. It's been a long 14 years. I'll be starting a build thread here shortly with all the details.
Awesome. That must feel so great!
Today I took my mostly stock 83 GSL out for a leg stretch before stowing it away until Spring 2018...it's supposed to snow here tomorrow and they'll salt the roads. That shuts me down until a good warm rain to wash it all away. 45 miles of twisty bits and a highway run.
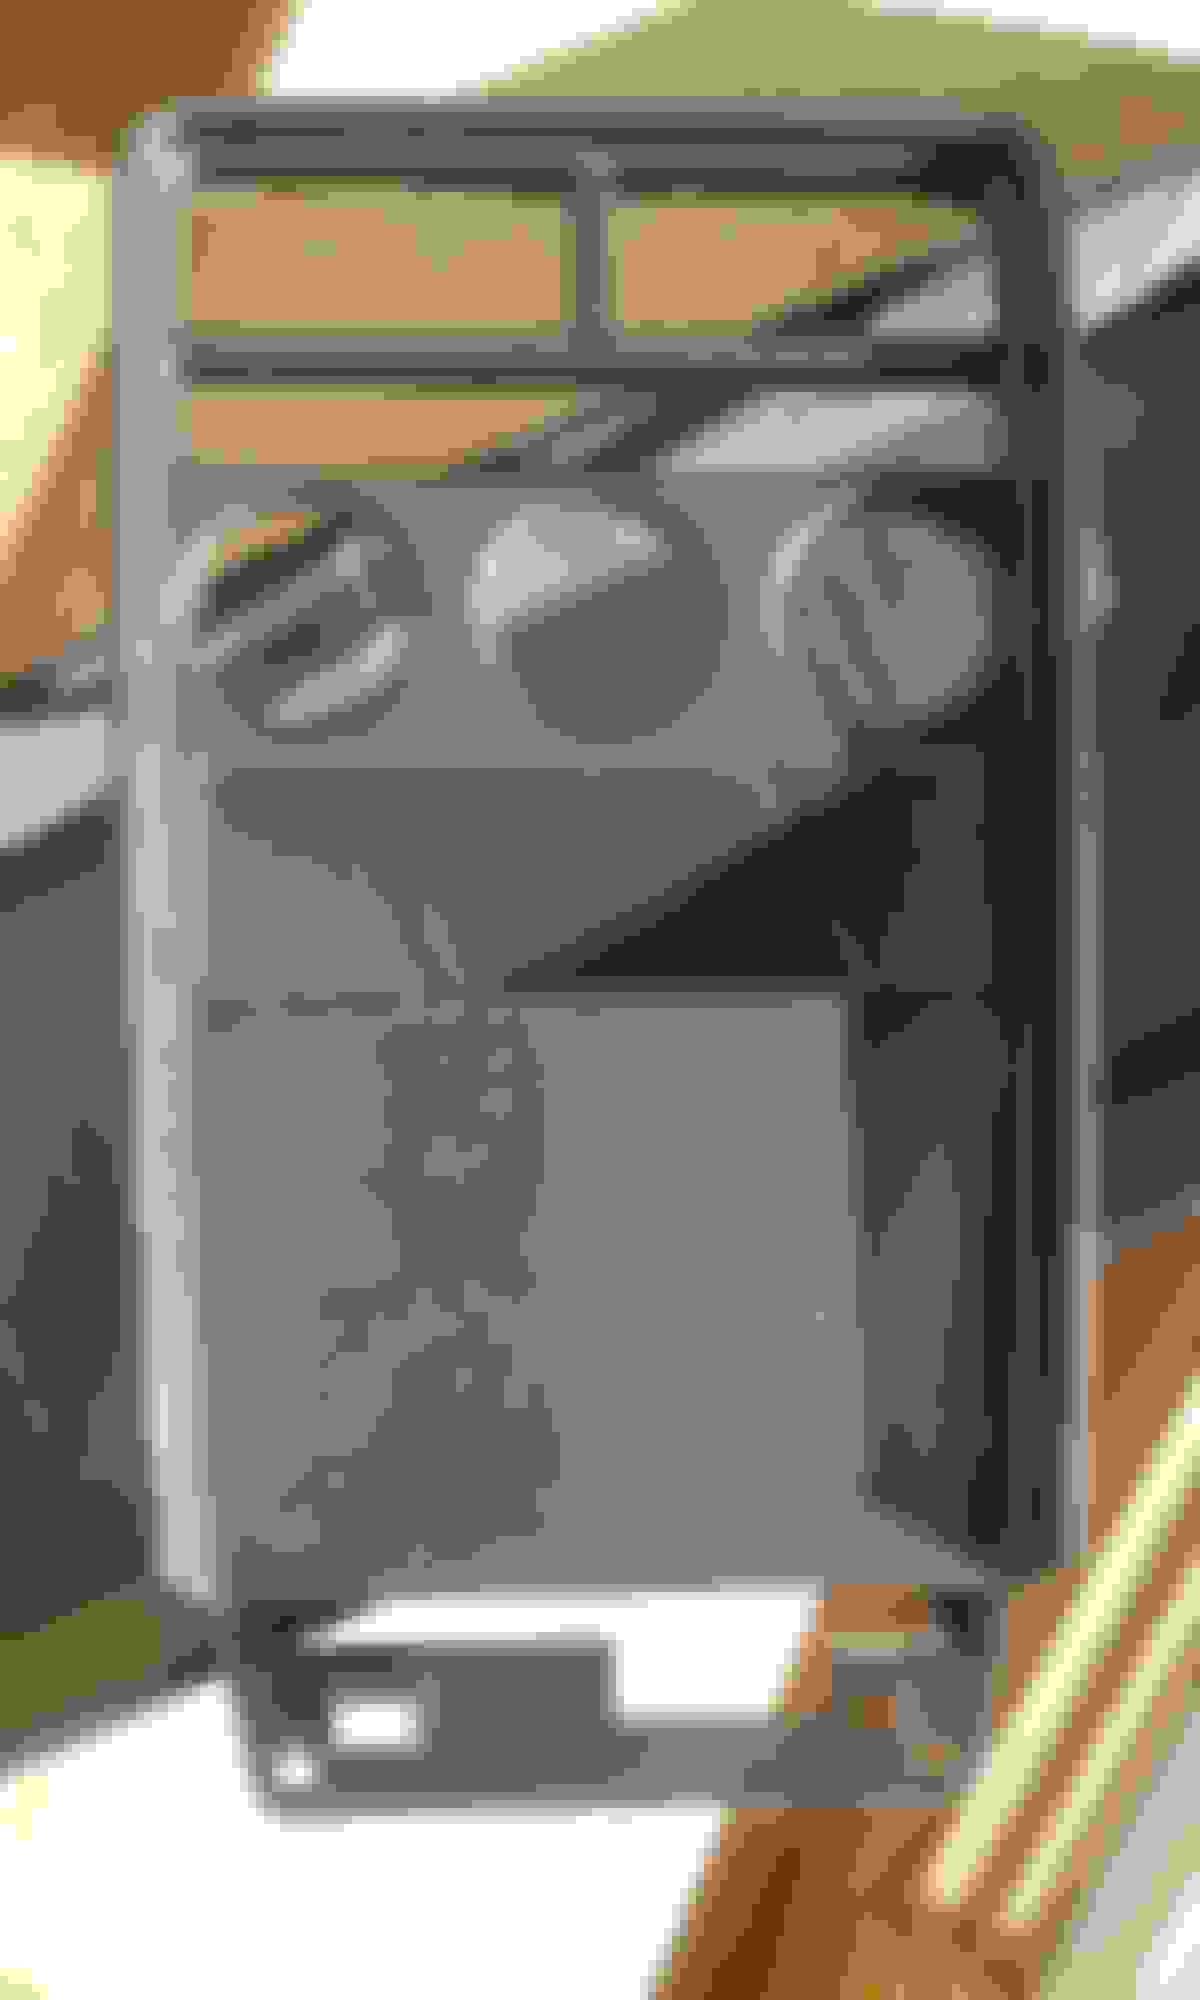
Made a custom center console surround. I still need to cut holes for my three 2" aftermarket gauges under the radio opening. I wanted the option of adding more then three gauges in the future.
I should note that I used a center console surround that was already beat up and still have my pristine factory original.
I took the ashtray and cut off the front and JB welded it in place. Then took a single din radio sleeve and put it in the factory double din opening. Then cut a couple pieces of 1/8 sheet ABS and JB welded in place. Then used bondo to smooth everything out. Sanded to 400 grit, sprayed on some primer to build up. Then sanded with 400 grit again. Plan used Rust-Oleum Universal Metallic paint and primer in one. The color is Flat Soft Iron. It has a very small texture/orange peel which works well. The paint is finicky so don't spray too heavy.
Last edited by KansasCityREPU; 12-09-17 at 04:28 PM.


 09-30-17, 05:16 PM