Officer Mikeys Clean Twin Turbo LS1 FD Build
 10-17-13, 12:58 AM
#1
Junior Member
Thread Starter

Join Date: Jul 2013
Location: Tacoma, WA
Posts: 25
Likes: 0
Received 0 Likes
on
0 Posts
Officer Mikeys Clean Twin Turbo LS1 FD Build
The time has come for me to do what I truly have been dying to build. A Twin Turbo LS1 FD.
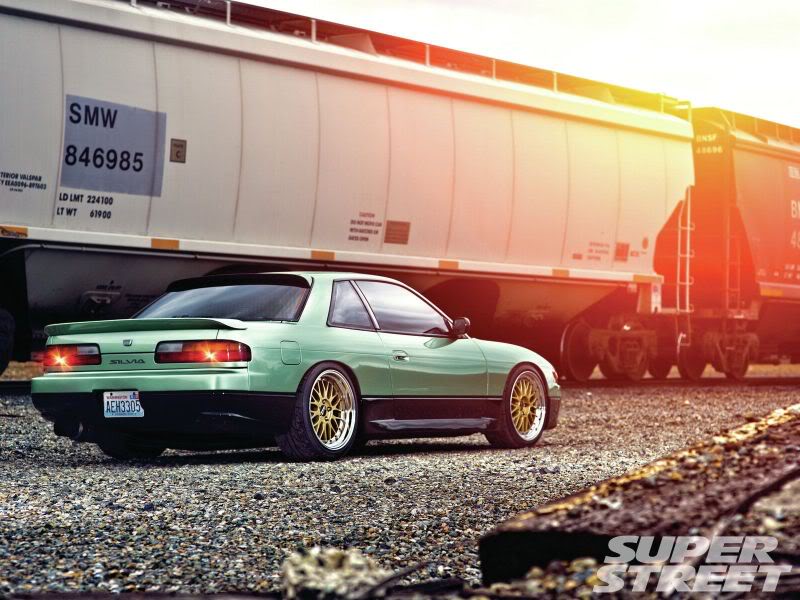
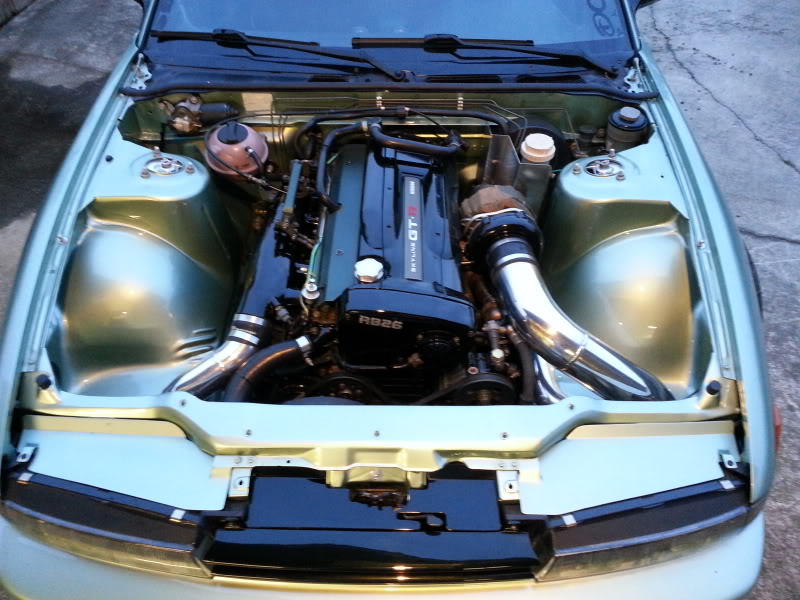
For those of you who don't know my last build was an RB26 S13. It was featured in SuperStreet in November 2012. I'm happy to be moving onto better things. Tune in.
Heres a link to this builds album:
Fdbuild Photos by downgradefab | Photobucket
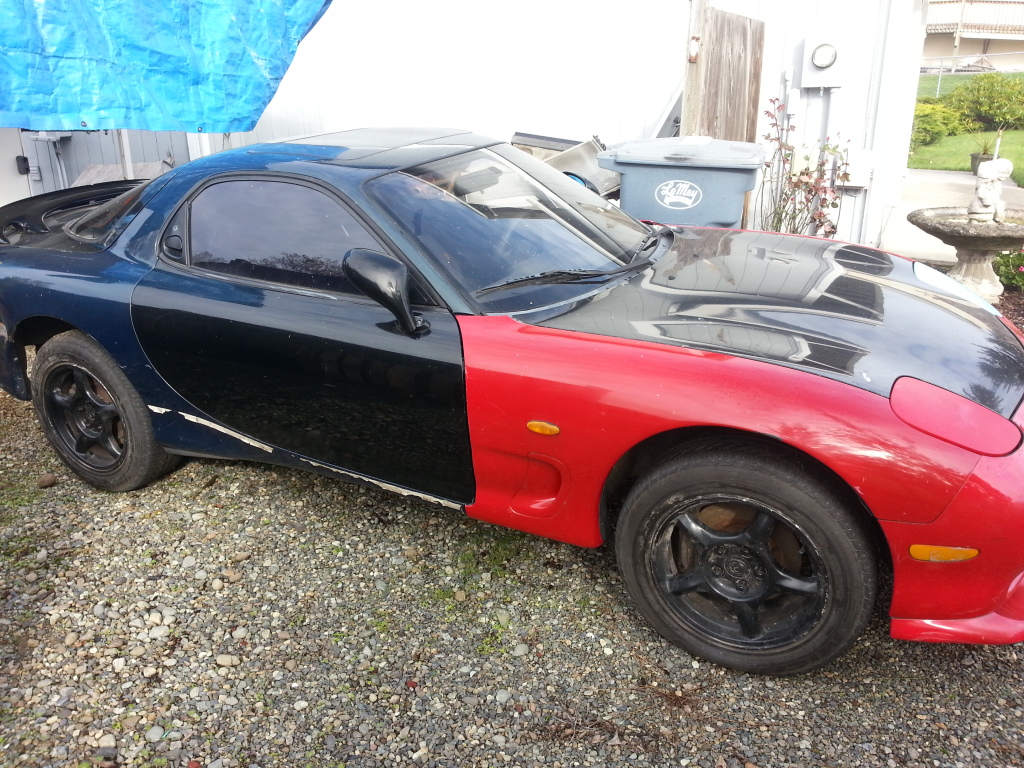
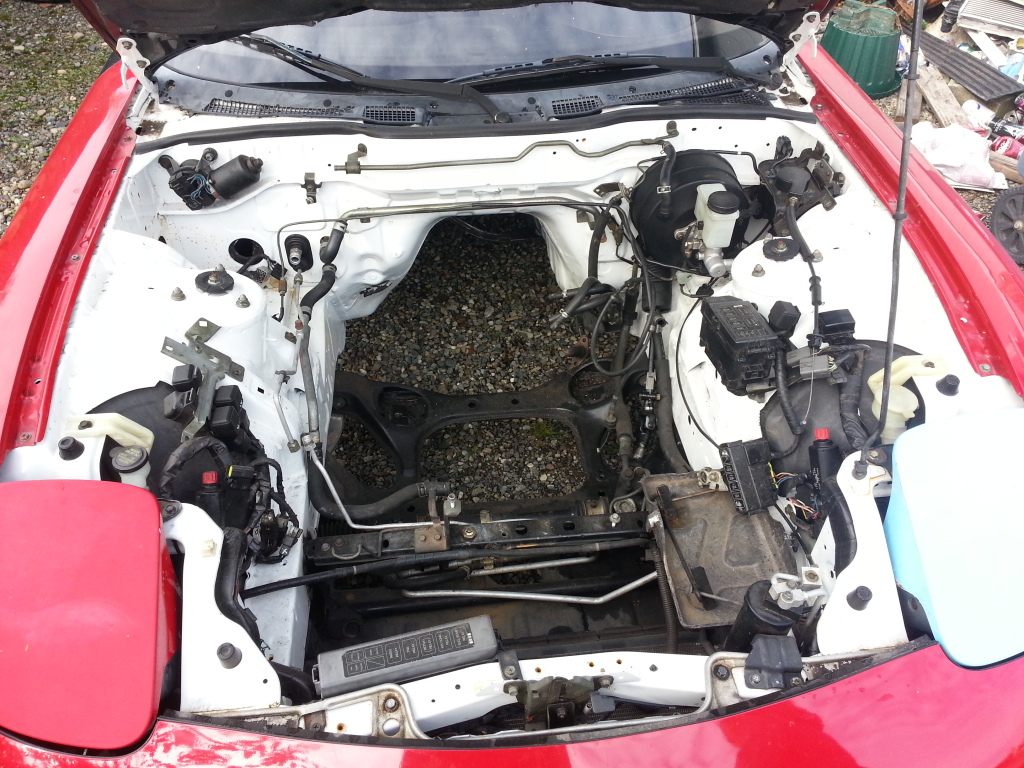
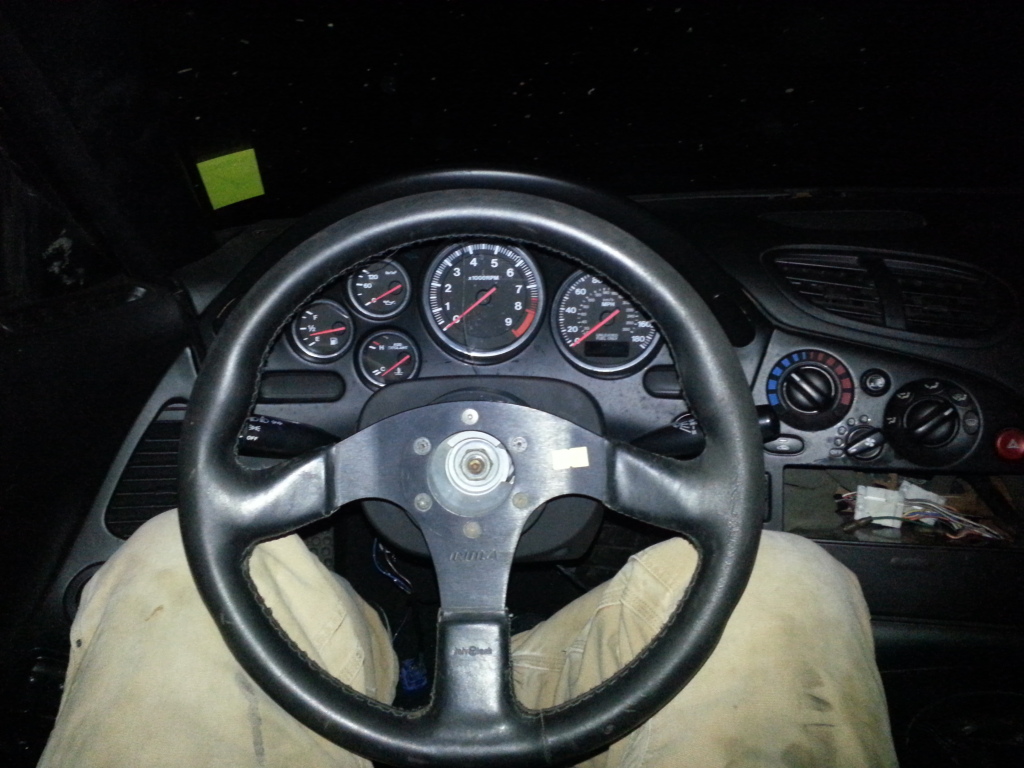
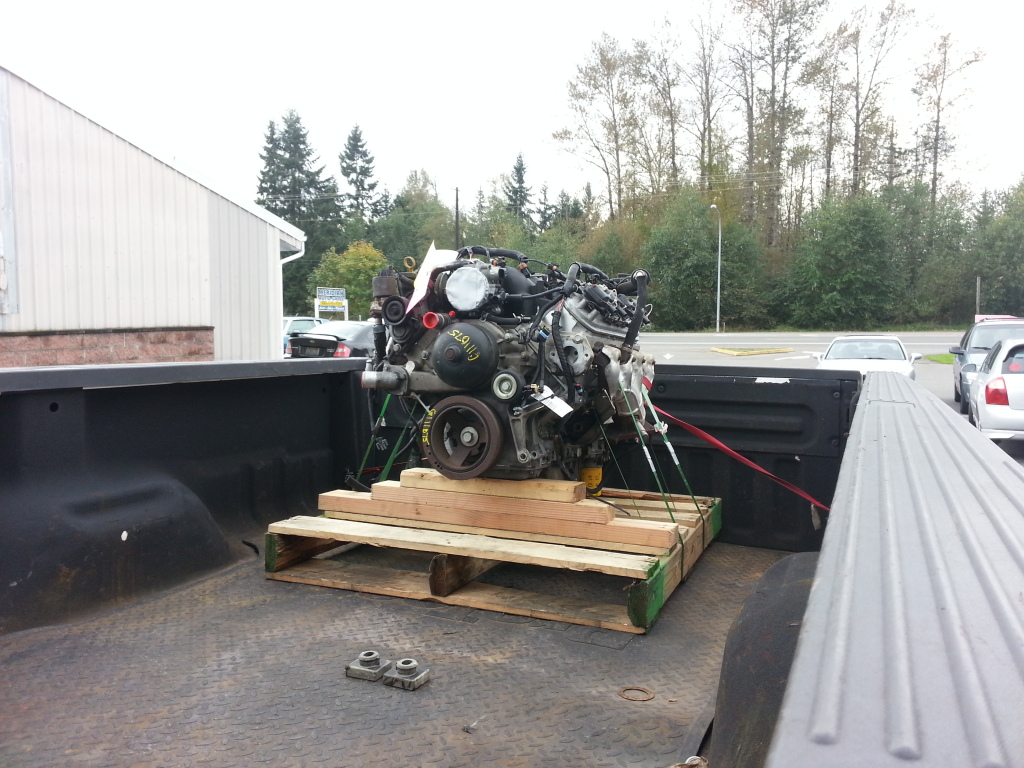
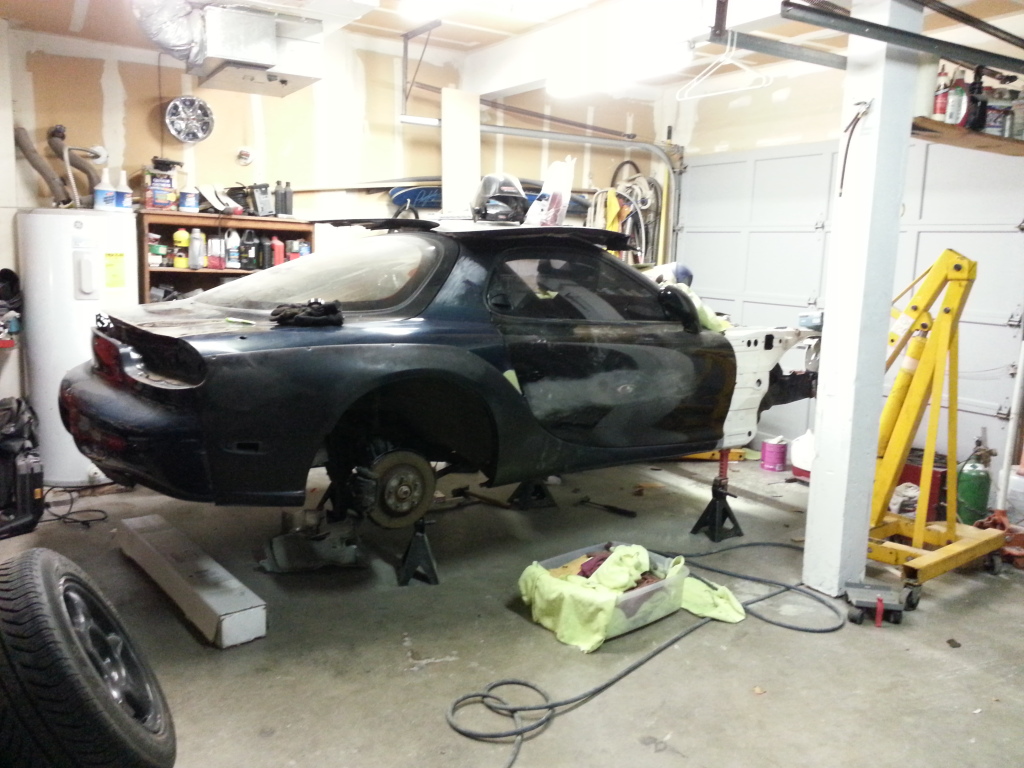
This FD will be the same quality as my S13. I'm a very nit picky guy on how clean I want things. I plan to take what I learned with my s13 and build something far better. I've got my hands on Ls1+Tranny set already. And just yesterday I picked up a straight 1993 Roller. The roller was purchased from a friend so I know its history. It was a bare FD that was put together with stuff from a wrecked FD among spare parts lying around. He had the engine bay painted and I believe was hoping to do an LS swap himself. Its multiple colors on the outside but that doesn't matter because I'm stripping her down and painting the whole car. As of right now my schedule in my head is put the engine and tranny in and fit it exactly where I want it then pull it out and begin body work. My s13 I painted the engine bay, put the engine in, tuned it, and then painted the outside. With this car I'm going to mach up the engine, pull it out, and do the engine bay and outside paint all at once. My goal is to have the car ready by next summer. Feel free to sit back and subscribe. The build starts now. Heres some pics of the goodies I have so far.

For those of you who don't know my last build was an RB26 S13. It was featured in SuperStreet in November 2012. I'm happy to be moving onto better things. Tune in.
Heres a link to this builds album:
Fdbuild Photos by downgradefab | Photobucket
This FD will be the same quality as my S13. I'm a very nit picky guy on how clean I want things. I plan to take what I learned with my s13 and build something far better. I've got my hands on Ls1+Tranny set already. And just yesterday I picked up a straight 1993 Roller. The roller was purchased from a friend so I know its history. It was a bare FD that was put together with stuff from a wrecked FD among spare parts lying around. He had the engine bay painted and I believe was hoping to do an LS swap himself. Its multiple colors on the outside but that doesn't matter because I'm stripping her down and painting the whole car. As of right now my schedule in my head is put the engine and tranny in and fit it exactly where I want it then pull it out and begin body work. My s13 I painted the engine bay, put the engine in, tuned it, and then painted the outside. With this car I'm going to mach up the engine, pull it out, and do the engine bay and outside paint all at once. My goal is to have the car ready by next summer. Feel free to sit back and subscribe. The build starts now. Heres some pics of the goodies I have so far.
Last edited by dgfab; 03-13-15 at 09:31 PM.
 10-17-13, 01:27 AM
#2
Junior Member
Thread Starter
Join Date: Jul 2013
Location: Tacoma, WA
Posts: 25
Likes: 0
Received 0 Likes
on
0 Posts
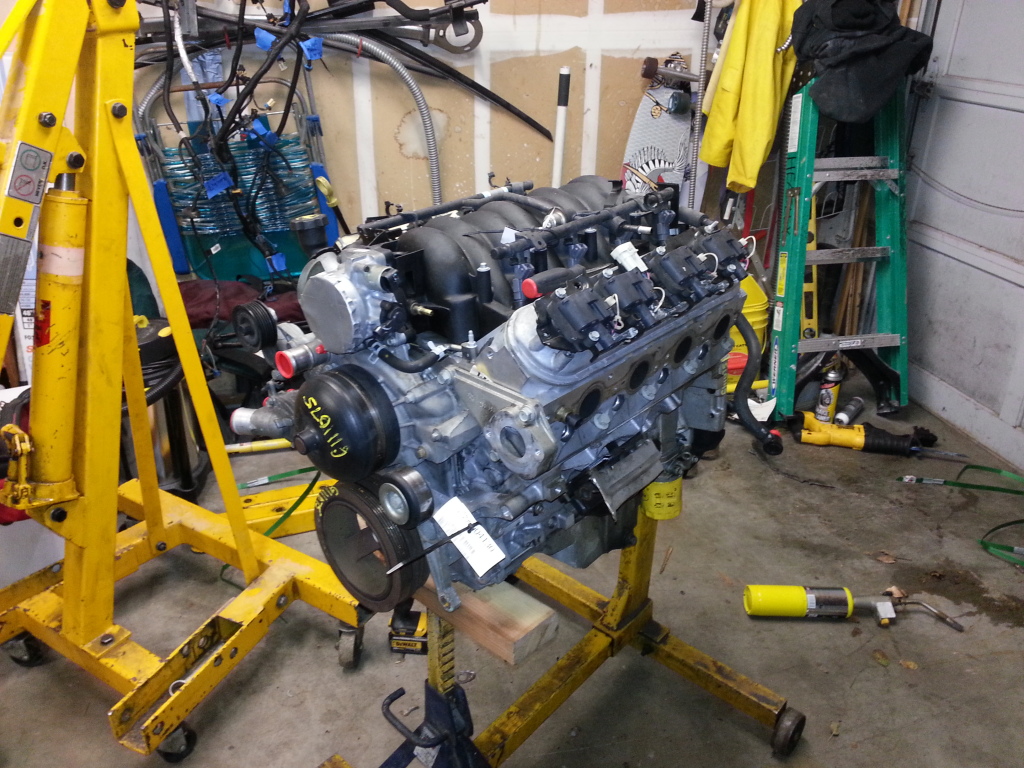
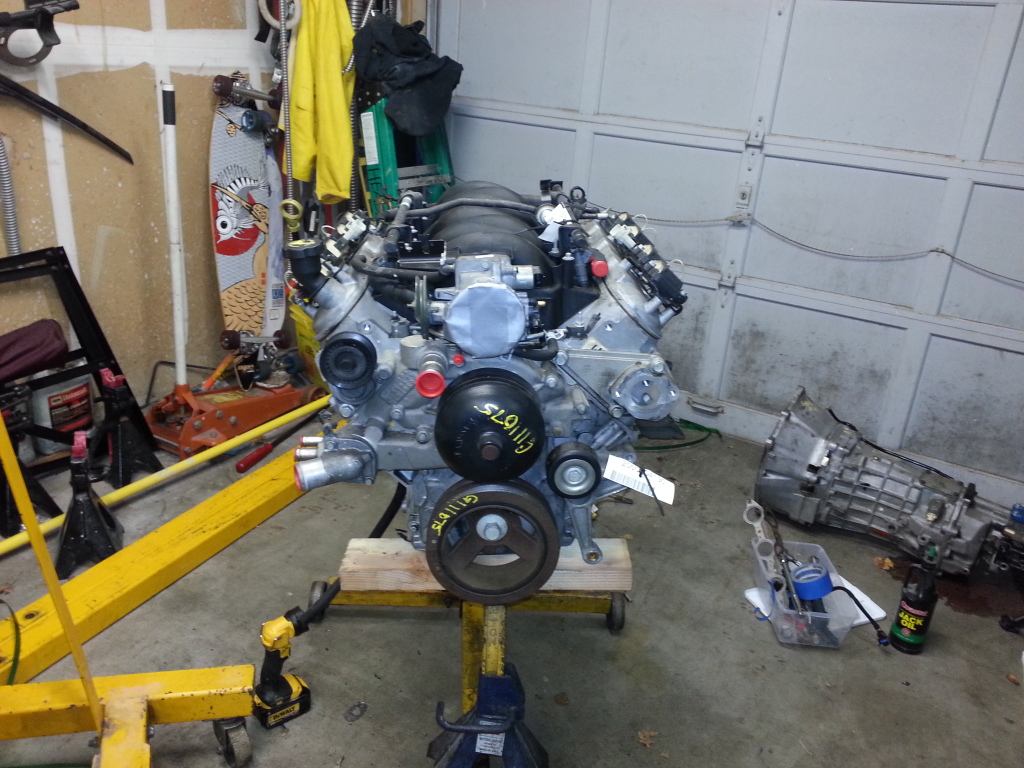
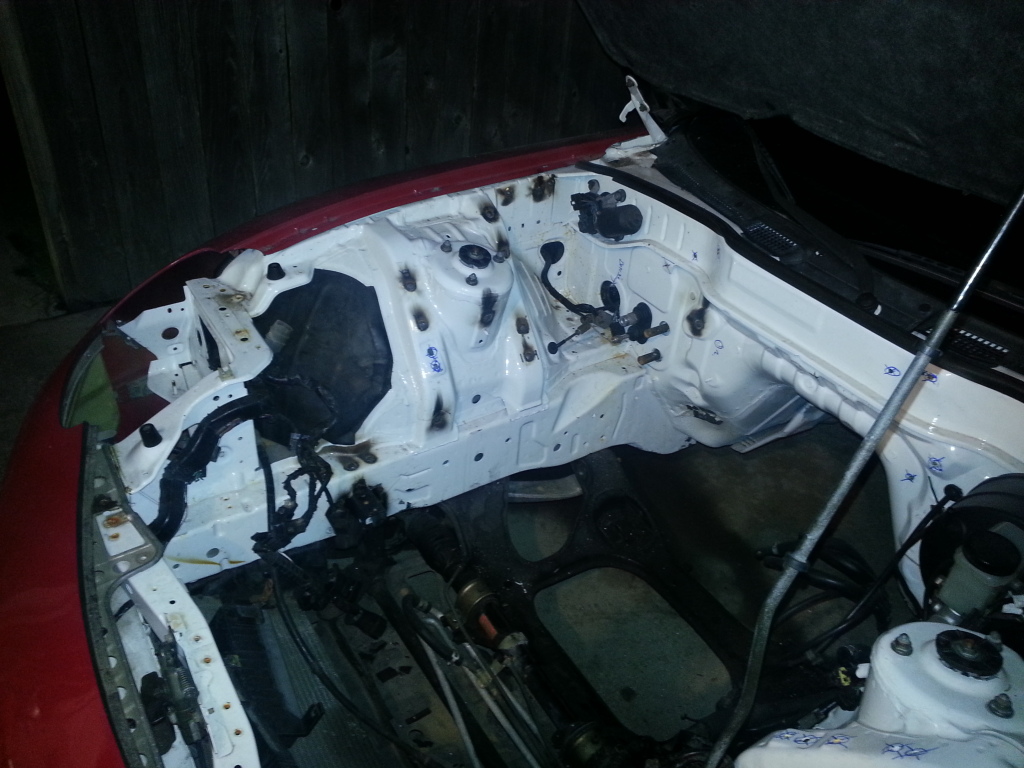
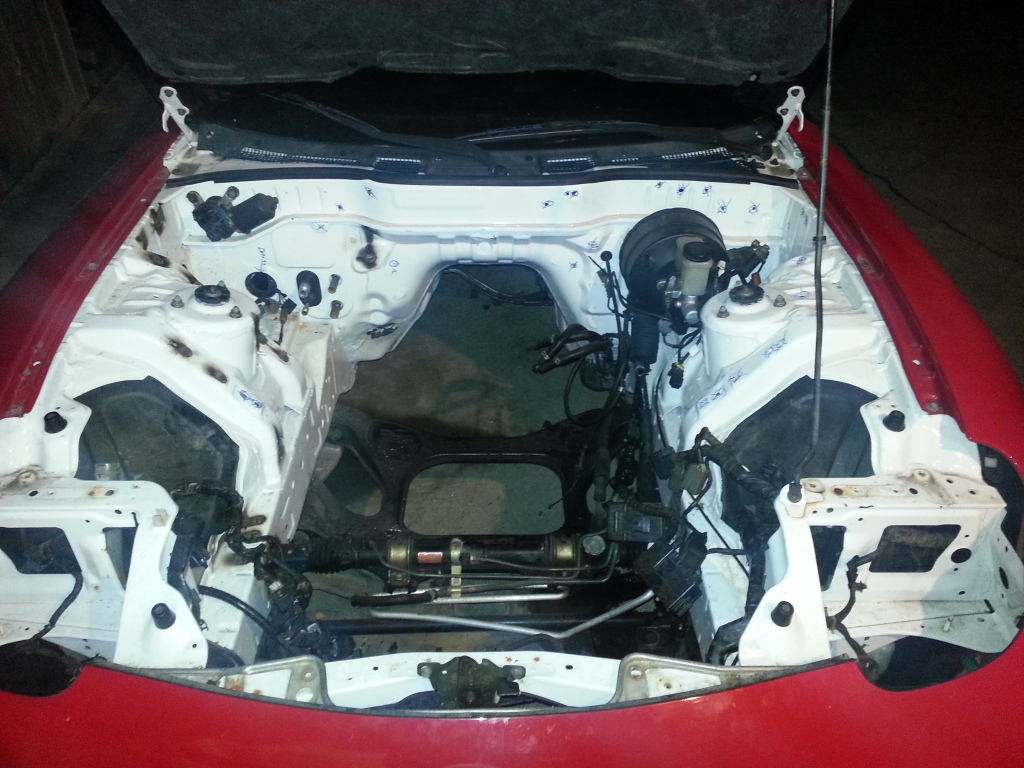
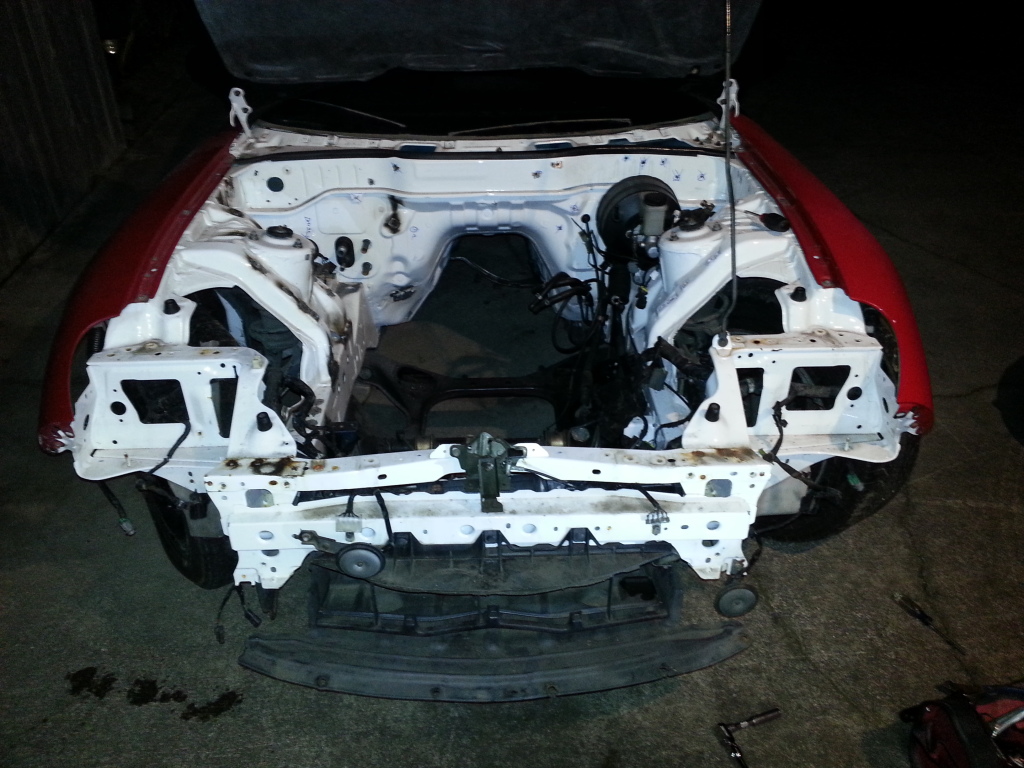
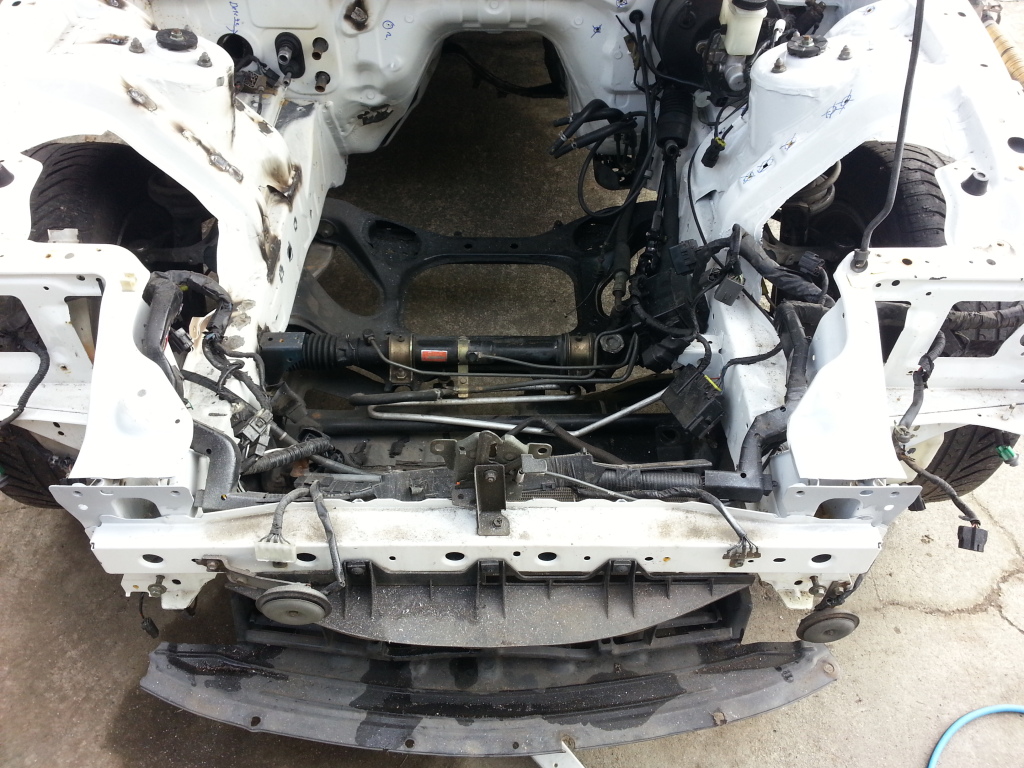
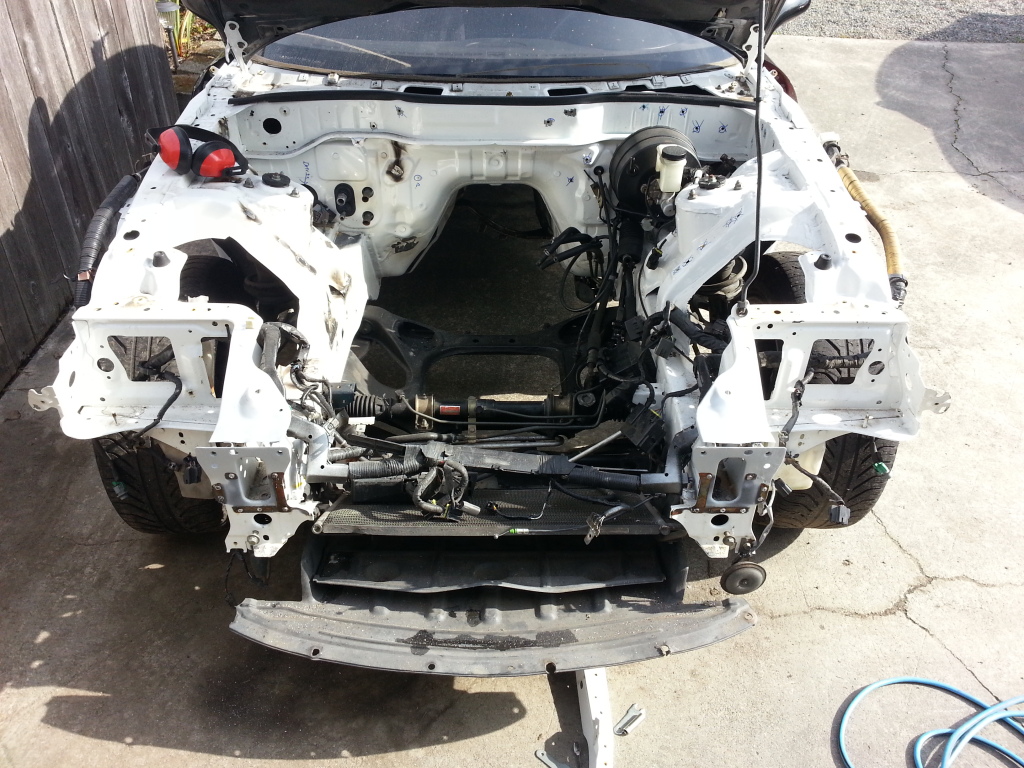
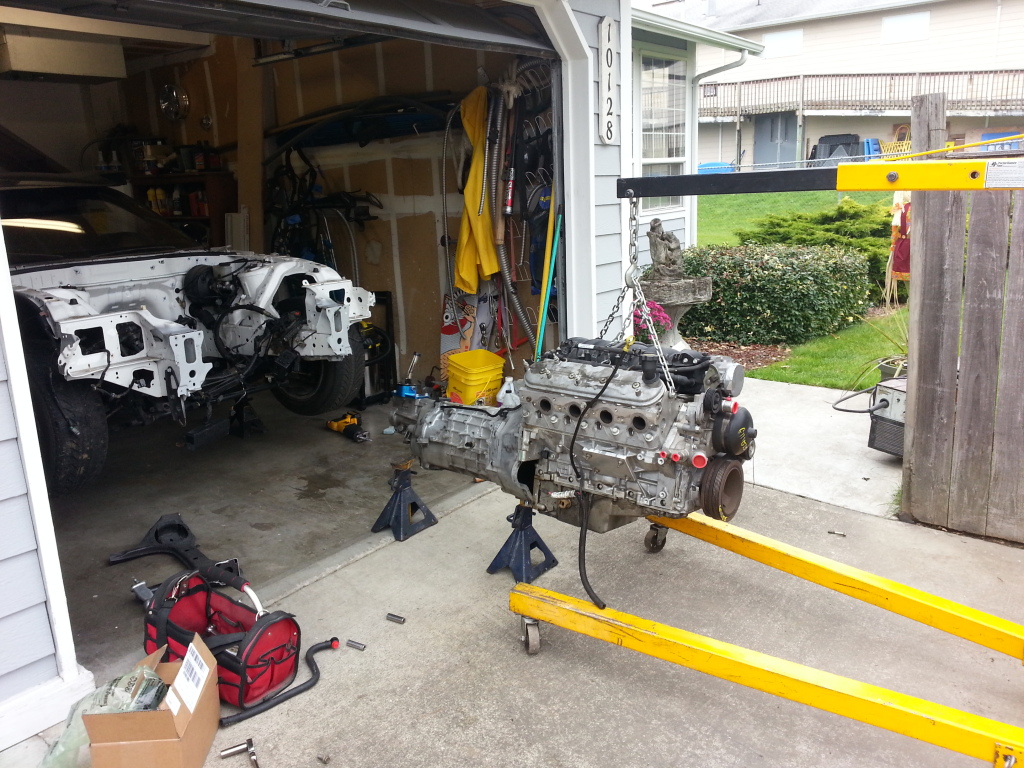
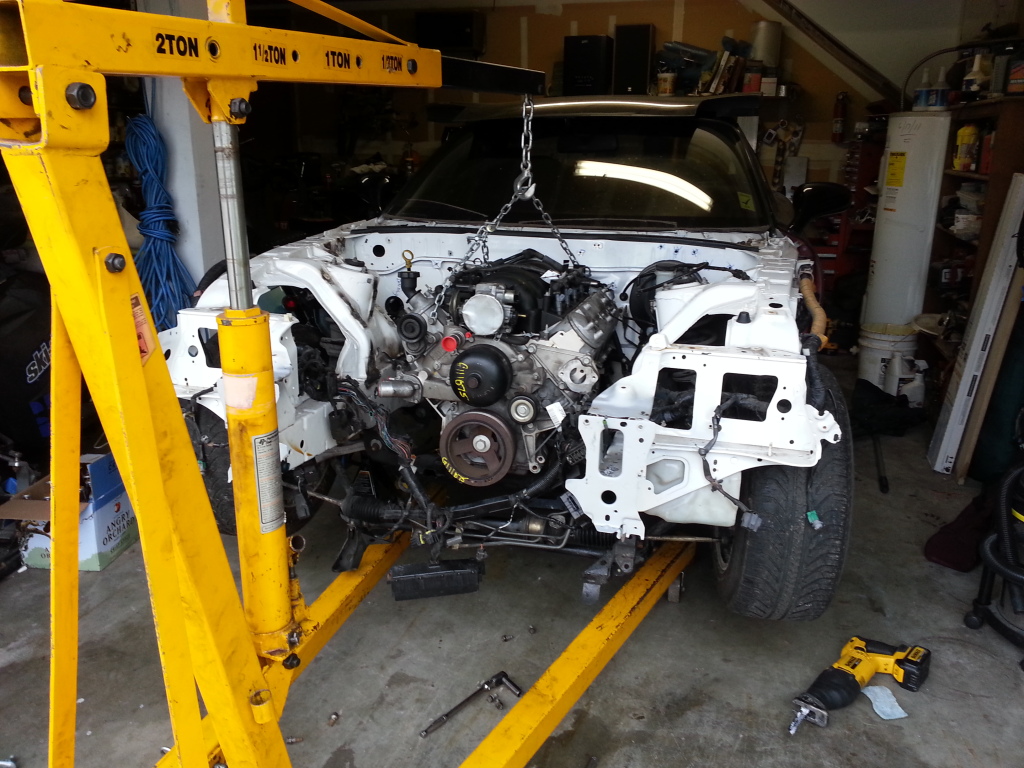
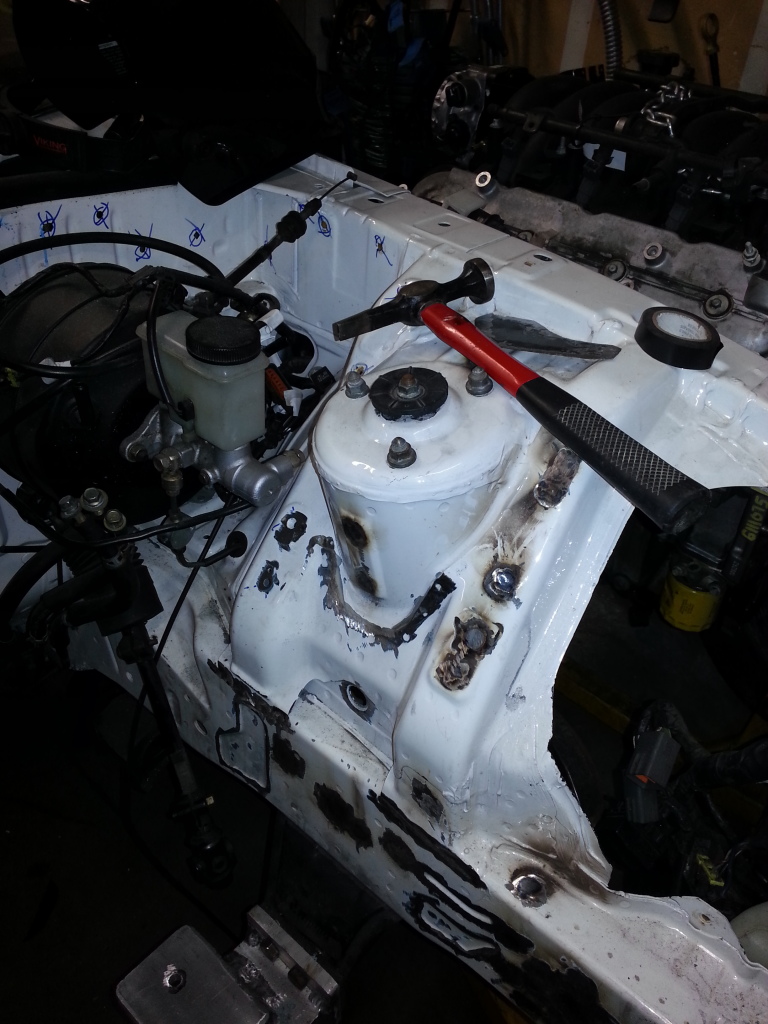
I've had the week off so I've been puttin in work. The upper tie bar replacement the body shop did on this car was poop. It was all rusted so I've been drilling spot welds, pull panels apart, removing rust, spraying with weld through primer, and welding parts back up. I did however make the most awesome modification ever. The two pieces directly in the front that hold the hood latch I drilled through the spot welds and tacked nuts on the back and make it removable via bolts. The pictures will show its awesome ness. I've been welding up holes burning time tell my mounts got here. Today I got the engine on stands in the bay. Tomorrow I will start to build the new cross member and mounts. For those of you who don't know I am a fabricator, a do it yourself, a picky sob. I don't like how far forward most mount kits put the engines and I don't like spending the extra mula on something I enjoy making myself.


 10-18-13, 10:27 PM
#6
Mostly stock
iTrader: (5)
Join Date: Dec 2005
Location: Houston
Posts: 381
Likes: 0
Received 0 Likes
on
0 Posts
Exactly how far back do you want the motor? I cant even put my finger between the back of the intake manifold and the firewall lip. Even if you shave the lip off and mount it further rearward you're only gaining a whopping 1/2." If you want to make it yourself thats cool, but dont say most kits mount it far forward because thats simply not true.
10-19-13, 02:19 AM
#7
Junior Member
Thread Starter
Join Date: Jul 2013
Location: Tacoma, WA
Posts: 25
Likes: 0
Received 0 Likes
on
0 Posts
Most* mount kits put the engines to far forward. From what I hear the Samburg kit puts it just a hair further forward then I put it. And yes I do enjoy fabricating. I love building my own stuff. I hate buying Joe blows turbo kit or Joe blows mount kit or Joe blows catch can, but obviously I can't make everything lol. Thats part of the reason why I sold the s13 is cause I wanted a new creation. I can't afford the s13 and a new car so it had to go. lol. I took the lip off the firewall and put the intake manifold about a half a centimeter away from it. If I wanted to do a lot of work I'd put the back two cylinders inside the firewall, however this isn't a race car.
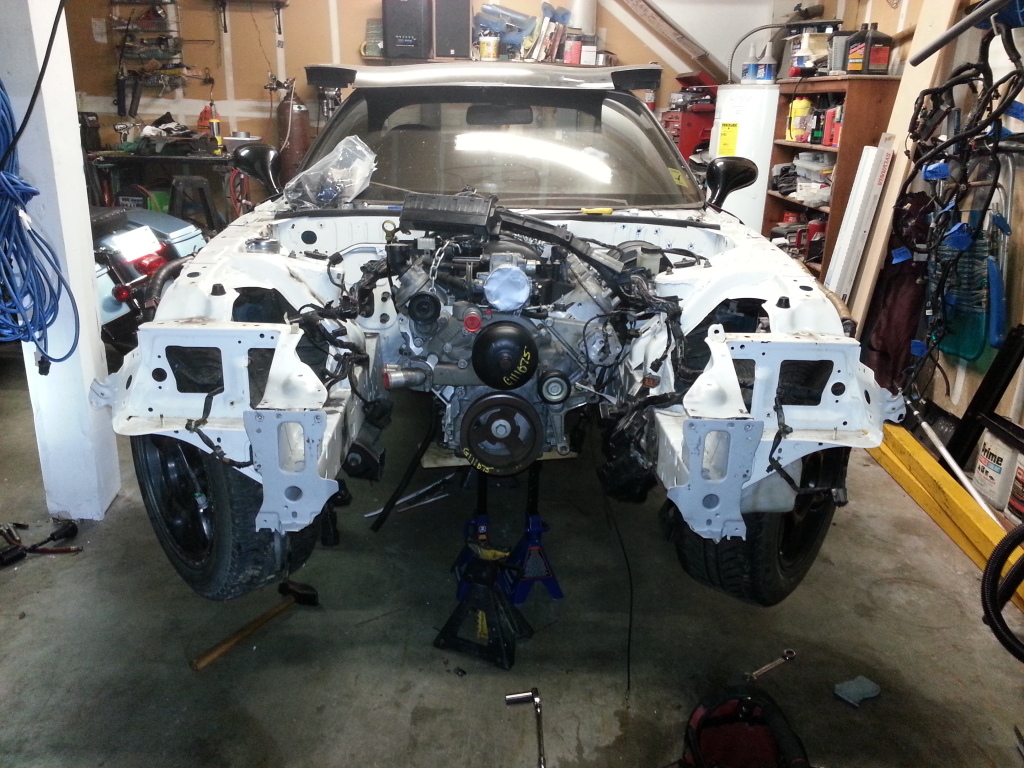
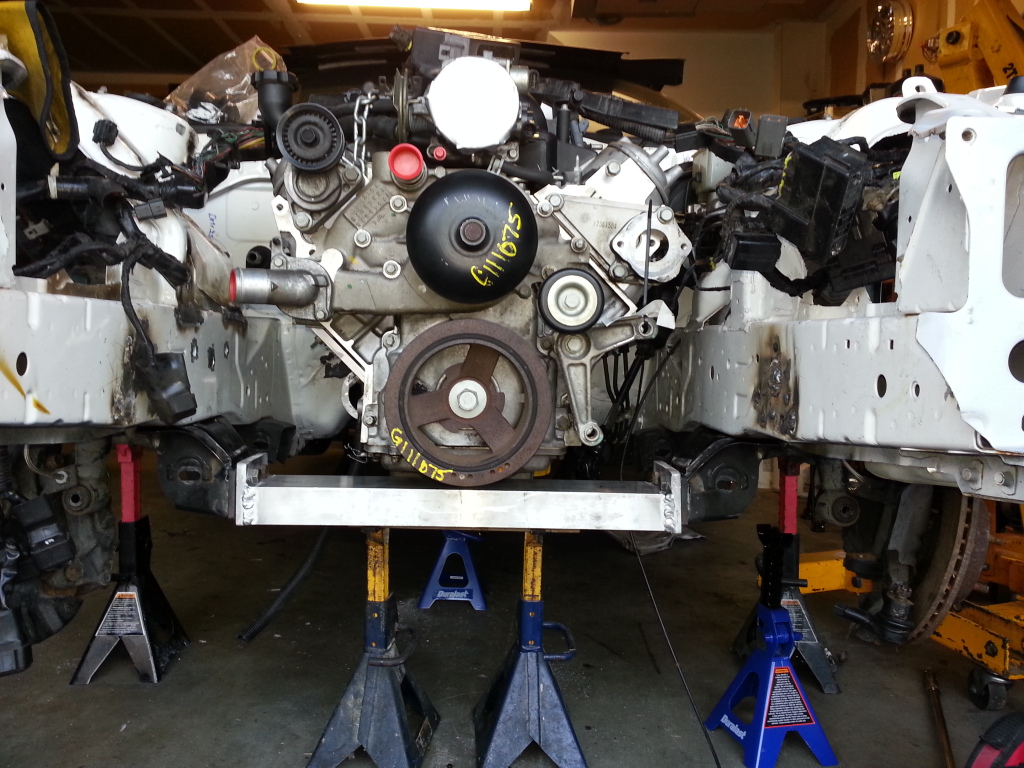
Ran out of argon and filler.. Gotta wait tell tomorrow to connect the engine to the isolators.
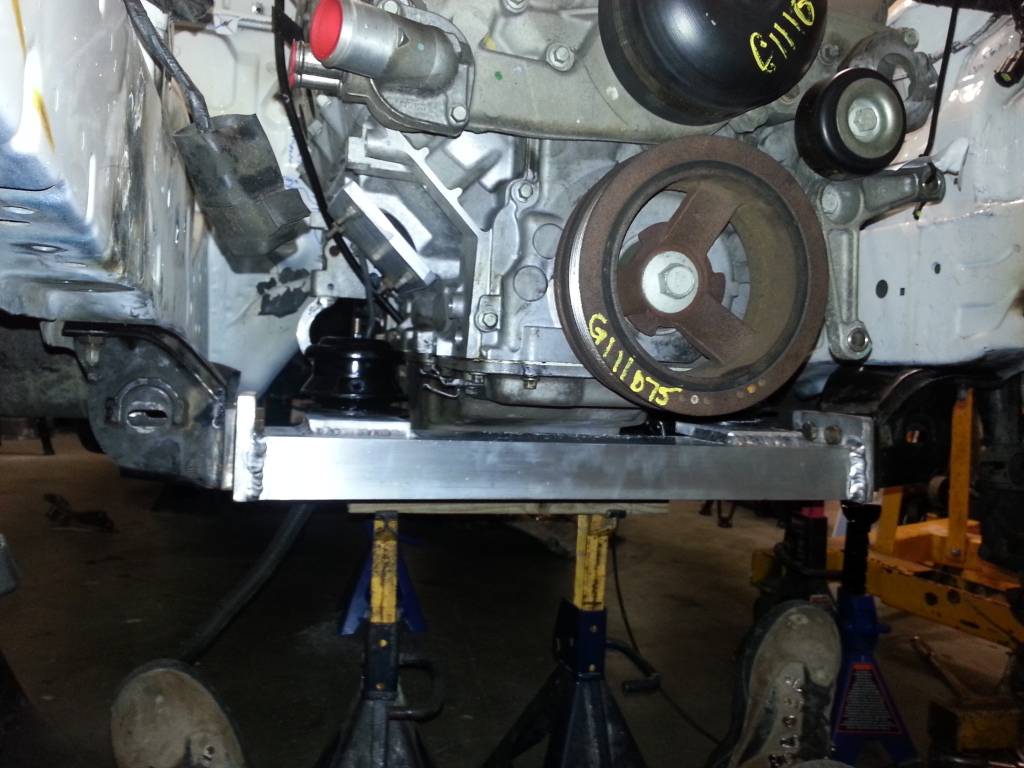
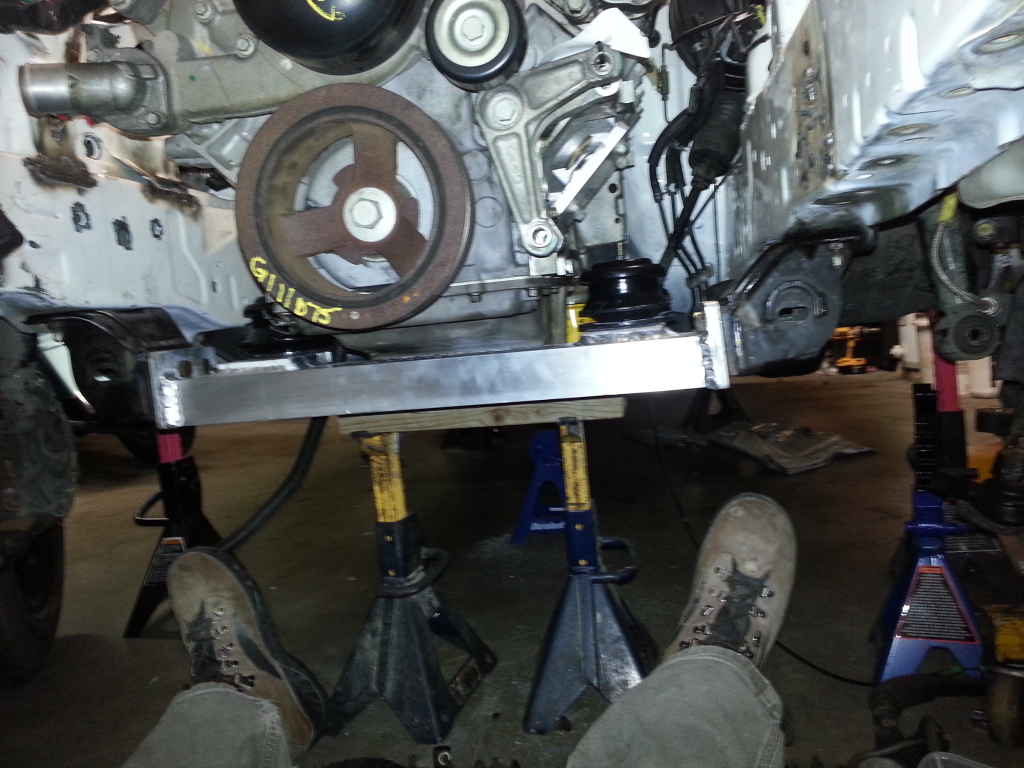
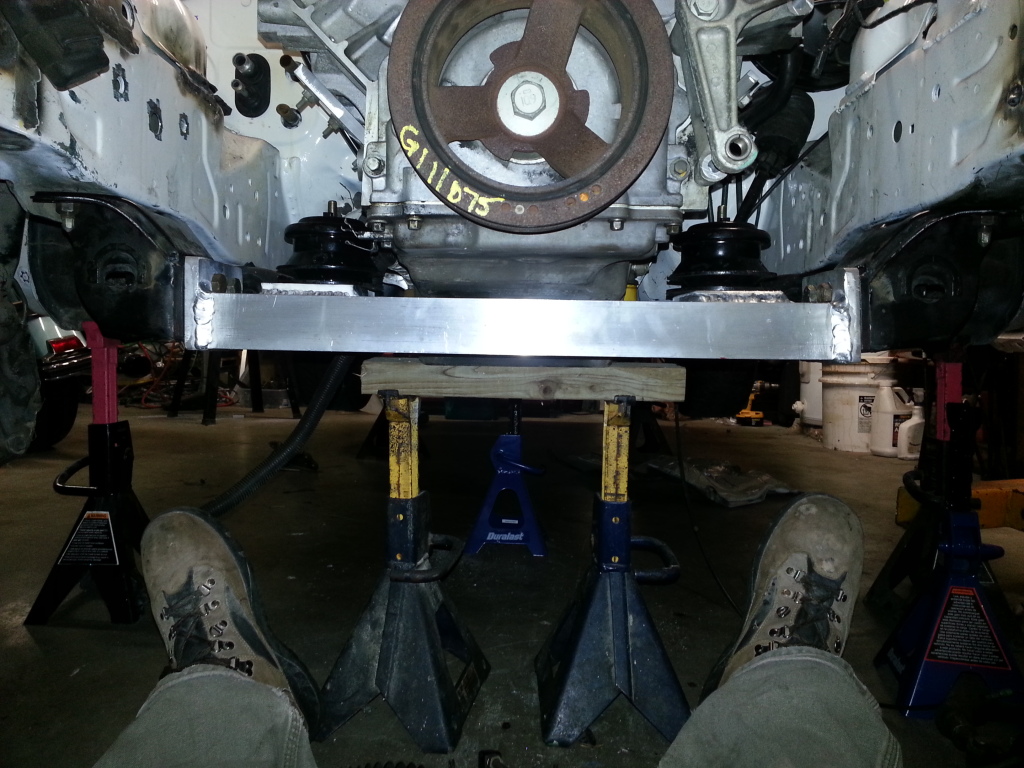
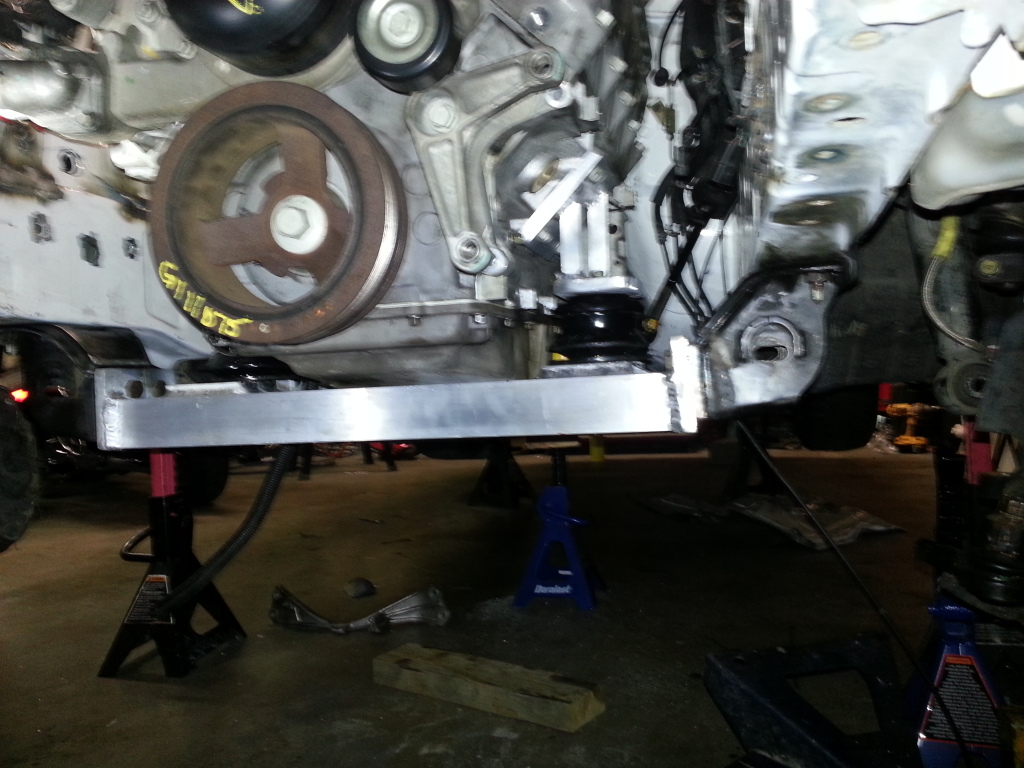
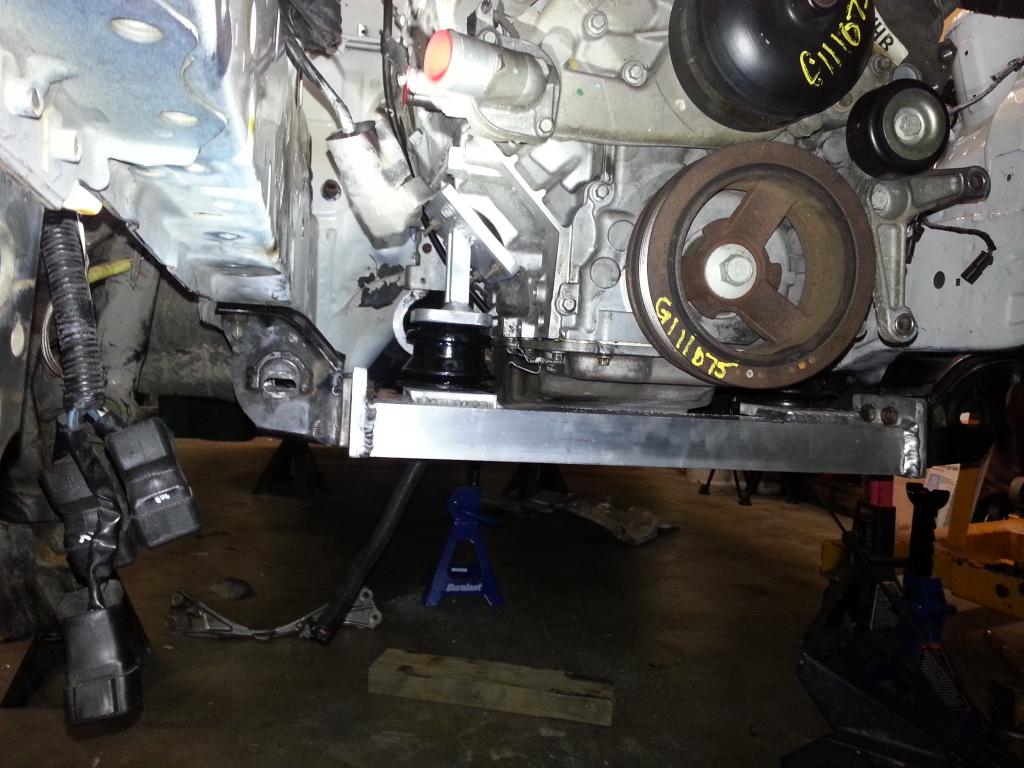
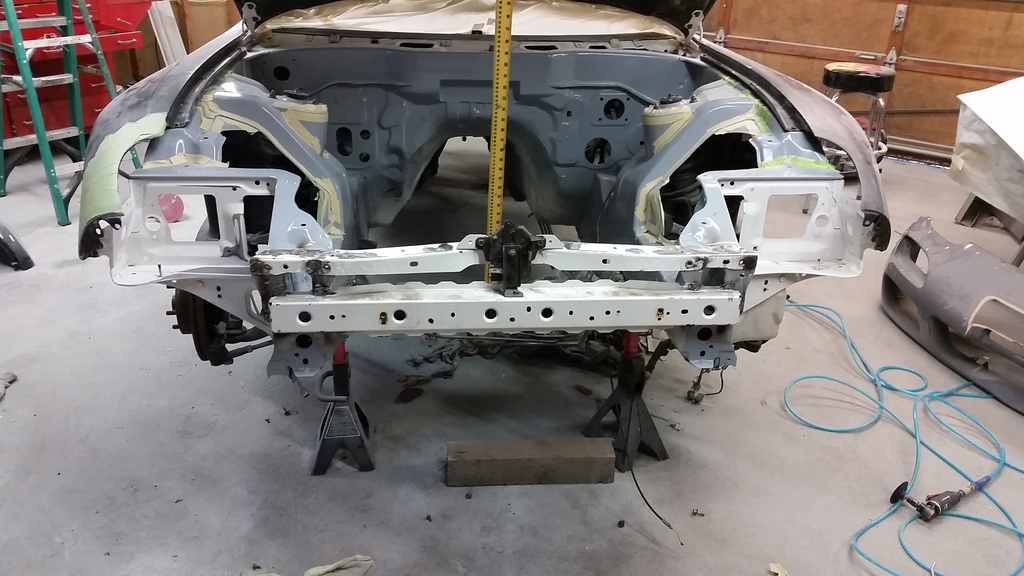
Aluminum subframe. Z32 isolators. Will connect the rest tomorrow. Ran out of argon and filler. I plan to reconnect the back half of the lower control arms later down the road when I figure out plumbing. I just wanted to sit the engine in mounts to figure out the tranny tunnel and fire wall. Just enough to start the body work for paint.
Ran out of argon and filler.. Gotta wait tell tomorrow to connect the engine to the isolators.
Aluminum subframe. Z32 isolators. Will connect the rest tomorrow. Ran out of argon and filler. I plan to reconnect the back half of the lower control arms later down the road when I figure out plumbing. I just wanted to sit the engine in mounts to figure out the tranny tunnel and fire wall. Just enough to start the body work for paint.
Trending Topics
10-21-13, 02:13 AM
#8
Junior Member
Thread Starter
Join Date: Jul 2013
Location: Tacoma, WA
Posts: 25
Likes: 0
Received 0 Likes
on
0 Posts
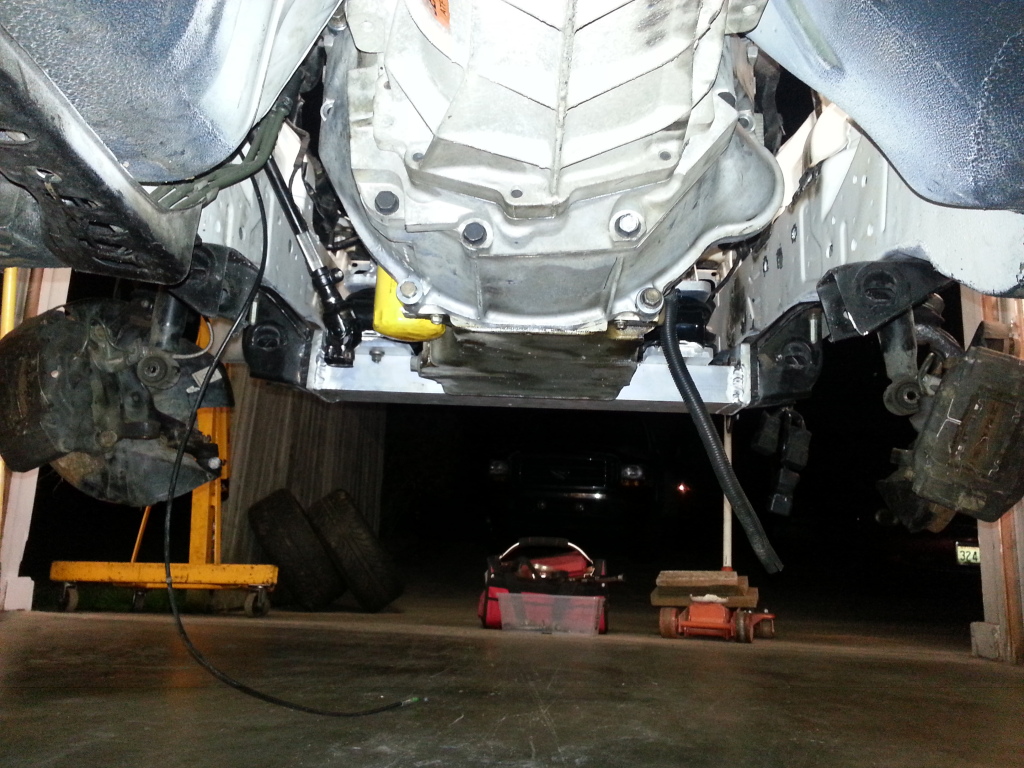
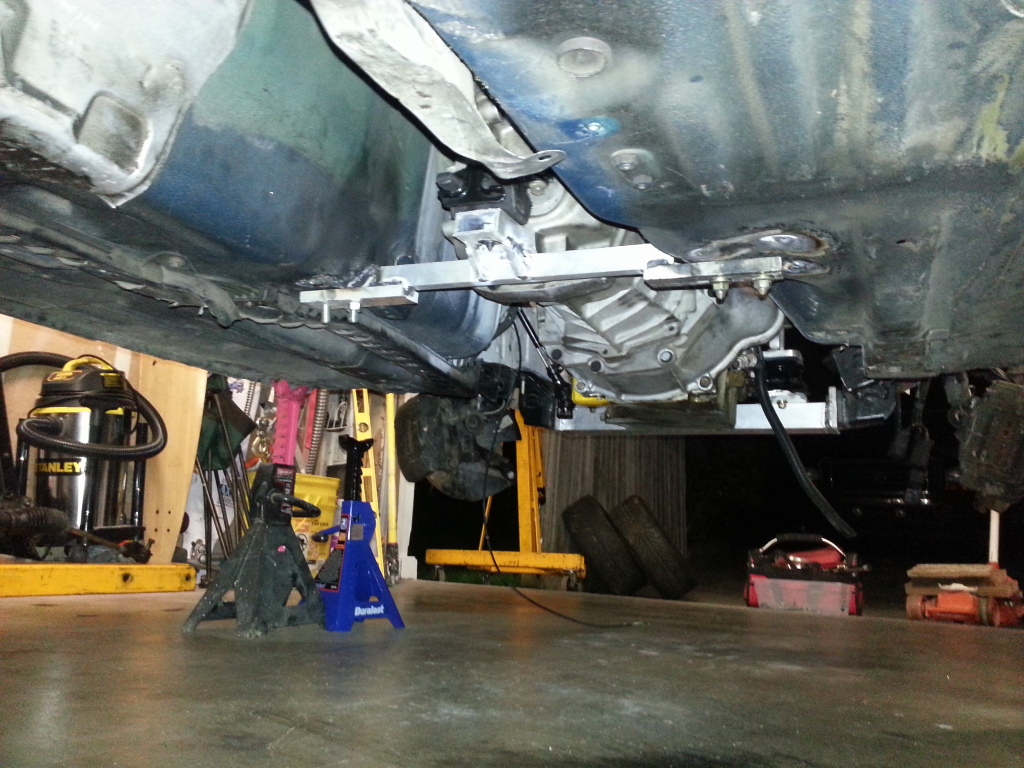
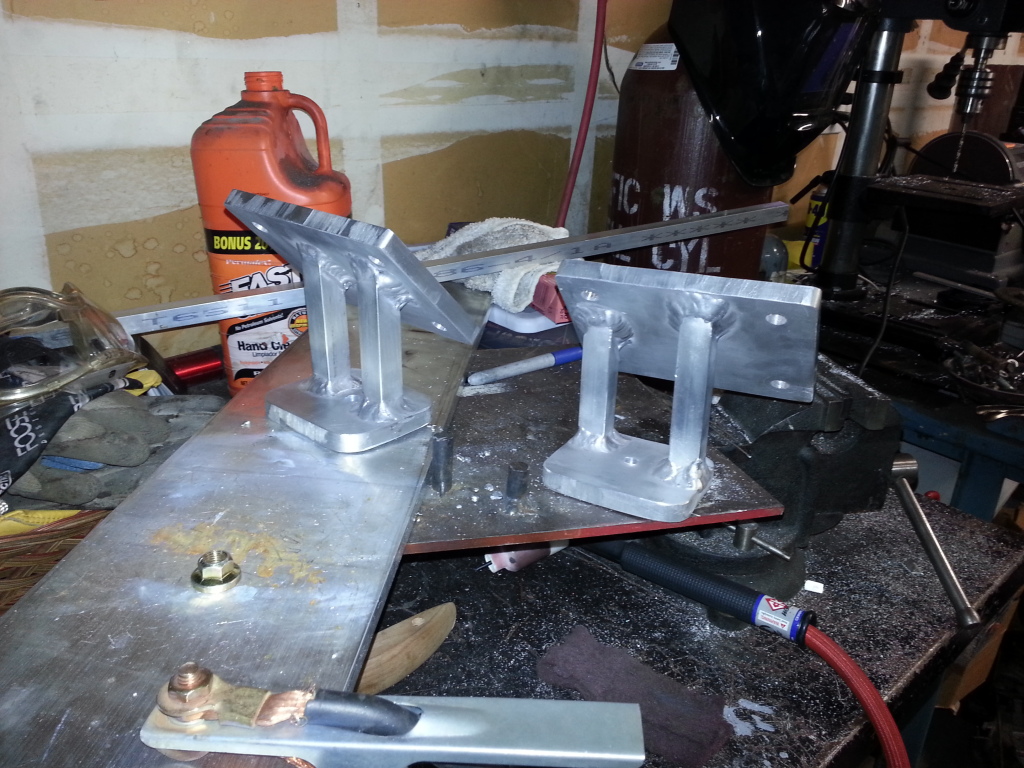
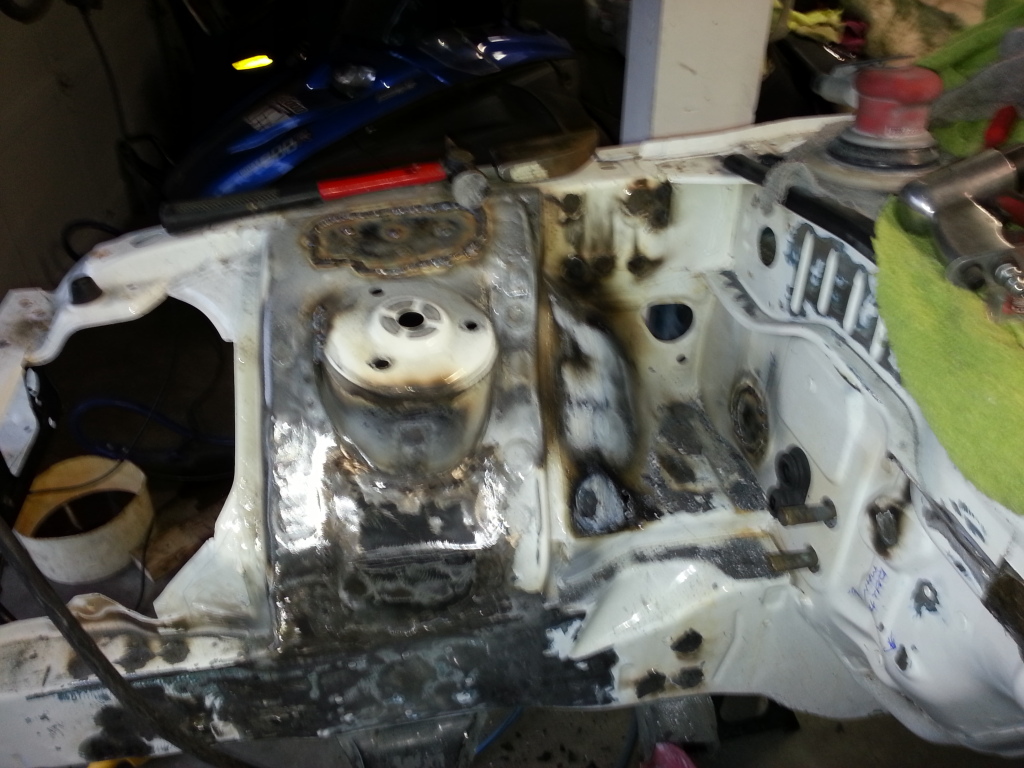
Its all 6061 T6. With 4043 filler. And yes my concerns are the welds cracking down the line but I was aware of this and knew I'd just have to keep an eye on things should be fine. The isolators should absorb most the engine motion and prevent fatigue. All the Aluminum mounts I've seen from auto manufacturers are cast, which get rid of the weak points aka the welds. However I do not own a kiln nor molds. Engine is all mounted up now. Gonna keep chugging along with the mock up until my body pieces arrive. I took time on the engine mounts making them look presentable but the transmission mount thats another story lol.. I just wanted to get it off the ground today. The previous owner of the vehicle was attempting a V8 swap as well and had already put bolts through for a tranny cross member. I did weld in thicker bracing above as thin body sheet metal tends to tear. lol


The following users liked this post:
ivegonemad (12-31-19)
10-30-13, 01:35 AM
#11
Junior Member
Thread Starter
Join Date: Jul 2013
Location: Tacoma, WA
Posts: 25
Likes: 0
Received 0 Likes
on
0 Posts
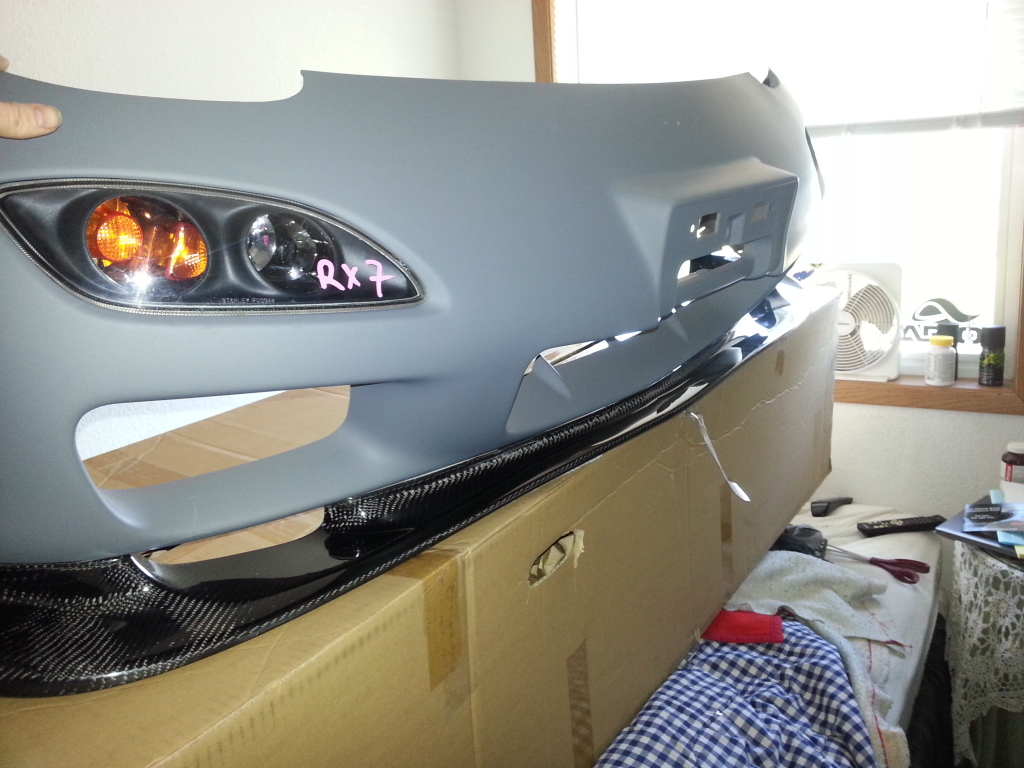
So... The engine is back out and I've been working on the engine bay. Trying to get it ready for primer. Been welding up everything and shaving stuff. Lots of parts are beginning to show up. My kouki bumper is here. All of my shine auto stuff is here..
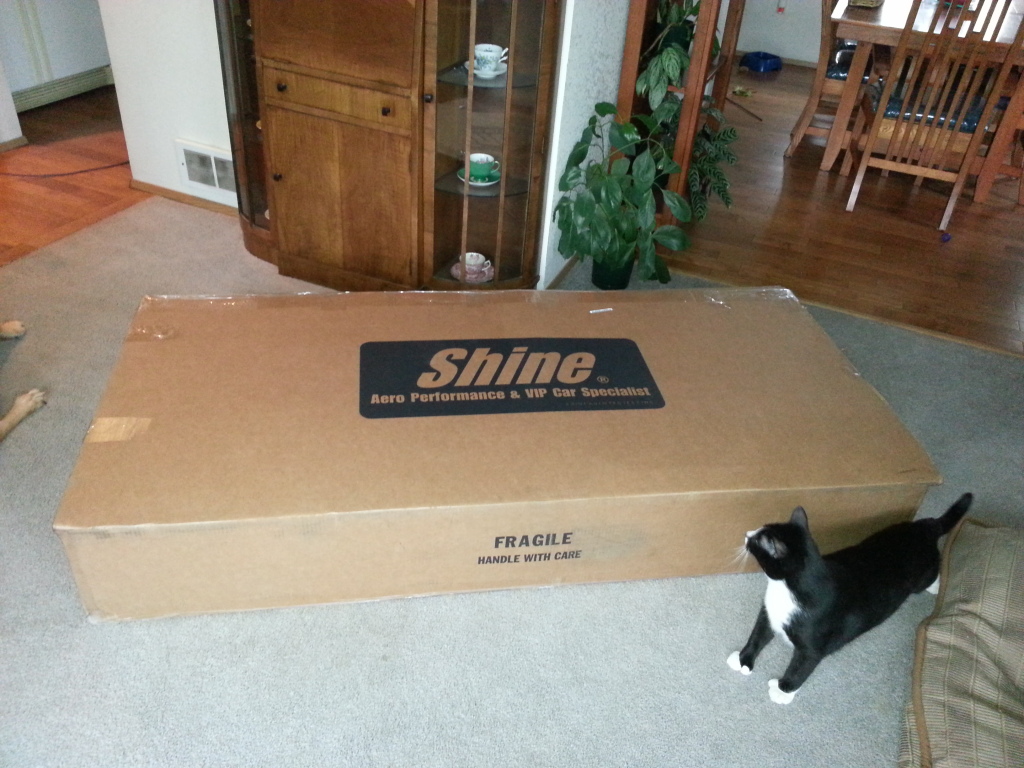
Just wanted to take a moment and throw a huge thanks to Ken over at Shine Auto Project. Hes been a lot of help. I've bought a lot of fiberglass stuff before for my s13 and its always been a pain in the *** getting the crap to fit right but I pulled out all the Shine Auto stuff and test fit it on the car and it fits so amazingly well! Its such a thrill to get a fiberglass part and its almost ready to paint. With some of the s13 stuff I had to cut and reglass over and over. Both Shines carbon parts and fiberglass parts fit like factory. Completely amazed and blown away. I highly recommend Shine's quality.
Shine Auto Project
Later down the line I will show you guys all of the parts from shine I went with. I also have been staring at so many cars trying to figure out a color for this car and I think I've got it. I sprayed out a test piece today to see if I like it. Right now my mind is on it but you'll have to wait and see.
Woopsies..
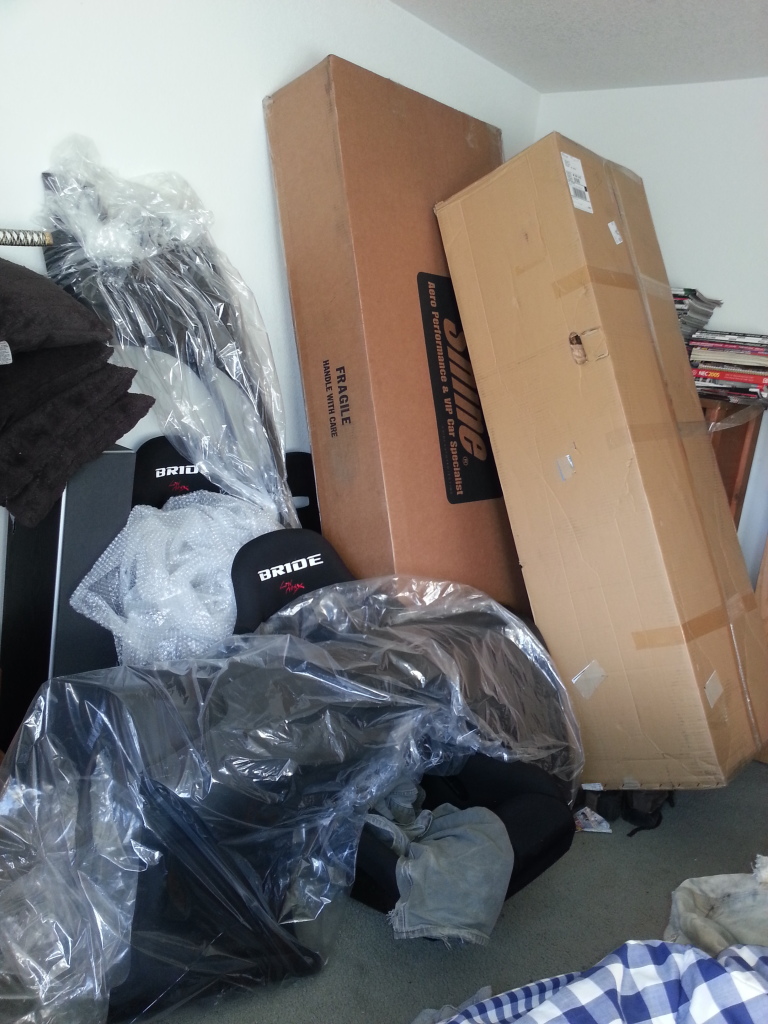
My room is beginning to get to full of build stuff :-/
Just wanted to take a moment and throw a huge thanks to Ken over at Shine Auto Project. Hes been a lot of help. I've bought a lot of fiberglass stuff before for my s13 and its always been a pain in the *** getting the crap to fit right but I pulled out all the Shine Auto stuff and test fit it on the car and it fits so amazingly well! Its such a thrill to get a fiberglass part and its almost ready to paint. With some of the s13 stuff I had to cut and reglass over and over. Both Shines carbon parts and fiberglass parts fit like factory. Completely amazed and blown away. I highly recommend Shine's quality.
Shine Auto Project
Later down the line I will show you guys all of the parts from shine I went with. I also have been staring at so many cars trying to figure out a color for this car and I think I've got it. I sprayed out a test piece today to see if I like it. Right now my mind is on it but you'll have to wait and see.
Woopsies..
My room is beginning to get to full of build stuff :-/

 12-07-13, 09:05 PM
#14
Junior Member
Thread Starter
Join Date: Jul 2013
Location: Tacoma, WA
Posts: 25
Likes: 0
Received 0 Likes
on
0 Posts
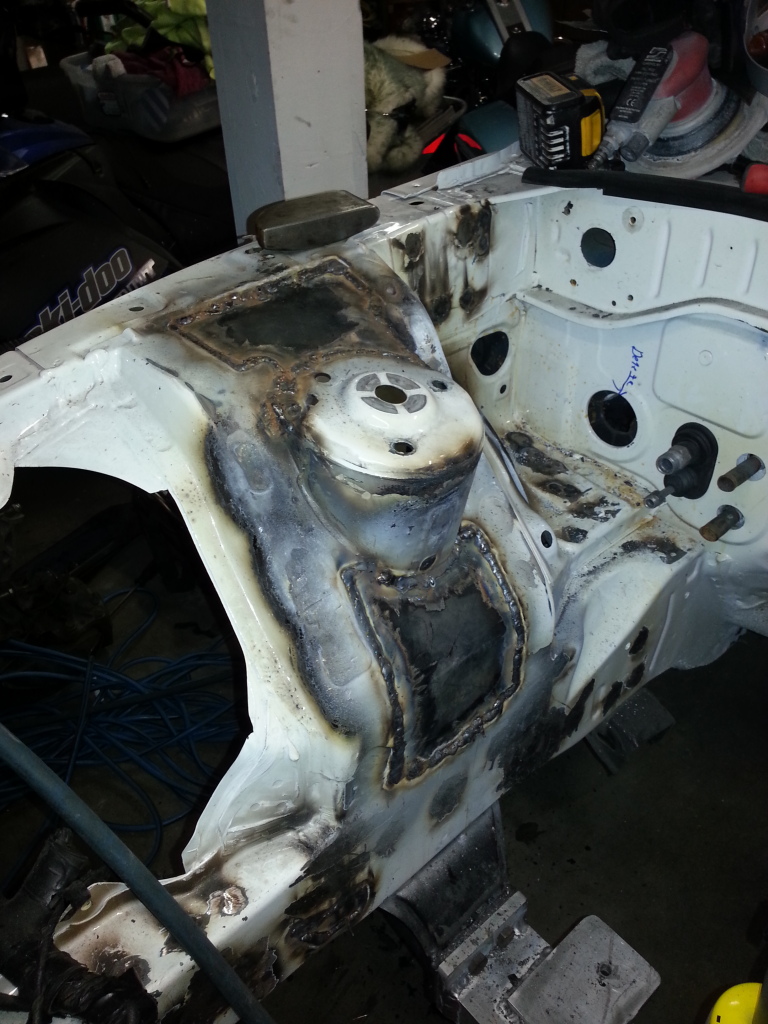
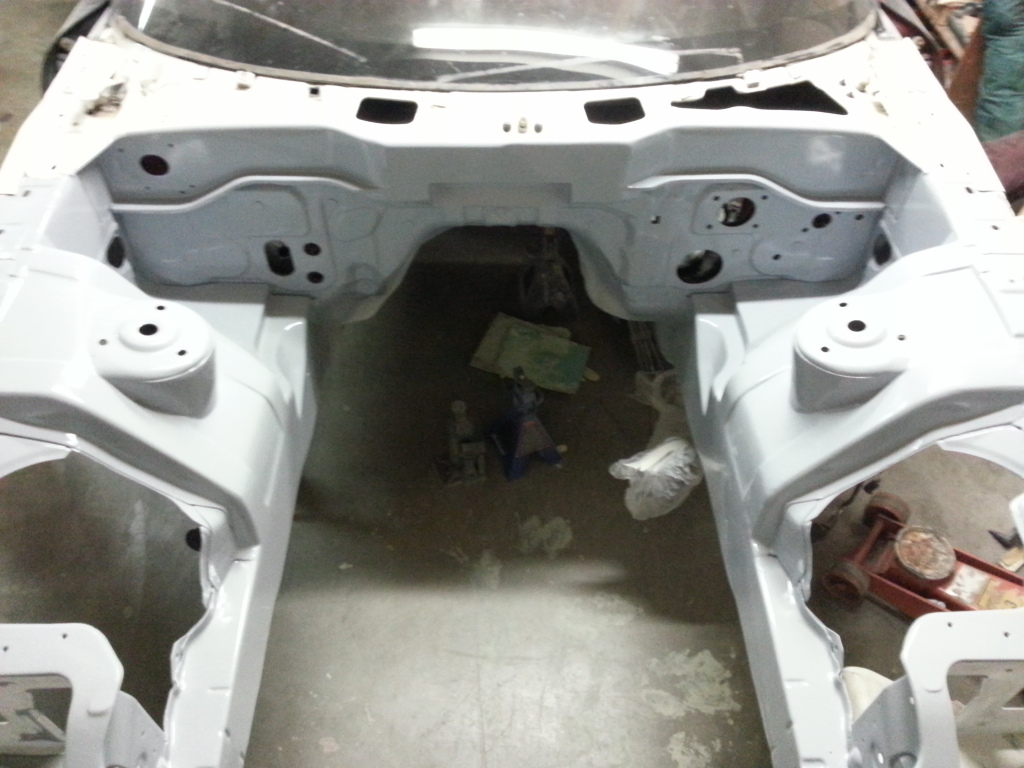
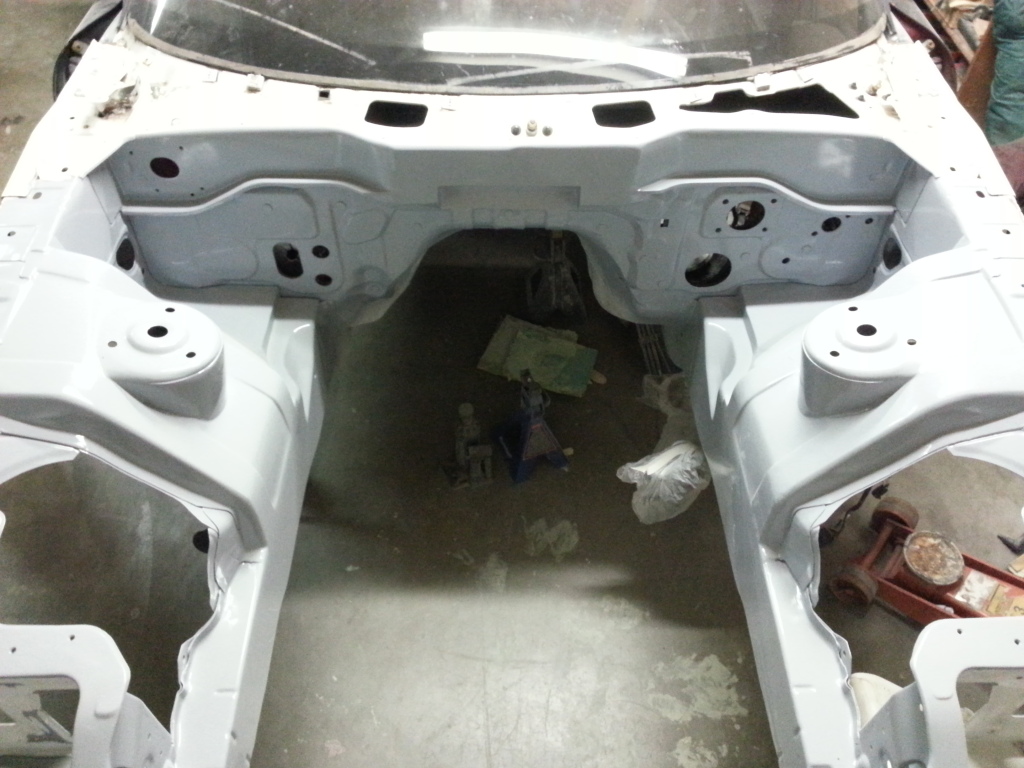
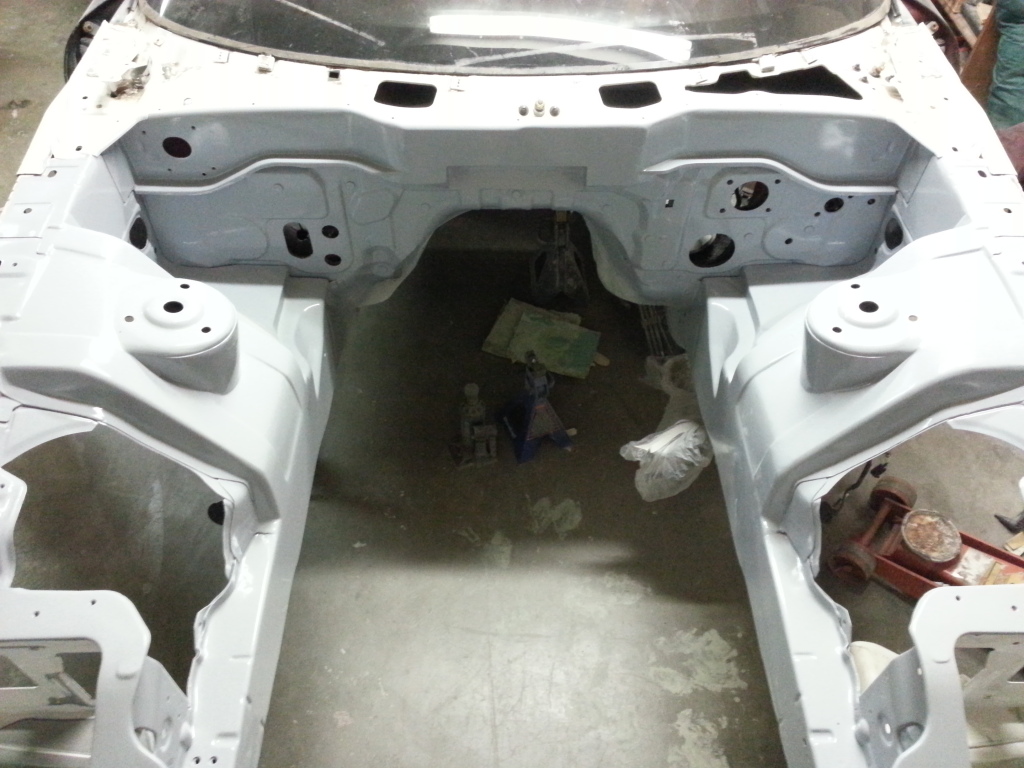
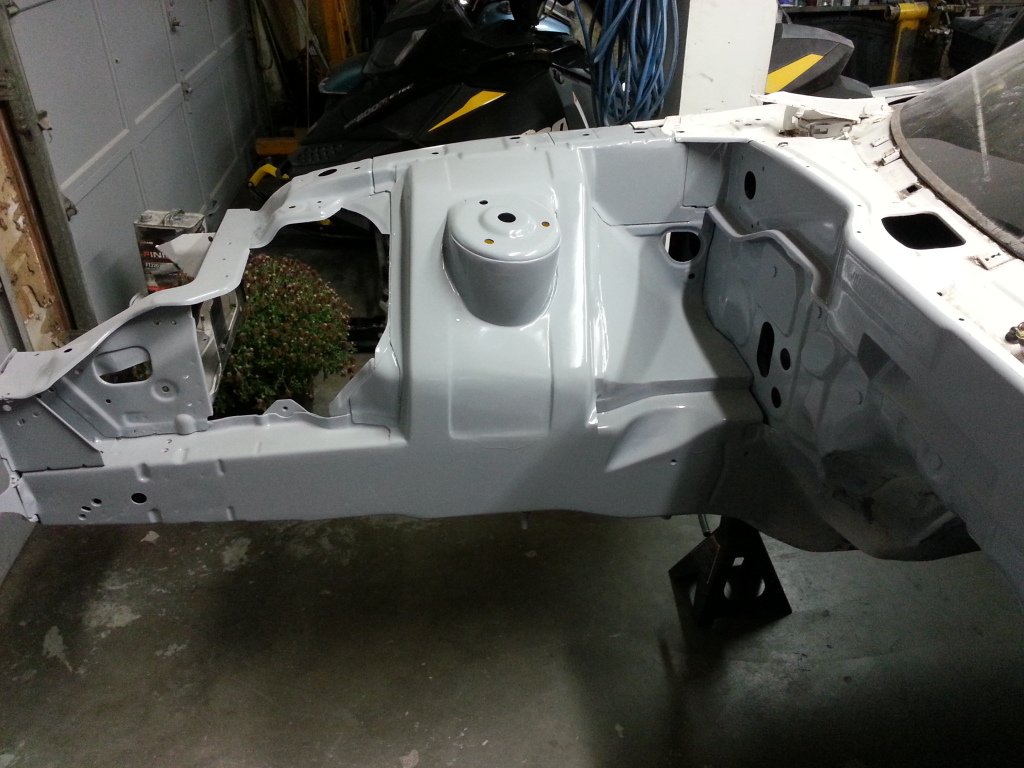
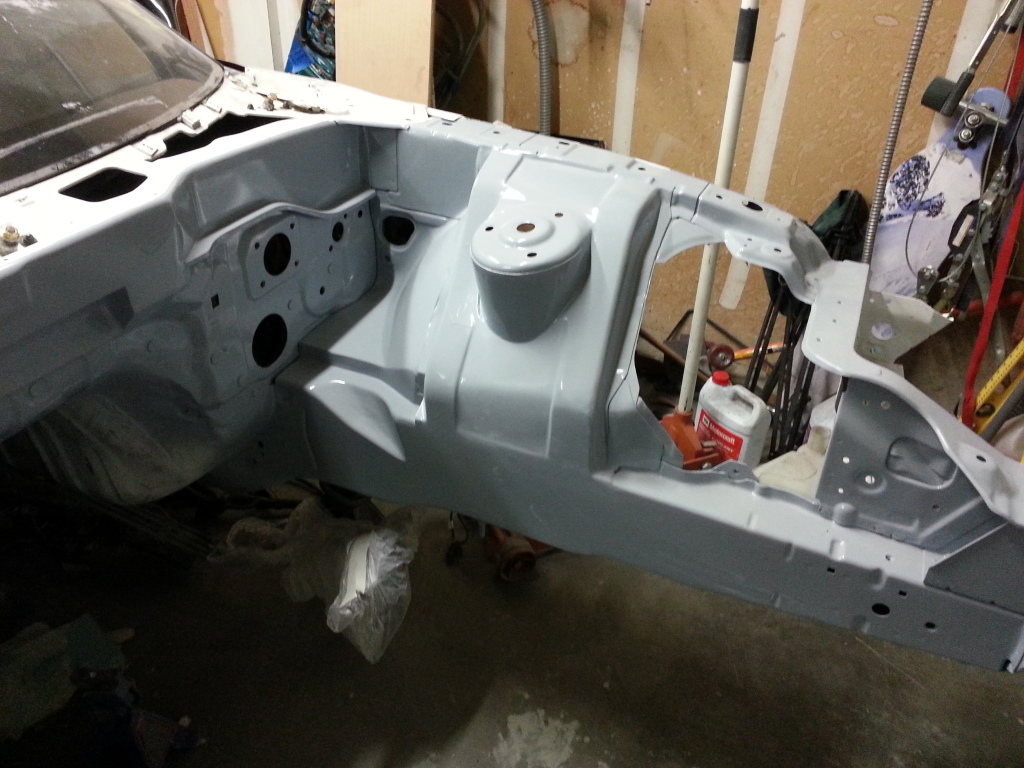
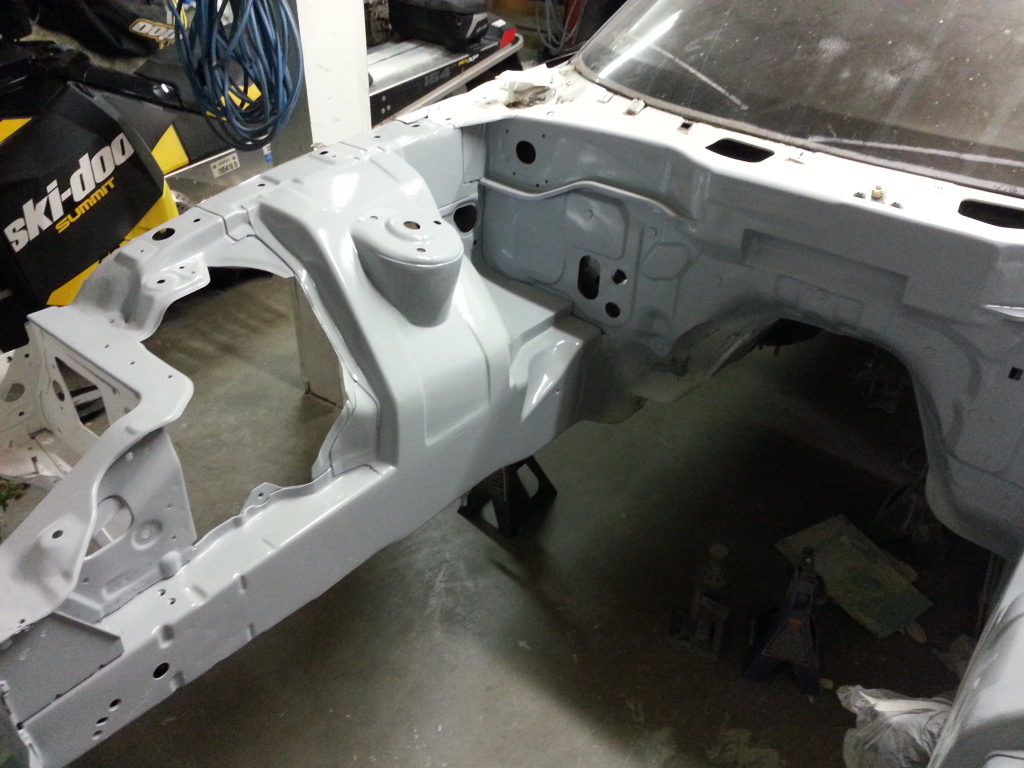
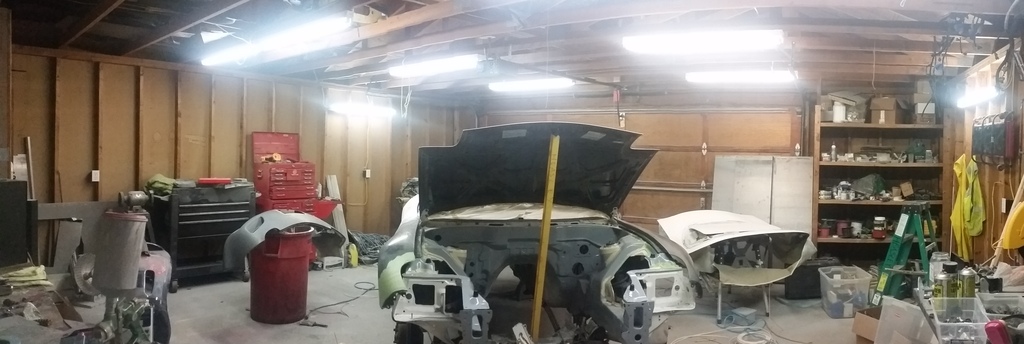
Time for an update.. Been working endless nights after work getting the engine bay done. Lots of welding. Lots of grinding. Lots of sanding. Took a long time. Took a long time to strip most of the shitty white paint job off. Their effort on prep work was pretty poor. Running a screw driver across the paint just chipped it right off. No adhesion. Definitely a lot harder then my s13 engine bay. Outside should go a lot smoother. Getting ready to fit the outside widebody stuff. Finally got the engine bay into primer a couple days ago. Got a bunch of crap coming from Japan too.


 12-07-13, 09:09 PM
#15
Junior Member
Thread Starter
Join Date: Jul 2013
Location: Tacoma, WA
Posts: 25
Likes: 0
Received 0 Likes
on
0 Posts
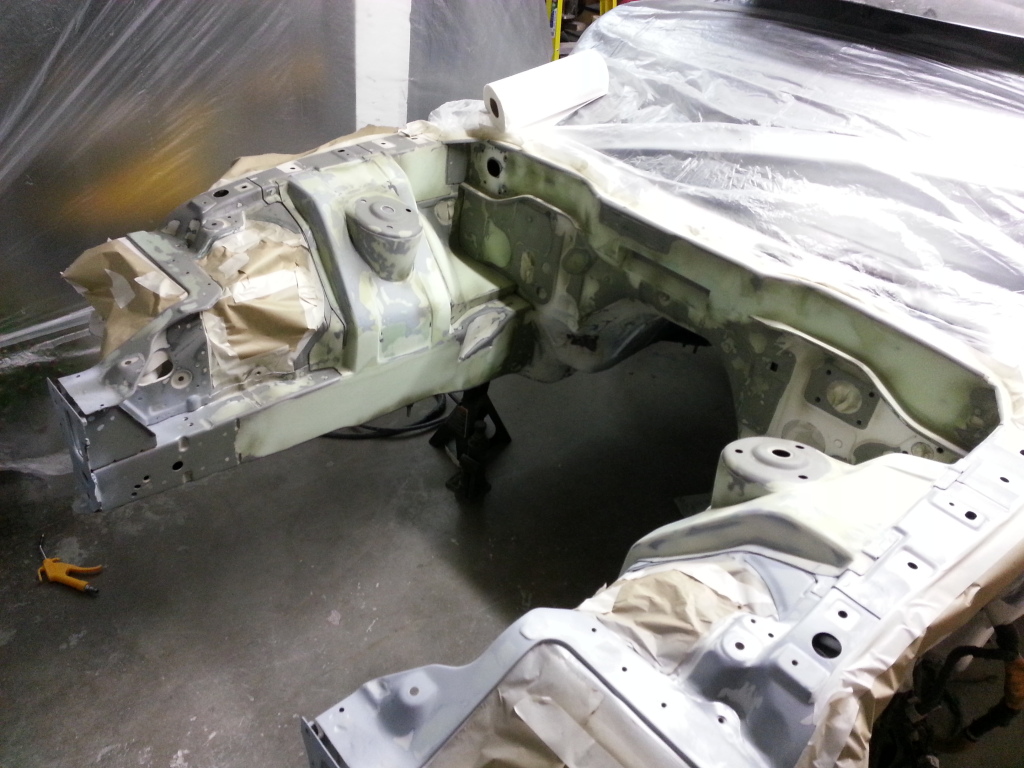
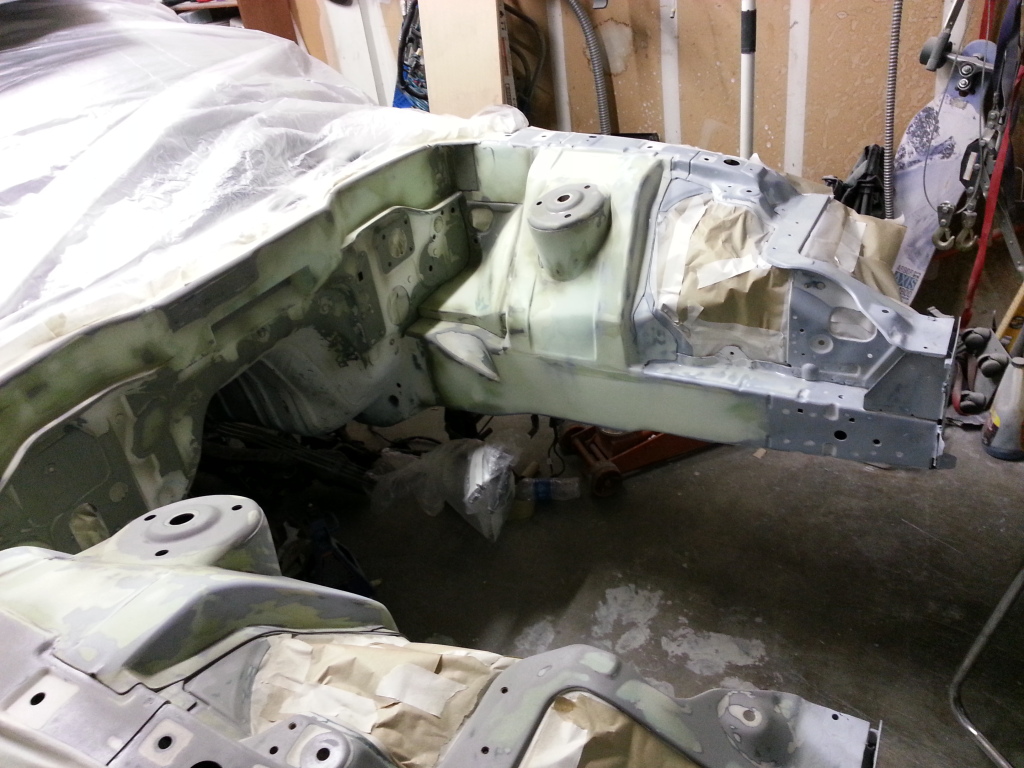
Now that its primed I've still got to redo all the seam sealer in the engine bay then reprime those areas. It should really look good after that. I plan to make panels to cover the open areas by the headlights then paint them. I would like to incorporate them into being airboxes.
 03-22-15, 01:33 AM
#20
Junior Member
Thread Starter
Join Date: Jul 2013
Location: Tacoma, WA
Posts: 25
Likes: 0
Received 0 Likes
on
0 Posts
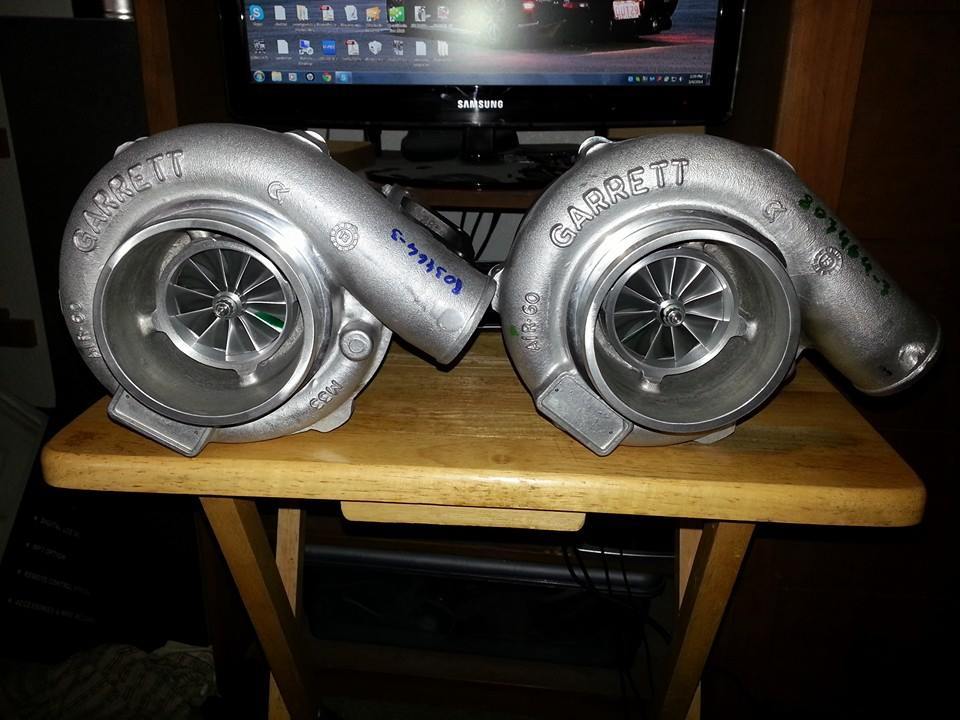
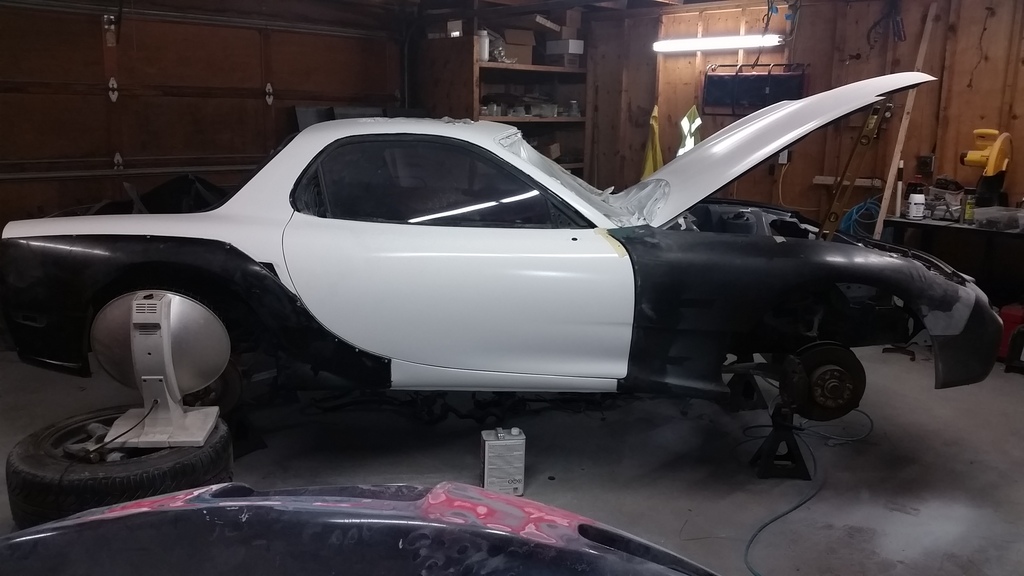
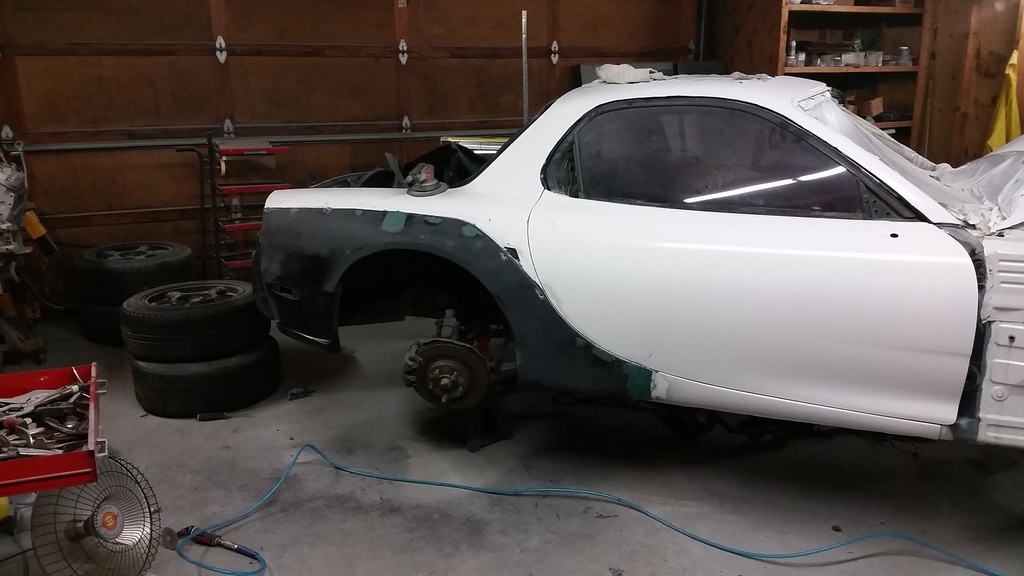
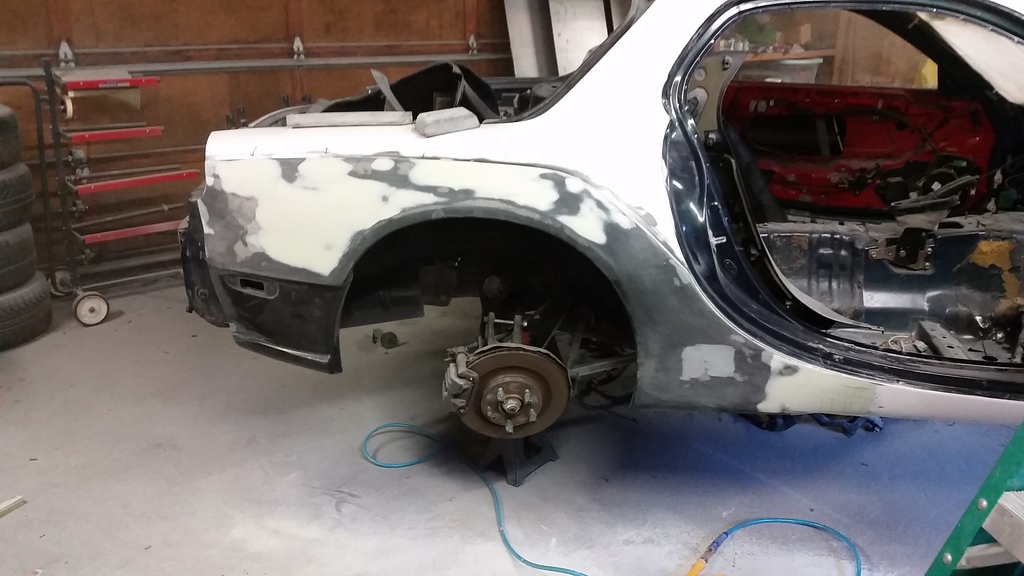
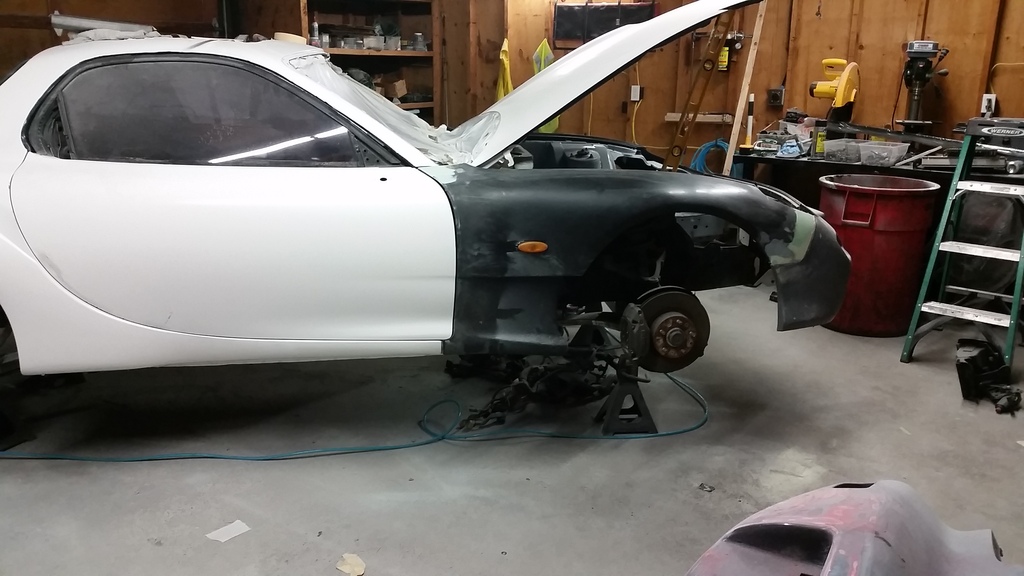
So its been awhile but I'm hitting the car hard again and I figured I'd updated these old threads. Last winter I was working hard on purchasing a house and moving. Eventually I bought a new house. Then moved all my cars over to the new house. Purchased and Evo and enjoyed the summer. There really wasn't a point in working on the FD during the short spurt of beautiful weather here in the Pacific northwest. This winter came and I've been working on the car and saving money. It hasn't been moving very fast but I've been hitting it hard recently to hopefully get the car on the road for this summer. So at this point I purchased a set of GTX3076Rs but before all the engine fun can begin I've been working on the body work and what not.
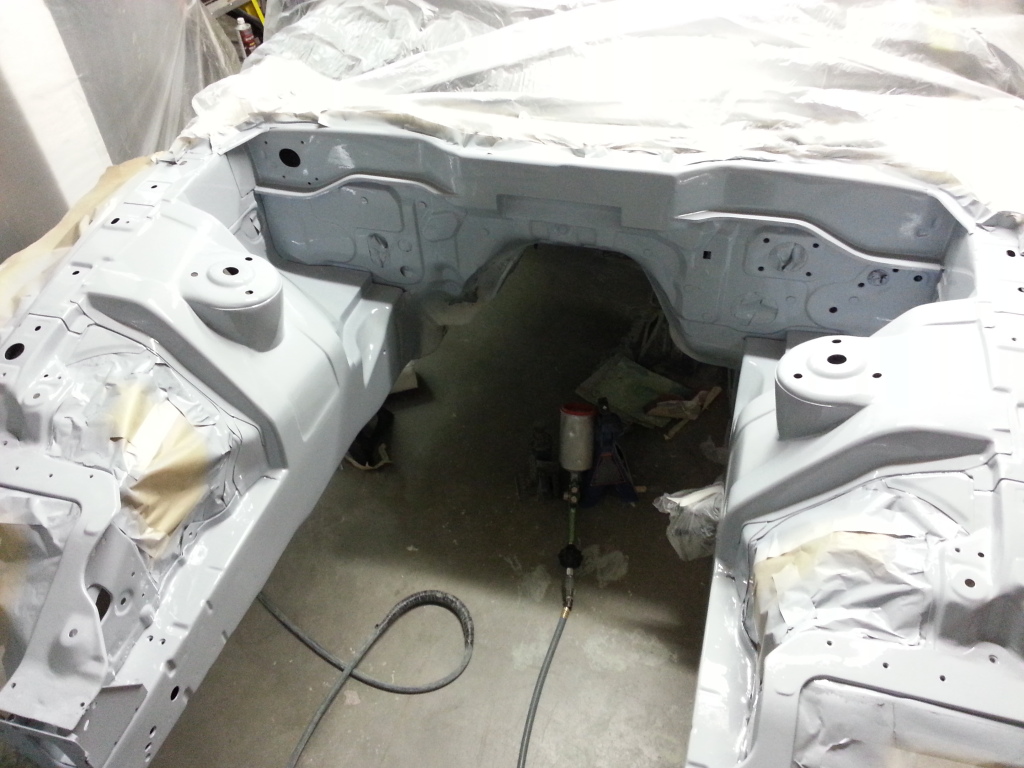
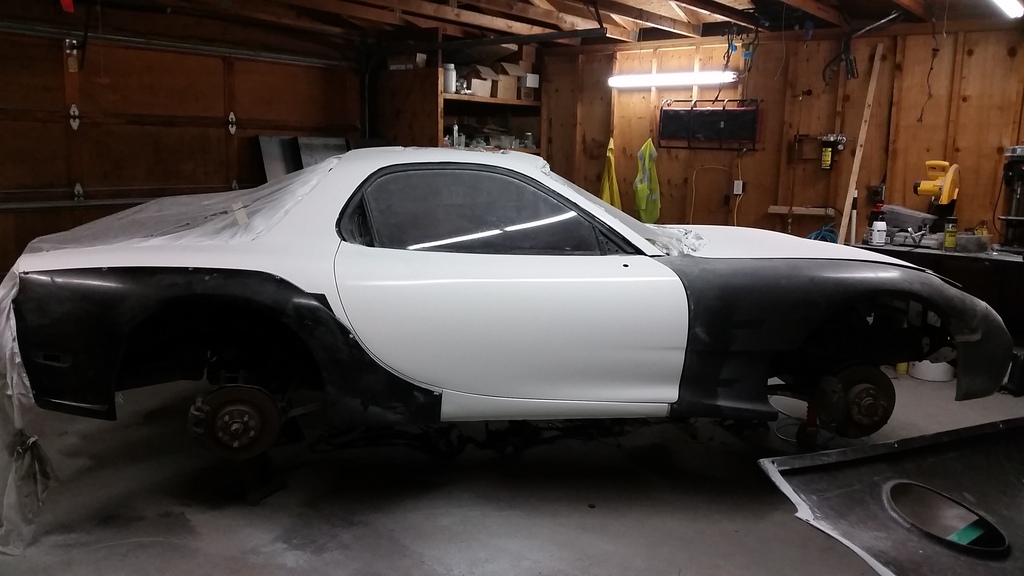
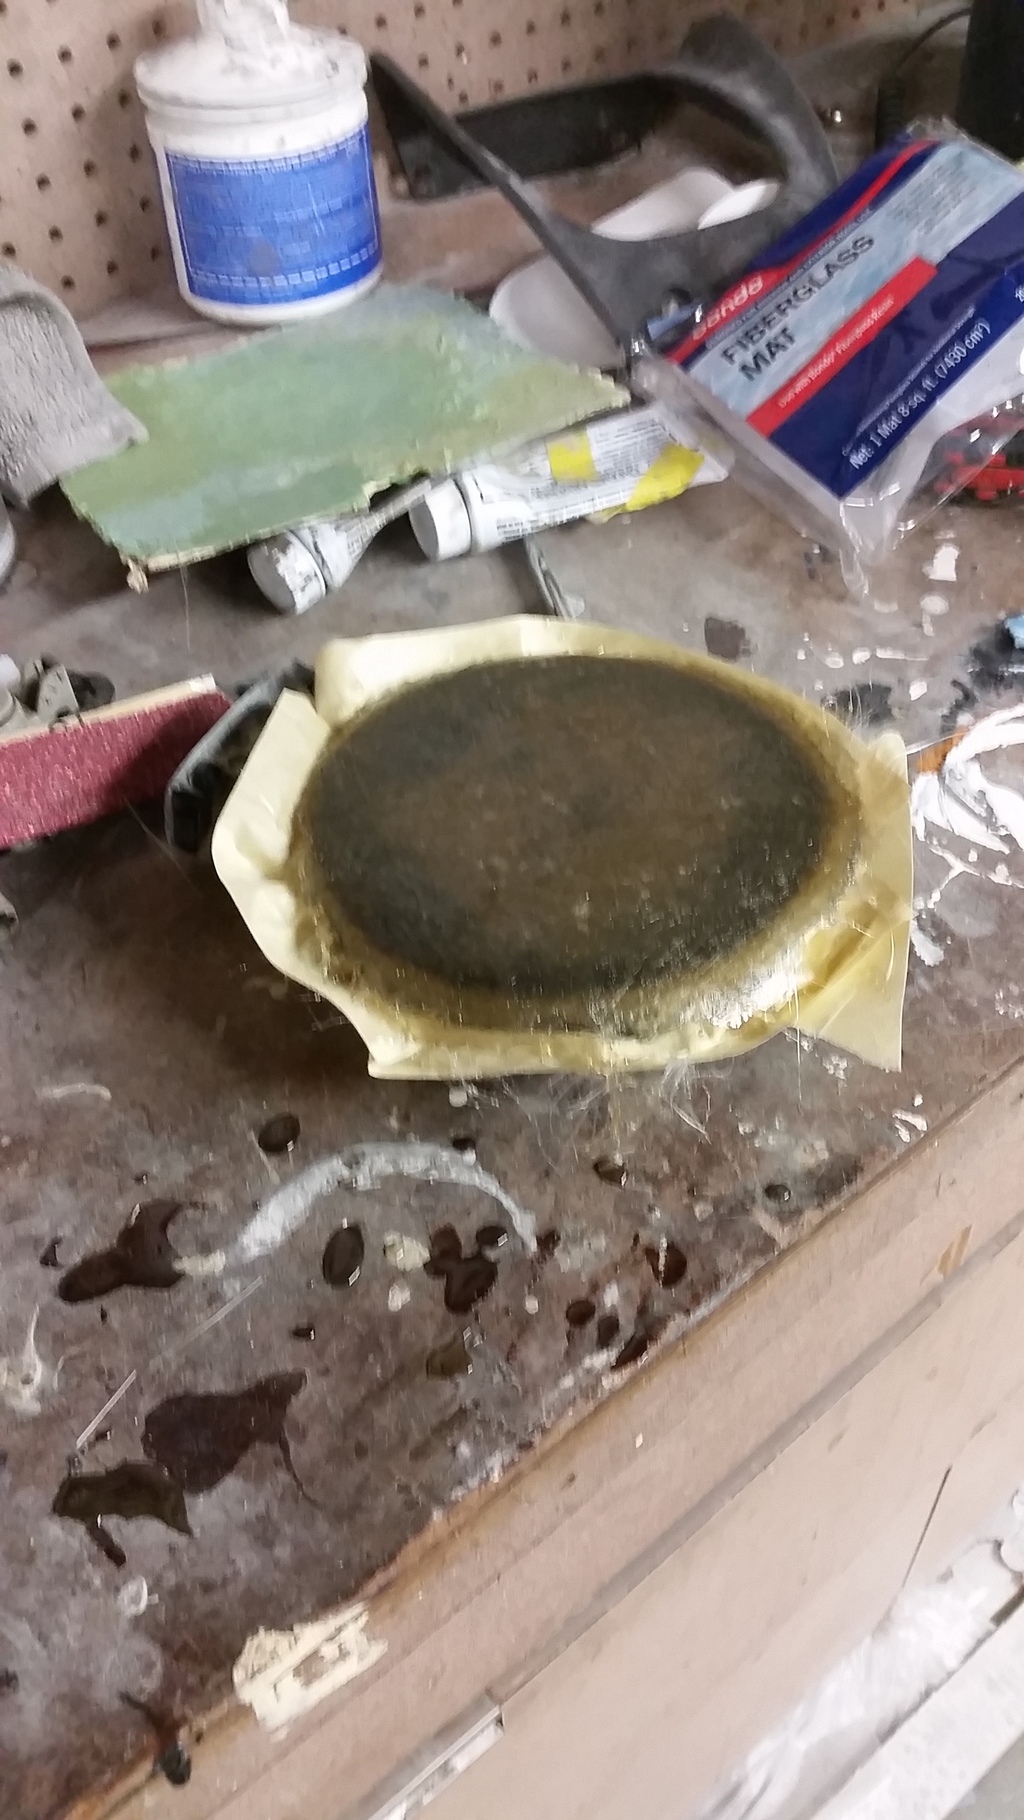
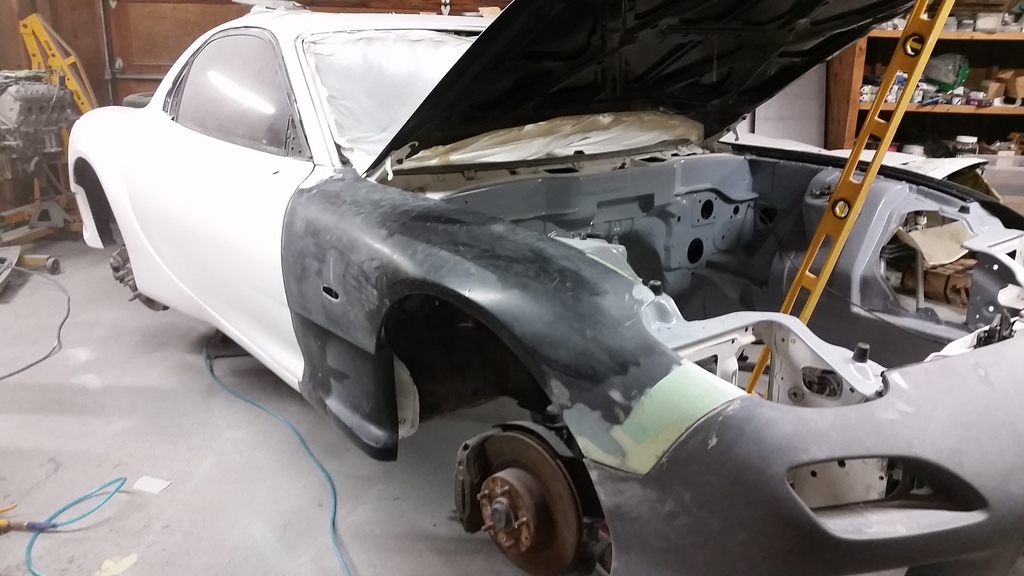
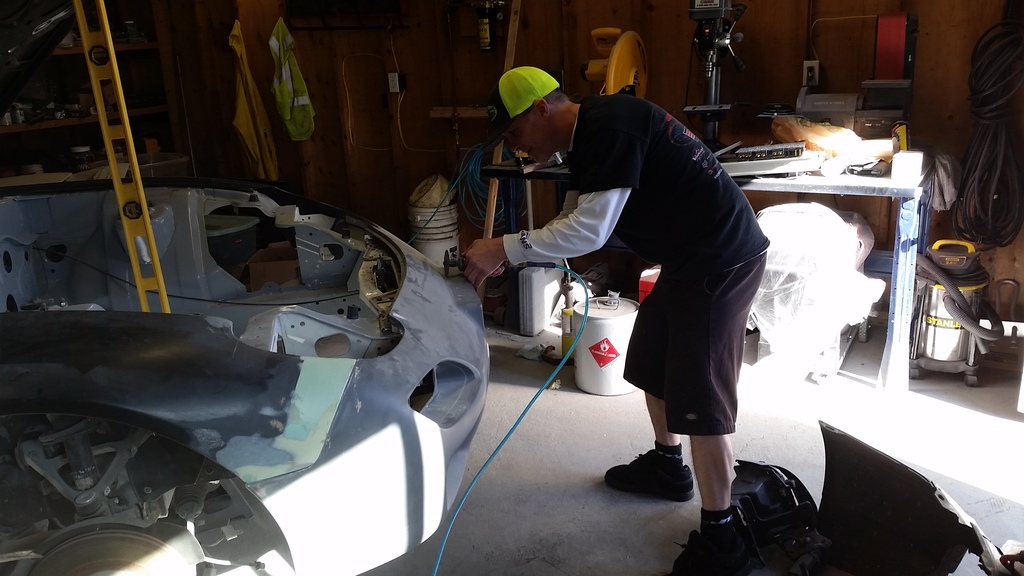
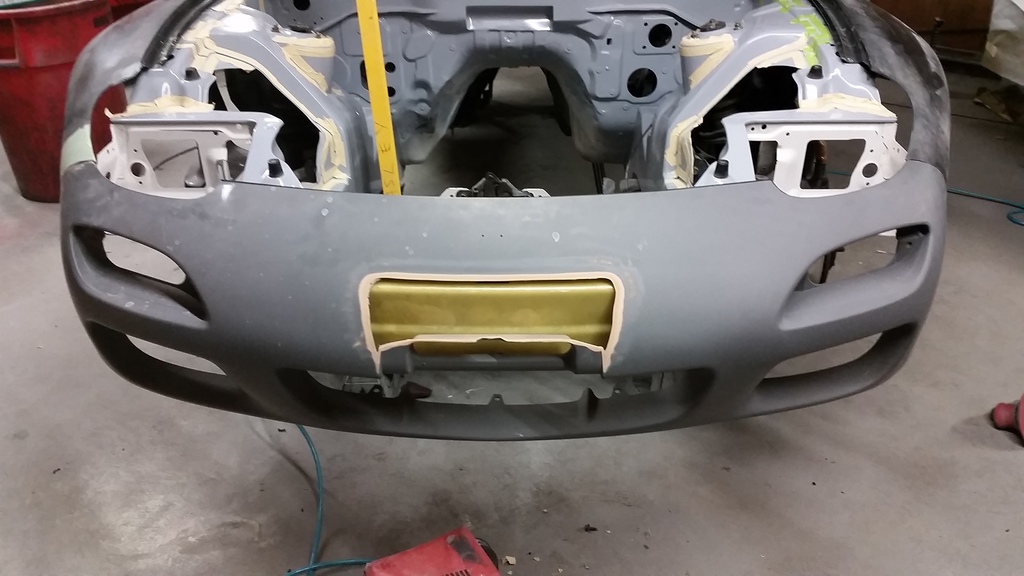
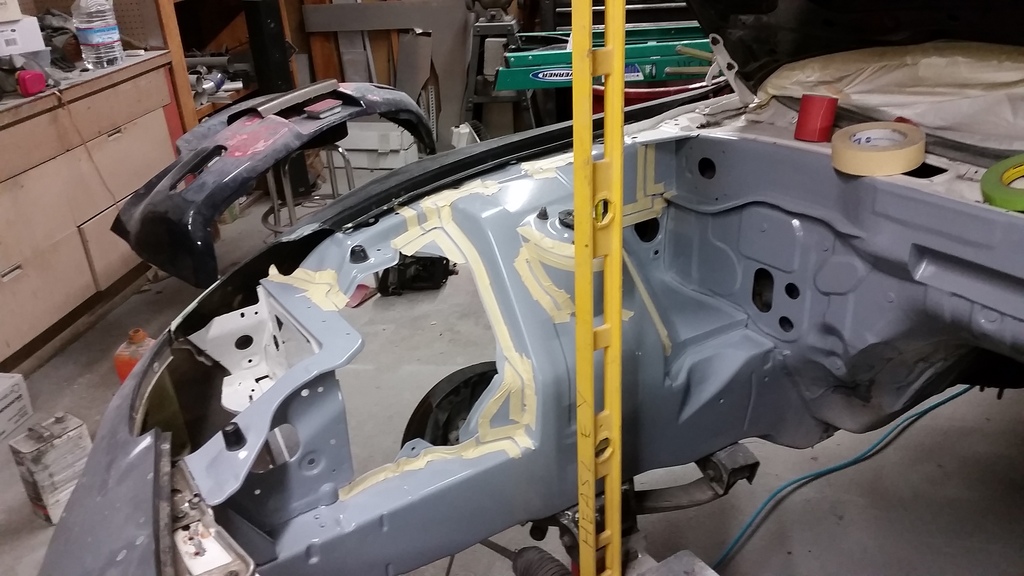
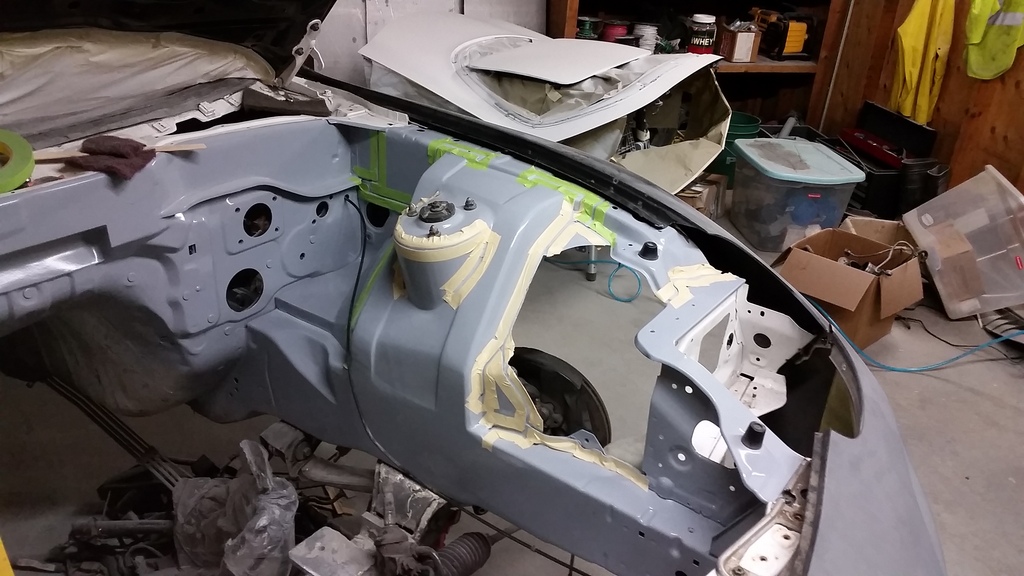
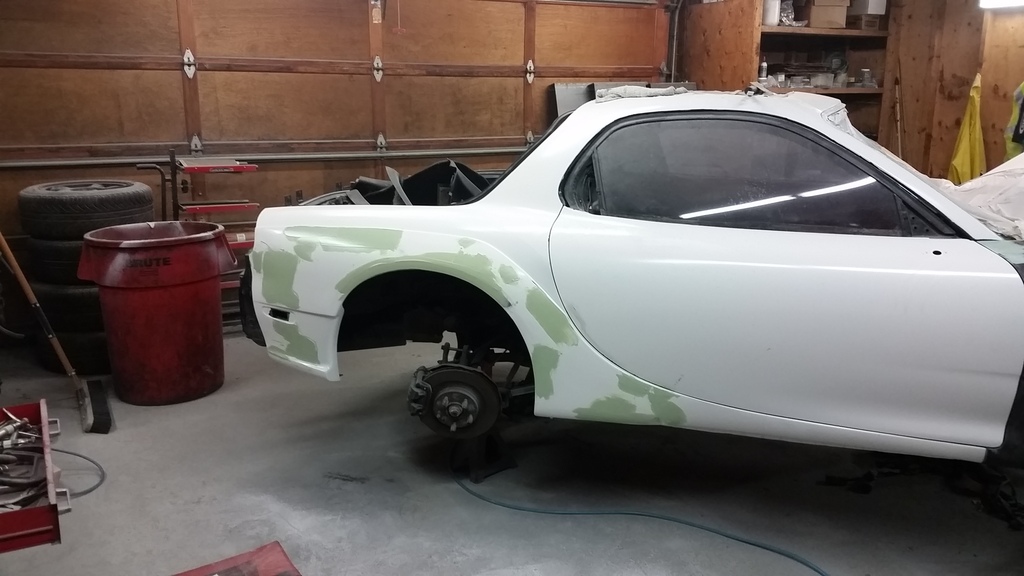
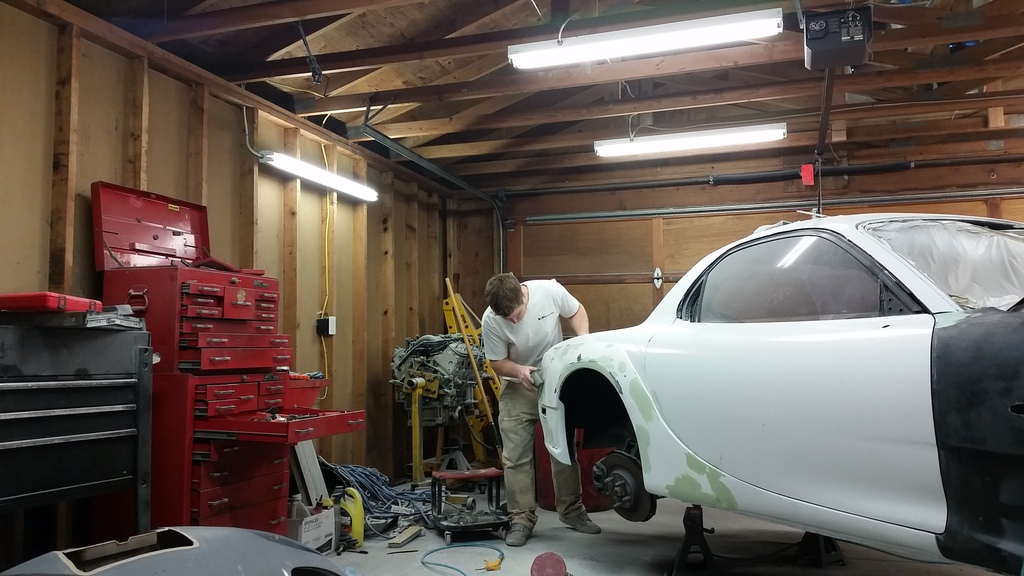
I stripped the entire car because it had anywhere from 5 to 8 paint jobs on it. Etch primed it and then primed the car. I prepped the quarter panels for the over fenders. Decided to use body panel adhesive in stead of the tradition rivet method. I filled the cracks with flexible body filler and blended the bottom to the car. Then reprimed the quarters. Fiberglass aftermarket parts are an S ton of work. The front fenders still need a lot of work at this point but I've knocked out a bunch of it. The front kouki bumper is getting the license plate shaved. The engine bay is ready for seam seal but I'm trying to get the rest of the body ready to prime first too. I decided to weld back on the front core support pieces instead of the bolt on set up I had before. So that needs to be finished sanded and etch primed then primed too. Thats pretty much where the car is at at this point. I'm trying to get the body atleast reprimed one more time before it goes over to Jason to start paint work. Obviously I'll start cutting in the doors, jams, and hood at the point. Need to pick up paint and what not but I've been so busy with long work days these past couple weeks. It sucks not being able to work on the car but the job is a prevailing wage job and I'm making a lot of money. It'll be over here soon and I'll have enough money for engine parts and i'll take a week off and catch up on the body work.
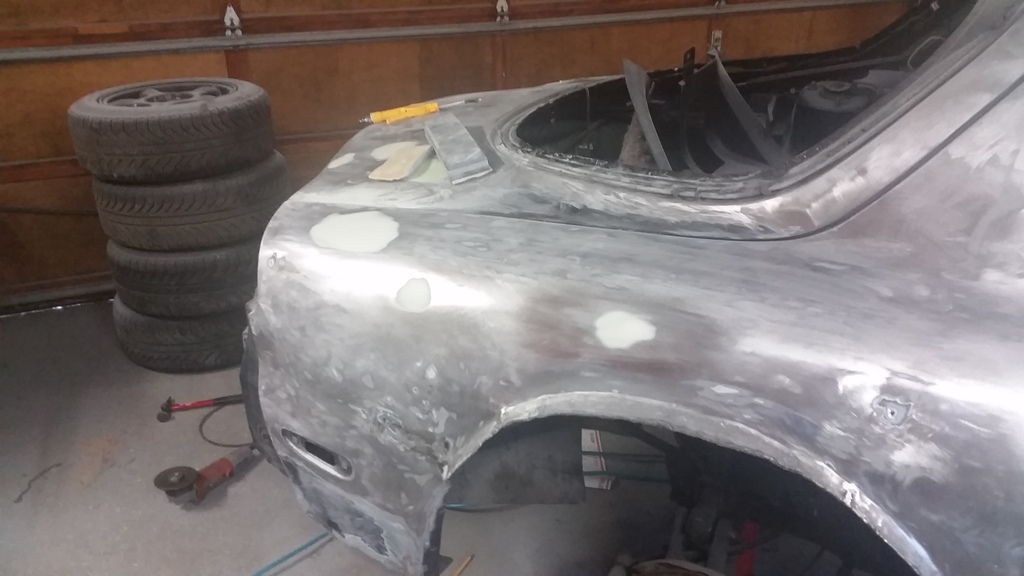
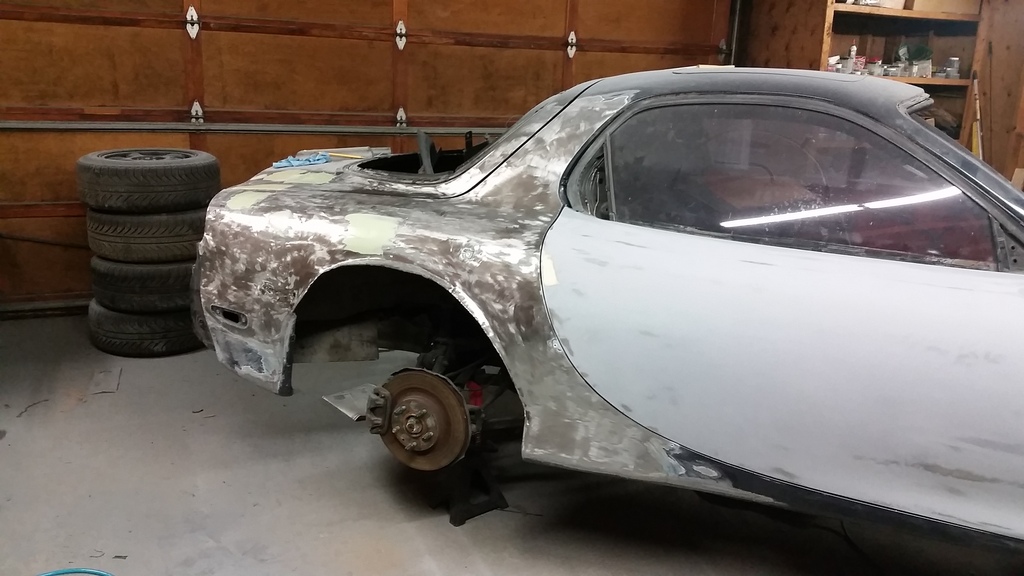
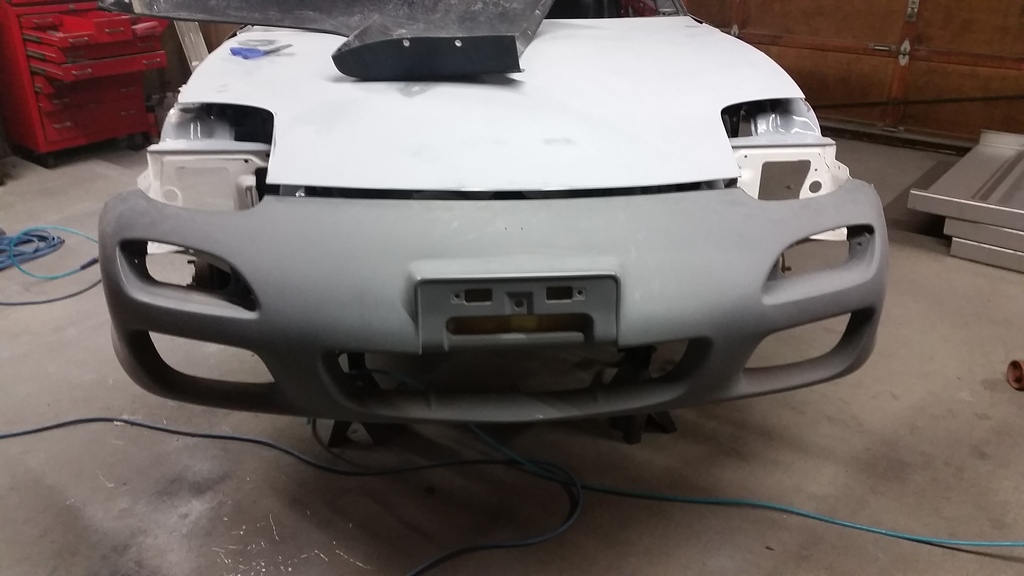
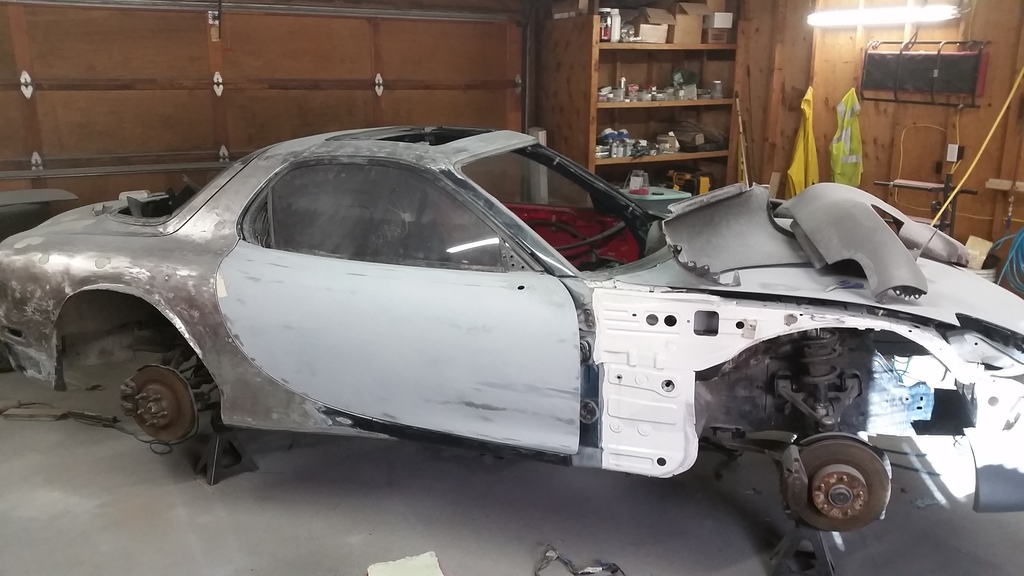
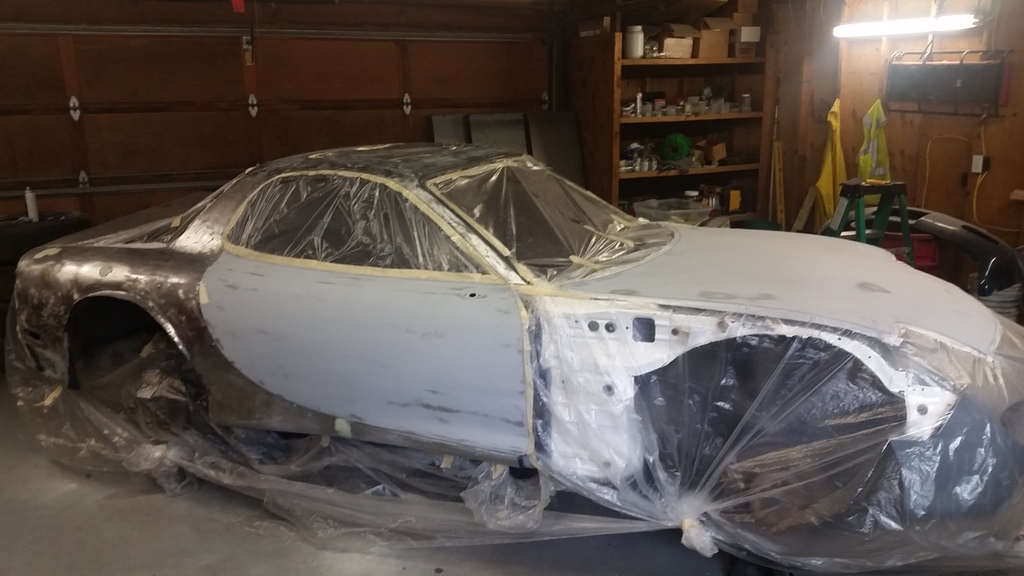
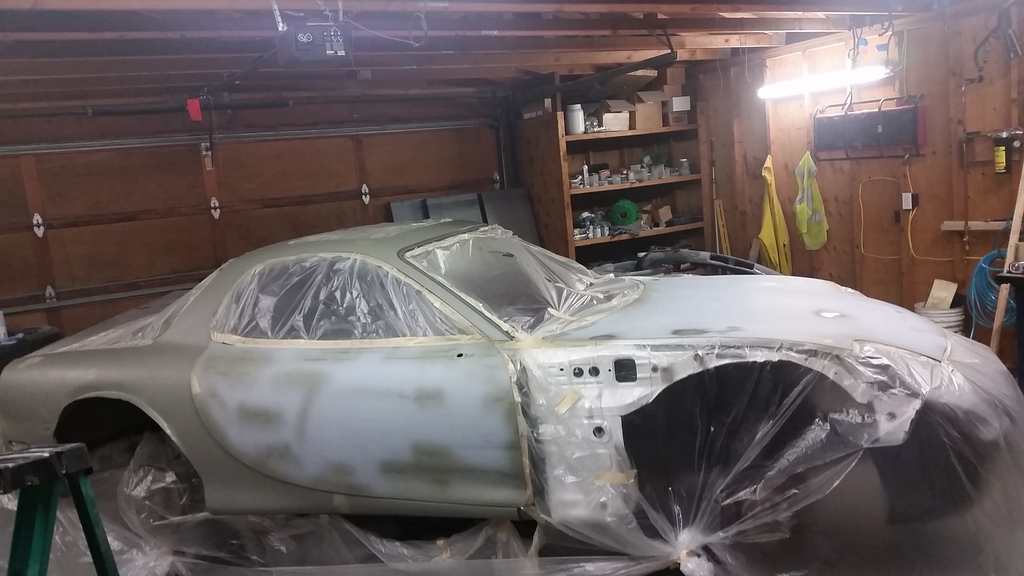
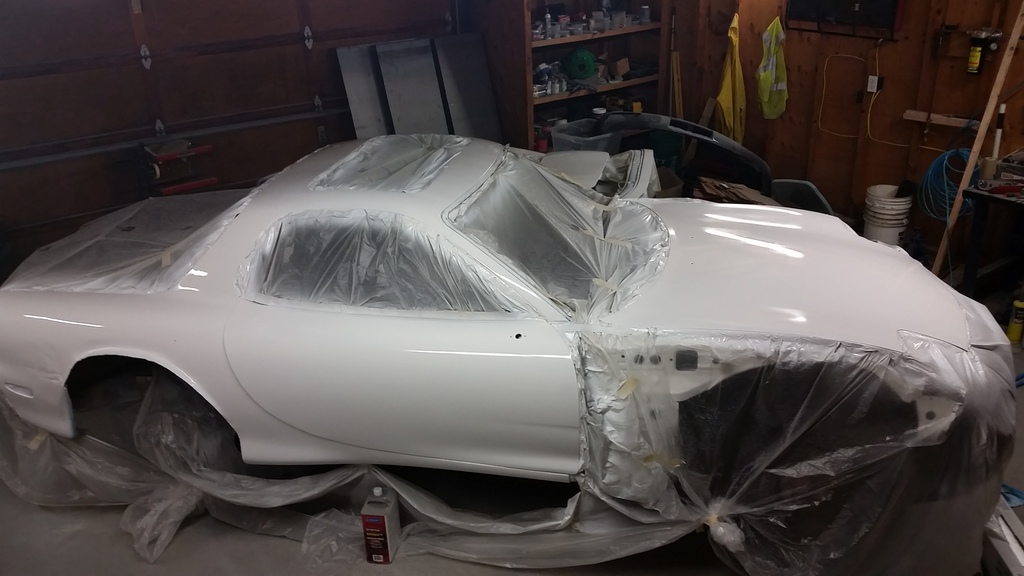
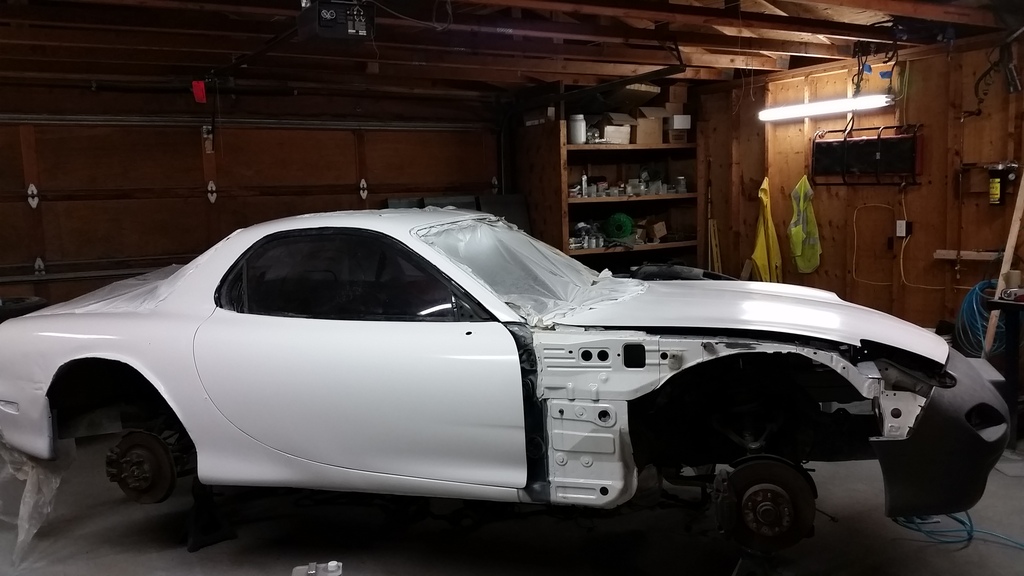
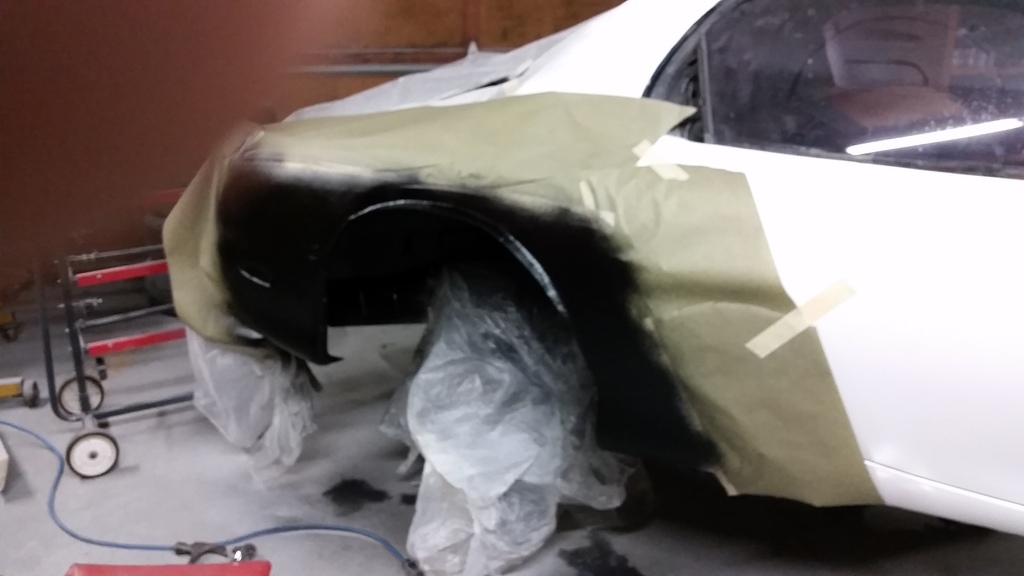
I stripped the entire car because it had anywhere from 5 to 8 paint jobs on it. Etch primed it and then primed the car. I prepped the quarter panels for the over fenders. Decided to use body panel adhesive in stead of the tradition rivet method. I filled the cracks with flexible body filler and blended the bottom to the car. Then reprimed the quarters. Fiberglass aftermarket parts are an S ton of work. The front fenders still need a lot of work at this point but I've knocked out a bunch of it. The front kouki bumper is getting the license plate shaved. The engine bay is ready for seam seal but I'm trying to get the rest of the body ready to prime first too. I decided to weld back on the front core support pieces instead of the bolt on set up I had before. So that needs to be finished sanded and etch primed then primed too. Thats pretty much where the car is at at this point. I'm trying to get the body atleast reprimed one more time before it goes over to Jason to start paint work. Obviously I'll start cutting in the doors, jams, and hood at the point. Need to pick up paint and what not but I've been so busy with long work days these past couple weeks. It sucks not being able to work on the car but the job is a prevailing wage job and I'm making a lot of money. It'll be over here soon and I'll have enough money for engine parts and i'll take a week off and catch up on the body work.

 03-22-15, 01:35 AM
#23
Junior Member
Thread Starter
Join Date: Jul 2013
Location: Tacoma, WA
Posts: 25
Likes: 0
Received 0 Likes
on
0 Posts
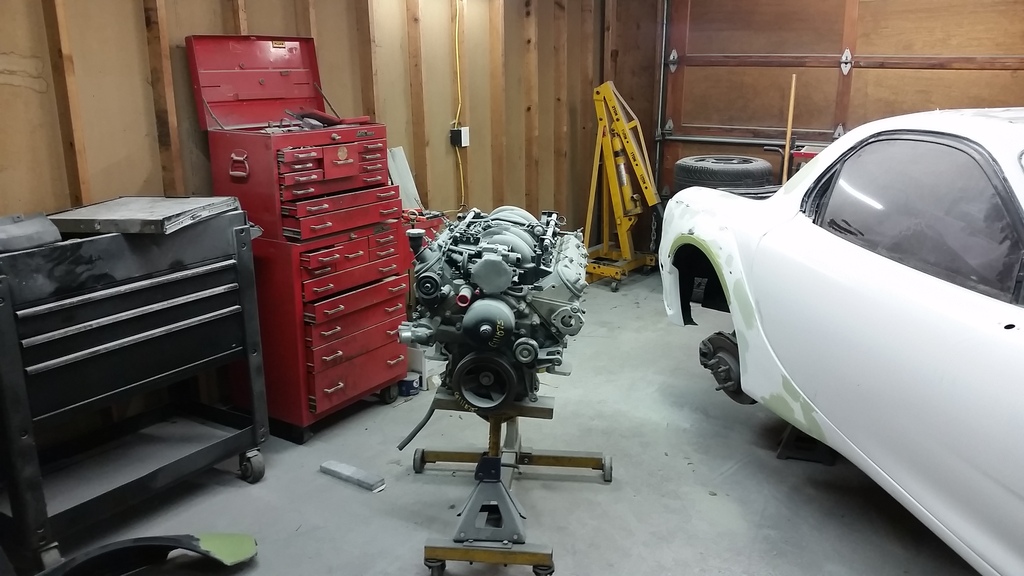
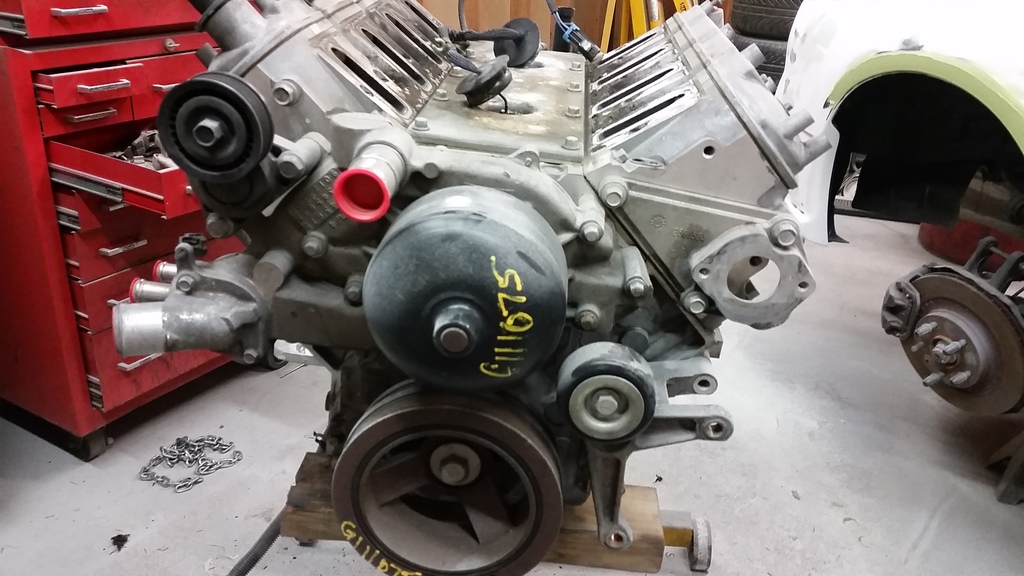
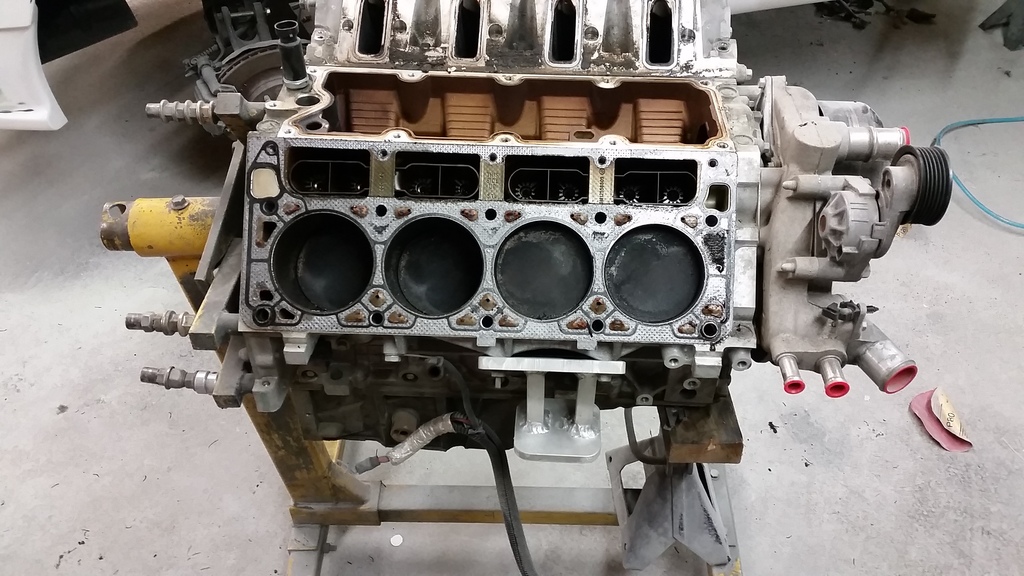
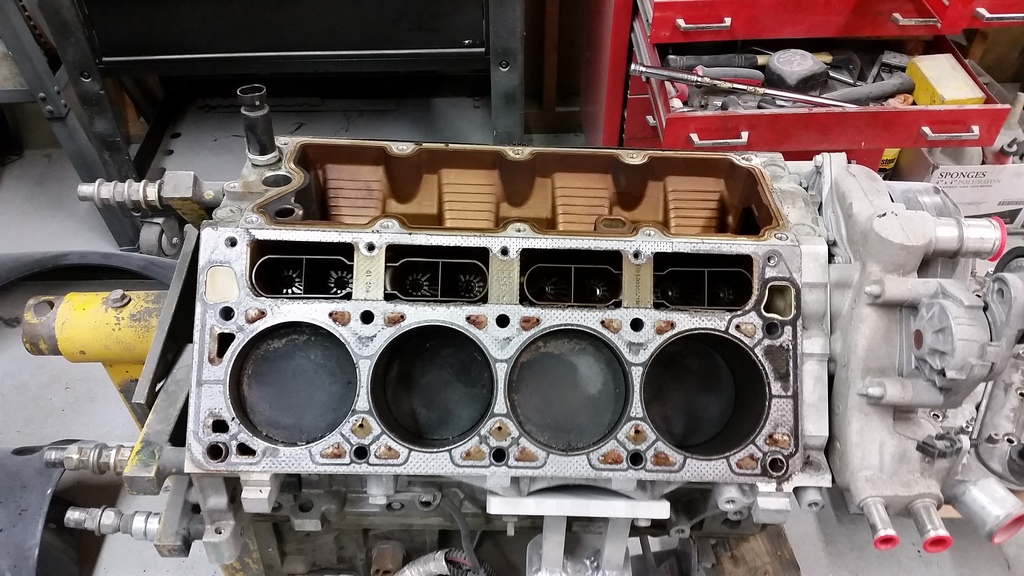
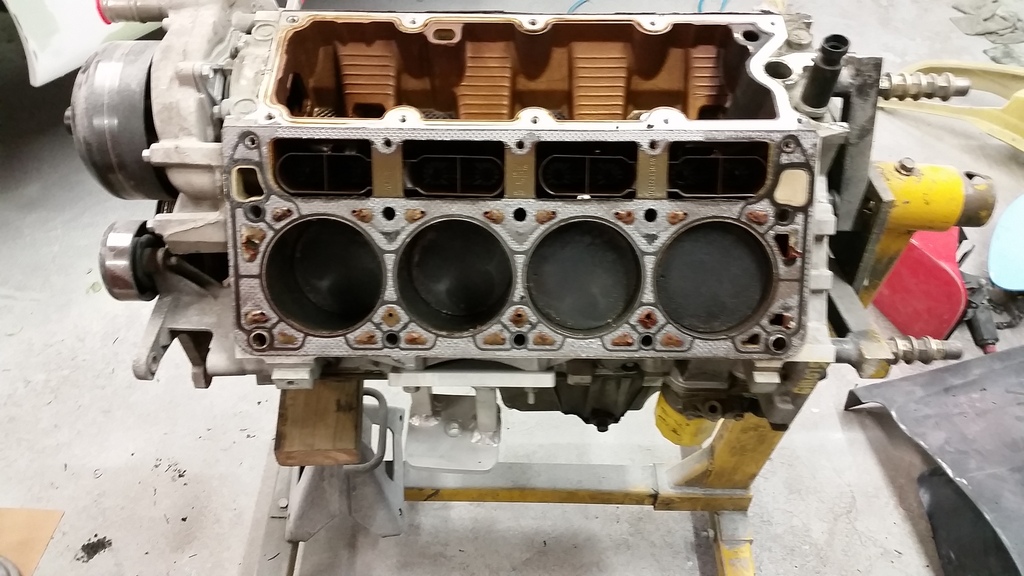
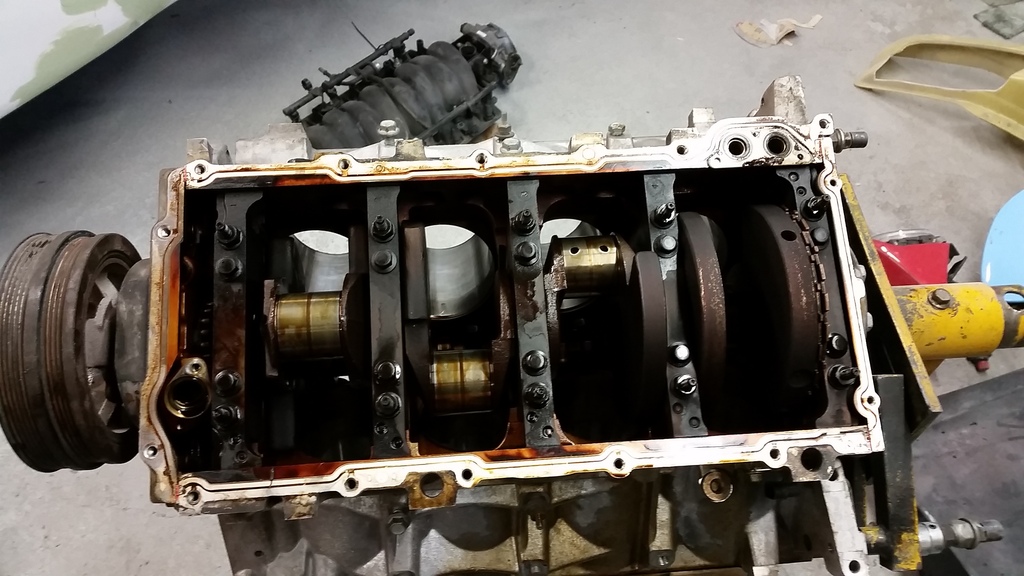
Ive been sanding for so long that I needed a break. I also came to the conclusion that I want to try and get the engine off to the machine shop so that I can time having the engine ready to go back in as soon as paint is done.
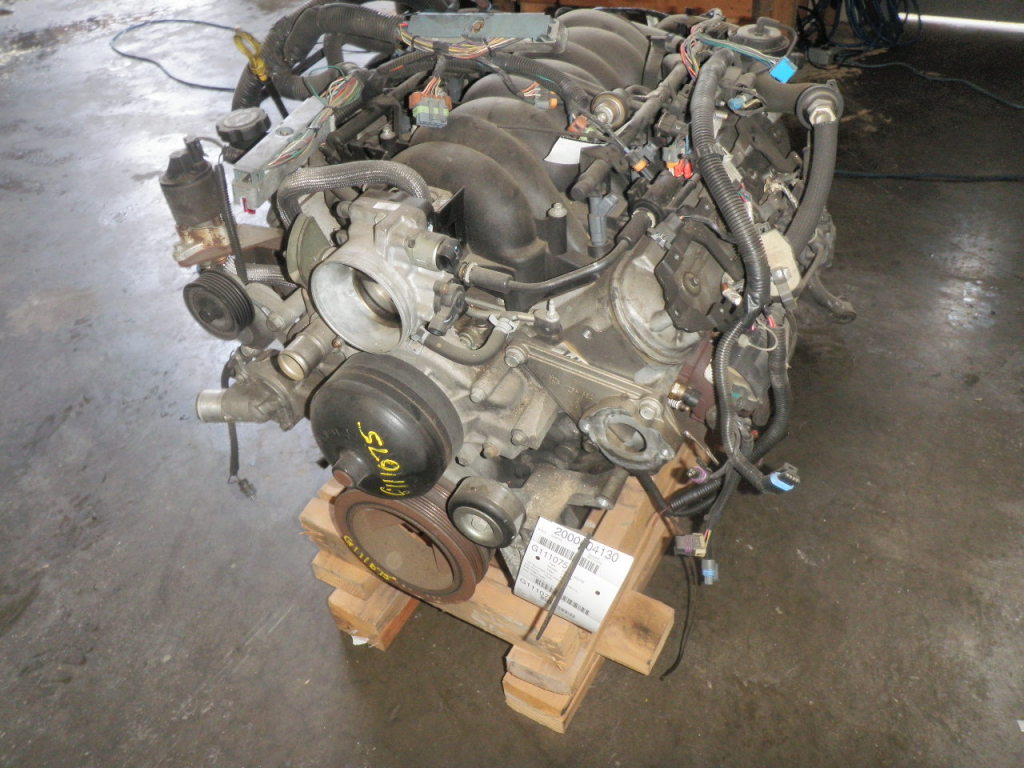
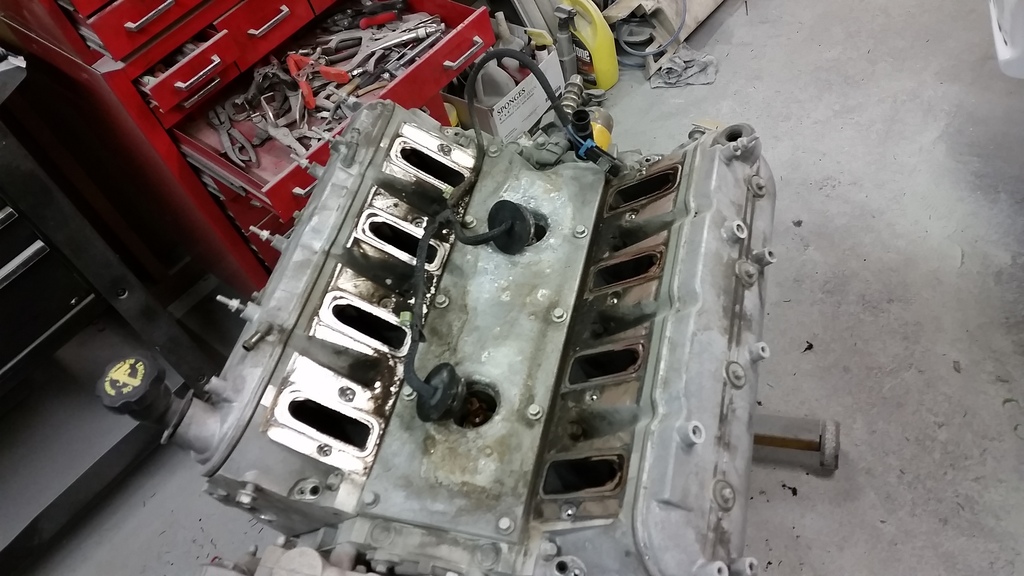
I took a risk at buying a cheap Ls1 from a wrecking yard. The yard described the noises it was making before they pulled it and it sounded like piston slap. The price was right and I decided to take the risk since I planned on putting pistons and rods in it anyway. So I got the engine apart and I couldn't be happier. Everything looks great. Cylinder walls have no damage and no ridges at the top or bottom. Crank is in great shape. Everything was in great shape. So soon as I can get over to the machine shop I'll have them look everything over and get some parts coming.
I also purchased color today a long with a few other things. So back to sanding the rest of this weekend.

