HOW TO: Remove/Replace Suspension Bushings
 08-06-03, 05:37 PM
#26
Lives on the Forum
Originally posted by PVerdieck
Why is the JimLab set so expensive? I don't know that much about the manufacturing, and was curious. I also don't know the OEM cost of a replacement set.
Why is the JimLab set so expensive? I don't know that much about the manufacturing, and was curious. I also don't know the OEM cost of a replacement set.
 08-06-03, 07:00 PM
#27
Super Snuggles
Thread Starter
Originally posted by PVerdieck
You know, that hydraulic press looks like a fancily mounted bottle jack.
You know, that hydraulic press looks like a fancily mounted bottle jack.

I wonder if someone could Mcgyver up some way to use a standard bottle jack?
How long do stock bushings last? At what point would you change them out?
Some people may drive 200,000+ miles without ever troubling themselves about their car's bushings, and some people want the best possible handling and replace them immediately with aftermarket versions.
On average, though, they should probably be replaced every 70-80k miles (depending on condition), especially on a performance car like the RX-7, although I've seen some bushings totally worn out at only 60k miles on a car that's seen hard use.
Why is the JimLab set so expensive? I don't know that much about the manufacturing, and was curious. I also don't know the OEM cost of a replacement set.
https://www.rx7club.com/forum/showth...13#post2021913
A set of my replacement bushings for the FD (18 total) sells for $650 before any group buy discount, and that includes shipping in the continental United States. By comparison, the six Mazda pillow bushings shown above cost about $50 each to replace. Add another $60 each for the two rear lower control arm damper bushings and $5 each for the stoppers, and for those eight OEM bushings alone, you'd spend $430+ before shipping. Those particular bushings aren't replaced with my kit because they're pillow bushings, but you get the idea.
08-07-03, 10:34 AM
#28
Rotary Freak
Join Date: May 2002
Location: Houston
Posts: 1,742
Likes: 0
Received 0 Likes
on
0 Posts
Cool, thanks for the info. I just figured that the stock ones wouldn't be so extortionate for that little bit of rubber and steel.
Anyways, I should wait, given that I have only 19K on the car, and have a shitload of stuff I have already spent money on to install. When I start going suspension crazy I'll probably start thinking of it again.
Anyways, I should wait, given that I have only 19K on the car, and have a shitload of stuff I have already spent money on to install. When I start going suspension crazy I'll probably start thinking of it again.
08-10-03, 12:00 PM
#30
Super Snuggles
Thread Starter
Originally posted by rotarypower101
Jim, does it look like there will be another run of the famous jimlab bushings at this time?
Has there been enough interest generated to justify a new run of them yet, perhaps a group buy even.
Jim, does it look like there will be another run of the famous jimlab bushings at this time?
Has there been enough interest generated to justify a new run of them yet, perhaps a group buy even.
https://www.rx7club.com/forum/showth...hreadid=211291
08-12-03, 10:10 AM
#36
1993 RX7 R1
Join Date: Jul 2001
Location: SoCal
Posts: 1,266
Likes: 0
Received 0 Likes
on
0 Posts
Originally posted by jimlab
Funny you should ask...
https://www.rx7club.com/forum/showth...hreadid=211291
Funny you should ask...
https://www.rx7club.com/forum/showth...hreadid=211291
 08-12-03, 12:27 PM
#37
Super Snuggles
Thread Starter
Originally posted by Mr. Stock
The real question is "When are the Unobtanium Motorsports Custom Pillow Ball Bushings going to be available for group purchase?"
The real question is "When are the Unobtanium Motorsports Custom Pillow Ball Bushings going to be available for group purchase?"
 08-12-03, 01:05 PM
#40
Super Snuggles
Thread Starter
Originally posted by LT1RX7
How are the pillow ***** going to be better than the nylon? I would guess the nylon would be stiffer and give more support.
How are the pillow ***** going to be better than the nylon? I would guess the nylon would be stiffer and give more support.
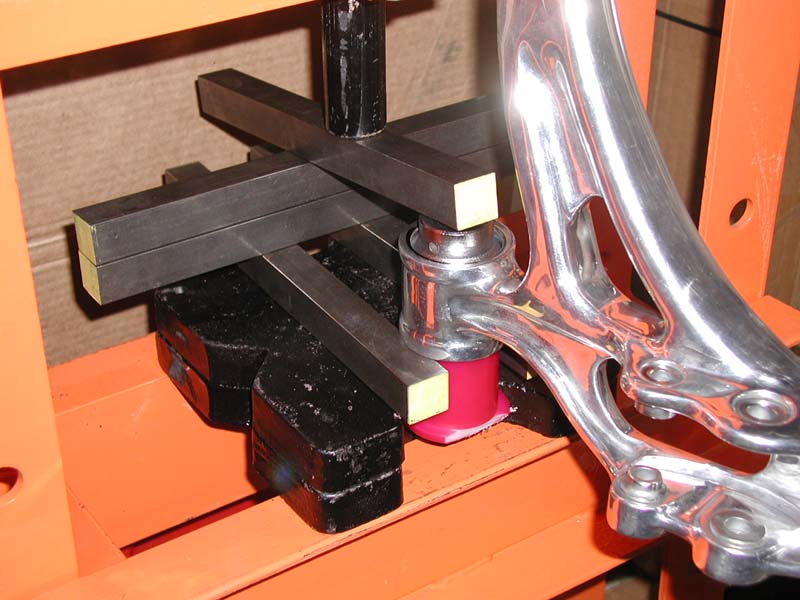
In the picture below you can see illustrated the constructional difference between a pillow-ball bushing (center) and an OEM and Nylon bushing for the rear upper control arm. As shown, the pillow-ball bushing can rotate wherever it needs to. The other two rotate along one axis only.
Think of it as the bushing equivalent of a spherical rod end... a "ball" trapped within a socket that can rotate in a non-linear fashion (not that it's required in this case). There is no slop whatsoever in this type of joint.
08-22-03, 02:57 AM
#41
Super Snuggles
Thread Starter
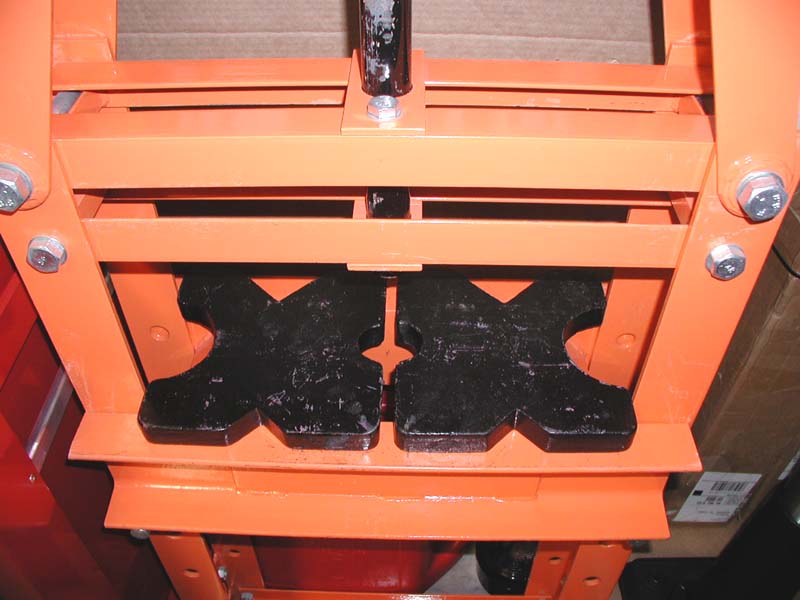
OK, time to deal with the trailing arms. The picture below shows the 4 different "cut-outs" that are in the arbor plates that come with the press. For the trailing arms, it's just easiest to use the two small half-circle cut-outs arranged opposite each other in the center as shown.
08-22-03, 03:12 AM
#42
Super Snuggles
Thread Starter
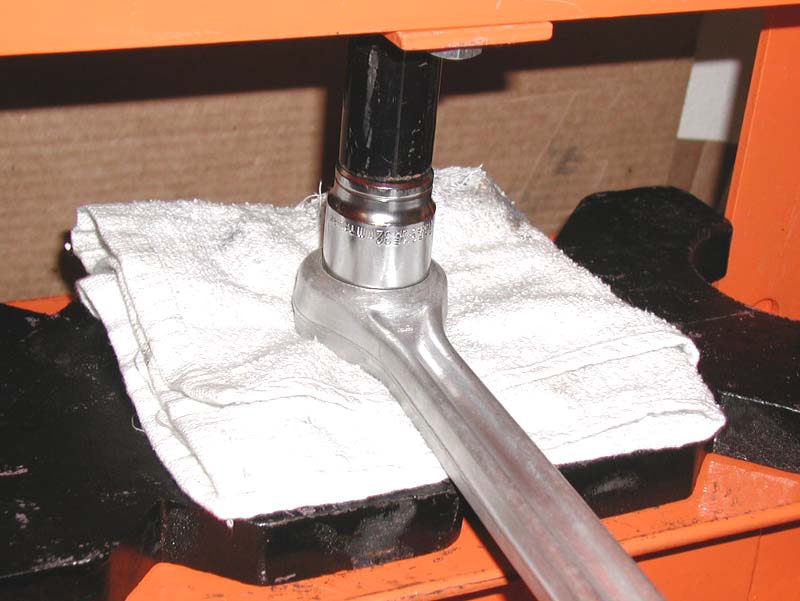
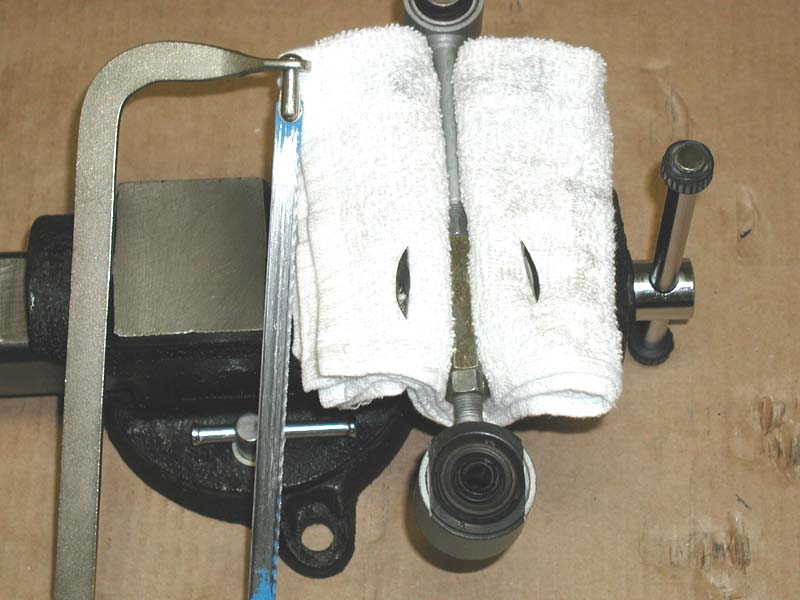
All you need then is a shop towel to protect the trailing arm and the 32mm socket (~1.64" dia.) mentioned previously to press out the bushing as shown below.
08-22-03, 03:15 AM
#43
Super Snuggles
Thread Starter
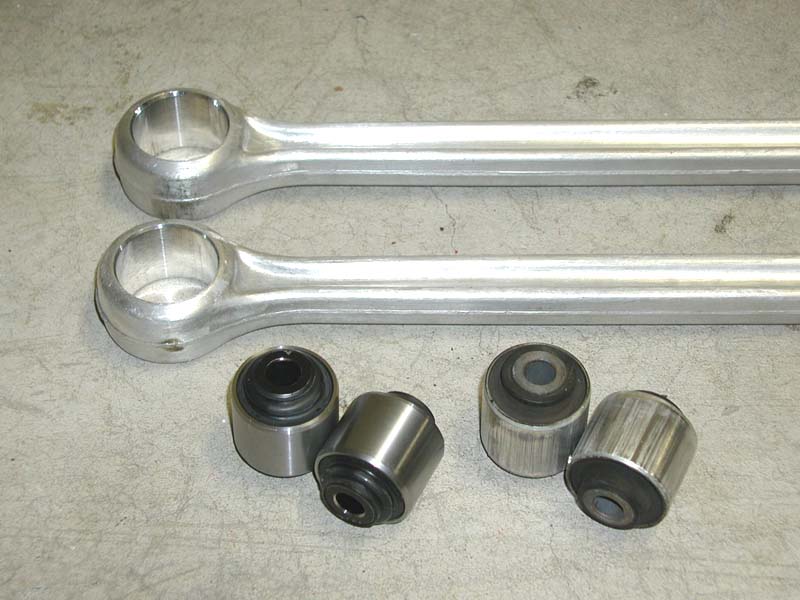
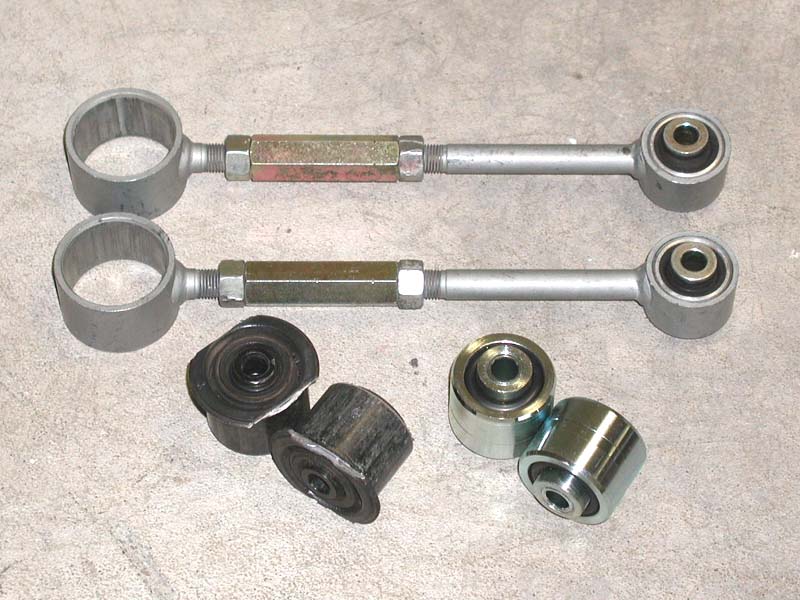
Here's the end result. You can install new bushings using the same arrangement when you're ready.
The OEM bushings are on the right and my new pillow-ball bushings are on the left. I'll install them after the trailing arms have been polished.
The OEM bushings are on the right and my new pillow-ball bushings are on the left. I'll install them after the trailing arms have been polished.
08-22-03, 03:20 AM
#44
Super Snuggles
Thread Starter
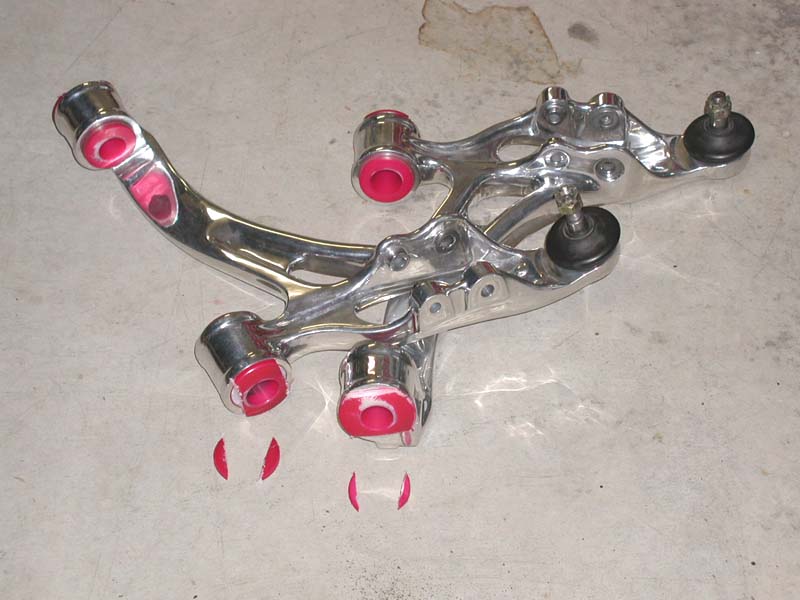
Next are the toe links. Most people probably won't ever replace their toe link bushings, but just in case, here's how the larger of the two bushings is removed.
The first step is identical to removing the damping bushing in the rear lower control arms. Part of the flange of the bushing has to be removed so that a surface is exposed which can be pressed against. Pressing against the flange gets you nowhere, obviously. It'd be like stepping into a bucket and then trying to lift yourself.
The picture below shows the two small sections of flange that I cut away so that I could support the toe link on both sides while pressing the bushing out.
08-22-03, 03:24 AM
#45
Super Snuggles
Thread Starter
The next picture shows the toe link being supported on each side by a piece of bar stock with just enough room in between for the bushing to slide through. That's a Pittsburgh 30mm socket being used (about 1.565" in diameter).
Like the bumper bushings in the lower control arms, these bushings take a little persuasion before they'll pop loose, but once they start moving, they come right out.
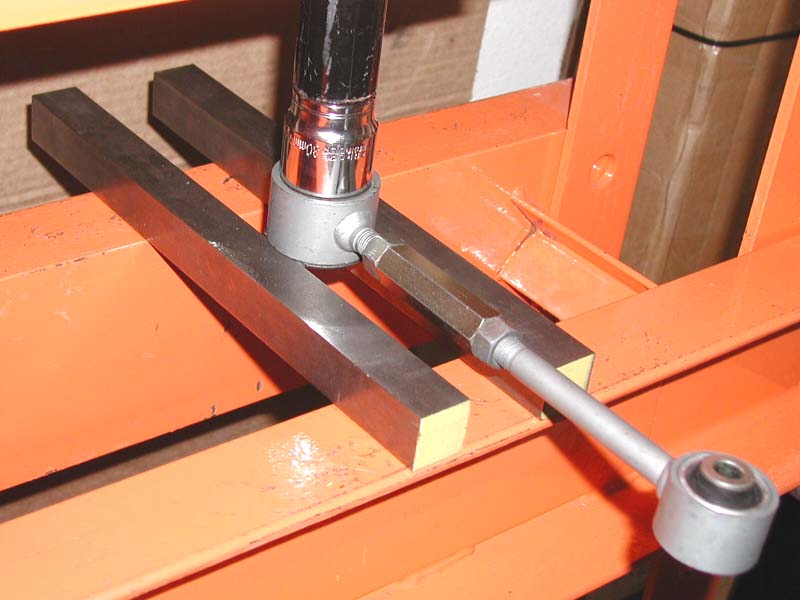
Like the bumper bushings in the lower control arms, these bushings take a little persuasion before they'll pop loose, but once they start moving, they come right out.
 08-22-03, 03:28 AM
#47
Super Snuggles
Thread Starter
The same 30mm socket was used to install the new bushings. The pieces of bar stock were moved in a little for more support, with a gap between them wide enough to clear the center "pin" of the new bushing easily.
08-22-03, 03:36 AM
#48
Super Snuggles
Thread Starter
And here's what the toe links look like with the new bushings installed.

Below is an illustration I scanned from the shop manual and which Steve Cirian added to his web site. The larger OEM bushing has a sleeve of rubber inside (area highlighted in light yellow) which introduces some slop into the link. The smaller OEM bushings is already a true pillow-ball bushing, so with the new bushings, there's no slop at either end now.

Below is an illustration I scanned from the shop manual and which Steve Cirian added to his web site. The larger OEM bushing has a sleeve of rubber inside (area highlighted in light yellow) which introduces some slop into the link. The smaller OEM bushings is already a true pillow-ball bushing, so with the new bushings, there's no slop at either end now.
08-22-03, 03:43 AM
#49
Super Snuggles
Thread Starter
Now here's a damn shame... 
To install the new pillow-ball bushings, I had to remove the still unused Nylon bushings from the front lower control arms. Unfortunately, the flange gets in the way of having something to press against, just like the toe links and inner damping bushings in the rear lower control arms. The only way to remove them is to cut away a portion of the flange. I tried tapping them out first, but they were designed to be as tight a fit as OEM, so unfortunately, I had to cut them.
Good luck using a hacksaw on these, though. The Nylon is very wear resistant and very slick. You'd spend all day trying to cut it with a standard hacksaw, so I got a chance to fire up my new bandsaw and it made quick work of the bushings.
As with all the flanges, just cut down until you're almost through, but not quite. You don't want to cut into the suspension component, just deep enough so that you can use a chisel or screwdriver and mallet to tap against and break off the portion outside the cut. The metal bushings may have to be tapped and then hammered back to fatique the metal before they'll break, but it's not difficult.
08-22-03, 03:48 AM
#50
Super Snuggles
Thread Starter
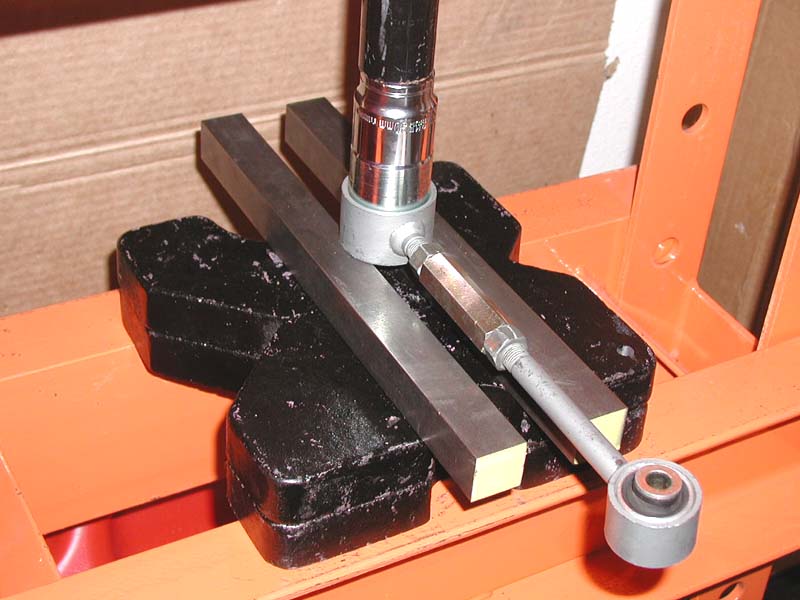
I had to press the bushings part of the way out using one arrangement, and then rearrange the plates and bar stock as shown below to get more depth and finish the process. I believe the socket I used was the 1 3/16", because it was tall enough to be able to press the bushing all the way out before the bar hit the control arm.