HOW TO: Remove/Replace Suspension Bushings
 08-22-03, 03:49 AM
#51
Super Snuggles
Thread Starter
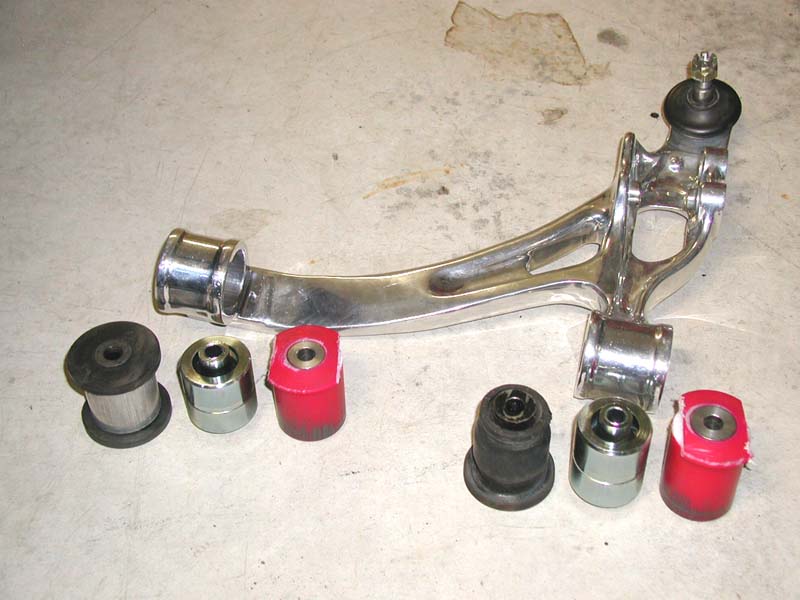
From left to right, OEM rubber bushings, new pillow-ball bushings, and hacked up Nylon bushings. 
Last edited by DamonB; 05-02-07 at 10:09 AM.
 08-22-03, 03:52 AM
#52
Super Snuggles
Thread Starter
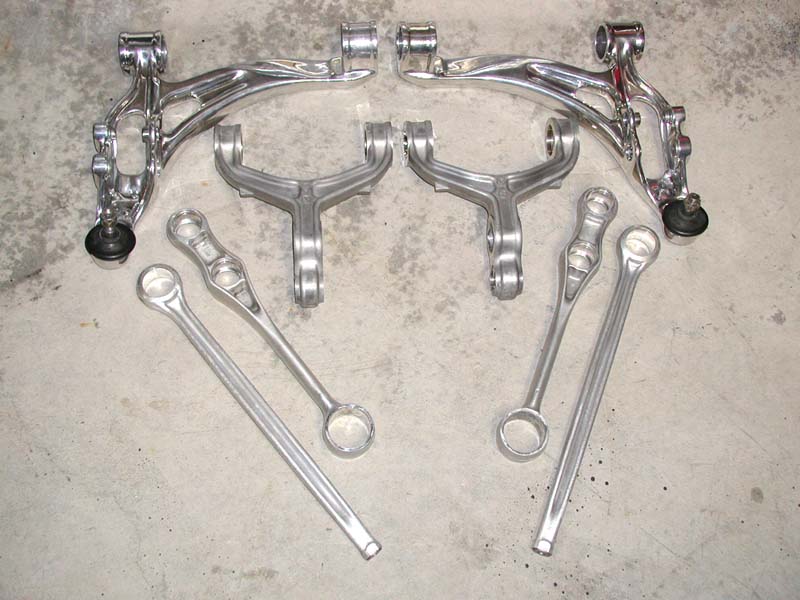
Here's the progress to date. The rear upper and lower control arms and trailing arms are "bare", ready to be sent for polishing. I redid the front upper control arms myself, but the front lower arms got a little abuse during test fitting for the new engine cradle, so I'm going to have them touched up and repolished with the rest of the pieces while I'm at it.
After they return, I'll install all the remaining pillow-ball bushings, and that'll be one more thing off my list.
After they return, I'll install all the remaining pillow-ball bushings, and that'll be one more thing off my list.
Last edited by DamonB; 05-02-07 at 10:10 AM.
08-22-03, 04:01 AM
#53
Super Snuggles
Thread Starter
One quick note... I wasn't able to attach most of the pictures in this thread because of forum lag, even though I waited to try late at night when load should have been at its lowest. I can't guarantee that the server hosting the pictures which were not attached will be up indefinitely, so be sure to copy any pictures that are of benefit to you to your local drive. That way, you'll have them regardless.
The reason I mention this is because I've had two servers shot out from under me in the past (both beyond my control), so the first few pages of my conversion thread in the 3rd gen. section has a lot of red Xs instead of cool pictures. You've been warned.
The reason I mention this is because I've had two servers shot out from under me in the past (both beyond my control), so the first few pages of my conversion thread in the 3rd gen. section has a lot of red Xs instead of cool pictures. You've been warned.
09-12-03, 02:44 AM
#54
Super Snuggles
Thread Starter
As I mentioned in my thread in the 3rd gen. forum, I got same-day turnaround on polishing my suspension components and sill plates, and paid only $300 for everything. If anyone is interested, the work was done by Eric Hayes, who I highly recommend. He's a really nice guy and a rotary enthusiast who doesn't mind a well-executed V8 conversion in an RX-7.
Here's Eric's contact information:
Eric J. Hayes
Fine Metal Polishing
Kirkland, WA
(425) 827-4898
And here's the end result...

So tonight at about 7:00 PM, my rear suspension looked like this...

and by about 11:30, it looked like this...

BTW, Max Cooper stated in his write-up on installing pillow bushings in the rear suspension that the new OEM bushings are pre-lubed (true) and that adding additional grease is optional. However, my shop manual specifically lists adding more grease, so I used high quality marine-grade lithium grease to "top off" both sides of each pillow bushing before installing the dust caps.

Here's Eric's contact information:
Eric J. Hayes
Fine Metal Polishing
Kirkland, WA
(425) 827-4898
And here's the end result...
So tonight at about 7:00 PM, my rear suspension looked like this...
and by about 11:30, it looked like this...
BTW, Max Cooper stated in his write-up on installing pillow bushings in the rear suspension that the new OEM bushings are pre-lubed (true) and that adding additional grease is optional. However, my shop manual specifically lists adding more grease, so I used high quality marine-grade lithium grease to "top off" both sides of each pillow bushing before installing the dust caps.
09-12-03, 03:02 AM
#55
Super Snuggles
Thread Starter
BTW, here's a note on installing new pillow bushing dust caps.
The dust caps are pretty much air-tight when new, so although they will easily snap into place (assuming the retention ring is clean), the center opening will stay near the top of the bolt opening unless you "burp" them. A scratch awl or pick is perfect for this. Very gently slide it between the center post of the bushing and the dust cap and then use it to hold the center opening of the dust cap away from the center post of the bushing. While doing this, push the rest of the cap down and the trapped air will escape through the opening. A small amount of grease may come up out of the opening during the process, but as soon as you slide the pick back out, just wipe it off and you're done.
After installing both dust caps on each bushing, I then slid a long Phillips screwdriver (for leverage) that was roughly the diameter of the bolt hole through the bushing and pushed the bushing around through its full range of motion several times to make sure that the dust caps were working properly and to work the grease around a little.
09-12-03, 03:42 AM
#56
Reverse Engineer
Join Date: Jun 2002
Location: Middle of Nowhere, Center of Everywhere
Posts: 355
Likes: 0
Received 0 Likes
on
0 Posts
Clear writing, good pictures, detailed information, highly educational. A stunning, inspirational read. I have not touched my 3rd Gen yet, but plan on reading every Jimlab thread before I do. Thanks.
Nat
Nat
07-05-04, 02:37 PM
#60
Super Snuggles
Thread Starter
Originally posted by suprfast
WOW, dont waste the money on the aftermarket toe links and trailing arms then, correct.
WOW, dont waste the money on the aftermarket toe links and trailing arms then, correct.
Aftermarket trailing arms, on the other hand, are only necessary if you need increased clearance for wider (over 9.5-10.0") wheels and tires. The stock trailing arms with stiffer bushings are all that's required otherwise.
07-05-04, 04:30 PM
#61
No disrespect to you since you make the bushings, or made whatever the case is but would compaines like prothane or energy suspension have bushings of similar sizes?
kris
kris
07-05-04, 04:43 PM
#62
Super Snuggles
Thread Starter
Originally posted by suprfast
No disrespect to you since you make the bushings, or made whatever the case is but would compaines like prothane or energy suspension have bushings of similar sizes?
No disrespect to you since you make the bushings, or made whatever the case is but would compaines like prothane or energy suspension have bushings of similar sizes?
11-21-04, 01:48 PM
#64
Junior Member
Join Date: Oct 2004
Location: closer
Posts: 6
Likes: 0
Received 0 Likes
on
0 Posts
Jim, will this press http://www.harborfreight.com/cpi/cta...emnumber=44811 do the job?
11-21-04, 03:01 PM
#65
Lives on the Forum
Originally Posted by the ancient words
Jim, will this press http://www.harborfreight.com/cpi/cta...emnumber=44811 do the job?
I had bought a used diff mount so I could mount my new bushings and then swap the mounts at my leisure. The used one was slightly corroded and the old bushings put up a big fight in being removed. They both let go with a very loud "bang!" and then still took some force to actually push out. The new ones slipped in with no problem. I haven't pressed anything with mine that took near the force as the removal of my old diff bushings did. I in fact bent the top bolts that the head presses against and so replaced them with grade 8 hardware. Nothing else I have done has required even half the force those did. I think mine were seriously corroded and stuck. If the 12 ton I have did those I'm sure it will handle anything else on the car.
PS- Don't know if this is true for everyone or not but I had to push my diff bushings from the inside to the outside to remove them. Wouldn't budge from the other direction even though the bore appears straight and there is no lip on the bushings.
Last edited by DamonB; 11-21-04 at 03:03 PM.
11-22-04, 08:30 AM
#66
Lives on the Forum
This is the press jimlab used; the 20 ton from Harbor Freight:
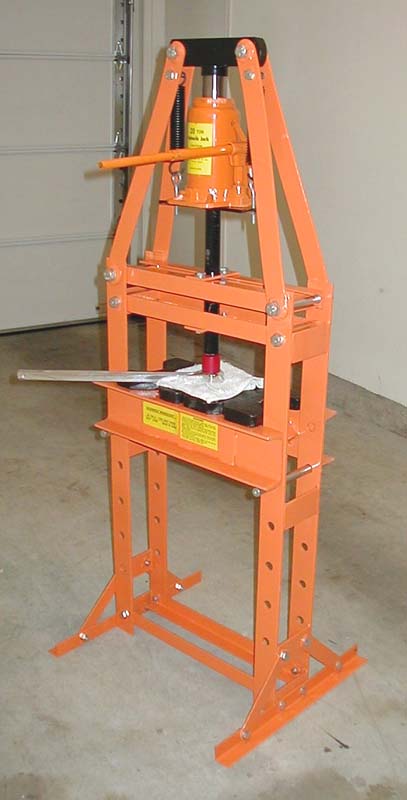
My 12 ton press looks exactly like it except the bottle jack is only rated for 12 tons and the support the arbor plates rest on is not quite as beefy. It's also about half the cost of the 20 ton. There is an extra tab welded onto the 20 ton midway down the uprights to keep them from spreading; mine doesn't have that. Best I can tell the "business end" which does all the work is the same on both except the frame of the 20 ton is slightly larger so you could fit larger parts in. I don't think any of the bits I use mine for will pose a problem though.
I bought the 12 ton because I figured I could always add a bigger jack or a heavier arbor support if I needed to.
11-22-04, 10:58 AM
#67
Super Snuggles
Thread Starter
Both of the hydraulic presses are still available from Harbor Freight, although you won't find them by searching unless you have the part numbers.
The 12-ton press is part #1667 - now only $99 and free shipping
http://www.harborfreight.com/cpi/cta...temnumber=1667
The 20-ton press is part #37999 - $199 and free shipping
http://www.harborfreight.com/cpi/cta...emnumber=37999
The 12-ton press is part #1667 - now only $99 and free shipping
http://www.harborfreight.com/cpi/cta...temnumber=1667
The 20-ton press is part #37999 - $199 and free shipping
http://www.harborfreight.com/cpi/cta...emnumber=37999
11-22-04, 11:40 AM
#69
Super Snuggles
Thread Starter
Originally Posted by Hattori Hanzo
Ok now the million dollar question is:
DO THEY SQUEEK??? AND NEED FREQUENT LUBRICATION (ONCE A MONTH OR TWO)???
DO THEY SQUEEK??? AND NEED FREQUENT LUBRICATION (ONCE A MONTH OR TWO)???
11-22-04, 08:29 PM
#70
kill it with BOOMSTICK!
jimlab, I must give you credit: even though I am not an FD owner, this writeup is one of-if not the-best I have ever read. Pictures and writing are perfectly detailed and clearly descriptive. Way to go, just sorry it cost you so much to be able to do it 
11-23-04, 09:08 AM
#71
Lives on the Forum
Originally Posted by Falcoms
Way to go, just sorry it cost you so much to be able to do it
11-23-04, 11:04 AM
#72
Senior Member
Join Date: Apr 2001
Location: Seattle, WA
Posts: 528
Likes: 0
Received 0 Likes
on
0 Posts
Originally Posted by jimlab
Unfortunately, it's unlikely that any more will be made. It was a long, hard battle to get these done, and they were almost 3 times the cost of a set of Nylon replacements.
BTW, I've discovered some interesting info re: my previous Unobtanium bushing "observations".
Regards,
Gene
11-23-04, 12:59 PM
#73
1993 RX7 R1
Join Date: Jul 2001
Location: SoCal
Posts: 1,266
Likes: 0
Received 0 Likes
on
0 Posts
Originally Posted by gfelber
If you consider producing these at some point in the future, some of us are willing to pay 3x the cost of the Nylon replacements.
 11-23-04, 05:57 PM
#74
Super Snuggles
Thread Starter
Originally Posted by DamonB
Compared to the cost of having a machine shop do all of the work this is the cheap way! The press will more than pay for itself just doing one entire set of bushings.
11-23-04, 06:00 PM
#75
Super Snuggles
Thread Starter
Originally Posted by Mr. Stock
Aren't these made by Knightsports and RE Amemiya as well?