
How to de-power your steering rack


How to de-power your steering rack
Disclaimer: If you mess something up while doing this I am not liable. This is a guide for people with a certain degree of mechanical ability and should not be attempted by someone with little knowledge of mechanics. If you screw up, the only person to blame is yourself.
I recommend doing this with a friend, but that is not completely necessary. I did because I do not have all the tools, nor the space, necessary to do everything. Beer is a very good form of payment and its nice to knock back a few cold ones once finished.
While discussing this with The Asset he mentioned most of the how-to threads were either gone or the pictures didn't work, so I figured I would take a bunch of pictures as I did mine and post them up. My memory card got full as I got near the end and some of the pictures won't be as big as the others (although still plenty big for the purpose of this write up.
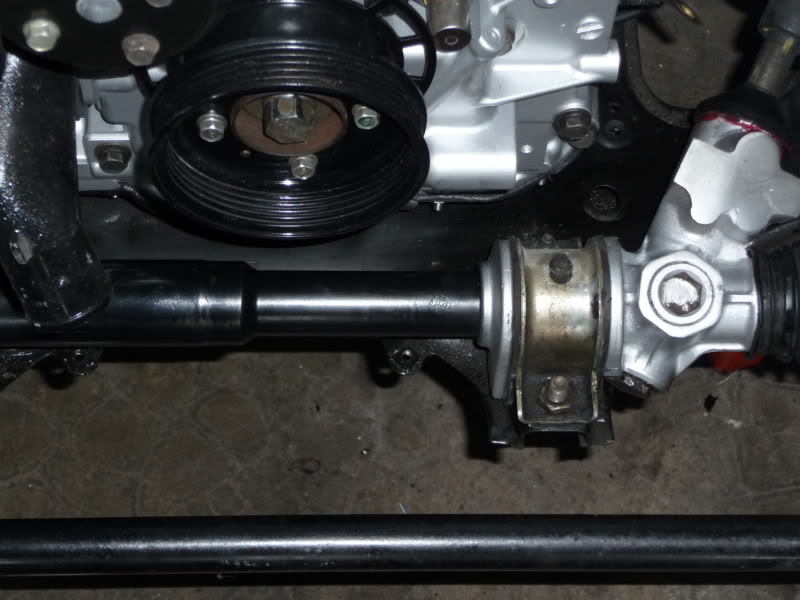
So... step 1, get the steering rack out. I didn't take any pictures, but its not that hard. Drain as much of the power steering fluid as possible. Take the wheels off, undo the cotter pin from the tie rod ends and loosen the nut till its sitting at the top of the bolt. Get a brass hammer and give it a few good whacks or get the tie rod separator tool. The FSM depicts a mazda SST that I didn't feel like looking for.
There are four bolts holding the steering rack down, unbolt these, mine were corroded and took a lot of effort to get loose. Undo one of the bolts holding the lower steering joint to either the intermediate shaft (FSM term) or the pinion shaft (flying miata term). For a picture check page 14 of the steering systems section of the FSM. Then pull the shaft free from the splines, it can be difficult, I originally started with the lower one (which will have to come off later anyways) and couldn't get it so I removed the upper one and found it was much easier to pull free.
Finally undo all the lines that snake around in the front of the car. For ease of removal I just took a hack saw and cut through some of mine. If you think you may want to go back to power steering, obviously don't do that as you will then have to buy new lines. There are some hard lines that come from the rack and goes directly back in, you can cut those if you want, but I would advise against it as you don't want to lose the bolts that they run to.
The rack should be able to come free at this point. There will more than likely still be some PS fluid in the lines so you'll get messy(ier).
Ok, step 2 and 3:
Once you get the steering rack on a work bench of some sort, unbolt those hard lines that I just told you about using some crescent wrenches. There should be 5 of them, plus a banjo bolt. The banjo bolt hooks to a line that goes up to the pump and the bigger of the other bolts goes to the lines that you cut earlier and they close the system up. Set all of these hard lines too the side, you'll need them later. Then push the boots that cover the inner tie rod ends off and over the tie rods, there are wires on the inside and clips on the outside that will need to be undone. There's also a little lip that the outer edge of the boot rests against and it can be a pain to get the boot over.
here's where 4 of the bolts go

here's the other two with the boot slid down

Step 4:
on each end get a screwdriver or something similar and gently tap up the ends of the washer (for lack of the correct term that I can't come up with) that was clamped down to hold the inner tie-rod ends in place, and take a pipe wrench (its easier) and remove the tie rod completely.


step 5:
take a straight edge that's approximately 3/8ths of an inch thick (the thickness makes it easier) and rotate the plug on the end of the passenger side until the wire clip inside comes loose. Then rotate it clockwise until you're able to pull the clip loose.
here's the clip, you can see it in the groove

here you can see how it comes loose once rotated

here it is as you rotate it CCW

I recommend doing this with a friend, but that is not completely necessary. I did because I do not have all the tools, nor the space, necessary to do everything. Beer is a very good form of payment and its nice to knock back a few cold ones once finished.
While discussing this with The Asset he mentioned most of the how-to threads were either gone or the pictures didn't work, so I figured I would take a bunch of pictures as I did mine and post them up. My memory card got full as I got near the end and some of the pictures won't be as big as the others (although still plenty big for the purpose of this write up.
So... step 1, get the steering rack out. I didn't take any pictures, but its not that hard. Drain as much of the power steering fluid as possible. Take the wheels off, undo the cotter pin from the tie rod ends and loosen the nut till its sitting at the top of the bolt. Get a brass hammer and give it a few good whacks or get the tie rod separator tool. The FSM depicts a mazda SST that I didn't feel like looking for.
There are four bolts holding the steering rack down, unbolt these, mine were corroded and took a lot of effort to get loose. Undo one of the bolts holding the lower steering joint to either the intermediate shaft (FSM term) or the pinion shaft (flying miata term). For a picture check page 14 of the steering systems section of the FSM. Then pull the shaft free from the splines, it can be difficult, I originally started with the lower one (which will have to come off later anyways) and couldn't get it so I removed the upper one and found it was much easier to pull free.
Finally undo all the lines that snake around in the front of the car. For ease of removal I just took a hack saw and cut through some of mine. If you think you may want to go back to power steering, obviously don't do that as you will then have to buy new lines. There are some hard lines that come from the rack and goes directly back in, you can cut those if you want, but I would advise against it as you don't want to lose the bolts that they run to.
The rack should be able to come free at this point. There will more than likely still be some PS fluid in the lines so you'll get messy(ier).
Ok, step 2 and 3:
Once you get the steering rack on a work bench of some sort, unbolt those hard lines that I just told you about using some crescent wrenches. There should be 5 of them, plus a banjo bolt. The banjo bolt hooks to a line that goes up to the pump and the bigger of the other bolts goes to the lines that you cut earlier and they close the system up. Set all of these hard lines too the side, you'll need them later. Then push the boots that cover the inner tie rod ends off and over the tie rods, there are wires on the inside and clips on the outside that will need to be undone. There's also a little lip that the outer edge of the boot rests against and it can be a pain to get the boot over.
here's where 4 of the bolts go
here's the other two with the boot slid down
Step 4:
on each end get a screwdriver or something similar and gently tap up the ends of the washer (for lack of the correct term that I can't come up with) that was clamped down to hold the inner tie-rod ends in place, and take a pipe wrench (its easier) and remove the tie rod completely.
step 5:
take a straight edge that's approximately 3/8ths of an inch thick (the thickness makes it easier) and rotate the plug on the end of the passenger side until the wire clip inside comes loose. Then rotate it clockwise until you're able to pull the clip loose.
here's the clip, you can see it in the groove
here you can see how it comes loose once rotated
here it is as you rotate it CCW
Last edited by GoodfellaFD3S; Feb 19, 2011 at 06:11 PM.
step 6:
remove the dust boot and the snap ring from the top of the pinion shaft (its fun I promise )
)

remove the cover from the bottom

then the bolt

and slide it out

remove the locknut, on mine the cover and spring came too

then the support yoke

step 7:
remember that wire snap ring we loosened/removed earlier? well if you didn't pull the end plug out do so now

and with a couple good hard pulls from the passenger side, the center shaft should come free

step 8:
USE EYE PROTECTION as you'll want your face very close to what you're cutting so you can make sure you don't accidentally cut the shaft. Slip ups do happen (I've got a small mark on mine now) and as long as they're not terrible, its nothing to really worry about. Gloves are not necessary, but helpful. I had my friend hold the shaft while I cut, but you can also get some padding and put the shaft in a vice so it doesn't rotate.
Begin carefully cutting the seal until you nearly touch the shaft, don't be afraid to get your face close.

rotate the shaft 180 degrees and do the same on the other side. Then take a wide punch and a brass hammer and start to separate the seal at one of the places that you cut. A chisel will work also, but you need to be more careful if you use one. Eventually it will separate.

twist and widen the seal until it breaks free.

remove the dust boot and the snap ring from the top of the pinion shaft (its fun I promise
)remove the cover from the bottom
then the bolt
and slide it out
remove the locknut, on mine the cover and spring came too
then the support yoke
step 7:
remember that wire snap ring we loosened/removed earlier? well if you didn't pull the end plug out do so now
and with a couple good hard pulls from the passenger side, the center shaft should come free
step 8:
USE EYE PROTECTION as you'll want your face very close to what you're cutting so you can make sure you don't accidentally cut the shaft. Slip ups do happen (I've got a small mark on mine now) and as long as they're not terrible, its nothing to really worry about. Gloves are not necessary, but helpful. I had my friend hold the shaft while I cut, but you can also get some padding and put the shaft in a vice so it doesn't rotate.
Begin carefully cutting the seal until you nearly touch the shaft, don't be afraid to get your face close.
rotate the shaft 180 degrees and do the same on the other side. Then take a wide punch and a brass hammer and start to separate the seal at one of the places that you cut. A chisel will work also, but you need to be more careful if you use one. Eventually it will separate.
twist and widen the seal until it breaks free.
here's the brass hammer and the wide punch, as well as the brass rod that we used to get into small spaces that the hammer couldn't quite reach.

step 9: REASSEMBLY!
reassembly is the opposite of assembly. I didn't take too many pictures, but here's the one thing that I felt might be helpful to take pictures of.
remember that wire clip from step 5? well here's how to get it back in.
place the end that faces the center of the clip (imagine the clip as a half circle) into the small hole in the plug

take your straightedge and rotate it clockwise while holding the clip in place

once the clip snaps into place, simply continue rotating the plug until it is roughly in the same place that it was in when you started.
These next 4 pictures were borrowed from the flying miata site which had instructions for doing this to the miata rack which is very similar to the FD rack.
Remember to grease up the steering shaft and the pinion shaft so everything moves nice and smoothly. Get nice and generous with that grease and don't be afraid to get even messier than before.


Step 10:
take the lines and bolts from earlier, clip them so there's less than an inch of line protruding from the ends of the bolts. Put them in a vice and clamp them shut. No need to do anything else because all you're doing now is keeping dust out.

or you can just weld the ends of the bolts closed

put all the bolts back in their respective places and tighten down. Get a bolt to replace the banjo bolt from your local hardware store. And torque down the locknut on the bottom of the pinion shaft. I couldn't find the torque specifications in the FSM so I used what flying miata used for the miata rack. 43 in-lbs then back it off 25 degrees, do it three times.
Step 11: install the rack back into the car and enjoy giving your arms a workout in parking lots!
step 9: REASSEMBLY!
reassembly is the opposite of assembly. I didn't take too many pictures, but here's the one thing that I felt might be helpful to take pictures of.
remember that wire clip from step 5? well here's how to get it back in.
place the end that faces the center of the clip (imagine the clip as a half circle) into the small hole in the plug
take your straightedge and rotate it clockwise while holding the clip in place
once the clip snaps into place, simply continue rotating the plug until it is roughly in the same place that it was in when you started.
These next 4 pictures were borrowed from the flying miata site which had instructions for doing this to the miata rack which is very similar to the FD rack.
Remember to grease up the steering shaft and the pinion shaft so everything moves nice and smoothly. Get nice and generous with that grease and don't be afraid to get even messier than before.
Step 10:
take the lines and bolts from earlier, clip them so there's less than an inch of line protruding from the ends of the bolts. Put them in a vice and clamp them shut. No need to do anything else because all you're doing now is keeping dust out.
or you can just weld the ends of the bolts closed
put all the bolts back in their respective places and tighten down. Get a bolt to replace the banjo bolt from your local hardware store. And torque down the locknut on the bottom of the pinion shaft. I couldn't find the torque specifications in the FSM so I used what flying miata used for the miata rack. 43 in-lbs then back it off 25 degrees, do it three times.
Step 11: install the rack back into the car and enjoy giving your arms a workout in parking lots!
Disclaimer: If you mess something up while doing this I am not liable. This is a guide for people with a certain degree of mechanical ability and should not be attempted by someone with little knowledge of mechanics. If you screw up, the only person to blame is yourself.
I recommend doing this with a friend, but that is not completely necessary. I did because I do not have all the tools, nor the space, necessary to do everything. Beer is a very good form of payment and its nice to knock back a few cold ones once finished.
I recommend doing this with a friend, but that is not completely necessary. I did because I do not have all the tools, nor the space, necessary to do everything. Beer is a very good form of payment and its nice to knock back a few cold ones once finished.


I see you left the seals/valves on the quill shaft. I think I remember reading somewhere that you need to remove the seals and weld the quill shaft to remove any slop in the steering rack. That is what I did on my rack as well.
Trending Topics
I'm talking about this:
From what I remember reading on other manual rack conversion DIY's, it was recommended that you weld the two shafts together like pictured for strength and to remove any slop as the PS rack has two separate piece that rotate.
From what I remember reading on other manual rack conversion DIY's, it was recommended that you weld the two shafts together like pictured for strength and to remove any slop as the PS rack has two separate piece that rotate.

Joined: Oct 2001
Posts: 6,279
Likes: 728
From: Florence, Alabama
five stars for you
a really nice "How To" as to taking it all apart and back together.
my question is why? i just removed the hydraulics along w most of the fluid and plugged the holes back in 99. please state the reasoning for taking it all apart. i am sure i am not the only one that misses the reason for the significant amount of work.
BTW, i am not being negative here, 'just looking for info.
howard
thanks howard,
gsxrated hit the nail on the head, I didn't weld the pinion shaft together because I was going off of the flying miata how-to and they didn't do it, so I didn't do it. I may take the rack apart again and do it because it would take all of 20 minutes, if not less, to do it.
gsxrated hit the nail on the head, I didn't weld the pinion shaft together because I was going off of the flying miata how-to and they didn't do it, so I didn't do it. I may take the rack apart again and do it because it would take all of 20 minutes, if not less, to do it.
 I followed the flying miata thread, then read some more on here and had to pull my rack back apart and weld the shaft. Luckily I hadn't reinstalled it into the car yet. It's nice having the forums as a resource for information.
Rotary Enthusiast

Joined: May 2006
Posts: 763
Likes: 15
From: reno nevada
I am also interested in more information on welding the quill. in a recent thread, i think from muibubbles? a post was made that without welding it the rack can break and send you off the road. yet if you do weld it, so much heat is put on the rack its weakend and also unsafe i would like to know the best approach.
I also did this mod but I ended up not likeing the feel. I wish I could go back to power steering but it would be too much of a hassle to go back so I deal with it.
Don't feel bad, I did the exact same thing! I followed the flying miata thread, then read some more on here and had to pull my rack back apart and weld the shaft. Luckily I hadn't reinstalled it into the car yet. It's nice having the forums as a resource for information.
I followed the flying miata thread, then read some more on here and had to pull my rack back apart and weld the shaft. Luckily I hadn't reinstalled it into the car yet. It's nice having the forums as a resource for information.I am also interested in more information on welding the quill. in a recent thread, i think from muibubbles? a post was made that without welding it the rack can break and send you off the road. yet if you do weld it, so much heat is put on the rack its weakend and also unsafe i would like to know the best approach.
I'm still undecided if I'm going to do this, I'll post some pictures if I do.
I won't let go


Joined: Aug 2002
Posts: 3,871
Likes: 23
From: Chi -> Maidstone
You need to weld the shaft!
I think you seriously run the risk of snapping the thing in two if you don't. I wish I did pics of it when I did mine...I think there are pics here...
https://www.rx7club.com/3rd-generation-specific-1993-2002-16/help-proper-way-remove-power-steering-892105/page2/#post10460273
Basically, it's two halves that make up the part. It's a little torsion bar I think that connects the two together. As you no longer have any hydraulic help, you're going to put some serious strain on the thing. Not to mention that it will crisp up your feel.
Otherwise, nice writeup. I don't think there's been one with FD specific pics for a true manual conversion (with an OEM rack).
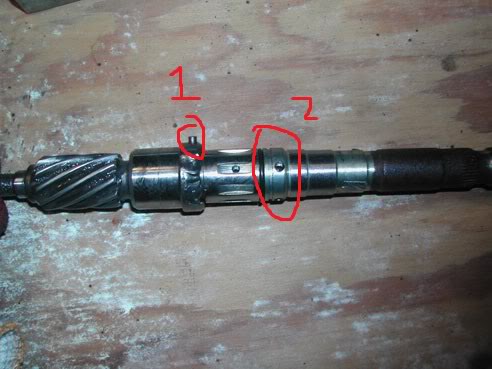

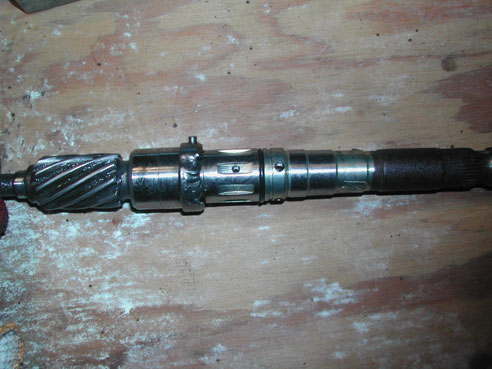
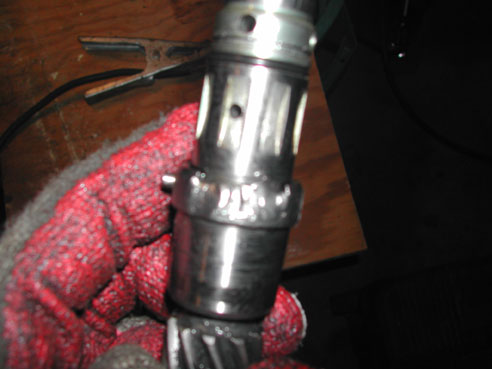
Ok, so I forgot the camera, my appologies for the phone pics. I decided to take the quill shaft, or whatever you want to call this part, back out and weld it. The bearing has to be pressed off, you can see it quite easily in step 9. There is a tab holding it in place that you can see in the above picture (1), you will need to cut a slot in some pipe for the press.

There is a snap ring holding it in place as well, we did not discover this until after we had tried pressing the bearing out a few times to no avail. The bottom ring will come out as well (2) press that back into place and BE CAREFUL to get it back in as close to its original position as possible.
For those who do tear there rack down. When i de power racks I weld the tube its self and grind smooth as well as add a grease zerk on the end furthest from the gears so you can service the rack with fresh grease from time to time here is pics

Ok, so I forgot the camera, my appologies for the phone pics. I decided to take the quill shaft, or whatever you want to call this part, back out and weld it. The bearing has to be pressed off, you can see it quite easily in step 9. There is a tab holding it in place that you can see in the above picture (1), you will need to cut a slot in some pipe for the press.
There is a snap ring holding it in place as well, we did not discover this until after we had tried pressing the bearing out a few times to no avail. The bottom ring will come out as well (2) press that back into place and BE CAREFUL to get it back in as close to its original position as possible.
Thanks in advance.