FC WRITE UP: Replacing Stock Clock with Something Useful
 11-30-08, 03:33 PM
#1
FC WRITE UP: Replacing Stock Clock with Something Useful
I spent the day mounting my Lambda gauge in place of the stock (worthless) clock. It was a little tricky.

•First I took the stock idiot cluster apart.

•Took all the components of the clock out of the idiot cluster. I was careful not to break the circuit board or any other elements of the warning system. Here is the piece I took out. I ended up cutting the clock **** off with some tin snips.

•I then had to take a file to the white housing. The area where the clock used to be has to be smoothed out to allow the lambda LCD gauge to fit in the slot where the clock used to be. There are little nubs that needed to be filed off. I circled the nubs, and dotted the area that needs to be filed down. There are nubs behind the dotted area that also need to be smoothed out.

• Ran the LCD gauge and all wires for the LED and calibration button up through the dash. This is the LCD gauge that came with my LC-1 wideband controller. I've seen similar displays at Radio Shack. Here you can see the little LED that tells you if your sensor is warmed up, calibrated, etc. There is also a calibration button not pictured.
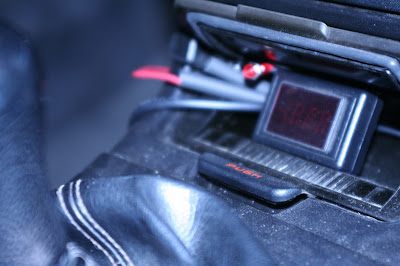
•Drilled two holes in the clear plastic lens so the LED and calibration button will mount on the outside of the lens. There is already one hole from the clock ****.

SIDE NOTE: I have a Series 4 cluster, but a Series 5 dash and idiot surround. I found a little trick that helped me out. If you turn the clear plastic lens upside down, and cut off the tabs for the tiny (useless) screws, the Series 5 surround fits the Series 4 cluster. So I drilled two holes on the opposite side from the original clock ****.

•Ran all LED and button wires through the cluster. Just make sure all the wires are run through the correct route before you connect everything. I did have to route out a small area for the wires to snake through the back of the cluster, above where the stock clip plugs in.
•Crimped and heat shrink for LED and button wires.
•Took the black panel (with all the warning symbols) and cut it right before the window for the clock. The LED gauge will take the place of this piece.

•Re-assemble carefully.

•First I took the stock idiot cluster apart.
•Took all the components of the clock out of the idiot cluster. I was careful not to break the circuit board or any other elements of the warning system. Here is the piece I took out. I ended up cutting the clock **** off with some tin snips.
•I then had to take a file to the white housing. The area where the clock used to be has to be smoothed out to allow the lambda LCD gauge to fit in the slot where the clock used to be. There are little nubs that needed to be filed off. I circled the nubs, and dotted the area that needs to be filed down. There are nubs behind the dotted area that also need to be smoothed out.
• Ran the LCD gauge and all wires for the LED and calibration button up through the dash. This is the LCD gauge that came with my LC-1 wideband controller. I've seen similar displays at Radio Shack. Here you can see the little LED that tells you if your sensor is warmed up, calibrated, etc. There is also a calibration button not pictured.
•Drilled two holes in the clear plastic lens so the LED and calibration button will mount on the outside of the lens. There is already one hole from the clock ****.
SIDE NOTE: I have a Series 4 cluster, but a Series 5 dash and idiot surround. I found a little trick that helped me out. If you turn the clear plastic lens upside down, and cut off the tabs for the tiny (useless) screws, the Series 5 surround fits the Series 4 cluster. So I drilled two holes on the opposite side from the original clock ****.
•Ran all LED and button wires through the cluster. Just make sure all the wires are run through the correct route before you connect everything. I did have to route out a small area for the wires to snake through the back of the cluster, above where the stock clip plugs in.
•Crimped and heat shrink for LED and button wires.
•Took the black panel (with all the warning symbols) and cut it right before the window for the clock. The LED gauge will take the place of this piece.
•Re-assemble carefully.
Last edited by stylEmon; 11-30-08 at 03:36 PM.

The following users liked this post:
Westcoast FC (04-24-21)
 12-02-08, 11:14 AM
#7
so did mine, and half the time is was so dull I couldn't see it anyway. Useless clock!
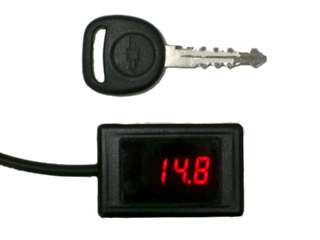
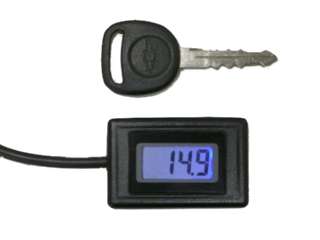
Here is the gauge by its self... you can get them for Temp, AFR, what ever...
They even come in Blue
http://www.dynotunenitrous.com/store...?idproduct=171 or search [square digital gauge]
Here is the gauge by its self... you can get them for Temp, AFR, what ever...
They even come in Blue
http://www.dynotunenitrous.com/store...?idproduct=171 or search [square digital gauge]
Last edited by stylEmon; 12-02-08 at 11:22 AM.
Trending Topics

 04-21-09, 05:03 PM
#10
Thanks for the idea! I went ahead and installed my LC-1 in exactly the same spot over the weekend (finally). I didn't cut the clear piece that overlays the lights, so I was able to mount my calibration button & LED in it instead. The button is even recessed in the plastic lens, so you can't press it accidentally.

Last edited by RotaryRocket88; 02-25-13 at 09:33 PM. Reason: fixed broken link
 04-24-09, 05:41 PM
#14
It's exactly what I wanted, since my A-piller pod is full, and there aren't too many other places with good visibility.
 04-25-09, 09:54 PM
#16
Hopeless Rotorhead
iTrader: (2)
Join Date: Feb 2005
Location: N. Houston, TX
Posts: 590
Likes: 0
Received 0 Likes
on
0 Posts
saw this in your album one day when your pics were up on the homepage. My clock don't work half the time anyway and theres always one on the cd player. I'll be ninja'ing your idea as well.
07-06-09, 03:46 PM
#18
Thanks to RotaryRocket88, I was forced to clean up the install on my gauge. 

In all honesty, it looks much cleaner! It is actually a little harder to see in the day time now that it's behind the stock clock lens tho... Still, looks amazing!

In all honesty, it looks much cleaner! It is actually a little harder to see in the day time now that it's behind the stock clock lens tho... Still, looks amazing!
11-09-09, 05:08 PM
#19
Sorry to bring this thread back from the dead, but I am in the process of doing this install too. I figured this thread could use some more in progress pics to make it easier for anyone else who wants to do it. I ordered my LCD gauge from the place stylEmon linked. I chose not to cut the side of the black panel off, to make it look more factory.
I only had to trim the surround a little bit, just enough to fit the lip around the LCD in between the top and bottom. You can't see it here but I also had to take off the nubs from the back side.

I plan on running the wire back behind the LCD and out behind the calibration button.

Once you take the clock reset button/**** out there is a hole where it used to go that the wires fit through nicely, headed towards the back of the panel instead of having to route it around the lights. If you don't feel like using tin snips to cut the **** off, if you take the unit apart and push in the ****, there is an E-clip on the back that you can pop off, then the **** slides out the front.

I only had to trim the surround a little bit, just enough to fit the lip around the LCD in between the top and bottom. You can't see it here but I also had to take off the nubs from the back side.
I plan on running the wire back behind the LCD and out behind the calibration button.
Once you take the clock reset button/**** out there is a hole where it used to go that the wires fit through nicely, headed towards the back of the panel instead of having to route it around the lights. If you don't feel like using tin snips to cut the **** off, if you take the unit apart and push in the ****, there is an E-clip on the back that you can pop off, then the **** slides out the front.
11-12-09, 01:41 AM
#21
I'll update it as I go, I pulled an S5 idiot light cluster at the junkyard today and want to see if I can make it work on my S4 since they look so much better. About half the lights are in different places, but the plug is the same so I'll see if I can figure out what goes where. Oddly enough the S5 unit loses the cooling fan and brake light lights, but gains a check engine light.
11-13-09, 12:04 AM
#22
I'll update it as I go, I pulled an S5 idiot light cluster at the junkyard today and want to see if I can make it work on my S4 since they look so much better. About half the lights are in different places, but the plug is the same so I'll see if I can figure out what goes where. Oddly enough the S5 unit loses the cooling fan and brake light lights, but gains a check engine light.