BigAl's FD 20B racecar project
 07-25-08, 06:40 AM
#51
Love your Fabricator!
Thread Starter
Join Date: Sep 2004
Location: Miami, FL
Posts: 353
Likes: 0
Received 0 Likes
on
0 Posts
BigAl...

 07-28-08, 08:54 AM
#53
Love your Fabricator!
Thread Starter
Join Date: Sep 2004
Location: Miami, FL
Posts: 353
Likes: 0
Received 0 Likes
on
0 Posts

BigAl...
07-28-08, 09:27 AM
#54
Some dry sump install info here with pics:
https://www.rx7club.com/defined-autoworks-176/how-install-drysump-finally-i-know-738603/
https://www.rx7club.com/defined-autoworks-176/how-install-drysump-finally-i-know-738603/
07-29-08, 10:43 AM
#55
Love your Fabricator!
Thread Starter
Join Date: Sep 2004
Location: Miami, FL
Posts: 353
Likes: 0
Received 0 Likes
on
0 Posts
Both Rob and I have been pretty busy lately but we have tried our best to get some work done. Below you'll see we are now finished with the bumper/fenders and the radiator. The oil coolers came in so we've started mocking those up.
Here is one last pic showing the brackets we made for the fenders
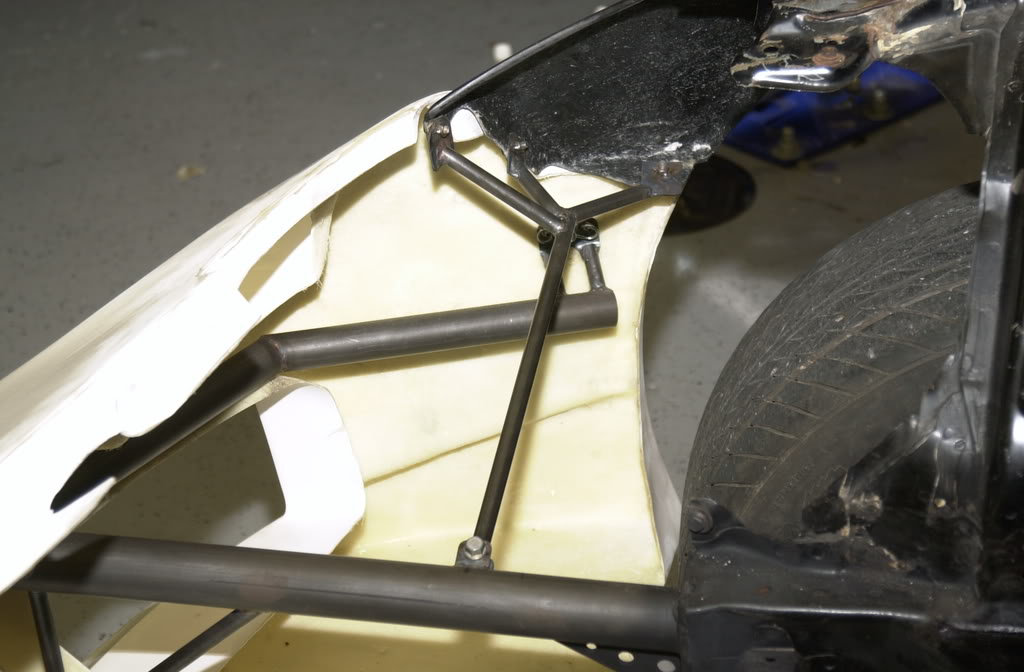
This is what it looked like before the fender brackets

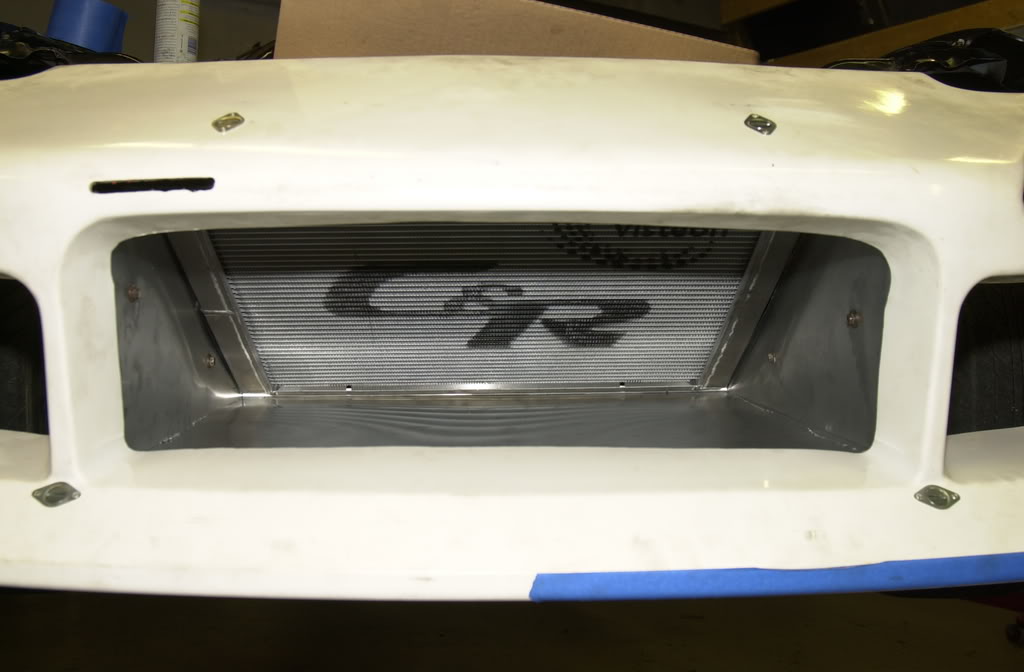
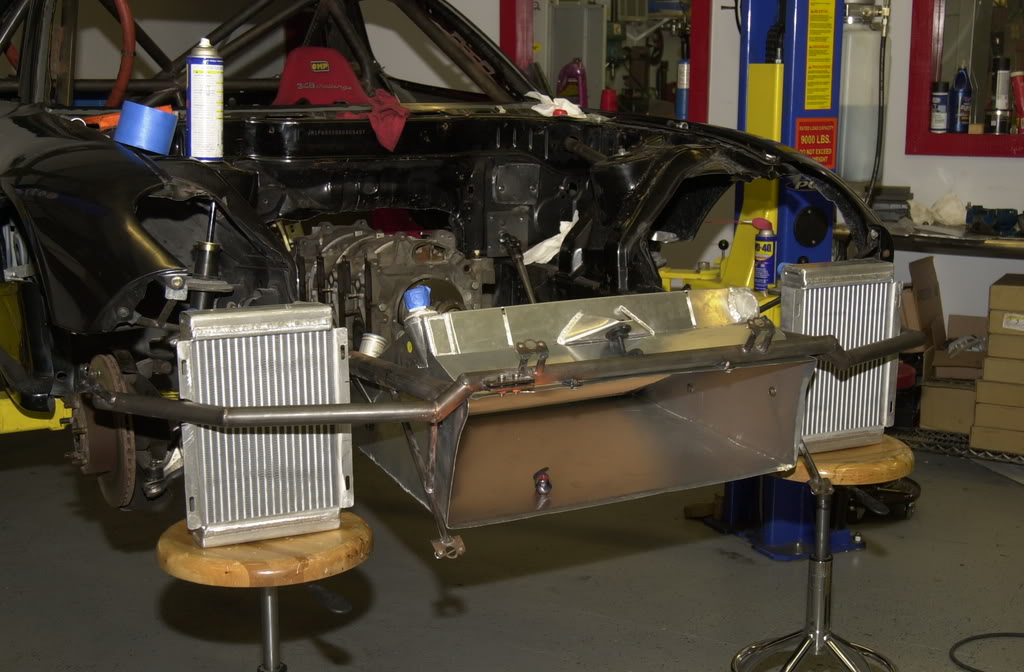
Here you can see the rad is in, along with the shroud that seals it to the bumper
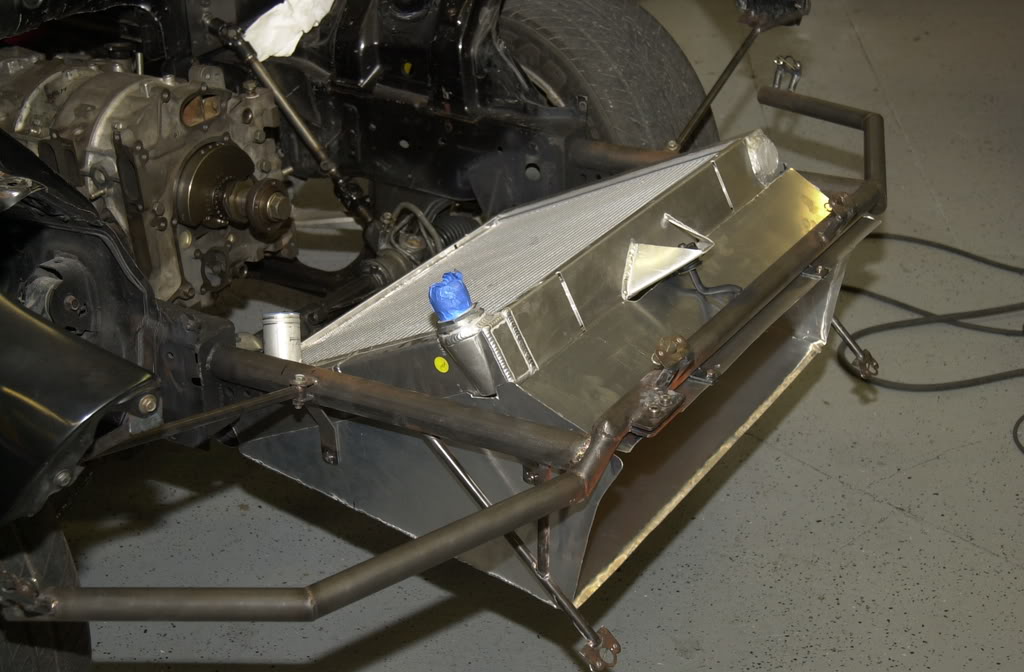
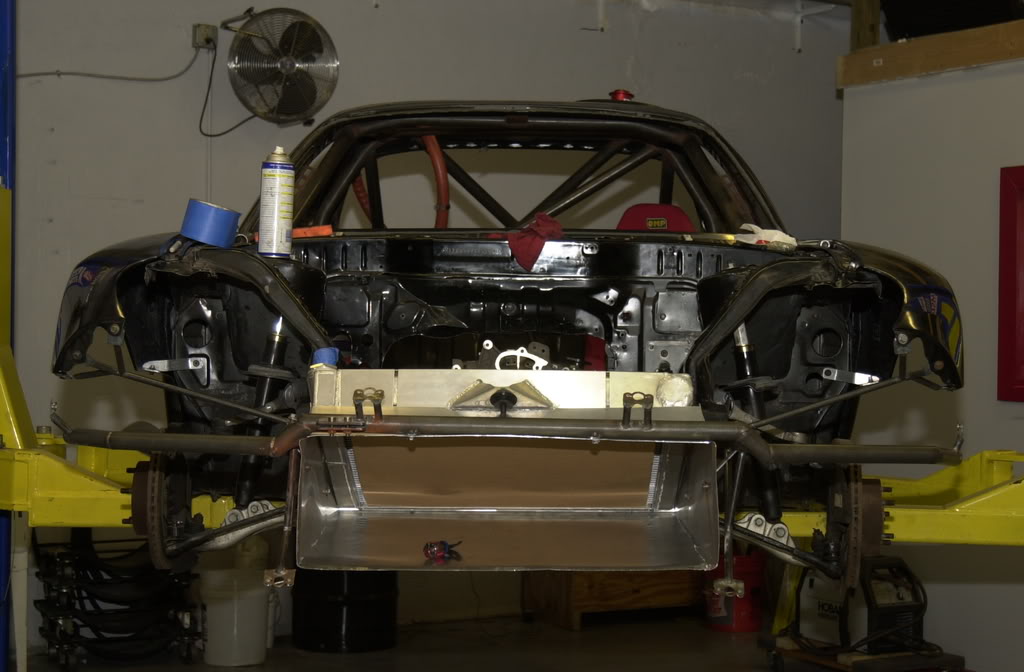
Here you see the brackets we made, we welded solid round stock to the bottom of the rad and used some old radiator bushings from by buddies evo 8 then fabbed up these brackets, you can see a piece of the card board we used to mock up the brackets.
other side
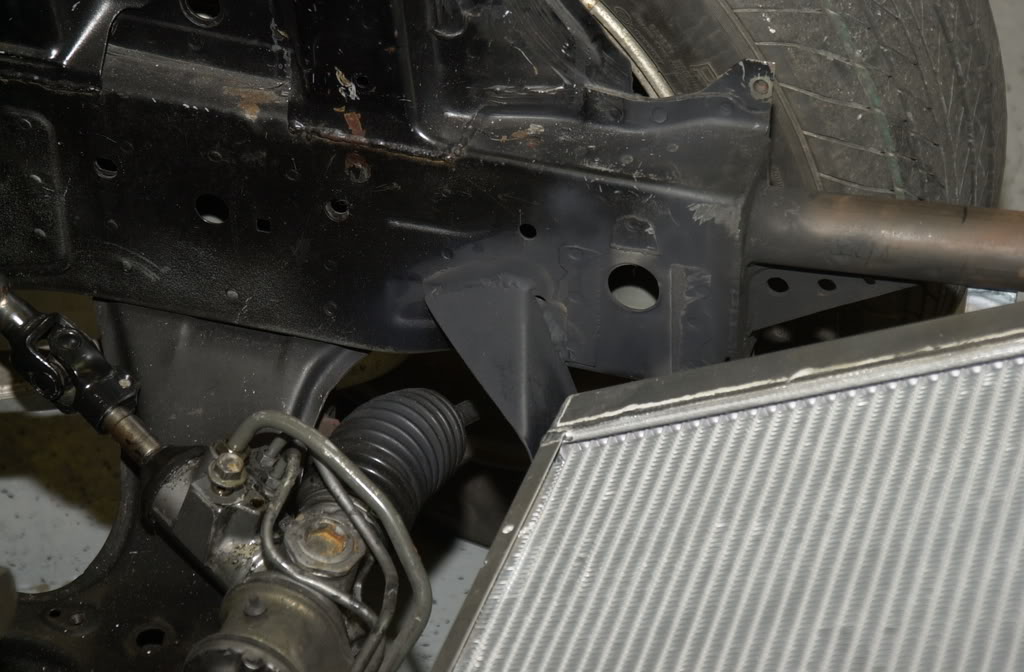
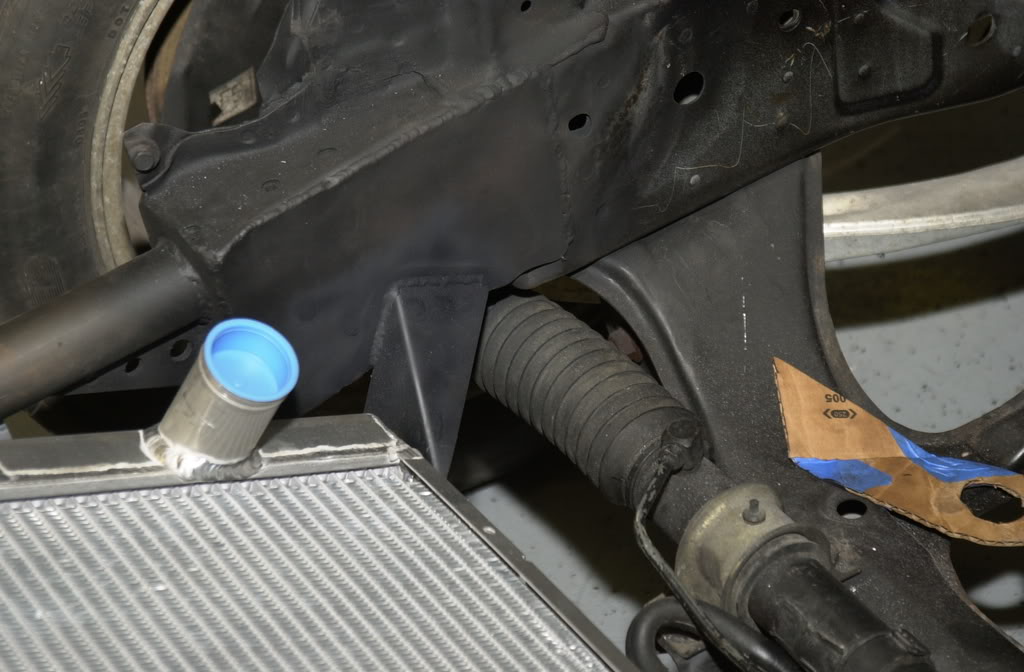
This is the front bracket, it's uses a cotter pin to lock down the radiator, with no hoses or water I can remove the rad in less than a second. I'm ready for those radiator removal races!
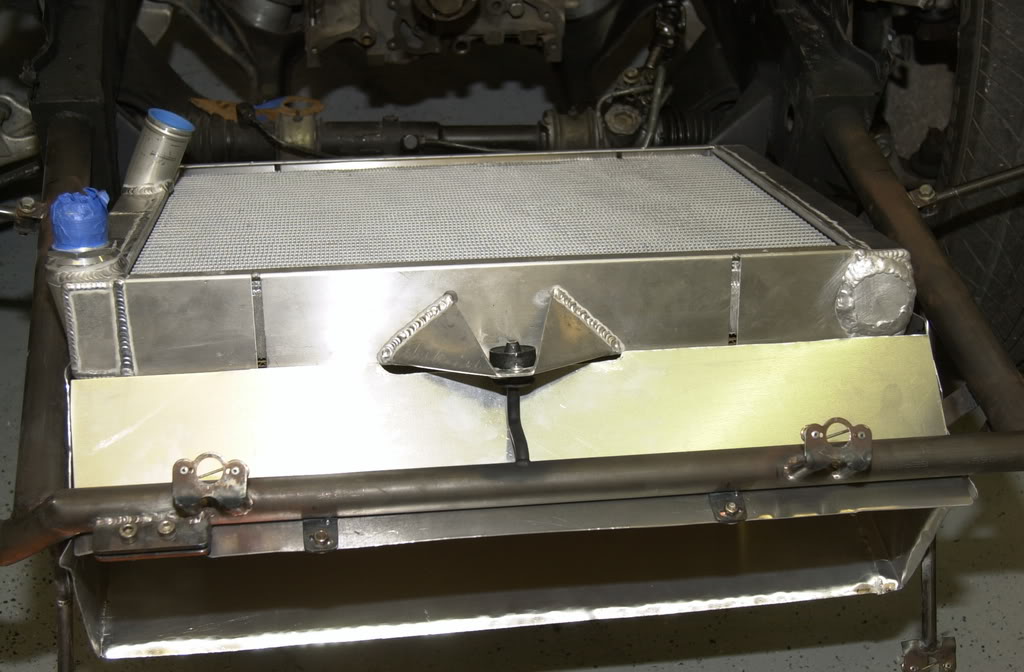
Finished product
UPS man delivers
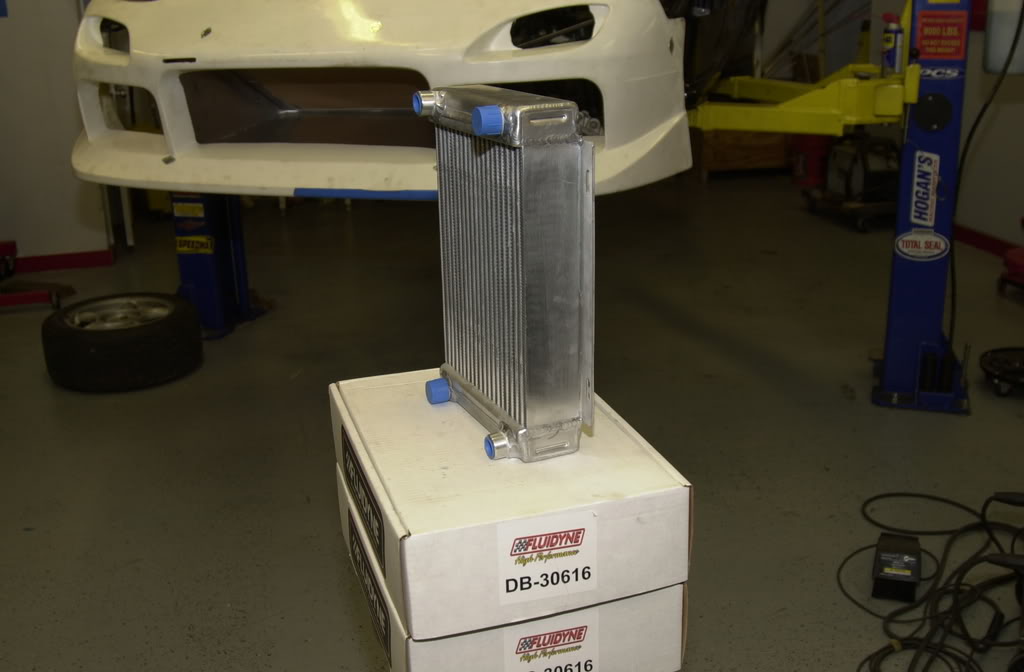
I decided to go with this type of cooler over the conventional setrab or mocal for a couple of reasons first they hold 1.6 quarts of oil each and second it's pretty obvious from the seperation of the tubes they flow more air, plus they look pretty awsome.
Here is the first step to installing them.
We should have the coolers installed this week!
BigAl...
Here is one last pic showing the brackets we made for the fenders
This is what it looked like before the fender brackets
Here you can see the rad is in, along with the shroud that seals it to the bumper
Here you see the brackets we made, we welded solid round stock to the bottom of the rad and used some old radiator bushings from by buddies evo 8 then fabbed up these brackets, you can see a piece of the card board we used to mock up the brackets.
other side
This is the front bracket, it's uses a cotter pin to lock down the radiator, with no hoses or water I can remove the rad in less than a second. I'm ready for those radiator removal races!
Finished product
UPS man delivers
I decided to go with this type of cooler over the conventional setrab or mocal for a couple of reasons first they hold 1.6 quarts of oil each and second it's pretty obvious from the seperation of the tubes they flow more air, plus they look pretty awsome.
Here is the first step to installing them.
We should have the coolers installed this week!
BigAl...
07-29-08, 11:16 AM
#57
Love your Fabricator!
Thread Starter
Join Date: Sep 2004
Location: Miami, FL
Posts: 353
Likes: 0
Received 0 Likes
on
0 Posts
BigAl...
07-29-08, 07:55 PM
#58
Derwin
iTrader: (2)
Join Date: Apr 2005
Location: MTL, QC
Posts: 2,888
Likes: 0
Received 0 Likes
on
0 Posts
I see wouldn't it have been much easier to fab some ramps or something? Are most of your track shorter tracks, I don't know how pronounced the added drag would be from increasing the frontal area with that bumper (not all that important on a short track).
Please don't see my comments as criticism I wish I could do something like this just curious.
Please don't see my comments as criticism I wish I could do something like this just curious.
07-29-08, 09:57 PM
#60
****** of disaster
iTrader: (1)
Join Date: Aug 2001
Location: Santa Monica, CA
Posts: 1,115
Likes: 0
Received 0 Likes
on
0 Posts
Fantastic looking Al! Thanks for the referral on the Jerico too 
I really want to front-half my car the way you have too; amazing how much more room there is when you get rid of all the stock crap.
I really want to front-half my car the way you have too; amazing how much more room there is when you get rid of all the stock crap.
07-30-08, 04:41 AM
#61
Injected with a Poison
iTrader: (1)
Join Date: Jul 2003
Location: Miami, FL
Posts: 795
Likes: 0
Received 0 Likes
on
0 Posts
It was the expireince with my car that led us to going to a quick release bumber set-up. My car is low as it is and would have been nicer to go a little lower but for the bumper there is just no way as mentioned above. I already have 7.2" foot ramps and i still have to jack up the truck significantly when we have to load the race car. We figured since we already had to cut off the front end of the "Majua Pingua" (second race car) we minus will just go the route that will make most sence in the long run. we do have maybe an extra 15-20 hours of work x2 but well worth the end result.
I see wouldn't it have been much easier to fab some ramps or something? Are most of your track shorter tracks, I don't know how pronounced the added drag would be from increasing the frontal area with that bumper (not all that important on a short track).
Please don't see my comments as criticism I wish I could do something like this just curious.
Please don't see my comments as criticism I wish I could do something like this just curious.
07-30-08, 09:06 AM
#62
Love your Fabricator!
Thread Starter
Join Date: Sep 2004
Location: Miami, FL
Posts: 353
Likes: 0
Received 0 Likes
on
0 Posts
I see wouldn't it have been much easier to fab some ramps or something? Are most of your track shorter tracks, I don't know how pronounced the added drag would be from increasing the frontal area with that bumper (not all that important on a short track).
Please don't see my comments as criticism I wish I could do something like this just curious.
Please don't see my comments as criticism I wish I could do something like this just curious.
BigAl...
07-30-08, 11:11 AM
#63
Love your Fabricator!
Thread Starter
Join Date: Sep 2004
Location: Miami, FL
Posts: 353
Likes: 0
Received 0 Likes
on
0 Posts
I see wouldn't it have been much easier to fab some ramps or something? Are most of your track shorter tracks, I don't know how pronounced the added drag would be from increasing the frontal area with that bumper (not all that important on a short track).
Please don't see my comments as criticism I wish I could do something like this just curious.
Please don't see my comments as criticism I wish I could do something like this just curious.

if so the bumper is not actually wider, it's the fiberglass fender that's actually bowing inwards, which is why we made the brackets to push out the fenders. Normally the fenders would just bolt to the bumper and the bumper would hold them out where they needed to be, but since we made the bumper quick release we needed something to hold the fenders.
BigAl...
08-17-08, 05:48 PM
#65
Love your Fabricator!
Thread Starter
Join Date: Sep 2004
Location: Miami, FL
Posts: 353
Likes: 0
Received 0 Likes
on
0 Posts
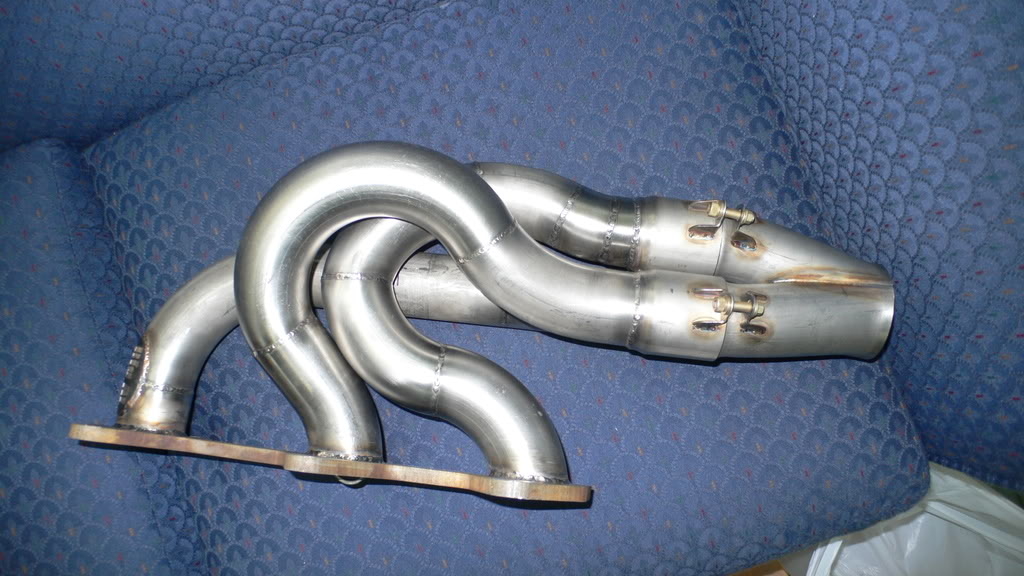
It's been a while since I've posted, I went on a little vacation with the family. But Rob and I were back at it this weekend, we finished installing the oil coolers and already made one of the shrouds, we also started the headers. The headers are almost finished, they're all tacked, just need to finish welding all the runners. I'll be posting pics on Tuesday.
BigAl...
BigAl...
08-20-08, 09:58 AM
#66
Love your Fabricator!
Thread Starter
Join Date: Sep 2004
Location: Miami, FL
Posts: 353
Likes: 0
Received 0 Likes
on
0 Posts
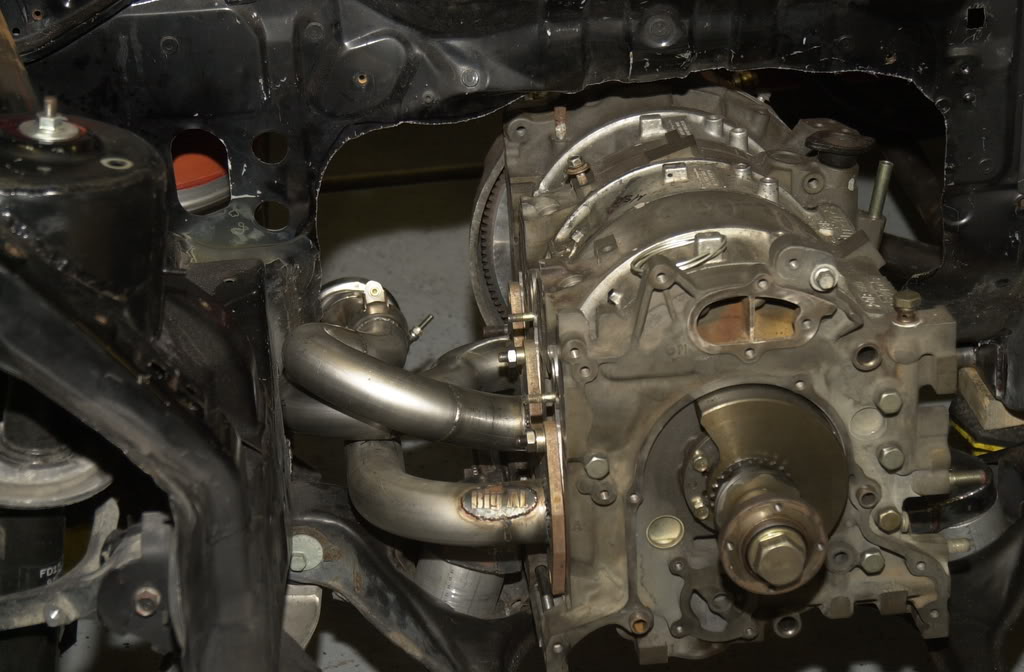
As promised here are the pictures of the headers, It took Rob, Ray and I all day Saturday to finish mocking these things up, and then another evening for me to finish welding them up but we're very happy with the results. All three runners are near perfect length only the middle rotor is off by a 1/4 of an inch (good enough for carpentry work ).
).
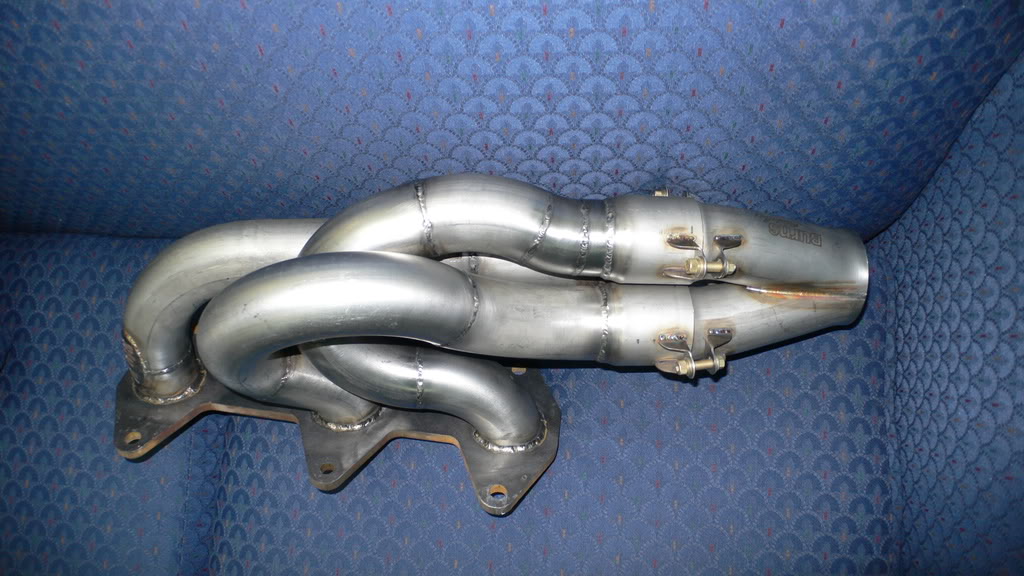
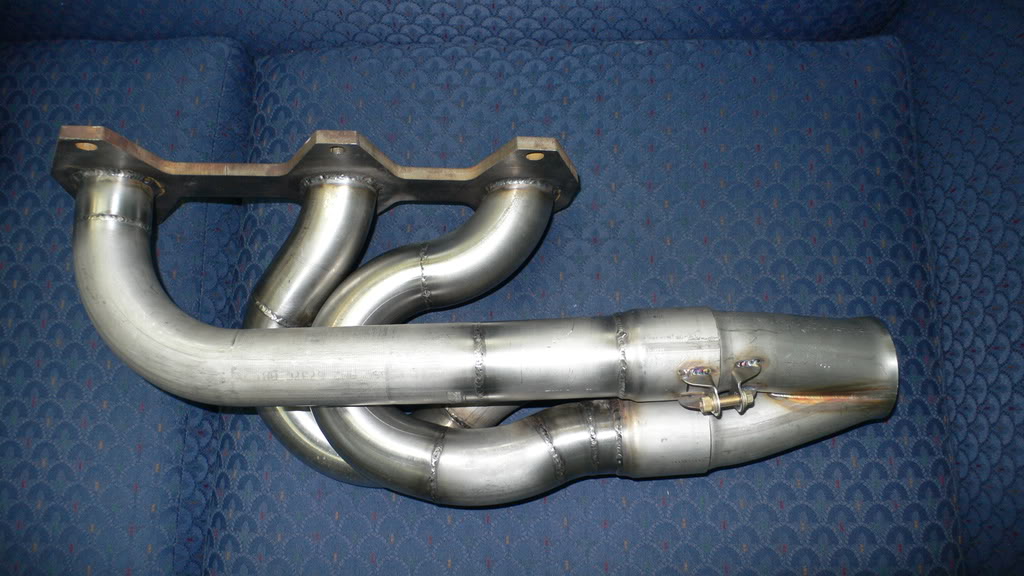
We're gonna start working on the rest of the exhaust tonight.
BigAl...
).We're gonna start working on the rest of the exhaust tonight.
BigAl...
08-21-08, 12:31 PM
#70
Love your Fabricator!
Thread Starter
Join Date: Sep 2004
Location: Miami, FL
Posts: 353
Likes: 0
Received 0 Likes
on
0 Posts
08-23-08, 08:21 PM
#72
Love your Fabricator!
Thread Starter
Join Date: Sep 2004
Location: Miami, FL
Posts: 353
Likes: 0
Received 0 Likes
on
0 Posts
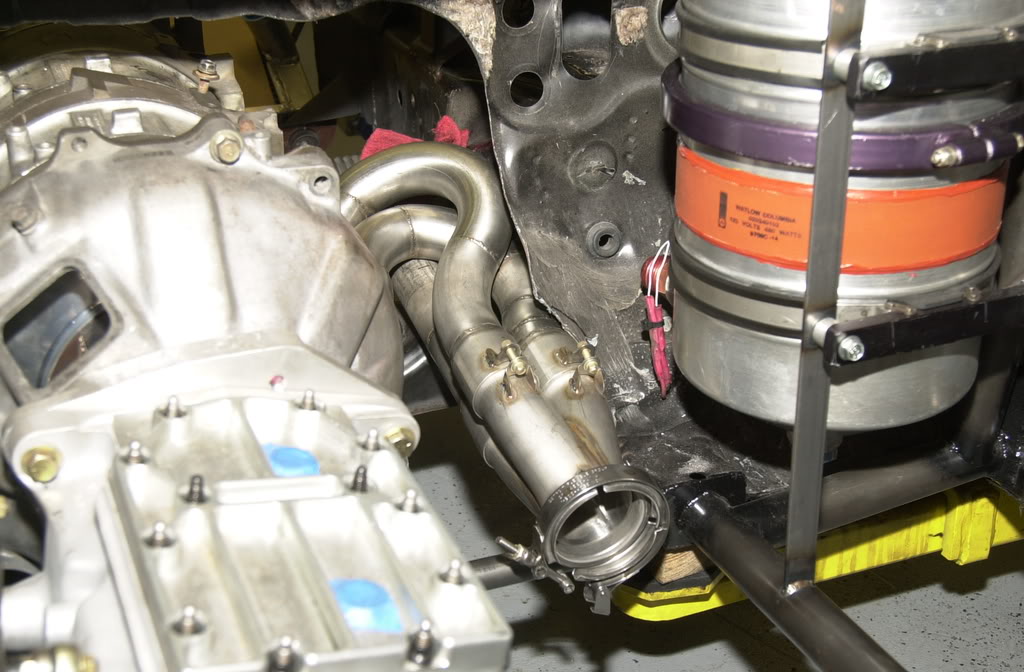
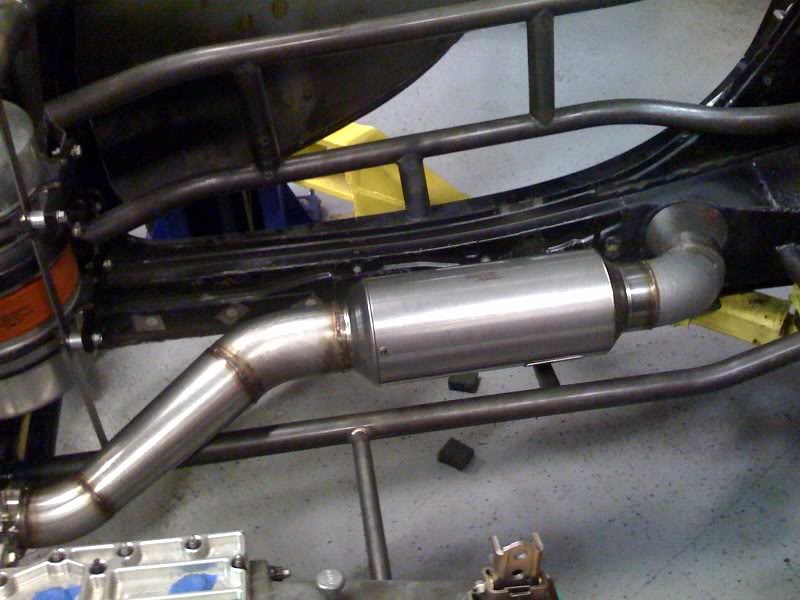
We got started on the exhaust today.
Some of you might wonder how you get the exhaust out, here ya go. We bored the holes and then inserted a 5inch piece of tubing and welded in place, just to keep some of the integrity.
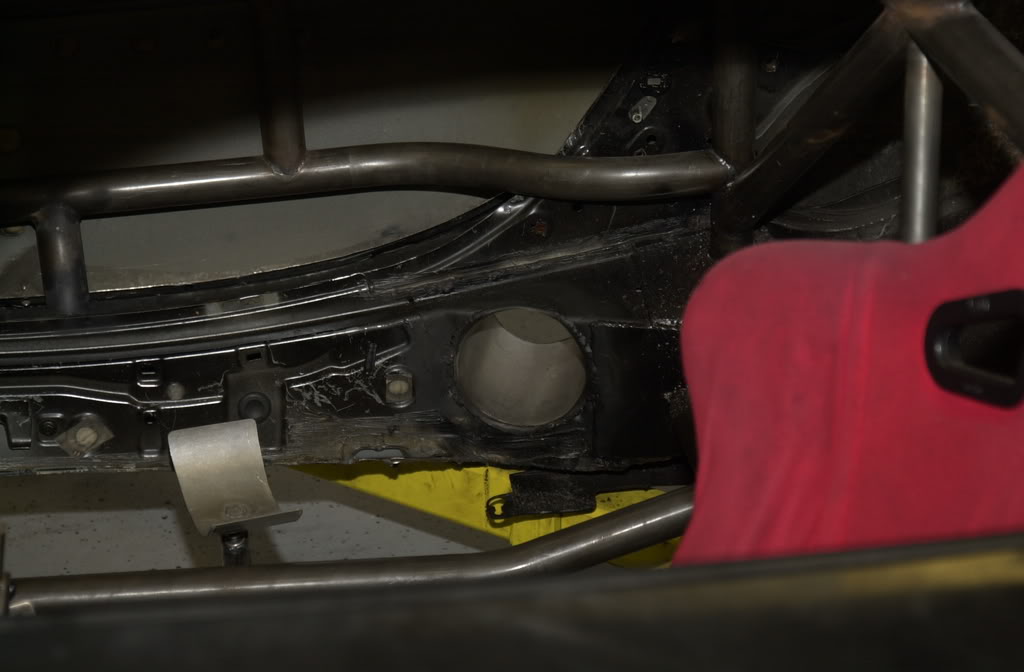
this reminds me of the old Trans Am days (the camaros and jags used to run there big exhaust out the side)
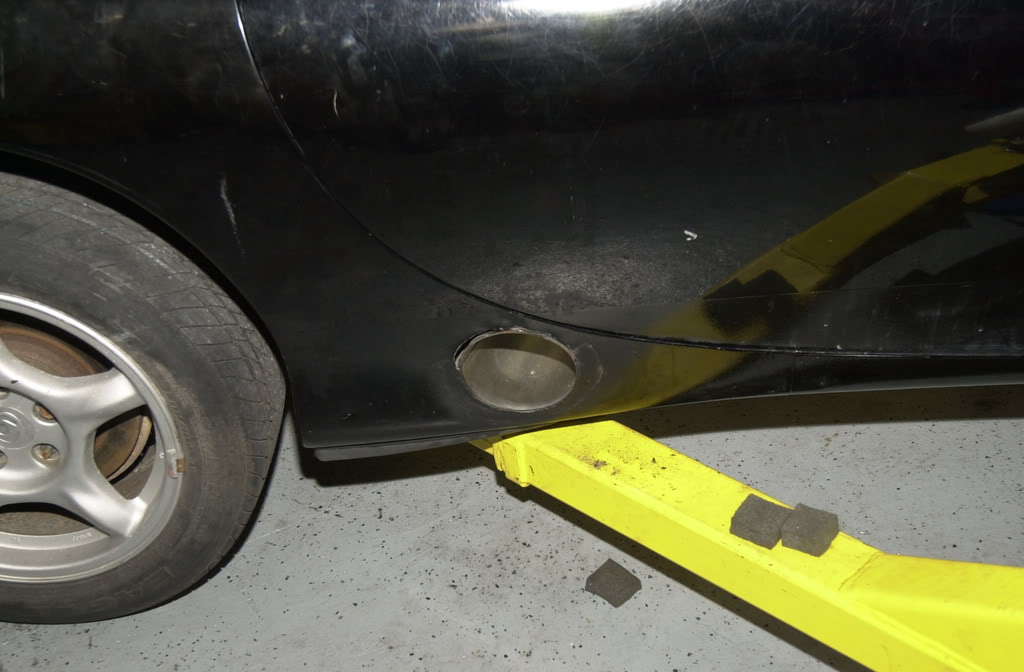
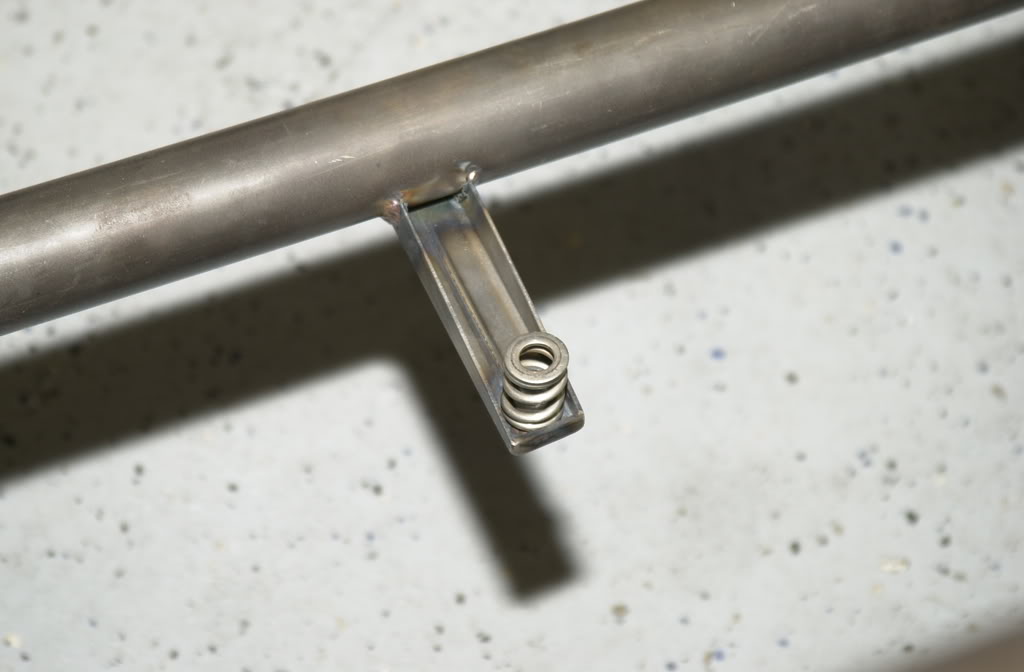
this is the bracket that holds the muffler up
and here is the exhaust

We've started working on the fuel cell, not fun!
BigAl...
Some of you might wonder how you get the exhaust out, here ya go. We bored the holes and then inserted a 5inch piece of tubing and welded in place, just to keep some of the integrity.
this reminds me of the old Trans Am days (the camaros and jags used to run there big exhaust out the side)
this is the bracket that holds the muffler up
and here is the exhaust
We've started working on the fuel cell, not fun!
BigAl...