QuietCoat Sound Dampening
 06-30-03, 01:21 PM
#16
Update:
Started the project this weekend. Worked on phase one which covered sound proofing the inside trunk as well as the hood.
I'm now testing the results with the sound meter I purchased and I'll post more details over the next few days. Didn't expect much from this phase. Expect much more from the doors and then from undercoating the bottom of the car.
David
 07-02-03, 11:53 AM
#18
Boost,
The doors are phse two of my project. I'm going to start this as soon as I finish posting phase I results.
Because Quiet Coat has to adhere to metal to work, I'm going to have to remove the plastic from the doors. Ohters have heated the "tar" to remove the plastic. I'm contemplating cutting out the plastic and re-gluing upon completion. Don't know yet.
Anyway, I'll try to have phase one results (including pictures) uploaded by Friday.
David
07-05-03, 10:58 AM
#19
Update on Quiet Coat Soundproofing Project:
Phase One: Trunk and under the hood. I expect the least amount of noise reduction from this phase.
Phase Two: Doors. I expect better results from this phase.
Phase Three: Underbody. I expect the most significant gains from this phase.
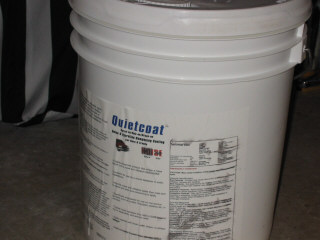
I've now completed phase one of the project; sound proofing of the trunk as well as under the hood. I tackled this first because I could do this myself with a paint brush and because if I made a mistake, the results could be easily covered up! I chose to use Quiet Coat (www.quietcoat.com), a liquid, viscoelastic polymer material. The manufacturer states that unlike mats such as Dynamat and others, QuietCoat bonds to the metal in your car and absorbs sound and vibration using a new viscoelastic polymer technology. Nothing beats QuietCoat in overall overall noise reduction! Sounded good to me (pun intended)!
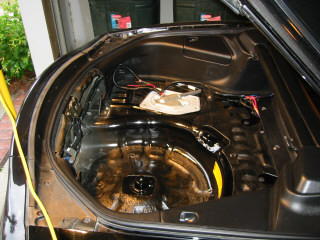
I removed the thermal insulation from the hood of the car (needs replacing after nine years of turbo heat abuse), and the trunk carpet, spare tire (am replacing this to save weight with a can of run flat), and the plastic access piece in the middle of the tail lights.
Phase One: Trunk and under the hood. I expect the least amount of noise reduction from this phase.
Phase Two: Doors. I expect better results from this phase.
Phase Three: Underbody. I expect the most significant gains from this phase.
I've now completed phase one of the project; sound proofing of the trunk as well as under the hood. I tackled this first because I could do this myself with a paint brush and because if I made a mistake, the results could be easily covered up! I chose to use Quiet Coat (www.quietcoat.com), a liquid, viscoelastic polymer material. The manufacturer states that unlike mats such as Dynamat and others, QuietCoat bonds to the metal in your car and absorbs sound and vibration using a new viscoelastic polymer technology. Nothing beats QuietCoat in overall overall noise reduction! Sounded good to me (pun intended)!
I removed the thermal insulation from the hood of the car (needs replacing after nine years of turbo heat abuse), and the trunk carpet, spare tire (am replacing this to save weight with a can of run flat), and the plastic access piece in the middle of the tail lights.
07-05-03, 11:29 AM
#20
Update on Quiet Coat Soundproofing Project:
Phase One: Trunk and under the hood. I expect the least amount of noise reduction from this phase.
Phase Two: Doors. I expect better results from this phase.
Phase Three: Underbody. I expect the most significant gains from this phase.
I've now completed phase one of the project that involved sound proofing of the trunk as well as under the hood. I tackled this first because I could do this myself with a paint brush and because if I made a mistake, the results could be easily covered up! I chose to use Quiet Coat (www.quietcoat.com), a liquid, viscoelastic polymer material. The manufacturer states that unlike mats such as Dynamat and others, QuietCoat bonds to the metal in your car and absorbs sound and vibration using a new viscoelastic polymer technology. Nothing beats QuietCoat in overall overall noise reduction! Sounded good to me (pun intended!) so I ordered 5 gallons of the material as well as a spray on gun kit (it's not unique, just one that is used for undercoating of cars) - total cost, about $250 bucks.
I removed the thermal insulation from the hood of the car (needs replacing after nine years of turbo heat abuse), and the trunk carpet, spare tire (am replacing this to save weight with a can of run flat), and the plastic access piece in the middle of the tail lights. I also removed the platic trim pieces from the top lip of the hatchback as I wanted to apply the material to the metal under this area as well. Then, following the directions, I used a paint brush provided with the kit to "paint" on one coat of the material on the metal portions of the trunk, spare tire wheel well, around the rear lights, the lip of the hatchback and the hood of the car. Note that I tried my best to paint on the material on the metal between the tail lights as I theorized noise was leaking in from this area.
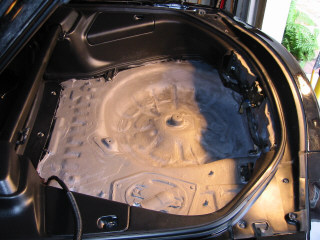
Applying Quiet Coat is pretty easy - it's like doing a bad job of painting as you should try to apply as thick a coat as possible (kind of the opposite of normal painting). My first mistake was probably making my coats too thin to begin with. As I painted on the second and third coats, I began to get the hang of it and made the coats thicker. Each coat needs to dry before applying the next coat so I waited about 4 hours between coats before applying the next layer. I'm in Florida so I'm assuming the material will dry much faster here than in other parts of the country. It's about 90 degrees outside and sun is no problem!. All in all, it's pretty easy. The material is water-based, so cleaning up mistakes is easy. Notice I said I "painted" the material on with a brush. I could have used the spray gun which would have made the job very easy but I didn't trust myself to not overspray the inside. I am going to use the spray gun on the undercoating phase. To avoid a problem with the material dripping on my engine, I covered the engine bay with a drop cloth. Also note I kept the plastic lip on the hatchback half way on and used the surface as a mini drop cloth to catch anything dripping from the metal of the hatchback.
Anyway, it took me two days to complete the three coats and to put everything back together. Fortunately I didn't break anything during the process.
A day after completing phase one, I used my Radio Shack sound meter to measure my initial results and I've attached these for you. As expected, the product did marginally reduce noise but not by much. Depending on my speed, the noise reduction was from 1 to 3 decibels, or from 1% to 4%.
My conclusions? Still to early to tell. I expect to get much better bang for the buck with the doors and with the undercoating portions of the project. I'm 1/2 of the way through doing the doors and from what I've seen, the results should be much more impressive. But I'll leave that up to the sound meter to decide!
Anyway, I'll update this in a few days with more pictures and the results of phase two, the doors!
David
Phase One: Trunk and under the hood. I expect the least amount of noise reduction from this phase.
Phase Two: Doors. I expect better results from this phase.
Phase Three: Underbody. I expect the most significant gains from this phase.
I've now completed phase one of the project that involved sound proofing of the trunk as well as under the hood. I tackled this first because I could do this myself with a paint brush and because if I made a mistake, the results could be easily covered up! I chose to use Quiet Coat (www.quietcoat.com), a liquid, viscoelastic polymer material. The manufacturer states that unlike mats such as Dynamat and others, QuietCoat bonds to the metal in your car and absorbs sound and vibration using a new viscoelastic polymer technology. Nothing beats QuietCoat in overall overall noise reduction! Sounded good to me (pun intended!) so I ordered 5 gallons of the material as well as a spray on gun kit (it's not unique, just one that is used for undercoating of cars) - total cost, about $250 bucks.
I removed the thermal insulation from the hood of the car (needs replacing after nine years of turbo heat abuse), and the trunk carpet, spare tire (am replacing this to save weight with a can of run flat), and the plastic access piece in the middle of the tail lights. I also removed the platic trim pieces from the top lip of the hatchback as I wanted to apply the material to the metal under this area as well. Then, following the directions, I used a paint brush provided with the kit to "paint" on one coat of the material on the metal portions of the trunk, spare tire wheel well, around the rear lights, the lip of the hatchback and the hood of the car. Note that I tried my best to paint on the material on the metal between the tail lights as I theorized noise was leaking in from this area.
Applying Quiet Coat is pretty easy - it's like doing a bad job of painting as you should try to apply as thick a coat as possible (kind of the opposite of normal painting). My first mistake was probably making my coats too thin to begin with. As I painted on the second and third coats, I began to get the hang of it and made the coats thicker. Each coat needs to dry before applying the next coat so I waited about 4 hours between coats before applying the next layer. I'm in Florida so I'm assuming the material will dry much faster here than in other parts of the country. It's about 90 degrees outside and sun is no problem!. All in all, it's pretty easy. The material is water-based, so cleaning up mistakes is easy. Notice I said I "painted" the material on with a brush. I could have used the spray gun which would have made the job very easy but I didn't trust myself to not overspray the inside. I am going to use the spray gun on the undercoating phase. To avoid a problem with the material dripping on my engine, I covered the engine bay with a drop cloth. Also note I kept the plastic lip on the hatchback half way on and used the surface as a mini drop cloth to catch anything dripping from the metal of the hatchback.
Anyway, it took me two days to complete the three coats and to put everything back together. Fortunately I didn't break anything during the process.
A day after completing phase one, I used my Radio Shack sound meter to measure my initial results and I've attached these for you. As expected, the product did marginally reduce noise but not by much. Depending on my speed, the noise reduction was from 1 to 3 decibels, or from 1% to 4%.
My conclusions? Still to early to tell. I expect to get much better bang for the buck with the doors and with the undercoating portions of the project. I'm 1/2 of the way through doing the doors and from what I've seen, the results should be much more impressive. But I'll leave that up to the sound meter to decide!
Anyway, I'll update this in a few days with more pictures and the results of phase two, the doors!
David
07-05-03, 02:47 PM
#28
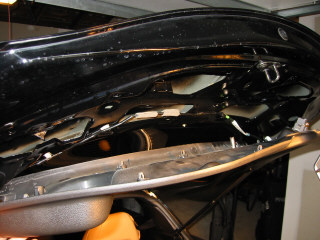
Picture of hood after application. I only applied material to the sections covered by the thermal shield. Also note the paint drop cloth. I heavily recommend you use one of these when applying over the engine bay.

Last edited by David Hayes; 07-05-03 at 02:57 PM.
07-05-03, 02:56 PM
#30
Lives on the Forum
Join Date: Dec 2001
Location: San Lorenzo, California
Posts: 14,716
Likes: 0
Received 8 Likes
on
8 Posts
Nice pics David. To get them to show up, you have to insert an image (IMG) with the controls above the typing window. Reference the urls of the pics you've posted, like this....
BEFORE QUIET COAT
AFTER QUIET COAT

BEFORE QUIET COAT
AFTER QUIET COAT