Beginning Restoration: 1972 Mazda 616 Capella
 10-22-08, 04:06 PM
#1
Likes to swear....alot
Thread Starter
iTrader: (3)
Join Date: Dec 2002
Location: Kitchener Ontario Canada
Posts: 3,791
Likes: 0
Received 3 Likes
on
3 Posts
Beginning Restoration: 1972 Mazda 616 Capella
Hey all,
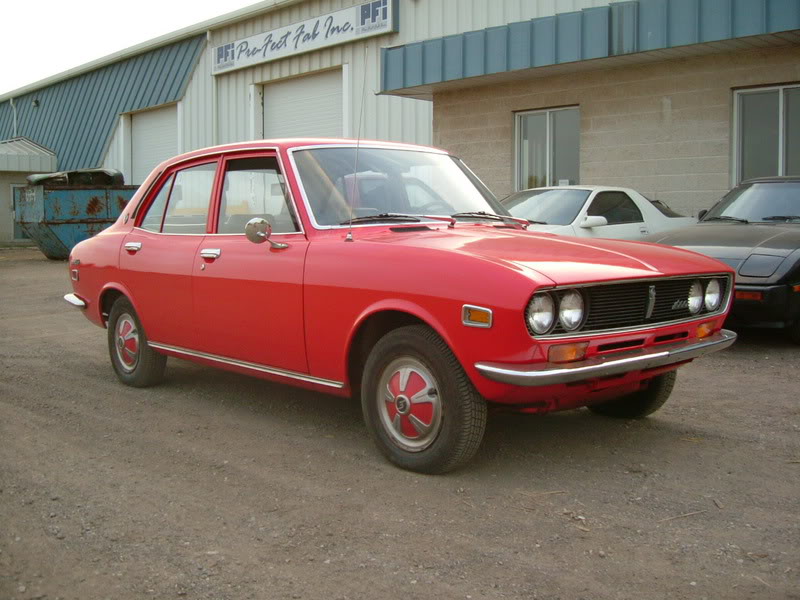
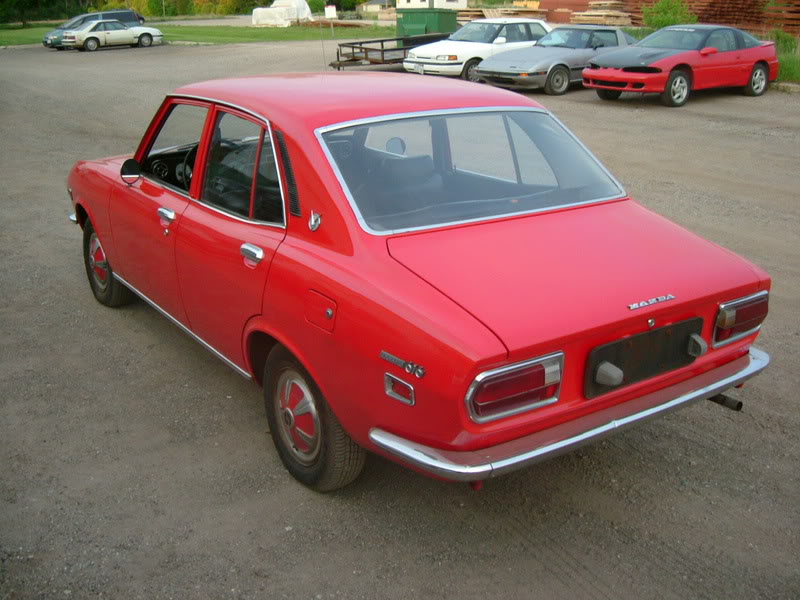
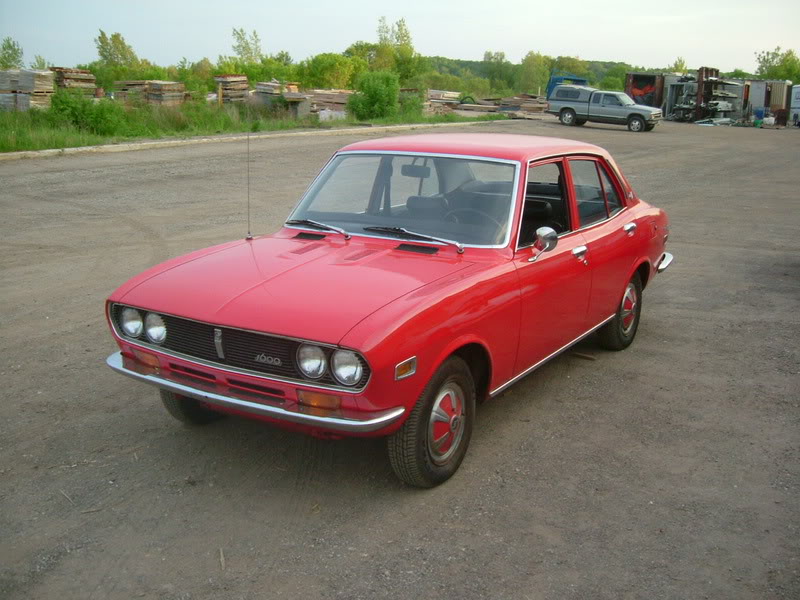
Most of you know I picked up a 72 616, the RX-2's piston powered brother.
Its a 4 door sedan with a 1.6L 4cyl 4speed trans in it, almost everything else is the same as the RX-2.
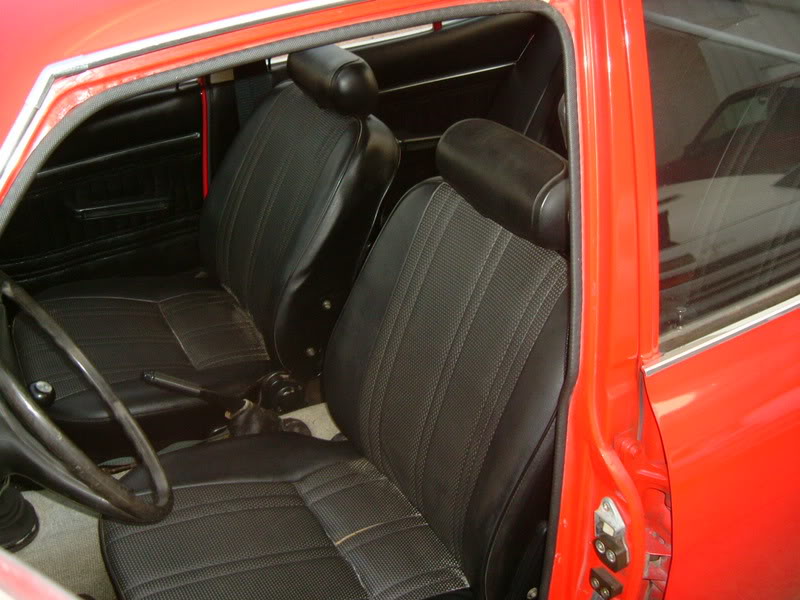
Suprisingly enough for being an orignal Canadian car, it is absolutely mint. With only 30,000 original miles on it, it was well taken care of.
Anyone who has met me, knows that I'm not right in the head and cant leave anything stock. So I immedeately pulled the piston engine out and started a 13B swap. I replaced the old suspention with new KYB struts all around and King lowering springs. The bushings were replaced with a Super Pro urethane kit for an RX-2. All of these parts were not available anywhere in North America without a 3 month waiting time. So I went to a supplier in Austrailia and had everything within 3 weeks.
The 13B swap didn't treat me very well. The first used engine I swapped in spun both rotor bearings within the first week of driving it and the second half bridge 13B got my into trouble with a cop who didn't appreciate the rate of speed this little car could accomplish. After getting it out of the impound lot the engine overheated on me and I pretty much gave up on the car. I parked it in my parents barn.
I now have decided to restore the car back to its factory specs. That way it'll keep me out of trouble with the law and be (flamesuit on) a little more reliable.
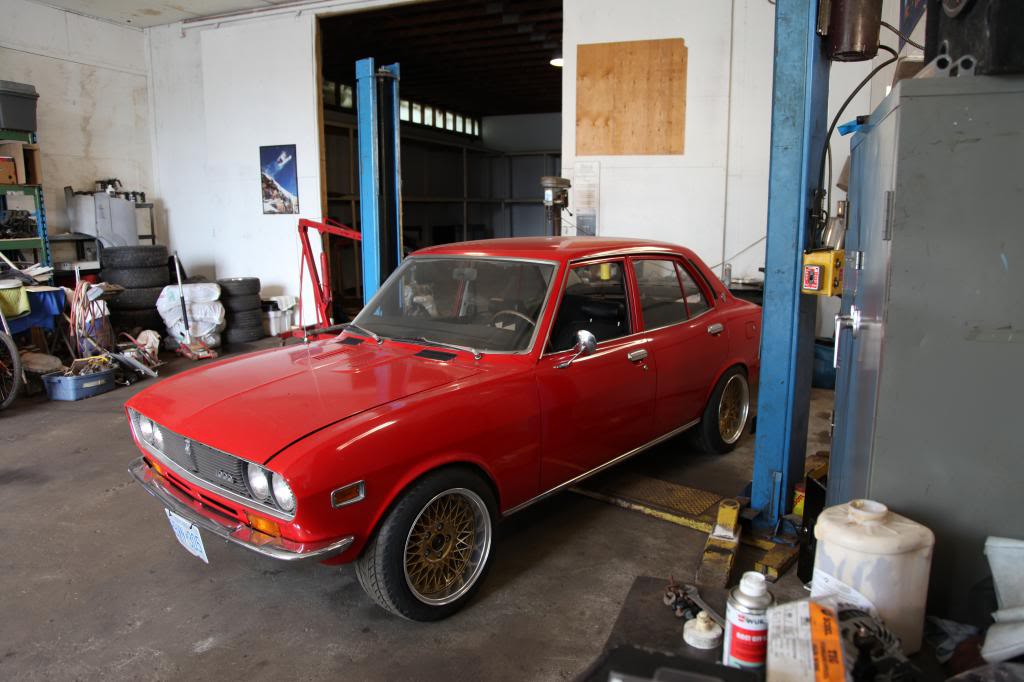
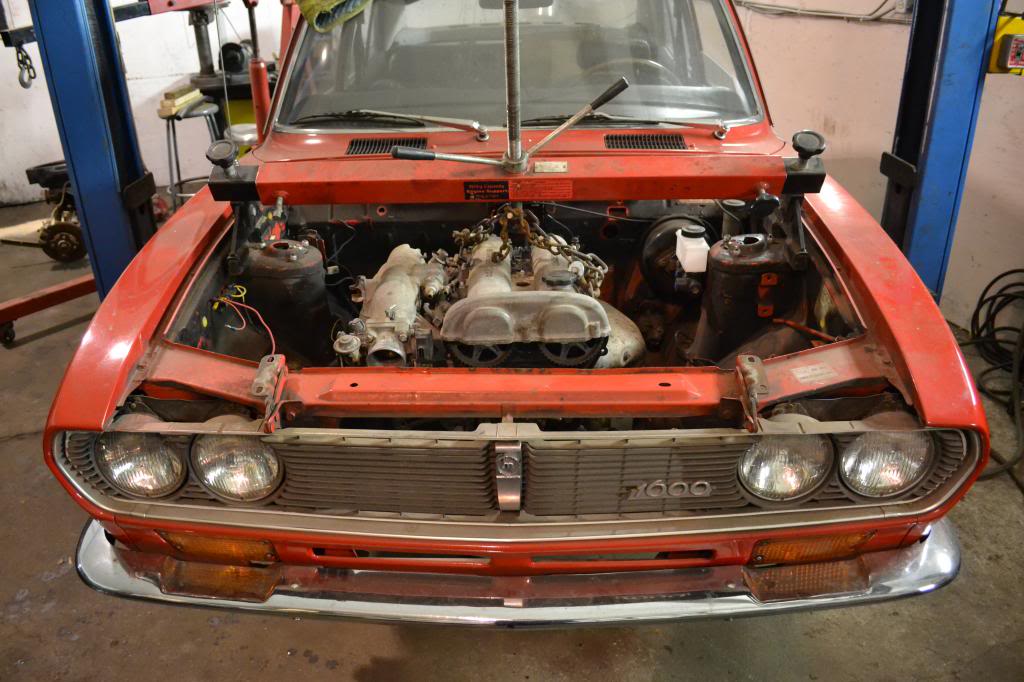
Heres a few pics of the car when I first got it.
I have already started by completely disassembling the 1.6L engine. It infact does only have 30,000 miles on it....because everything is very clean and not a sign of wear of the cyl walls or bearings. Its perfect.
The engine block was just hot tanked and will be ready for powdercoating this week. All the pistons, rings, oil scrappers are being soaked in diesel fuel to get rid of the small bits of carbon.
Now here is where I need help.
Some of the original parts were sacrificed to do the 13B swap in the first place. Some parts have gone missing since we've moved to a new shop last year. Some parts have been damaged and need to be replaced.
I would really appreciate any info to where I could find either N.O.S. parts or used parts in restorable condition.
These cars were produced from 1970 until 1974 and had both a 1.6L engine or a 1.8L. The other option was the Rotary engine which made the car an RX-2.
The parts I'm looking for are:
Throttle pedal and linkage,
Ignition swith
Plasic kick plate (top of rocker and covers the carpet)
4 speed transmission
Possibly a good condition hood (the hood I have is fixable, but one in good shape would be better)
Exhaust system from manifold back to tail pipe (might be impossible to find, hoping for a Mazda dealer to have one kickin in a back corner lol)
There is probably more parts to add to the list....I'll have to see as I go along with the build.
Thanks
Joe
Most of you know I picked up a 72 616, the RX-2's piston powered brother.
Its a 4 door sedan with a 1.6L 4cyl 4speed trans in it, almost everything else is the same as the RX-2.
Suprisingly enough for being an orignal Canadian car, it is absolutely mint. With only 30,000 original miles on it, it was well taken care of.
Anyone who has met me, knows that I'm not right in the head and cant leave anything stock. So I immedeately pulled the piston engine out and started a 13B swap. I replaced the old suspention with new KYB struts all around and King lowering springs. The bushings were replaced with a Super Pro urethane kit for an RX-2. All of these parts were not available anywhere in North America without a 3 month waiting time. So I went to a supplier in Austrailia and had everything within 3 weeks.
The 13B swap didn't treat me very well. The first used engine I swapped in spun both rotor bearings within the first week of driving it and the second half bridge 13B got my into trouble with a cop who didn't appreciate the rate of speed this little car could accomplish. After getting it out of the impound lot the engine overheated on me and I pretty much gave up on the car. I parked it in my parents barn.
I now have decided to restore the car back to its factory specs. That way it'll keep me out of trouble with the law and be (flamesuit on) a little more reliable.
Heres a few pics of the car when I first got it.
I have already started by completely disassembling the 1.6L engine. It infact does only have 30,000 miles on it....because everything is very clean and not a sign of wear of the cyl walls or bearings. Its perfect.
The engine block was just hot tanked and will be ready for powdercoating this week. All the pistons, rings, oil scrappers are being soaked in diesel fuel to get rid of the small bits of carbon.
Now here is where I need help.
Some of the original parts were sacrificed to do the 13B swap in the first place. Some parts have gone missing since we've moved to a new shop last year. Some parts have been damaged and need to be replaced.
I would really appreciate any info to where I could find either N.O.S. parts or used parts in restorable condition.
These cars were produced from 1970 until 1974 and had both a 1.6L engine or a 1.8L. The other option was the Rotary engine which made the car an RX-2.
The parts I'm looking for are:
Throttle pedal and linkage,
Ignition swith
Plasic kick plate (top of rocker and covers the carpet)
4 speed transmission
Possibly a good condition hood (the hood I have is fixable, but one in good shape would be better)
Exhaust system from manifold back to tail pipe (might be impossible to find, hoping for a Mazda dealer to have one kickin in a back corner lol)
There is probably more parts to add to the list....I'll have to see as I go along with the build.
Thanks
Joe
 10-22-08, 06:34 PM
#3
Senior Member
I remember when this car was on ebay. when you say restore do you mean paint and everything or just bringing it back to stock? seeing as how this car is originaly from canada did the exaust originaly have the emision control stuff that the US spec RX2 have?
great car, good to see its being restored original.
great car, good to see its being restored original.
10-22-08, 07:19 PM
#4
Likes to swear....alot
Thread Starter
iTrader: (3)
Join Date: Dec 2002
Location: Kitchener Ontario Canada
Posts: 3,791
Likes: 0
Received 3 Likes
on
3 Posts
The car was actually repainted at some point in time. A decent job, but a cheap job. Its showing its age now.
I'm considering to repaint it, but first a good wetsand and buff might bring it back to life.
The car originally came with a 4cyl piston engine, so it had a completely different exhaust system than the RX-2.
I'm considering to repaint it, but first a good wetsand and buff might bring it back to life.
The car originally came with a 4cyl piston engine, so it had a completely different exhaust system than the RX-2.
10-22-08, 07:41 PM
#5
talking head
check the aussie forums for what your looking for
the move from NA boat anchor to 13B is a popular route here
and most of the stuff you want is regularly thrown into scrap
( and the money conversion will be good, postage suck )
having built a few myself ( original and fakers )
i think the NA FC motor and carb adapter and suitable sump is by far the easier path , with awesome results and engine longevity
PS
there is a thread on performance forums on some custom working to hybrid NA and MA parts and turbos into capellas
http://www.performanceforums.com/for...php?t=67235942
10-23-08, 07:20 PM
#6
Senior Member
The car was actually repainted at some point in time. A decent job, but a cheap job. Its showing its age now.
I'm considering to repaint it, but first a good wetsand and buff might bring it back to life.
The car originally came with a 4cyl piston engine, so it had a completely different exhaust system than the RX-2.
I'm considering to repaint it, but first a good wetsand and buff might bring it back to life.
The car originally came with a 4cyl piston engine, so it had a completely different exhaust system than the RX-2.
11-26-08, 10:49 PM
#7
Likes to swear....alot
Thread Starter
iTrader: (3)
Join Date: Dec 2002
Location: Kitchener Ontario Canada
Posts: 3,791
Likes: 0
Received 3 Likes
on
3 Posts
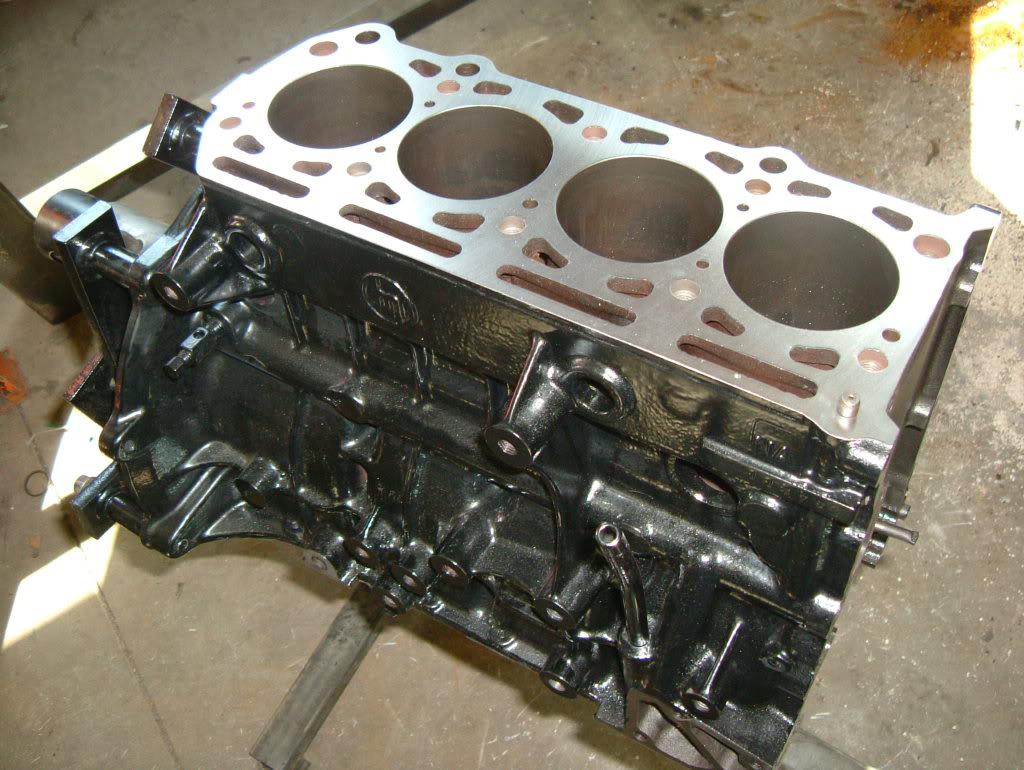
Starting to re-assemble the 1.6L engine
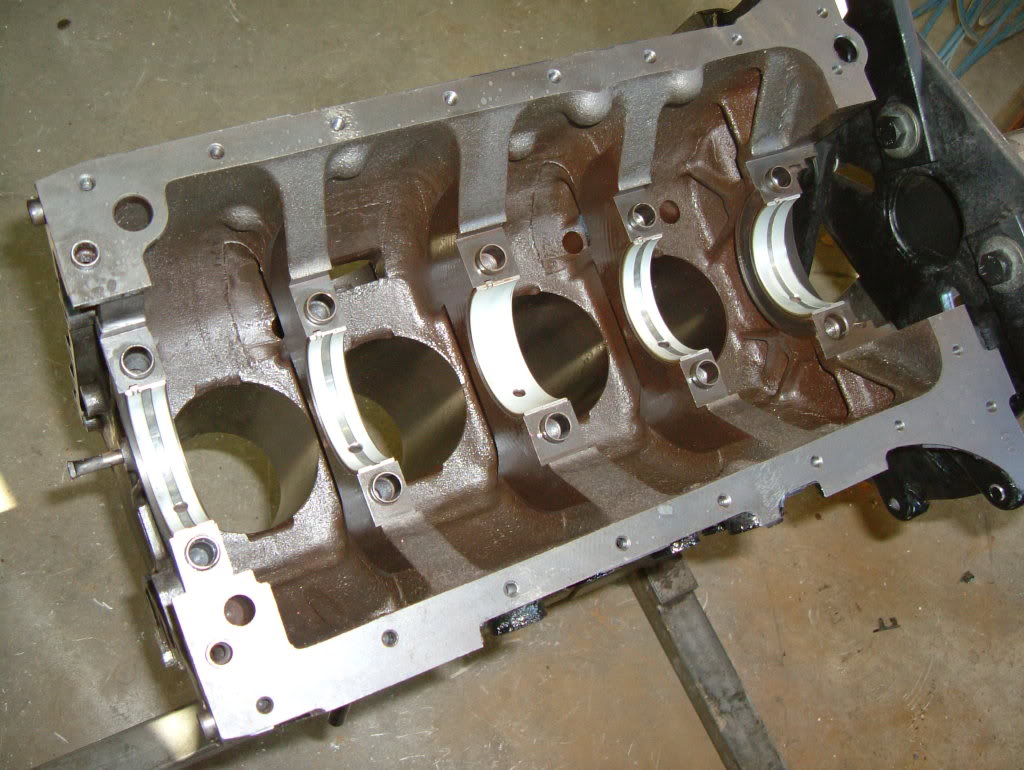
Bare block freshly powdercoated and decked
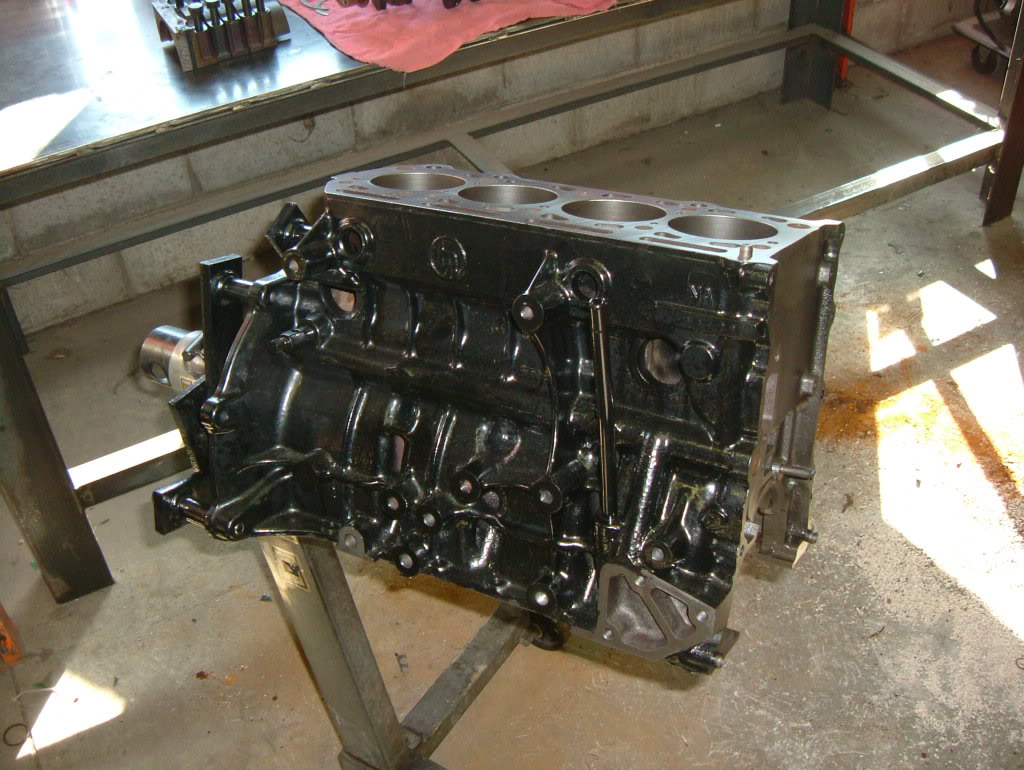
Crank and caps
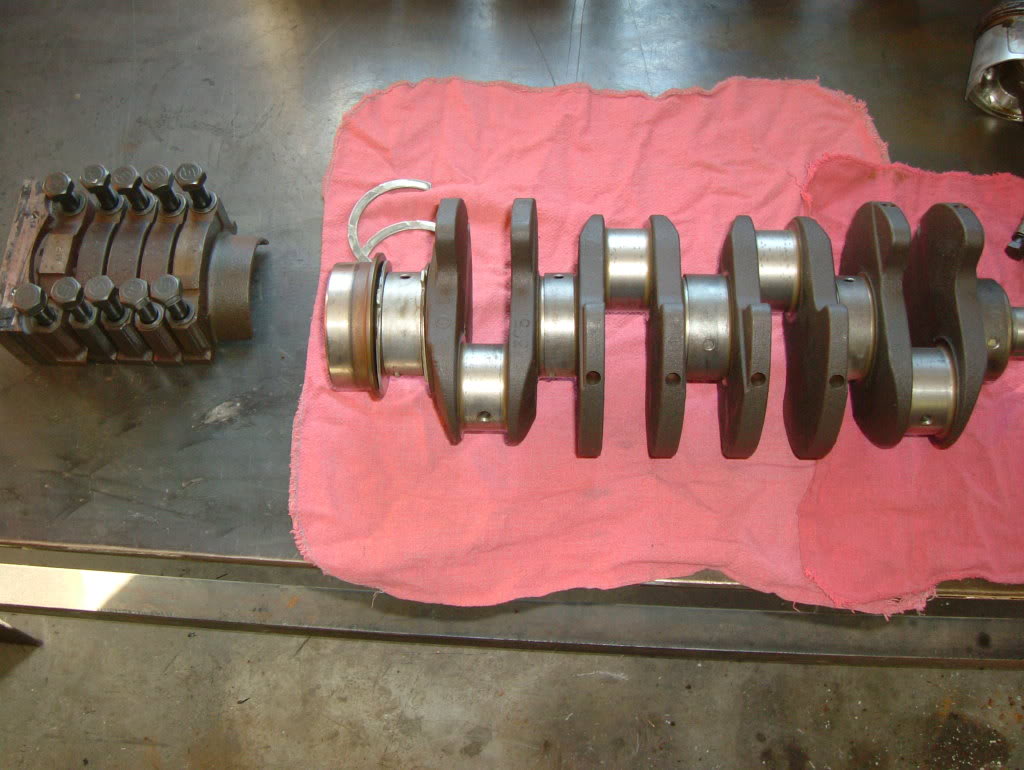
Original bearings in perfect shape
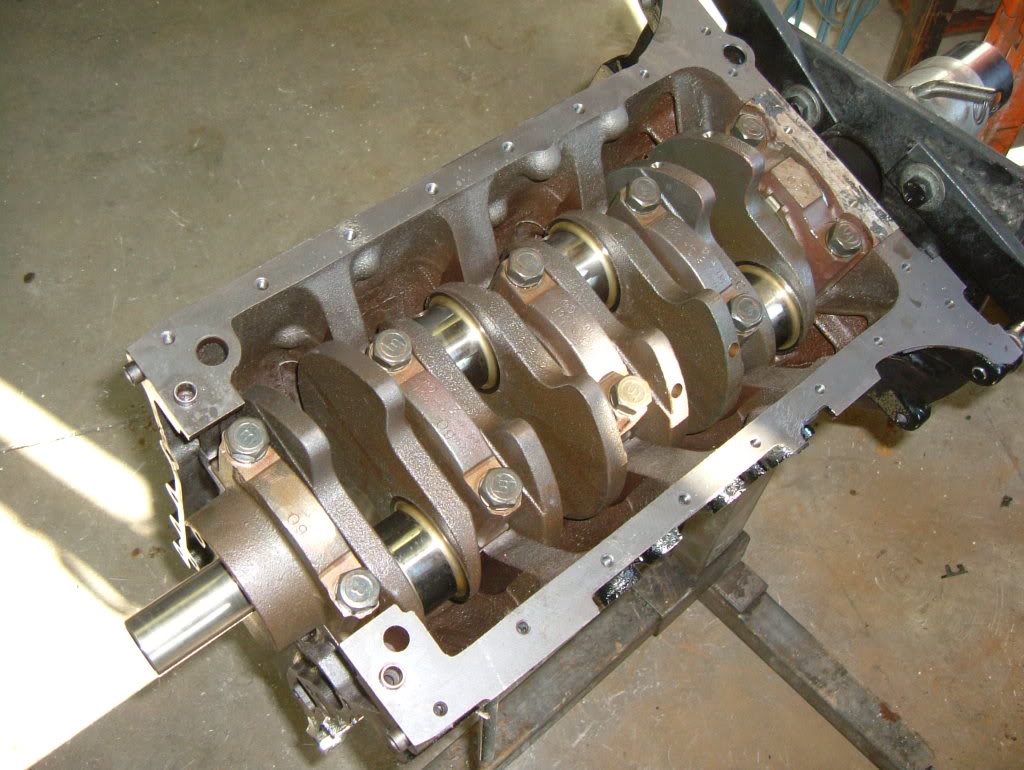
Old Mazda symbol on the main bolts
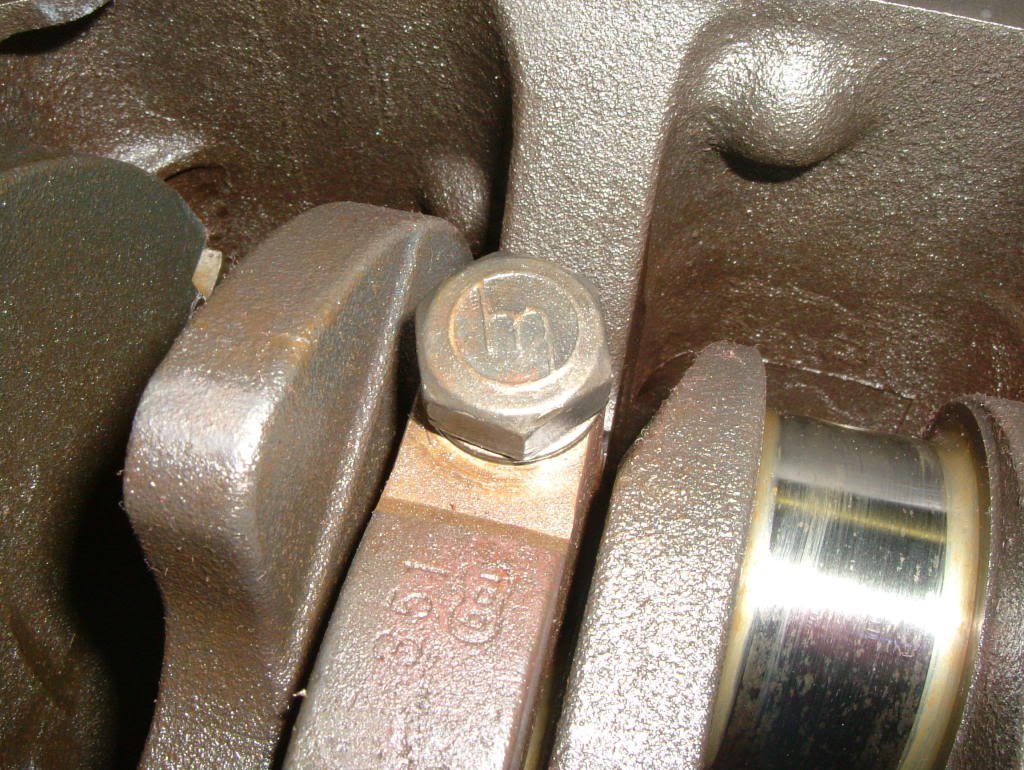
Bare block freshly powdercoated and decked
Crank and caps
Original bearings in perfect shape
Old Mazda symbol on the main bolts
Trending Topics
11-26-08, 10:50 PM
#8
01-06-14, 10:15 PM
#11
Likes to swear....alot
Thread Starter
iTrader: (3)
Join Date: Dec 2002
Location: Kitchener Ontario Canada
Posts: 3,791
Likes: 0
Received 3 Likes
on
3 Posts
Epic thread revival: 5 years later
Cant keep this car stock, so I've decided to do a 1.6L Miata drivetrain swap and convert the front end to rack and pinion steering.
Pics!
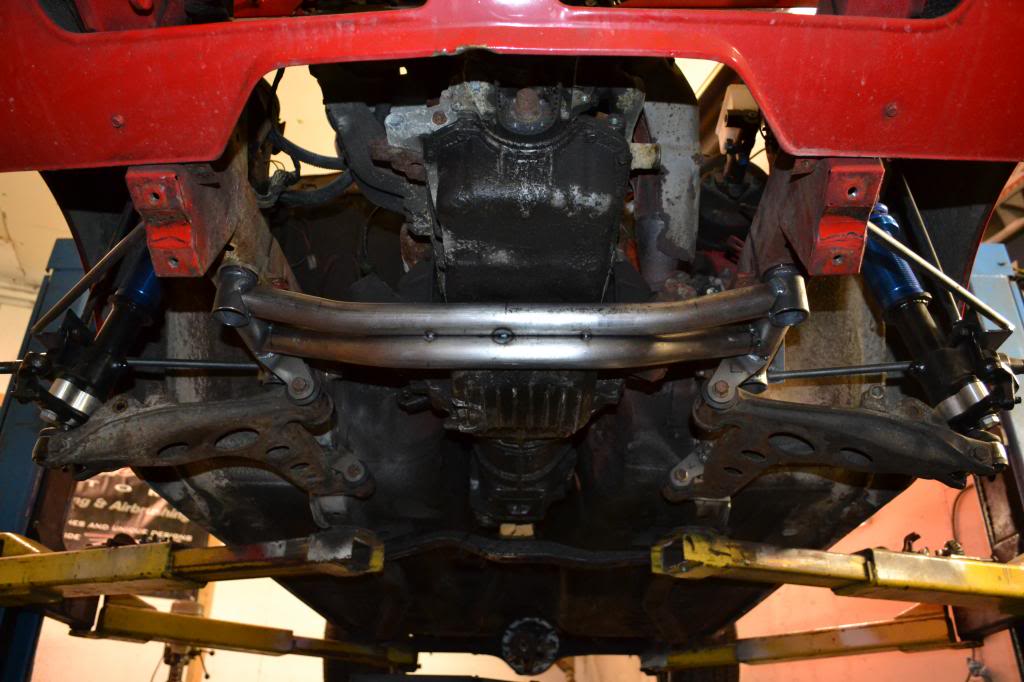
So I have converted the rear axles to custom Moser 5 bolt with a GSL-SE LSD center section and the front strut assembly to FB spindles with 5 bolt hubs and 4 piston FC calipers. Mounted 16x8 and 16x9.5 Work Ewings on the car, but decided they were just a bit too large for the chassis.
Here is the Miata engine hanging in the engine bay ready to be mounted in place
I built a fixture to get the placement of the lower balljoint so I could build my own front subframe using Miata front end parts.
I'm using stock Miata lower control arms and my own build subframe in place of the original
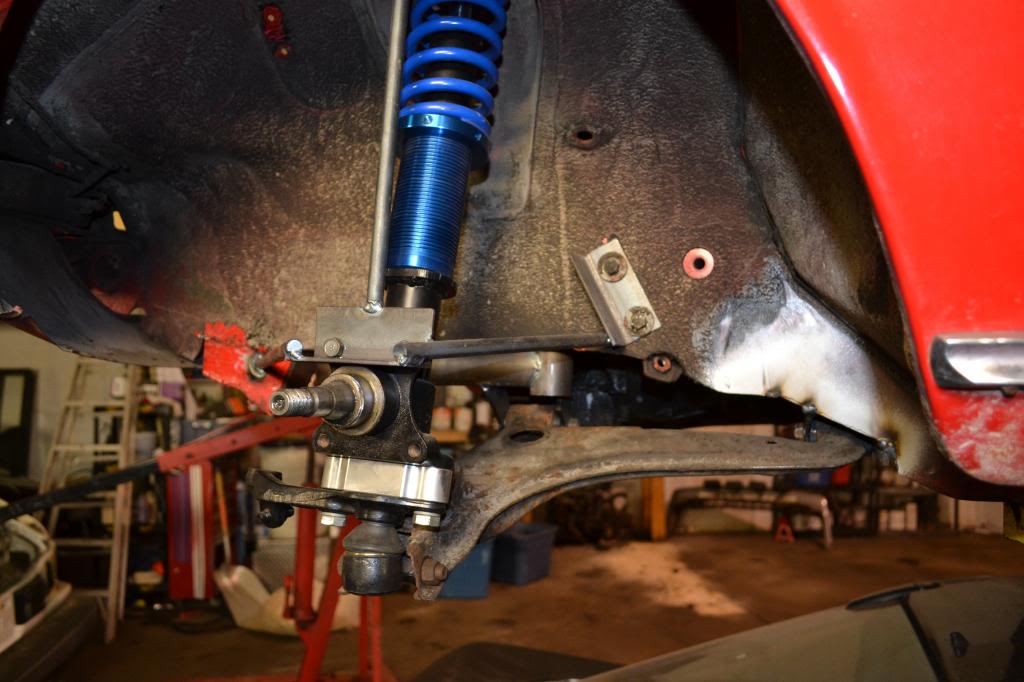
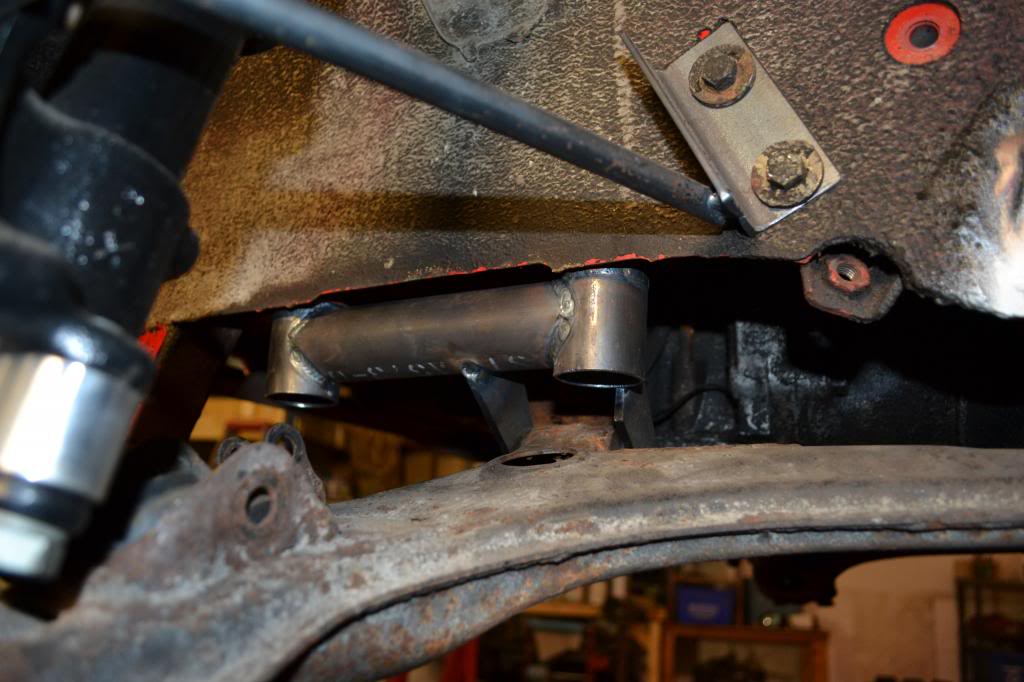

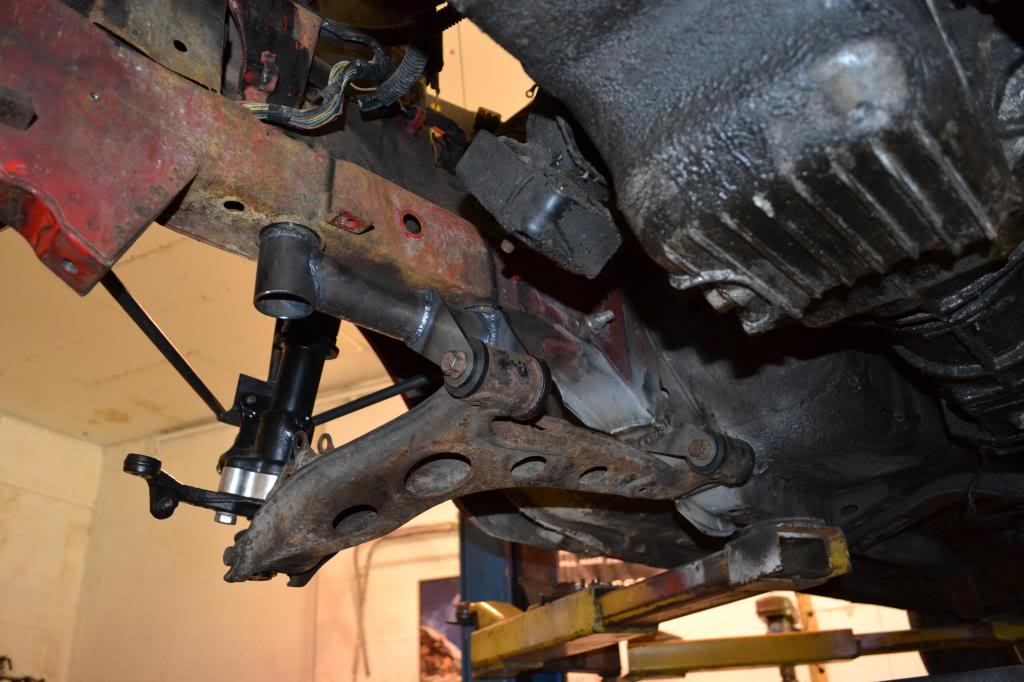
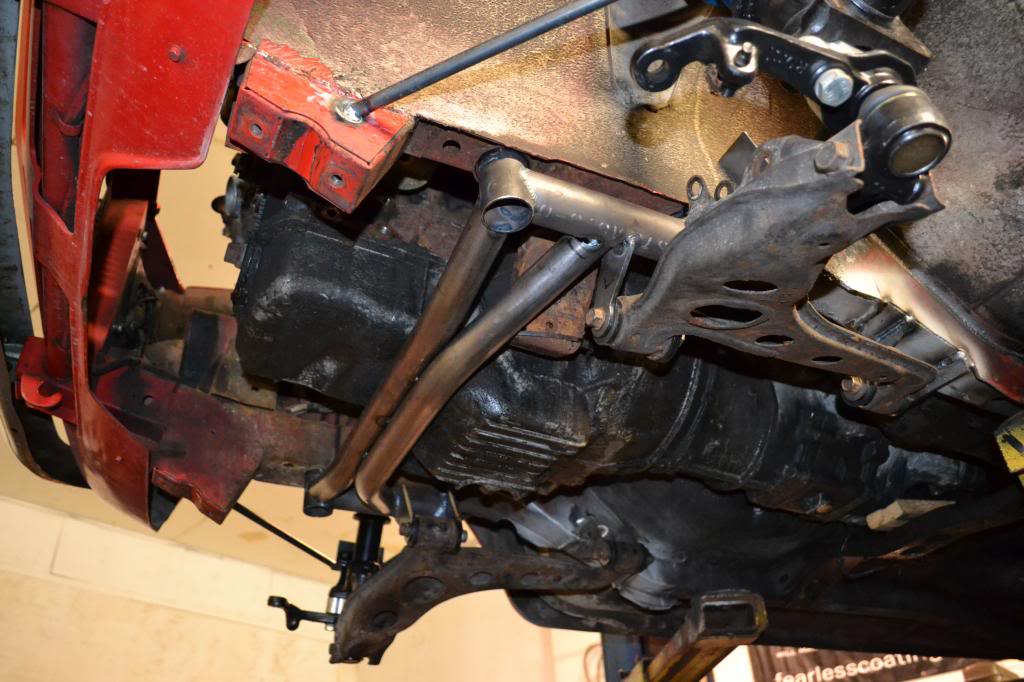
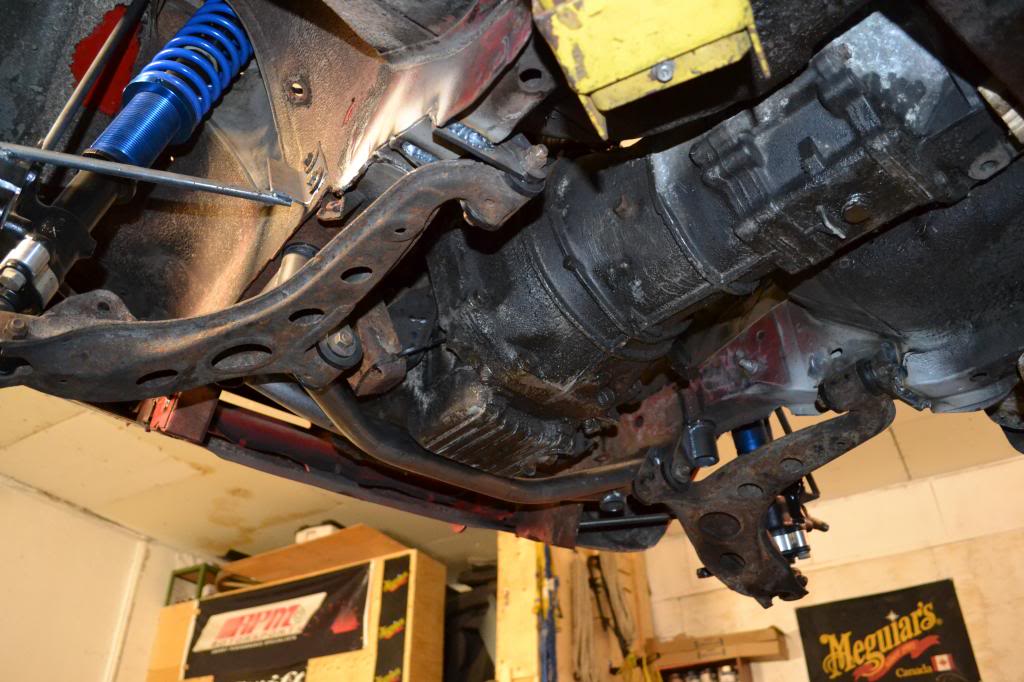
I had to notch into my MINT frame rails to make the rear control arm bushing mounts work.....but it will be worth it!!
Next on the list of things to do is shorten up the Miata rack and pinion and mount it in place, I should have my rack and pinion mounts water jet cut buy the end of the week.
Cant keep this car stock, so I've decided to do a 1.6L Miata drivetrain swap and convert the front end to rack and pinion steering.
Pics!
So I have converted the rear axles to custom Moser 5 bolt with a GSL-SE LSD center section and the front strut assembly to FB spindles with 5 bolt hubs and 4 piston FC calipers. Mounted 16x8 and 16x9.5 Work Ewings on the car, but decided they were just a bit too large for the chassis.

Here is the Miata engine hanging in the engine bay ready to be mounted in place

I built a fixture to get the placement of the lower balljoint so I could build my own front subframe using Miata front end parts.
I'm using stock Miata lower control arms and my own build subframe in place of the original


I had to notch into my MINT frame rails to make the rear control arm bushing mounts work.....but it will be worth it!!
Next on the list of things to do is shorten up the Miata rack and pinion and mount it in place, I should have my rack and pinion mounts water jet cut buy the end of the week.
01-06-14, 11:24 PM
#12

swap the steering knuckles from left to right now that you are going with a front mounted steering assembly as you will have absolutely no Ackerman or better yet measure the car up for the correct geometry and make a new set of steering knuckles that are 3-4cm shorter as well, the ones you have are meant to be used for a steering box and your steering ratio will go way up thats why the EXTRA length is there (leverage).
So far it looks great !! I am enjoying the build !!!! keep going
So far it looks great !! I am enjoying the build !!!! keep going
01-07-14, 12:15 AM
#13
Cool 616. May I ask why you are fighting the urge to do a rotary swap? I ask because the miata/mx-5 were notoriously gutless creatures. I just don't see the just reward for all of your hard work. Seems more logical to do a rotor swap. Not here talking crap , just wondering.
01-07-14, 08:33 AM
#14
Likes to swear....alot
Thread Starter
iTrader: (3)
Join Date: Dec 2002
Location: Kitchener Ontario Canada
Posts: 3,791
Likes: 0
Received 3 Likes
on
3 Posts
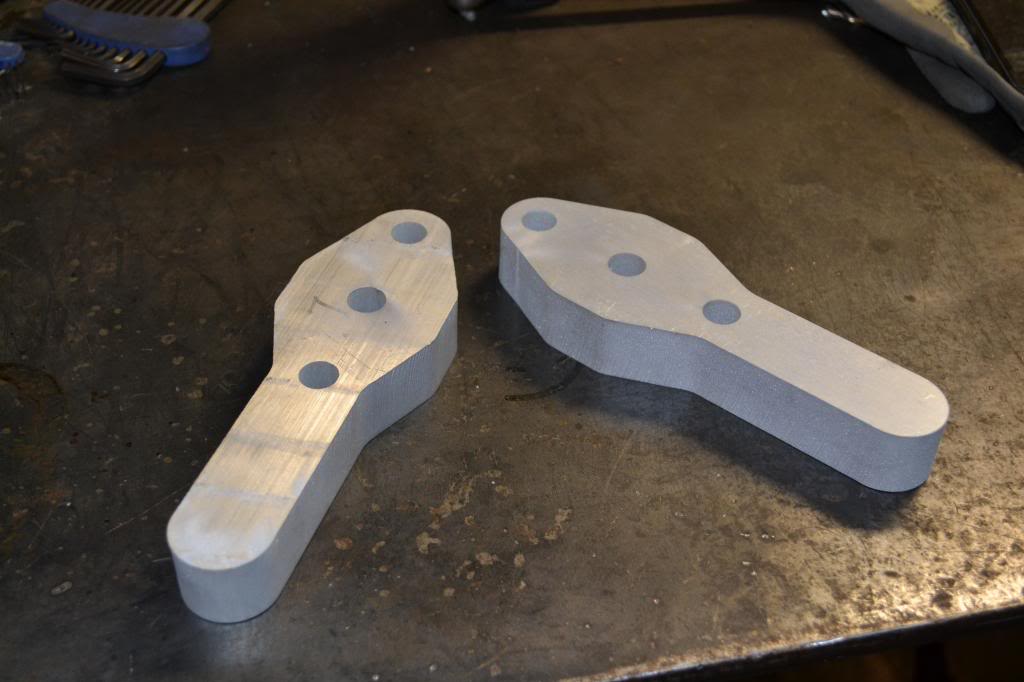
I'm machining aluminum steering knuckles to suit the Miata rack which will be slightly shorter and straight as opposed to the angled FB knuckles.
Yes, the 1.6L Miata engine is well known to be quite the weak-sauce powerhouse. I'm really stuck on keeping the displacement the same as the car originally came with, just updated with EFI and standalone ECU.
I cant post too many details about the drivetrain build. Keep tabs on future issues of Modified Mag, my build is being featured as a Project car for the Mag
01-26-14, 11:24 AM
#16
Likes to swear....alot
Thread Starter
iTrader: (3)
Join Date: Dec 2002
Location: Kitchener Ontario Canada
Posts: 3,791
Likes: 0
Received 3 Likes
on
3 Posts
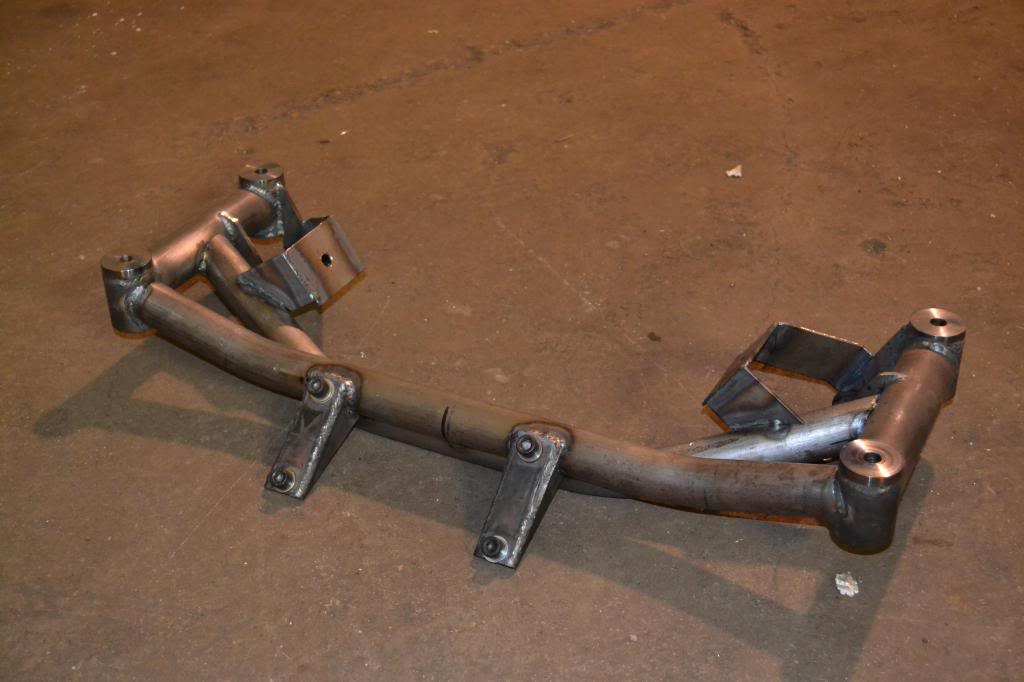
Update on the front subframe:
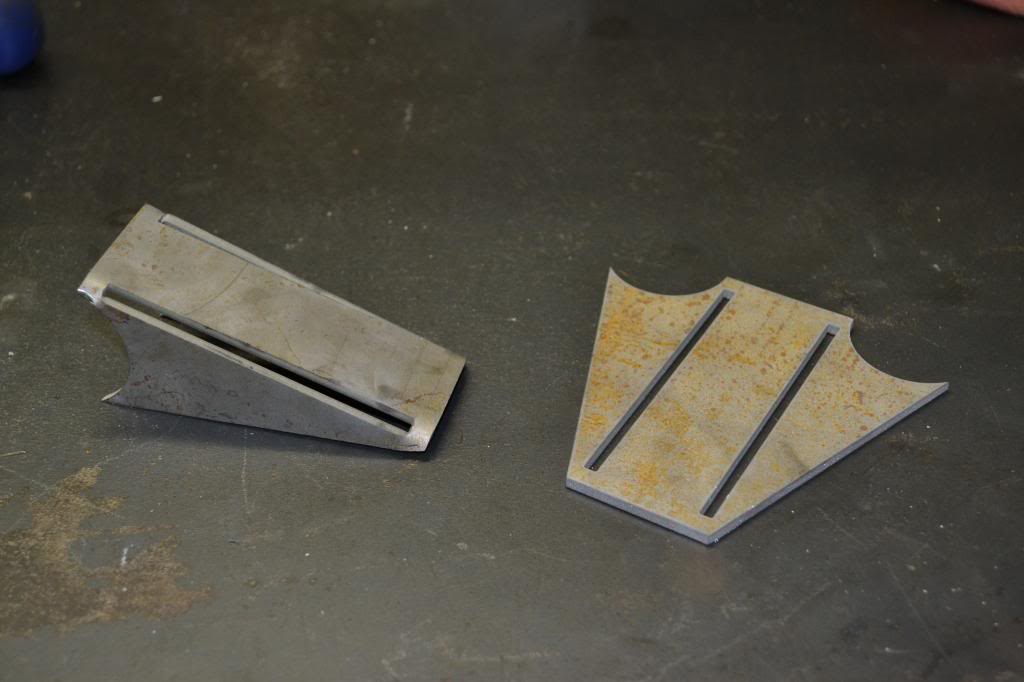
I designed these Rack and Pinion mounts and the steering arm and had them waterjet cut. The steering arm will require some more machining to finish, but the basic shape is there.
Next step was to disassemble the Miata rack and shorten it by 4.5". I had a machinist buddy of mine order a Tap from his work so we could tap the steering shaft for the inner tie rod end. M17x1.0 was about $280. Fuuuuuck

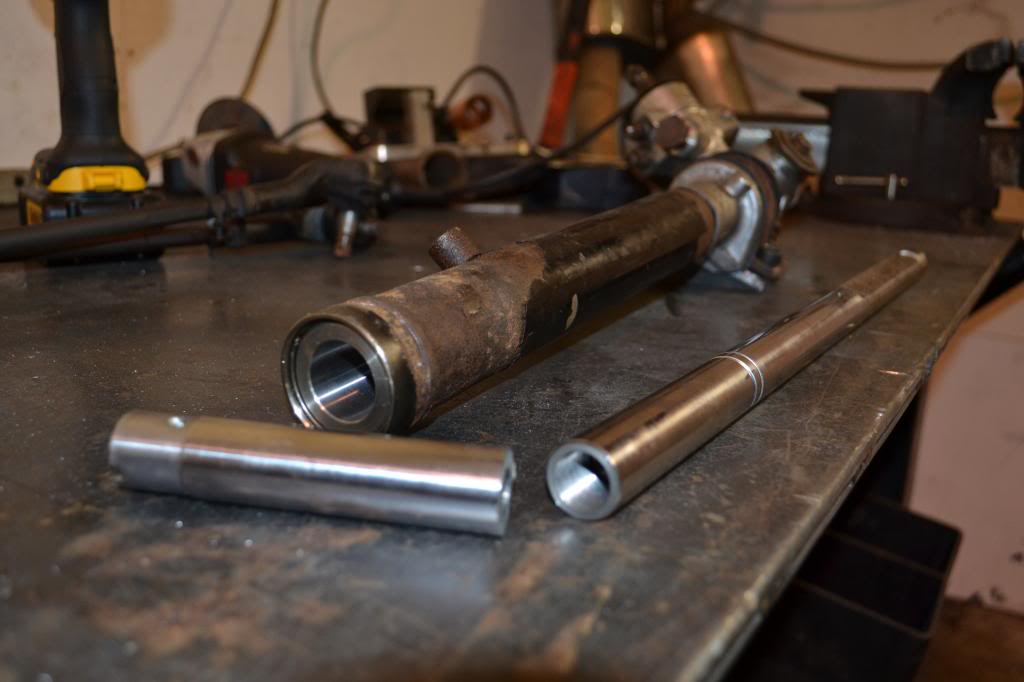
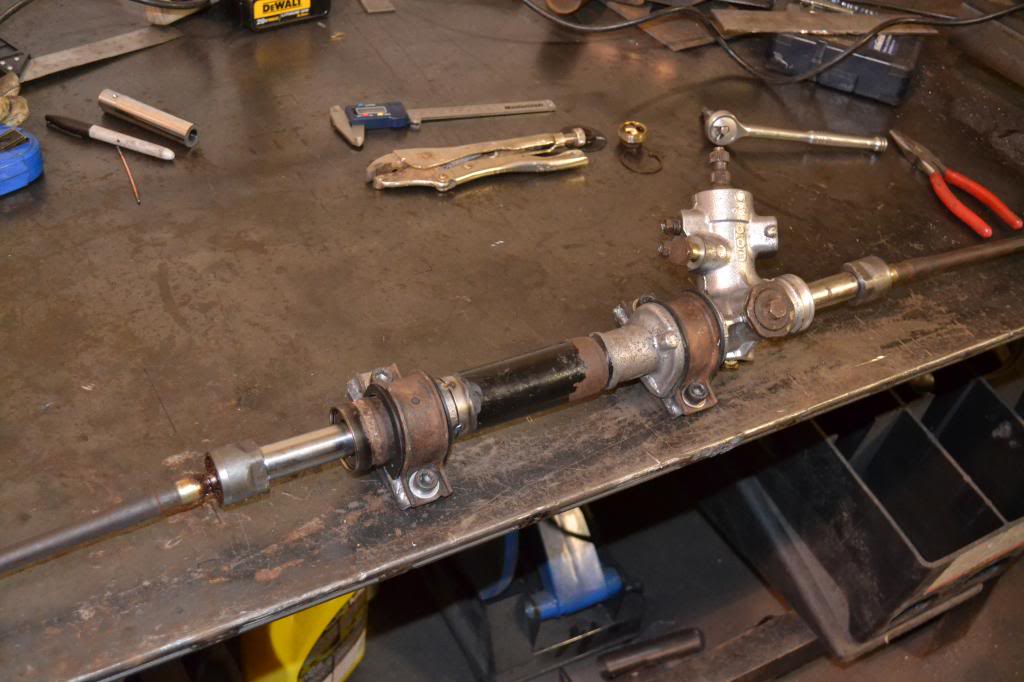
Here is a picture of the back side of the rack with the mounts ready to be welded in place
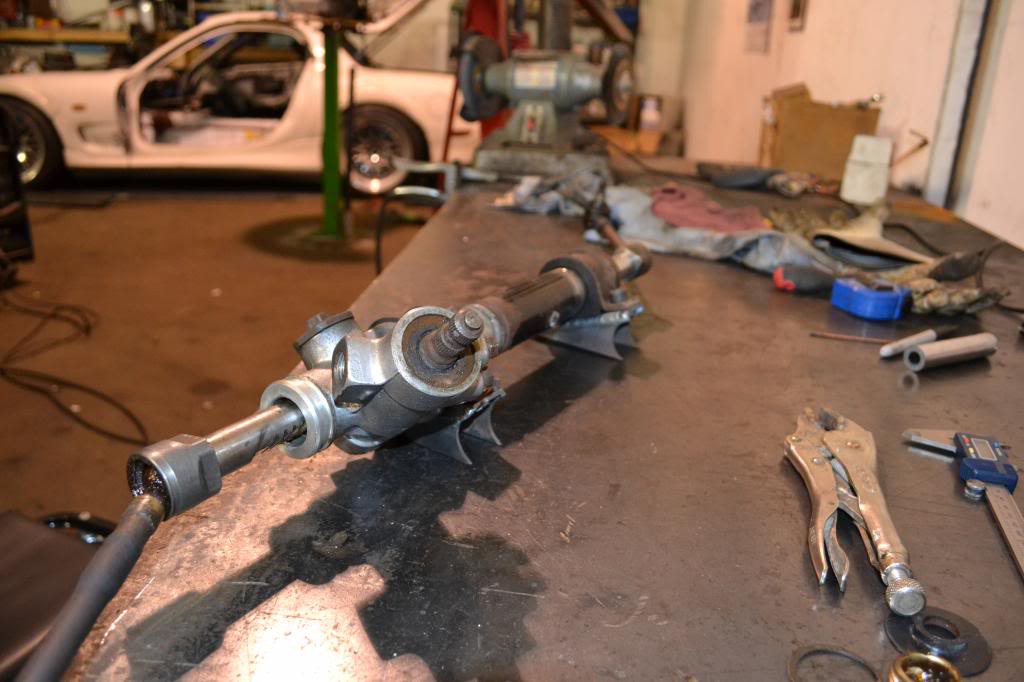
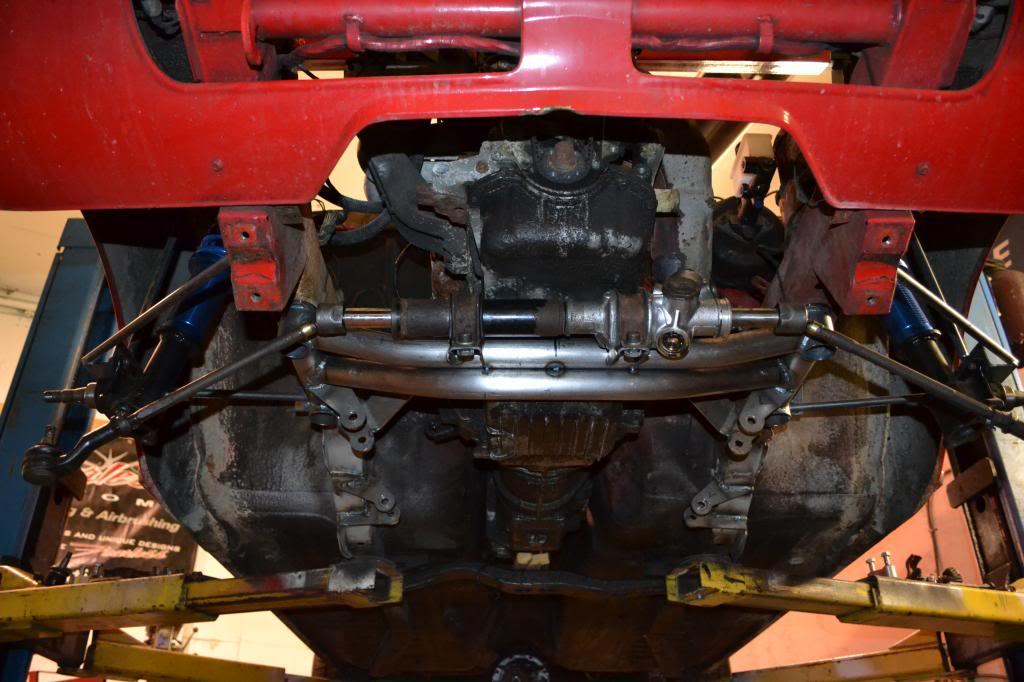
Rack mounts tack welded into place nice and level and centered perfectly
Here is a pic of the 1/8" plate motor mounts started, everything is tack welded and ready for re-inforcement
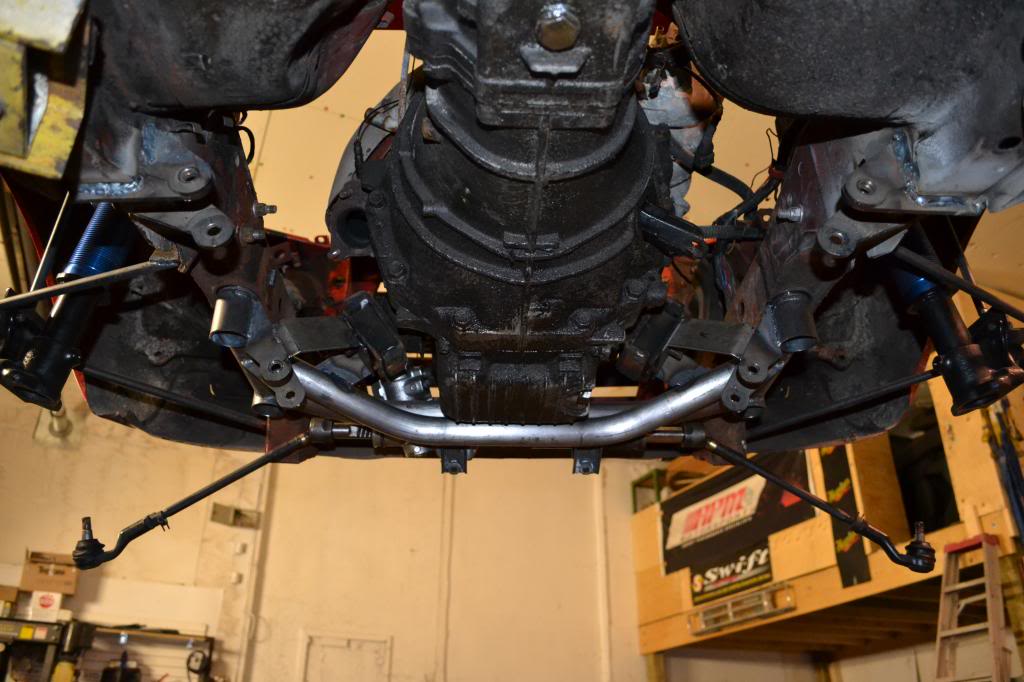
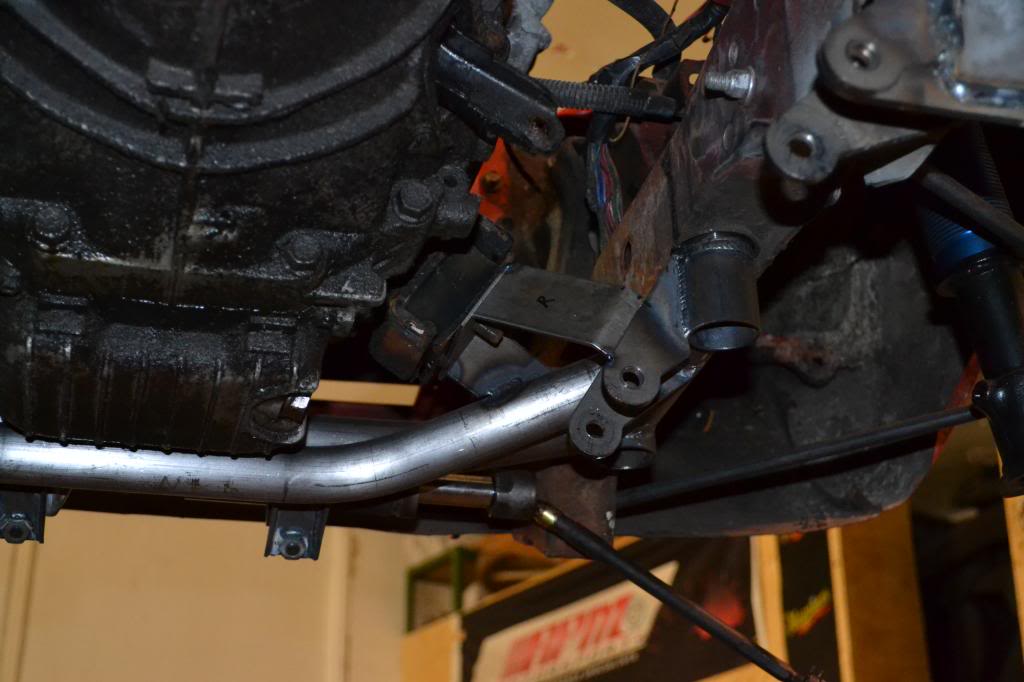
Engine back out
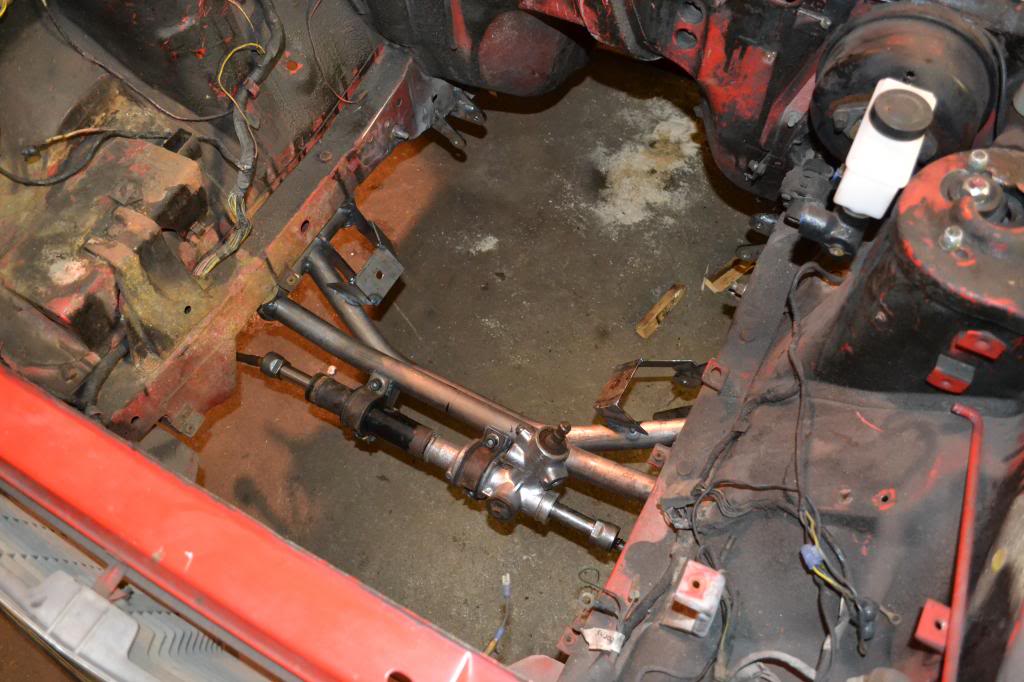
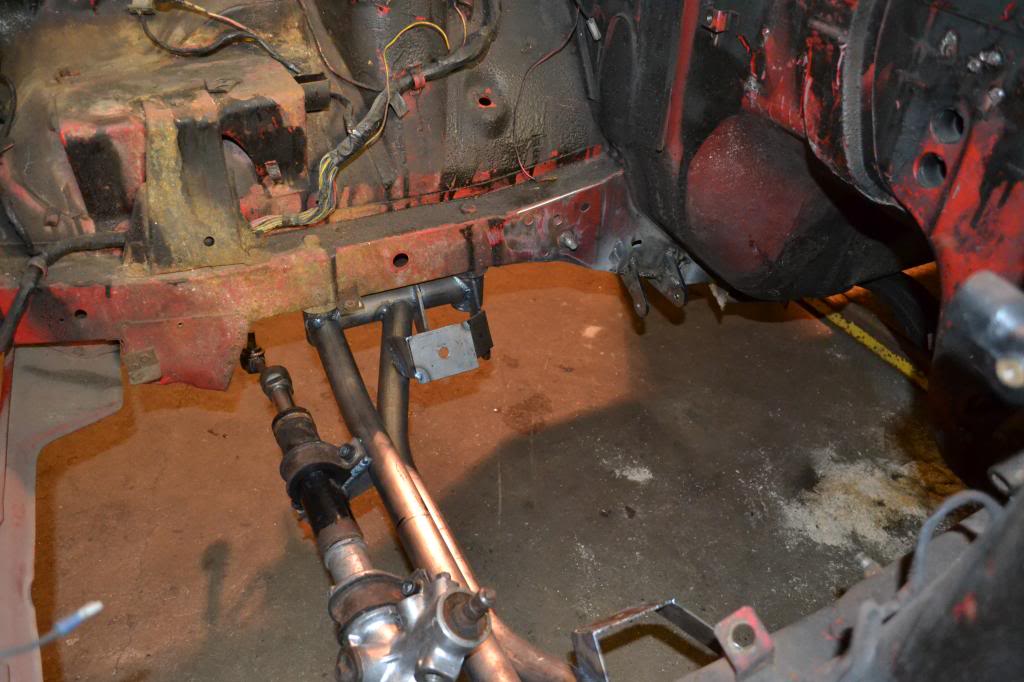
And subframe out ready to be finish welded. My plan is to box in the top of the engine mounts.....just ran out of metal today.
I designed these Rack and Pinion mounts and the steering arm and had them waterjet cut. The steering arm will require some more machining to finish, but the basic shape is there.


Next step was to disassemble the Miata rack and shorten it by 4.5". I had a machinist buddy of mine order a Tap from his work so we could tap the steering shaft for the inner tie rod end. M17x1.0 was about $280. Fuuuuuck


Here is a picture of the back side of the rack with the mounts ready to be welded in place

Rack mounts tack welded into place nice and level and centered perfectly

Here is a pic of the 1/8" plate motor mounts started, everything is tack welded and ready for re-inforcement


Engine back out


And subframe out ready to be finish welded. My plan is to box in the top of the engine mounts.....just ran out of metal today.
 01-29-14, 11:39 PM
#17
Full Member

Join Date: Nov 2011
Location: orange, ca
Posts: 105
Likes: 0
Received 0 Likes
on
0 Posts
I'm going to have to subscribe to motor mag as I've got a 73 rx2 that I'm thinking of installing a fc front subframe in. I May just have to steal your tube frame idea. Thank you for sharing this!
01-30-14, 01:08 AM
#18
Full Member
iTrader: (1)

Join Date: May 2011
Location: Queensland, Australia
Posts: 68
Likes: 0
Received 0 Likes
on
0 Posts
You should consider marketing and selling those front subframe/crossmember assemblies to the public. There would definitely be a market (albeit small to be realistic I guess) for units in RHD as the steering box in Capellas is often a problem with trying to squeeze decent extractors or large turbo dump pipes through between the engine and bellhousing.
You could have it Miata specific with the engine mounts or no mounts which might allow people to use the tradition under swaybar crossmber for rotary transplants. I'm not sure if the rotary sump would clear the rack and crossmember though.
You could have it Miata specific with the engine mounts or no mounts which might allow people to use the tradition under swaybar crossmber for rotary transplants. I'm not sure if the rotary sump would clear the rack and crossmember though.
02-01-14, 11:28 AM
#19
Full Member
iTrader: (1)
Join Date: Dec 2011
Location: Los Angeles CA
Posts: 203
Likes: 0
Received 0 Likes
on
0 Posts
Great job on the fabrication work! Love the idea of miata rack & pinion, and lca's on a Capella/RX2, keep it up! Also consider Eeyore's suggestion of marketing subframe/crossmember assemblies. i would be intersted in one.
02-03-14, 09:18 AM
#20
Likes to swear....alot
Thread Starter
iTrader: (3)
Join Date: Dec 2002
Location: Kitchener Ontario Canada
Posts: 3,791
Likes: 0
Received 3 Likes
on
3 Posts
I've been through that before....everyone says they want a kit, but when it comes right down to it, nobody will buy a kit. I'll keep it in mind though.
02-22-14, 03:41 AM
#22
Can Post Only in New Member Section

Join Date: Feb 2014
Location: Melbourne, Australia
Posts: 4
Likes: 0
Received 0 Likes
on
0 Posts
I really like this project. I always wanted to put a twin cam motor (was leaning towards a 4age) into my 1300. Before I knew it I had a 12A ep. This time it's definitely getting a BP 1.8.
Helps having a hoist to do an engine conversion hey?
Helps having a hoist to do an engine conversion hey?

Thread
Thread Starter
Forum
Replies
Last Post
AMOC
SE RX-7 Forum
1
09-10-15 09:42 AM
ZaqAtaq
New Member RX-7 Technical
2
09-05-15 08:57 PM

