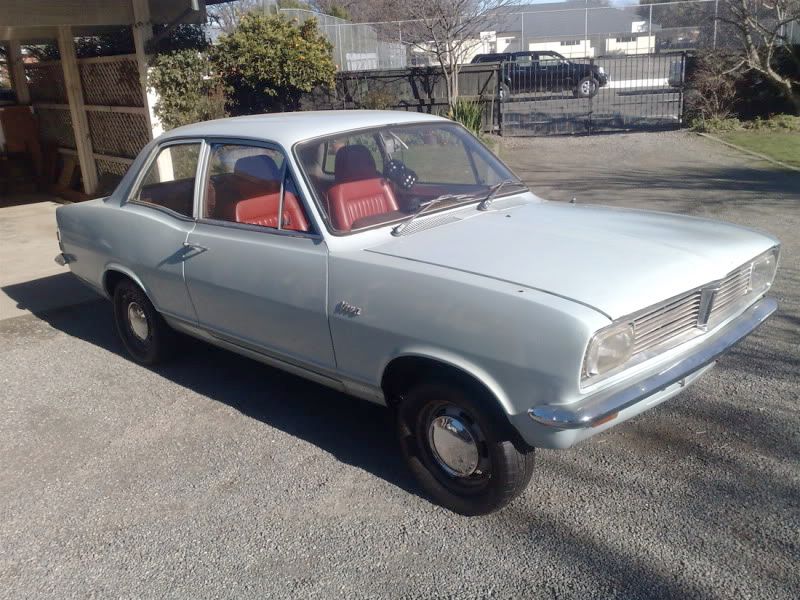
1968 Vauxhall HB Viva 12A project
 12-02-10, 02:01 PM
#1
Full Member
Thread Starter
Join Date: Feb 2007
Location: South Island, NZ
Posts: 150
Likes: 0
Received 0 Likes
on
0 Posts
1968 Vauxhall HB Viva 12A project
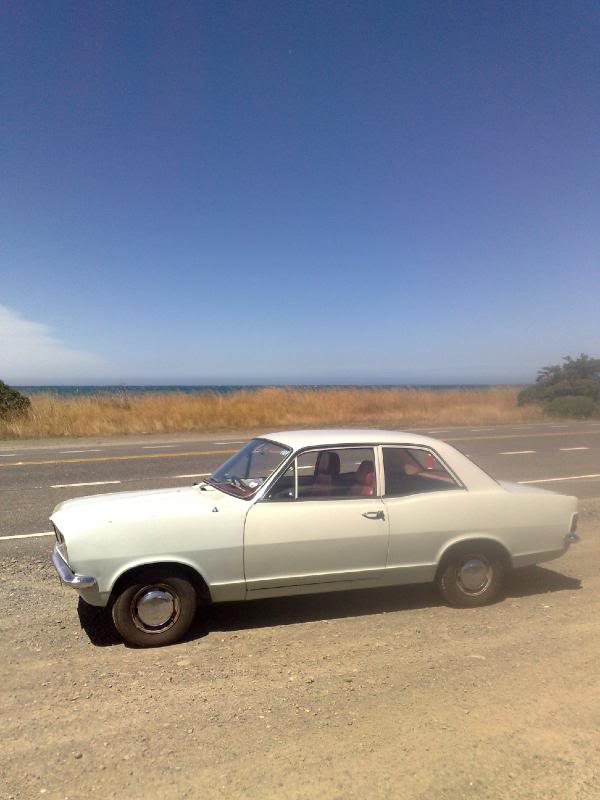
The HB Viva is a fairly common classic car in the UK and theres a few left here in NZ too. They sold well - in fact more HBs were sold than the later HC. But these days they are not as many left on the road as the HC. I have only seen one on the road since being back in NZ. Plenty of HCs around though.
I think the GT version HBs (2.0 OHC engine) were sold in Canada and were called a Epic GT's but were not sold in the US. In Australia they were rebadged as a Holden HB Torana.
Last year while still living in England I bought an old rusty Rx7 from a friend who owns the oldest Mazda dealership in the UK. It was a rare Elford Turbo series 2 rx7. He had rebuilt the engine fully using all new parts (handy when you own a dealership eh) a few years back but the body work had become tired so I got the car at a very nice price. Engine is barely run in. By the time I had sold loads of other bits and pieces from the rx7 (koni shocks, springs, interior bits) I made back enough money that all the parts I needed only cost me �50!!! �50 for a rebuilt engine...I was very happy. So all the parts went in a container back to NZ. I had also got some spax shocks before leaving- spax were just 5 miles up the road from where I lived so it was rude not to.
My Viva started off as a standard deluxe with the little 1100 engine. This just had to go.
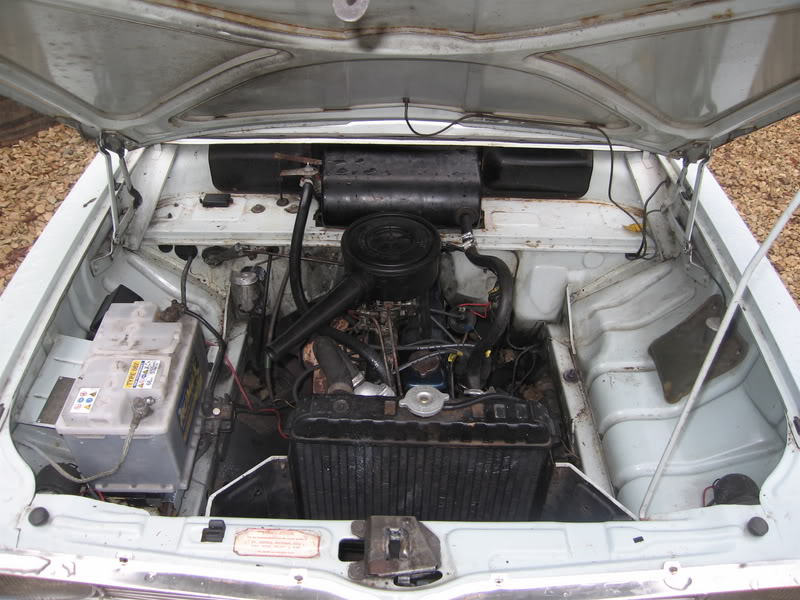
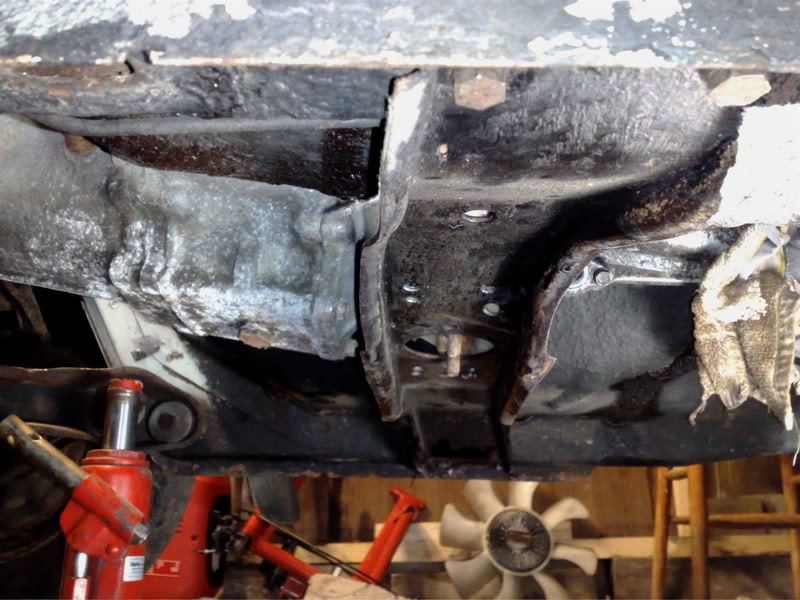
It was burning a lot of oil (about a pint every 100 miles) and was no fun at all. I knew as soon as I slung the 12A into the bay between engines that a rotary would be a nice fit conversion. The gearbox mount sat bang in the middle of the original g/box support and there seemed plenty enough room in the bay for exhaust building etc. Good clearance around the tunnel.

I bought some goodies from a fellow Vauxhall nutter down south including an 1800 axle, big 3.3 Vauxhall Ventora front discs on modified lower arms, a brake servo.
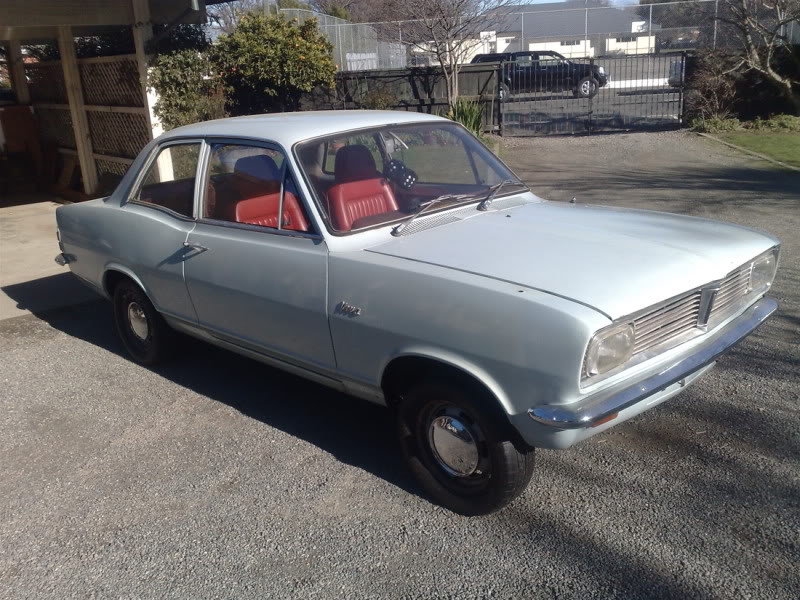
I got these seats as i just couldn't get along with the originals. And these Momo ones are out of an alfa and match almost perfectly!- I'm really happy because its not often i see modern seats with the 'fluted?' style of cover to match the rear seat. Colour is almost spot on too! I have now removed these seats and my original mounts as I will have to redo the mountings to the standards for when it comes to being certified. Might have some questions about that..
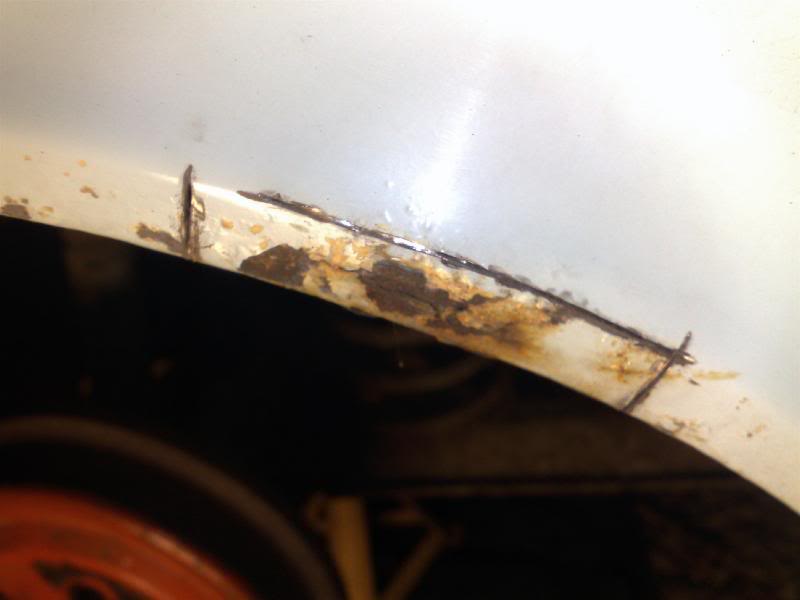
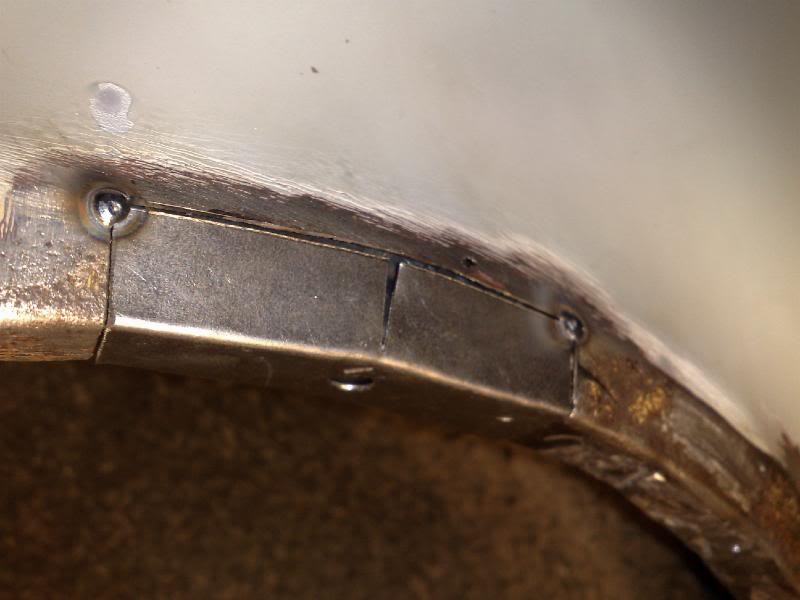
I have also had to deal with some rust. Just a bit on one arch. I cut it out and welded fresh steel in. As always it turned out to be worse than i first thought so i'm glad i've done it now!!! Its all painted now.

I think the GT version HBs (2.0 OHC engine) were sold in Canada and were called a Epic GT's but were not sold in the US. In Australia they were rebadged as a Holden HB Torana.
Last year while still living in England I bought an old rusty Rx7 from a friend who owns the oldest Mazda dealership in the UK. It was a rare Elford Turbo series 2 rx7. He had rebuilt the engine fully using all new parts (handy when you own a dealership eh) a few years back but the body work had become tired so I got the car at a very nice price. Engine is barely run in. By the time I had sold loads of other bits and pieces from the rx7 (koni shocks, springs, interior bits) I made back enough money that all the parts I needed only cost me �50!!! �50 for a rebuilt engine...I was very happy. So all the parts went in a container back to NZ. I had also got some spax shocks before leaving- spax were just 5 miles up the road from where I lived so it was rude not to.
My Viva started off as a standard deluxe with the little 1100 engine. This just had to go.
It was burning a lot of oil (about a pint every 100 miles) and was no fun at all. I knew as soon as I slung the 12A into the bay between engines that a rotary would be a nice fit conversion. The gearbox mount sat bang in the middle of the original g/box support and there seemed plenty enough room in the bay for exhaust building etc. Good clearance around the tunnel.
I bought some goodies from a fellow Vauxhall nutter down south including an 1800 axle, big 3.3 Vauxhall Ventora front discs on modified lower arms, a brake servo.
I got these seats as i just couldn't get along with the originals. And these Momo ones are out of an alfa and match almost perfectly!- I'm really happy because its not often i see modern seats with the 'fluted?' style of cover to match the rear seat. Colour is almost spot on too! I have now removed these seats and my original mounts as I will have to redo the mountings to the standards for when it comes to being certified. Might have some questions about that..
I have also had to deal with some rust. Just a bit on one arch. I cut it out and welded fresh steel in. As always it turned out to be worse than i first thought so i'm glad i've done it now!!! Its all painted now.
 12-02-10, 02:01 PM
#2
Full Member
Thread Starter
Join Date: Feb 2007
Location: South Island, NZ
Posts: 150
Likes: 0
Received 0 Likes
on
0 Posts
So about 3 months ago I did this...

No going back now- I dropped the front crossmember out...nice and easy on a Viva- 2 bolts, 2 nuts and steering coupling. Once off and on the floor I drilled out the spot welds holding the engine mount brackets. Off they came and now its all set to properly drop the rotary in place and see if the turbo fits... 8)


The turbo setup will fit BUT... no way can I fit standard brake servo etc. I would have to go remote servo.
The steering column doesn't need moving which is nice. The rubber coupling just fouls the manifold and would not last long- so a metal joint here would sort that...

The sump needs some chopping about the steering column on one side.
There is enough room for the mazda clutch master with turbo in place- just ;D
The SU carb on turbo setup just touches the battery tray so the tray would go and battery in boot.
And once I shorten gearstick remote the gearstick will pop out in a nice handy place.... I'm gonna take the top off the tunnel anyway to give a touch more clearance on box.

The bottom arms do not have sway bar mounts on them- well they do now. The same guy has lent me some spares to copy so I cut some 3mm steel to shape and bent in the vice- hey presto- factory mounts.

Welded them in and now all they need is a wire brush with a lick of paint.

One day when I have a lot of money I would love to get some lightweight calipers. I could machine my own hubs if I had a lathe (one day) and then have a nice light brake set up because these ones are very heavy.
Oh- and i have some new wheels. These ones are 13" off a vauxhall victor. They still not wide enough but that will get sorted one day. I reckon they look wicked with the 185/60 toyos (not so stretched...) fitted. They came with quite nice flat faced s/s hubcaps but i was well happy to discover the shiny chrome dome caps off my 12" snap in place perfect.
this car is still looking old man style but for the seats 8) it is getting dropped too!
No going back now- I dropped the front crossmember out...nice and easy on a Viva- 2 bolts, 2 nuts and steering coupling. Once off and on the floor I drilled out the spot welds holding the engine mount brackets. Off they came and now its all set to properly drop the rotary in place and see if the turbo fits... 8)
The turbo setup will fit BUT... no way can I fit standard brake servo etc. I would have to go remote servo.
The steering column doesn't need moving which is nice. The rubber coupling just fouls the manifold and would not last long- so a metal joint here would sort that...
The sump needs some chopping about the steering column on one side.
There is enough room for the mazda clutch master with turbo in place- just ;D
The SU carb on turbo setup just touches the battery tray so the tray would go and battery in boot.
And once I shorten gearstick remote the gearstick will pop out in a nice handy place.... I'm gonna take the top off the tunnel anyway to give a touch more clearance on box.
The bottom arms do not have sway bar mounts on them- well they do now. The same guy has lent me some spares to copy so I cut some 3mm steel to shape and bent in the vice- hey presto- factory mounts.
Welded them in and now all they need is a wire brush with a lick of paint.
One day when I have a lot of money I would love to get some lightweight calipers. I could machine my own hubs if I had a lathe (one day) and then have a nice light brake set up because these ones are very heavy.
Oh- and i have some new wheels. These ones are 13" off a vauxhall victor. They still not wide enough but that will get sorted one day. I reckon they look wicked with the 185/60 toyos (not so stretched...) fitted. They came with quite nice flat faced s/s hubcaps but i was well happy to discover the shiny chrome dome caps off my 12" snap in place perfect.
this car is still looking old man style but for the seats 8) it is getting dropped too!
12-02-10, 02:02 PM
#3
Full Member
Thread Starter
Join Date: Feb 2007
Location: South Island, NZ
Posts: 150
Likes: 0
Received 0 Likes
on
0 Posts
ded I had better get shifting on this wee car or we'll miss another summer of driving it.
Lovely spring day to blow the wood dust off the car.

Marked the sump for some cuttingwhere it sits next to the steering rack/column junction. It possibly wont touch but I'd rather not risk it. I'll also remove the oil level warning gubbins and add a baffle.
Then removed the engine/box so i can cut the top of tunnel off- it only needs to be about an inch higher. Luckily the tunnel is really easy to get too as there is no heater in the way on Vivas, the heater being mounted up on the firewall in the bay.
We took out the front suspension and little discs etc.
we had a little helper....

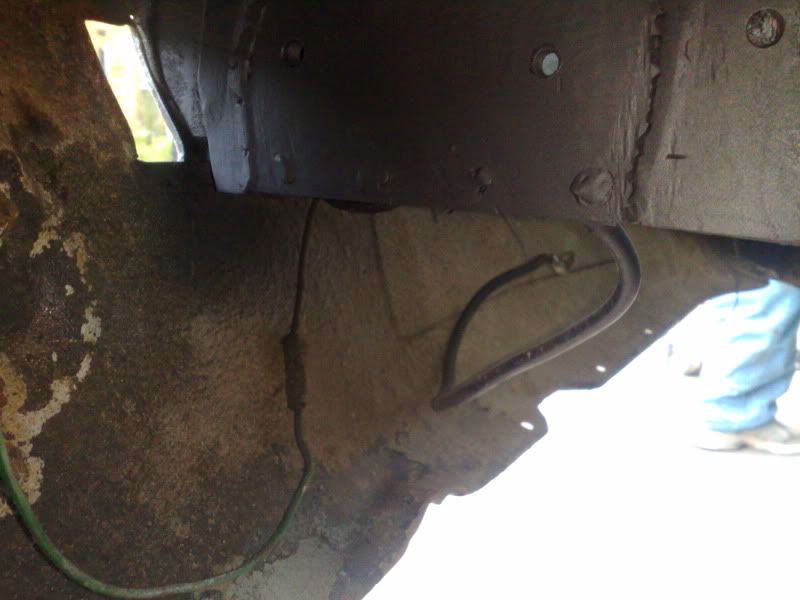
Hannah found some rust behind the bumper mount so I cut it out...


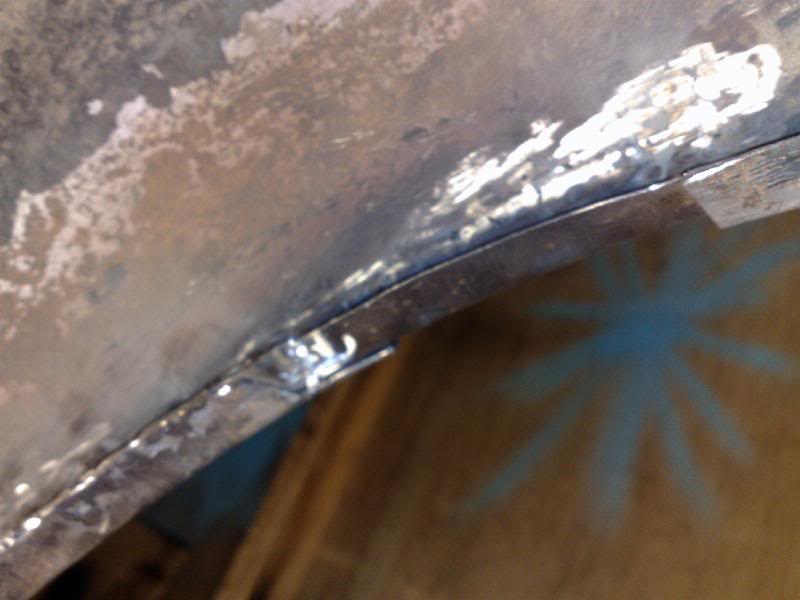
There were two skins leading to a water trap. I cut one thick piece of steel to replace it with. nuts welded on back..
Then welded up, ground down and painted.
After doing that it was on with the big 'ol Victor discs and hubs, heftier springs.

Its good to be finally working on a classic again. After doing the engine swap in the hiace this is so easy to work on!!!
A friend told me that there a load of guys in town planning to all have the their project cars on the road for around christmas and do some runs. Plus lots of shows to go in 2011.
Next the axle. I had got my hands on a nice strong 1800 magnum jobbie. With big drums. Gave it a good scrub in the evening sun. Painted black now and sitting under the vivas bum where it should be. I also scored a pair of shorter springs- this is a bonus as Viva's have funny shaped coils that you cant just chop down. So now my Viva sits about 2" lower I think they are stiffer too- certainly were way less rusty!


Next job is to remove the seats and cut the top of the tunnel off so I can lift the gear box 1.5 " and make some engine mounts. Looking forwards to having it sat in there on its own mounts!
Lovely spring day to blow the wood dust off the car.
Marked the sump for some cuttingwhere it sits next to the steering rack/column junction. It possibly wont touch but I'd rather not risk it. I'll also remove the oil level warning gubbins and add a baffle.
Then removed the engine/box so i can cut the top of tunnel off- it only needs to be about an inch higher. Luckily the tunnel is really easy to get too as there is no heater in the way on Vivas, the heater being mounted up on the firewall in the bay.
We took out the front suspension and little discs etc.
we had a little helper....
Hannah found some rust behind the bumper mount so I cut it out...
There were two skins leading to a water trap. I cut one thick piece of steel to replace it with. nuts welded on back..
Then welded up, ground down and painted.
After doing that it was on with the big 'ol Victor discs and hubs, heftier springs.
Its good to be finally working on a classic again. After doing the engine swap in the hiace this is so easy to work on!!!
A friend told me that there a load of guys in town planning to all have the their project cars on the road for around christmas and do some runs. Plus lots of shows to go in 2011.
Next the axle. I had got my hands on a nice strong 1800 magnum jobbie. With big drums. Gave it a good scrub in the evening sun. Painted black now and sitting under the vivas bum where it should be. I also scored a pair of shorter springs- this is a bonus as Viva's have funny shaped coils that you cant just chop down. So now my Viva sits about 2" lower
I think they are stiffer too- certainly were way less rusty!Next job is to remove the seats and cut the top of the tunnel off so I can lift the gear box 1.5 " and make some engine mounts. Looking forwards to having it sat in there on its own mounts!
12-04-10, 04:15 AM
#6
Full Member
Thread Starter
Join Date: Feb 2007
Location: South Island, NZ
Posts: 150
Likes: 0
Received 0 Likes
on
0 Posts
Yeah I love it! Its so 60's. I have the photo on my phone wall paper so it keeps me inspired to work on the car! The Momo seats are well comfortable too.
12-04-10, 02:45 PM
#7
Full Member
Thread Starter
Join Date: Feb 2007
Location: South Island, NZ
Posts: 150
Likes: 0
Received 0 Likes
on
0 Posts
Engine mounts are done! clutch pedal box mods are done.
I have cut the tunnel top off. Luckily it only needed the very top whipped off. With gearbox lifted, sump sitting on some thin blocks of wood on the viva crossmember a spirit level sat on top of Nikki carb manifold is almost level.
While engine was sat in place I marked the sump where it was touch the steering rack. Off with the sump and I chopped out a notch then welded in new steel. Back on and it fits perfectly.

I then bought some steel from my old work and started on the engine crossmember. I was all set to have to make a breast plate too.( This is engine mount thing mounted to the front cover that sit on top of the engine mounts) I was positive that I had brought one over from the UK with me but I looked and looked and just couldn't find it! But just as I was about to start making one whilst searching for something else I found it sitting in a box right at the back under the bench! I was so happy to find it as it would have been a pain to make.
I started off by drilling two holes a side through each chassis rail. I used a bigger bit on the inside face and welded in some tube so the rails wont crush when the bolts are done up tight.


Then I hung 80 x 6mm plate down from each side and lined up a length of 50 x 25 x 3mm rhs between them. Nice hefty welds and some reinforcing plates on each side to stop sideways movement. The N/S reinforcing plate has a hole through it for the oil cooler pipes.
The cross member has to drop quite far as the viva has quite high chassis rails. Once it was all bolted up it is nice and strong- if slightly over built.

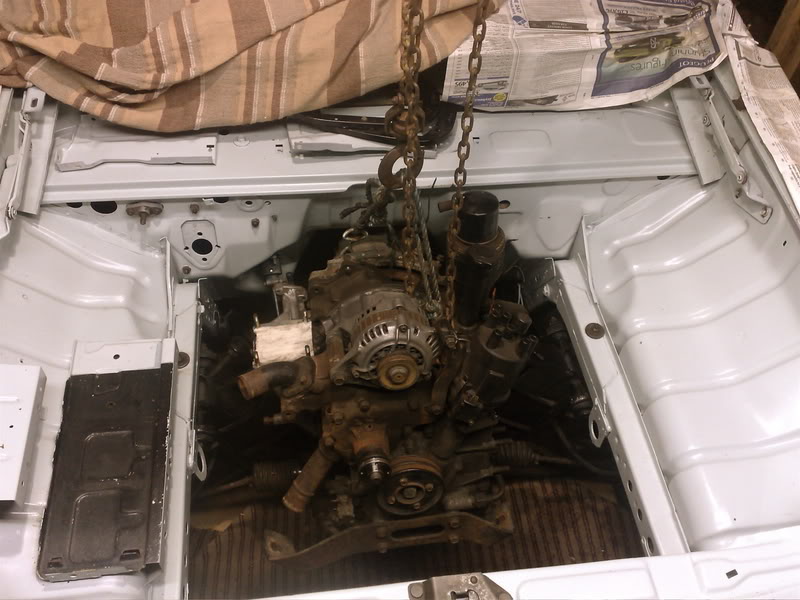
The gearbox was easy- just some 35 mm box section bolted in between the mazda g/box mount and the Viva g/box support. Simple. It was great to step back and see the lot sitting there on its own mounts! Out with the engine again- which is very easy to hoist in and out.

Next job was the clutch master cylinder placement and modifications to the pedal box. As the Viva is originally a cable operated clutch I had to do a redesign of the whole lot. I started by chopping off the clutch pedal from the viva pedal box and fitting in its place a RX7 clutch pedal - with its fulcrum mounted higher up. I made an adjustable stop for it too so I can set the pedal heights.
Then I filled in all the various holes on the firewall that were not to be used and made an extra big hole for the new rx7 master cylinder I had bought to go through. This was the longest part of the mods as my smallest hole saw was broken and I wasn't about to buy a new one for just one job.


To fill in the smaller 5/16 bolts holes I cut little thin discs off a long bolt and held them in place with a magnet so they sat flush before tacking in place. Beats my old way of just filling in the hole from the edge with tonnes of weld!
Bolts are welded onto the back and protrude through the firewall. The master cylinder mounting holes were threaded- I drilled them out and it now slides in place onto the studs easily.

I chopped the bottom off the Viva brake pedal and the bottom rx7 pedal fitted in place perfect for good strong welds. Now both pedals match. I set them both a bit lower too as I always found the Viva pedals to high off the floor. I will use an HC accelerator pedal assembly as its all one unit that bolts to the floor and is bottom hinged which I prefer.


The clutch pedal works perfect so i am well happy with it.
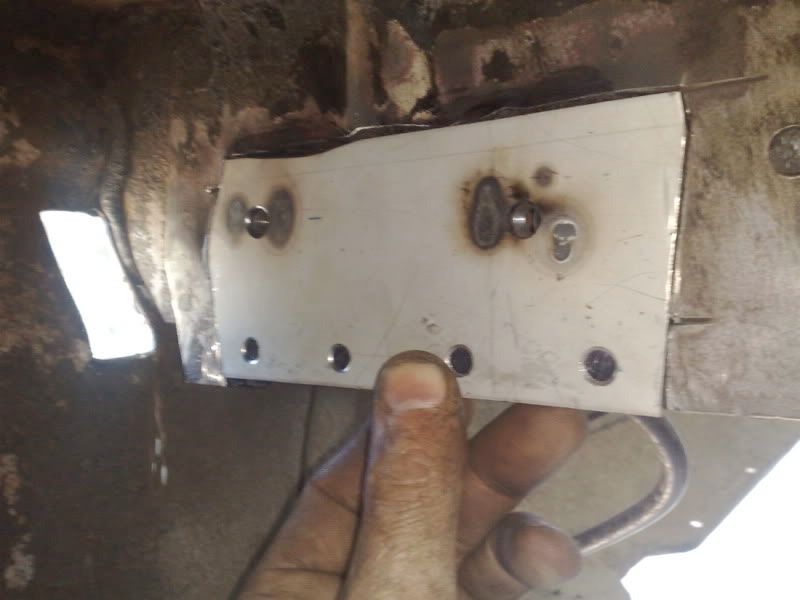
On friday I removed the battery tray. It looked at first like it was hiding rust but luckily after a good wire brush session it was deemed solid. I welded up a load of old screw holes and cut off any tabs or bits I didn't need then ground the lot smooth. Some filler and sanding to do but its looking much better without the battery tray there and if i Do go down the way of the Elford turbo i'll have plenty of room to point the carb!
I also cut out the stamped profile on the front valance for extra cooling that the GTs have. This will be needed as standard airflow is not great at all. It was an easy neat job to do with my jigsaw. I will put some mesh behind it to stop stones etc.


I have cut the tunnel top off. Luckily it only needed the very top whipped off. With gearbox lifted, sump sitting on some thin blocks of wood on the viva crossmember a spirit level sat on top of Nikki carb manifold is almost level.
While engine was sat in place I marked the sump where it was touch the steering rack. Off with the sump and I chopped out a notch then welded in new steel. Back on and it fits perfectly.
I then bought some steel from my old work and started on the engine crossmember. I was all set to have to make a breast plate too.( This is engine mount thing mounted to the front cover that sit on top of the engine mounts) I was positive that I had brought one over from the UK with me but I looked and looked and just couldn't find it! But just as I was about to start making one whilst searching for something else I found it sitting in a box right at the back under the bench! I was so happy to find it as it would have been a pain to make.
I started off by drilling two holes a side through each chassis rail. I used a bigger bit on the inside face and welded in some tube so the rails wont crush when the bolts are done up tight.
Then I hung 80 x 6mm plate down from each side and lined up a length of 50 x 25 x 3mm rhs between them. Nice hefty welds and some reinforcing plates on each side to stop sideways movement. The N/S reinforcing plate has a hole through it for the oil cooler pipes.
The cross member has to drop quite far as the viva has quite high chassis rails. Once it was all bolted up it is nice and strong- if slightly over built.
The gearbox was easy- just some 35 mm box section bolted in between the mazda g/box mount and the Viva g/box support. Simple. It was great to step back and see the lot sitting there on its own mounts! Out with the engine again- which is very easy to hoist in and out.
Next job was the clutch master cylinder placement and modifications to the pedal box. As the Viva is originally a cable operated clutch I had to do a redesign of the whole lot. I started by chopping off the clutch pedal from the viva pedal box and fitting in its place a RX7 clutch pedal - with its fulcrum mounted higher up. I made an adjustable stop for it too so I can set the pedal heights.
Then I filled in all the various holes on the firewall that were not to be used and made an extra big hole for the new rx7 master cylinder I had bought to go through. This was the longest part of the mods as my smallest hole saw was broken and I wasn't about to buy a new one for just one job.
To fill in the smaller 5/16 bolts holes I cut little thin discs off a long bolt and held them in place with a magnet so they sat flush before tacking in place. Beats my old way of just filling in the hole from the edge with tonnes of weld!
Bolts are welded onto the back and protrude through the firewall. The master cylinder mounting holes were threaded- I drilled them out and it now slides in place onto the studs easily.
I chopped the bottom off the Viva brake pedal and the bottom rx7 pedal fitted in place perfect for good strong welds. Now both pedals match. I set them both a bit lower too as I always found the Viva pedals to high off the floor. I will use an HC accelerator pedal assembly as its all one unit that bolts to the floor and is bottom hinged which I prefer.
The clutch pedal works perfect so i am well happy with it.
On friday I removed the battery tray. It looked at first like it was hiding rust but luckily after a good wire brush session it was deemed solid. I welded up a load of old screw holes and cut off any tabs or bits I didn't need then ground the lot smooth. Some filler and sanding to do but its looking much better without the battery tray there and if i Do go down the way of the Elford turbo i'll have plenty of room to point the carb!
I also cut out the stamped profile on the front valance for extra cooling that the GTs have. This will be needed as standard airflow is not great at all. It was an easy neat job to do with my jigsaw. I will put some mesh behind it to stop stones etc.
Trending Topics
12-05-10, 02:32 AM
#8
Full Member
Thread Starter
Join Date: Feb 2007
Location: South Island, NZ
Posts: 150
Likes: 0
Received 0 Likes
on
0 Posts
Today after a very relaxed hot sunday morning I set to work on shortening the gear box remote.
First undo the 4 bolts holding cover plate on remote then undo the bolt holding the hub thing for the gearstick ball end thing- GSBE- ( techy terms I know).

Then undo the 4 bolts holding the remote in place. There are two pins locating it so it has to be lifted up with large persuasive flatblade screwdrivers. Then hammer it off backwards. The GSBE will come off shaft with it. Remove the pins - they wont be needed and wont line up anyway once remote is shortened.

Mark on shaft a centre 103mm forwards of existing hole. Set up and drill 5mm hole- taking much care to keep it lined up straight with the existing hole. If its out it makes getting reverse a pig.


Then drill halfway in with 6mm. then tap hole M6 x 1
Now cut off remaining shaft. Also cut down remote housing and shorten shaft tube by 103mm. Make a new seal at one end with electrical tape wrapped round it till its a tight fit.

Reassemble and hey presto- a gear stick 100 mm further forwards- which pops it up nicely to hand in chevettes, vivas plus older 4speed rotary mazdas.

I then spent some time out in the afternoon sun (30d today!) cleaning up the outside and giving it a quick polish - i cxan think of worse things to do with a beer in hand...

I followed this with a bit of sanding of in the engine bay.

First undo the 4 bolts holding cover plate on remote then undo the bolt holding the hub thing for the gearstick ball end thing- GSBE- ( techy terms I know).
Then undo the 4 bolts holding the remote in place. There are two pins locating it so it has to be lifted up with large persuasive flatblade screwdrivers. Then hammer it off backwards. The GSBE will come off shaft with it. Remove the pins - they wont be needed and wont line up anyway once remote is shortened.
Mark on shaft a centre 103mm forwards of existing hole. Set up and drill 5mm hole- taking much care to keep it lined up straight with the existing hole. If its out it makes getting reverse a pig.
Then drill halfway in with 6mm. then tap hole M6 x 1
Now cut off remaining shaft. Also cut down remote housing and shorten shaft tube by 103mm. Make a new seal at one end with electrical tape wrapped round it till its a tight fit.
Reassemble and hey presto- a gear stick 100 mm further forwards- which pops it up nicely to hand in chevettes, vivas plus older 4speed rotary mazdas.
I then spent some time out in the afternoon sun (30d today!) cleaning up the outside and giving it a quick polish - i cxan think of worse things to do with a beer in hand...
I followed this with a bit of sanding of in the engine bay.
12-08-10, 01:51 AM
#9
Full Member
Thread Starter
Join Date: Feb 2007
Location: South Island, NZ
Posts: 150
Likes: 0
Received 0 Likes
on
0 Posts
Getting ready for paint. Tidied up the engine bay and the seams around the wings etc- it amazes me how solid it is in places like that. Most cars i've had have been worse there.

I put one coat of paint on but ran out- i have ordered more colour matched paint in a can.
Then I tidied up the engine some more- ground down any casting marks in the iron plates- not so much for look but because the paint will go on better/smoother. I have to decide on a colour to piant the engine- thinking the same colour as the body but its a bit impractical. maybe a darker blue? See Resene colour chart in blue here...
http://www.resene.co.nz/swatches/sea...p?type=palette
Hmmmm. ford riveria blue that i painted the rx3 was nice.. what ever colour i choose it wont be sprayed on this time - I will brush paint it on in enamel as it will stick better. I was forever touching up flakey paint on the chevette and rx3 engine plates.
12-13-10, 04:58 PM
#12
Full Member
Thread Starter
Join Date: Feb 2007
Location: South Island, NZ
Posts: 150
Likes: 0
Received 0 Likes
on
0 Posts
Yeah its a bit of a mission to get it all level with blocks of wood but it saves any more stripping of the tranny. Its the 4th one I've done now- I once made the big mistake of chopping the shaft down before drilling the new bolt hole!!! Then I had to try and work out exactly where to drill- it was out a bit and made getting reverse very tricky. lessons learned!
Been busy painting little bits and pieces here and there, straightening and tidying the front valance. Engine all ready to be painted- engine colour chosen- its pretty close to ford riviera blue and should (I hope) go well with car colour.

I checked the sump mods for any leaks- one tiny one which weeped out after over an hour of sump sitting full of water. welded it up and checked again- seems ok now.

I have also decided to paint in behind grill black.
Some masking...

I want to make my own grill later on and with black behind it should look better. It will also be easier to keep looking tidy. Looks cool so far- do cars really need lights? 8-)

I have also made a bolt on drain into sump for.....TURBO... not that I am definitely gonna fit it but if I do i don't want to be taking sump off again later on to have to do this. It bolts through sump wall into a captive ring with m5 nuts welded to it. I can remove it and have made a plate to bolt in place if I do. I will make a canister to weld onto pipe into sump- the canister will sit above oil line for turbo drain to run into- I have been told this will be a good idea? Is it?
Will put up photo of it later when sump paint is dry.
I have made sure that the drain into sump is same size and no smaller then pipe off bottom of turbo. I don't want a smoky turbo.
Been busy painting little bits and pieces here and there, straightening and tidying the front valance. Engine all ready to be painted- engine colour chosen- its pretty close to ford riviera blue and should (I hope) go well with car colour.
I checked the sump mods for any leaks- one tiny one which weeped out after over an hour of sump sitting full of water. welded it up and checked again- seems ok now.
I have also decided to paint in behind grill black.
Some masking...
I want to make my own grill later on and with black behind it should look better. It will also be easier to keep looking tidy. Looks cool so far- do cars really need lights? 8-)
I have also made a bolt on drain into sump for.....TURBO... not that I am definitely gonna fit it but if I do i don't want to be taking sump off again later on to have to do this. It bolts through sump wall into a captive ring with m5 nuts welded to it. I can remove it and have made a plate to bolt in place if I do. I will make a canister to weld onto pipe into sump- the canister will sit above oil line for turbo drain to run into- I have been told this will be a good idea? Is it?
Will put up photo of it later when sump paint is dry.
I have made sure that the drain into sump is same size and no smaller then pipe off bottom of turbo. I don't want a smoky turbo.
12-14-10, 01:20 AM
#13
Full Member
Thread Starter
Join Date: Feb 2007
Location: South Island, NZ
Posts: 150
Likes: 0
Received 0 Likes
on
0 Posts
Cool score- I had found this light ages ago in a oxford motor factor- I thought it would fit our chevette (that chevette had cibies) but it didn't. so I took it back. But just prior to leaving blighty I thought I might just as well have it for future chevettes as it was cheap. And well there ya have it- it fits my viva- and now I have two shiny brand new lights!

Started putting things back in- grill aperture looks great (esp with new lights!)

And how's this- bright enough?.....will it clash? :-/

Started putting things back in- grill aperture looks great (esp with new lights!)
And how's this- bright enough?.....will it clash? :-/
12-15-10, 02:36 AM
#15
Full Member
Thread Starter
Join Date: Feb 2007
Location: South Island, NZ
Posts: 150
Likes: 0
Received 0 Likes
on
0 Posts
Cheers man. I'm excited- getting there! Today I finished painting engine. I made this....

and this...

and then did this...

With Hannah standing on engine so it didn't move.
2ft long lever + me 180lbs ish = nut now done up proper tight! Engine can go back in and then I'll sort out re-roofing the tunnel.
and this...
and then did this...
With Hannah standing on engine so it didn't move.
2ft long lever + me 180lbs ish = nut now done up proper tight! Engine can go back in and then I'll sort out re-roofing the tunnel.
12-16-10, 03:23 AM
#17
Full Member
Thread Starter
Join Date: Feb 2007
Location: South Island, NZ
Posts: 150
Likes: 0
Received 0 Likes
on
0 Posts
Spent ages scraping off underseal on tunnel this morning so at a later date I can do the rest of the car and not worry about around g/box. Then I chucked box back on engine and slung engine into position. bolted it al up and jumped on my old royal mail post bike down to old work for some 20g sheet. back home and tonight I finished this. I couldnt stop even when it gor dark- I just love it when I manage to cut the steel perfect for neat butt joints, tack them together and as I do just tap it all neat and smooth with small hammer. It really is a relaxing enjoyable thing. Only when its easy to get to with welder- I still hate welding under cars!

I will finish it in the morning- just the little stamped ring that the red scrap chevette from the rotorvette days had donated to me to weld in - I knew it would come in handy. The chevette gearstick gaitor is a nice fit over the rx7 stick.
Then back out with engine etc and paint the tunnel from underneath. Then engine back in for good hopefully.
12-18-10, 07:17 PM
#18
Full Member
Thread Starter
Join Date: Feb 2007
Location: South Island, NZ
Posts: 150
Likes: 0
Received 0 Likes
on
0 Posts
Engine is back in for good- I hope. It may well have to come out after first run because when I bought it the rear frost plug had popped out from a cold Welsh winter- so the water seals may well be damaged. I wont know until its running. Anyway- it comes in and out so easy.
I have repainted it to much the bodywork- I am really happy now with how it looks in there. Sooooo tiny too.. i love this stage when its not covered in a carb or alternator- looks fuss free. I'm liking the colours- the black against the blue (Oyster grey....)


The tunnel is all welded up and hannah painted the floor- photos of that later- I love a painted floor. It transforms the tidyness inside.
I have repainted it to much the bodywork- I am really happy now with how it looks in there. Sooooo tiny too.. i love this stage when its not covered in a carb or alternator- looks fuss free. I'm liking the colours- the black against the blue (Oyster grey....)
The tunnel is all welded up and hannah painted the floor- photos of that later- I love a painted floor. It transforms the tidyness inside.
12-23-10, 02:56 PM
#20
Full Member
Thread Starter
Join Date: Feb 2007
Location: South Island, NZ
Posts: 150
Likes: 0
Received 0 Likes
on
0 Posts
Among other things this weeks I built a new turbo manifold ;D Very happy with it as its solid and turbo is in a great position.
It was a mission as to start with I had to make the flanges myself out of 10mm plate. This is a budget build, because I have no money to spare, so I couldn't just buy them. Anyway the rear flange for the down pipe is unusual or so my local exhaust bloke said. But I have time so while Hannah is out working I'll play.. I mean work..on the Viva. I was lucky to have bought a cheap rx7 exhaust manifold which I robbed the main exhaust flange from.
So with my trusty �30 pillar drill and new blades in my hacksaw I set to work.

How else could I easily put a big hole through 10mm plate without a lathe or gas set....


Due to positioning constraints in an RX7 the cast iron Elford manifold is flawed where the WG is mounted at one end in the wrong direction to the flow and the runners are uneven...

I wanted this one to be even so the pulses hit the turbo evenly. Plus I wanted to mount the waste gate in the middle near the turbo. I discovered I would be able to continue to use the Elford made WG but I left the design open for possible future upgrades to the more common (but out of budget at this point) 38mm Tial style WG's.
Once flanges were made I made a little jig to hold the turbo where I wanted it.

I used 3mm thick pipe and 3mm plate to build between the flanges, with 5mm plate for where the WG would mount. I will still space the WG away with a spacer to stop as much heat soak- if it matters.
Then I slowly pieced it together. My poor little welder was having a hard time - its a bit moody almost as if the power supply is irregular. It didn't like all the tick plate- too much heat sap and it has a crap duty cycle so it was a long process.

Finished with some high temp paint (how long will that last?...)

Then I discovered a small crack on the WG plate, I wondered how far it went through so I did what most would do and hit it with a hammer. It went almost all the way through so that was a another plate to make.

It was a mission as to start with I had to make the flanges myself out of 10mm plate. This is a budget build, because I have no money to spare, so I couldn't just buy them. Anyway the rear flange for the down pipe is unusual or so my local exhaust bloke said. But I have time so while Hannah is out working I'll play.. I mean work..on the Viva.
I was lucky to have bought a cheap rx7 exhaust manifold which I robbed the main exhaust flange from.So with my trusty �30 pillar drill and new blades in my hacksaw I set to work.
How else could I easily put a big hole through 10mm plate without a lathe or gas set....
Due to positioning constraints in an RX7 the cast iron Elford manifold is flawed where the WG is mounted at one end in the wrong direction to the flow and the runners are uneven...
I wanted this one to be even so the pulses hit the turbo evenly. Plus I wanted to mount the waste gate in the middle near the turbo. I discovered I would be able to continue to use the Elford made WG but I left the design open for possible future upgrades to the more common (but out of budget at this point) 38mm Tial style WG's.
Once flanges were made I made a little jig to hold the turbo where I wanted it.
I used 3mm thick pipe and 3mm plate to build between the flanges, with 5mm plate for where the WG would mount. I will still space the WG away with a spacer to stop as much heat soak- if it matters.
Then I slowly pieced it together. My poor little welder was having a hard time - its a bit moody almost as if the power supply is irregular. It didn't like all the tick plate- too much heat sap and it has a crap duty cycle so it was a long process.
Finished with some high temp paint (how long will that last?...)
Then I discovered a small crack on the WG plate, I wondered how far it went through so I did what most would do and hit it with a hammer. It went almost all the way through so that was a another plate to make.
12-23-10, 02:57 PM
#21
Full Member
Thread Starter
Join Date: Feb 2007
Location: South Island, NZ
Posts: 150
Likes: 0
Received 0 Likes
on
0 Posts
Elford had fitted a drain for any fuel that collects in the bottom of the turbo scroll. I couldn't believe my luck when I discovered I already had the appropriate 1/8th bsp tap for tapping its new location

I also cleaned up the inlet manifold- it had unneeded castings on it for RX7 fitment so these came off. Then a good wire brushing with a wire wheel on the drill cleaned it up nicely.

Its all in place. Luckily the Elford WG pipe will work too- it should meet up nicely with the down pipe out the back of turbo. I need to find or make a 90 outlet for the servo as the turbo heat shield is just in the way. Now I am looking to find some suitable elbows to connect a pipe between turbo outlet and inlet manifold. Anything but gay blue silicone piping! 50mm ID- so maybe truck radiator hose bends as suggested by some on oldschoolnz. Even if they only last a year till I can afford proper silicone bends- in black!


I also cleaned up the inlet manifold- it had unneeded castings on it for RX7 fitment so these came off. Then a good wire brushing with a wire wheel on the drill cleaned it up nicely.
Its all in place. Luckily the Elford WG pipe will work too- it should meet up nicely with the down pipe out the back of turbo. I need to find or make a 90 outlet for the servo as the turbo heat shield is just in the way. Now I am looking to find some suitable elbows to connect a pipe between turbo outlet and inlet manifold. Anything but gay blue silicone piping! 50mm ID- so maybe truck radiator hose bends as suggested by some on oldschoolnz. Even if they only last a year till I can afford proper silicone bends- in black!
 12-23-10, 04:28 PM
#23
Full Member
Thread Starter
Join Date: Feb 2007
Location: South Island, NZ
Posts: 150
Likes: 0
Received 0 Likes
on
0 Posts
Yeah I would like to keep the carb setup for now- it looks nice and period- it could almost be a seventies modification as its a bit like the old supercharger setups one could once buy off the shelf for various old 60's/70's cars. They usually used SU carbs.
I have friend who has a 12A turbo setup and the turbo outlet on his is in almost the same place so possibly in the future I could fit a 12a turbo inlet manifold and go fuel infection... but I do like the simplicity of this setup. Time will tell.
There are a few people who have put some work into experimenting with this setup - one in guy Holland has managed a nice 220 odd BHP. I'm hoping with the better manifold I've made plus a cleaner down pipe out the back my turbo will spin up quicker? Once its running I may play a little with the boost...
I would be really interested in any info or links to threads in which others have put turbos onto NA engines and what boost they are running. I have seen one you tube video ages ago - its a fella who has put loads of boost into a standard 13b. He fully expected it to not last for very long but it went well and took far boost more than expected! It was quite interesting but I just cant find the clip.
