FD Interior Plastics - Refinishing
 01-04-09, 10:09 PM
#1

FD Interior Plastics - Refinishing
Well I've done quite a bit of searching and it seems that oven cleaner or a hobby paint remover product is the most effective way to remove the "sticky" film in the 93 interiors. It seems every thread I found tiptoed around the best way to remove the film or prepare the surface but never went into great detail about it. I wanted to get an opinion from anyone who has went through this.
I took all of my "black plastic" out tonight and fooled around w/ it momentarily before turning in. I tried some paint thinner and it removed the film after some pretty hard scrubbing - I can't imagine putting that kind of elbow greece into scrubbing all of the plastics - I had just assumed drop the mother load on new pieces if it requires that kind of labor.
So, with that said, does anyone have any suggestions? I am looking for a stock finish and would absolutely love it if i could just remove the film and just go back with "bare" plastic without having to repaint the trim with something else that's not going to last when seatbelt buckles, rings, keys, etc. bang into it.
I'm actually prepared to paint it all but wanted to see if anyone had any good experiences with just removing the film and not repainting everything. I guess the worst case scenario is you repaint it all and if you need to touch it up - just mask the hell out of the area to be touched up and do it "in place" in lieu of ripping out all the fragile plastic and respraying it. I am sure that everytime something is removed - a new rattle is created.
 01-04-09, 10:29 PM
#2
Enter Title Here
iTrader: (1)

Join Date: Jan 2008
Location: Sioux Falls, SD
Posts: 767
Likes: 0
Received 0 Likes
on
0 Posts
Don't use paint thinner on plastics, it will probably ruin them. I sanded my door plastic and a/c panel using a coarse grit working up to very fine grit then just used krylon plastics paint and they turned out pretty good. I still need to do the gauge hood and surround yet. Considering how much the parts can cost even used, I'll spend the time. For the kick panels, rear panels and everything else behind the seats I just used a couple coats of the krylon paint and those turned out really good too. If you want to go really extreme you could talk to Gordon (gmonsen) about what he did with his, but it was very expensive.
01-04-09, 10:43 PM
#3
Don't use paint thinner on plastics, it will probably ruin them. I sanded my door plastic and a/c panel using a coarse grit working up to very fine grit then just used krylon plastics paint and they turned out pretty good. I still need to do the gauge hood and surround yet. Considering how much the parts can cost even used, I'll spend the time. For the kick panels, rear panels and everything else behind the seats I just used a couple coats of the krylon paint and those turned out really good too. If you want to go really extreme you could talk to Gordon (gmonsen) about what he did with his, but it was very expensive.
I did buy some krylon plastics paint and refinished my driver door storage lid with that and it looked great except it was noticeably shinier than the rest of the trim - I haven't looked to see if they have that available in mutlipe sheens. Some semi-gloss in that paint would probably look great if available.
01-04-09, 10:57 PM
#4
Enter Title Here
iTrader: (1)
Join Date: Jan 2008
Location: Sioux Falls, SD
Posts: 767
Likes: 0
Received 0 Likes
on
0 Posts
I got the satin black finish and it is definitely darker than the original finish but it's not overly shiny. And yes, it takes a lot of work and sandpaper to get down to the plastic. If I had a sander to get the easier spots then it wouldn't have taken as long. At least when you get down the to plastic and start on the finer grit paper it doesn't take as long to do the piece.
The following users liked this post:
Mod Bugs (08-16-22)
01-05-09, 05:20 PM
#6
Rotary Enthusiast
sorry I quoted the wrong stuff. the stuff you want is made by performix plasti dip multi purpose rubber coating. you get it at home depo and it matches the 93 interior very well and fills in scratches so little sanding is needed. just scuff it up with a sponge scrubber and paint. great results and easy to use
Jeff
Jeff
The following users liked this post:
Mod Bugs (08-16-22)
01-05-09, 09:42 PM
#9
Is that a hobby paint stripper? I tried sandpaper tonight and that is a nightmare. I'm in the Southeast and it is super humid and the sandpaper clogs up immediately and really just makes a big mess. I've been using a fine steel wool and that seems to do better because it doesn't clog. I know that traditional paint stripper pretty much pits and dissolves these type plastics. I plan to go by hobby lobby tomorrow and see what they have to offer in the stripper category. Thanks Purer.
In the midst of stripping that "coating" off, I can't help but wonder what moron decided to use that finish on the interior of such a great car without some R&D. Obviously it only took one year for Mazda to wisen up.
Hey Jeff - thanks for that link to that thread. I failed to search the tech forums. I'm going to see if our Lowes/Home Depot has that paint and give it a whirl. It looked like some people had great luck with it and some didn't... I hope the high humidity in this area doesn't contribute to the bad results people have had.
01-06-09, 12:39 AM
#12
Senior Member
iTrader: (12)
Join Date: Aug 2007
Location: Calgary, Alberta (Canada)
Posts: 272
Likes: 0
Received 1 Like
on
1 Post
When I did mine I actually used acetone and I bought a 10 pack of the green dish scrubbies. It does scrub off with a little effort. I didn't let it sit on the plastic very long and washed it off with a mild dish soup and water. It does take a while but it's not that bad. After the old stuff is all off I lightly sanded it and sprayed it with flat black bumper paint. It's been 2 years and it's still good.

Hope this helps.
Hope this helps.
The following users liked this post:
Mod Bugs (08-16-22)
01-06-09, 06:36 AM
#13
Full Member

Join Date: Jul 2007
Location: Attica, NY (not in the prison)
Posts: 70
Likes: 0
Received 0 Likes
on
0 Posts
Just finished doing this same thing. Everyone with scratchy plastics need to do this mod, it changes the interior dramatically. I did it at the same time as the hardbodeez/hyperite gauge mod.
Remove all plastics, inside door panels, etc. that are scratched. Sand with lite grade sandpaper (I used $3 testors multipack). Rub remaining rubber off with wash cloth + acetone. Sand a little more till smooth.
Buy black plasti-dip in the spray can ($6 at most hardware stores). Do 3-4 coats. 30 minutes inbetween.
Sorry I have no pics, G9 is broken, but I definitely recommend the plasti-dip over normal paint.
01-06-09, 11:41 AM
#15
Nice looking plastics Nero!
I just picked up my acetone and plasti-dip during my lunch break. I may try a small piece in the next day or two but I bet it's too damn humid here for this stuff to work properly. It's 73% humidity now.
Thanks for the help/tips guys.
I just picked up my acetone and plasti-dip during my lunch break. I may try a small piece in the next day or two but I bet it's too damn humid here for this stuff to work properly. It's 73% humidity now.
Thanks for the help/tips guys.
01-06-09, 01:28 PM
#17
Senior Member
iTrader: (12)
Join Date: Aug 2007
Location: Calgary, Alberta (Canada)
Posts: 272
Likes: 0
Received 1 Like
on
1 Post
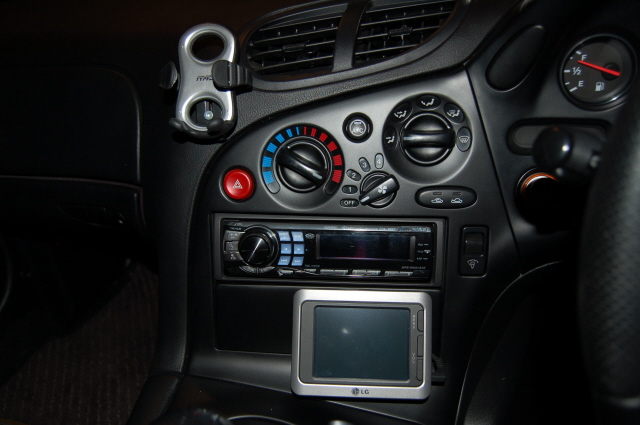
Thanks guys. Ya it takes a bit but once it's finished it looks a thousand times better. You have to take the dash panels out in order. There should be a couple how to's on where the srews and clips are. I believe you have to take out the the main gauge cluster panel and the shifter panel to get at the heater panel. I remember the gauge one to be a bitch. Just remember to pull it straight towards you (not up) with a bit of force to get it out. You also need a heat gun to remove the heater panel back lit dials (the off-1-2-3-4 etc...). Here's some more pics when I installed a start button and removed the chrome rings off the gauge cluster.