Vulcan Autoworx Sleepy Eye Kit

 07-22-13, 12:26 AM
#53

shrouds are looking good dan!
id recommend SEM Trim paint instead. this stuff is magnificent. 100% idiot proof, VERY easy to spray, no drips, and freaking smells like strawberries. best smelling spray paint EVER

That is a good idea Peter. I bet that would look really nice. I blinged mine up a bit and had then painted Mazda glossy black. Of course now I am rocking the carbon fiber ones from Dan 
I think you are right Dan, if they are FRP, then they should have some pretty good flexibility to them and should bend in when you screw them in. You could also take a heat gun to them and shape them but you'd need to be careful.
I think you are right Dan, if they are FRP, then they should have some pretty good flexibility to them and should bend in when you screw them in. You could also take a heat gun to them and shape them but you'd need to be careful.
07-22-13, 11:30 AM
#54
Thanks Benny
As far as the smell goes, wasn't there scented and flavored glues and markers back in the day? Kids ended up eating and huffing so the got rid of it. Lol. I picture a bunch of people with spray paint mustaches. Haha
As far as the smell goes, wasn't there scented and flavored glues and markers back in the day? Kids ended up eating and huffing so the got rid of it. Lol. I picture a bunch of people with spray paint mustaches. Haha
08-09-13, 04:49 AM
#57
Junior Member

Join Date: Apr 2010
Location: Waterlooville UK
Posts: 31
Likes: 0
Received 0 Likes
on
0 Posts
Hi Dan,
I hope all is well with you and yours.
Can you supply an up to date situation on the progress on your excellent kit?
Have the shrouds been finalized? From memory I think they were the only thing holding you up.
Cheers
I hope all is well with you and yours.
Can you supply an up to date situation on the progress on your excellent kit?
Have the shrouds been finalized? From memory I think they were the only thing holding you up.
Cheers
08-12-13, 01:57 PM
#59
hey guys, sorry for the delay and updates. My wife and I have been super busy with our new son, he was born 3 months early so we've been at the hospital pretty much nonstop. We just got home, and things should quiet down a little bit which will allow me to bake some decent progress I've got one kit ready for some final testing that I will be sending out the next day or so, so I should have some updates very shortly.
 08-23-13, 01:02 AM
#61
So i decided something that i think we will all be happy with. Up untill this point i have had the mounting brackets laser cut out of a flat piece of steel and i then bent them by hand. after speaking with the fabrication company they are able to bend them. this will allow for a more consistent product, and i wont have to worry about marring the the metal.
 4066906743 if you need some help


 09-06-13, 02:01 PM
#68
thanks for the pics James.
He has been helping me test a kit, some final trouble shooting before I'm comfortable selling them. One thing we are running into is the headlight binding up on the downward movement. So anyone that has done a sleepy eye mod via arm modification please weigh in here. basically the we achieve the lower height of the light fixture via a shorter arm. what is happening is that on the downward cycle the light fixture is bottoming out before the motor gets to the full down location. then the motor will return to the up position to prevent damage to the motor (correct me if I'm wrong James).
The strange thing is that on David's personal kit doesn't have this issue. the original design on his was basically remove a portion from the center of the stock arm and weld it back together. He is now running my arms and still doesn't have the issue So we have 1 kit that does, and one that doesn't, yet they should be the same movement.
So for those of you that did a sleepy eye mod please let me know if you ran into this issue.
09-06-13, 02:14 PM
#69
Probably a stupid question, but have you guys tried a Pivot headlight controller? They're used for the lazy-eye mod.
Pivot Pop-Up Headlight Controller - Height Adjuster
Pivot Pop-Up Headlight Controller - Height Adjuster

 09-07-13, 01:22 AM
#74
So i have been racking my brain about the binding issue. the only thing i can think is that Toyzzzz issue will happen to everyone. what i dont understand is why David didn't have the issue.
for those curious, let me elaborate what is happening...
There are 2 bump stops, one that contacts at full up, and the other at full down. when only shortening the the main arm the headlight assembly bottoms out on the full down bump stop.
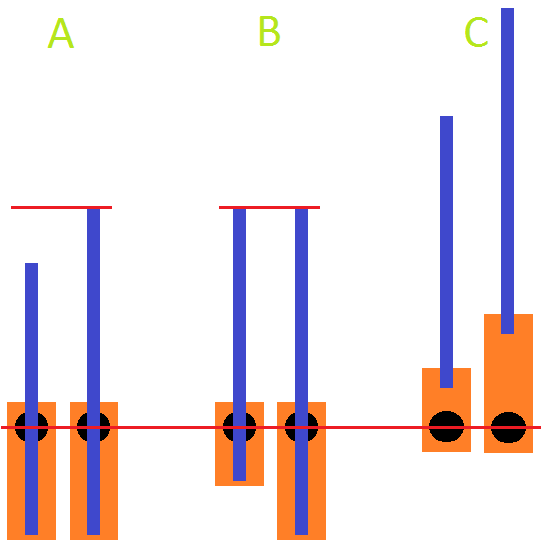
3 pairs of arms, the left of each pair is with the shortened arm right is stock length arm.
In A, (full down position) it shows if the Cam Arm (the short arm attached directly to the motor) remains the same length the full down point is different. this shows how shortening the main arm brings full down past the stock point.
In B both the main and cam arms are shortened equal amounts, allowing both to have the full down in the stock location.
In C, like B the both arms are shortened but in the full up position. Notice the top point of the shortened arm is much lower than the stock length, thus the light wont come up as far.
In a short description, you want, in the full down position, the distance from the motor shaft to where the arm attaches to the bucket to be the same (B) from stock to modified.