Bubble Tech Gauge Hood
 08-19-16, 08:11 AM
#1

So we've been in the works of developing a Gauge hood replacement since they're prone to breaking and I believe a new one from mazda is $300+ and will just break again!
Here's some development notes to get everyone up to date!
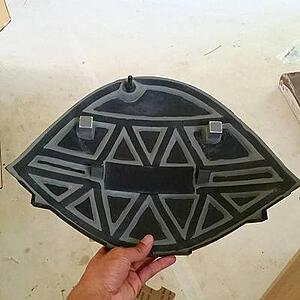
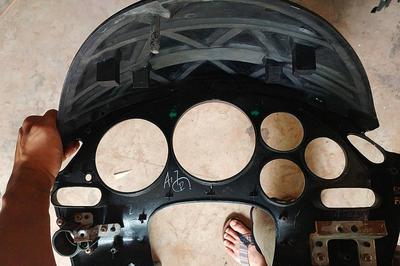
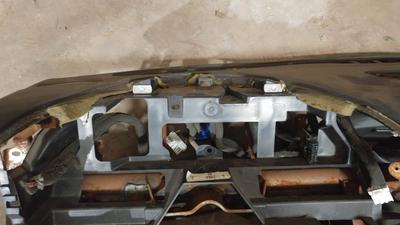
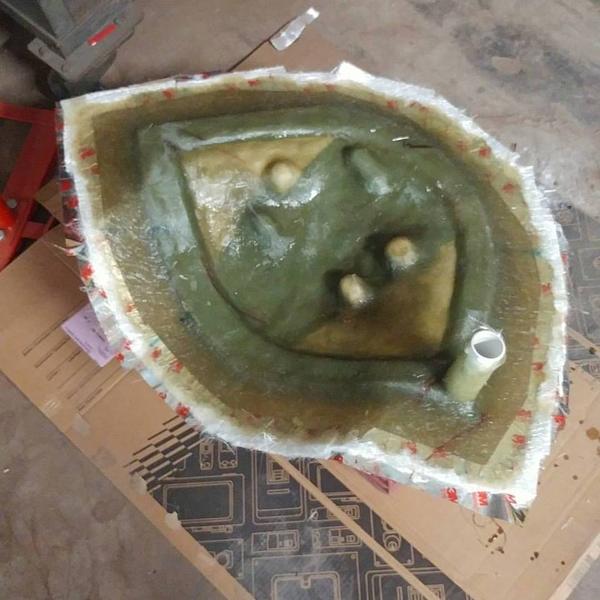
Working on the plug -- Adding a rib-cage like structure to give it more strength!
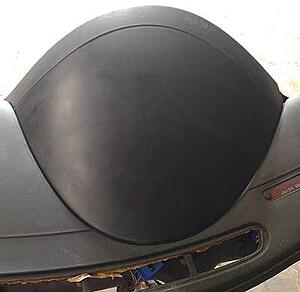
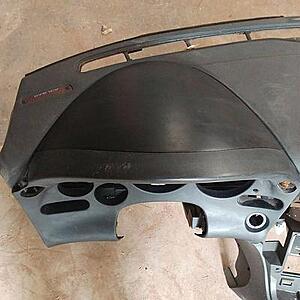
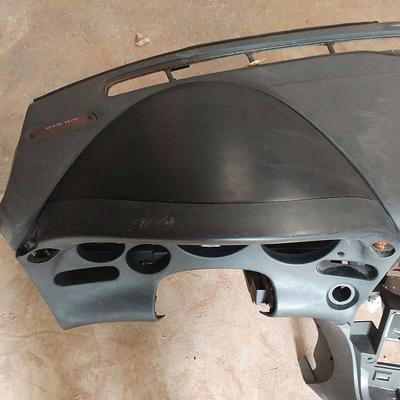
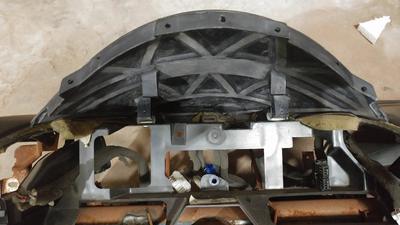
First pull from Prototype 1! I'm very happy with the fitment as it's spot on (everything is just held together in the pics, nothing is bolted in) The rib-cage structure provided a very nice solid feel
However the feel was deception!
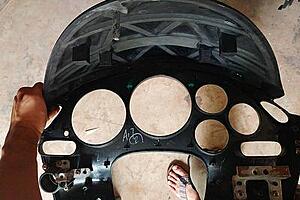
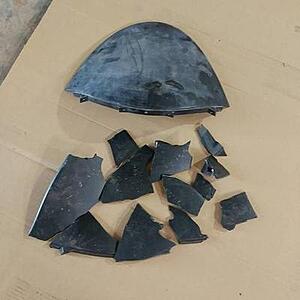
 Due to the properties of the material, the thicker you make the part, the less impact resistant it is. (In the pic I took the gauge hood and slammed it hard on the ground) After further researching I had 2 options:
Option 1: Switch materials for something with more impact resistance, softer shore hardness (more pliable/flexible giving it that impact resistance) BUT the trade off would be much lower heat deflection temps. Given this will be on the dashboard and seeing a lot of sunlight, it is not something I was willing to compromise.
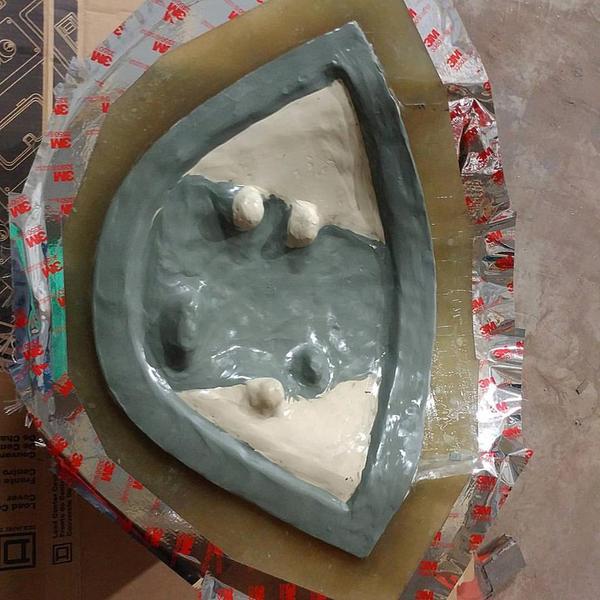
Option 2: Since i love this material for its heat deflection properties, which is a huge key for me, I wanted to do whatever I could to keep using it. So we decided to laminate a layer of fiberglass.
After a few test runs with the fiberglass (and having some trial and errors) we got the process down and got some good test results! After slamming the hood on concrete, only the alignment post snapped off! I did manage to stand on it before it started showing signs of fatigue and it did crack, but stayed completely intact due to the fiberglass laminate, perfect! (In reality it will NEVER see the amount of force I applied on the Gauge hood, I was simply researching for it's breaking point)
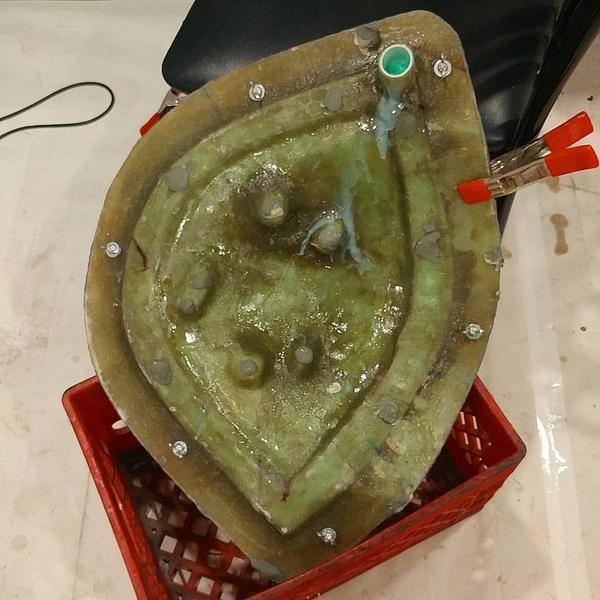
I know some people may still be hesitant because of the ungodly stiff retaining clips holding the gauge hood in place, but that's another issue we addressed. The OEM clips Mazda decided to use are extremely stiff + the brittle plastic they use is a terrible combination. We've switched out the clips, and converted them to magnets.

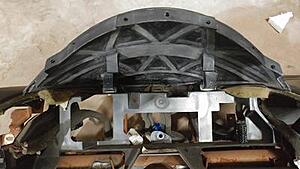
These pics are from the first prototype version (2 posts) but we have redesigned Version 2 to have 3 posts, utilizing all the same stock mounting points!
This Gauge hood has taken way longer than we had expected to develop due to all the issues we came across during R&D. We believe we have all the bugs sorted out and will begin making the newer mold for Version 2 today. I'm terrible with ETA's so I'm not going to post any dates.
BUT for a rough timeline, I'd say:
-Aug22 mold construction
-Aug 29 make some pulls, and then little more testing to double check out results.
-Sept 5 Buy supplies/begin production
Price will be under $250. We can't give an exact price until we do some pulls to do a cost analysis on how much material is required per part and then pricing for hardware/labor. However I do know this takes about 5-6 times more material then the map lips and passenger handles!!!
Questions, comments, concerns welcomed
I'll try frequenting more, but if it unanswered and urgent, never hesitate to shoot us an email! Sales@bubbletech.us
Here's some development notes to get everyone up to date!

Working on the plug -- Adding a rib-cage like structure to give it more strength!

First pull from Prototype 1! I'm very happy with the fitment as it's spot on (everything is just held together in the pics, nothing is bolted in) The rib-cage structure provided a very nice solid feel

However the feel was deception!
Due to the properties of the material, the thicker you make the part, the less impact resistant it is. (In the pic I took the gauge hood and slammed it hard on the ground) After further researching I had 2 options:Option 1: Switch materials for something with more impact resistance, softer shore hardness (more pliable/flexible giving it that impact resistance) BUT the trade off would be much lower heat deflection temps. Given this will be on the dashboard and seeing a lot of sunlight, it is not something I was willing to compromise.
Option 2: Since i love this material for its heat deflection properties, which is a huge key for me, I wanted to do whatever I could to keep using it. So we decided to laminate a layer of fiberglass.
After a few test runs with the fiberglass (and having some trial and errors) we got the process down and got some good test results! After slamming the hood on concrete, only the alignment post snapped off! I did manage to stand on it before it started showing signs of fatigue and it did crack, but stayed completely intact due to the fiberglass laminate, perfect! (In reality it will NEVER see the amount of force I applied on the Gauge hood, I was simply researching for it's breaking point)
I know some people may still be hesitant because of the ungodly stiff retaining clips holding the gauge hood in place, but that's another issue we addressed. The OEM clips Mazda decided to use are extremely stiff + the brittle plastic they use is a terrible combination. We've switched out the clips, and converted them to magnets.
These pics are from the first prototype version (2 posts) but we have redesigned Version 2 to have 3 posts, utilizing all the same stock mounting points!
This Gauge hood has taken way longer than we had expected to develop due to all the issues we came across during R&D. We believe we have all the bugs sorted out and will begin making the newer mold for Version 2 today. I'm terrible with ETA's so I'm not going to post any dates.
BUT for a rough timeline, I'd say:
-Aug22 mold construction
-Aug 29 make some pulls, and then little more testing to double check out results.
-Sept 5 Buy supplies/begin production
Price will be under $250. We can't give an exact price until we do some pulls to do a cost analysis on how much material is required per part and then pricing for hardware/labor. However I do know this takes about 5-6 times more material then the map lips and passenger handles!!!
Questions, comments, concerns welcomed
I'll try frequenting more, but if it unanswered and urgent, never hesitate to shoot us an email! Sales@bubbletech.us


 08-21-16, 06:02 PM
#5

Good, now get to work on the HVAC panel and tunnel trim. People here have been asking as of late, and I would like the option also. It's nice to get replacements on these items, but we really need the full set. I'm sure folks like me would rather wait until you could provide a full set of dash and tunnel cover plastics instead of buying the gauge hood now and the next piece when you decide to make that and so on. It would be better if you could develop the set all together. I'm sure many would agree.
08-21-16, 11:06 PM
#6
Good, now get to work on the HVAC panel and tunnel trim. People here have been asking as of late, and I would like the option also. It's nice to get replacements on these items, but we really need the full set. I'm sure folks like me would rather wait until you could provide a full set of dash and tunnel cover plastics instead of buying the gauge hood now and the next piece when you decide to make that and so on. It would be better if you could develop the set all together. I'm sure many would agree.
Version 1- Climate control delete, HVAC Panel will only have openings for the Hazard button, Light dimmer, and Double din.
Version 2- full delete, completely blanked out
08-22-16, 04:49 PM
#7
Trending Topics
08-25-16, 08:44 PM
#8
Full Member
Benny, would you also be producing a replacement for the bezel that goes around the gauges? I shattered mine last month. I'm definitely in for the gauge hood. Not sure if I should order a OEM bezel while they're still available or wait for you.
09-02-16, 10:57 PM
#9
Evolution of our #mazda #rx7 #fd3s gauge hood cluster.
Prototype V1:
Failed- too brittle and shattered when slammed on the ground
Revision: changed the casting process and has a fiberglass core reinforcement, hello strength💪
Revision- filled mounting tabs to gauge cluster to add rigidity and strength
Failed- mounting system was not fully developed leading to sub par connection.
Revision- Prototype V2
Prototype V2:
Failed- new mold was poorly made due to user error.
Revision- new mounting point locations resulting in a great fit. Extra mounting point added further securing the hood to the dash.
Revision- replaced old stock hulk grip clamps with neodymium magnets for a strong hold without overly stressing the gauge hood for future uninstall/installment
Prototype V3:
Revision- removed "rib cage" and thickened core about 100% resulting in a nice clean smooth finish on the back👌 as well more strength
Revision- fillet filled the front lip adding strength to connection points to gauge cluster face
Next up, our first attempt at a matrix mold or "cavity pour" if all ends well we should have these available to ship by October!
Start of our new mold!

Prototype V1:
Failed- too brittle and shattered when slammed on the ground
Revision: changed the casting process and has a fiberglass core reinforcement, hello strength💪
Revision- filled mounting tabs to gauge cluster to add rigidity and strength
Failed- mounting system was not fully developed leading to sub par connection.
Revision- Prototype V2
Prototype V2:
Failed- new mold was poorly made due to user error.
Revision- new mounting point locations resulting in a great fit. Extra mounting point added further securing the hood to the dash.
Revision- replaced old stock hulk grip clamps with neodymium magnets for a strong hold without overly stressing the gauge hood for future uninstall/installment
Prototype V3:
Revision- removed "rib cage" and thickened core about 100% resulting in a nice clean smooth finish on the back👌 as well more strength
Revision- fillet filled the front lip adding strength to connection points to gauge cluster face
Next up, our first attempt at a matrix mold or "cavity pour" if all ends well we should have these available to ship by October!

Start of our new mold!

 09-19-16, 10:22 PM
#13
Our FD gauge hood Prototype 3.1 Update:
We finally got our first pull out of our newest mold! There are a few issues but the mold seems solid and promising!

Issue 1: Print through, and air bubbles on the top surface finish. This isn't a big issue as it was caused by user error as I was trying a new technique, back to what we originally formulated!
Issue 2: Trapped air in all the post legs resulting in half cast posts. This one was a little tricky since we're using a matrix mold. We added some vent lines and inserted straws to slow down the leakage. Once the resin is visible in the straw we plug it up and should do the trick!
Prototype 3.2 is currently curing and we'll pull it in the morning!
P.S. The newest version is S T R O N G 💪💪💪 can't wait to do some stress testing!
Link to IG video of the latest prototype and fitment
https://www.instagram.com/p/BKj_E1wj...=bubbletech.us
We finally got our first pull out of our newest mold! There are a few issues but the mold seems solid and promising!
Issue 1: Print through, and air bubbles on the top surface finish. This isn't a big issue as it was caused by user error as I was trying a new technique, back to what we originally formulated!
Issue 2: Trapped air in all the post legs resulting in half cast posts. This one was a little tricky since we're using a matrix mold. We added some vent lines and inserted straws to slow down the leakage. Once the resin is visible in the straw we plug it up and should do the trick!
Prototype 3.2 is currently curing and we'll pull it in the morning!
P.S. The newest version is S T R O N G 💪💪💪 can't wait to do some stress testing!
Link to IG video of the latest prototype and fitment
https://www.instagram.com/p/BKj_E1wj...=bubbletech.us

 10-02-16, 04:27 PM
#19
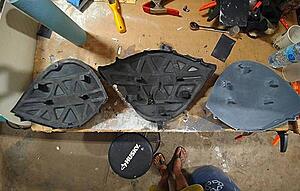
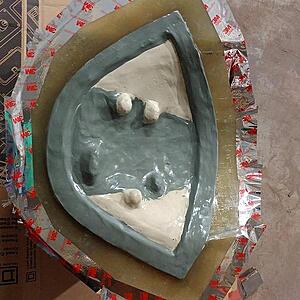
Hey guys sorry for the delay. We are about 95% there. We have been having tiny cosmetic issues that we're trying to work out. We've also improved our manufacturing process as we are pressure casting our parts making them stronger and bubble free.

Here are some of our prototypes. Plenty of failures, and much learned from each one to refine our product!
Here are some of our prototypes. Plenty of failures, and much learned from each one to refine our product!
 10-04-16, 08:04 AM
#22
Full Member
I'm ready to order as well. I wrapped my gauge hood in vinyl to hold it together but I need to remove it next week and I think that's the last time it'll even remotely hold together.
