Pictorial write up of my engine pull and re-install.
 01-27-03, 01:04 AM
#1
Pictorial write up of my engine pull and re-install.
Hello all,
I thought that I would start a thread with some motor pulling info and plenty of pics for everyone. I've been a bit shy about pulling my 94's motor and am happy that I finnaly started. Hopefully this will convince some of the other owners out there to have-at a motor pull ... think of the $$$ you'll save!
First a bit of background:
1) I bought my car knowing that it had some trouble.
2) I've been doing some serious homework looking for options to fix my blown water seals.
3) Thanks Nameless for your help with this part. Your experience is appreciated.

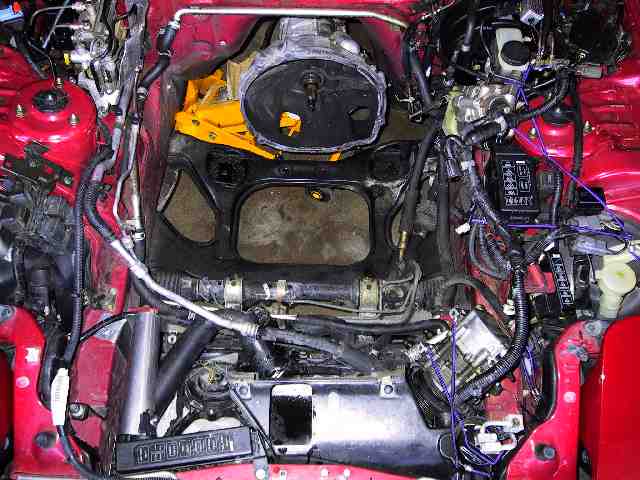
This is my engine compartment after prepping it for the motor pull. I spent (with help ... did I say thank you Nameless!) about six hours of time to accomplish what you see ... draining of oil and coolant, disconnecting every wire and tube, etc. The only thing remaining is to pull the wiring harness through the firewall (top left). Once this is done I'll be ready for the motor pull. Put another way, the only things attached to the motor AND frame at this point are the motor mounts and trans ... even the starter has been removed from the trans. bell housing.
Here's a hi-res pic. click here (2.4MB) Note that this is a large file. I don't suggest that you click the link unless you are very patient or have a broadband connection.
later untill the next pic,
James
P.S. This (next pic.) should be in about two Saturdays.
I thought that I would start a thread with some motor pulling info and plenty of pics for everyone. I've been a bit shy about pulling my 94's motor and am happy that I finnaly started. Hopefully this will convince some of the other owners out there to have-at a motor pull ... think of the $$$ you'll save!
First a bit of background:
1) I bought my car knowing that it had some trouble.
2) I've been doing some serious homework looking for options to fix my blown water seals.
3) Thanks Nameless for your help with this part. Your experience is appreciated.
This is my engine compartment after prepping it for the motor pull. I spent (with help ... did I say thank you Nameless!) about six hours of time to accomplish what you see ... draining of oil and coolant, disconnecting every wire and tube, etc. The only thing remaining is to pull the wiring harness through the firewall (top left). Once this is done I'll be ready for the motor pull. Put another way, the only things attached to the motor AND frame at this point are the motor mounts and trans ... even the starter has been removed from the trans. bell housing.
Here's a hi-res pic. click here (2.4MB) Note that this is a large file. I don't suggest that you click the link unless you are very patient or have a broadband connection.
later untill the next pic,
James
P.S. This (next pic.) should be in about two Saturdays.

The following users liked this post:
Spikegary (12-04-22)
01-27-03, 01:12 AM
#2
built my own engine

that is so clean, i'm jealous....
good luck with all of this,i'm sure it will turn out nicely when you're done, and you'll have much more peace of mind
good luck with all of this,i'm sure it will turn out nicely when you're done, and you'll have much more peace of mind
The following users liked this post:
Spikegary (12-04-22)
The following users liked this post:
Spikegary (12-04-22)
01-27-03, 09:30 AM
#5
Rotary Enthusiast

Join Date: Jul 2001
Location: Nashville, TN
Posts: 1,087
Likes: 0
Received 0 Likes
on
0 Posts
You are very welcome James, I'll take you up on that engine bay cleaning some day.... mine is obviously very dirty compared to yours I'll try to pass by on that next scheduled date.
I'll try to pass by on that next scheduled date.
01-27-03, 11:28 AM
#6
Senior Member

Join Date: Oct 2002
Location: Bartlesville, OK.
Posts: 394
Likes: 0
Received 0 Likes
on
0 Posts
Like others I'm jealous over your super clean engine bay. I downloaded your high-res picture (I have broadband) and it shows it off as being even prettier.
I also noticed the little aluminum ? box in the upper right hand corner of your picture. It has the hand writing on its cover and is apparently mounted on the brake booster. Is that your calibration unit for a linearized stock water temperature gauge?
I also noticed the little aluminum ? box in the upper right hand corner of your picture. It has the hand writing on its cover and is apparently mounted on the brake booster. Is that your calibration unit for a linearized stock water temperature gauge?
01-27-03, 12:30 PM
#7
Click this link to see the secret to my clean engine bay. I just bought it at AutoZone for $200. If anyone lives in LA, they have one more left ... best deal I found in my search for a pressure washer.
I used to spend about $10 at the local coin op car wash to do this. I've been afraid to do it with my 7 as it runs so hot. I kept thinking of the exhaust manifold / turbos and the nasty crack / snap that comes with a rapid water induced cool down. With my own pressure washer, I just let the car cool overnight and wash away. After the car has drip dried for a few hours I start it up and go for a cruise to finish the job.
When the motor is out, I'm going to climb into the engine bay and finish off the wash job. After this ... some sand paper and paint to touch up the damaged areas.
FDjunkie, yep that's my temp gauge adjustment box. I used some extra strength double sided foam tape to stick the box to my brake booster.
Pp13bnos, I haven't had any major problems ... yet. I do have a few battle scars from slipping with a wrench. I think that I've been lucky though. If you check my other posts on this forum, you'll know that my turbos were replaced 2500 miles ago as were all of my rubber hoses ... vacuum, oil and water. I suspect that things would have been much more troublesome (stuck on) if this wasn't the case.
The A/C and Power Steering weren't too bad ... I recommend that you purchase a 3/8 drive set of metric sockets as well as a 1/2 inch drive set. Think Craftsman or some other high quality brand. Also, the 3/8 drive set should include a nearly flat ratchet as there are some low clearance nuts to turn. I.E. the A/C compressor.
Hmm ... also, I didn't need a special (shop manual) tool to remove the PS pump. I used a large and blunt regular screwdriver. There are some large blocks of plastic (don't use the smaller fins) behind that PS pump pulley. Just wedge your screw driver in there and carfully losten the pulley nut.
Last edited by James Paventi; 01-27-03 at 12:36 PM.
Trending Topics
01-27-03, 01:39 PM
#8
If you don't have an impact to get the PS pulley off just pull the pump with the motor. That way you won't risk breaking the pulley.
It is actually easier to remove the pump with the motor than to keep it on the car. Remove the high pressure line on top via banjo bolt and the return line on the back via hose clamp. That's it! It is slightly more messy pulling the pump with the motor as PS fluid will drip out of the pump, turning the steering wheel will also flow fluid out of the open ends of the lines.
Nice clean engine bay. I've got a little electric pressure washer too. I love it. See ArchangleX's posts on pulling his motor.
Jeff
It is actually easier to remove the pump with the motor than to keep it on the car. Remove the high pressure line on top via banjo bolt and the return line on the back via hose clamp. That's it! It is slightly more messy pulling the pump with the motor as PS fluid will drip out of the pump, turning the steering wheel will also flow fluid out of the open ends of the lines.
Nice clean engine bay. I've got a little electric pressure washer too. I love it. See ArchangleX's posts on pulling his motor
.Jeff
01-28-03, 09:01 PM
#10
boost deprived
Join Date: May 2002
Location: sioux city, IA
Posts: 152
Likes: 0
Received 0 Likes
on
0 Posts
you should look into picking up an engine degreaser. i helped pull my bro's engine this past summer. his car only had 35,000 miles on it and it was still pretty dirty. he picked up some engine degreaser. it worked great for those really nasty spots.
just some FYI
looking forward to pulling my engine in the coming months...
just some FYI
looking forward to pulling my engine in the coming months...
01-29-03, 05:01 AM
#11
Looks clean and looks great! I can't wait to see following pics of your work. I really appreciate that you are taking the extra bit of time to clean up the engine bay and engine itself while it's out - definitely something everyone should do.
On another note, that pic will fit-the-bill nicely for me as another example of how needlessly complicated the FD really is.
On another note, that pic will fit-the-bill nicely for me as another example of how needlessly complicated the FD really is.
01-30-03, 06:52 PM
#12
Senior Member
iTrader: (3)
Join Date: Aug 2001
Location: Medford, OR
Posts: 571
Likes: 0
Received 0 Likes
on
0 Posts
Just an FYI for next time-- You do not need to remove (or even disconnect) the starter for this job. Also, I leave the pre-cat (or DP) on as well. There is plenty of room to leave them on when you remove and reinstall the engone/tranny. As turbojeff said, I also leave on the PS pump, and just disconnect the two lines. I suck out the fluid reservor fist to minimize the mess, but you will want to do this if you remove it too.
Looks good and clean! Mine do not usually look that good until the motor is going back in. Kudos.
Jeff B
Looks good and clean! Mine do not usually look that good until the motor is going back in. Kudos.
Jeff B
02-03-03, 12:28 AM
#14
get'n close!
Hello again all,
I bought a new (2 ton) engine crane and motor leveler this weekend for $120 ... from a guy in Anaheim. If you're interested, PM me ... I'll pass his number on.

Have a look at the plastic ramps that my car is on ... $25 from Pep Boys. They feel much safer than jack stands as well as leaving more room.
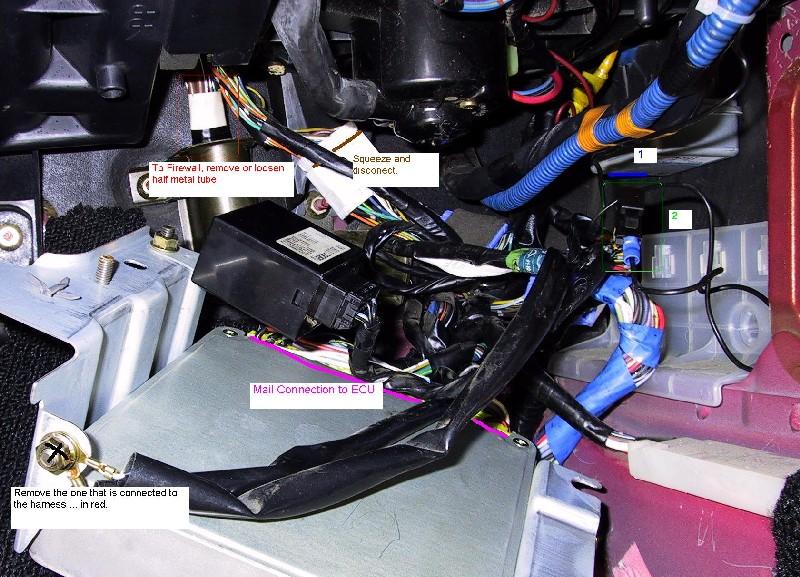
I also disconnected the ECU wiring harness today. Here's a pic. of the job, half done.
Click here for a high res. version, about 500KB.
Notice the blue line and number one as well as the green box and number two.
Number one is the connection that I used to drop the stock cooling fan trigger point by ten degrees. See this thread for more detail.
Number two is the "test" point that is described here. It can be used to trigger a 10 minute radiator fan cool-down-run after shut off.
OK ... unless something huge happens ... next week is the motor pull!
Thanks for the input everyone ... keep it up. This will be a great how to thread.
I bought a new (2 ton) engine crane and motor leveler this weekend for $120 ... from a guy in Anaheim. If you're interested, PM me ... I'll pass his number on.
Have a look at the plastic ramps that my car is on ... $25 from Pep Boys. They feel much safer than jack stands as well as leaving more room.
I also disconnected the ECU wiring harness today. Here's a pic. of the job, half done.
Click here for a high res. version, about 500KB.
Notice the blue line and number one as well as the green box and number two.
Number one is the connection that I used to drop the stock cooling fan trigger point by ten degrees. See this thread for more detail.
Number two is the "test" point that is described here. It can be used to trigger a 10 minute radiator fan cool-down-run after shut off.
OK ... unless something huge happens ... next week is the motor pull!
Thanks for the input everyone ... keep it up. This will be a great how to thread.
02-09-03, 04:22 PM
#15
Pulled it!
Hello all,
Well ... It's out ... have a look at:
 high res
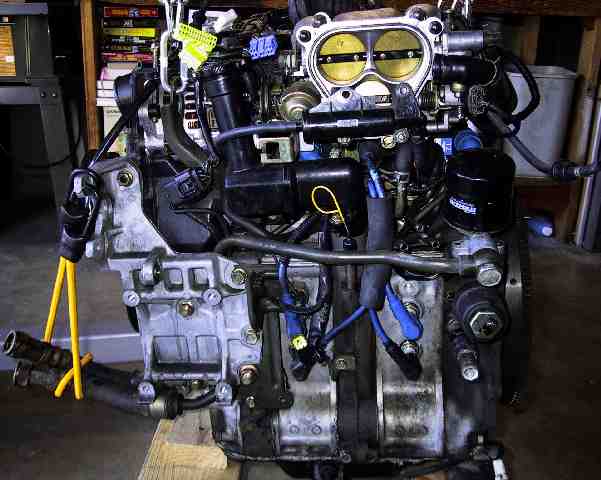
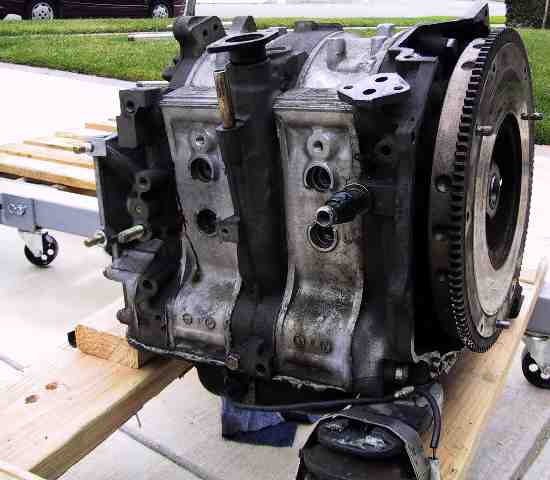
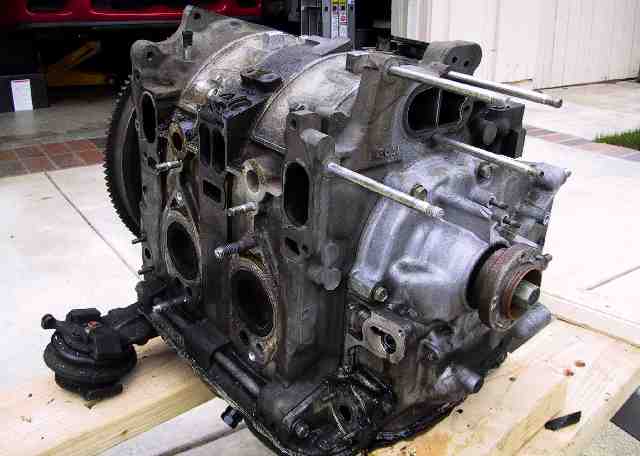
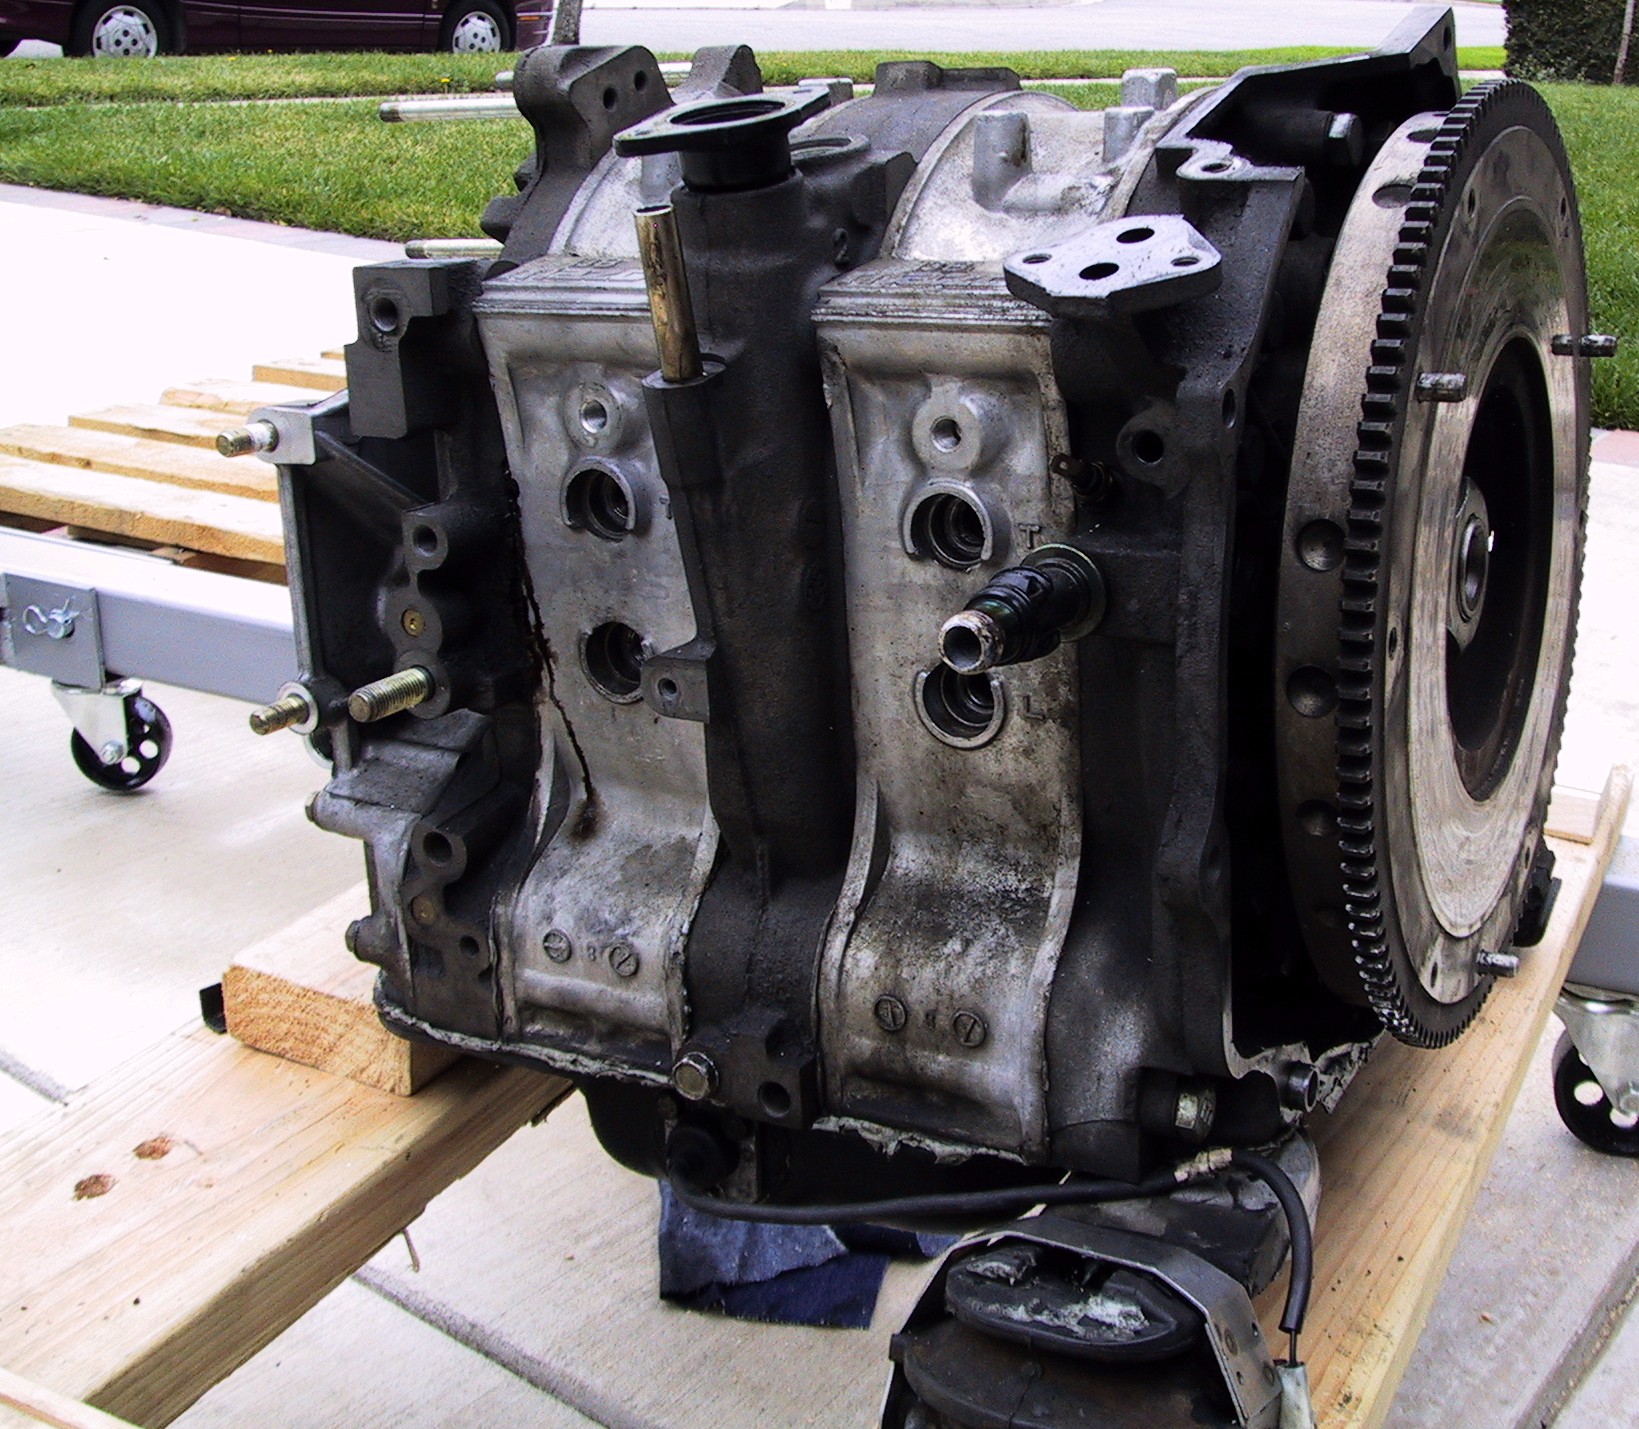
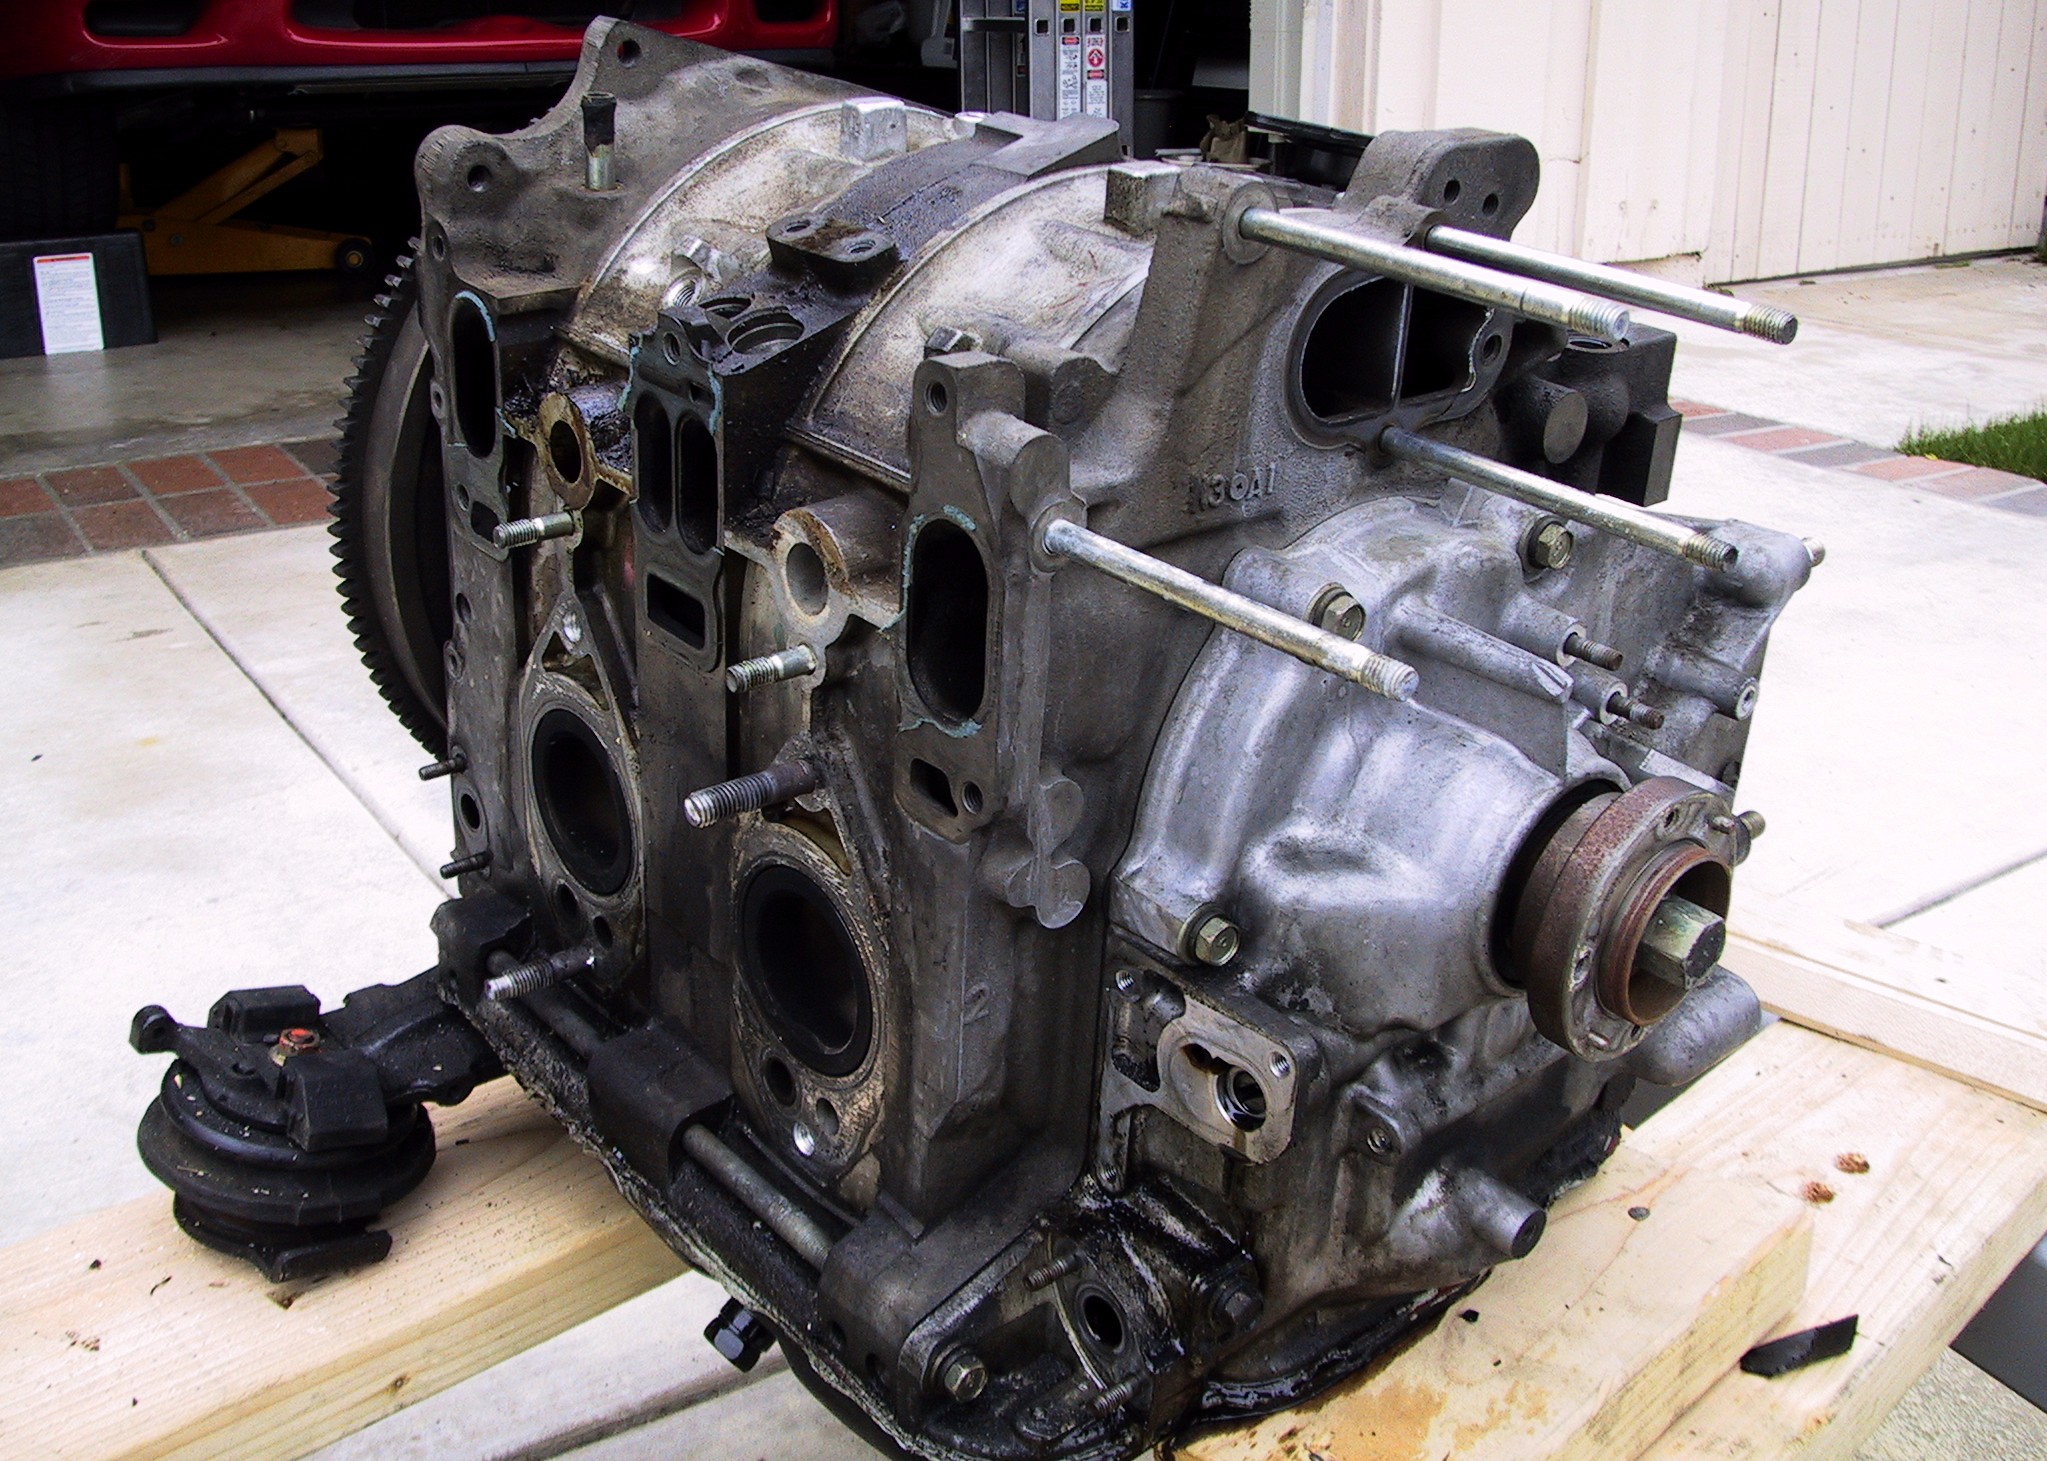
Here are some shots of the engine, out of the car:
 high res
 high res
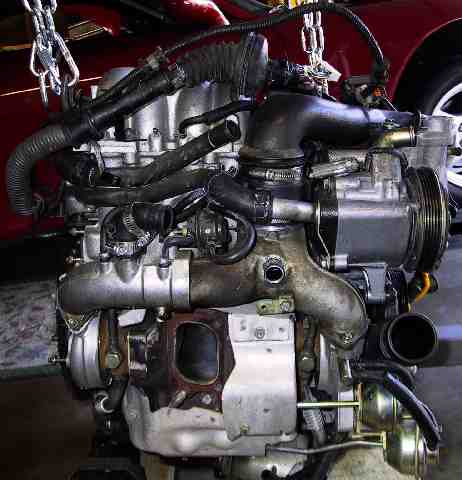 high res
 high res
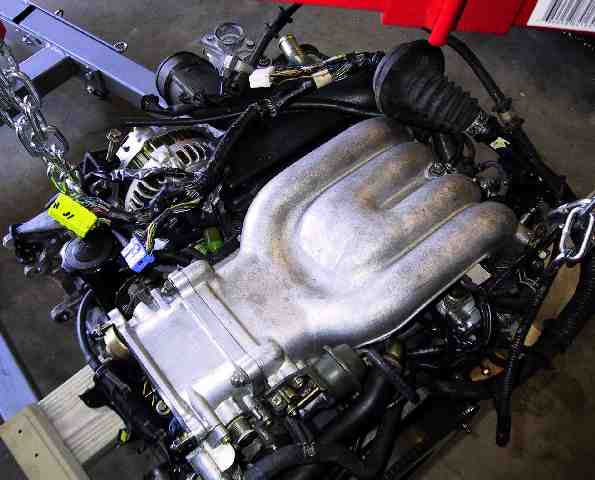 high res
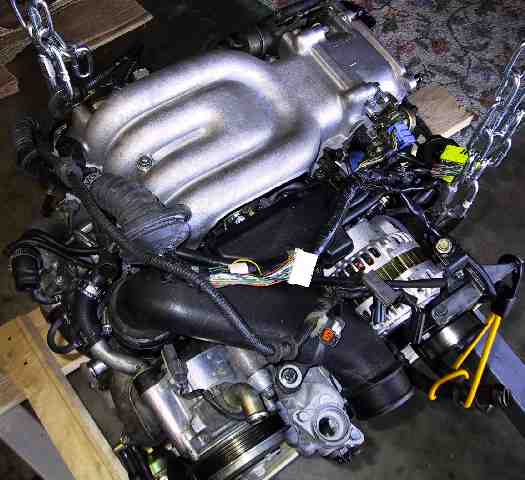 high res
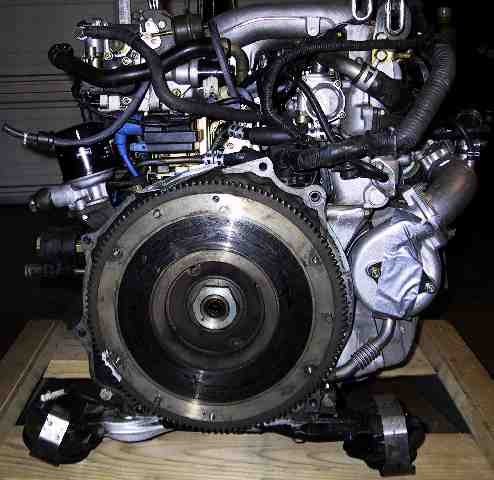
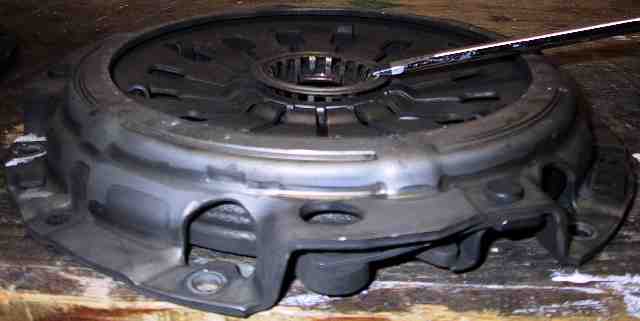
I've got a nasty cold, so I won't be striping the engine down until next Saturday. The only thing that I did is remove the clutch from the flywheel:
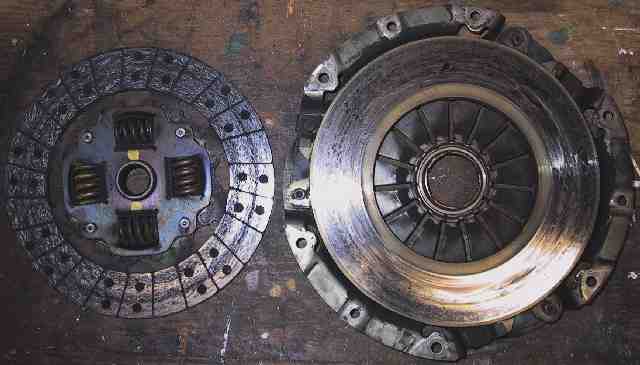 high res
Well ... It's out ... have a look at:
high resHere are some shots of the engine, out of the car:
high res high res high res high res high res high resI've got a nasty cold, so I won't be striping the engine down until next Saturday. The only thing that I did is remove the clutch from the flywheel:
high res
02-09-03, 04:22 PM
#16
Everything went easy, with some help from my dad. If this is your first time pulling the engine, I would recommend having a second body on hand.
The only part that threw me for a loop was the clutch removal. It was just too easy ... seriously, I was looking for something more difficult and this threw me off track. Here is the thread that I used as a guide ... damn this forum is a great reference!
See the thin ring in the pic below:
 high res
When the fork (read the thread that I linked to above.) is pulled back, this ring is pushed down flush with the clutch. At this point it's easy to twist a screwdriver (inserted as in the above photo) and boom ... job done.
Here are a couple more pics. First the empty Trans Bellhousing and then a close up of the piece that pops out of the thin ring above.
 high res

Next Saturday ... the teardown ...
The only part that threw me for a loop was the clutch removal. It was just too easy ... seriously, I was looking for something more difficult and this threw me off track. Here is the thread that I used as a guide ... damn this forum is a great reference!
See the thin ring in the pic below:
high resWhen the fork (read the thread that I linked to above.) is pulled back, this ring is pushed down flush with the clutch. At this point it's easy to twist a screwdriver (inserted as in the above photo) and boom ... job done.
Here are a couple more pics. First the empty Trans Bellhousing and then a close up of the piece that pops out of the thin ring above.
high resNext Saturday ... the teardown ...
02-18-03, 12:05 AM
#17
Well, it's on a pallet and bound for Pineapple Racing in Portland Oregon. It should arrive tomorrow. I've really been amazed with Saia, the shipping company. They operate nearly 24 x 7. This made it super easy to drop off.
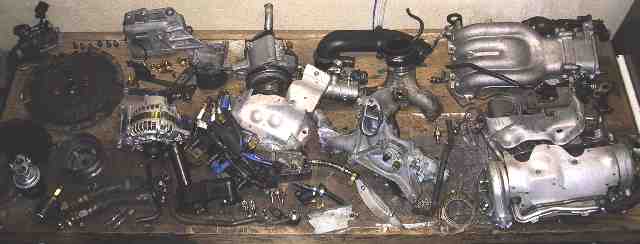
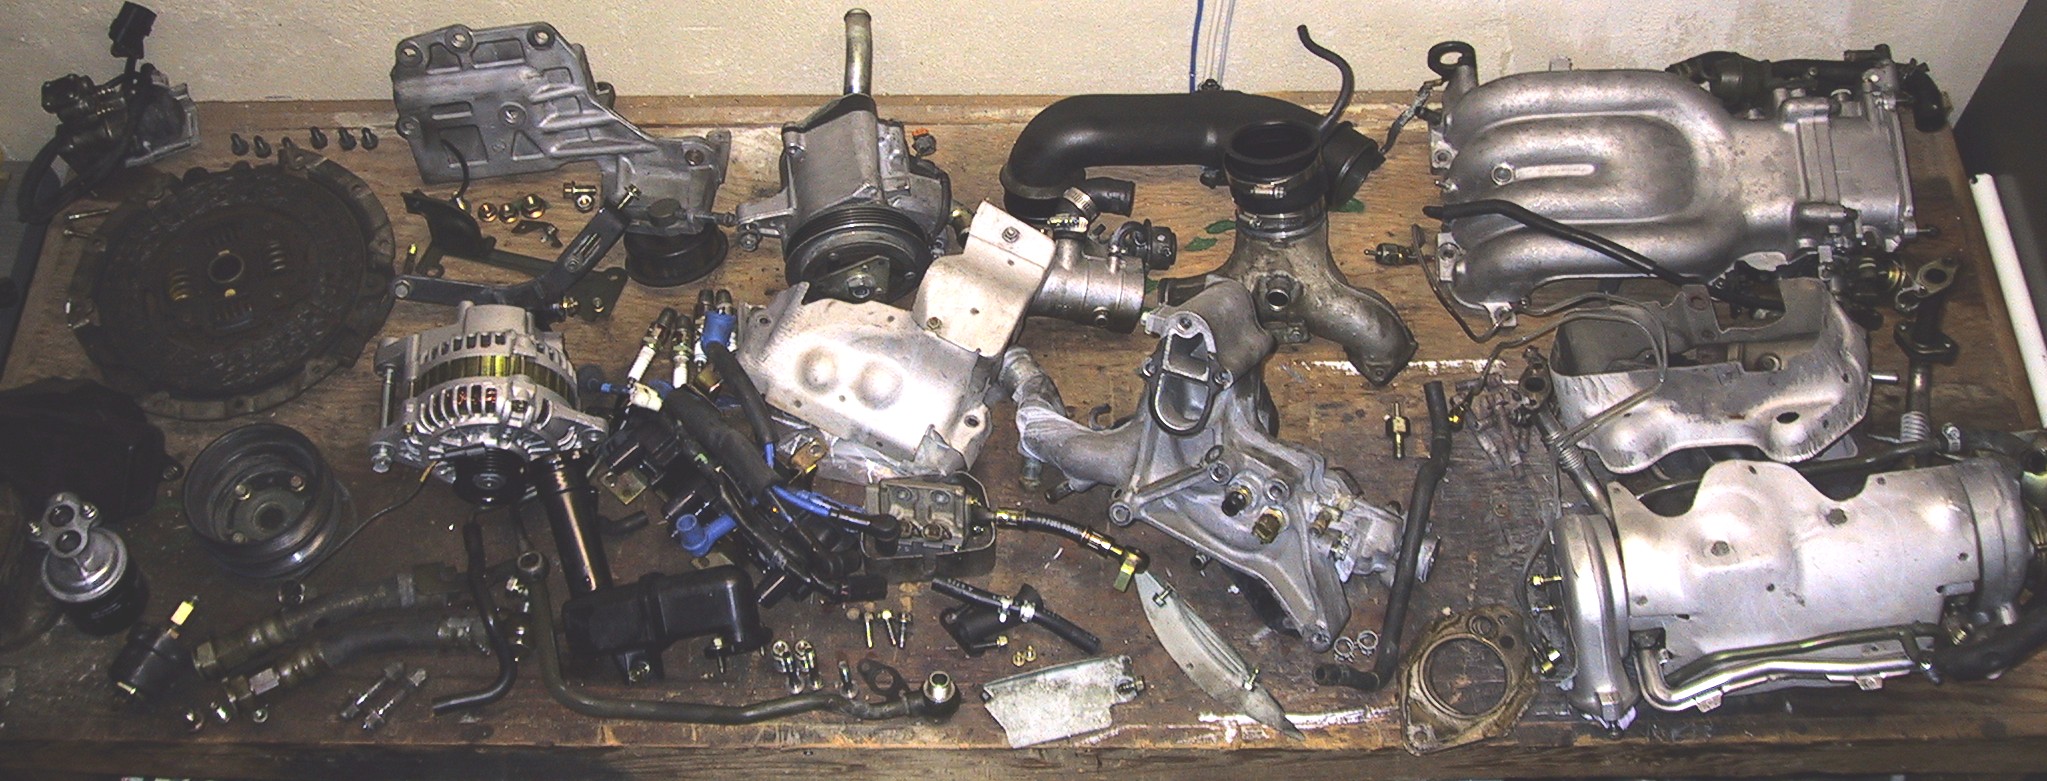
The first pic is what was removed from the motor. This was about a three hour job for three people. This could easily be cut to under an hour with experience. I had to take it easy however. I felt that if I moved too fast, I wouldn't remember where things went during the reassembly.
Note that I had to add a 23 (millimeter is it?) wrench and socket to my collection for the disassembly.
I'll abstain from captions as these are fairly obvious.
To get to my usual high res pics, just click the low res (the ones that are on your screen now) ones.

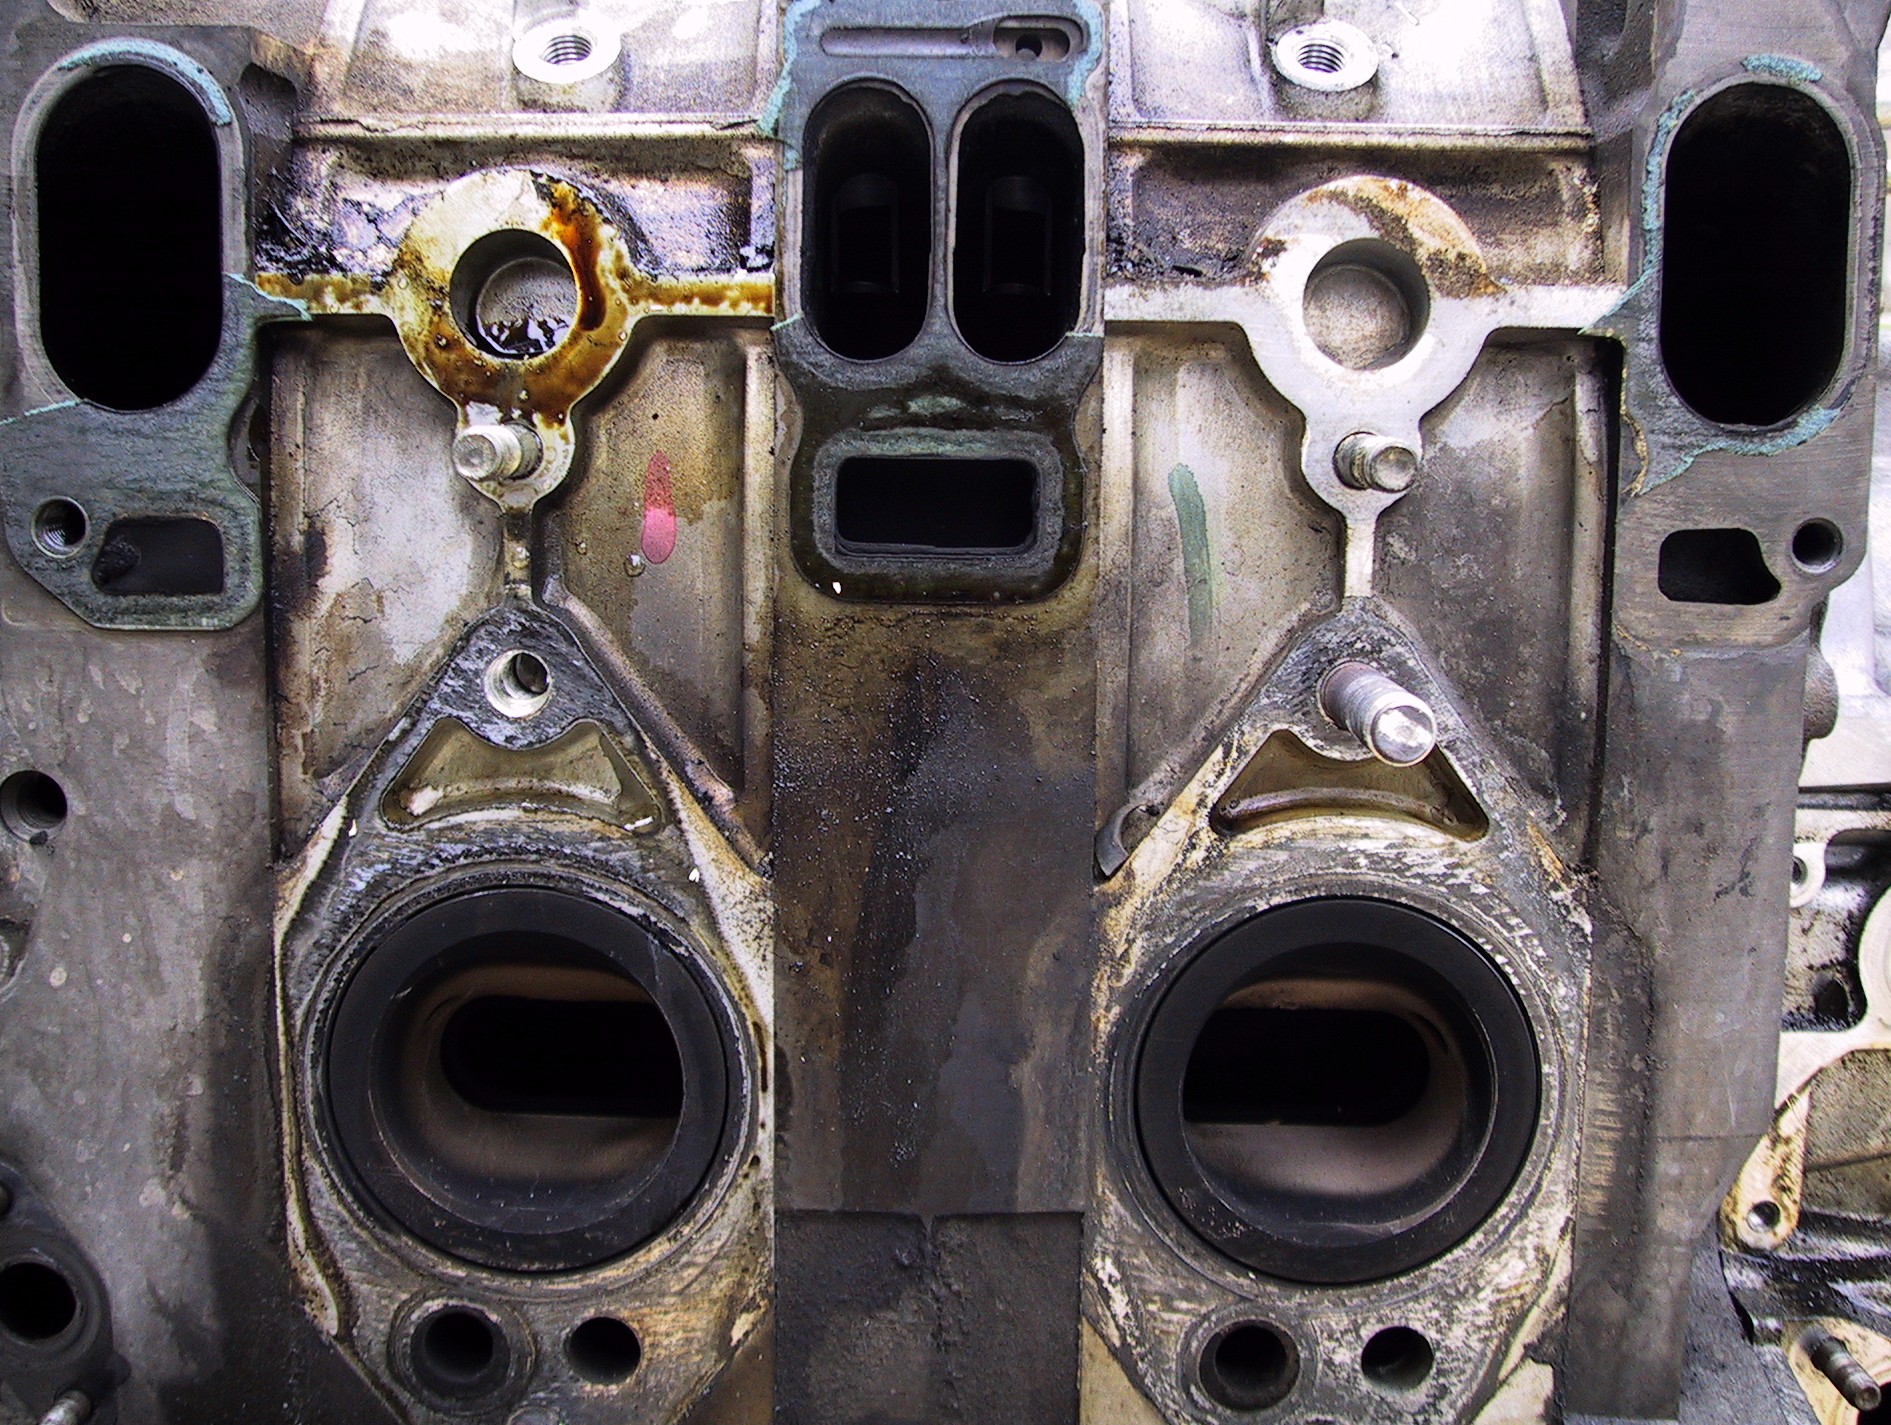
Low res close ups of the ports:
1 2 3 4
High res close ups of the ports:
1 2 3 4
When the motor comes back, I'll post some comparison pics. It should be interesting to see what a mild street port looks like.
While I'm waiting for the motor, I may post some picks of the cleaned up motor bay, exhaust manifold (broke a stud off), and other interesting or useful items.
Suggestions?
The first pic is what was removed from the motor. This was about a three hour job for three people. This could easily be cut to under an hour with experience. I had to take it easy however. I felt that if I moved too fast, I wouldn't remember where things went during the reassembly.
Note that I had to add a 23 (millimeter is it?) wrench and socket to my collection for the disassembly.
I'll abstain from captions as these are fairly obvious.
To get to my usual high res pics, just click the low res (the ones that are on your screen now) ones.
Low res close ups of the ports:
1 2 3 4
High res close ups of the ports:
1 2 3 4
When the motor comes back, I'll post some comparison pics. It should be interesting to see what a mild street port looks like.
While I'm waiting for the motor, I may post some picks of the cleaned up motor bay, exhaust manifold (broke a stud off), and other interesting or useful items.
Suggestions?
 02-18-03, 01:39 AM
#19
The Dude Abides
Join Date: Mar 2001
Location: san jose, ca
Posts: 601
Likes: 0
Received 0 Likes
on
0 Posts
Good stuff. Glad to see more people attempting this kind of thing. I found it easier to remove the A/C after pulling the motor out half way. Installing the engine is the most time consuming part. Good luck. Hope you marked everything or have a good memory.
02-18-03, 08:26 AM
#21
Lives on the Forum
Go ahead and pull the tranny before reinstalling the new motor. It's much easier mating the tranny to the motor outside the car and then dropping them in as one; put the downpipe on beforehand too. It will all go back in very easily and you'll be happy 
02-18-03, 09:07 AM
#22
Rotary Freak
Join Date: Dec 2001
Location: Hattiesburg, MS
Posts: 1,668
Likes: 0
Received 0 Likes
on
0 Posts
That clutch collar threw me for a loop too. I couldn't figure it out, so I unbolted the pressure plate instead. After getting it apart, I found that separating the throwout bearing from the pressure plate is very easy, assuming you have everything in the right position. A lesson learned for next time
Good luck on the rebuild. It seems I am a couple weeks ahead of you I'm just about done putting all the accessories on my new Malloy engine, and hopefully will be dropping it in this weekend.
I've been taking pictures the whole time, and was going to do a writeup, but you beat me to it.
Good luck on the rebuild. It seems I am a couple weeks ahead of you
I'm just about done putting all the accessories on my new Malloy engine, and hopefully will be dropping it in this weekend.I've been taking pictures the whole time, and was going to do a writeup, but you beat me to it.
02-18-03, 12:21 PM
#23
Full Member

Join Date: Aug 2001
Location: hattiesburg, MS
Posts: 117
Likes: 0
Received 0 Likes
on
0 Posts
hey paw140, where are you at in hattiesburg, I also live in hattiesburg and would like to take a look at your project while the engion is out. I have not seen another FD around year for years. I have the blue 94 with "0ps10s" tag.
mike
mike
02-18-03, 12:24 PM
#24
Full Member
Join Date: Aug 2001
Location: hattiesburg, MS
Posts: 117
Likes: 0
Received 0 Likes
on
0 Posts
hey paw140, where are you at in hattiesburg, I also live in hattiesburg and would like to take a look at your project while the engion is out. I have not seen another FD around here for years. I have the blue 94 with "0ps10s" tag.
mike
mike
02-18-03, 12:32 PM
#25
Rotary Freak
Join Date: Dec 2001
Location: Hattiesburg, MS
Posts: 1,668
Likes: 0
Received 0 Likes
on
0 Posts
Mike: Wow! I have only seen another FD twice in Hattiesburg, and it was a Montego Blue; I assume it was you. I have a white '94, which admittedly I haven't driven around town too much. I live in the neighborhood south of Lincoln on 34th street. Send me an email at pawusm@yahoo.com and we can get together so you can check out my project.
Paul
Paul